4 Drawer Simple Dresser
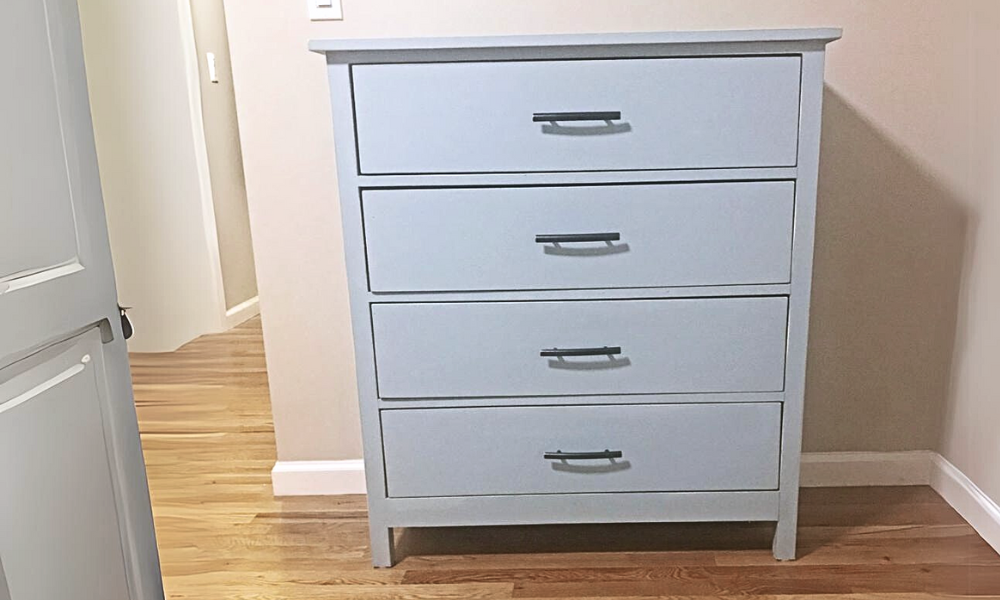
A simple shaker style dresser featuring four drawers and a narrower profile. Built by Patrick, you can read the brag post here.
Specifications
| Project type | Dresser Plans |
|---|---|
| Room | Bedroom |
| Style | Cottage Style Furniture Plans |
| Difficulty | Advanced |
| Estimated cost | $100-$150 |
Dimensions
Use the size-specific shopping and cut lists below.
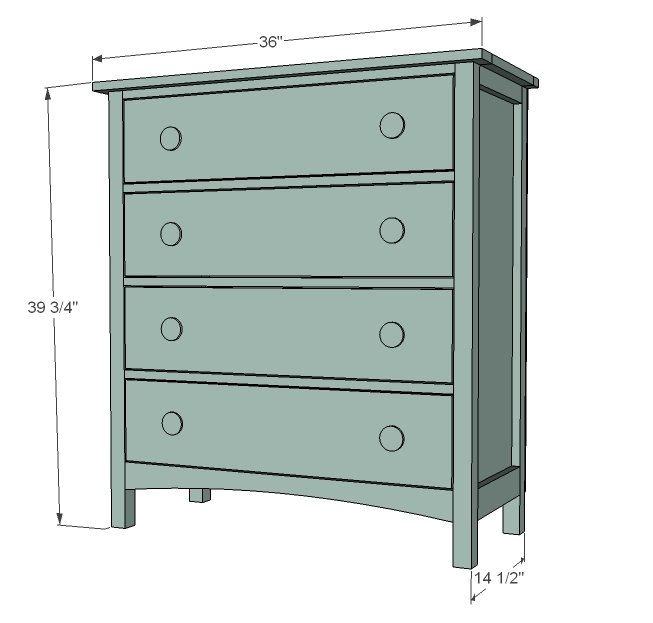
Shopping List
- 4 - sets of 12" drawer slides, white euro style (available on Amazon)
- 8 - knobs or handles
- 2 - 2x2 @ 8 feet long
- 1 - 1x12 @ 10 feet long
- 1 - 1/4" plywood @ full sheet (4x8 feet)
- 3 - 1x3 @ 8 feet long
- 3 - 1x2 @ 8 feet long
- 3 - 1x6 @ 8 feet long
- 1 - 1x8 @ 12 feet long
Cut List
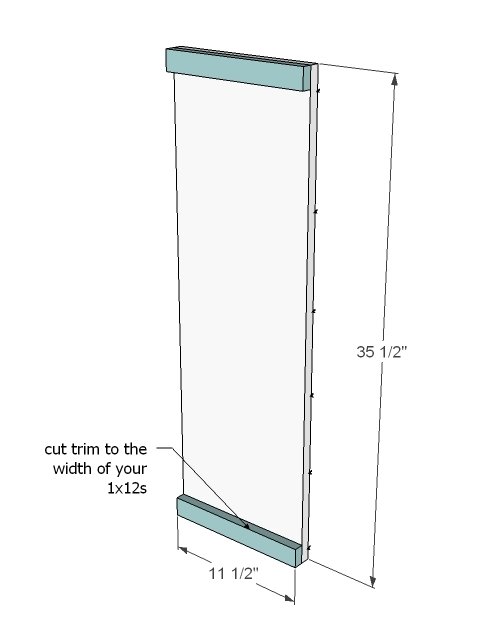
- 2 - 1x12 @ 35 1/2"
- 2 - 1x3 @ 11 1/2" (Cut to width of your 1x12 boards)
- 2 - 1x2 @ 11 1/2" (Cut to width of your 1x12 boards)
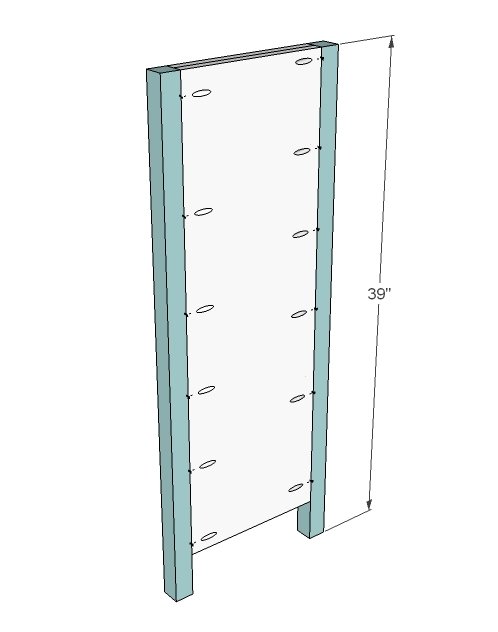
- 4 - 2x2 @ 39"
- 4 - 1x3 @ 31"
- 4 - 1x2 @ 31"
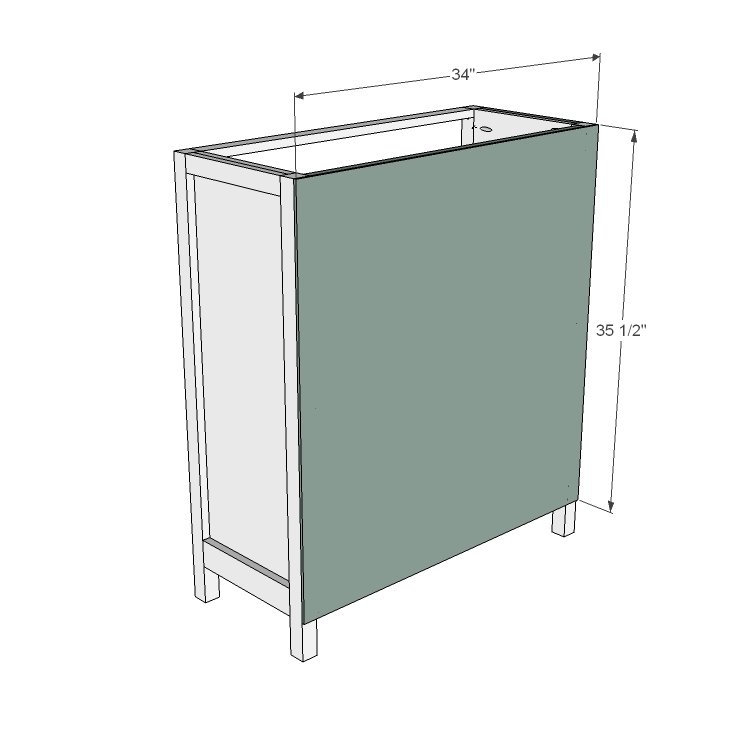
- 1 - 1/4" Plywood @ 35 1/2" x 34"
- 1 - 1x2 @ 36"
- 1 - 1x12 @ 36"
- 1 - 1x3 @ 36"
Drawers - measure and cut to fit to allow clearances per drawer slide instructions
- 8 - 1x6 @ 28 1/2"
- 8 - 1x6 @ 12 1/2"
- 4 - 1/4" Plywood @ 30" x 12 1/2"
- 4 - 1x8 @ 30 3/4"
Tools
- measuring tape
- pencil
- safety glasses
- kreg-jig
- drill
- circular saw
- jigsaw
- nailer
- sander
- countersink drill bit
Step-by-step Instructions
Step 1
Use 1 1/4" finish nails and glue to attach the trim to the sides. The 1x3 goes on the bottom, 1x2 on the top. Build two of these.
Step 2
The the sides, attach legs. Use either 3" screws countersunk or Kreg Jig as shown above (set for 3/4" stock, using 1 1/4" pocket hole screws). Do this on both sides.
Step 3
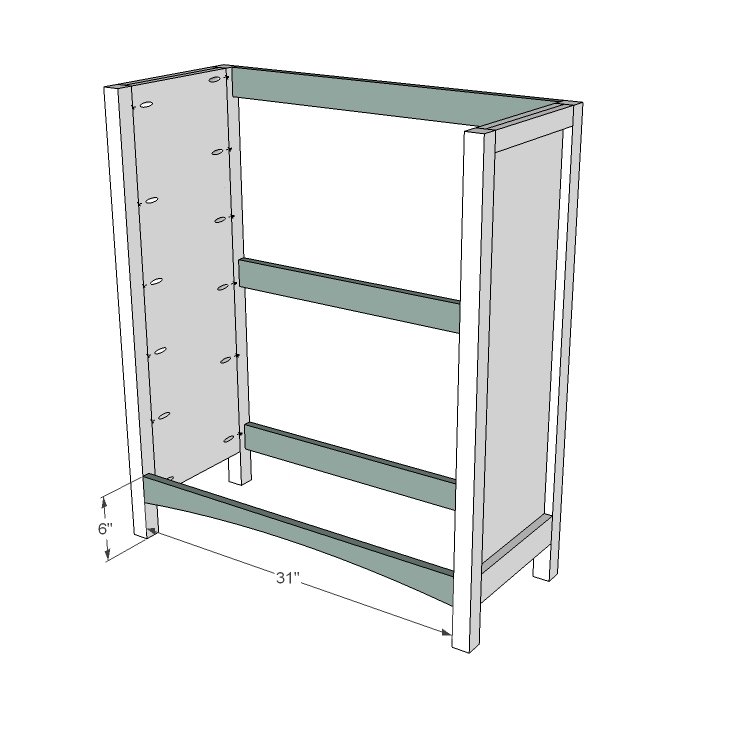
Once the sides are built, attach 1x3s as shown above. All are flush to the outsides. Cut out a decorative pattern from the bottom front 1x3 (shown with arch shape) using jigsaw.
Step 4
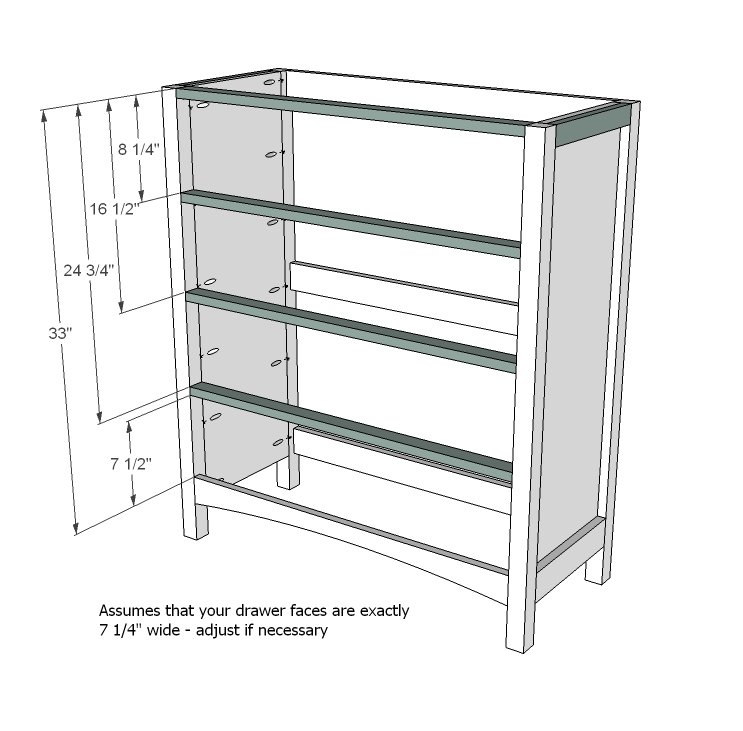
Now attach 1x2 stiles - be very careful here. You must leave 7 1/2" between the stiles so your drawer faces will fit just right.
Step 5
Step 6
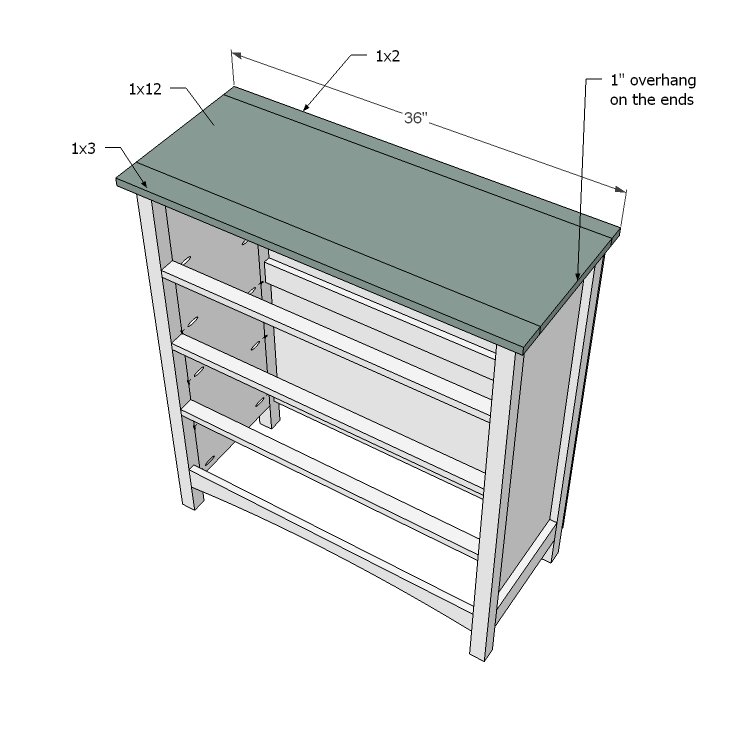
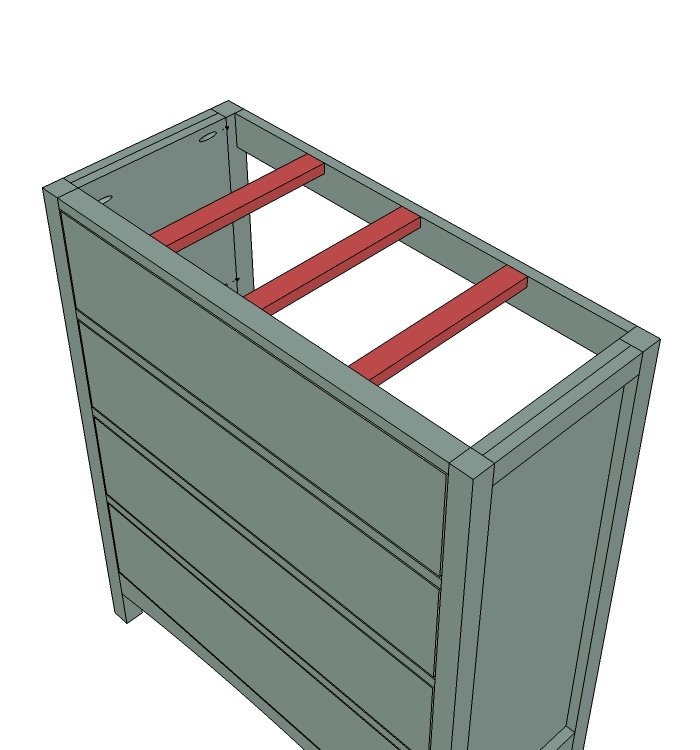
Top. If you have a Kreg Jig, build your top as shown above using pocket holes, and then attach to the top of the dresser. If you do not have a Kreg Jig, attach supports as shown in this diagram and then use 1 1/4" finish nails and glue to attach top pieces. Overhang on front and sides is 1".
Step 7
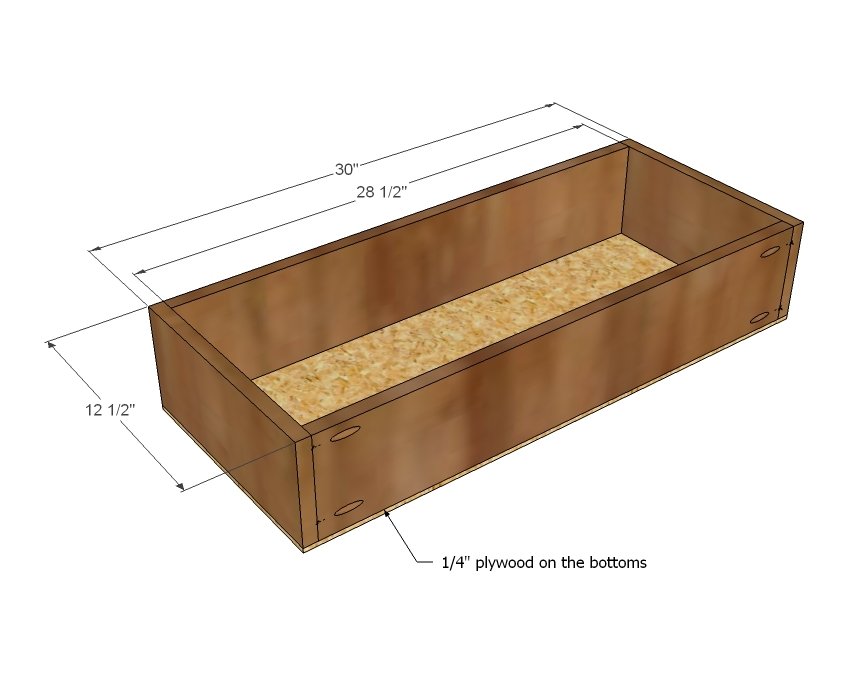
Build drawer boxes as shown above. Tack plywood to bottom. Once drawer boxes are built, use drawer slides to install drawers in the dresser. Remember, the drawer faces sits inset, so you will need to install the drawers 3/4" in from the face of the dresser (see below). Here's my video tutorial on installing the drawer slides:
Step 8
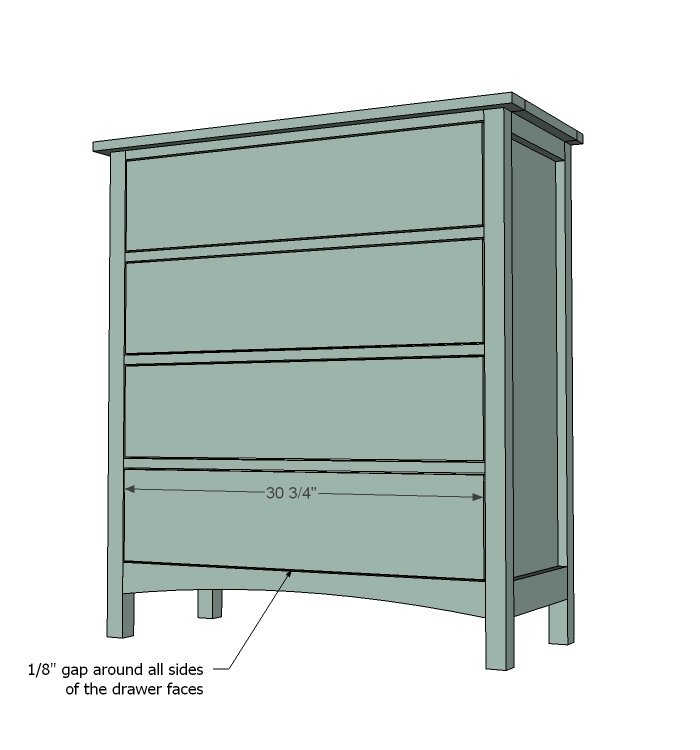
Will all drawers installed, lay dresser on it's back. Place drawer faces on drawer boxes, centering so an even gap of approximately 1/8" is on all sides of the drawer faces. Attach with a few 1 1/4" finish nails and glue. Be considerate of your hardware location when you nail. Once drawer faces are on, pull the drawers out and attach from insides with 1 1/4" fasteners. Add hardware.
Finishing
Sand all surfaces, starting with a medium grit and finishing with fine. Wipe off the dust, fill any holes or gaps with wood filler, and sand smooth once dry. Apply primer if you're painting, then finish with your choice of paint or stain and seal with a durable clear topcoat. For outdoor projects, use exterior-rated primer, paint or stain, and sealer so the piece stands up to the weather.
Source (temporary): https://www.ana-white.com/woodworking-projects/4-drawer-simple-dresser-narrow-depth