7 Drawer Extra Wide Dresser
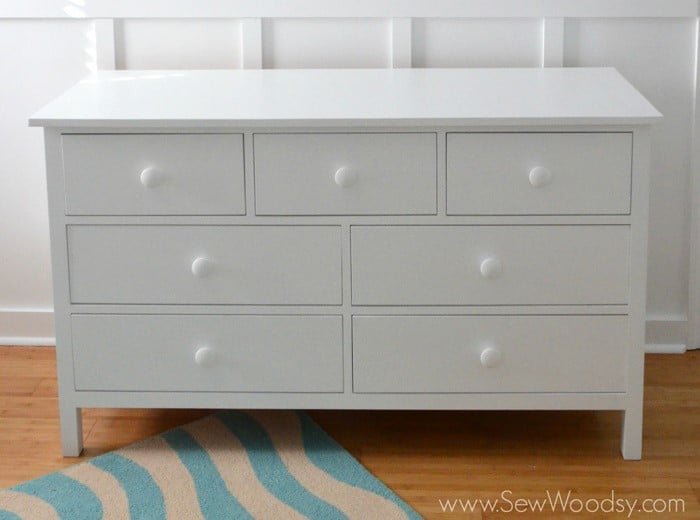
This is a great dresser, with seven drawers to organize it all. Simple styling goes with just about any decor style. include step by step instructions, with diagrams and lots of reader submitted photos from
Specifications
| Project type | Dresser Plans |
|---|---|
| Room | Storage Solutions |
| Difficulty | Advanced |
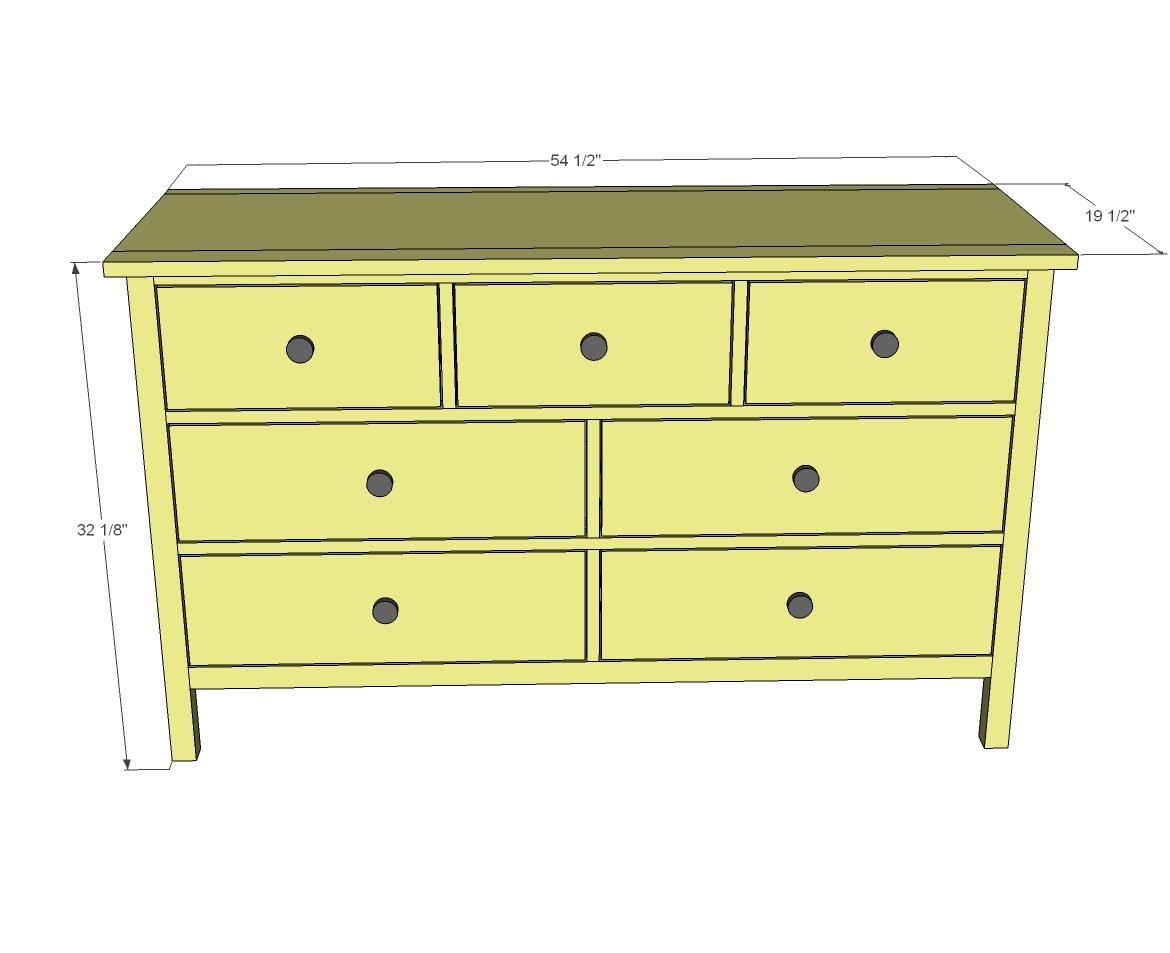
Dimensions
Use the size-specific shopping and cut lists below.
Shopping List
- 1 - sheet of 3/4” plywood, ripped into strips 15-1/2” wide (you’ll only use up about 1/2 of this plywood, but the 15-1/2” wide strips can be used for a variety of other projects or as shelving)
- 3 - 2x2 @ 8 feet long
- 4 - 1x2 @ 10 feet long
- 1 - 1x3 @ 10 feet long
- 6 - 1x6 @ 8 feet long
- 2 - 1x8 @ 8 feet long (IMPORTANT: Plan assumes 1x8s are 7-1/4” wide)
- 1 - sheet 1/4” plywood for back
- 7 - 16” euro drawer slides
- 7 knobs or handles
- 1-1/4” and 2-1/2” pocket hole screws
- 5/8" and 1-1/4" brad nails
Cut List
- 2 - 3/4” plywood @ 15-1/2” x 26-1/4” (side panels)
- 4 - 2x2 @ 31-1/4” (legs)
- 2 - 2x2 @ 49-1/2” (back support and bottom support)
- 6 - 1x2 @ 49-1/2” (front and back trim between drawers)
- 8 - 1x3 @ 7-1/2” (front trim between drawers vertically)
- 1 - 2x2 @ 15-1/2” (bottom support) If you used 1x4s on back, this board must be 3/4” longer in length
DRAWERS - CUT TO FIT!!! Plan uses 1x6 for drawer boxes and 1x8 for drawer faces. Drawer sides are 16" long.
TOP
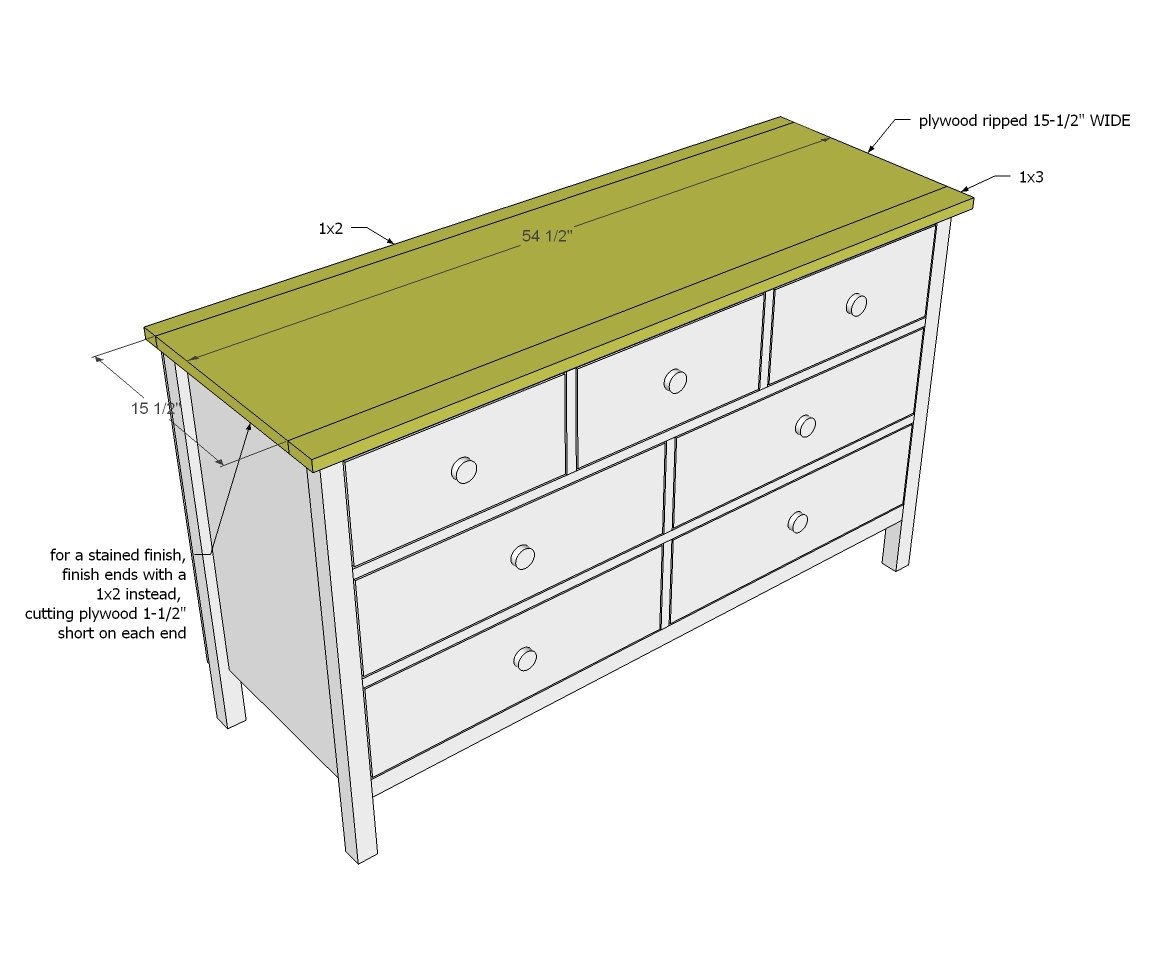
- 1 - 3/4” plywood @ 15-1/2” x 54-1/2”
- 1 - 1x2 @ 54-1/2”
- 1 - 1x3 @ 54-1/2”
BACK
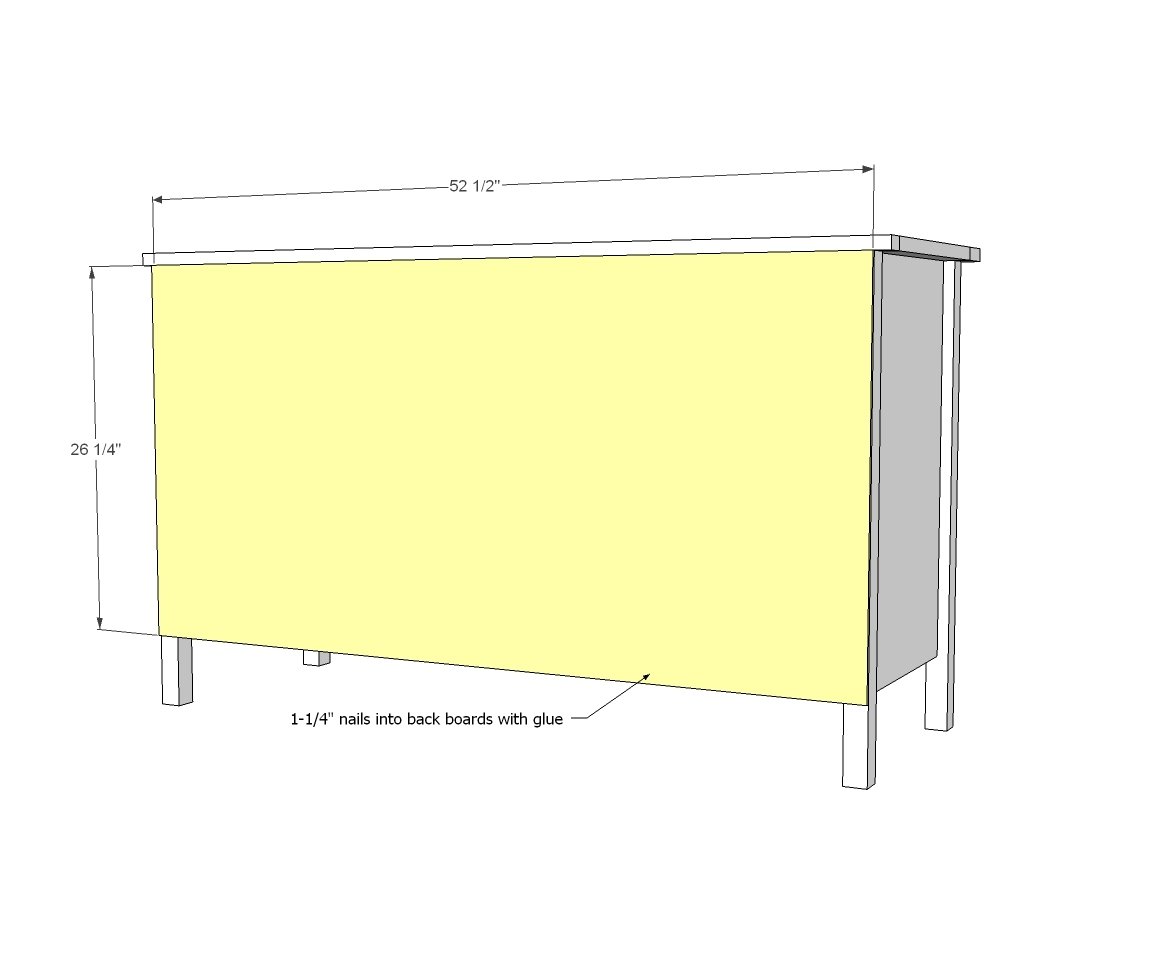
- 52-1/2” x 26-1/4” - 1/4" plywood
Tools
- measuring tape
- square
- pencil
- safety glasses
- kreg-jig
- drill
- compound miter saw
- nailer
- sander
Step-by-step Instructions
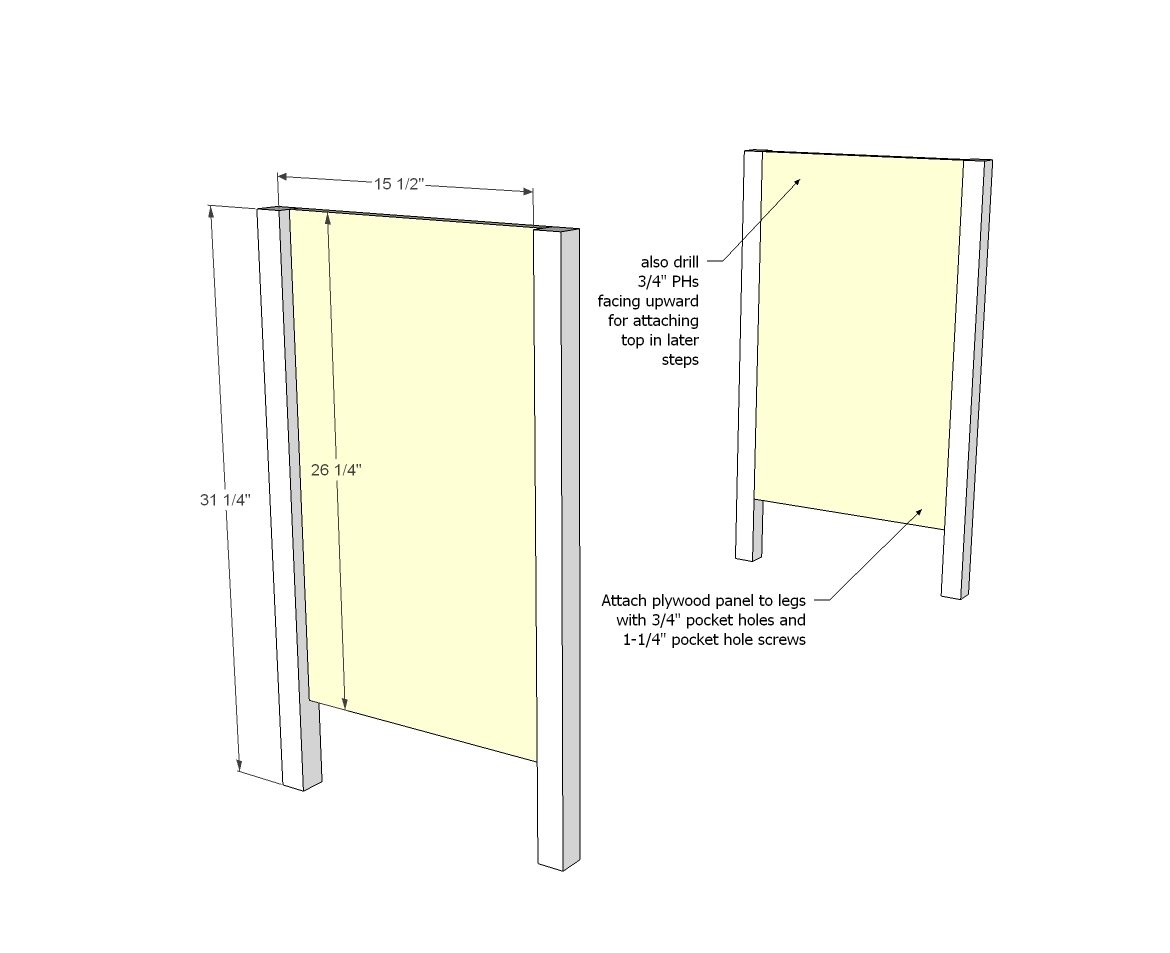
Start by building the two sides. Everything is flush to inside.
Use 3/4" pocket holes, every 8-10" on inside, with 1-1/4" pocket hole screws. TIP: Also drill 3/4" pocket holes facing upward for attaching the top in later steps.
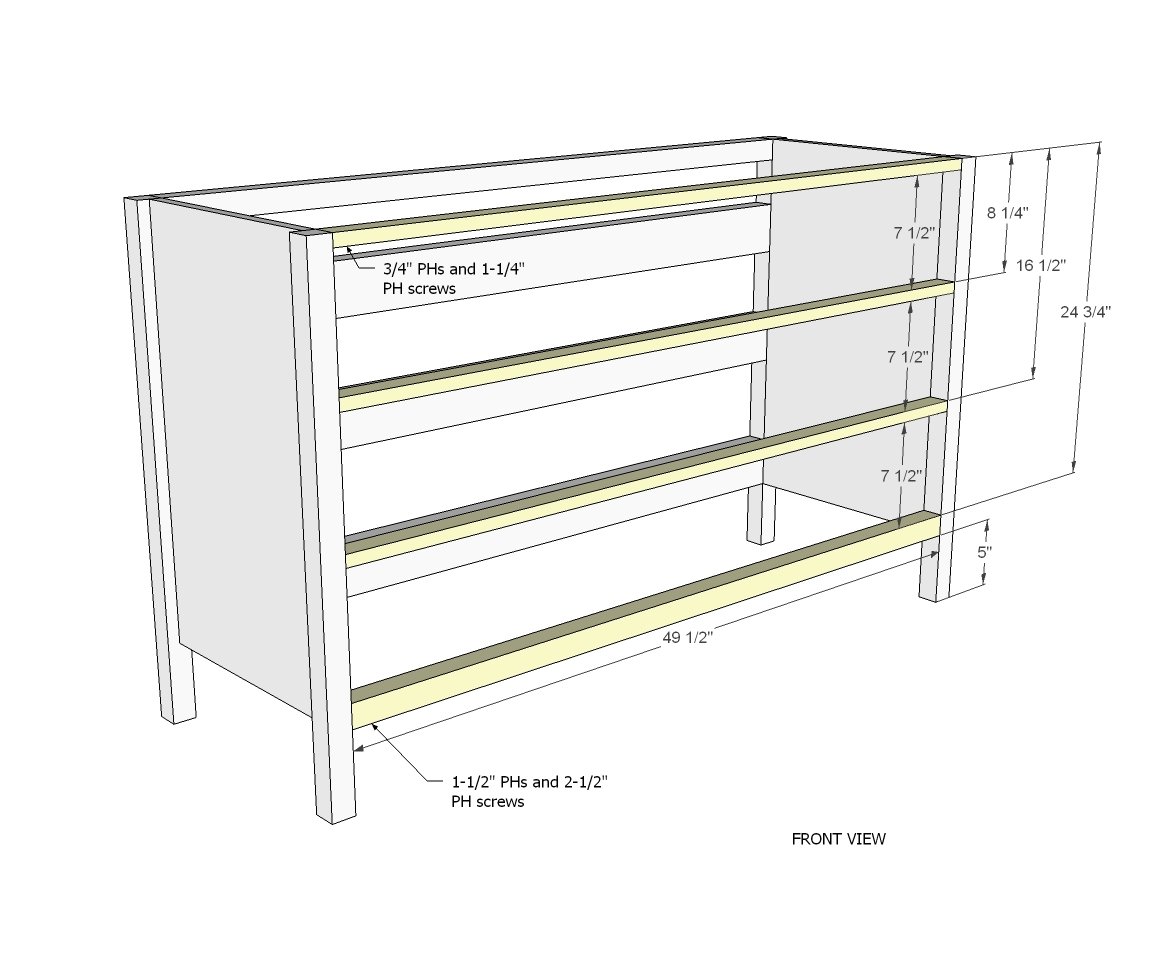
Between the sides, add to both the FRONT AND BACK 1x2s and 2x2s at the bottom.
Do this by first drilling 3/4" pocket holes on each end of the 1x2s, and then attaching to the 2x2 legs. Use glue and 1-1/4" pocket hole screws. Place pocket holes on underside so not visible. For the bottom 2x2s, use 1-1/2" pocket holes and 2-1/2" pocket hole screws and glue.
Step 3
Attach the 1x3 dividers inside the framing, so the 1x3s are flush on the front, but overhang to the inside of the dresser by 1" (to give room for installing drawer slides in later steps). The 1x3s can be nailed and glued in place. Make sure these are attached exactly as measured, as they will determine the drawer slide placement. Cutting a couple of spacer blocks to help with placement will make it easier, as you have to match the front and back.
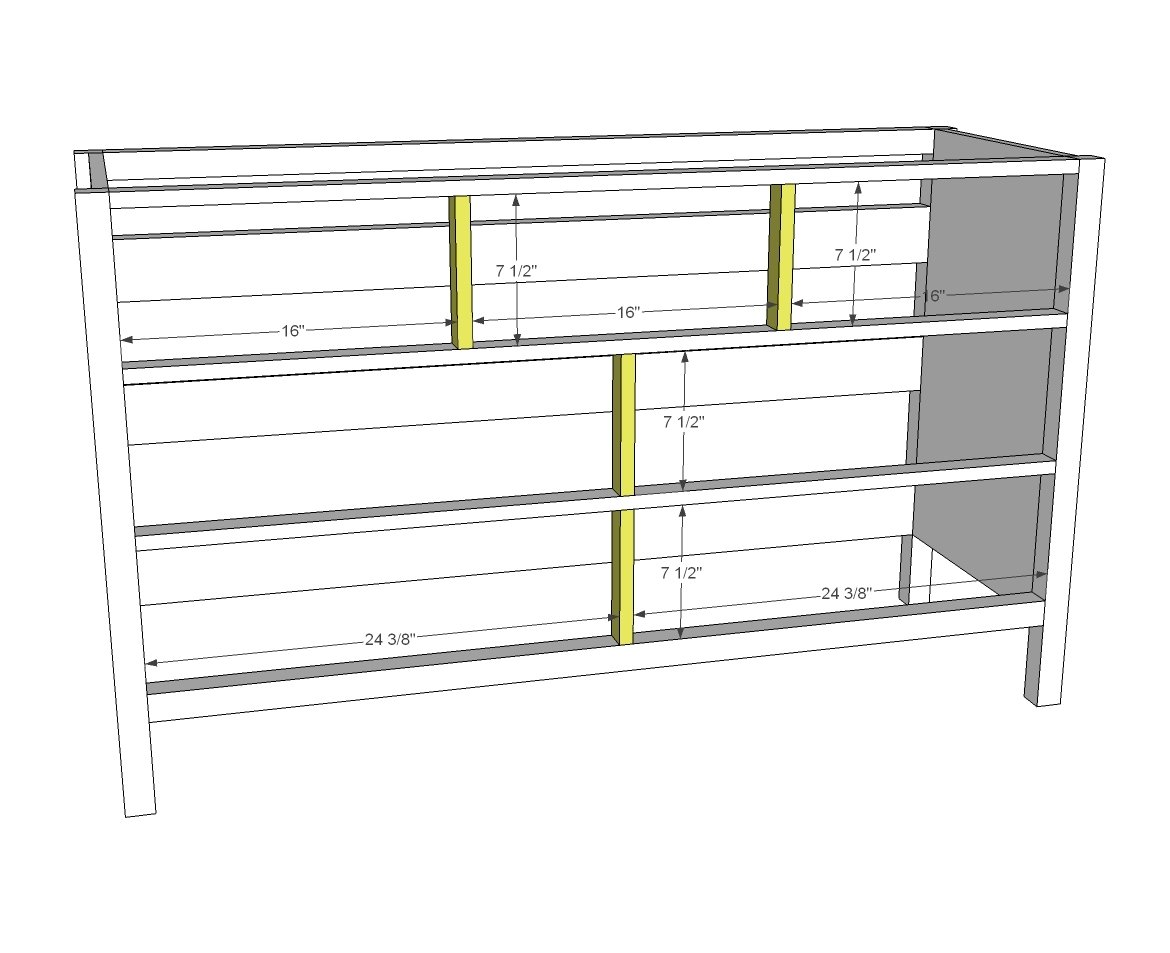
Add the bottom center support.
If you are concerned about the center of your dresser sagging, a fifth "leg" can be brought down from this bottom center support, to take the dresser drawer weight to the ground.
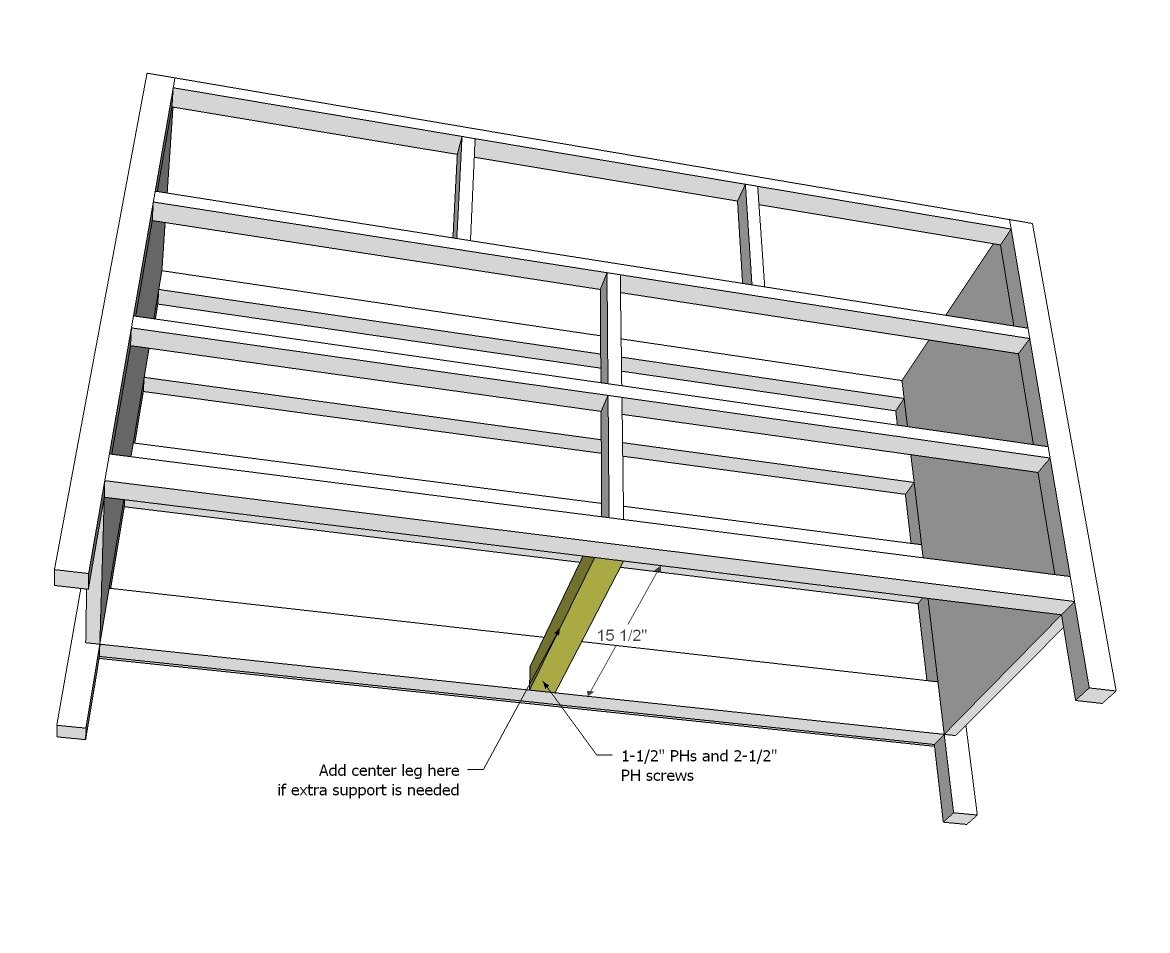
Step 5
Drawers should be built to fit the openings per drawer slide recommendations. Each drawer opening should be measured just to make sure there is no variance between drawers openings. Drawer boxes should be 1x6 or 1x4. Cut drawer sides to 16". 1/4” plywood is used on bottom with glue, nailed or stapled on with 5/8" brad nails or staples. Build and install the drawers using this method:
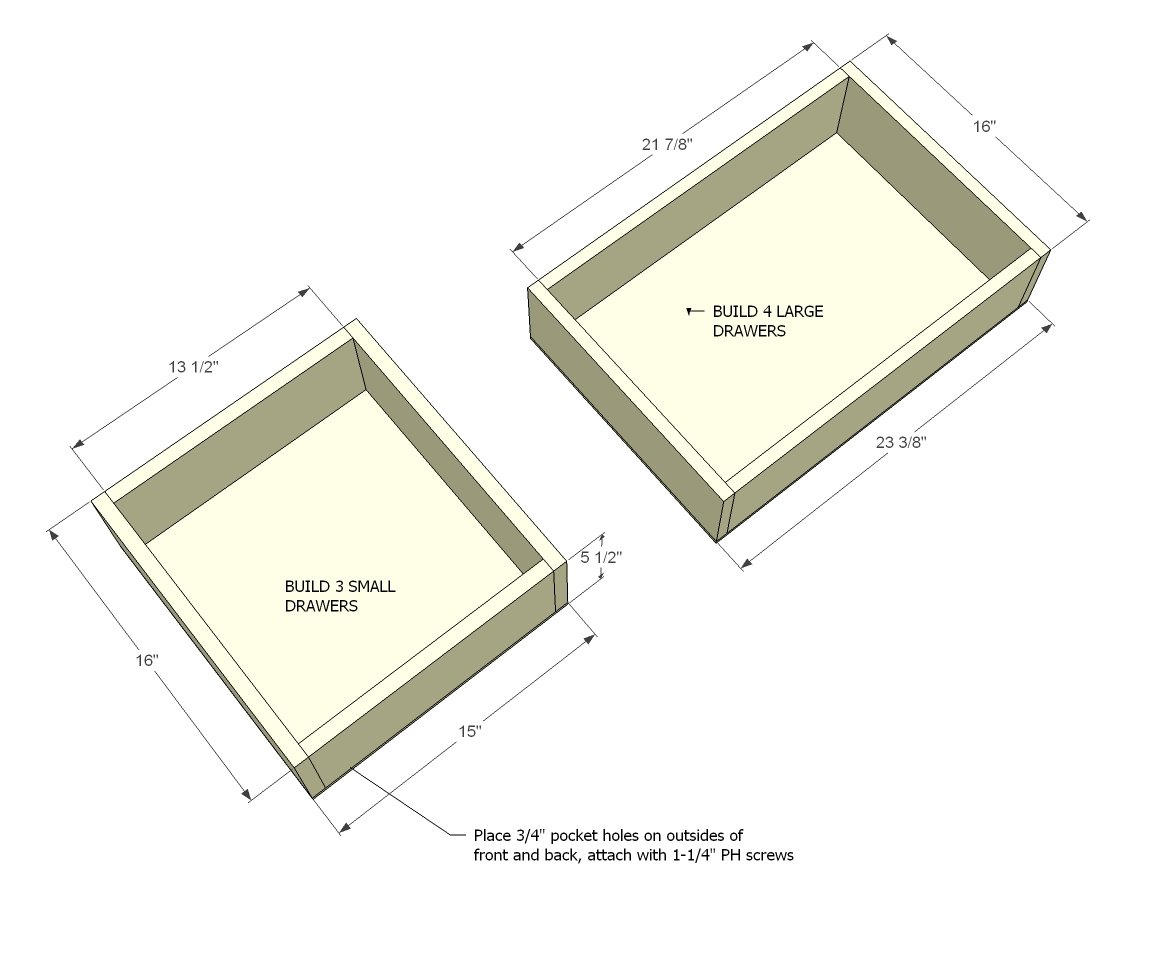
Step 6
Drawers are installed 3/4” inset to allow for the drawer faces.
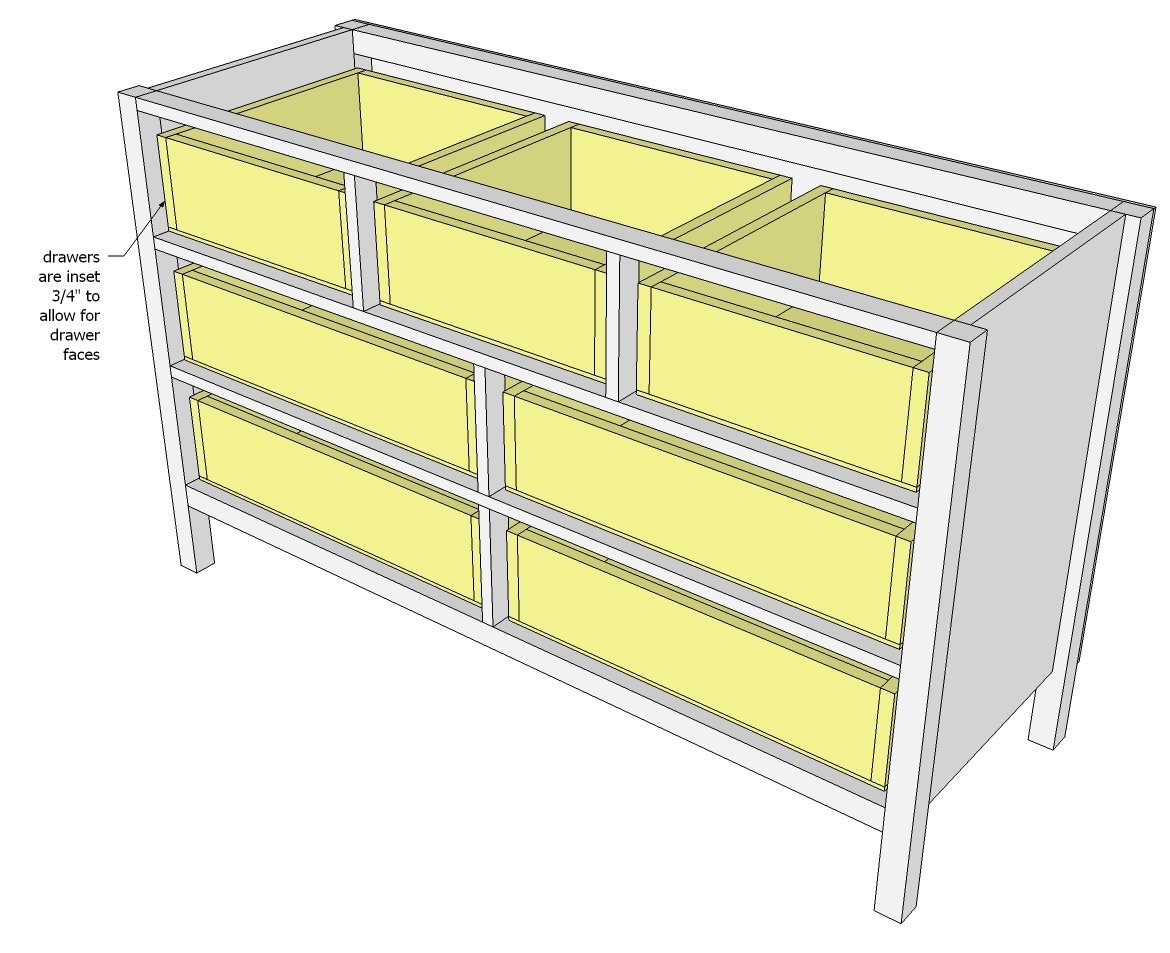
Step 7
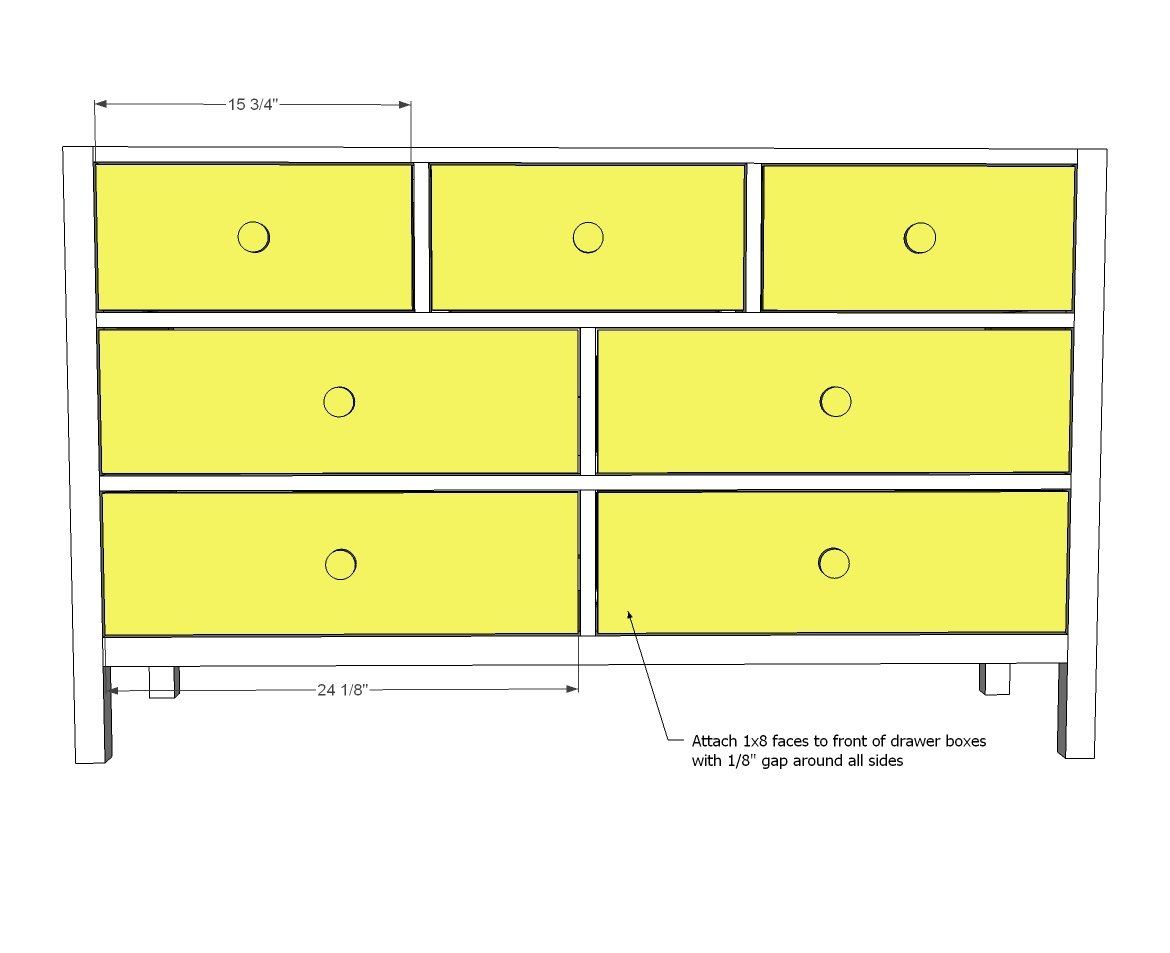
Cut drawer faces to fit, leave an 1/8” gap on all sides. Attach to drawer boxes with 1-1/4" brad nails and glue. Then further secure from inside with 1-1/4" screws (yes, you can use 1-1/4" pocket hole screws). TIP: You may wish to install the drawer pulls first.
Step 8
Build top first with 3/4" pocket holes and 1-1/4" pocket hole screws, and then attach to top of dresser. Alternatively, the ends can also be finished by cutting short and adding 1x2s. For a paint finish, the plywood end can filled, sanded and painted.
Step 9
Attach back with glue and 5/8" brad nails.
Finishing
Sand all surfaces, starting with a medium grit and finishing with fine. Wipe off the dust, fill any holes or gaps with wood filler, and sand smooth once dry. Apply primer if you're painting, then finish with your choice of paint or stain and seal with a durable clear topcoat. For outdoor projects, use exterior-rated primer, paint or stain, and sealer so the piece stands up to the weather.
Source (temporary): https://www.ana-white.com/woodworking-projects/7-drawer-extra-wide-dresser