Armoire with Drawers and Mirrored Door
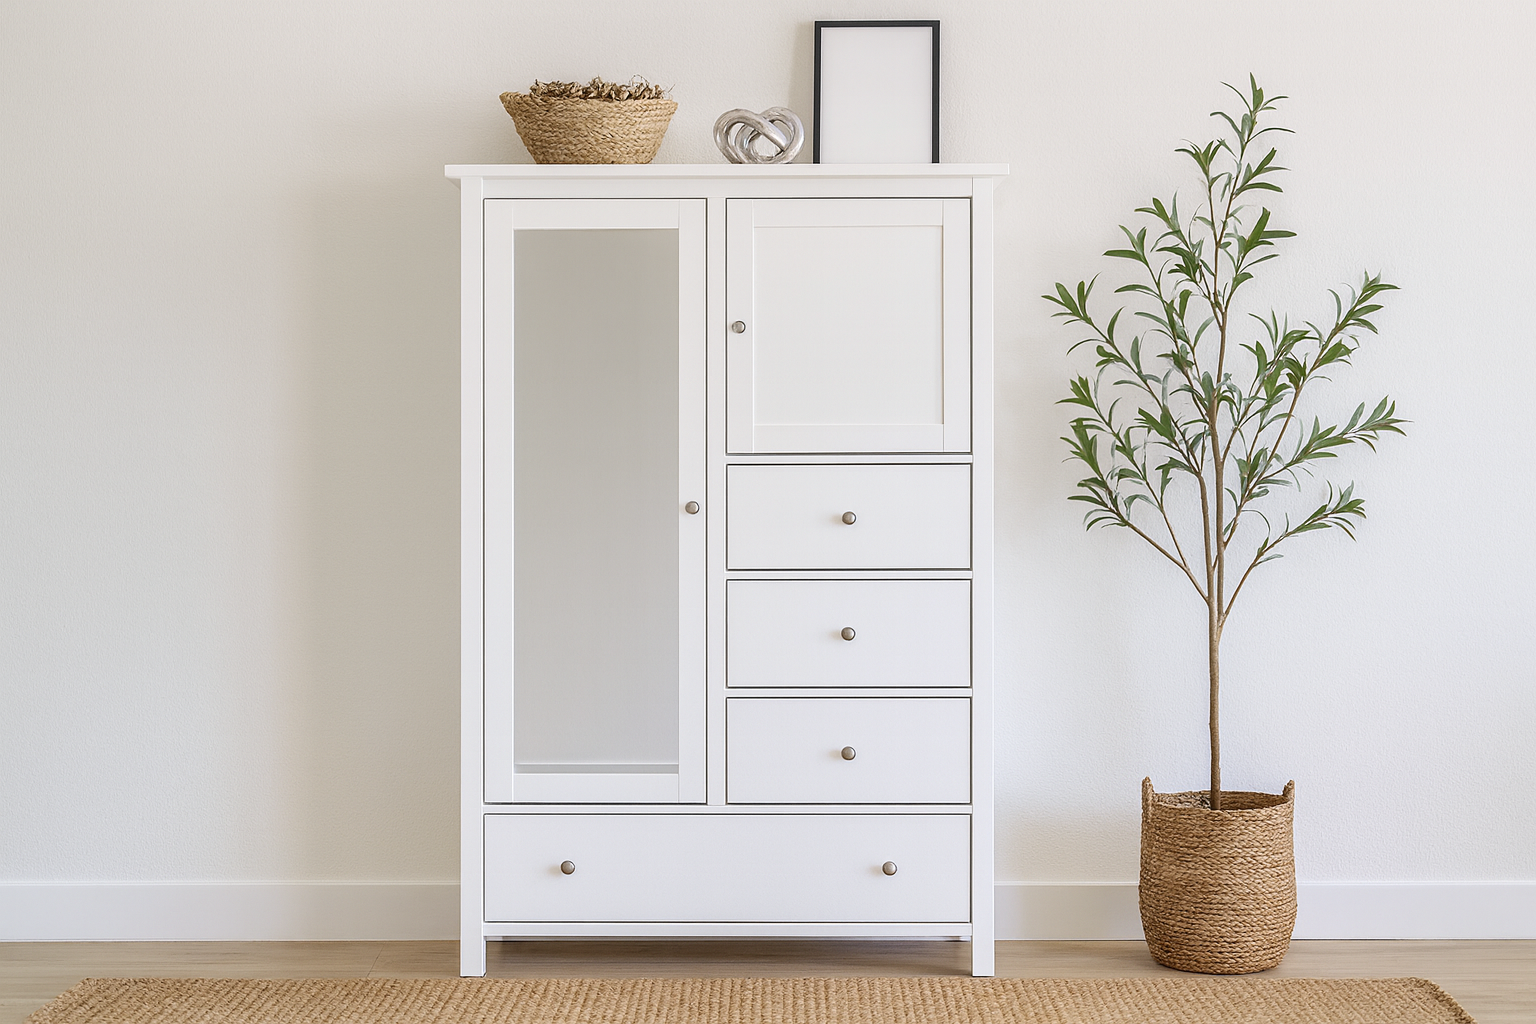
Build your own armoire with drawers and mirrored cabinet. We love this project for guest rooms, kids rooms, nursery, airbnb rentals, or anywhere you need a little extra storage in a beautiful cabinet! This is a step by step woodworking plans with detailed diagrams, shopping and cut list from
Specifications
| Project type | Dresser Plans |
|---|---|
| Room | Bedroom |
| Style | Farmhouse Furniture |
| Difficulty | Advanced |
Dimensions
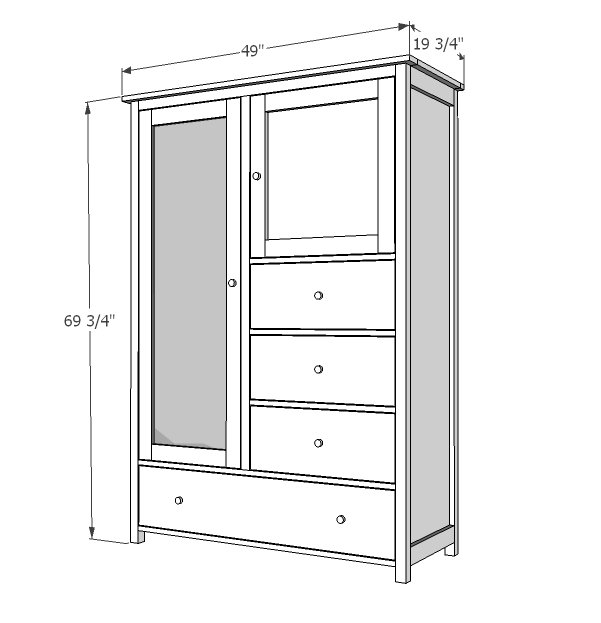
Use the size-specific shopping and cut lists below.
Shopping List
- 2 – sheets 3/4" Plywood cut into strips 15 3/4" wide x 8 feet long, referred to as 1x16 boards in this plan
- 2 – sheets 1/4" plywood or other hardboard for back and drawer bottoms
- 3- 1x3 @ 8 feet long
- 7 – 2x2 @ 8 feet long
- 2 – 1x2 @ 8 feet long
- 4 – 1x8 @ 8 feet long
- 1 – 1x10 @ 10 feet long
- 1 1/4" pocket hole screws
- 2 1/2" pocket hole screws
- 1 1/4" brad nails
- 3/4" brad nails
- 2 sets narrow profile hinges
- 4 – 16” Euro Style bottom corner mount drawer sldies
- 7 knobs or handles
- 1 – mirror 49 1/4" x 14” (available at Lowes)
NOTE: this armoire can also be made 24" deep - or any depth for the matter - by altering the rip width of your plywood cuts. For example, you could use 1x12s for the sides for a narrow cabinet.
Cut List
- 2 – 1x16 @ 67”
- 4 – 1X3 @ 15 3/4"
- 4 – 2X2 @ 69” (LEGS)
- 2 – 2x2 @ 44” (top supports)
- 1 – 1x16 @ 44” (bottom Shelf)
- 1 – 1x16 @ 56” (center divider)
- 4 – 1x2 @ 44” (Bottom drawer trim)
- 2 – 2x2 @ 54 1/2" (Center divider trim)
- 4 – 1x2 @ 23 1/4” (smaller drawer trim)
- 1 – 1x16 @ 23 1/4" (Shelf)
- 1 – 1x16 @ 49” (top)
- 1 – 1x2 @ 49” (top)
- 1 – 1x3 @ 49” (top)
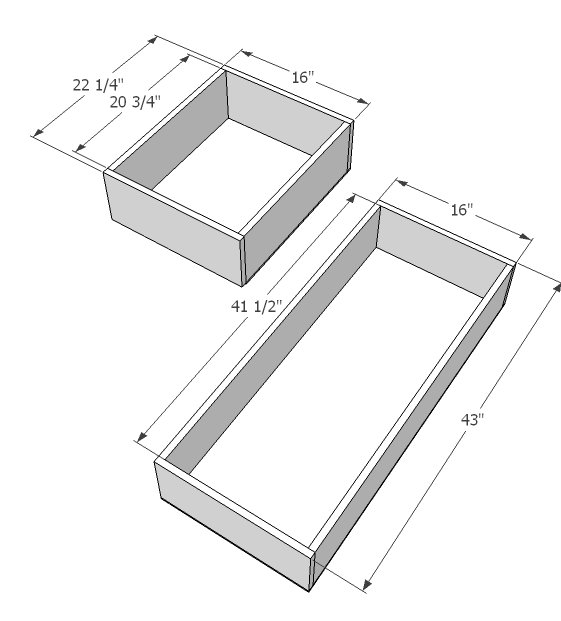
SMALL DRAWERS (build 3 total)
- 6 – 1x8 @ 16”
- 6 – 1x8 @ 20 3/4"
- 3 – ¼” plywood @ 22 1/4” x 16”
LARGE DRAWER (build 1)
- 2 – 1x8 @ 41 1/2"
- 2 – 1x8 @ 16”
- 1 – 1/4” plywood @ 43” x 16”
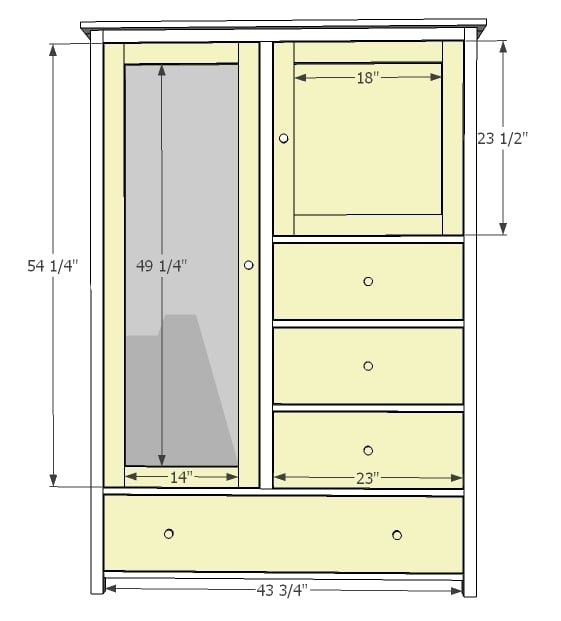
DOORS and DRAWER FACES
- 2 – 1x3 @ 54 1/4"
- 2 – 1x3 @ 14”
- 2 – 1x3 @ 23 1/2"
- 2- 1x3 @ 18”
- 3 – 1x10 @ 23”
- 1 – 1x10 @ 43 3/4"
- 1 – 1/4" plywood @ 54 ¼” x 19”
- 1 – 1/4” plywood @ 23 ½” x 18”
Back is optional
Tools
- measuring tape
- square
- pencil
- safety glasses
- hearing protection
- kreg-jig
- drill
- circular saw
- table saw
- nailer
- sander
- level
- countersink drill bit
Step-by-step Instructions
Step 1
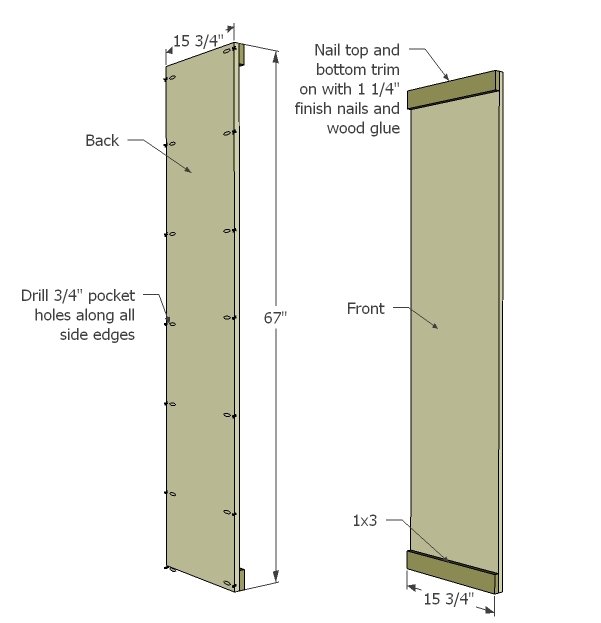
This plan is designed for a very specific mirror and drawer faces that are made of 1x10s measuring 9 1/4" wide. This is an advanced plan. Please take time to fully understand plan before beginning. But the good news, it starts out pretty easy. You will also want to drill all pocket holes before starting the project. To start, drill 3/4" pocket holes along side edges of the side plywood pieces. Then attach 1x2 trim to tops and bottoms.
Step 2
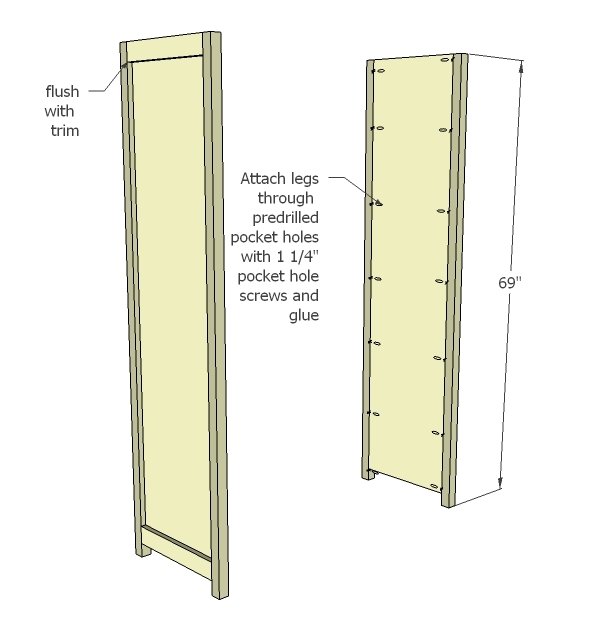
Now attach the legs with 1 1/4" pocket hole screws through the predrilled holes. Keep inside edges flush. TIP: Drill 3/4" pocket holes along top edges pointing upward on inside for attaching top in later steps.
Step 3
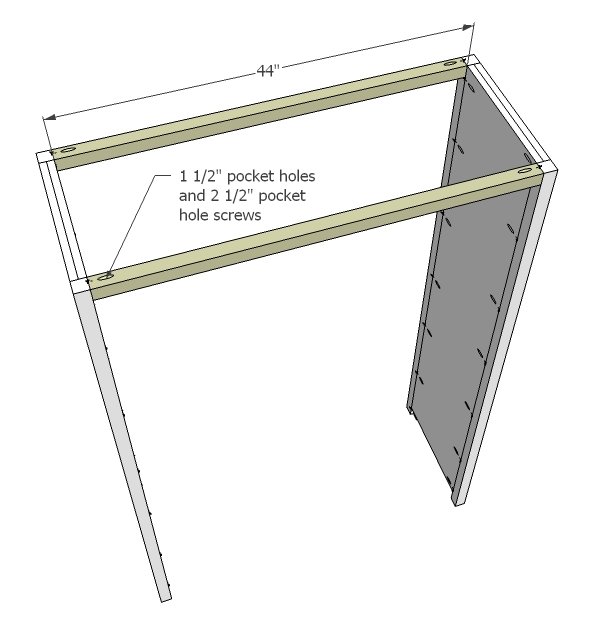
And then join the two sides with the top supports.
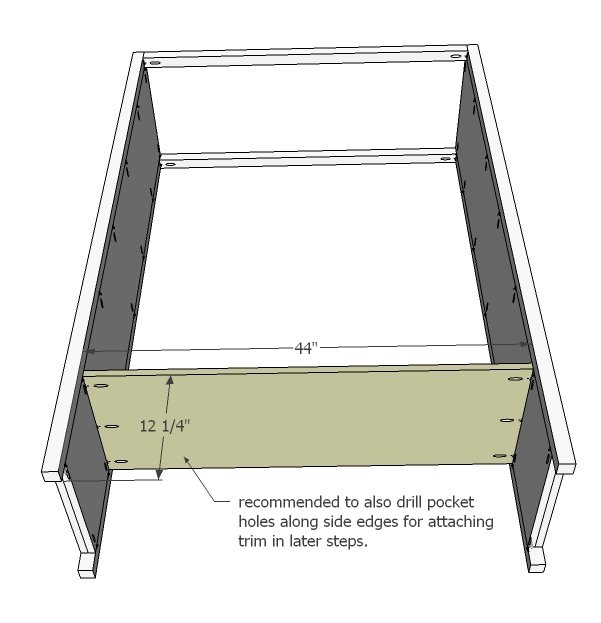
Now add the bottom shelf.
TIP: Drill 3/4" pocket holes along front and back edges of bottom shelf for attaching trim in step 6.
Step 5
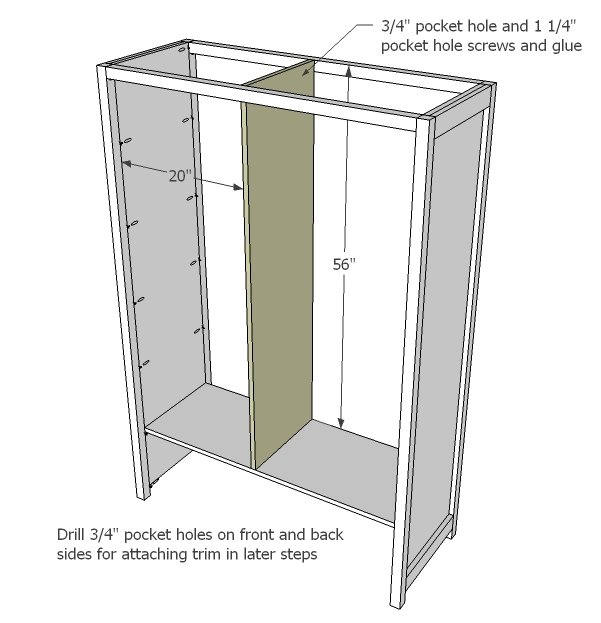
Step 6
Now trim out the bottom shelf as shown above.
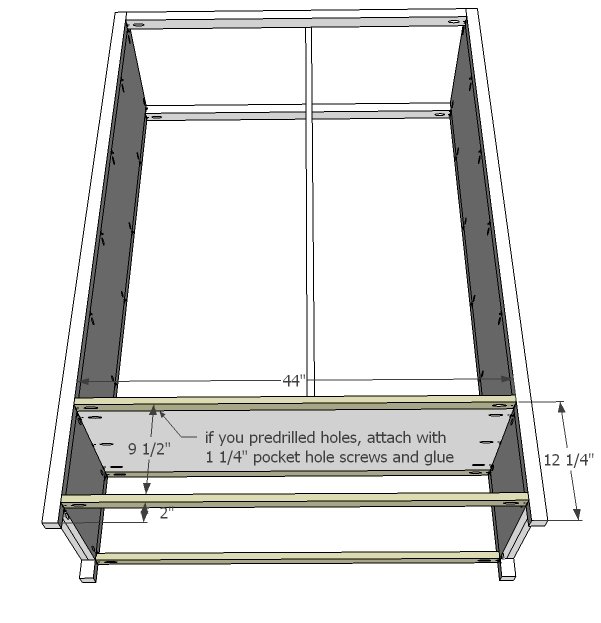
Step 7
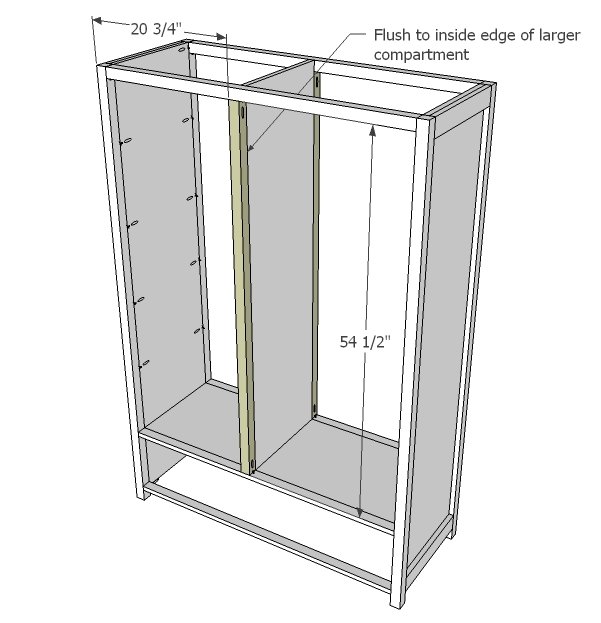
Add the center divider trim to front and back. Note that the center divider trim runs flush to the inside of the larger - drawer - compartment. This is important. Attach through the predrilled pocket holes with 1 1/4" pocket hole screws.
Step 8
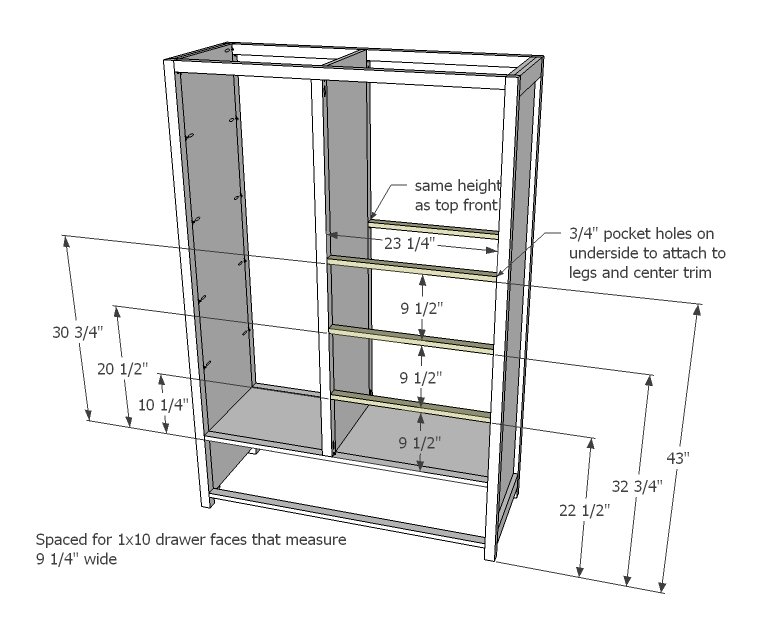
Now the drawer trim. Note that this is designed for drawer faces measuring 9 1/4" wide, with 1/8" gap on all sides.
Step 9
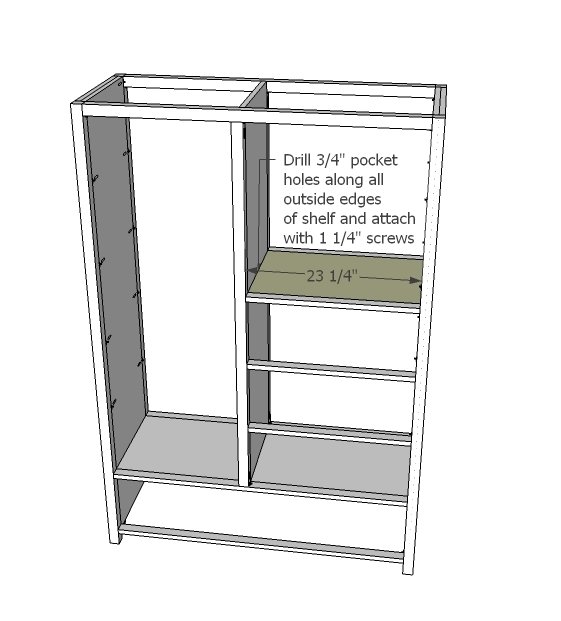
For the top compartment, we'll add a shelf between the trim. Do this by drilling 3/4" pocket holes on all sides of the shelf trim, and attaching in place.
Step 10
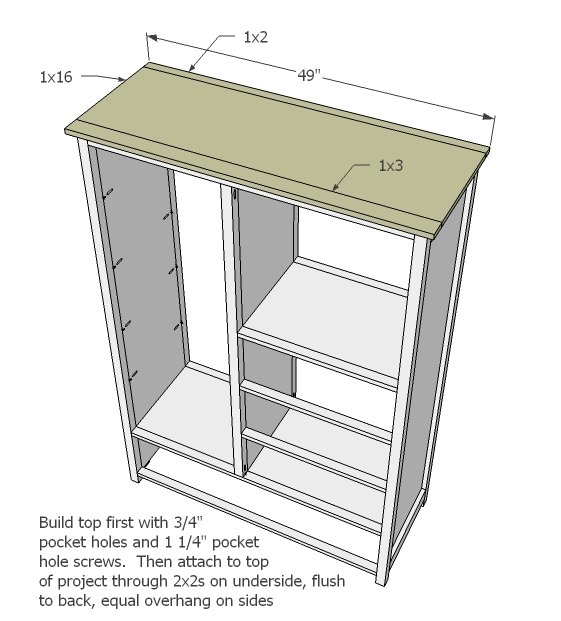
Build the top first, trimming out sides with the 1x2 and 1x3. Then attach to top.
Step 11
Build drawers to fit your drawer boxes, normally 1" less in width than opening to account for drawer slides. If you place your pocket holes to the outsides, the drawer face will hide it:) Install the drawers into the cabinet, inset 3/4" from face for adding the drawer faces in next step.
Step 12
Construct your door faces and install with hinges. Then position the drawer faces over the drawer boxes and attach, leaving an even 1/8" gap on all sides, with 1 1/4" finish nails and glue.
Finishing
Sand all surfaces, starting with a medium grit and finishing with fine. Wipe off the dust, fill any holes or gaps with wood filler, and sand smooth once dry. Apply primer if you're painting, then finish with your choice of paint or stain and seal with a durable clear topcoat. For outdoor projects, use exterior-rated primer, paint or stain, and sealer so the piece stands up to the weather.
Source (temporary): https://www.ana-white.com/woodworking-projects/armoire-drawers-and-mirrored-door