Baby Changing Table with Drawers and Topper
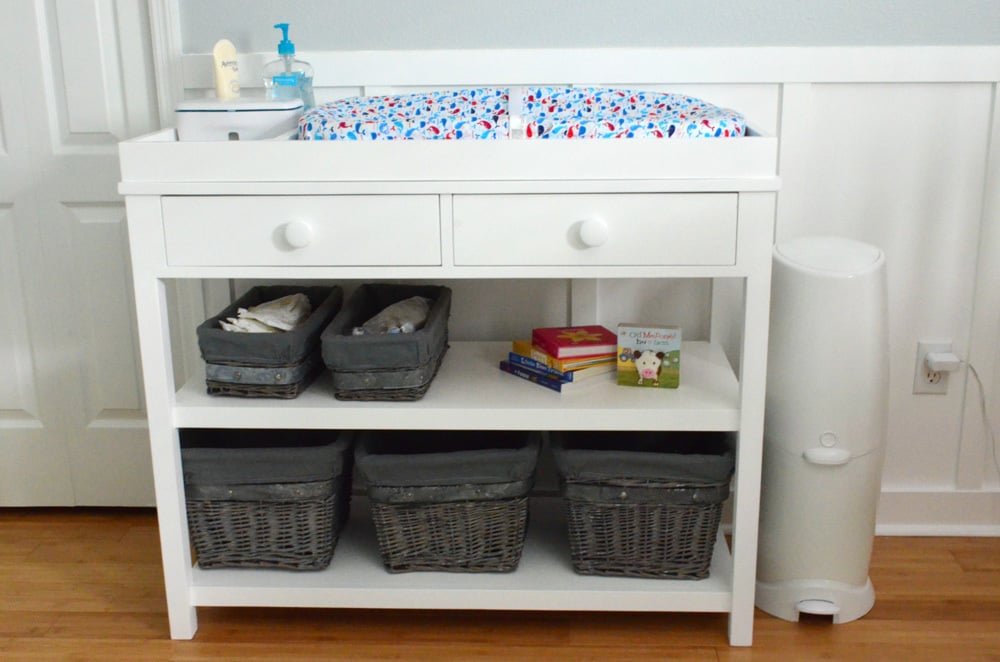
Here's a great baby changing table plan! Featuring two small drawers, two big shelves, and a large top perfect for changing, get all of baby's things ready and organized. from
Specifications
| Project type | Buffet, Sideboard and Credenza Plans |
|---|---|
| Room | Kids and Toys |
| Difficulty | Advanced |
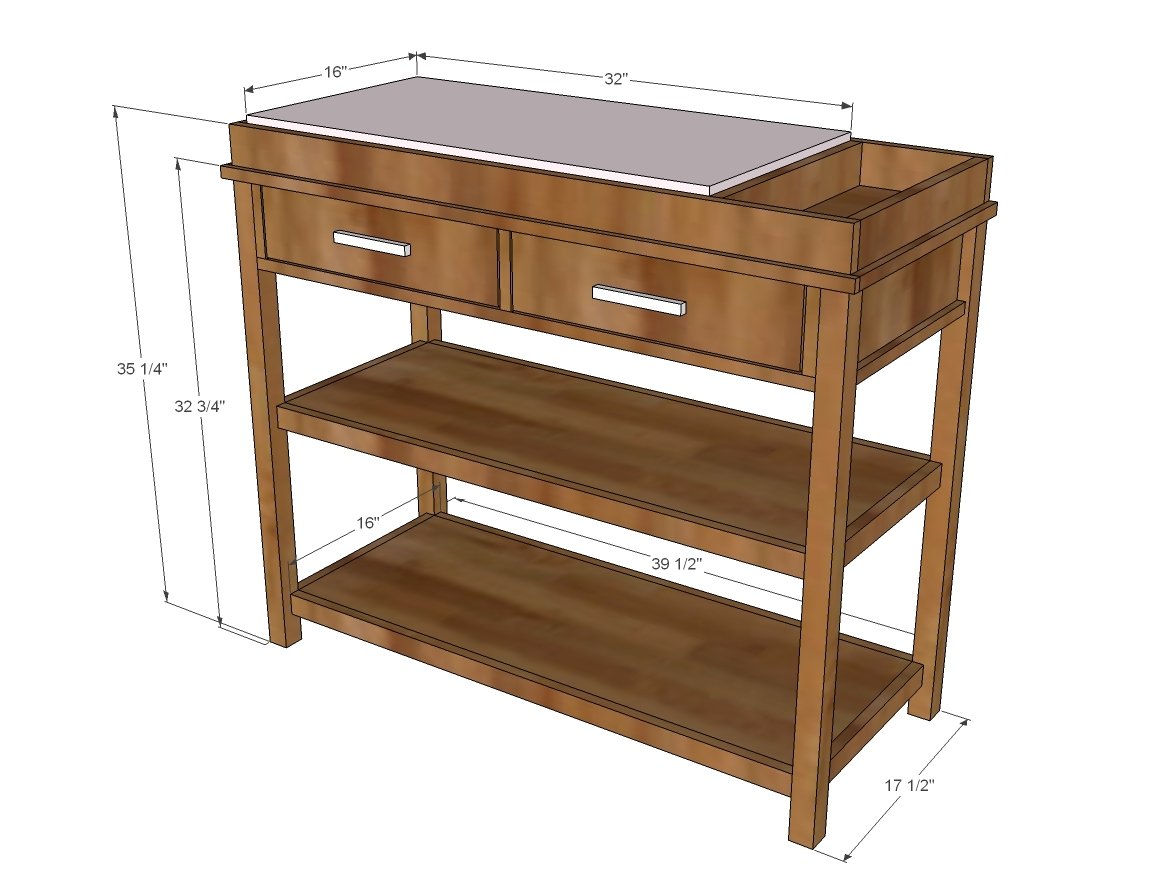
Dimensions
Use the size-specific shopping and cut lists below.
Shopping List
- 1/2 Sheet of 3/4” plywood or MDF
- 2 - 2x2 @ 8 feet long
- 3 - 1x2 @ 8 feet long
- 1 - 1x6 @ 10 feet long
- 1 - 1x4 @ 12 feet long
- 1/4” plywood piece at least 16” x 35”
- 2 - 1x3 @ 8 feet long (for topper)
- 1-1/4” pocket hole screws
- 2 - sets of 14" drawer slides
- 1-1/4" and 3/4" brad nails
- wood glue
Cut List
- 4 - 2x2 @ 32” - legs
- 4 - 1x2 @ 14-1/2” - side trim
- 4 - 1x2 @ 38” - front and back trim
- 2 - 3/4” plywood @ 14-1/2” x 38” - shelves
- 2 - 1x6 @ 14-1/2” - sides
- 1 - 1x6 @ 38” - back
- 1 - 3/4” plywood @ 17-1/2” x 41”
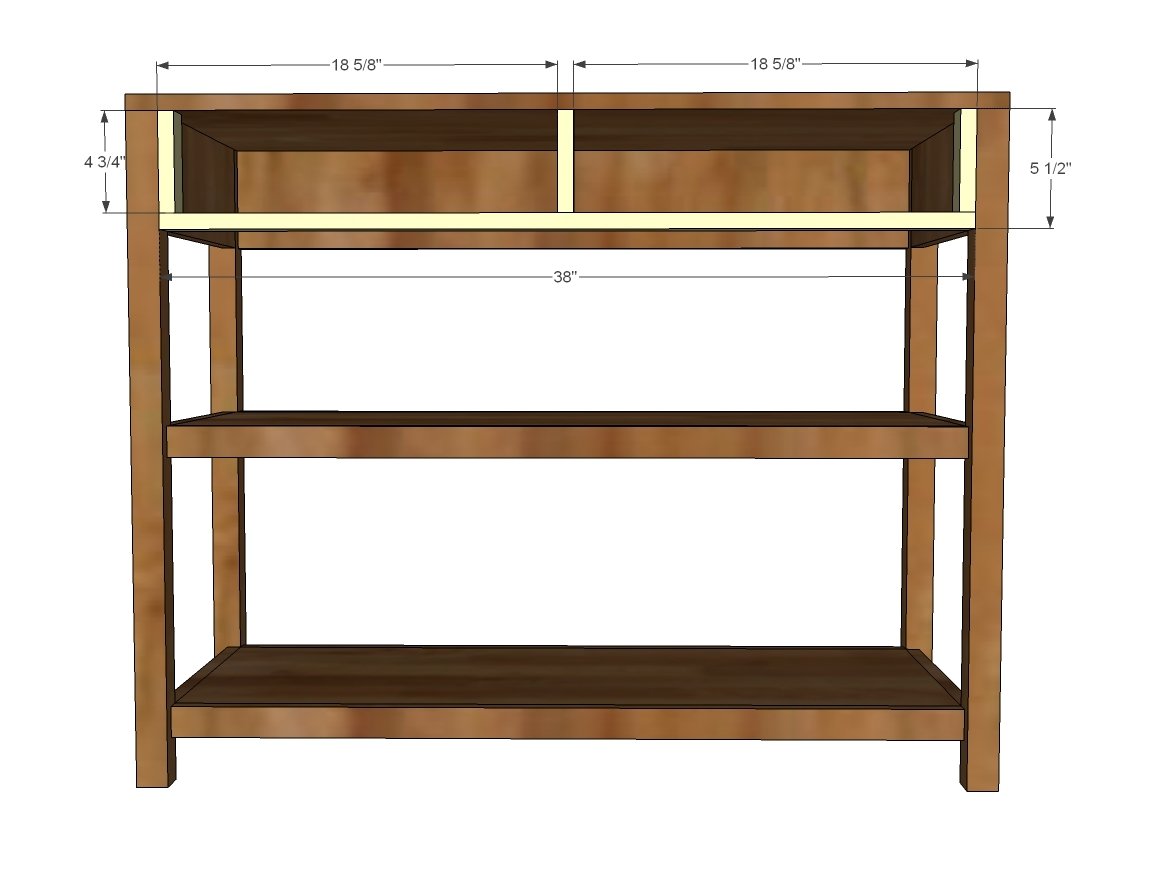
- 2 - 1x2 @ 38” - drawer trim
- 6 - 1x2 @ 4-3/4” - drawer trim
DRAWERS
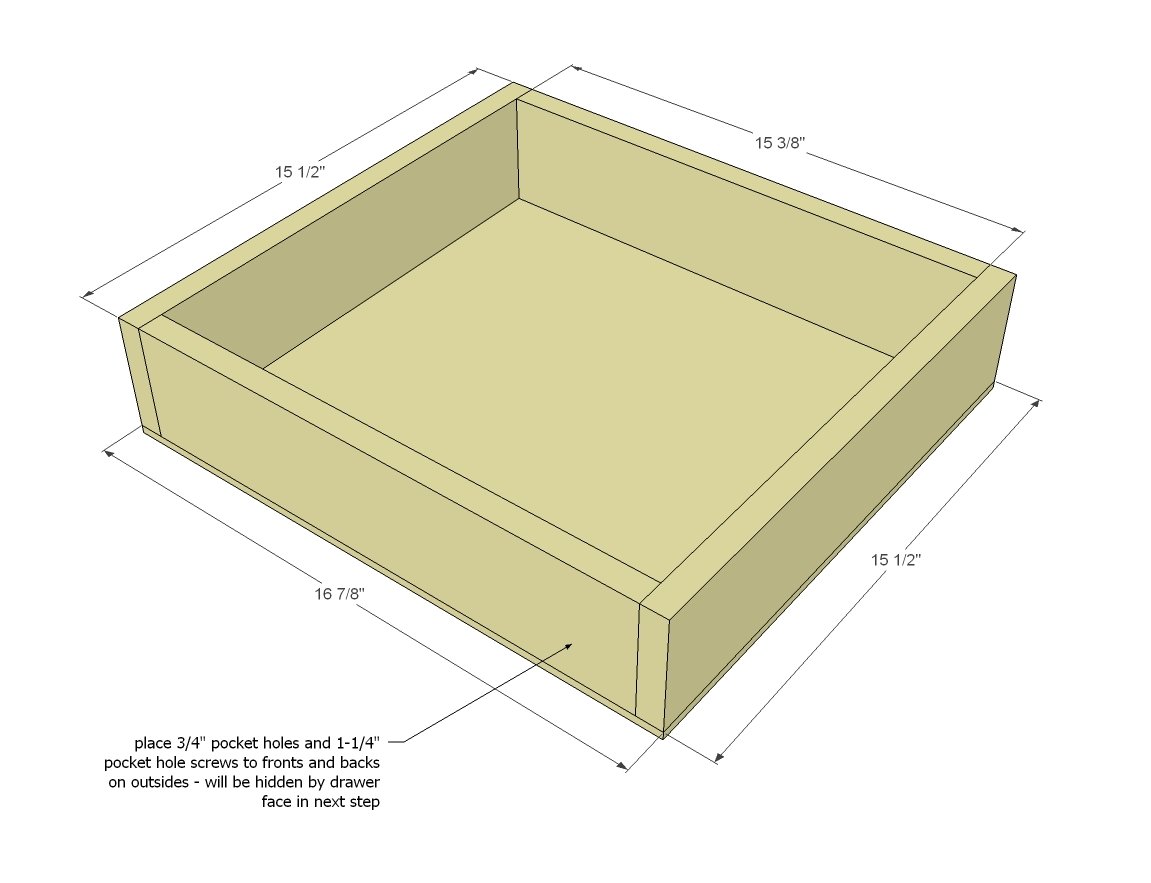
- 4 - 1x4 @ 15-1/2” (sides)
- 4 - 1x4 @ 15-3/8” (front/back)
- 2 - 1/4” plywood @ 15-1/2” x 16-7/8” (bottom)
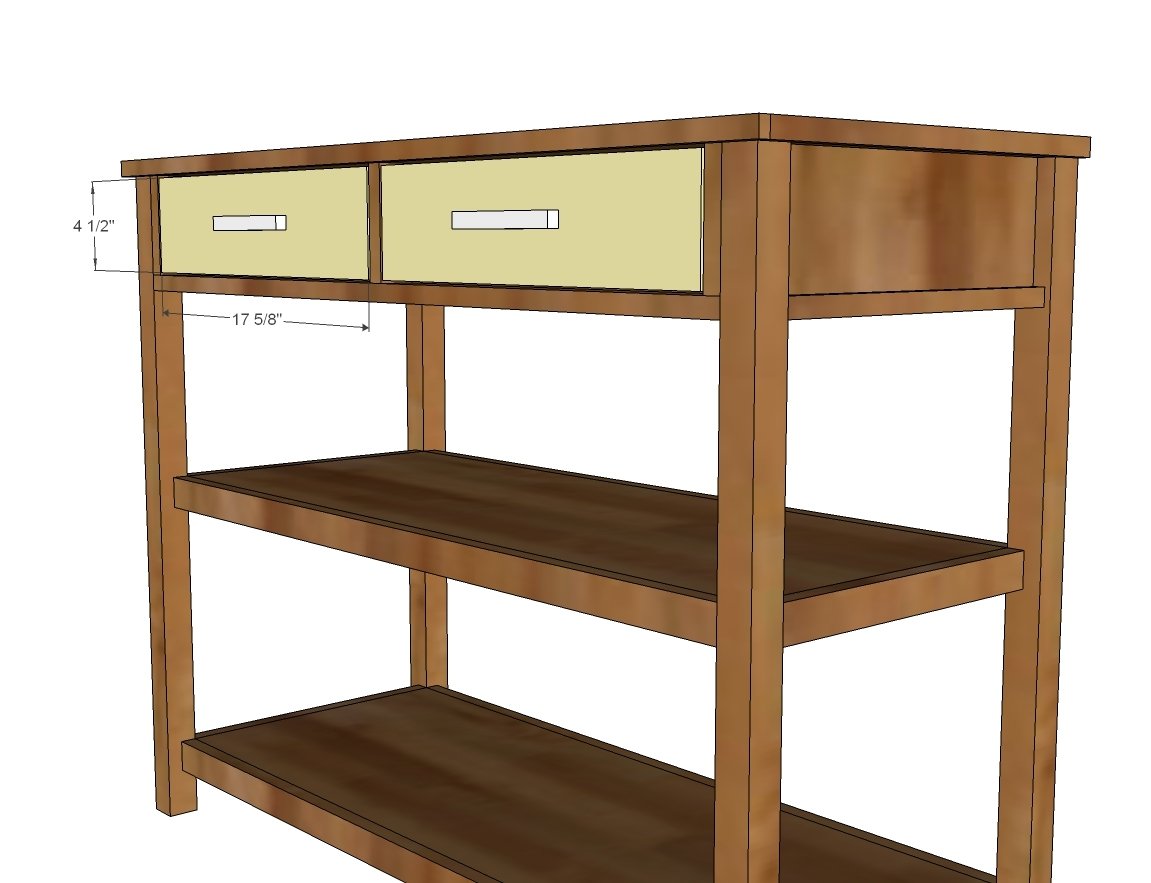
- 2 - 3/4” plywood or 1x6 @ 4-1/2” x 17-5/8” (front)
TOPPER
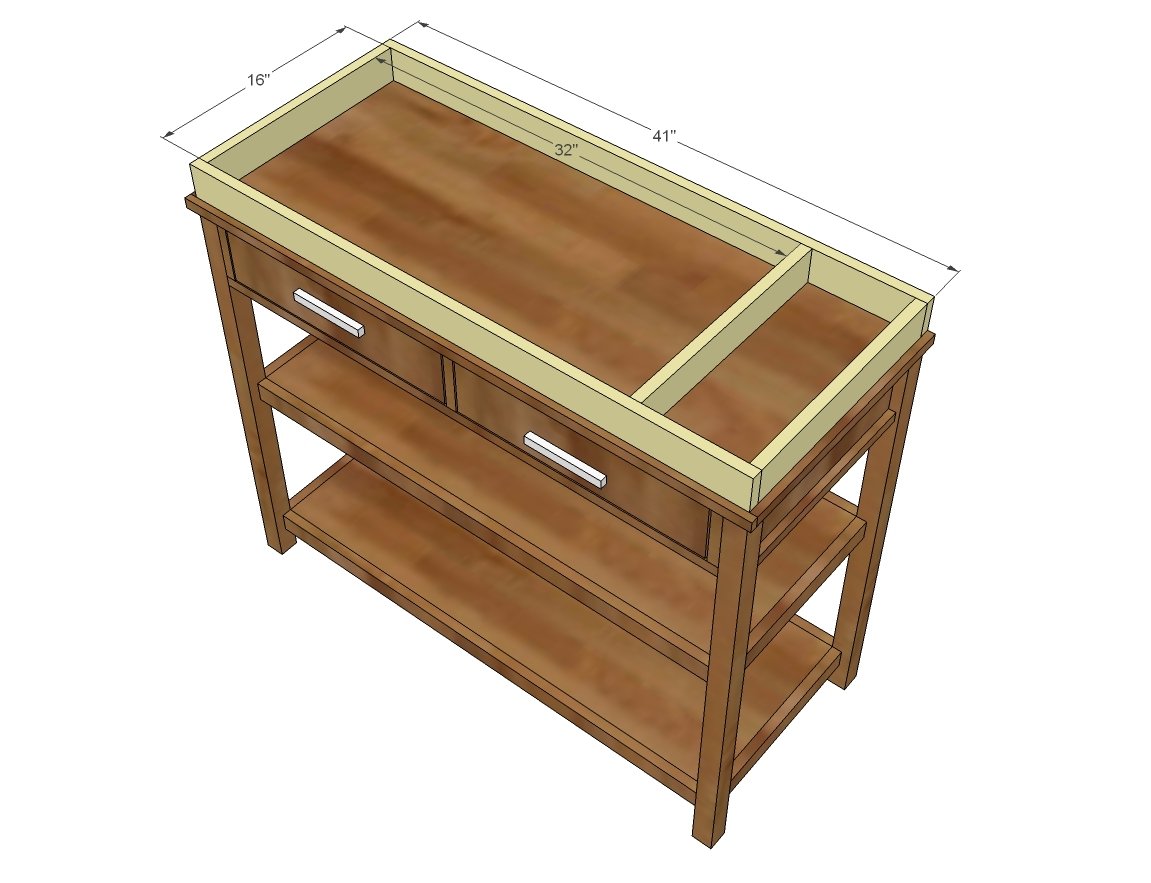
- 2 - 1x3 @ 41”
- 3 - 1x3 @ 16"
Tools
- measuring tape
- square
- pencil
- safety glasses
- hearing protection
- kreg-jig
- drill
- circular saw
- compound miter saw
- nailer
- sander
Step-by-step Instructions
Step 1
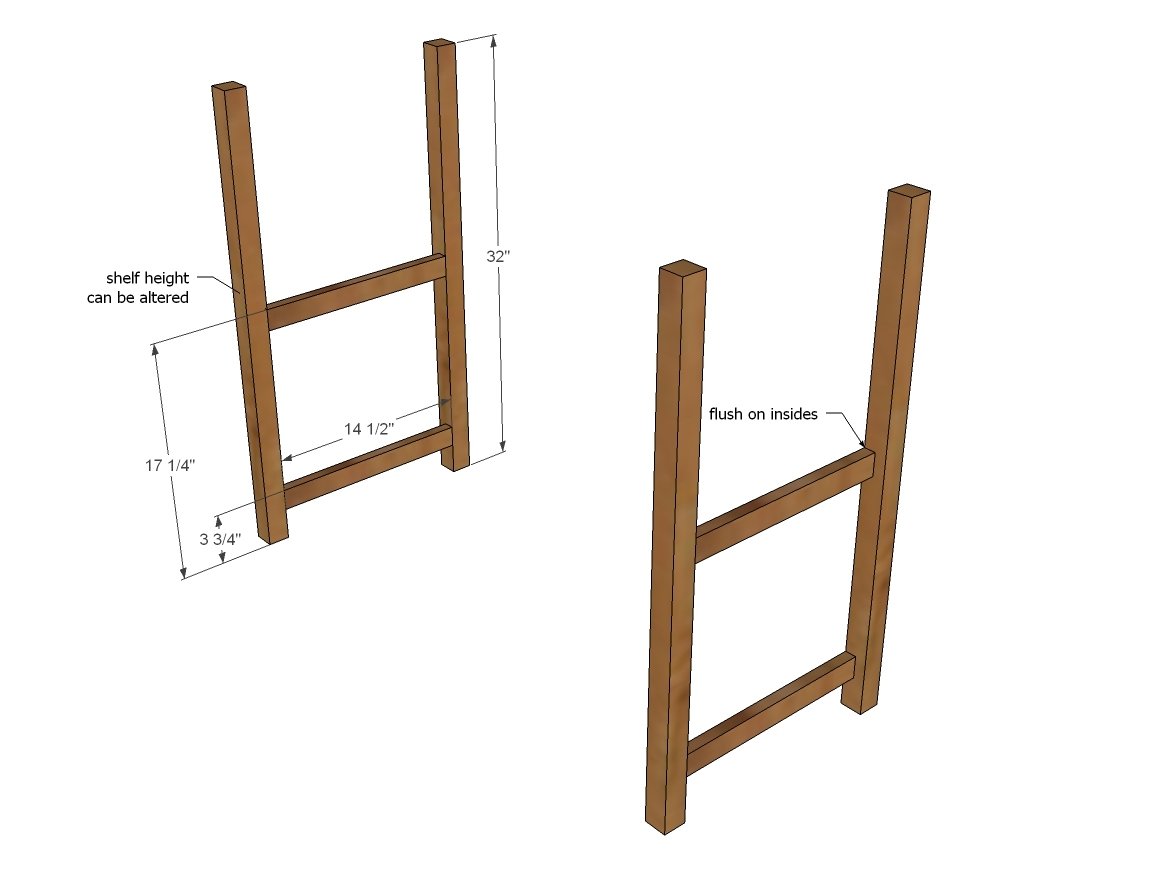
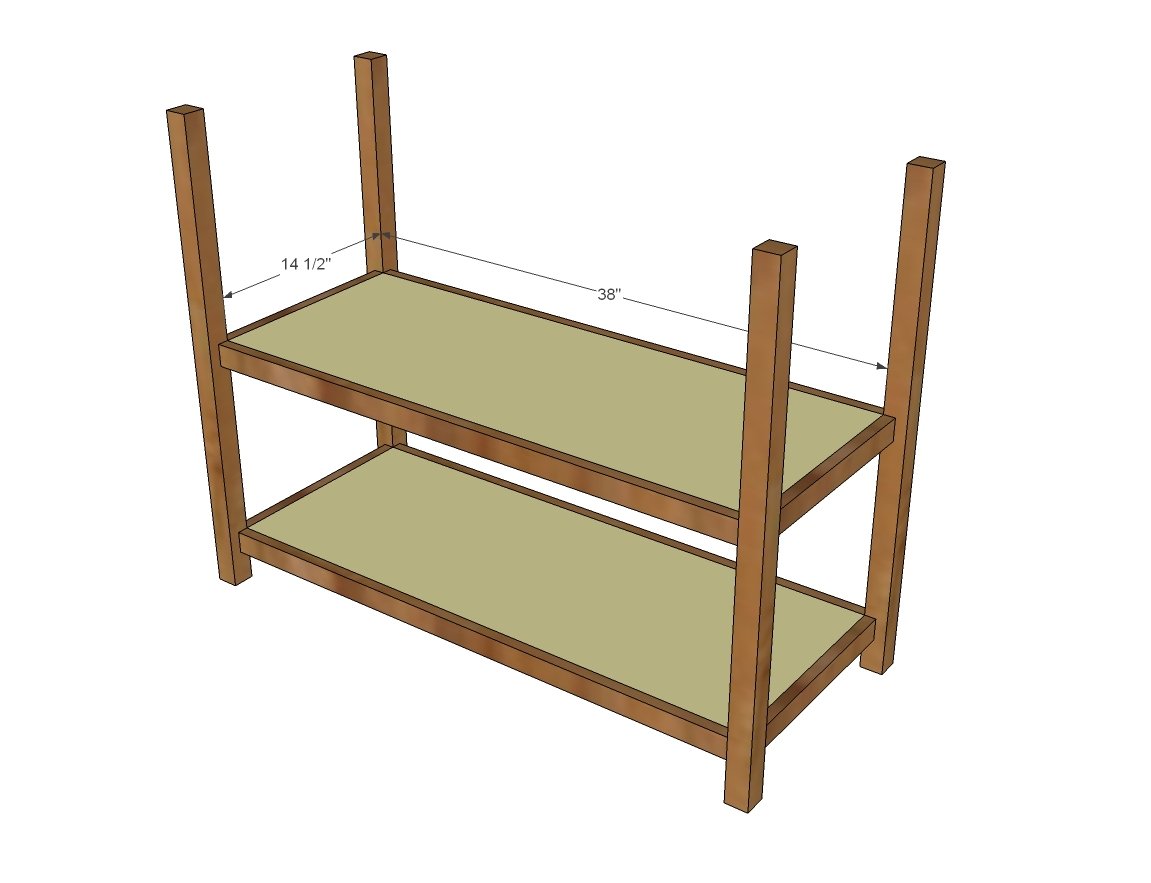
Drill (2) 3/4” pocket holes on each end of the 1x2 @ 14-1/2” long. Attach to the 2x2 legs with 1-1/4” pocket hole screws, flush to inside, keeping pocket holes hidden on insides. NOTE: Upper shelf can be placed at any height. In this plan, the upper shelf is placed to allow 12” height on lower shelf.
Step 2
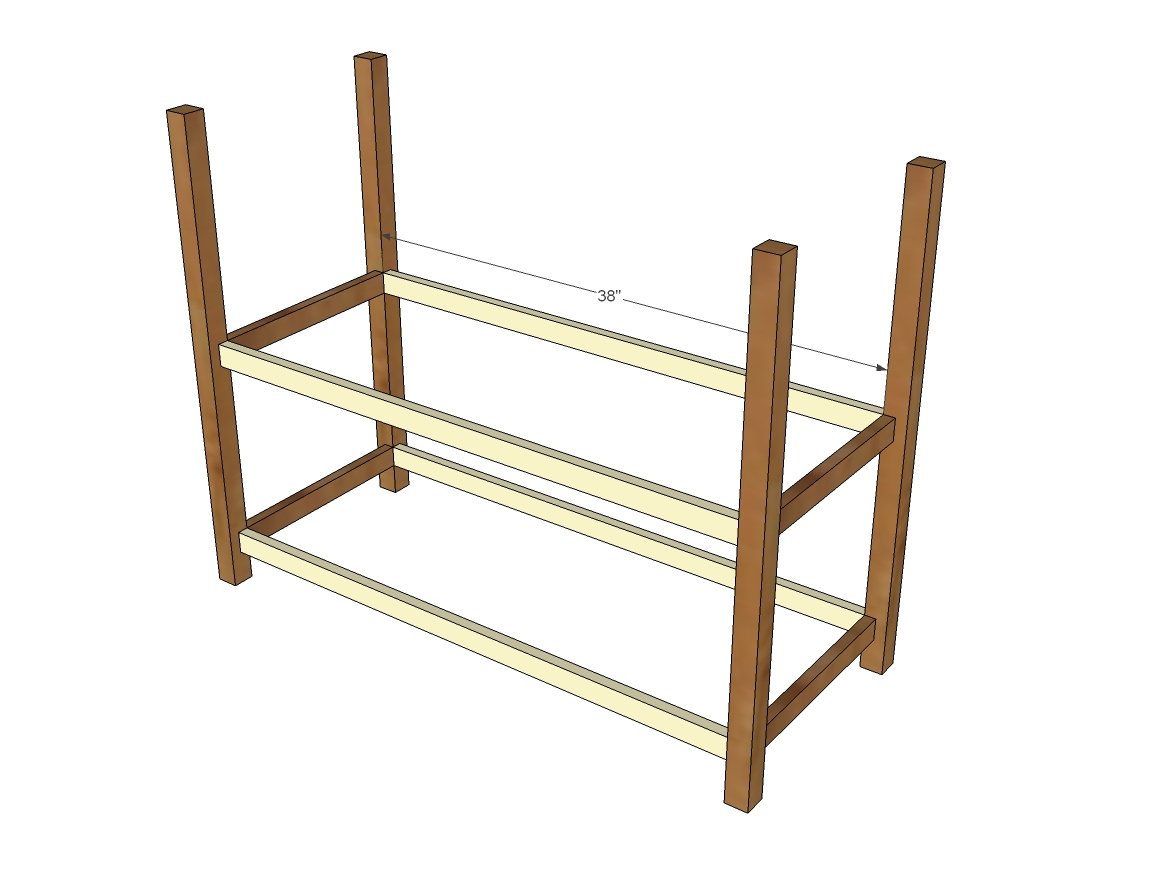
Drill 2 - 3/4” pocket holes on each end of the 1x2 @ 38” long and attach with 1-1/4” pocket hole screws to the 2x2 legs, at the same height as the side 1x2s. Keep 1x2s flush to inside of the legs.
Step 3
Drill 3/4” pocket holes around all four edges of the two shelves (14-1/2” x 38”), spacing pocket holes every 6-8 inches. Attach inset to the 1x2 frames with 1-1/4” pocket hole screws.
Step 4
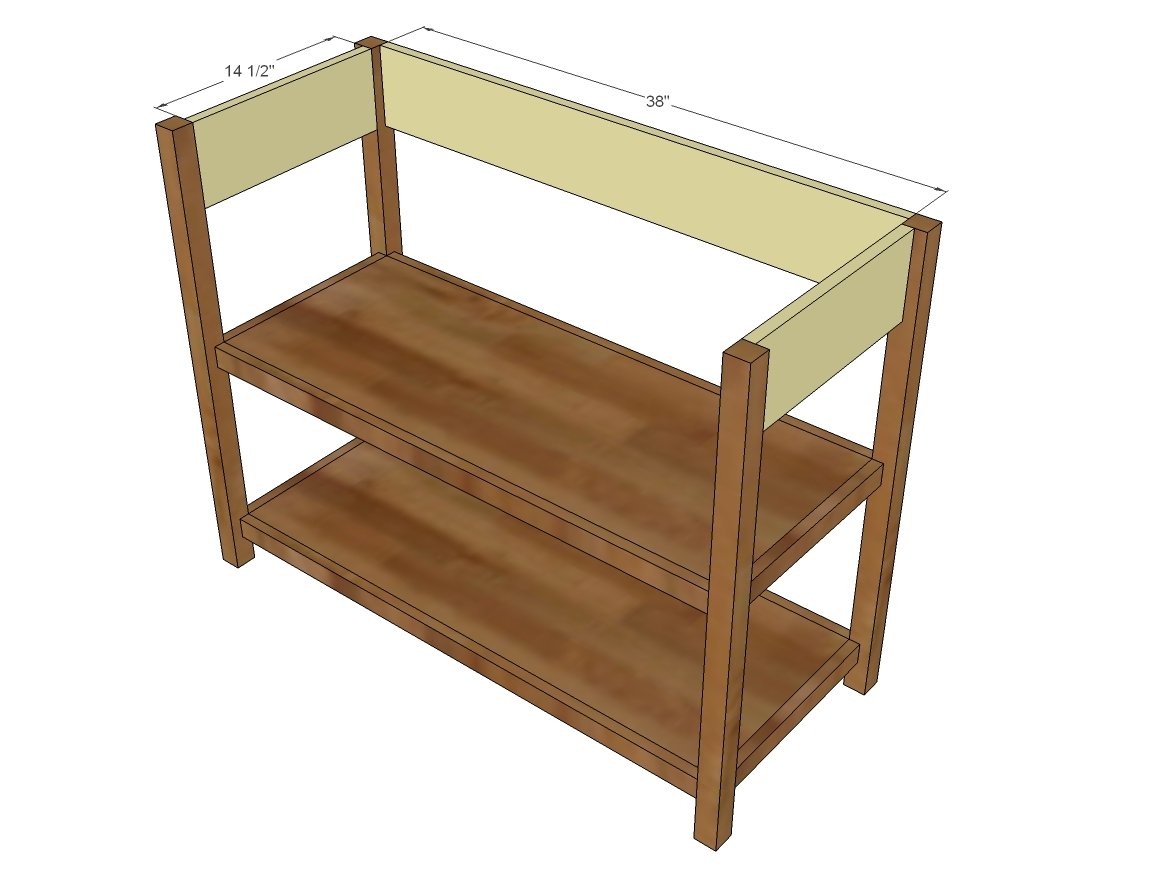
On the 1x6 boards, drill 3/4" pocket holes facing upward for attaching the top in later steps. Then drill 3/4" pocket holes on the ends for attaching to the legs. Attach the 1x6 side and back aprons with 3/4” pocket holes and 1-1/4” pocket hole screws. Also drill 3/ 4” pocket holes on the insides of the aprons facing upward to attach the top in later steps. *Note: the backboard should be flush to the outside of the legs.
Step 5
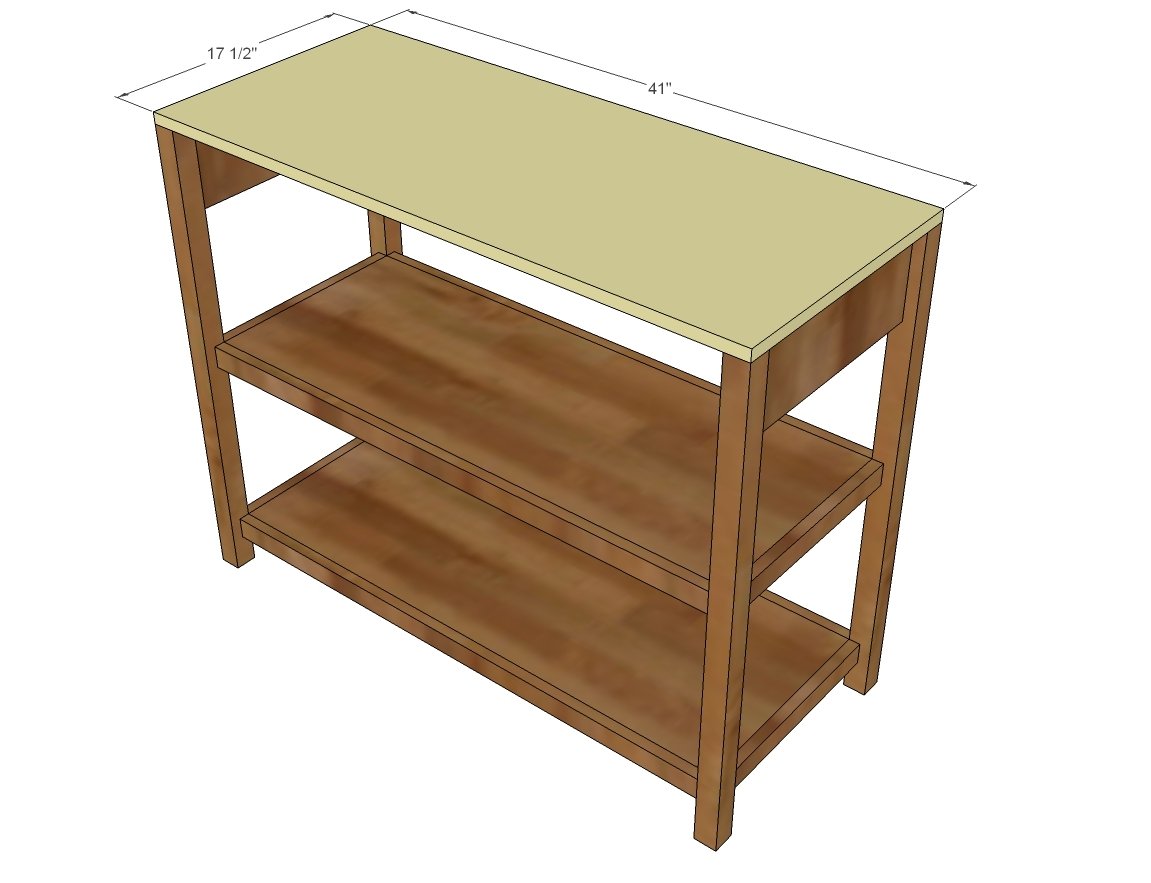
Top - attach the top through the predrilled holes in the 1x6 boards with 1-1/4" pocket hole screws.
Step 6
Attach the shorter 1x2 boards to inside of drawer area. Then attach bottom 1x2 with glue and finish nails - also use pocket holes to attach to legs. Repeat this step for the second frame, positioned so the 14" drawer slides can be attached at the back to the shorter 1x2s.
Step 7
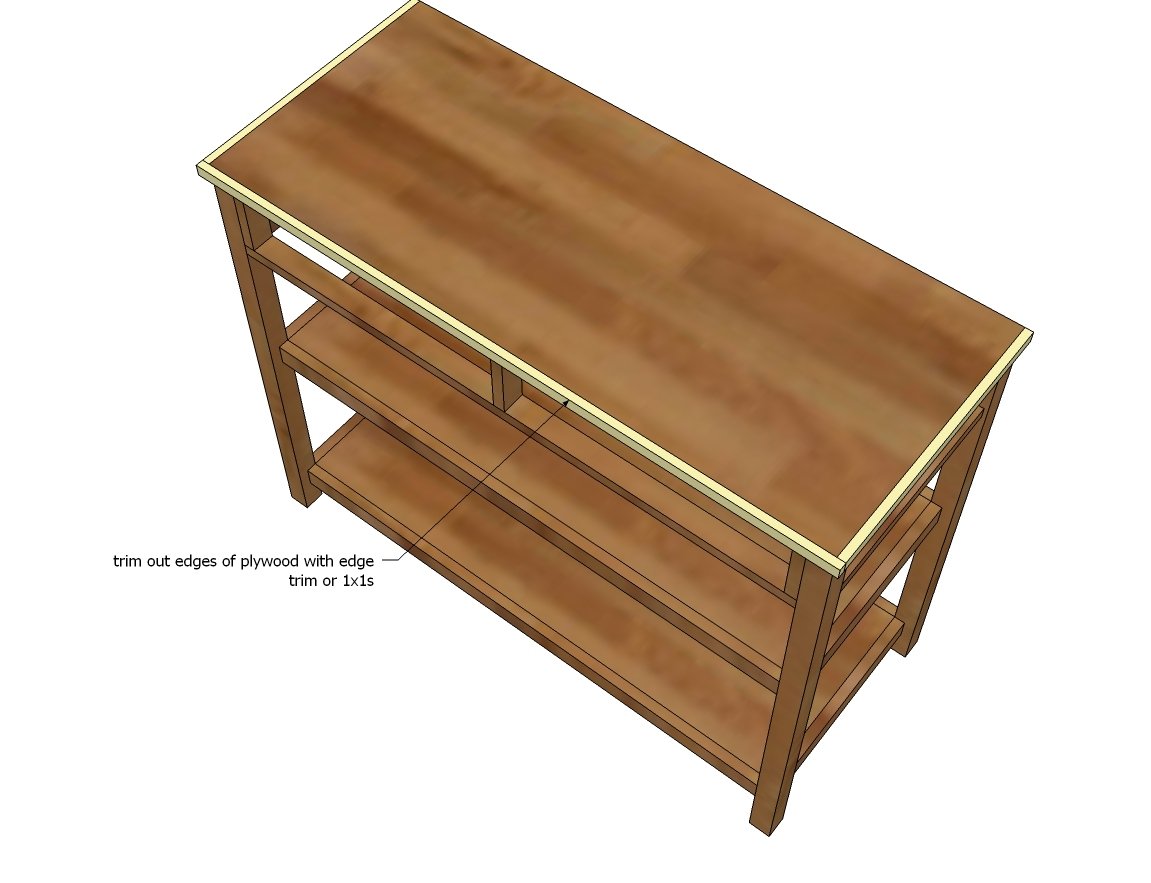
Trim out around top with molding or 1x1s to finish plywood edges. For a more finished look, miter corners.
Step 8
Build drawers to fit openings and drawer slides. Install drawers in table with drawer slides, insetting 3/ 4” to allow for the drawer face. The drawer can be built with 1-1/4" brad nails and glue. The bottom of the drawer can be attached with 3/4" brad nails and glue. Here is a good video on installing drawers:
Step 9
Attach drawer face to drawers with 1-1/4” finish nails and glue, then attach from inside with 1-1/4” screws. NOTE: It may be easier to attach handles or knobs before attaching the drawer faces.
Step 10
Build topper with either finish nails and glue or pocket holes. Bottom is not necessary. Can be attached with a bracket on back side to keep in place. *Note: We adjusted the 32” measurement to 30” to fit our changing pad and wipe container better.
Finishing
Sand all surfaces, starting with a medium grit and finishing with fine. Wipe off the dust, fill any holes or gaps with wood filler, and sand smooth once dry. Apply primer if you're painting, then finish with your choice of paint or stain and seal with a durable clear topcoat. For outdoor projects, use exterior-rated primer, paint or stain, and sealer so the piece stands up to the weather.
Source (temporary): https://www.ana-white.com/woodworking-projects/baby-changing-table-drawers-and-topper