Banker's Bookcase
These bookcases are cute and extremely functional. I love the bottom bins. Even as young as three years old, your child could fill these bins with toys when instructed. Give your child a chance to be organized with the Banker's Bookcases.
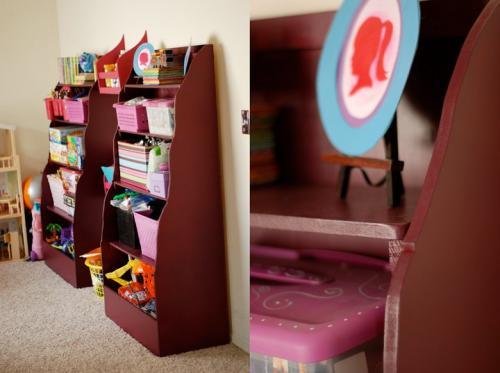
Specifications
| Project type | Bookshelf and Bookcase Plans |
|---|---|
| Room | Storage Solutions |
| Style | Cottage Style Furniture Plans |
| Difficulty | Intermediate |
| Estimated cost | $50 - $100 |
Shopping List
- 1 sheet 3/4″ MDF or plywood
- 1 sheet 1/4″ plywood or paneling
- 2 – 1×2 boards
- 2″ screws
- 1 1/4″ screws
- 1 1/4″ nails
This bookcase is designed to be finished with paint and not to be stained as the front edges of the plywood will be difficult to stain or finish. It's tough to iron on edge banding on a curve.
Cut List
A) 2 – 3/4″ MDF @ 60″ x 15″ (Sides, in step 2 you will cut to the proper shape)
B) 2 – 1×2 @ 13″ (Round edges as shown in diagram in step 3)
C) 2 – 1×2 @ 11″ (Round edges as shown in diagram in step 3)
D) 2 – 1×2 @ 9″ (Round edges as shown in diagram in step 3)
E) 2 – 1×2 @ 7″ (Round edges as shown in diagram in step 3)
F) 1 – 3/4″ MDF @ 31 1/2″ x 14 1/4″ (Bottom of Storage Bin)
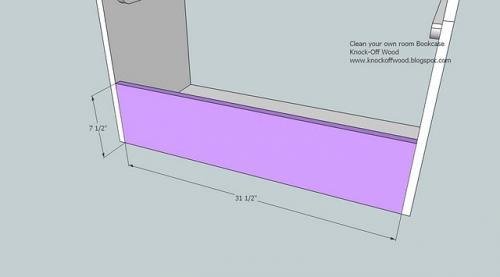
G) 1 – 3/4″ MDF @ 31 1/2″ x 7 1/2″ (Front of Storage Bin)
H) 1 – 1×2 @ 31 1/2″ (Top Support)
I) 1 – 1/4″ Plywood or Paneling @ 33″ x 60″ (Back of Bookcase)
J) 1 – 3/4″ MDF @ 31 1/2″ x 13″ (Bottom Shelf)
K)1 – 3/4″ MDF @ 31 1/2″ x 11″ (2nd to Bottom Shelf)
L) 1 – 3/4″ MDF @ 31 1/2″ x 9″ (3rd to Bottom Shelf)
M) 1 – 3/4″ MDF @ 31 1/2″ x 7″ (Top Shelf)
Tools
- measuring tape
- square
- hammer
- safety glasses
- hearing protection
- drill
- circular saw
- nailer
- sander
Step-by-step Instructions
Step 1
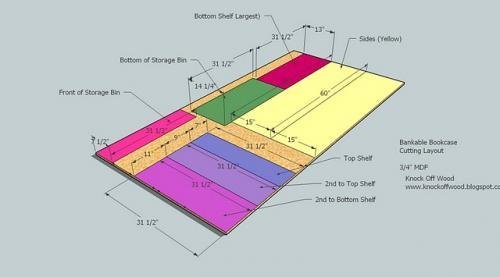
The above diagram shows a sample cutting layout for the 3/4″ MDF pieces. You will also need to cut the back out (33″ x 60″) from 1/4″ plywood or paneling. I say 1/4″ because this is the minimum I would recommend. Got an extra sheet of 1/2″? Use it up! Store bought pieces use cardboard. Yes, cardboard.
Step 2
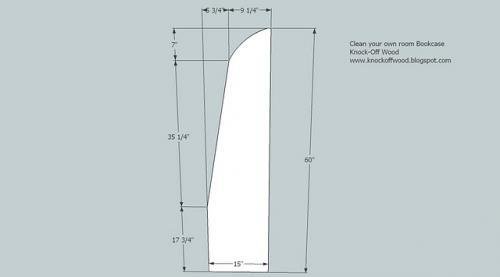
Cutting the Sides. Draw out your desired sides for the bookshelf. The above is a simple design that I would recommend and would be easy to cut. If you are good with a jigsaw, go ahead and mark you board like the Land of Nod bookcase and cut away. Just remember where your shelves are located. It would be a good idea to mark out where the shelves are placed before cutting so you can square from both sides the shelf location.
Step 3
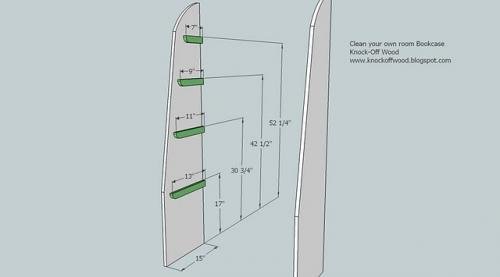
Attaching the Shelf Supports. With the shelves marked in step 2, screw with the 1 1/4″ screws the shelf supports as shown above. Use 3 screws per shelf support. I recommend rounding the front edge of the shelf support to avoid sharp corners. This is shown above. Remember, each set of shelf supports is a different length. Use the measurements in the above diagram to guide you.
Step 4
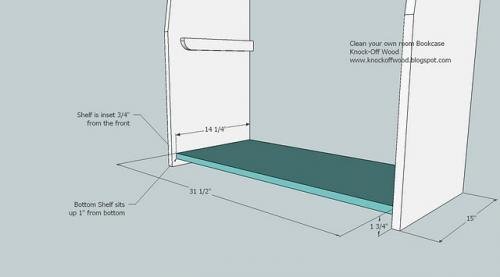
Attach the bottom, F (Blue) to the sides, A (White), as shown above. Keep the back edge flush. There will be a 1″ gap under the bottom shelf and the bottom of the bookshelf. This is shown above. There will also be a 3/4″ difference from the front of the bookshelf and the front of F. Use glue and 2″ screws.
Step 5
Step 6
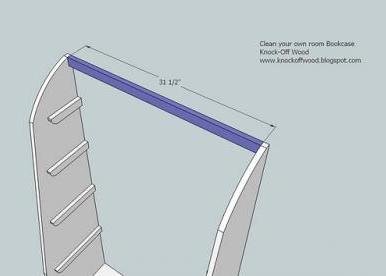
Attach the top support, H, by screwing through the sides into the end edges of H. Use 2 2″ screws on each side.
Step 7
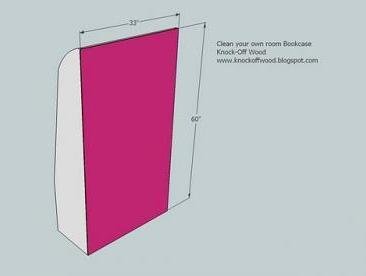
Add the Back. Use the 1 1/4″ nails to nail the back to the bookshelf, as shown above.
Step 8
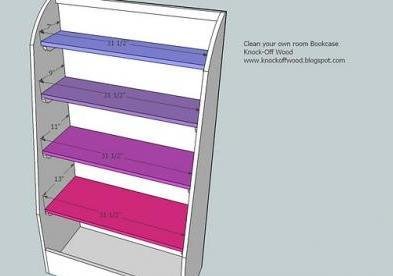
Add the Shelves. I recommend screwing with 1 1/4″ screws the shelves in place. However, you can opt to only screw the top and middle shelf in place and leave the 13″ and 9″ shelf removeable.
Step 9
Finish the Bankable Bookshelf. Fill nail holes with putty, then sand and paint as desired. You may wish to first use a primer for MDF or wood, then paint.
Finishing
Sand all surfaces, starting with a medium grit and finishing with fine. Wipe off the dust, fill any holes or gaps with wood filler, and sand smooth once dry. Apply primer if you're painting, then finish with your choice of paint or stain and seal with a durable clear topcoat. For outdoor projects, use exterior-rated primer, paint or stain, and sealer so the piece stands up to the weather.
Source (temporary): https://www.ana-white.com/woodworking-projects/bankers-bookcase