Beach Hut Bed
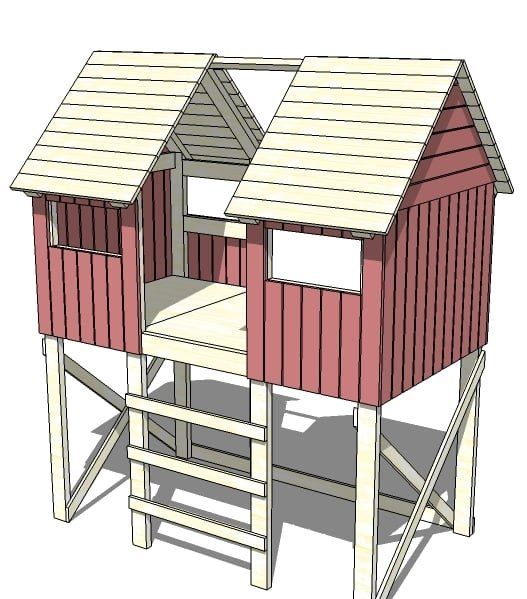
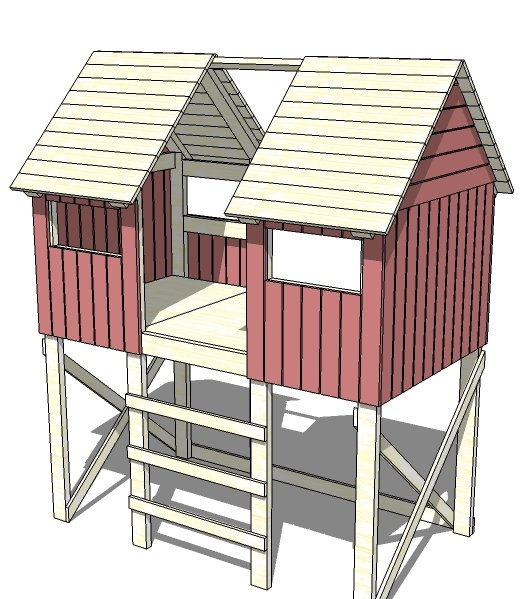
A beach hut loft bed that can be assembled in room. Features a large, wide ladder, two sides with gable roofs, and four windows.
Specifications
| Project type | Playhouse |
|---|---|
| Room | Bedroom |
| Style | Children's and Kid's Room Furniture and Toy Plans |
| Difficulty | Advanced |
| Estimated cost | $150 - $200 |
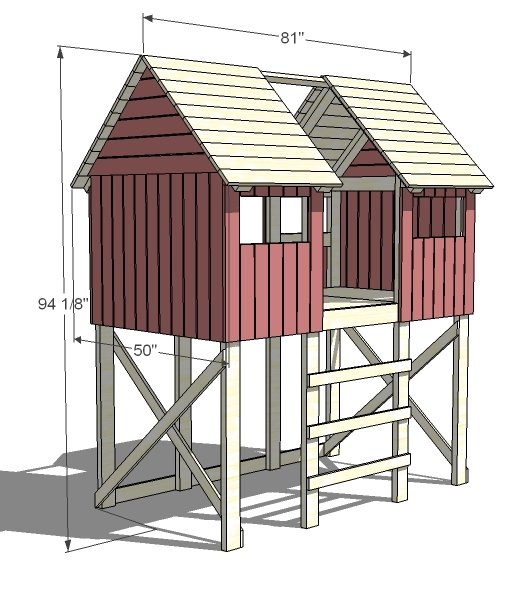
Dimensions
Use the size-specific shopping and cut lists below.
Shopping List
- 20 – 2×4 @ 8 feet long
- 5 – 1×3 @ 8 feet long
- 30 – 1×4 @ 8 feet long
- 1 – 2×6 @ stud length or 8 feet
- 1 – 2×2 @ 25″
- 1 – sheet 3/4″ plywood
- 3″ Screws
- 2 1/2″ Pocket Hole Screws
- 2″ Screws
- 8 – 4 1/2″ Lag Bolts, Nuts and Washers
Cut List
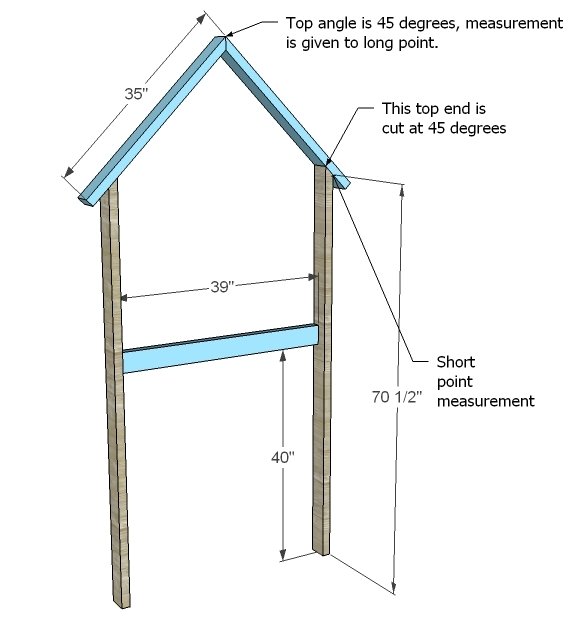
- 8 – 2×4 @ 70 1/2″ to the Short Point, one end cut at 45 degrees off square (overall length will be 72″)
- 8 – 2×4 @ 35″ (one end cut at 45 degrees off square, long point measurement)
- 8 – 2×4 @ 39″ (Floor Joists)
- 6 – 2×4 @ 20″ (Floor Supports)
- 12 – 2×4 @ 18″ (Side Trim)
- 2 – 3/4″ Plywood @ 39″ x 23″ (Hut Floors)
- 4 – 1×3 @ 63″ (Cross Braces)
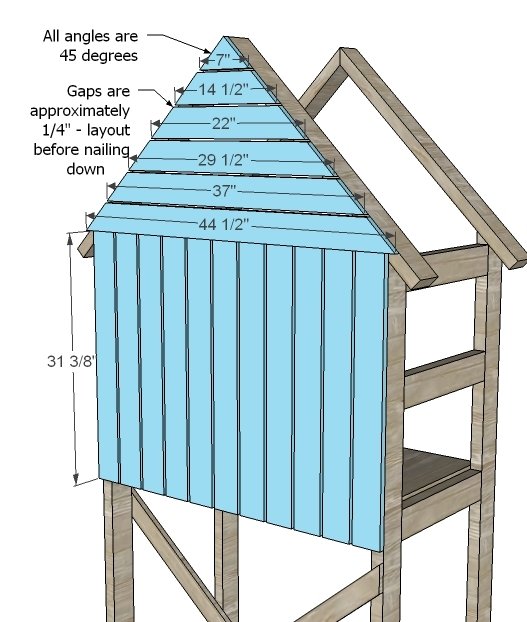
- 22 – 1×4 @ 31 3/8″ (End Siding)
- 2 – 1×4 @ 7″ (Long Point, both ends cut at 45 degrees off square)
- 2 – 1×4 @ 14 1/2″ (Long Point, both ends cut at 45 degrees off square)
- 2 – 1×4 @ 22″ (Long Point, both ends cut at 45 degrees off square)
- 2 – 1×4 @ 29 1/2″ (Long Point, both ends cut at 45 degrees off square)
- 2 – 1×4 @ 37″ (Long Point, both ends cut at 45 degrees off square)
- 2 – 1×4 @ 44 1/2″ (Long Point, both ends cut at 45 degrees off square)
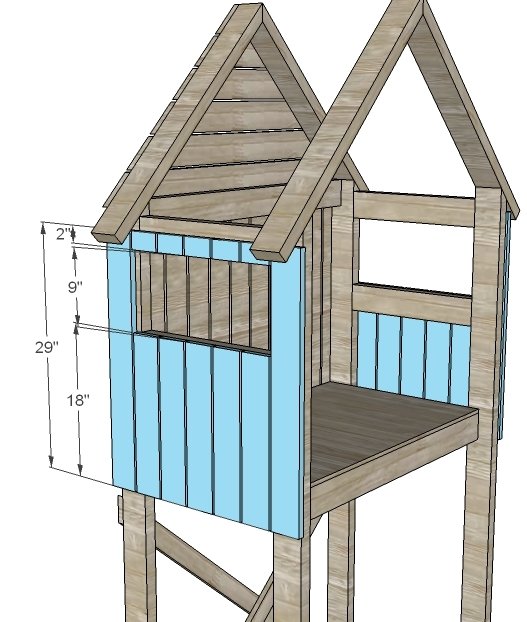
- 8 – 1×4 @ 29″ (Side Siding)
- 20 – 1×4 @ 18″ (Side Siding)
- 20 – 1×4 @ 2″ (Side Siding)
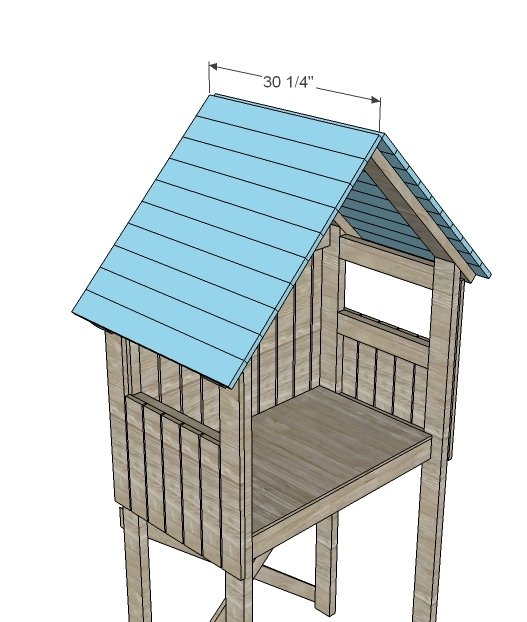
- 40 – 1×4 @ 30 1/4″ (Roofing)
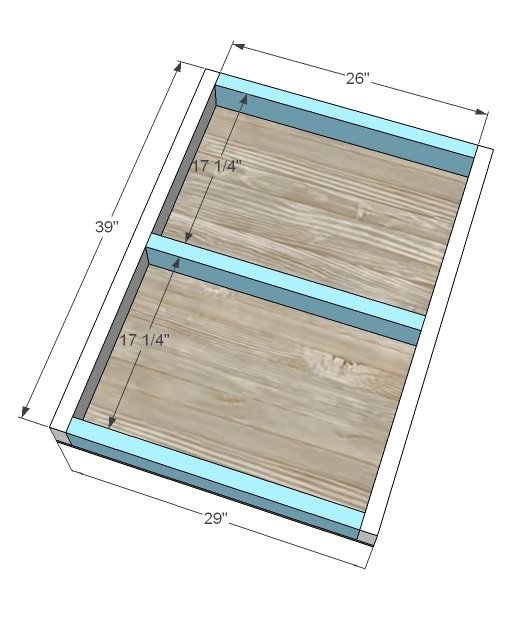
- 3 – 2×4 @ 26″ (Center Floor Joists)
- 1 – 3/4″ Plywood @ 39″ x 29″ (Center Floor)
- 2 – 2×6 @ 25″ (Center Trim)
- 3 – 1×3 @ 32″ (Ladder Rungs)
- 1 – 2×2 @ 25″ (Center Top)
- 1 – 1×3 @ 75″ (Back Support)
Tools
- measuring tape
- square
- pencil
- hammer
- safety glasses
- hearing protection
- kreg-jig
- drill
- circular saw
- jigsaw
- compound miter saw
- nailer
- sander
- level
- countersink drill bit
Step-by-step Instructions
Trusses
Build four trusses exactly as shown above. Use either 2 1/2″ pocket hole screws or 3″ wood screws countersunk and glue. Make sure all trusses match exactly and are square.
Outside Trusses
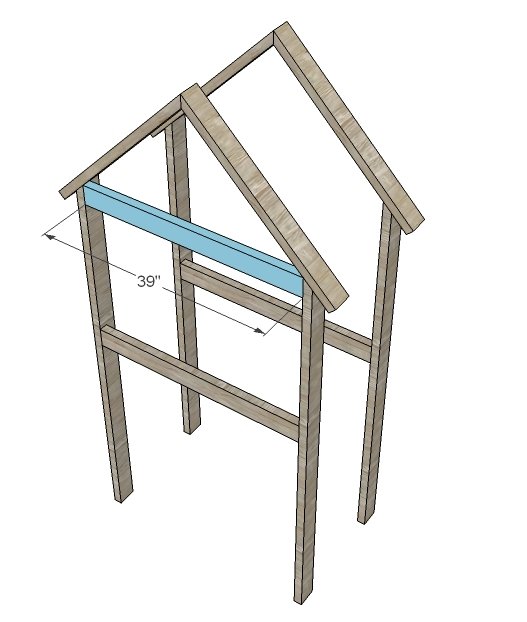
On the two outside trusses, attach another 2×4 flush to the top of the legs as shown above. Notice how the 2×4 is flush to the outside, same as the lower support? Only do this on two of the four trusses.
Side Huts
First things first. Make sure you can get project that is 26″ wide through your doorway. If not, you will need to assemble in place. You will need to build two hut frames as shown above buy joining the two trusses (one end truss and one open truss) as shown above. Build two identical huts as shown above.
Sides
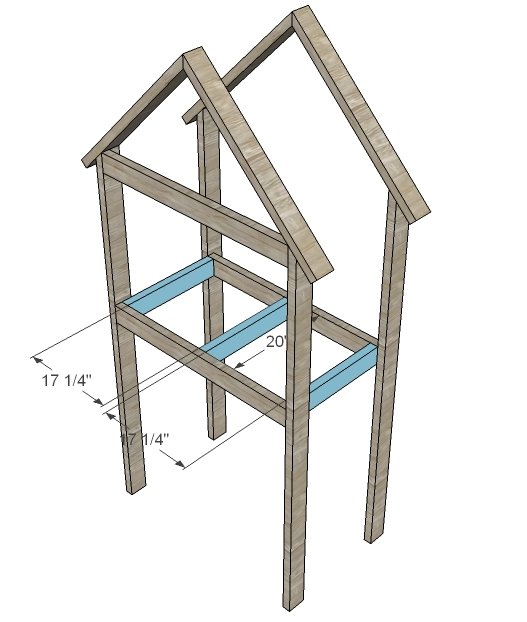
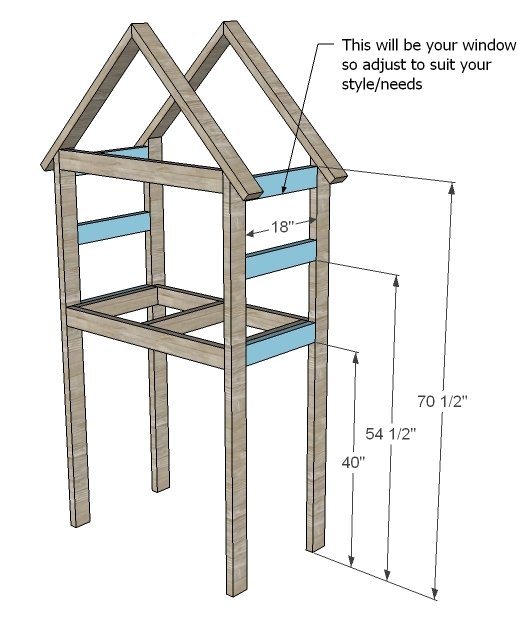
Use the Kreg Jig™ to drill holes in the side supports and attach to the trusses as shown above. The location of your windows is the top opening, so you can adjust as you see fit.
Step 5
Cross Braces
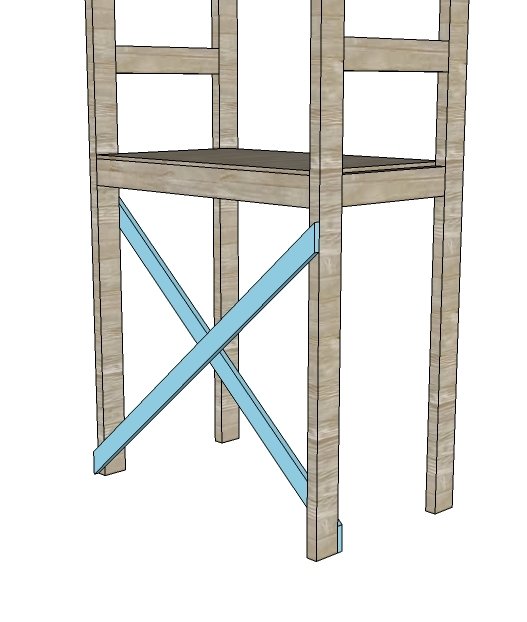
Lay the cross braces over the sides of the bottom and mark. Remove and cut the ends off at an angle, so the cross braces will look as they do above. Screw down (make sure everything is very square before you screw down).
Siding
If your doorway measurements were particularly tight, you may wish to screw the siding on in place, as it does add an extra 3/4″. Layout, with approximately 1/4″ gaps between the boards. Screw down with 2″ screws (if removable) or 2″ finish nails and glue (if permanent). Make sure everything is good and square. This step should make the huts pretty stable, though very top heavy and likely to tip over. Be cautious.
Side Siding
This part you could nail down. It will save you time now and also be easier to conceal nail holes. Use 2″ finish nails and glue.
Roof
Now the roof is where things are getting wider. If your doorway (or window) can’t fit an object 30 1/4″ wide through it, save this step for finishing in the room. Start the roofing at the top and work your way down. The roofing boards are not designed to have gaps between them. And our huts are done!
Center Floor
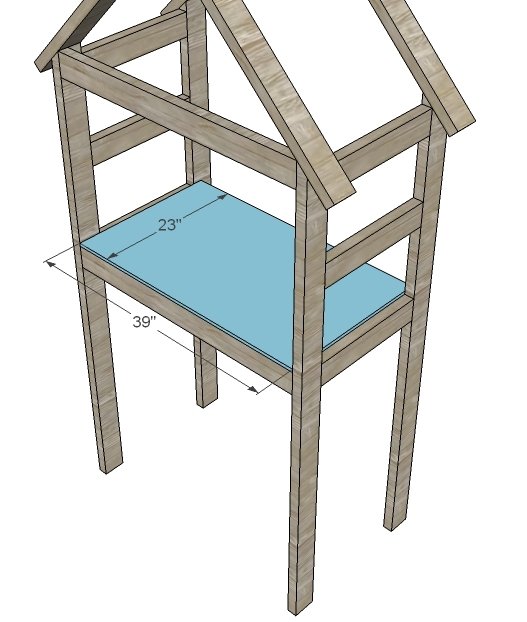
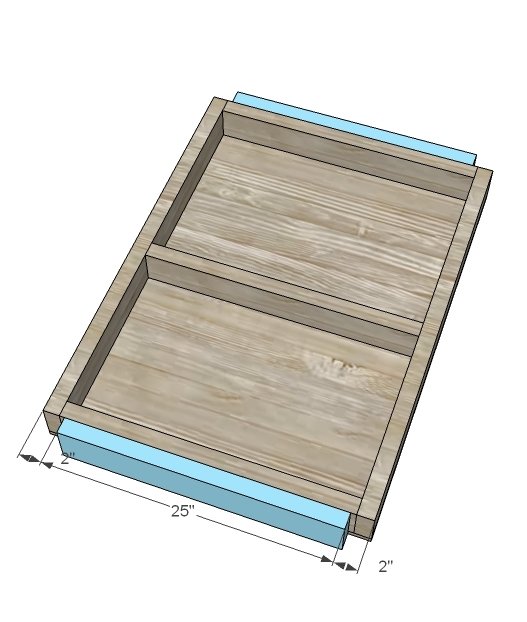
Construct the center floor as shown above. Use 3″ screws and glue. Adjust for square before screwing plywood to the frame.
Center Trim
Attach the center trim pieces to the sides of the center as shown above. 3″ screws and glue – just three screws per board will do. Keep the 2×6 flush to the bottom, so you will have a lip to the top to keep things inside the hut.
Assembly
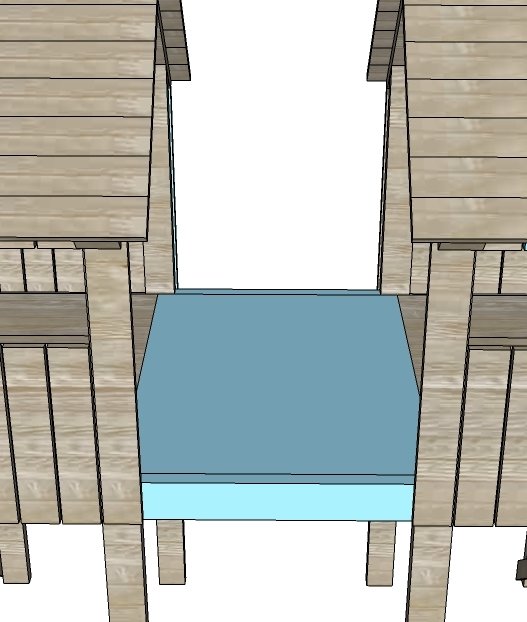
With all pieces in the final room, attach the center piece to the two huts, using 4 1/2″ lag bolts with washers and nuts. You will need to predrill holes for the lag bolts. Use four bolts per side, and periodically check to make sure bolts are still tight and tighten if necessary.
Ladder/Top
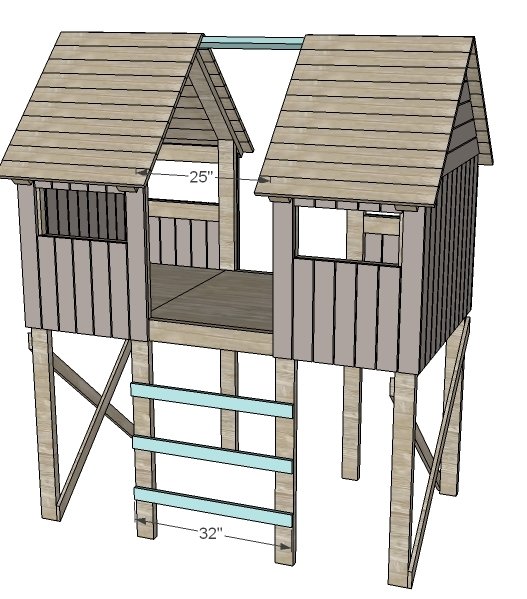
I choose to do the ladder this way because it ties in the two huts at the base. You can bolt these down or just use screws. I also put the center piece up to keep the two huts in position at the top, but the Ram had a good point... what little boy isn’t going to be hanging off of it? So consider beefing the top support up if you have a climber.
Base Support
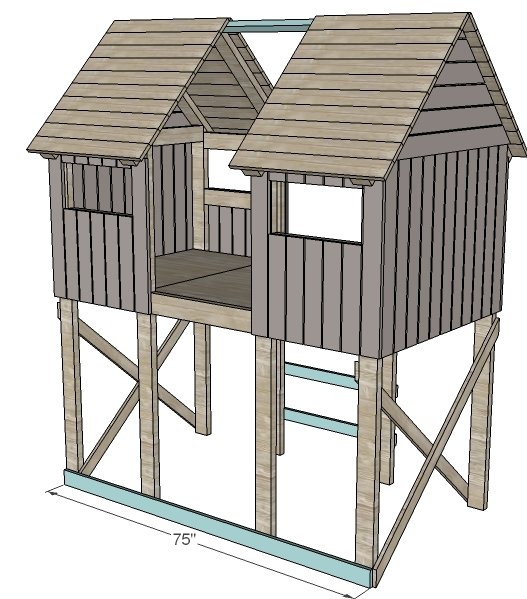
The best way to add support to the back would be cross bracing. But a base support as shown above should do the trick. If you need to, add cross bracing (like done on the sides) to the back. That will take any wiggle out of the base. Now the fun part. Finishing:)
Step 15
Bed is four feet tall in center, without mattress. You will need to fold mattress in half, slide through opening, and let the mattress unfold to fit it in the bed. Build and use at your own risk. Please see disclaimer in the footer below.
Finishing
Sand all surfaces, starting with a medium grit and finishing with fine. Wipe off the dust, fill any holes or gaps with wood filler, and sand smooth once dry. Apply primer if you're painting, then finish with your choice of paint or stain and seal with a durable clear topcoat. For outdoor projects, use exterior-rated primer, paint or stain, and sealer so the piece stands up to the weather.
Source (temporary): https://www.ana-white.com/woodworking-projects/beach-hut-bed