Benchmark Media Console
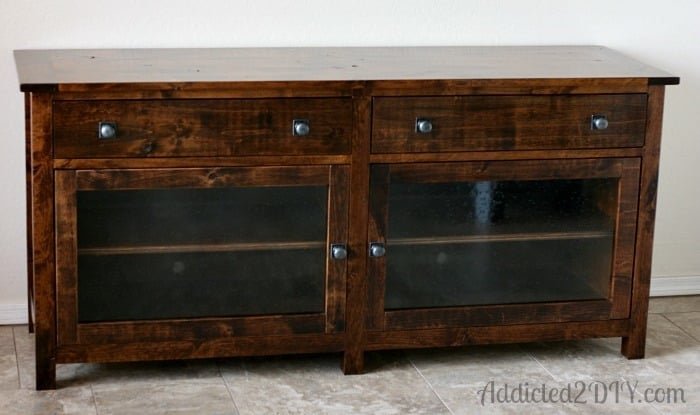
Build your own tv media console with! Stain or paint any color. You can also build the matching side towers with.
Specifications
| Project type | Media and Entertainment Centers |
|---|---|
| Room | dining room |
| Style | Farmhouse Furniture |
| Difficulty | Advanced |
| Estimated cost | $100-$150 |
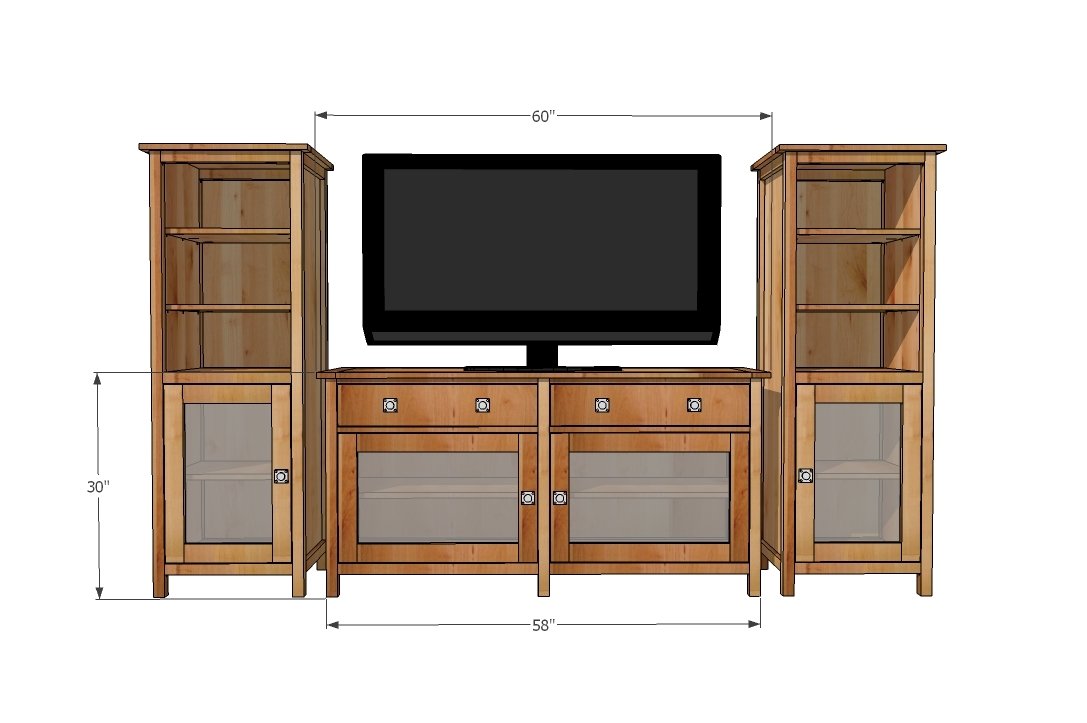
Dimensions
Use the size-specific shopping and cut lists below.
Shopping List
- 1 and a half sheets of 3/4" Plywood, cut into strips 15 3/4" wide, 8 feet long, cut with the grain. For the half sheet, cut into strips 4 feet long, with the grain.
- 1 sheet 1/4" plywood for the back
- 4 - 1x2 @ 8 feet long
- 4 - 2x2 @ 8 feet long
- 1 - 1x6 @ 6 feet long
- 3 - 1x3 @ 8 feet long
- 1 sheet acrylic glass 1/4" thick, 30" x 24"
- 6 knobs
- 4 sets Euro Style Hinges
Cut List
- 2 - 3/4" plywood @ 15-3/4" x 26 1/4" (Sides)
- 3 - 3/4" plywood @ 15-3/4" x 55" (Main Shelves and Top)
- 1 - 3/4" plywood @ 15-3/4" x 17 1/2" (Center Divider)
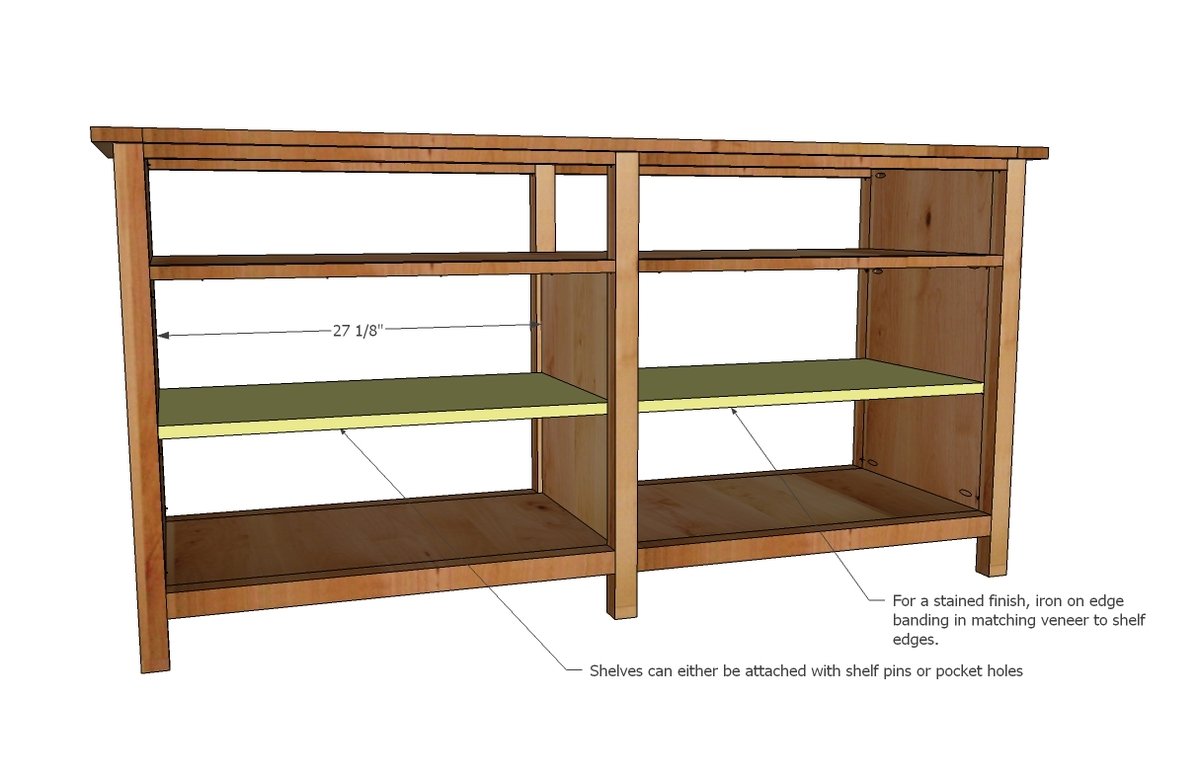
- 2 - 3/4" plywood @ 15-3/4" x 27 1/8" (Shelves)
- 4 - 1x2 @ 15 3/4" (Side Trim)
- 6 - 2x2 @ 29 1/4" (Legs)
- 4 - 2x2 @ 26 3/4" (Bottom Trim)
- 8 - 1x2 @ 26 3/4" (Top Door Area Trim)
- 2 - 1x3 @ 19 3/4" (Top Breadboard Ends)
- 1 - 1x3 @ 55" (Top Front)
- 1 - 1x2 @ 55" (Top Back)
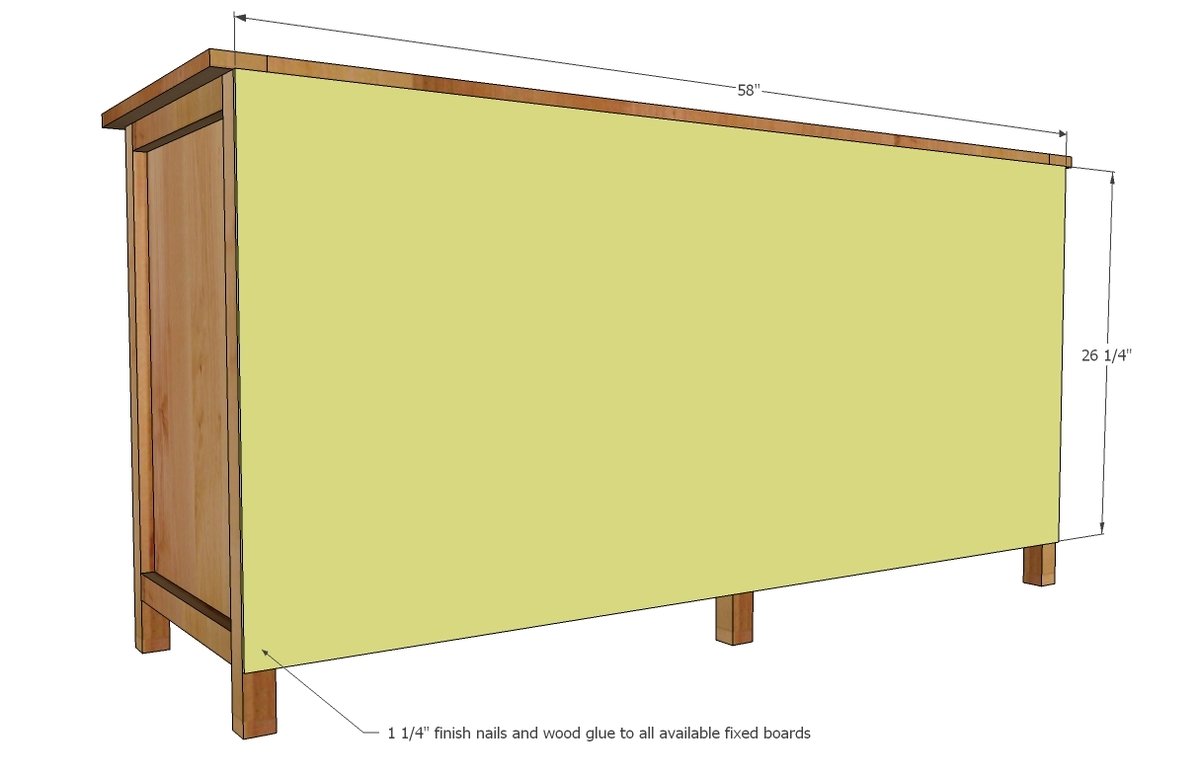
- 1 - 1/4" plywood 58" x 26 1/2" (Back)
DOOR/DRAWER FACES
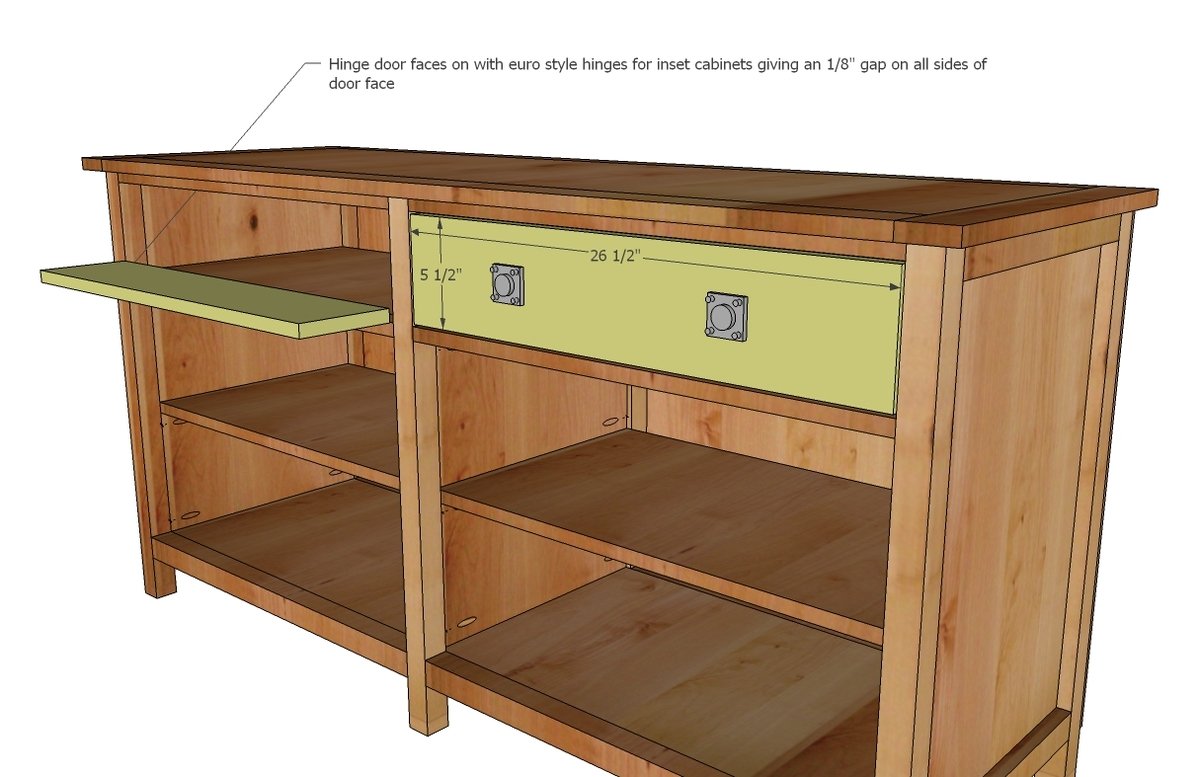
- 2 - 1x6 @ 26 1/2" (Doors - CUT TO FIT)
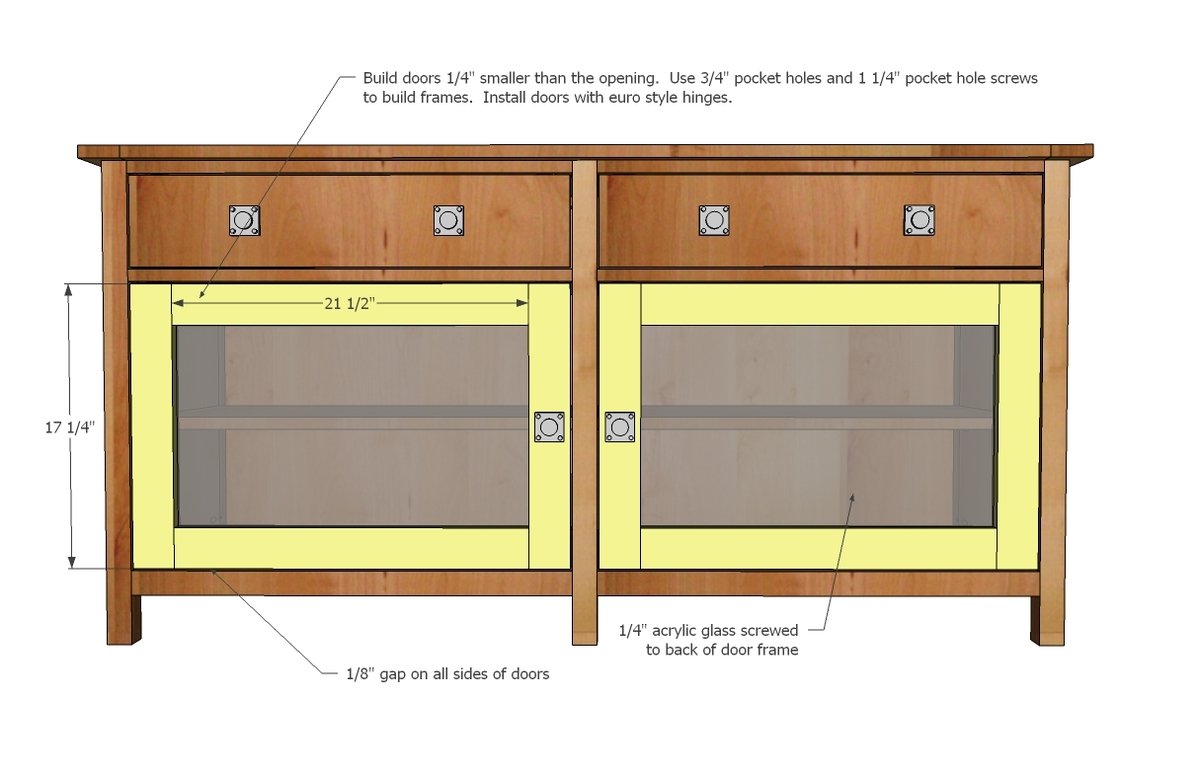
- 4 - 1x3 @ 17 1/4" (Door Frames - CUT TO FIT)
- 4 - 1x3 @ 21 1/2" (Door Frames - CUT TO FIT)
Tools
- measuring tape
- square
- pencil
- safety glasses
- hearing protection
- kreg-jig
- drill
- circular saw
- nailer
- sander
- level
Step-by-step Instructions
Go through the plan and mark and predrill all Kreg Jig pocket holes prior to assembly.
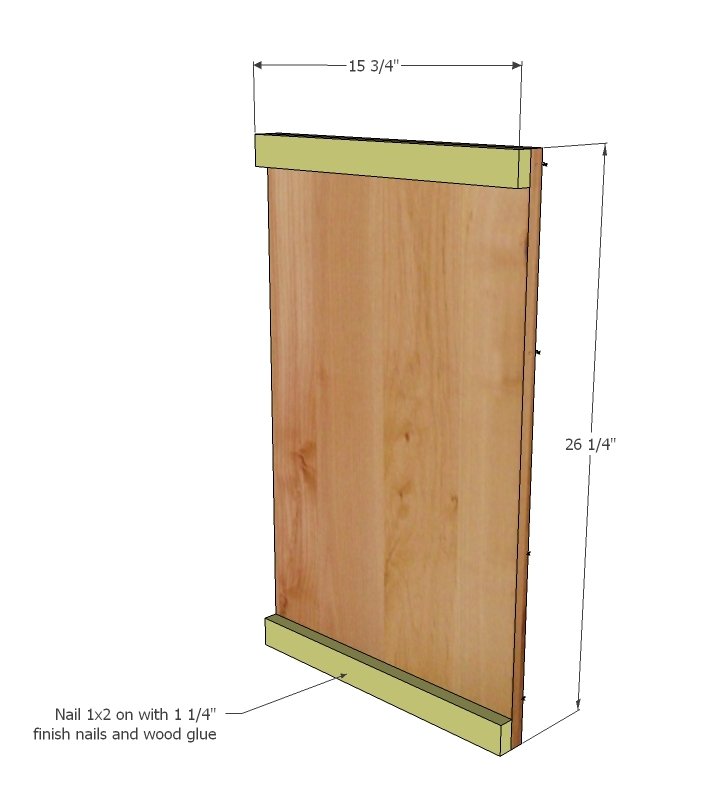
Glue and nail side trim to outsides of the sides, flush with top and bottom edges as shown in diagram.
Step 2
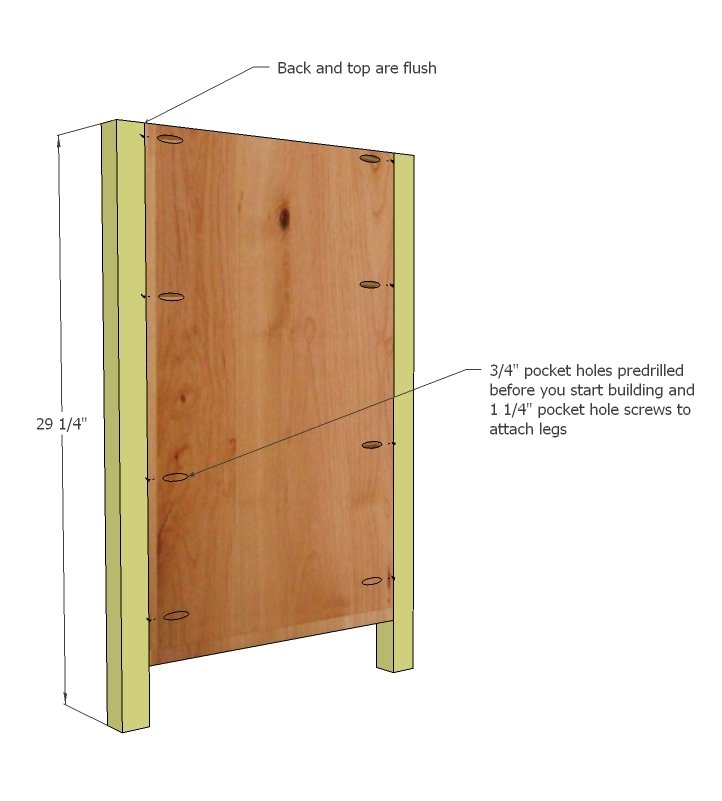
Through predrilled pocket holes, attach legs to sides with 1 1/4" pocket hole screws. Do this on both sides.
Step 3
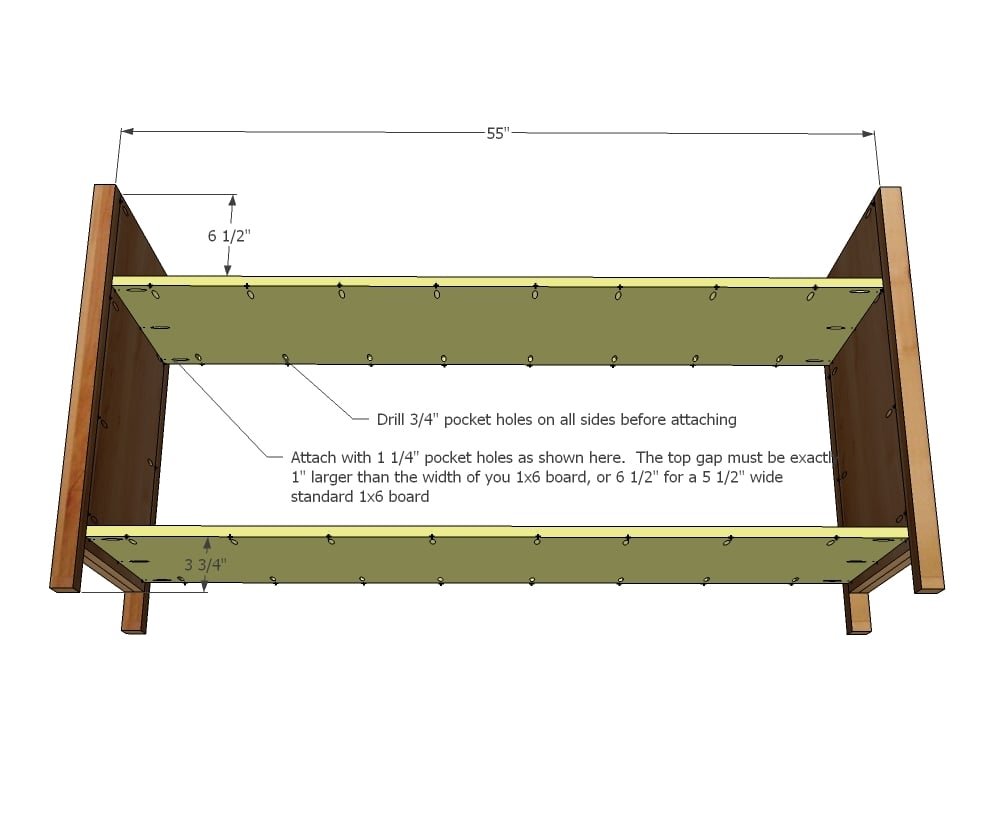
Mark the sides as shown in diagram and attach two main shelves with pocket holes.
Step 4
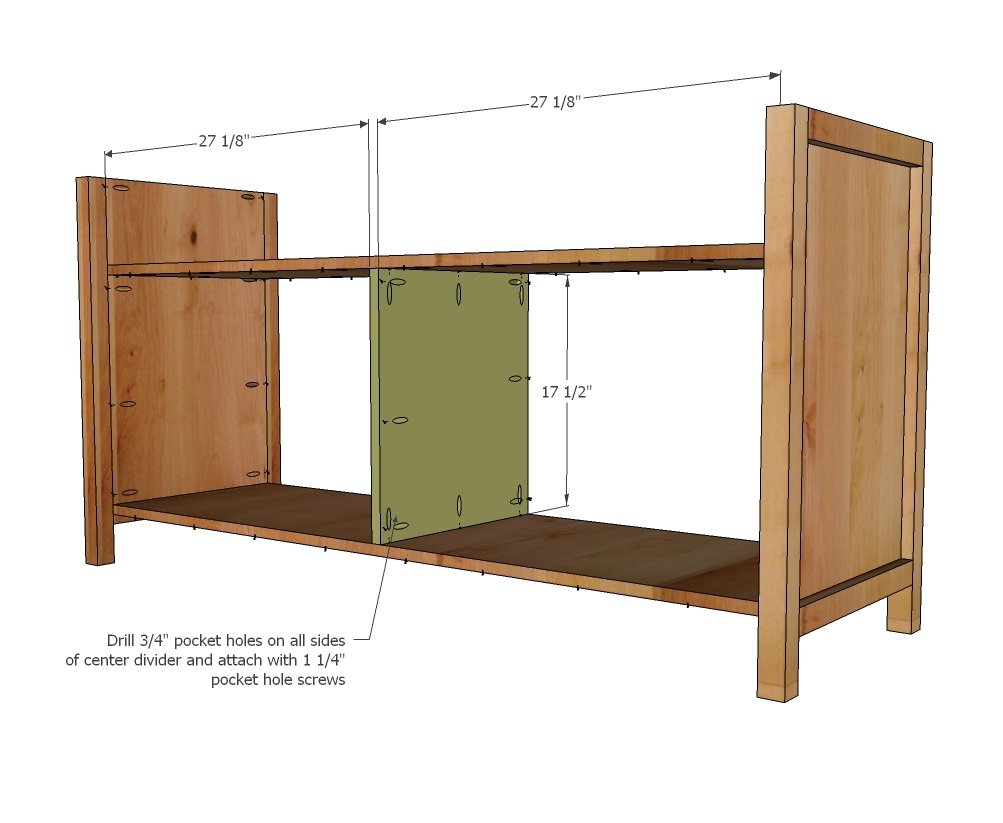
Carefully mark location of center divider and attach with 1 1/4" pocket hole screws.
Step 5
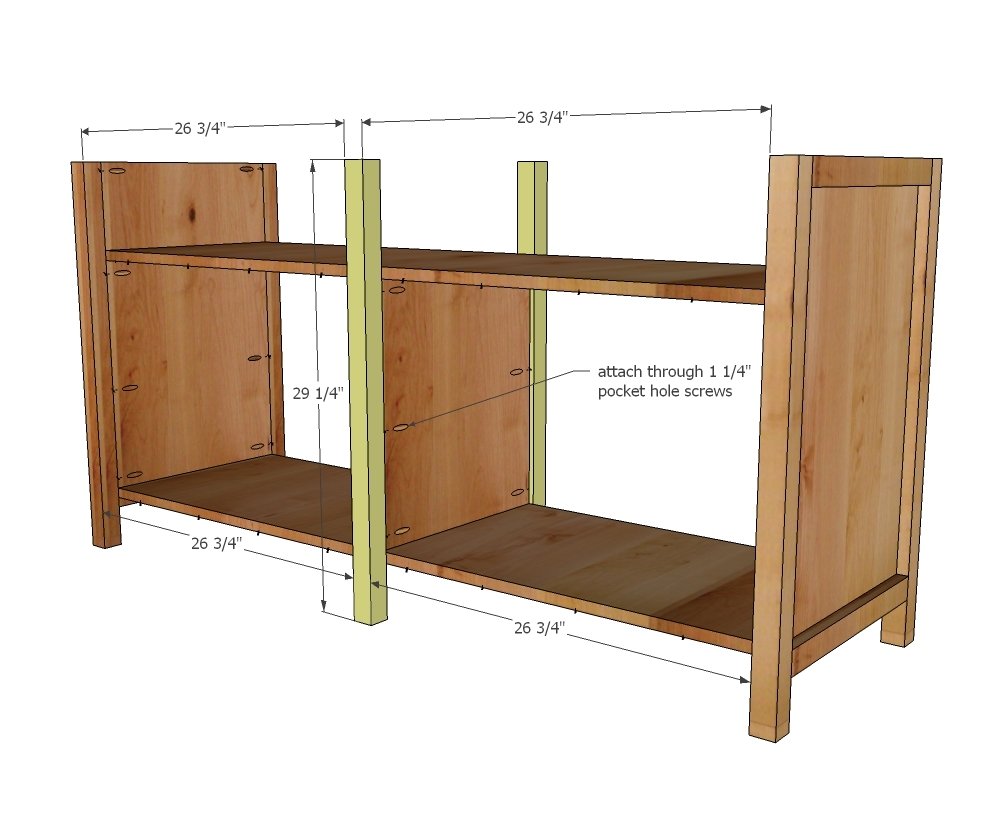
Step 6
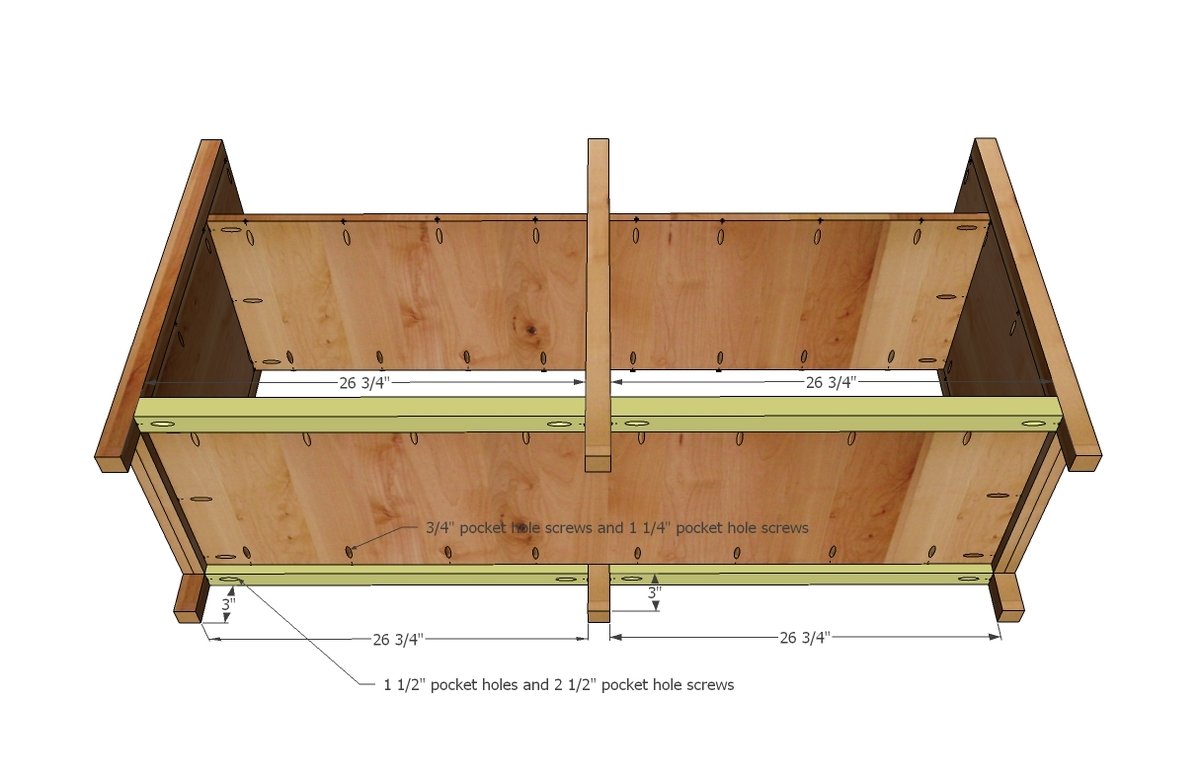
Attach bottom trim, flush on top.
Step 7
Top trim needs to be added on front and back.
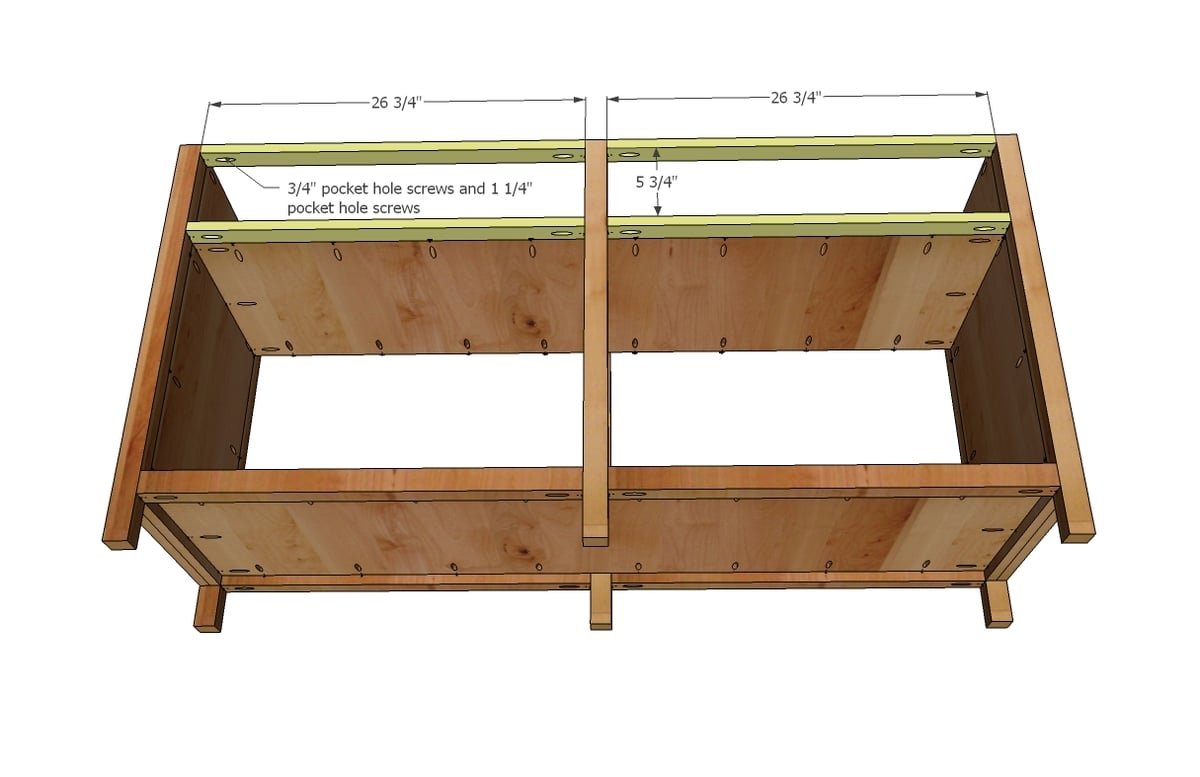
Step 8
Build your top on a flat level surface, using clamps to ensure a smooth, even joint.
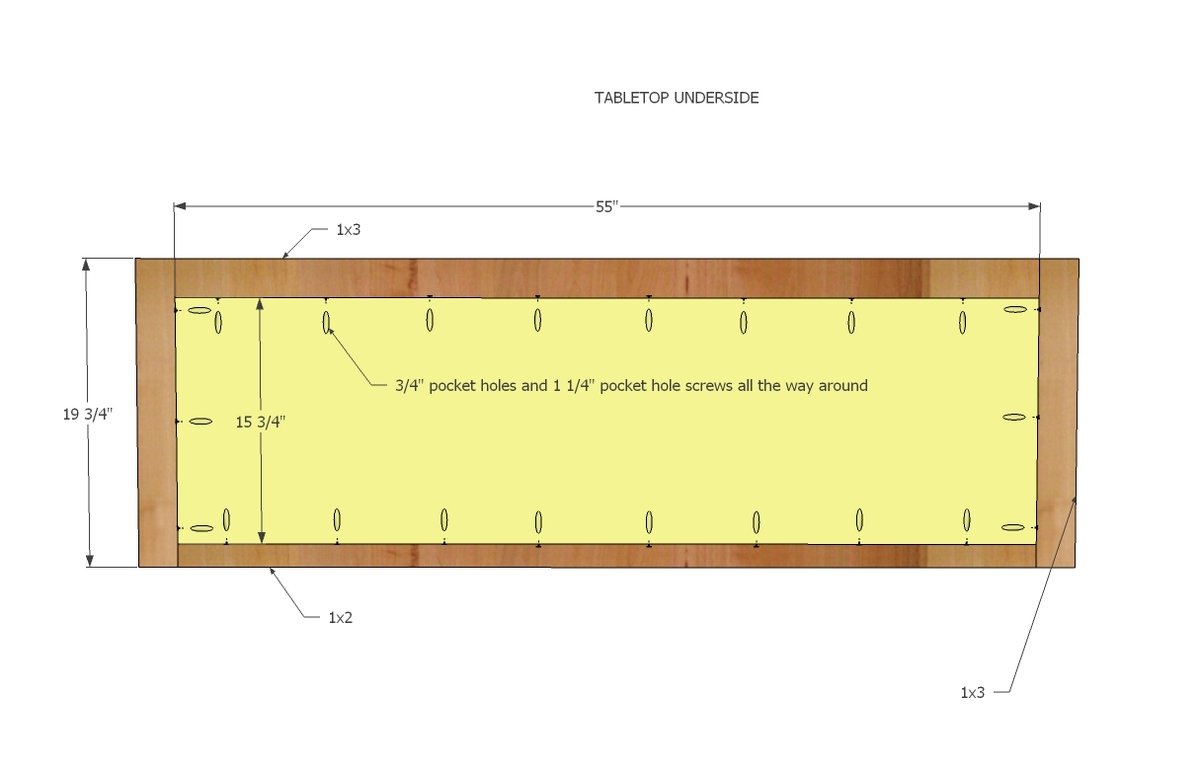
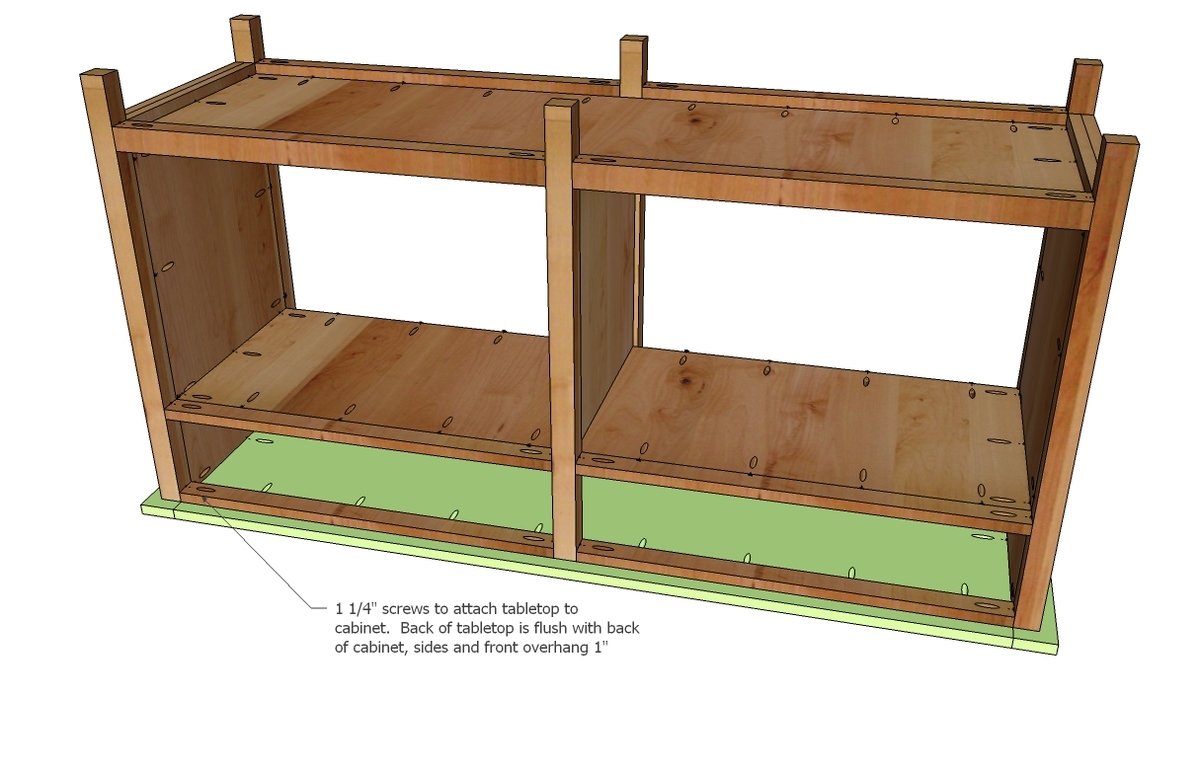
Mark the top 1" in on front and sides. Attach as shown in diagram.
NOTE: You may wish to install the 1x6 doors BEFORE adding the top if you do not have a right angle drill - or at least the hinges. See step #12.
Step 10
Shelves can be installed with either 3/4" pocket holes and 1 1/4" pocket hole screws for fixed shelves, or you can predrill holes for use with shelf pins for adjustable shelves.
Step 11
Cut the back from your 1/4" sheet of plywood. Tack on with 1 1/4" finish nails and wood glue.
Step 12
Cut your 1x6 boards to fit the door openings. Install with the Euro hinges, shown below:
Step 13
Measure the openings of your cabinet and build doors 1/4" smaller overall. Attach acrylic glass to backs and install in cabinet with Euro hinges.
Finishing
Sand all surfaces, starting with a medium grit and finishing with fine. Wipe off the dust, fill any holes or gaps with wood filler, and sand smooth once dry. Apply primer if you're painting, then finish with your choice of paint or stain and seal with a durable clear topcoat. For outdoor projects, use exterior-rated primer, paint or stain, and sealer so the piece stands up to the weather.
Source (temporary): https://www.ana-white.com/woodworking-projects/benchmark-media-console