Braden Shoe Shelf Entryway Bench
This popular plan features two shelves perfect for shoes. Works with the rest of the Braden Entryway Collection to tidy up your mudroom. Hutch plans available. Special thanks to our readers for sharing their photos.
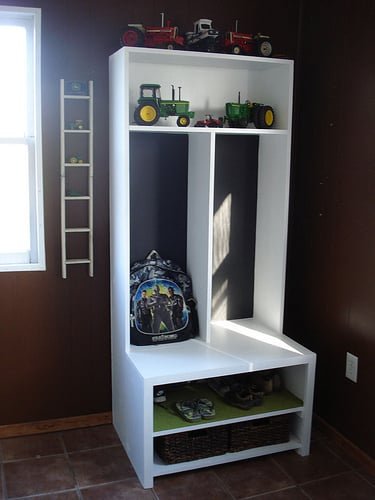
Specifications
| Project type | Other Projects |
|---|---|
| Room | Storage Solutions |
| Style | Farmhouse Furniture |
| Difficulty | Intermediate |
| Estimated cost | $20 - $50 |
Dimensions
Use the size-specific shopping and cut lists below.
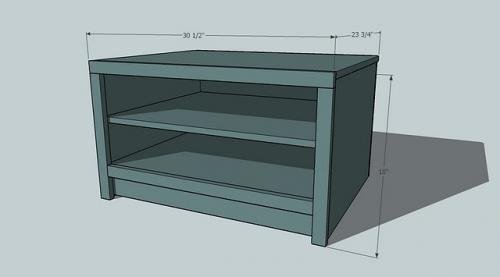
Shopping List
1 - sheet 3/4" Plywood or MDF Scrap 1/4" Plywood 1 - 1x2 @ 8 feet long 1 - 1x4 @ 30" long
Cut List
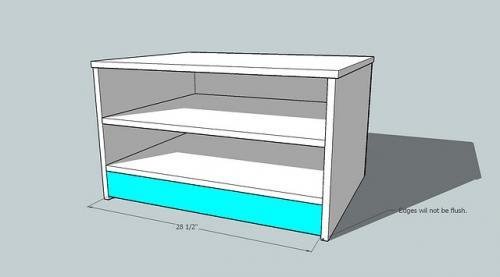
A) 2 - 3/4″ Plywood @ 28 1/2″ x 23″ (Shelves) B) 2 - 3/4″ Plywood @ 17 1/4″ x 23″ (Sides) C) 1 – 3/4″ Plywood @ 30 1/2″ x 23″ (Top) D) 1 – 1/4 to 1/2″ Plywood @ 30″ x 18″ Back) E) 1 – 1×4 @ 28 1/2″ (Toekick) F) 1 – 1×2 @ 30 1/2″ (Top Trim) G) 2 – 1×2 @ 16 1/2″ (Side Trim) H) 1 – 1×2 @ 27 1/2″ (Toekick Trim)
Tools
- measuring tape
- square
- safety glasses
- hearing protection
- drill
- circular saw
- nailer
- sander
Step-by-step Instructions
Step 1
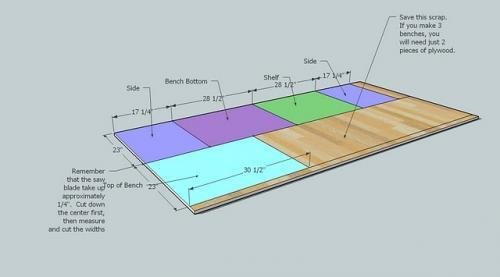
Cut you plywood pieces, as shown below. Remember that the saw blade takes up about 1/4″, so don’t just mark your plywood and cut both pieces. Mark the first 23″, cut out the sides and shelves, then from the remaining piece, measure and mark out the top of the bench. You can use a round saw, but I recommend for the straightest cuts, using a table saw. I recommend that you cut the remaining pieces as you go. Measure the distance and cut to get a perfect fit. Remember to use 2″ nails unless otherwise directed. For added strength, you can use screws. Just remember to predrill your screw holes with a countersink bit. Always use glue and make sure the bench is square during each step.
Step 2
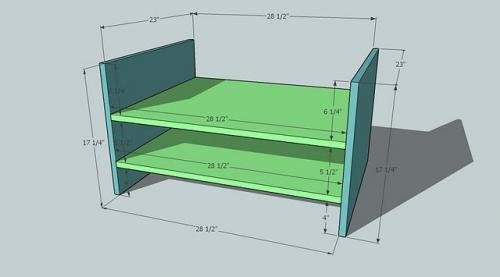
Start by marking the sides, boards B, shown above in blue, where the shelves will be fastened. This is shown above. Remember that your plywood is 3/4″ thick. Then fasten the plywood to the sides using the 2″ nails and glue.
Step 3
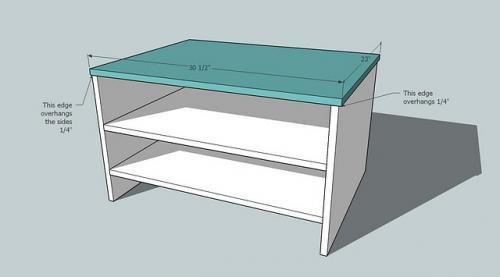
Mark the top, board C, 1/4″ in on the sides, on both the front and back. Then position the top on the bench and fasten in place. Make sure the sides overhang 1/4″ on each side, but the front and back is flush.
Step 4
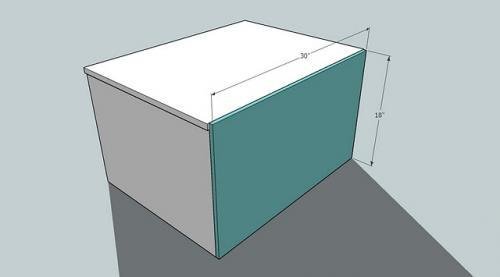
Use 1 1/4″ nails and glue to fasten the back, D, to the bench, as shown above. Make sure you check for square first, and that the plywood is square.
Step 5
Step 6
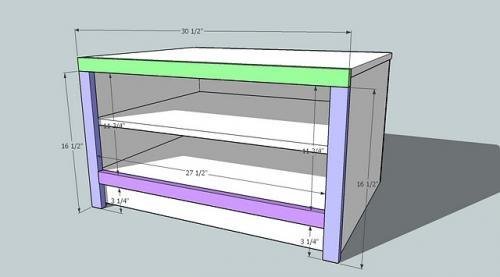
Start with the top trim, shown in green above. Measure and cut to fit the top of the bench. Nail in place keeping the top edge flush with the top of the bench. E will also be flush with the sides of the top of the bench, but overextend the sides of the bench by 1/4″. Next, measure and cut the side trim pieces, G, shown in blue above. Mark G 1/4″ in and fasten in palce as shown above. G, the blue pieces, will overextend the sides of the bench by 1/4″, as with the top of the bench and the top trim, shown above in green. Make sure you nail through the top of F (green) into the top edge of G (blue). Finally, measure for board H, shown in purple. Cut and fasten in place, keeping the top edge flush. Make sure you nail through the side edge of G (blue) into the end edge of H (purple). With the 1 1/4″ nails, nail through the face of G (blue) and H (purple) into the toekick.
Finishing
Sand all surfaces, starting with a medium grit and finishing with fine. Wipe off the dust, fill any holes or gaps with wood filler, and sand smooth once dry. Apply primer if you're painting, then finish with your choice of paint or stain and seal with a durable clear topcoat. For outdoor projects, use exterior-rated primer, paint or stain, and sealer so the piece stands up to the weather.
Source (temporary): https://www.ana-white.com/woodworking-projects/braden-shoe-shelf-entryway-bench