Build the Simple Playhouse
The goal: Make building a playhouse easy! We simplify the process by in this easy to build playhouse plans. You'll love the step by step diagrams and shopping list. This playhouse has been built thousands of times and is beloved by families all over the world! from
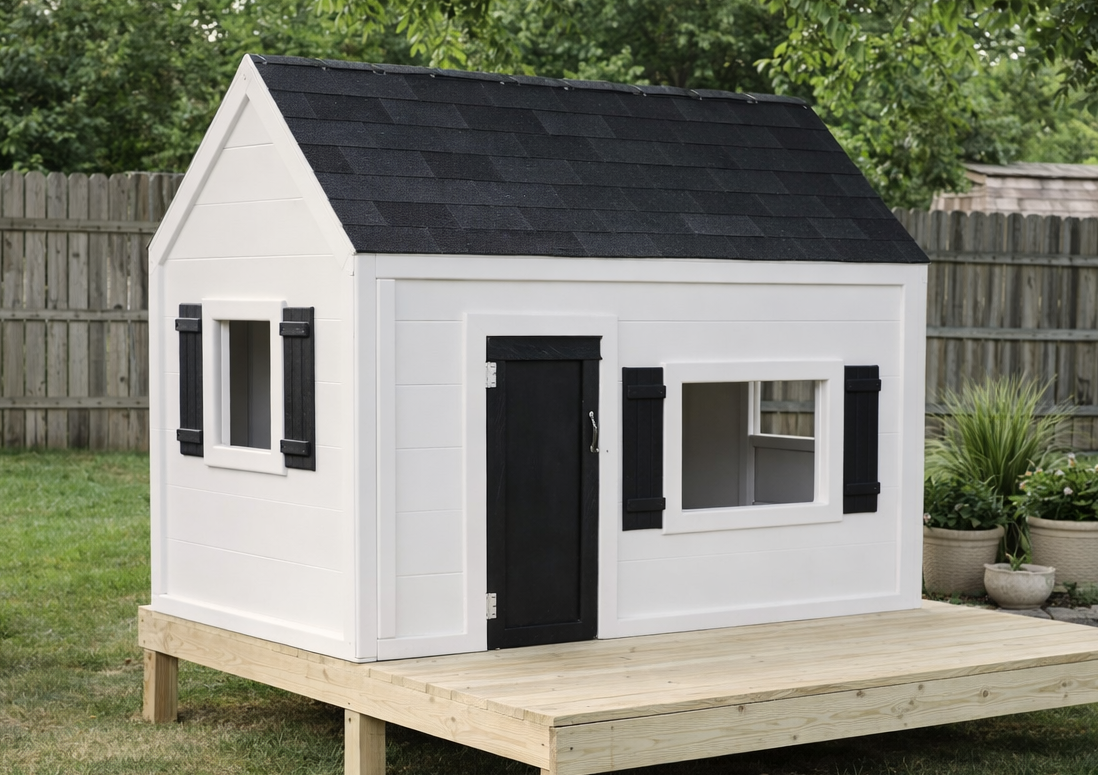
Specifications
| Project type | Playhouse |
|---|---|
| Room | Outdoor |
| Style | Children's and Kid's Room Furniture and Toy Plans |
| Difficulty | Intermediate |
| Estimated cost | $20 - $50 |
Dimensions
Use the size-specific shopping and cut lists below.
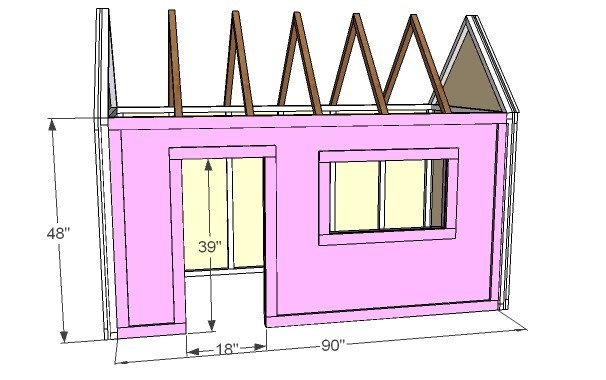
Shopping List
Shopping List for Front Wall Only
- 1 – Sheet of 1/4″ Exterior Plywood
- 6 – 2×2 Furring Strips, 8′ Long
- 3 – 1×2 Furring Strips, 8′ Long
- 3 – 1×3 Furring Strips, 8′ Long
- Hinges for the Doors
Cut List
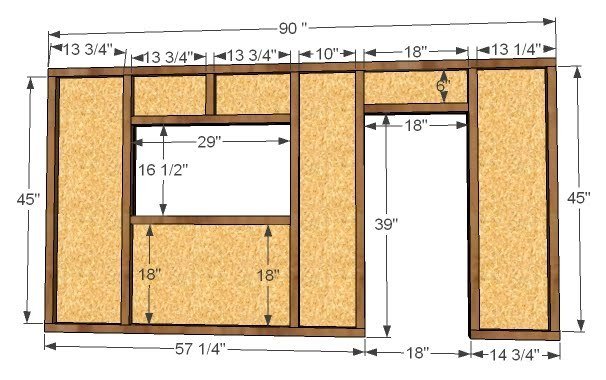
CUT LIST FOR THE WALL FRAMING
- 1 – 2×2 @ 90″ (Top Plate)
- 6 – 2×2 @ 45″ (Studs)
- 2 – 2×2 @ 29″ (Window Top and Bottom)
- 1 – 2×2 @ 57 1/4″ (Bottom Plate)
- 1 – 2×2 @ 14 3/4″ (Bottom Plate)
- 1 – 2×2 @ 18″ (Door Header)
- 1 – 2×2 @ 7 1/2″ (Window Header Stud)
- 90″ x 48″ 1/4″ Plywood with Windows and Doors cut out to fit the stud wall.
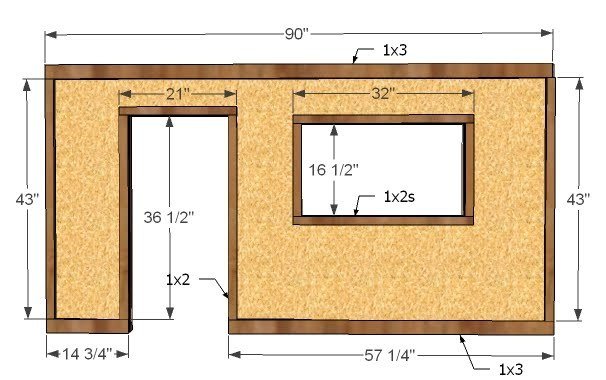
CUT LIST FOR THE TRIM
- 1 – 1×3 @ 90″ (Top Trim)
- 1 – 1×3 @ 14 3/4″ (Bottom Trim)
- 1- 1×3 @ 57 1/4″ (Bottom Trim)
- 2 – 1×2 @ 43″ (Side Trim)
- 2 – 1×2 @ 36 1/2″ (Door Trim)
- 1 – 1×2 @ 21″ (Top of Door Trim)
- 2 – 1×2 @ 16 1/2″ (Window Side Trim)
- 2 – 1×2 @ 32″ (Window Top and Bottom Trim)
CUT LIST FOR DOOR
- Scrap Door Piece of plywood
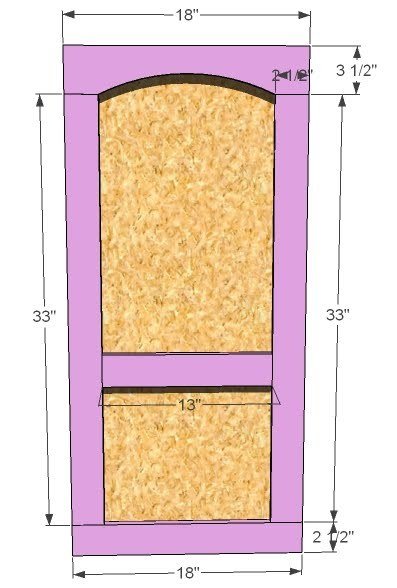
- 2 – 1×3 @ 33″ (Door Sides)
- 1 – 1×3 @ 13″ (Middle Trim)
- 1 – 1×3 @ 18″ (Door Bottom)
- 1 – 1×4 @ 18″ (If you don’t have a 1×4 scrap, you can use a 1×3 but the length of the door sides will need to be increased to 34″)
Tools
- measuring tape
- square
- pencil
- hammer
- safety glasses
- hearing protection
- kreg-jig
- drill
- circular saw
- nailer
- sander
Step-by-step Instructions
STUD FRAMING
Frame your wall as shown above using 2″ screws and glue. Check for square. Trace out your windows and doors onto the plywood and cut out the openings. If you are careful about cutting out your door, you can use the door scrap to build your door with. Attach the plywood to the stud wall using 1 1/4″ nails and glue.
TRIM
It is always a good idea to measure and cut your trim as you go to get the best fit. Use 1 1/4″ nails and glue to attach the trim to the face of the wall, keeping outside edges flush.
Step 3
Cut your top door header piece in an arch as shown above. Then use a Kreg Jig™ to join the door pieces to create a door frame. I used 1x2s and a 1×3 header because that is what I had for scraps. You can see the pocket holes in the above photo of the door. Then use 1″ nails and glue to attach the back plywood to the door frame. If your nailer doesn’t shoot 1″ nails, you can by brad nails and use a hammer to add the nails. Do not forget the glue.
Step 4
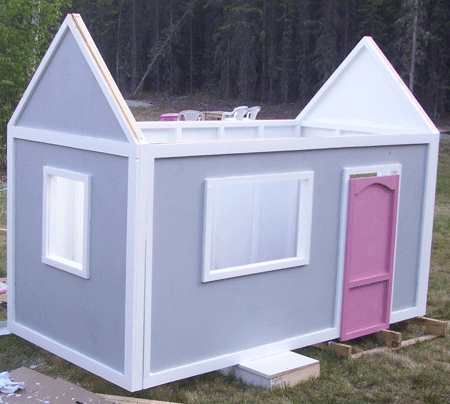
Here is the door completed, but not yet on it’s hinges.
Finishing
Sand all surfaces, starting with a medium grit and finishing with fine. Wipe off the dust, fill any holes or gaps with wood filler, and sand smooth once dry. Apply primer if you're painting, then finish with your choice of paint or stain and seal with a durable clear topcoat. For outdoor projects, use exterior-rated primer, paint or stain, and sealer so the piece stands up to the weather.
Source (temporary): https://www.ana-white.com/woodworking-projects/build-simple-playhouse-front-wall-door