Captains Bed with Trundle Bed
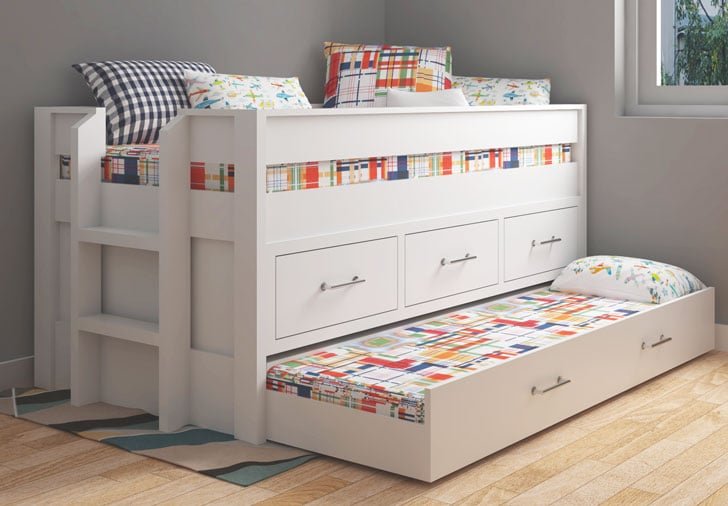
Build your own captains bed with trundle and storage drawers! Spend a couple hundred instead of a couple thousands! Choose your own finish and hardware. Step by step plans include over 15 diagrams, detailed shopping list and cut list. Free
Specifications
| Project type | Bunk Bed |
|---|---|
| Room | Bedroom |
| Style | Children's and Kid's Room Furniture and Toy Plans |
| Difficulty | Advanced |
| Estimated cost | $150 - $200 |
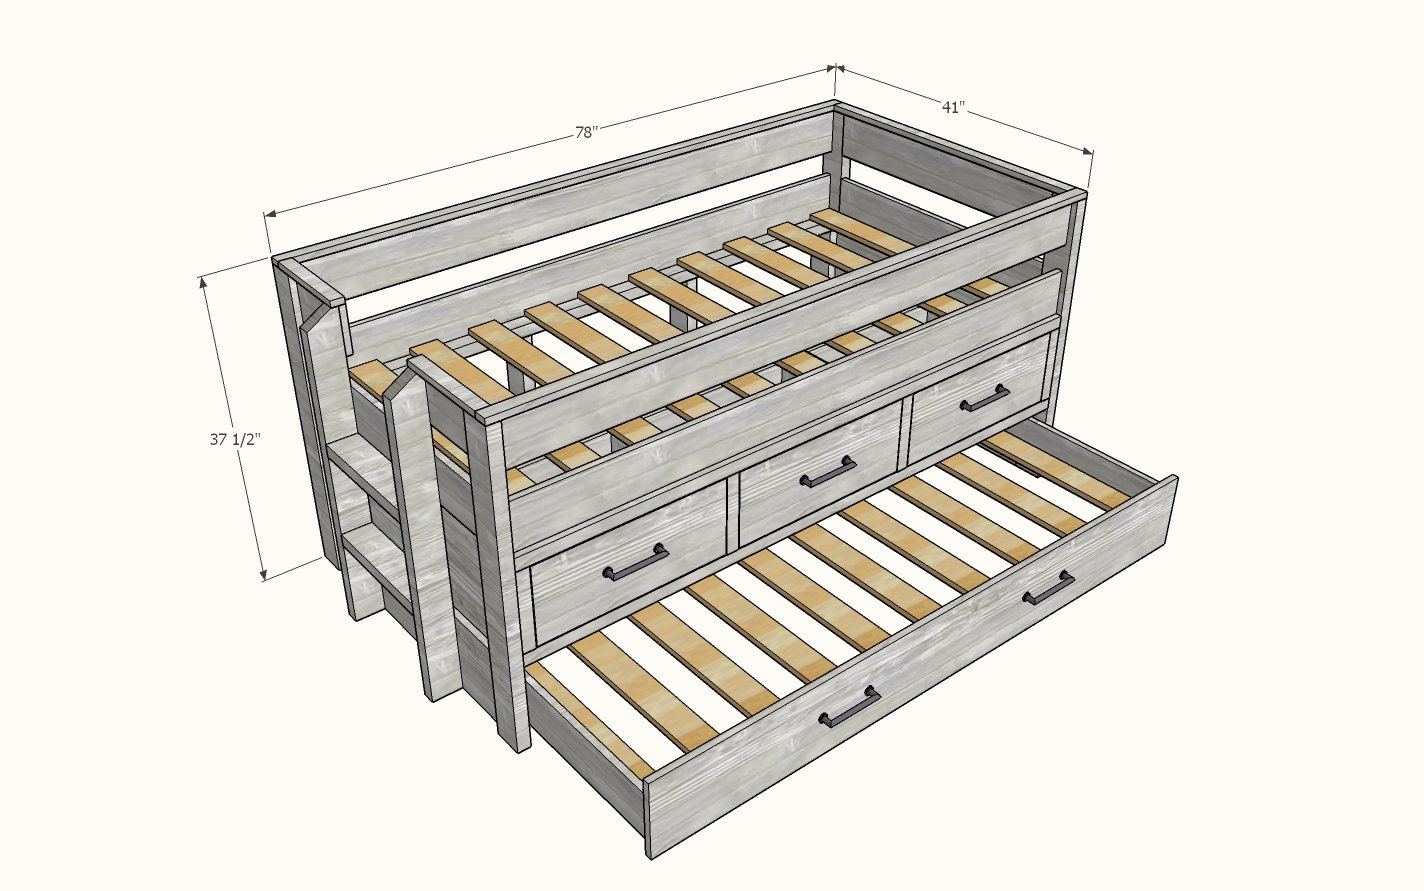
Dimensions
Use the size-specific shopping and cut lists below.
Shopping List
6 - 2" caster wheels (50 pound load rating minimum)
3 - 18" drawer slides
9 - 2x4 @ 8 feet long
1- 2x2 @ 8 feet long
5 - 1x6 @ 10 feet long
4 - 1x2 @ 8 feet long
2 - 1x10 @ 10 feet long
10 - 1x4 or 1x3 @ 8 feet long (used for slats)
1 - 1/4" plywood sheet used for end panels and drawer bottoms
100 - 1-1/4" pocket hole screws
70 - 2-1/2" self tapping wood screws like these
8 - 2-1/2" pocket hole screws
200 - 1-1/4" brad nails
50 - 3/4" brad nails
wood glue
5 - handles or pulls
33" x 72" trundle mattress (sometimes called a "sleeper sofa bed mattress)
38" x 75" standard twin mattress
Cut List
ENDS
- 6 - 2x4 @ 36-3/4" - legs and ladder legs
- 2 - 1x10 @ 34" - bottom
- 3 - 1x6 @ 34" - top rails
- 2 - 1/4" plywood @ 34" x 15" - end panels
- 2 - 2x4 @ 15" - ladder rungs
- 2 - 1x6 @ 9-1/2" - top rails on ladder side
- 2 - 1x2 @ 13" - top trim ladder side
- 1 - 1x2 @ 41" - top trim end without ladder
SIDES/CENTER
- 4 - 2x4 @ 75" - drawer support framing
- 8 - 2x4 @ 9-1/2" - drawer support framing
- 4 - 1x6 @ 75" - siderails
- 2 - 1x2 @ 75" - top trim, siderails
- 2 - 2x2 @ 34" - drawer support rails
- 2 - 1x2 @ 34" - drawer support rails, ends
- 10 - 1x4 @ 38" - bed slats
TRUNDLE
- 2 - 2x4 @ 73" - trundle supports
- 10 1x4 @ 33" - slats
- 2 - 1x6 @ 33" - ends
- 1 - 1x6 @ 74-1/2" - back
- 1 - 1x10 @ 74-1/2" - front
DRAWERS - ASSUMES OPENING OF 23" and 1/2" clearance drawer slides
- 6 - 1x6 @ 18" - drawer sides
- 6 - 1x6 @ 22" - drawer front/back
- 3 - 1/4" plywood @ 18" x 22" - drawer bottom
- 3 - 1x10 @ 22-3/4" - drawer face
Tools
- measuring tape
- square
- pencil
- safety glasses
- hearing protection
- kreg-jig
- drill
- circular saw
- compound miter saw
- nailer
- sander
Step-by-step Instructions
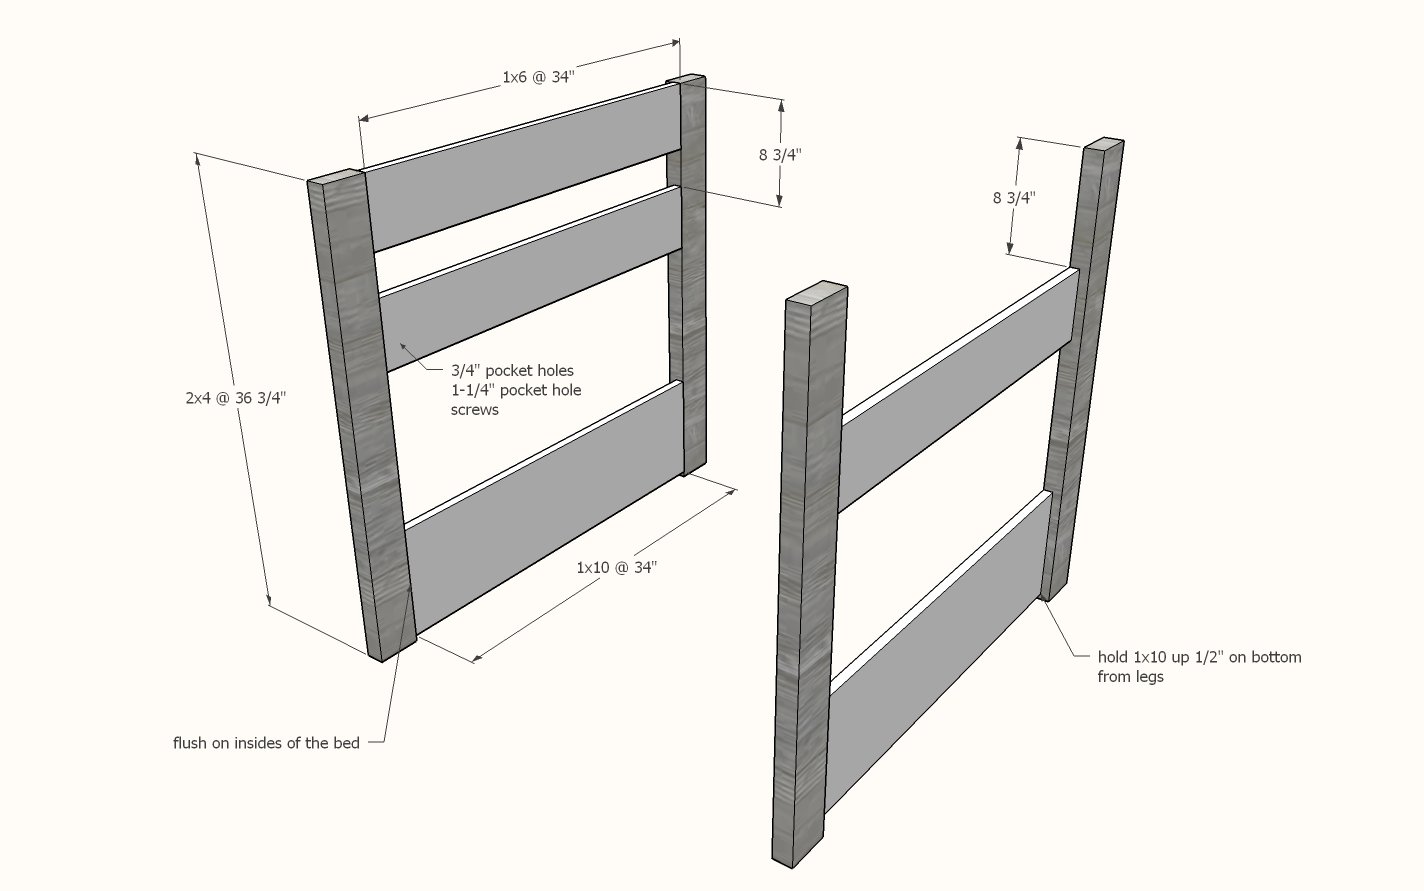
Drill two 3/4" pocket hole son each end of the 1x6 boards. Drill three on ends of 1x10.
Attach with 1-1/4" pocket hole screws to the 2x4 legs, flush on inside, pocket holes on inside.
Step 2
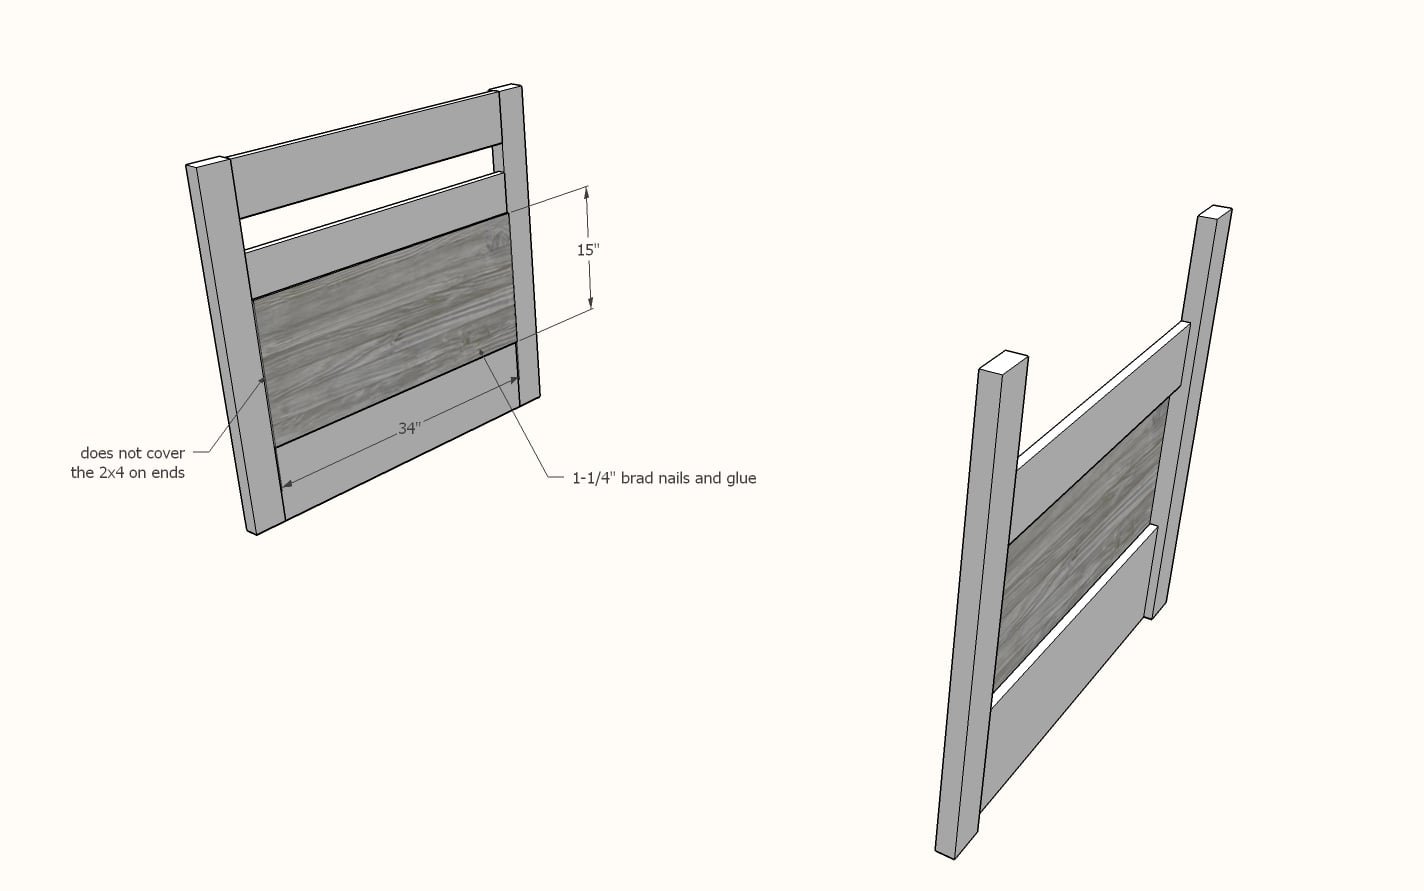
Glue and nail 1/4" plywood to end panels.
Step 3
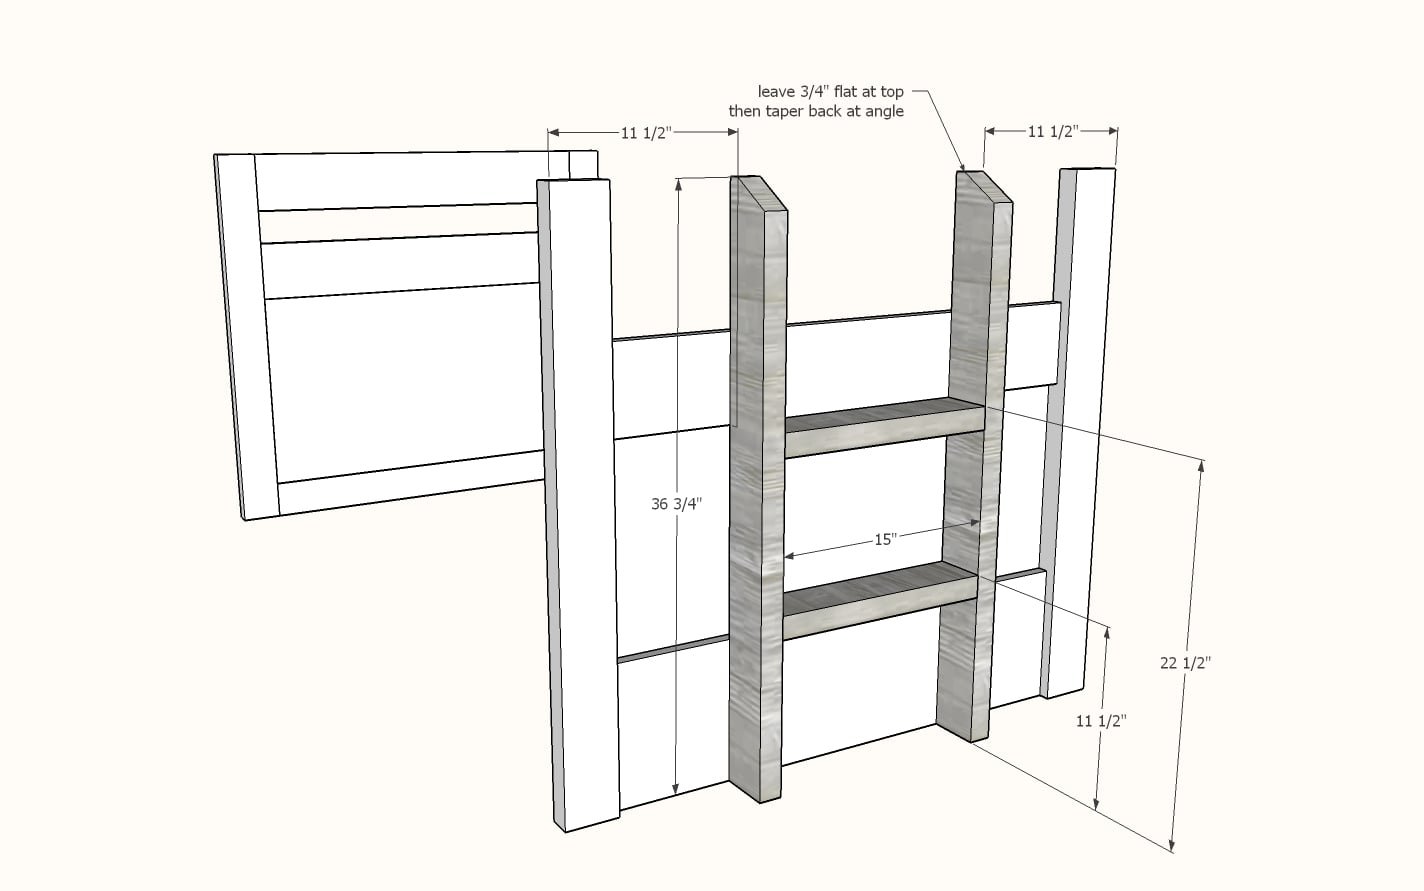
Cut ladder top legs at angle with circular saw or miter saw - shown with 30 degree angle. Leave 3/4" at top flat. Build ladder with 2-1/2" self tapping wood screws. Attach from back with 2-1/2" self tapping wood screws.
Step 4
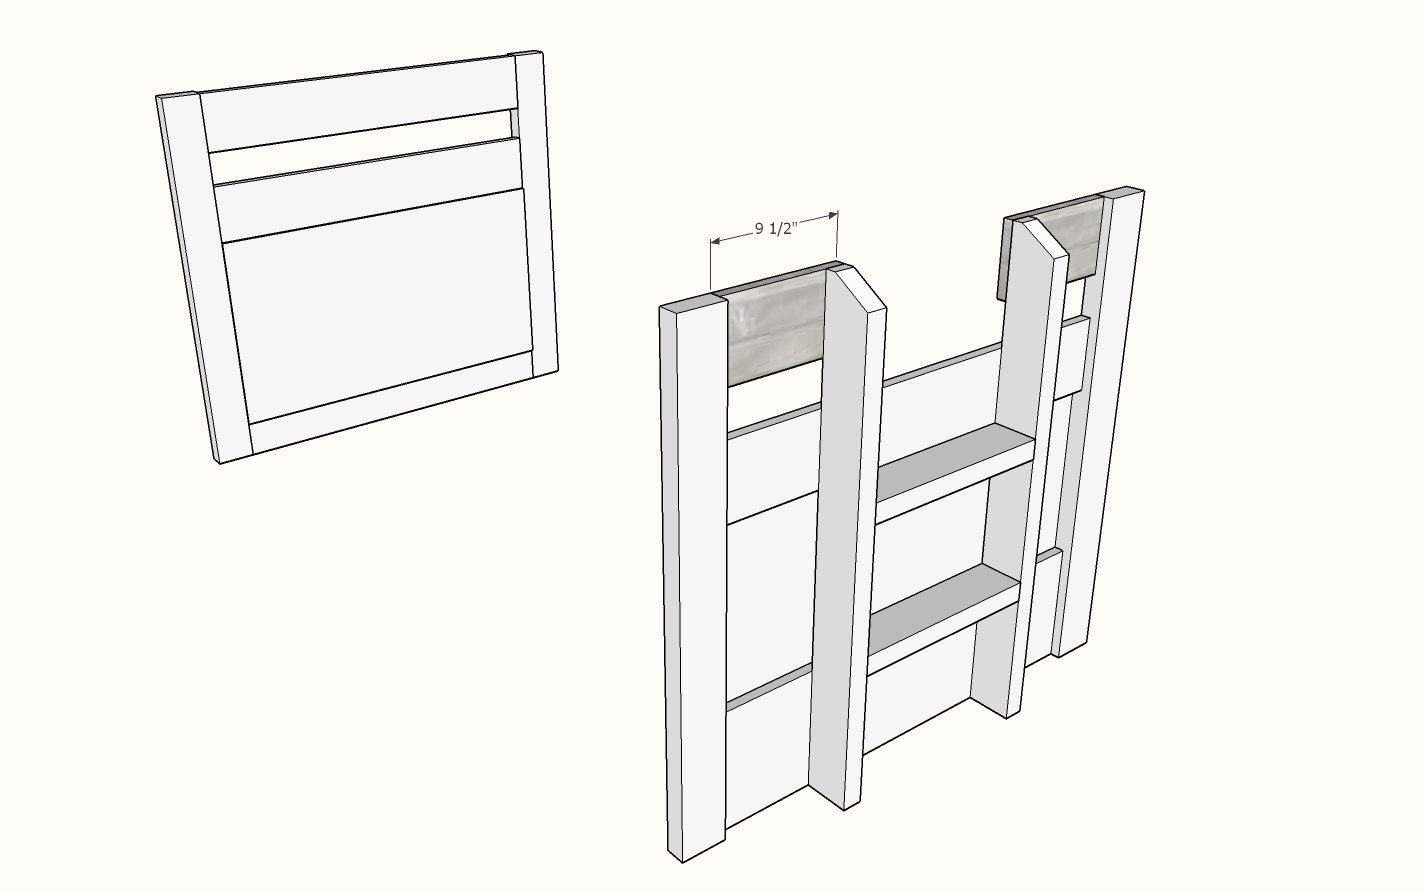
Drill 3/4" pocket holes on ONE end of the small 1x6 pieces. Attach to 2x4 legs with 1-1/4" pocket hole screws. Attach to top of ladder with 2-1/2" self tapping wood screws. This completes the two end panels. Finish the entire end panels as desired.
Step 5
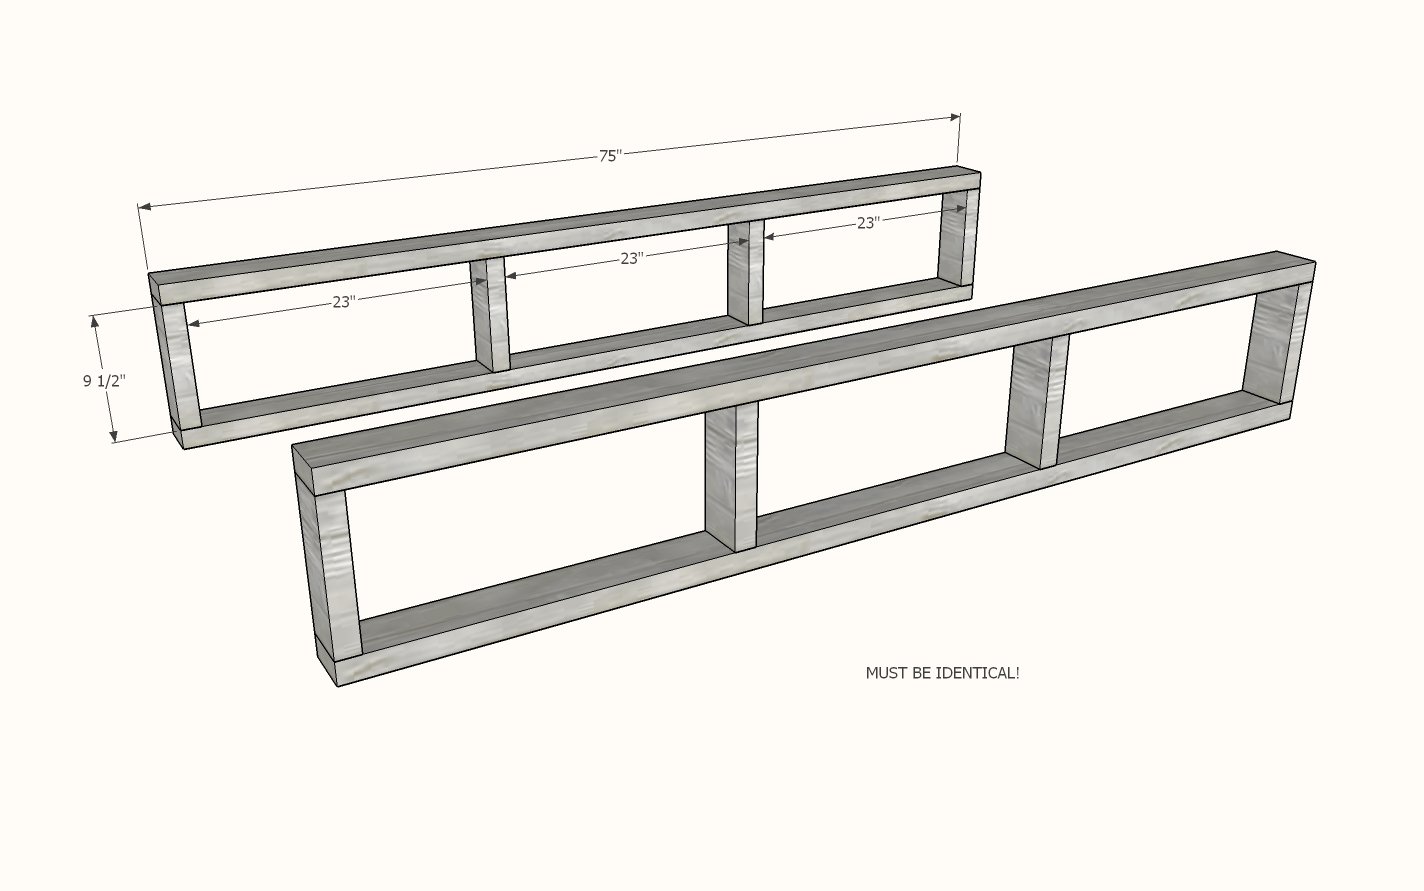
Build two identical drawer support frames as shown - the must match exactly for the drawer slides to slide correctly. Use 2-1/2" self tapping screws or 2-1/2" pocket hole screws to build.
Paint or stain the 2x4 drawer frames and the 1x6 side rails.
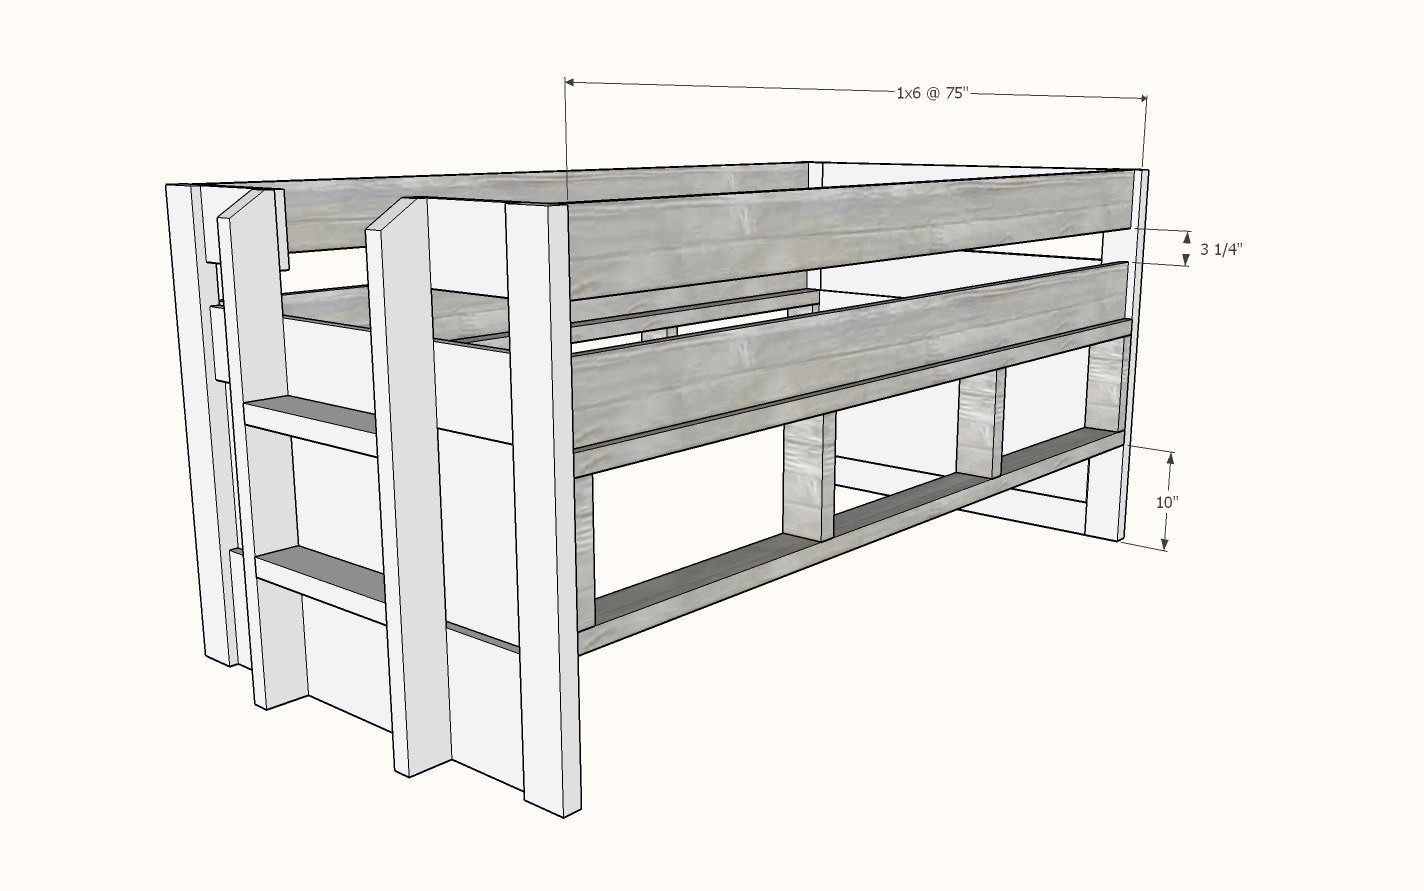
Drill two 3/4" pocket holes into each end of the 1x6s. For the bottom siderails, also drill a few 3/4" pocket holes facing downward to attach to the 2x4s on install. Attach 1x6 to the ends with 1-1/4" pocket hole screws and glue. Attach 2x4 drawer framing to end panels with 2-1/2" wood screws. Attach bottom 1x6 siderail to the 2x4s with 1-1/4" pocket hole screws.
Step 7
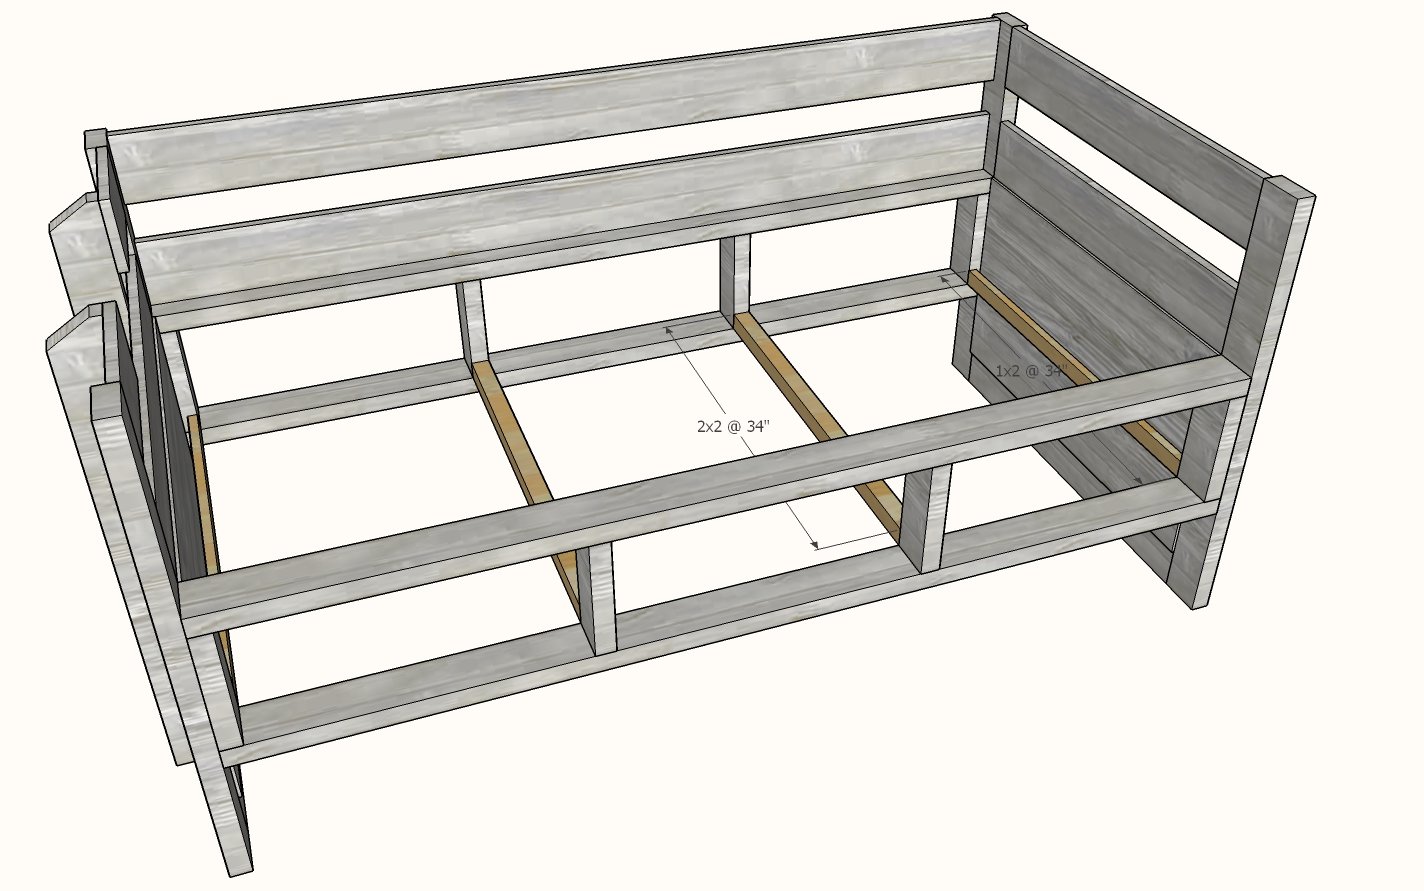
Attach drawer rails to insides of 2x4s with pocket hole screws - use 3/4" setting and 1-1/4" pocket hole screws for 1x material, use 1-1/2" setting and 2-1/2" pocket hole screws for 2x materials. *Some parts missing to enable a better view of interior of bed
Step 8
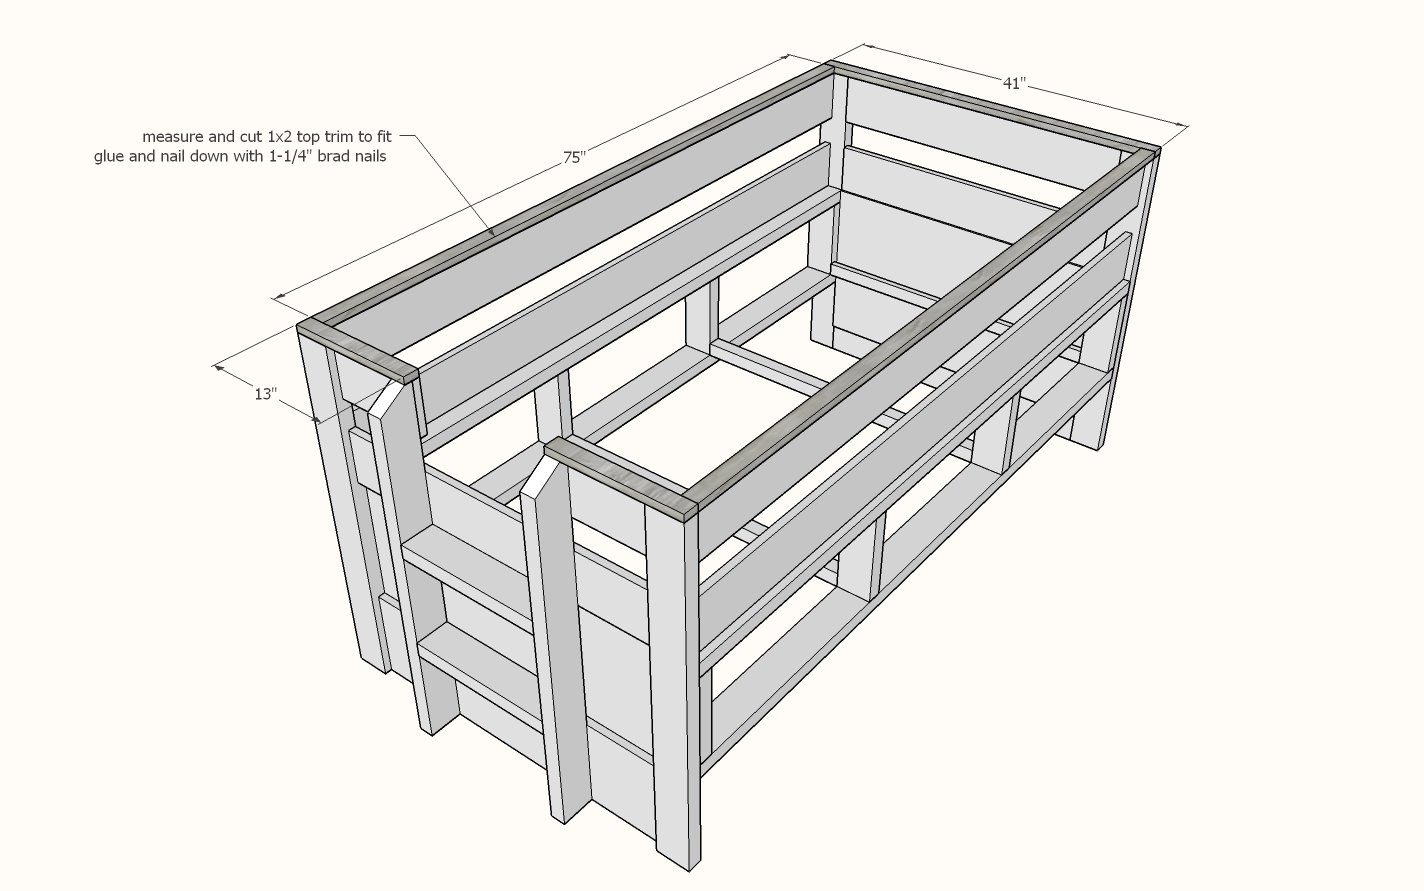
IMPORTANT: Check bed for square. Take diagonal measurements from opposite outside corners and adjust until both diagonals match. Cut 1x2 trim boards to fit and nail and glue to top of bed.
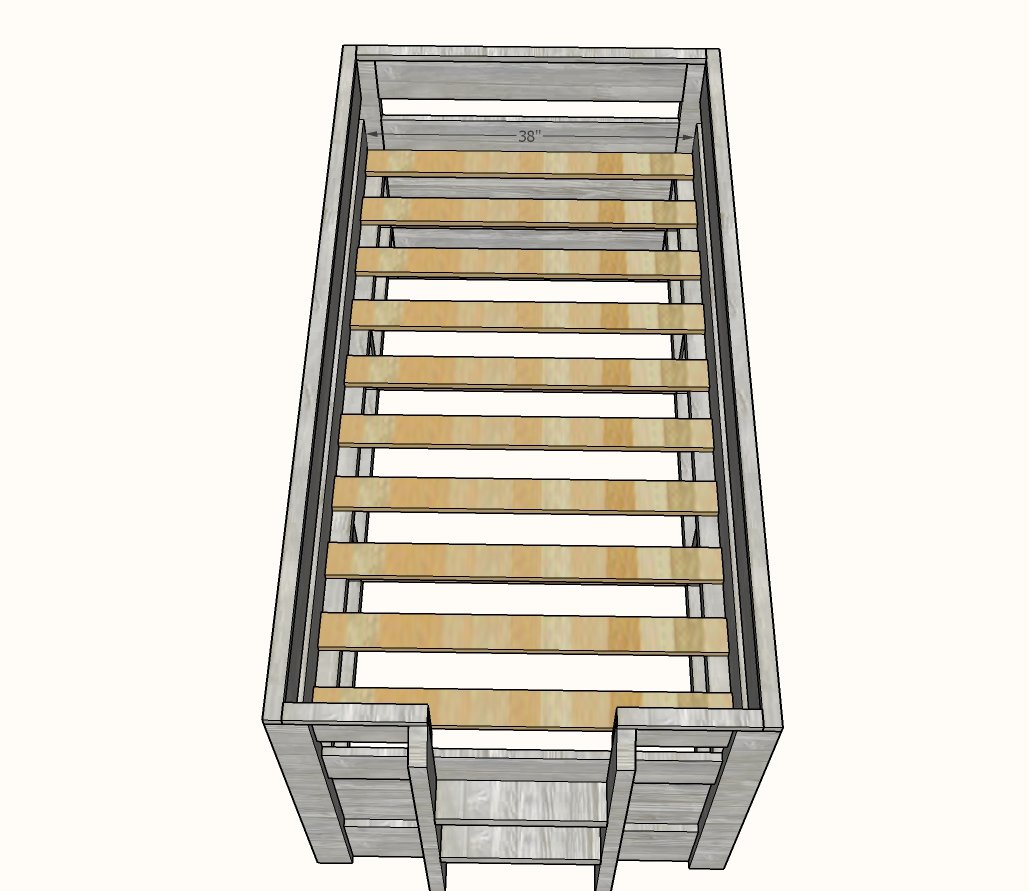
Check for square. Add bed slats and nail or screw down.
Nails are less expensive and easier, but harder to remove. If using screws, use 1-1/2" screws (or close in length)
Trundle
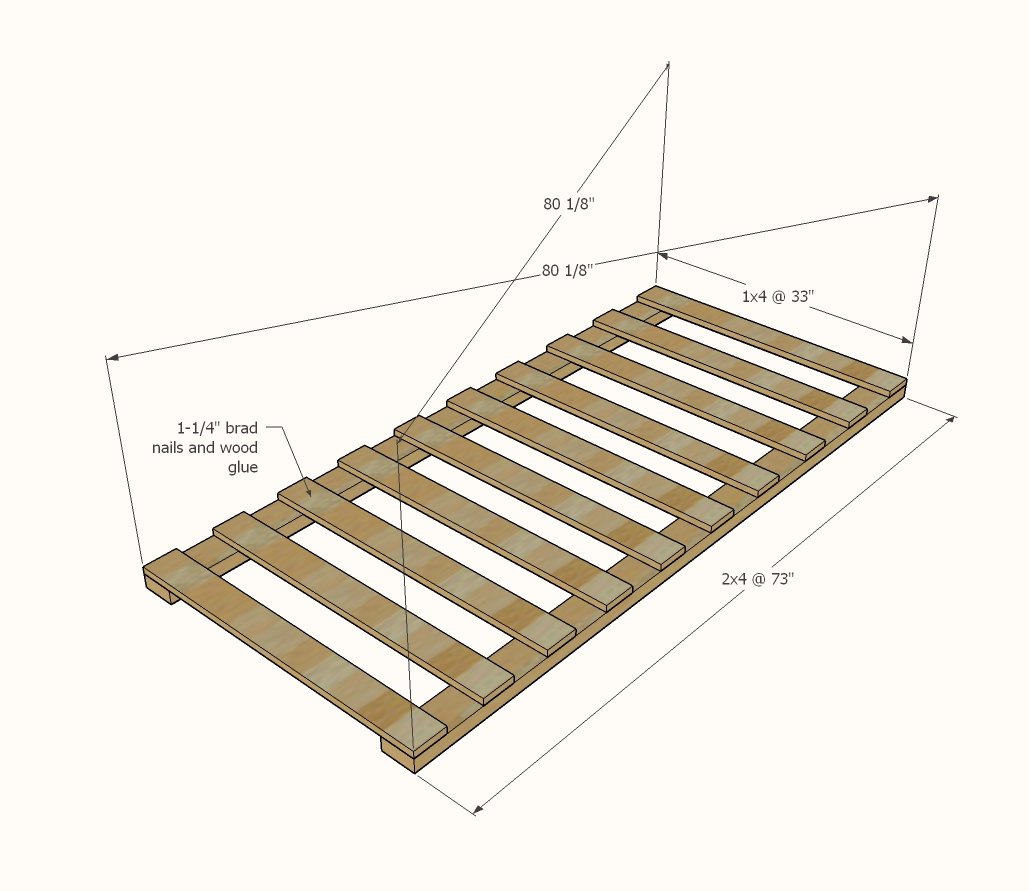
Lay 2x4s on a flat surface. Place slats on top. Adjust for square - opposite diagonals MUST match. Nail and glue slats to 2x4s.
Add back and sides to the trundle.
Recommend: Drill 3/4" pocket holes on top end of the 1x6s and attach with 1-1/4" pocket hole screws at top. Also drill for attaching the front in next step.
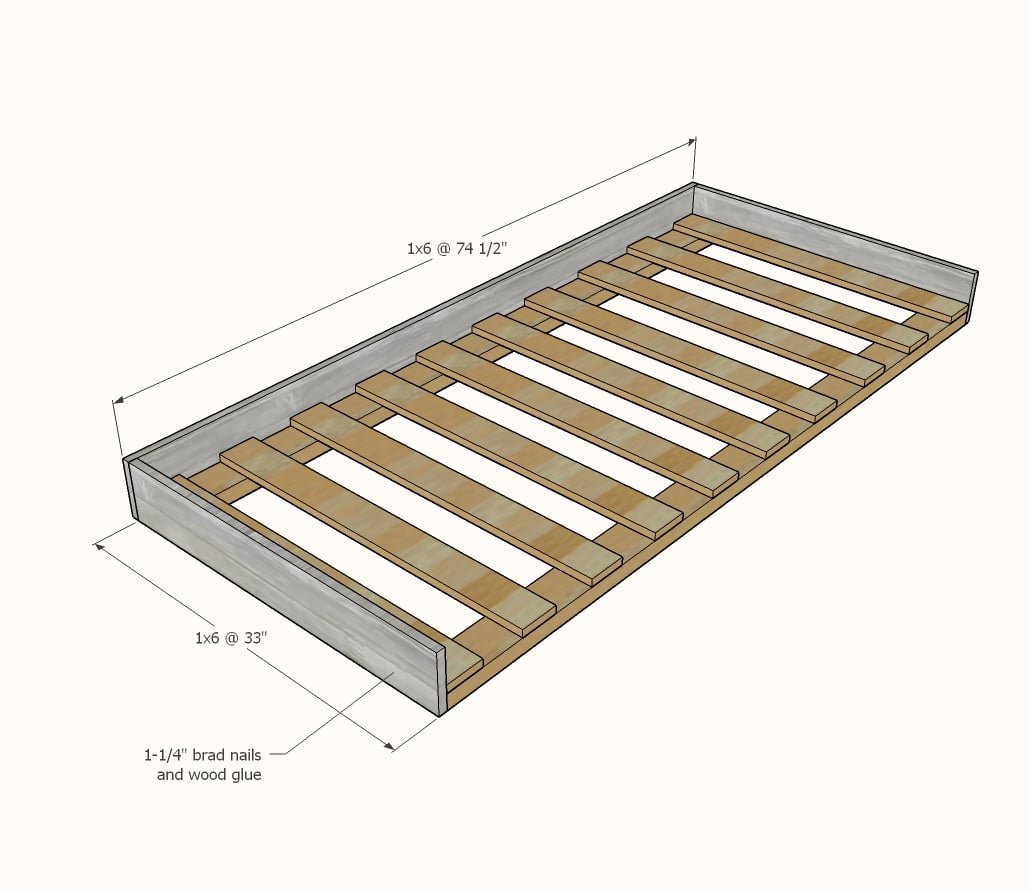
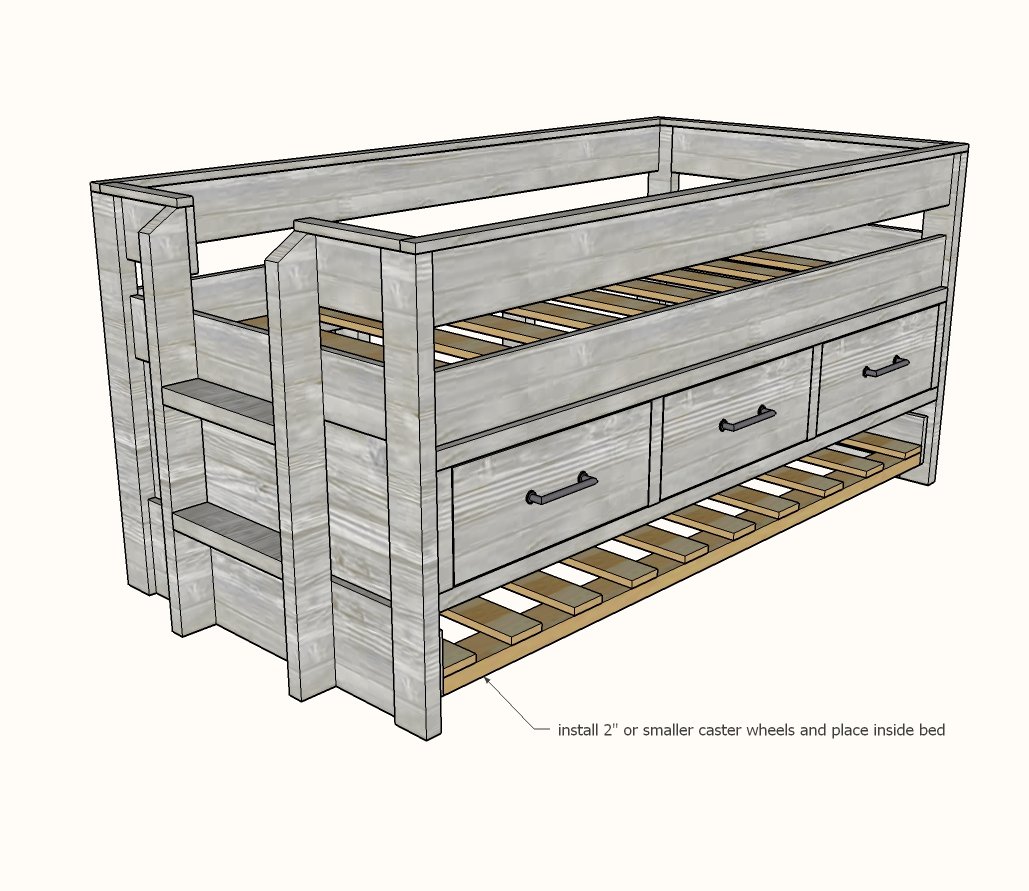
Add caster wheels, three on front and three on back, to the 2x4s.
Place trundle inside the bed.
Step 13
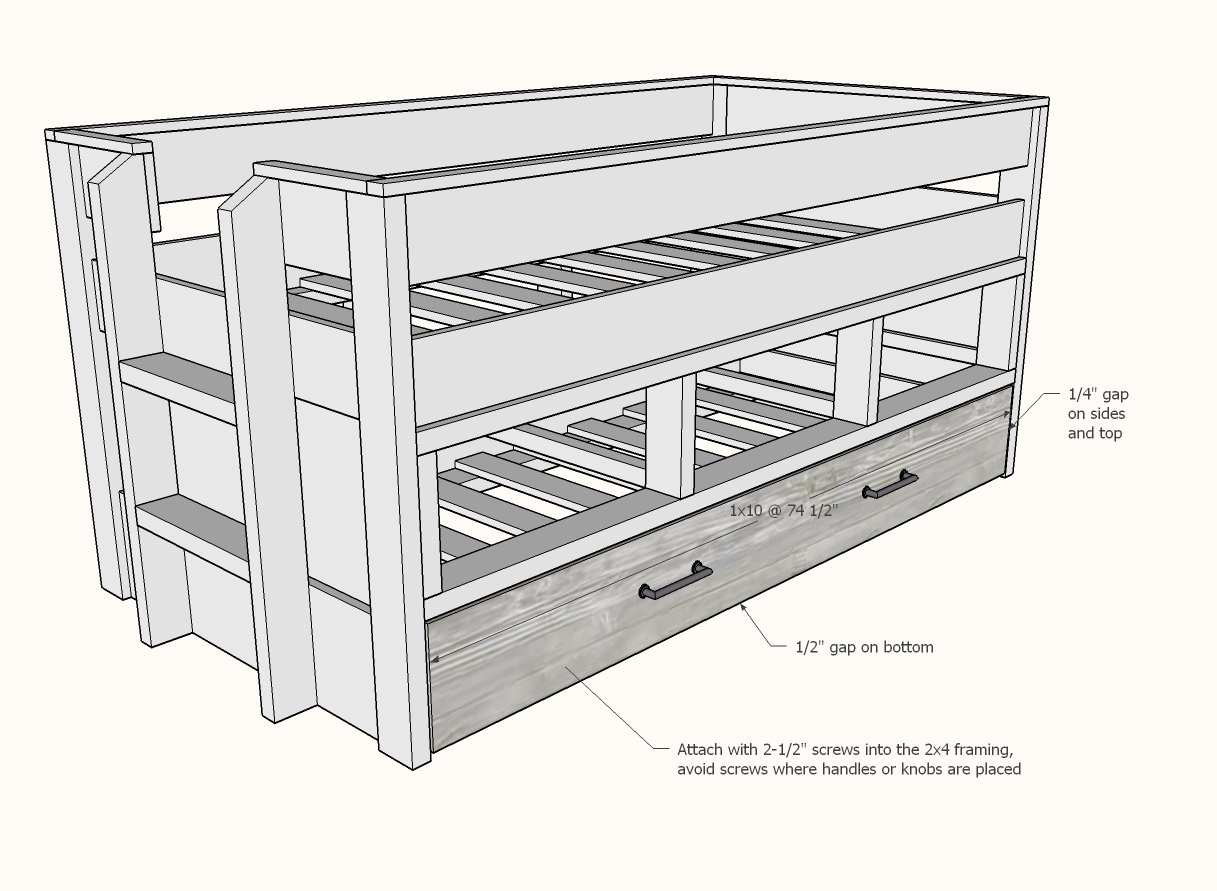
Position the trundle face over the trundle and attach with screws.
Step 14
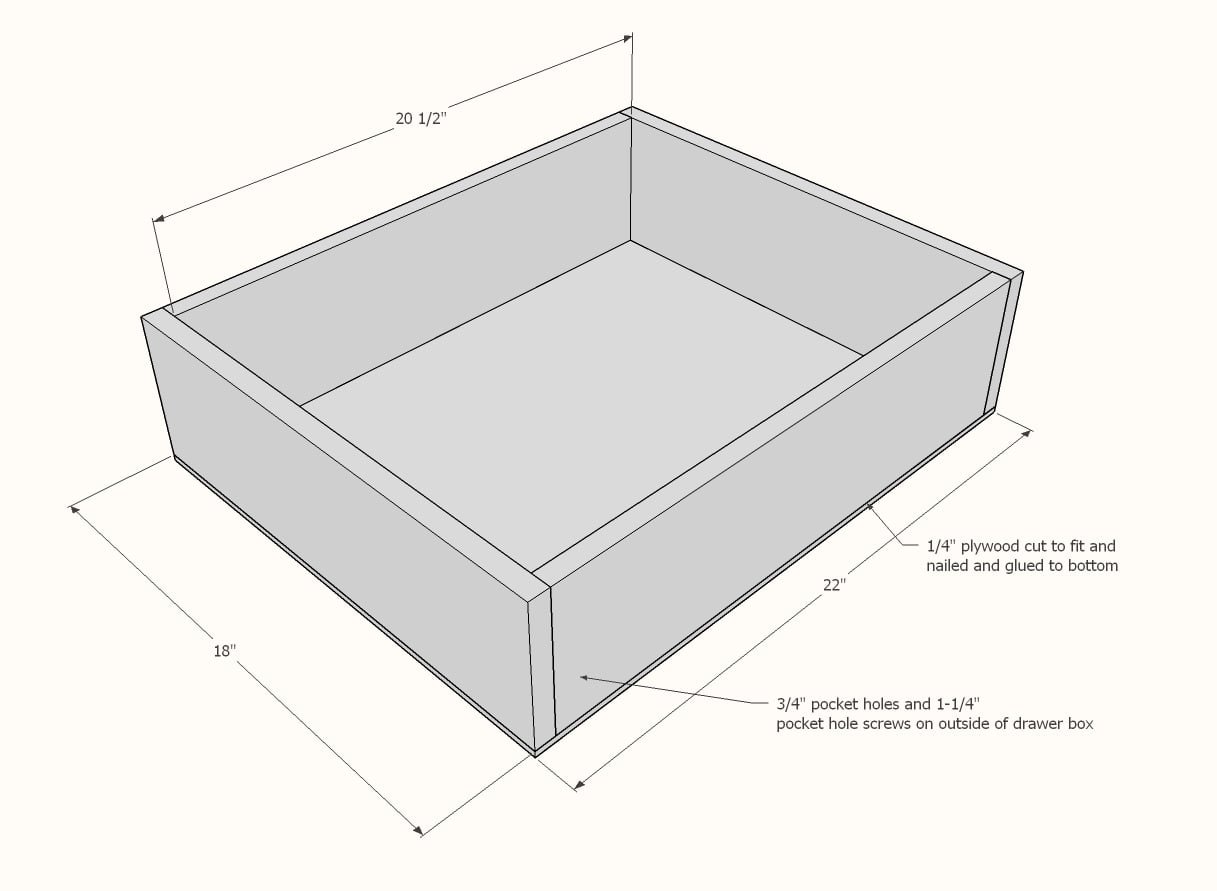
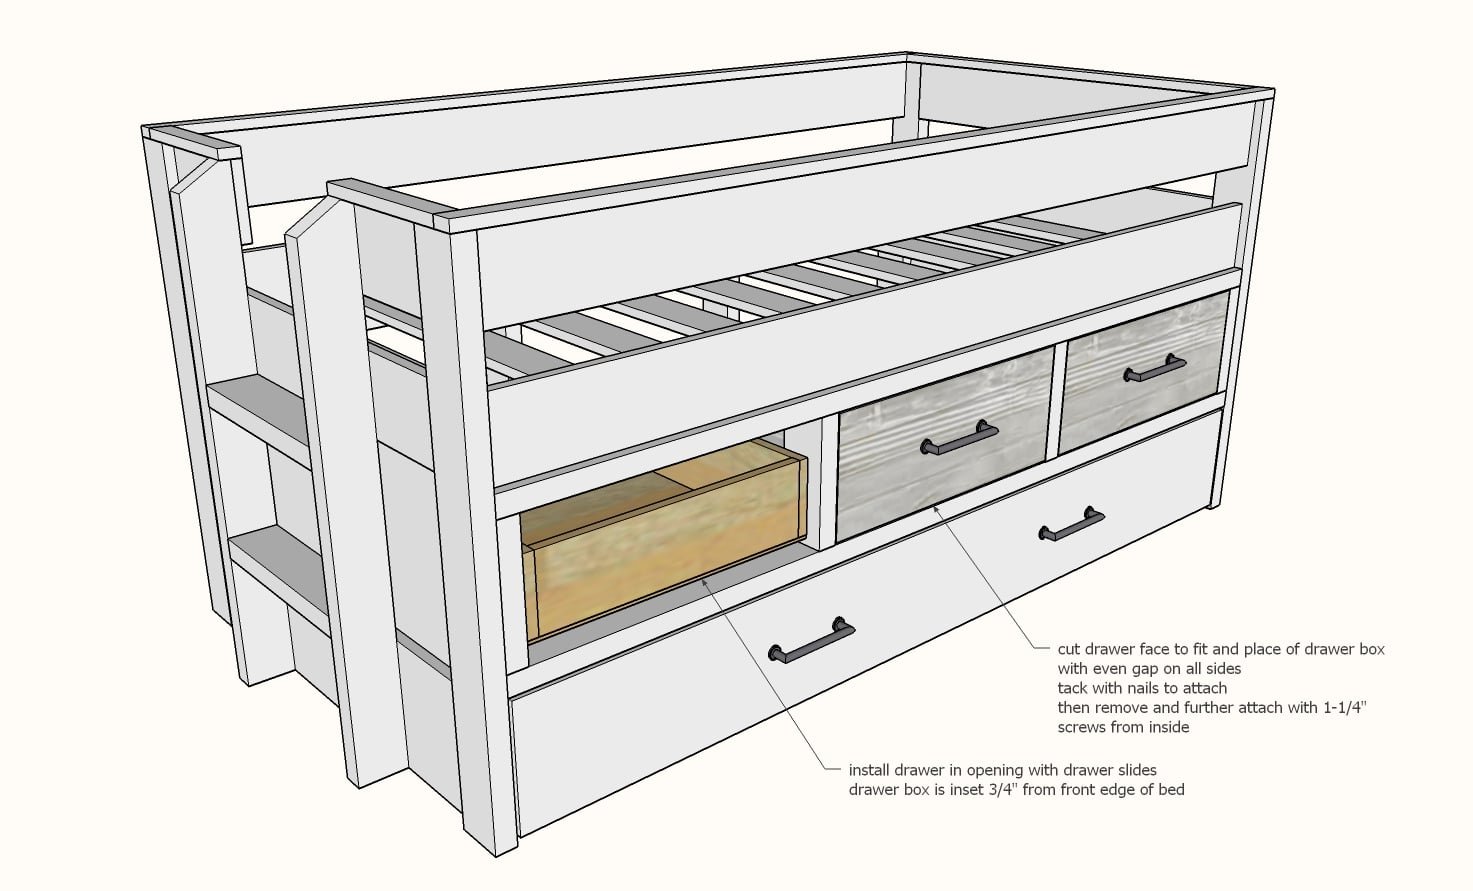
Read instructions with your drawer slides. This drawer tutorial assumes each drawer slide needs 1/2" clearance (1" overall). If you drawer slide differs you will need to adjust your drawer cuts. Measure drawer openings and confirm the openings are 23" wide. If not, you will need to adjust the drawer width. Build drawer boxes. We recommend pocket holes on the outside (will be covered in later steps by drawer face) Check drawers for square. Glue and nail the plywood bottom to the drawer boxes.
Step 15
Install drawers inside the openings with drawer slides. INSET 3/4" from front edge of 2x4s to allow for the drawer face. Cut drawer faces 1/4" smaller than opening. Place drawer face over installed drawers. Attach with a couple of 1-1/4" nails (avoid areas where knobs or pulls will be installed) Remove the drawers and attach from inside with 1-1/4" screws (you can use pocket hole screws)
Finishing
Sand all surfaces, starting with a medium grit and finishing with fine. Wipe off the dust, fill any holes or gaps with wood filler, and sand smooth once dry. Apply primer if you're painting, then finish with your choice of paint or stain and seal with a durable clear topcoat. For outdoor projects, use exterior-rated primer, paint or stain, and sealer so the piece stands up to the weather.
Source (temporary): https://www.ana-white.com/woodworking-projects/captains-bed-trundle-bed