Castle Loft Bed with Stairs and Slide
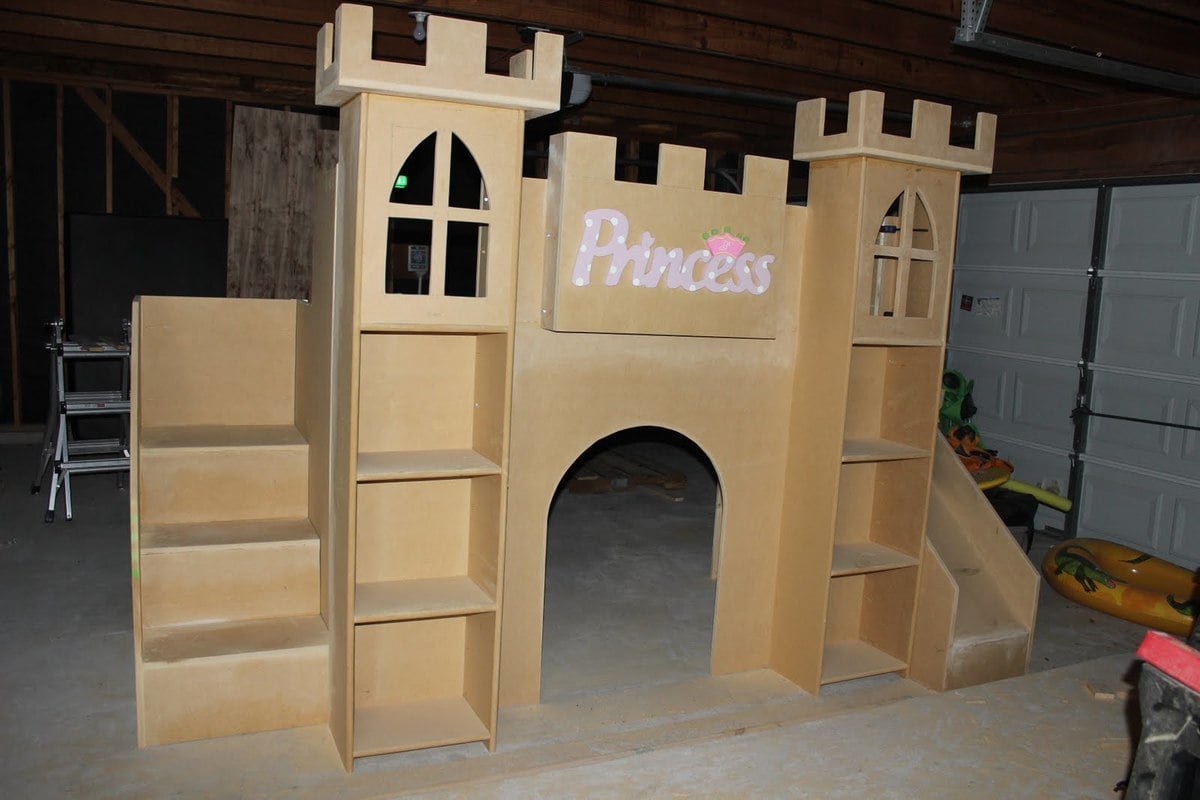
You don't have to be royalty to give your kids a castle. Build your own DIY castle loft bed with. Browse reader submitted photos for ideas and advice. Plans
Specifications
| Project type | Bunk Bed |
|---|---|
| Room | Bedroom |
| Style | Children's and Kid's Room Furniture and Toy Plans |
| Difficulty | Intermediate |
Shopping List
- 6 sheets of 3/4" plywood
- 11 - 1x2 at 8'
- 8- 1x3 at 8'
- 7 - 1x4 at 8'
- 2- 2 x 2 at 8'
- 1/8" plywood (1/4 sheet or 1/2 sheet depending on how you finish the towers)
Cut List
- 2 - 3/4" Plywood 56.5" x 48" (Slide sides)
- 1 - 3/4" Plywood 17.25" x 48" (Slide back)
- 2 - 3/4" Plywood 40" x 48" (Stairs side)
- 1 - 3/4" Plywood 26" x 48" (Stairs back)
- 1 - 3/4" Plywood 2.25" x 48" (Front right section)
- 1 - 3/4" Plywood 47" x 48" (Front middle)
- 1 - 3/4" Plywood 11" x 60" (Tower front)
- 1 - 3/4" Plywood 18" x 60" (Tower front)
- 4 - 3/4" Plywood 10" x 60" (Tower sides)
- 1 - 3/4" Plywood 15" x 24.5" (Top Stair)
- 2 - 3/4" Plywood 11.25" x 24.5" (Lower Stairs)
- 1 - 3/4" Plywood 24.5" x 29.25" (Top Stair Support)
- 1 - 3/4" Plywood 24.5" x 19.25" (Middle Stair Support)
- 1 - 3/4" Plywood 24.5" x 9.25" (Bottom Stair Support)
- 1 - 3/4" Plywood 15.75" x 13" (Slide platform)
- 1 - 3/4" Plywood 15.75" x 57" (Slide)
- 1 - 3/4" Plywood 15.75" x 41.25" (Slide platform support)
- 1 - 3/4" Plywood 15.75" x 7 5/8" (Slide bottom support)
- 2 - 3/4" Plywood 16.5" x 10" (Tower seat and shelf)
- 4 - 3/4" Plywood 9.5" x 10" (Tower shelves)
- 4 - 1x2 at 14.25" (Upper stair support)
- 8 - 1x2 at 10.5" (Lower stair supports)
- 2 - 1x2 at 54" (Slide supports)
- 2 - 1x2 at 11.5" (Slide platform support sides)
- 2 - 1x2 at 12.25" (Lower slide platform support)
- 1 - 1x2 at 15.75" (Slide platform support rear)
- 2 - 1x4 at 15 7/8" (Railing outside stairs)
- 2 - 1x4 at 25" (Railing inside stairs)
- 2 - 1x4 at 47" (Railing front center)
- 2 - 1x4 at 2.25" (Railing front right)
- 2 - 1x4 at 25" (Railing inside slide)
- 2 - 1x4 at 13" (Railing inside stairs)
- 2 - 1x4 at 115.75" (Railing back)
- 56 (approx) - 1x2 at 11.5 (Railings)
- 2 - 2x2 at 77.5 (Mattress supports)
- 16 - 1x3 at 40" (Mattress supports)
- 1/8" Plywood cut per instructions (depends on how you want to finish)
Tools
- measuring tape
- square
- pencil
- hammer
- safety glasses
- hearing protection
- kreg-jig
- drill
- circular saw
- jigsaw
- compound miter saw
Step-by-step Instructions
Step 1
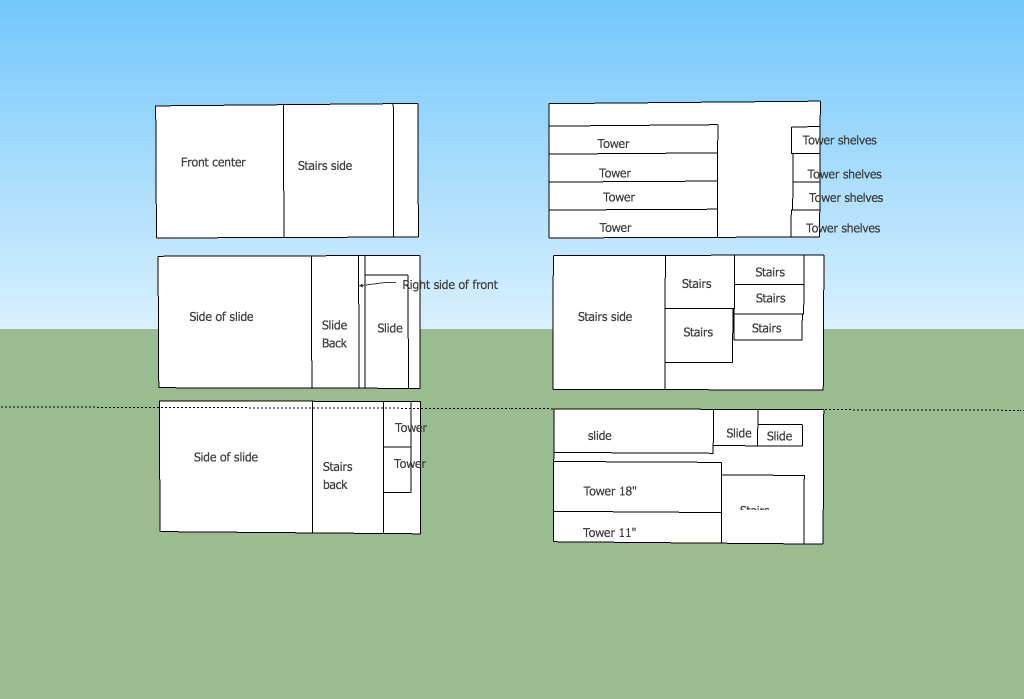
As mentioned above, I recommend cutting as you go. Here is an approximate look at how you can cut the plywood to get the above pieces.
Step 2
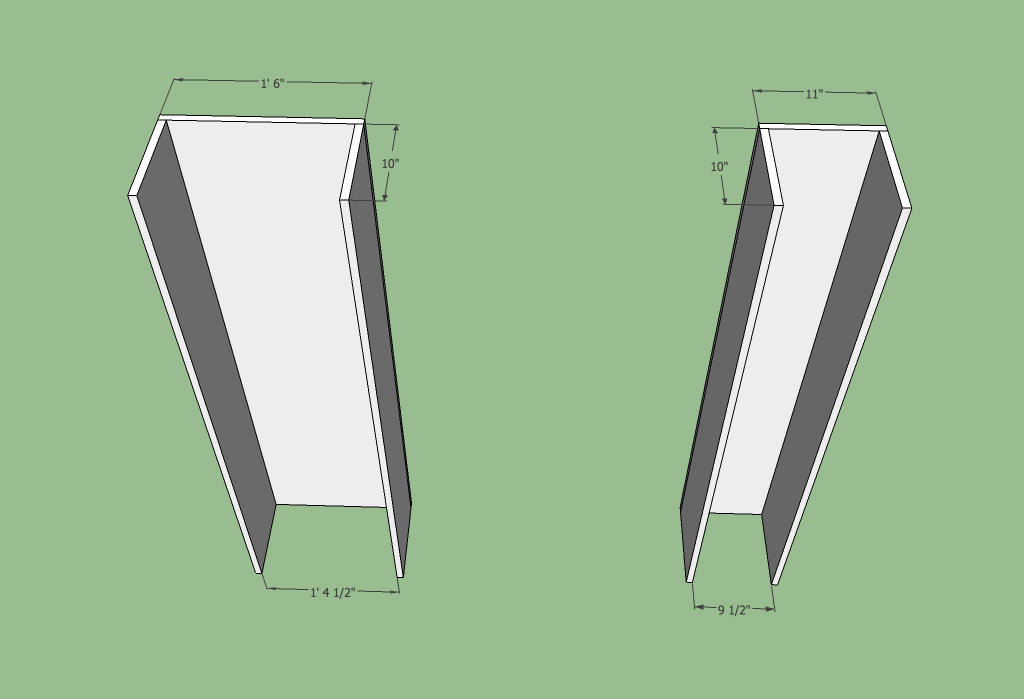
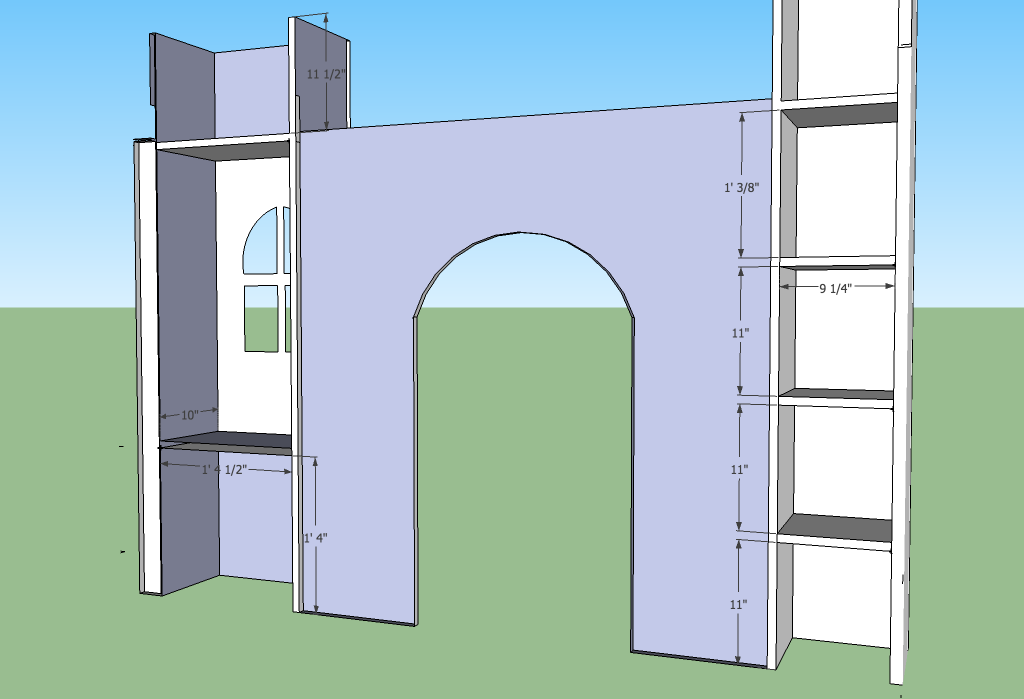
I worked in sections. I made the front section first, then the slide sections, then the stairs. Each section will stand up on it’s own (and is very heavy). Then, I put them all together and added the railings and bed slats. Connect the sides (10” wide) of the tower to the front of the towers (11” & 18”). I used a Kreg jig with 1-1/4” screws to connect them. The sides are connected to the back of the tower fronts, so that the total width of the towers are 11” and 18”.
Step 3
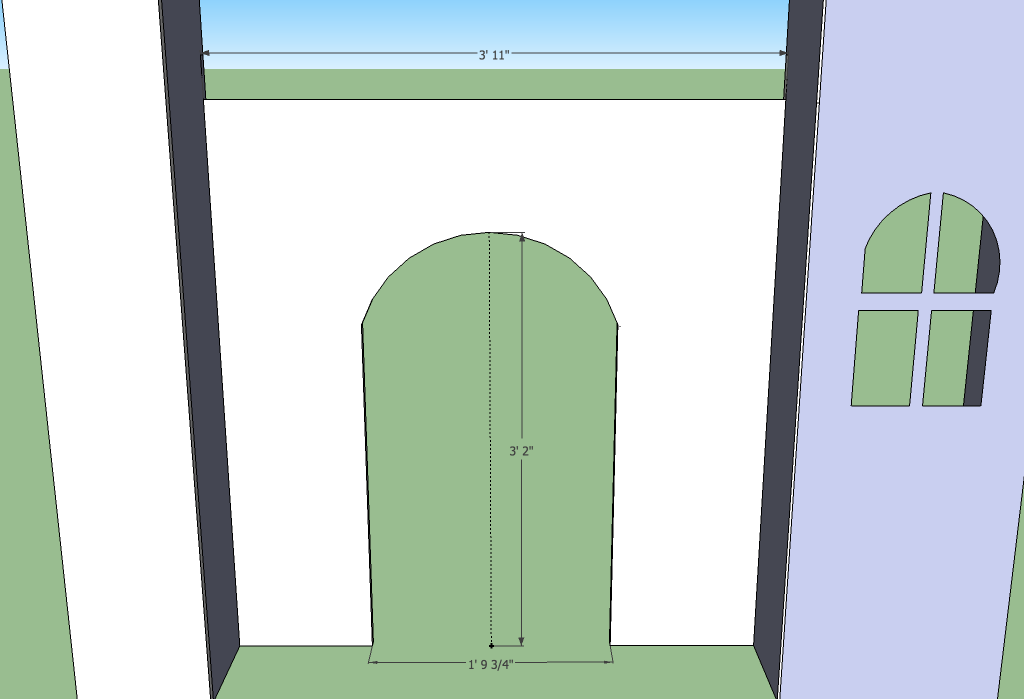
Working on the front center, cut out the door. I made the door 22” wide and 38” high in the middle. Draw with pencil first and then cut out with a jigsaw. Connect the middle to the two towers so that the back of the middle is flush with the back of the two towers.
Step 4
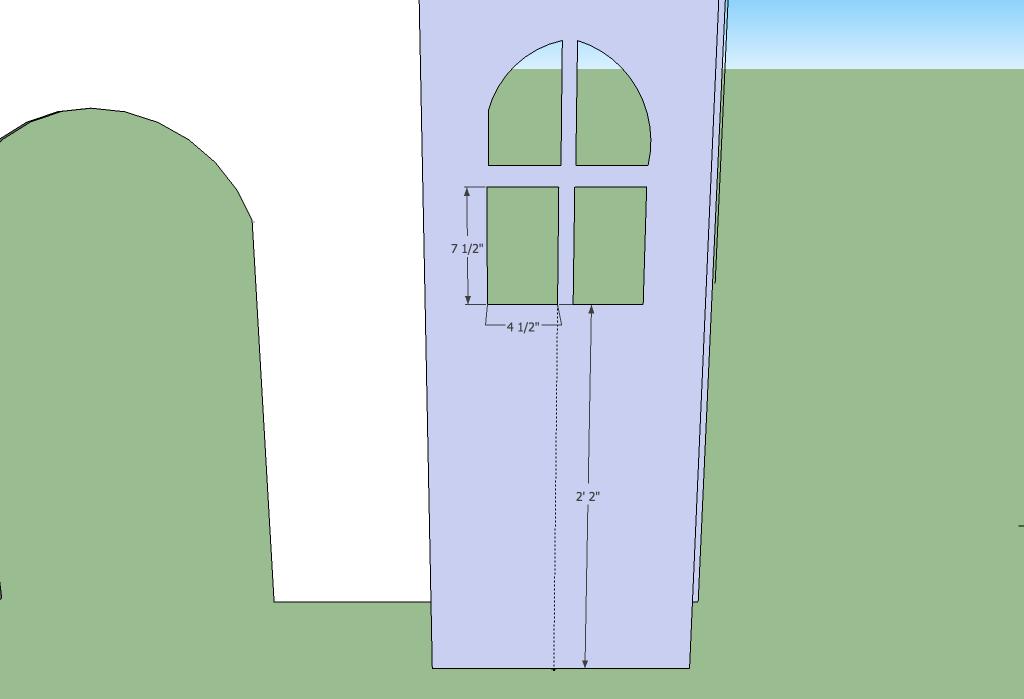
I wanted the larger tower to be a little window seat. To cut the window, I measured up 26” from the bottom. Then, I made each of the windows 4 ½ x 7 ½ with 1 inch in between. I rounded the top windows for looks. Again, I drew on the windows with pencil, used a drill in the corners to get started, and cut out with a jigsaw. You might want to adjust the height according to how tall your child is.
Step 5
Step 6
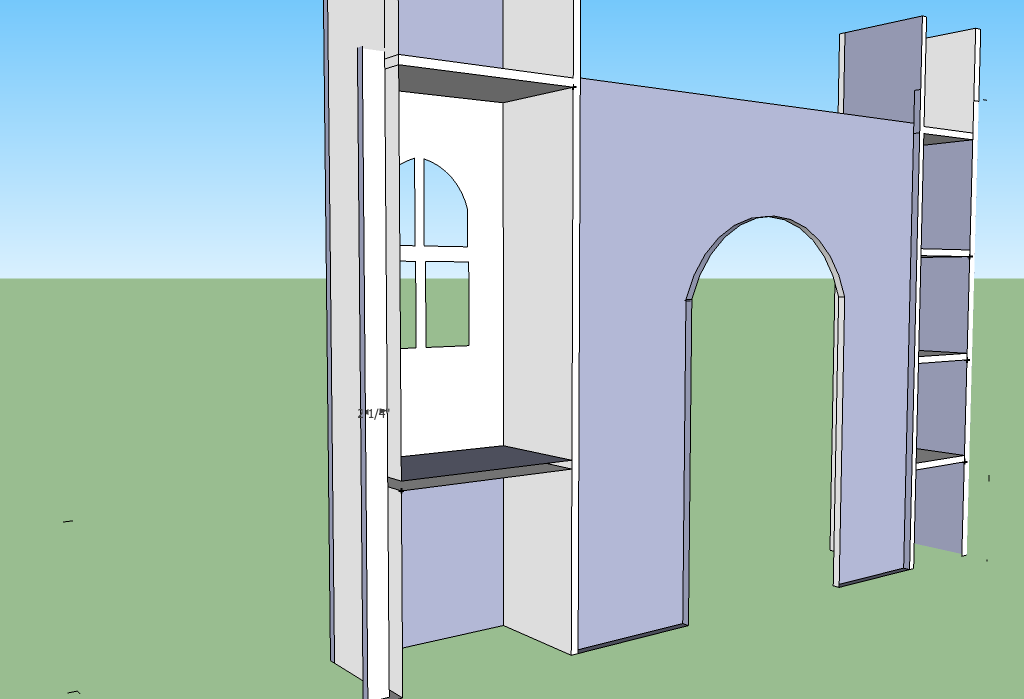
Add the 2 1/4 “ piece of plywood onto the end. This is to make it long enough to fit the twin mattress. You can forego this and instead make a tower or the center piece wider, but I liked how this made the front and slide connect better.
Step 7
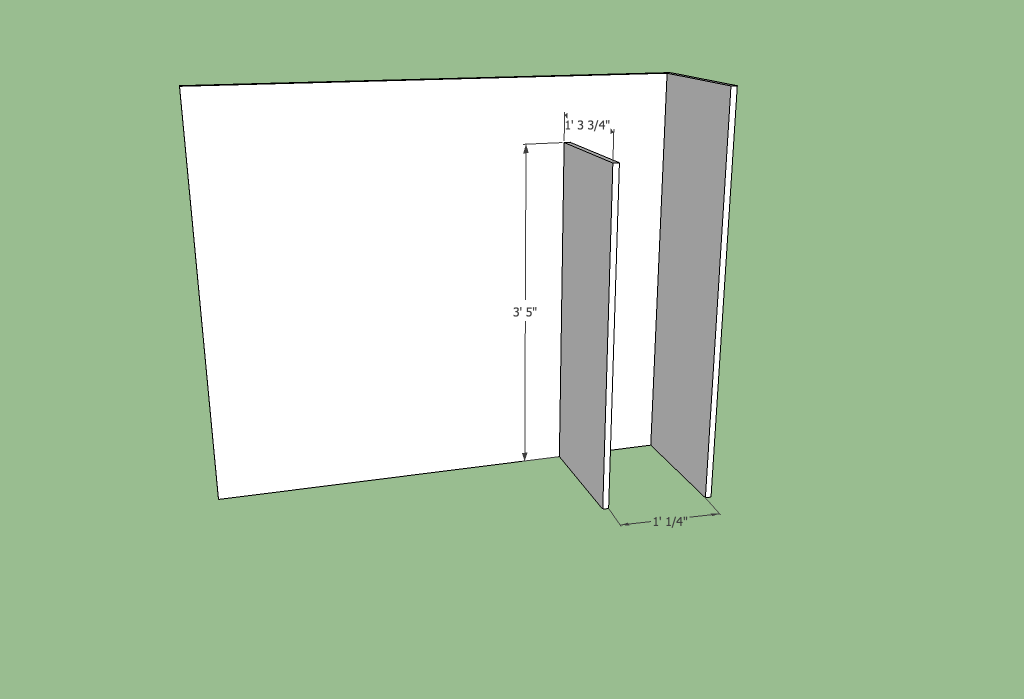
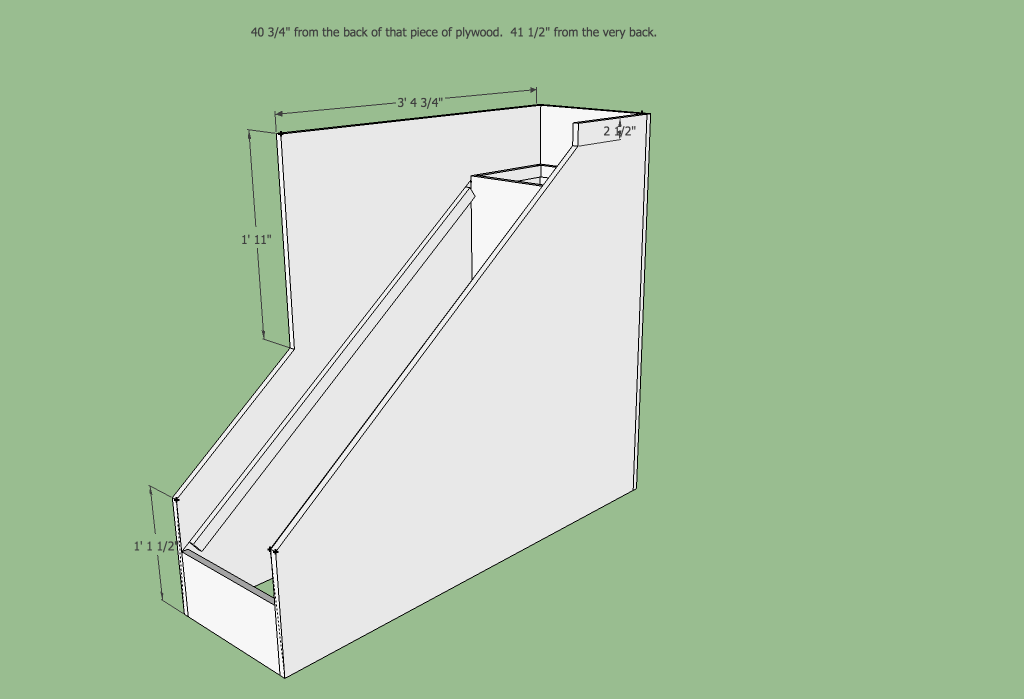
Next, the slide. Probably the hardest part of the entire bed for me. Trying to figure out how to make it so that it wasn’t too fast or too slow. The dimensions I give you are for a fairly fast slide. My 3 year old does great, but it might be too fast for a two year old. If you want it slower, just drop the same distance down, but make the side a little longer to make the slope a little slower. The dimensions I give you are for a slide that is wide enough for kids and a tight fit for most adults. If you plan on going down the slide a lot yourself, you may want to make the slide wider. Take the two 56.5” pieces of plywood for the two sides and the piece 17 ¼” for the back. This part gets a little tricky, because you can put the sides and back together now, but it is narrow enough it makes it hard to work inside that area. I would suggest putting some of the supports on first and then putting it all together. Take the 15 3/4 “ wide by 41 1/2” piece and attach this to a side 12 ¼ “ from the back. This will help support the slide platform.
Step 8
Get your 1x2 boards that are 11 ½”, 12 ¼” and 15 3/4” long. Connect the 15.75” long one to the back of the slide, with 3/4 “ on each side (on the side already attached, it will be right up against the side), with the top of the board being 7 ½” from the top. Then attach each of the 11 ½” to the sides, also 7 ½” from the top, inset from the back by ¾”. The 12 ¼” pieces go along the floor, flush with the back of the sides to give added support between the back and the platform support.
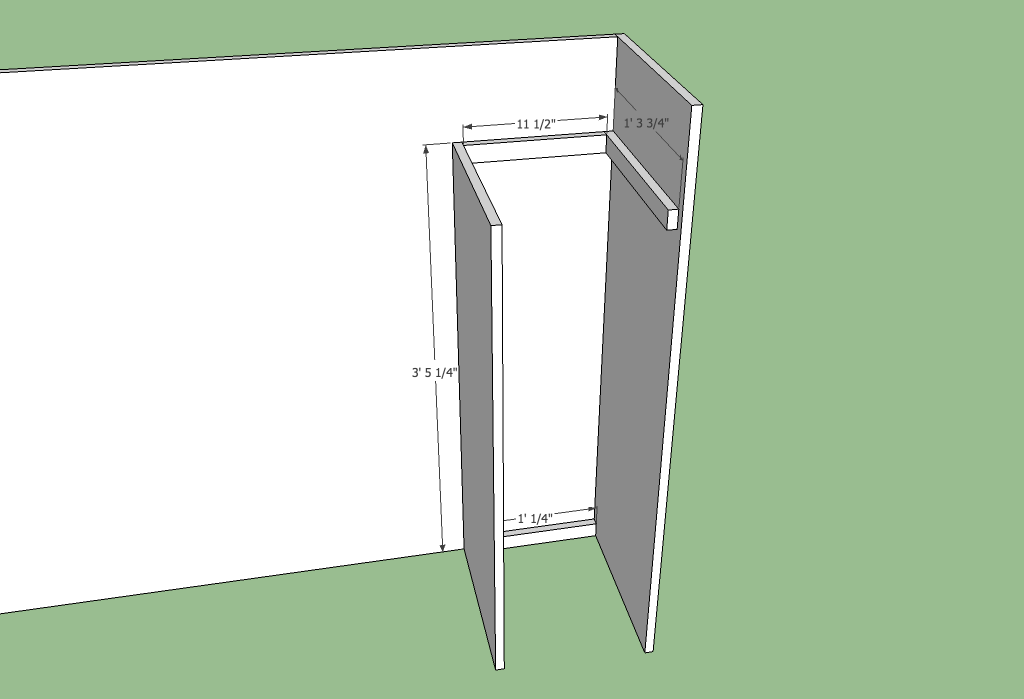
Step 9
Attach the 7 5/8” by 15 ¾” wide piece to one of the sides, flush with the front edge. This will be the bottom support for the slide.
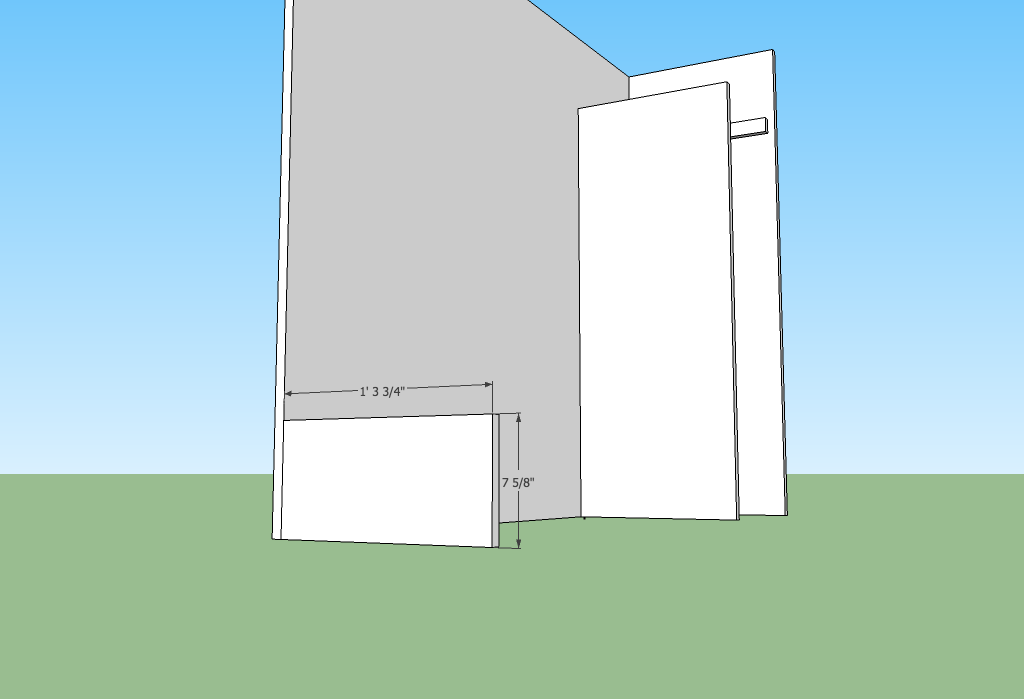
Step 10
Now, draw a line of where the slide will sit. Go from the front of the slide support to the front of the bottom support. Directly under this is where you will put the 1x2 slide supports on each side. The 1x2 does not have to go the entire length – I left an inch or so on each end so that I didn’t have to mess with cutting the ends at the right angle. Attach this to each of the sides.
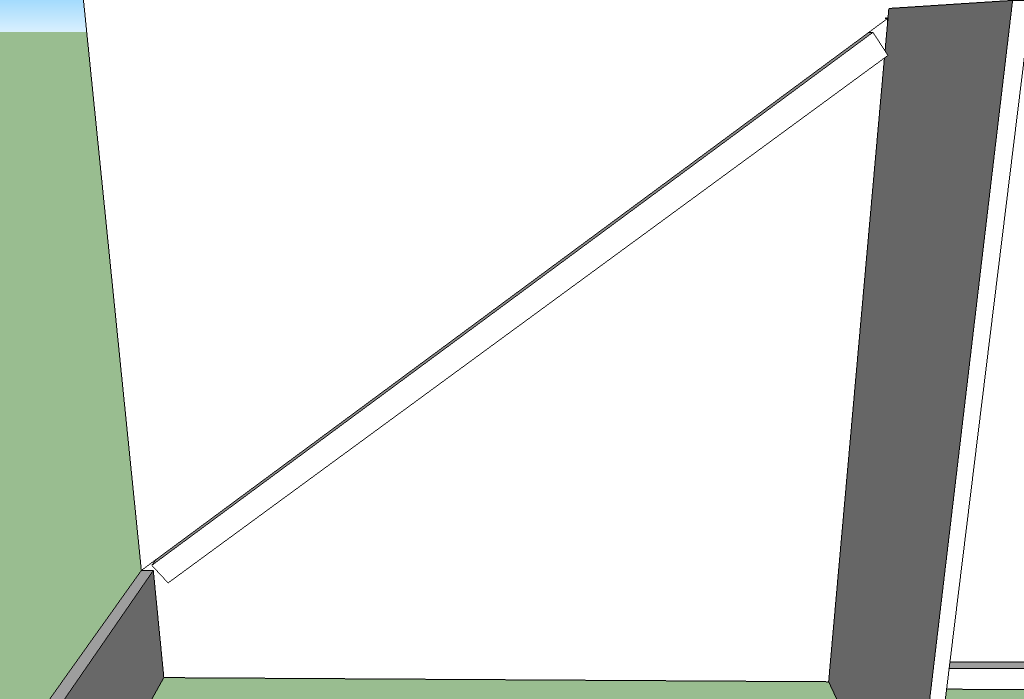
Step 11
Finally, put all the sides together and attach.
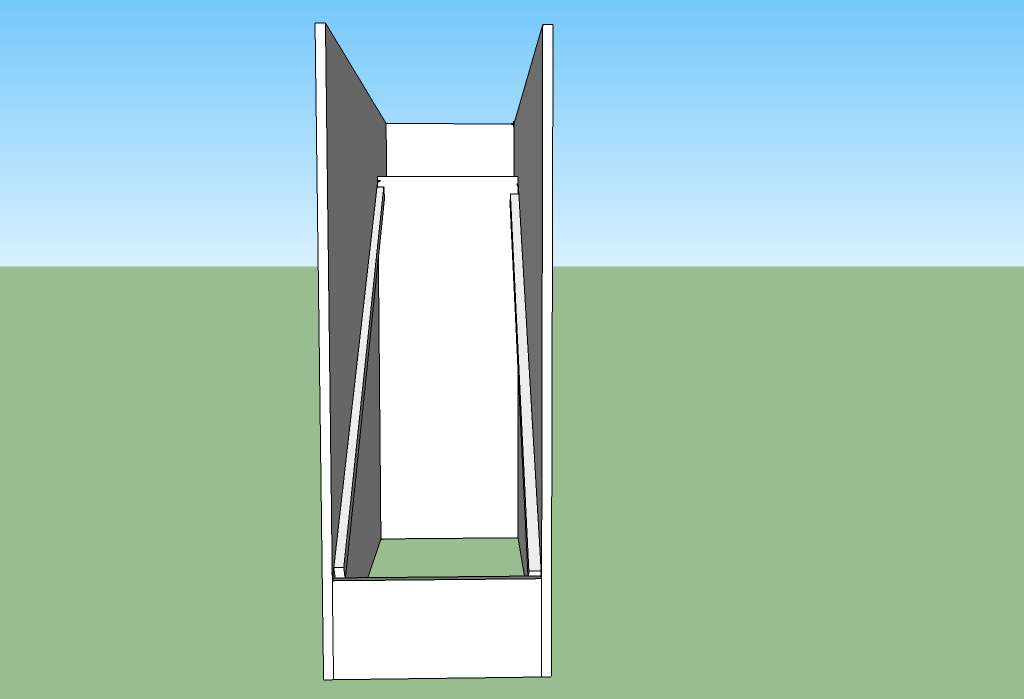
Step 12
This step isn’t essential, but just for looks. I wanted to leave the sides of the slide open as much as possible. On the outer side of the slide, starting at the front edge of the platform I went down 2 ½”. At the bottom of the slide, I went up 13 1/2” and made a mark. I drew a straight line between these two marks and cut with my jigsaw. On the inside wall of the slide, I measured up the same 13 1/2” at the bottom of the slide. Then, I determined where the edge of the bed would be, 40 ¾” from the back of the side. I drew a line straight down for 23”, then drew a line from this point to the front of the slide and made two straight cuts.
Step 13
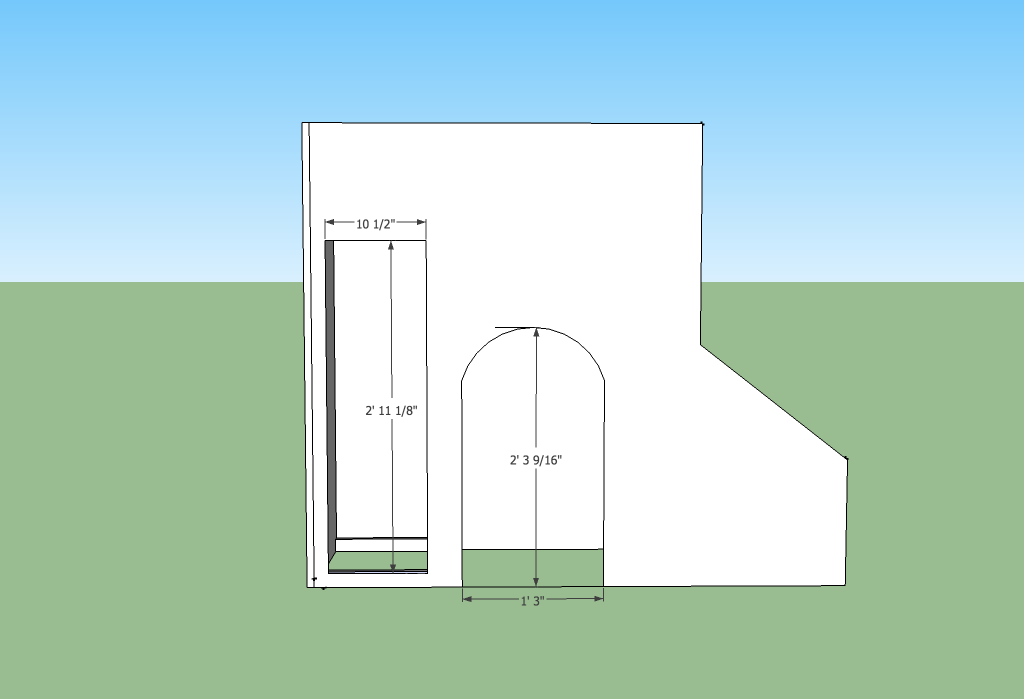
Not wanting all that space under the slide to go to waste, I cut out underneath to make two closets. I again just drew on and cut out with the jigsaw.
Step 14
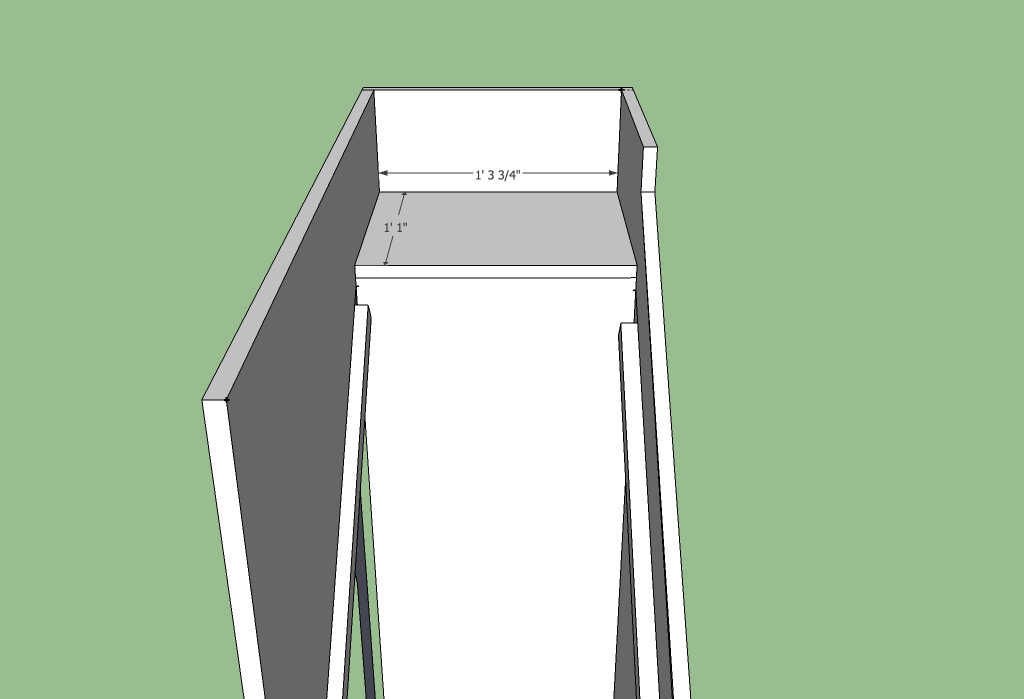
Now time for the platform and slide! Take the piece 15 ¾” by 13” for the platform and attach to the supports.
Step 15
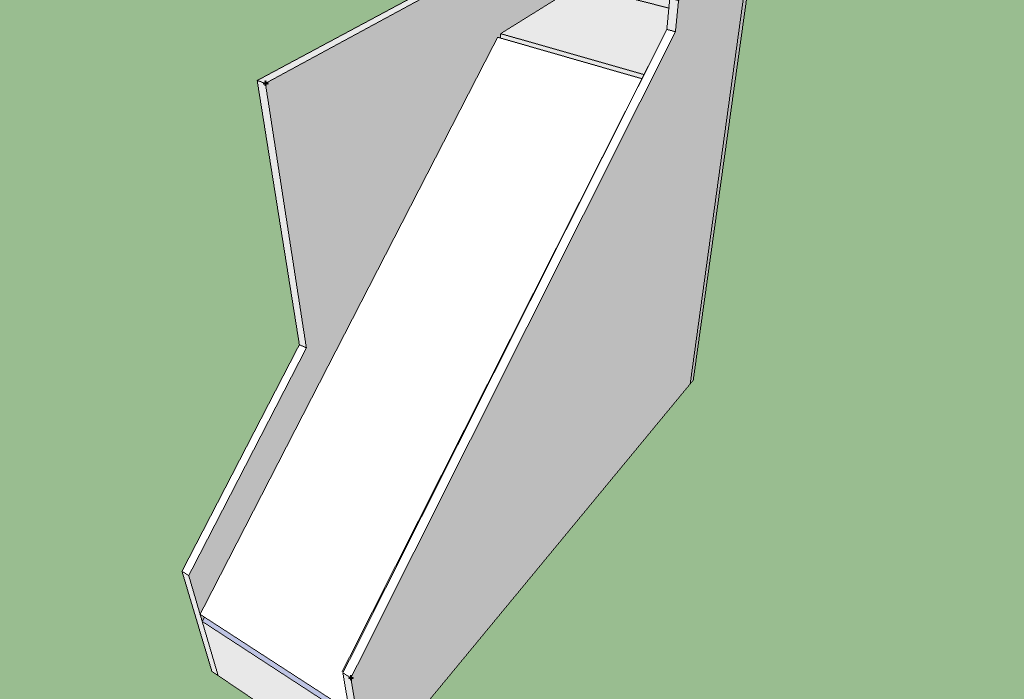
Then comes the slide. This is the one time when using melamine plywood really helped out. It is very slick, even once painted (at least after the one coat I put on). I would recommend using it for this piece. You can always get a piece in the section of the box store that sells closeting products if you want just one board, although you may have to adjust the width of the slide accordingly. This piece is 15 ¾” wide by at least 55 3/8” long. I made mine a little long (57”) because I liked the thought of it hanging off the end a little and wanted to be able to cut some off to make the end of the slide straight up and down. Another tricky part for me was at the top of the slide. The top of the slide needs to be cut at an angle so that it fits snugly with the platform. I laid the slide on the supports and estimated the angle to cut it at. Then I cut it and laid it on the platform again until I was happy with the fit. Finally, attach the slide to the supports. I just countersinked some screws and screwed the slide directly into the supports underneath.
Step 16
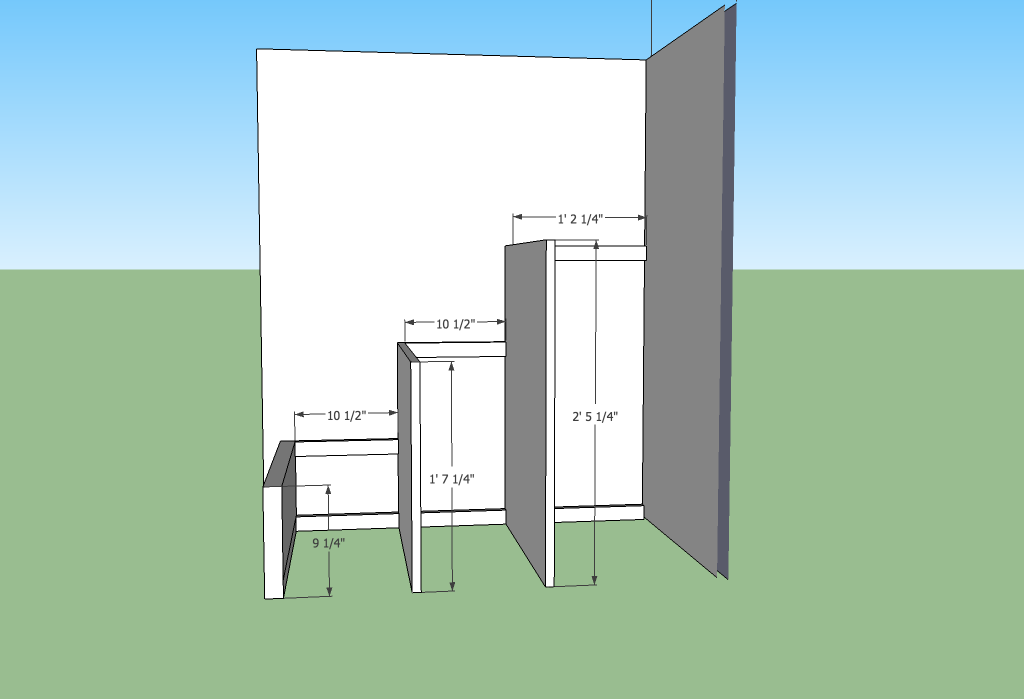
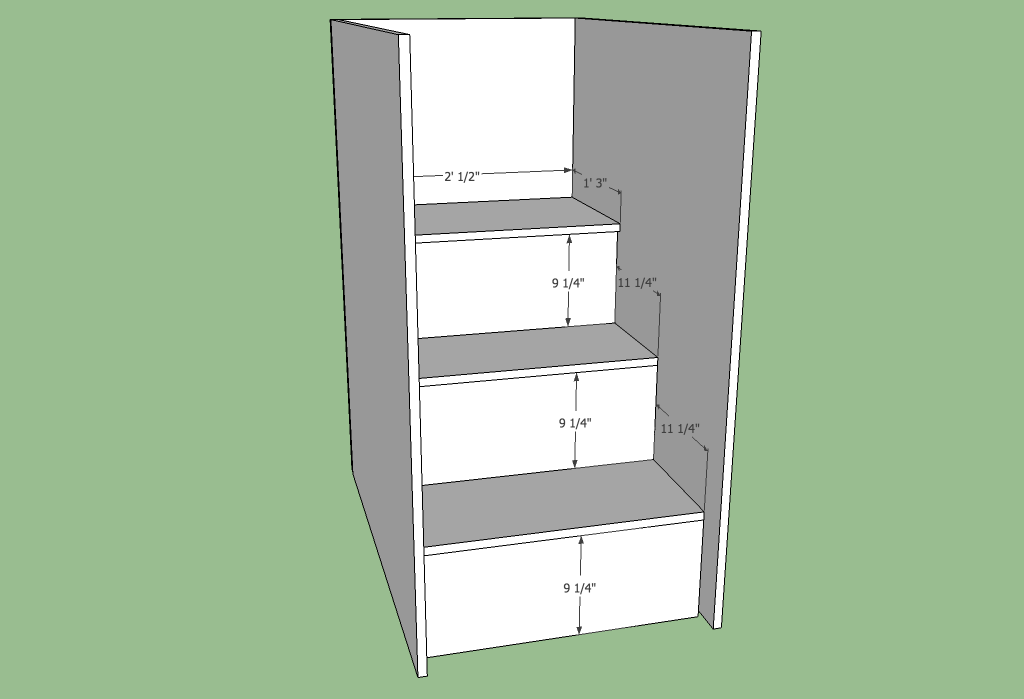
The stairs. Attach the sides to the back, just like the slide sides. It is wide enough that you can put both sides on first if you want, although it is a little tight to work if you do that. Then, attach the 1x2 step supports on both sides, at the top and bottom of each step, as shown in the diagram. Also at this stage attach the larger 29.25”, 19.25”, and 9.25” stair supports in.
Step 17
Attach supports to sides, then attach steps to the top of the supports. At this point if you want to cut off some extra from the outside of the stairs, I recommend measuring up approx. 29” from the bottom of the front of the stairs and measuring 16” from the back of the top. Draw a line between these and cut a straight line. If you want to finish this edge off, I used a 1x2 on it’s side to make a sort of railing.
Step 18
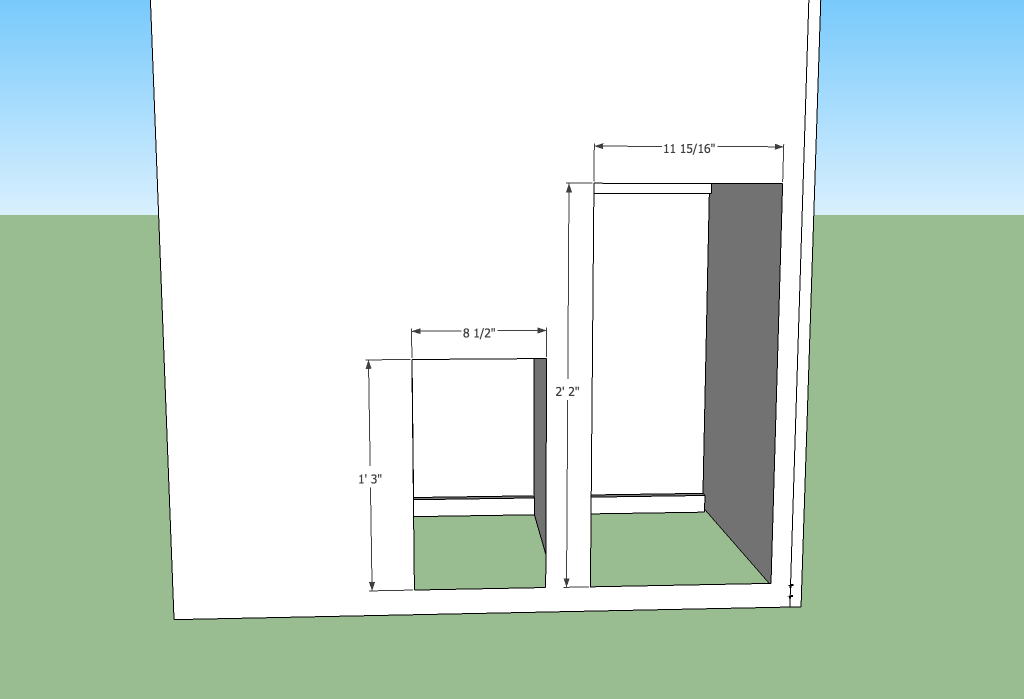
Cut out under the stairs, just like under the slide, to make a couple of closets.
Step 19
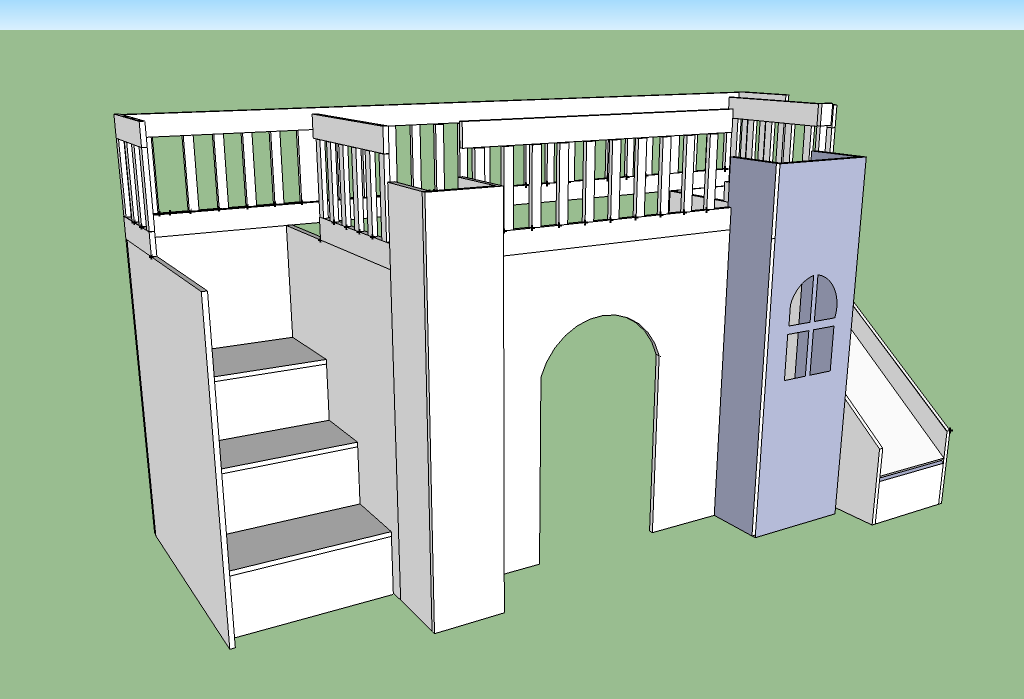
Attach all the pieces together. Then, make the railing. Use 1x4’s for the top and bottom of the railings with 1x2’s cut at 11 ½” long for the up and down part of the railings. Space evenly with 3” between slats. Note: Especially on the back, please cut length to exact measurement, as yours may differ slightly! Stairs outer edge: Cut 1x4’s to 15 7/8”, use 4 slats Stairs inner edge: 1x4’s to 25”, use 6 slats Front center: 1x4’s to 47”, use 10 slats Front right: 1x4 to 2 ¼”, use 1 slat Slide inner side: 1 x 4 to 25 ½”, use 6 slats Slide outer side: 1 x 4 to 13 1/16”, use 3 slats Back: 1 x 4 to 115 ¾”, use 26 slats I used 1x3 instead of 1x2 at some of the intersections of pieces, just a preference. Attach all the slats to the bed. Since the railing against the wall supports the mattress, I then used bolts to attach the top railing to studs in the wall. I did this about four times across the bed and it really helped with the support and to keep the railing from being pulled away from the wall. Also, for the slide inner edge and the stairs inner edge, there wasn't as much support as I wanted. So, I bought a couple of L brackets (used to put up shelvings and such) and attached one to each set of railings, with the other end of the L bracket being attached to the under bed slats.
Step 20
Cut two 2x2s to 77 ½” long. Attach one to the front of the back railing, flush with the bottom using 2” screws and glue.
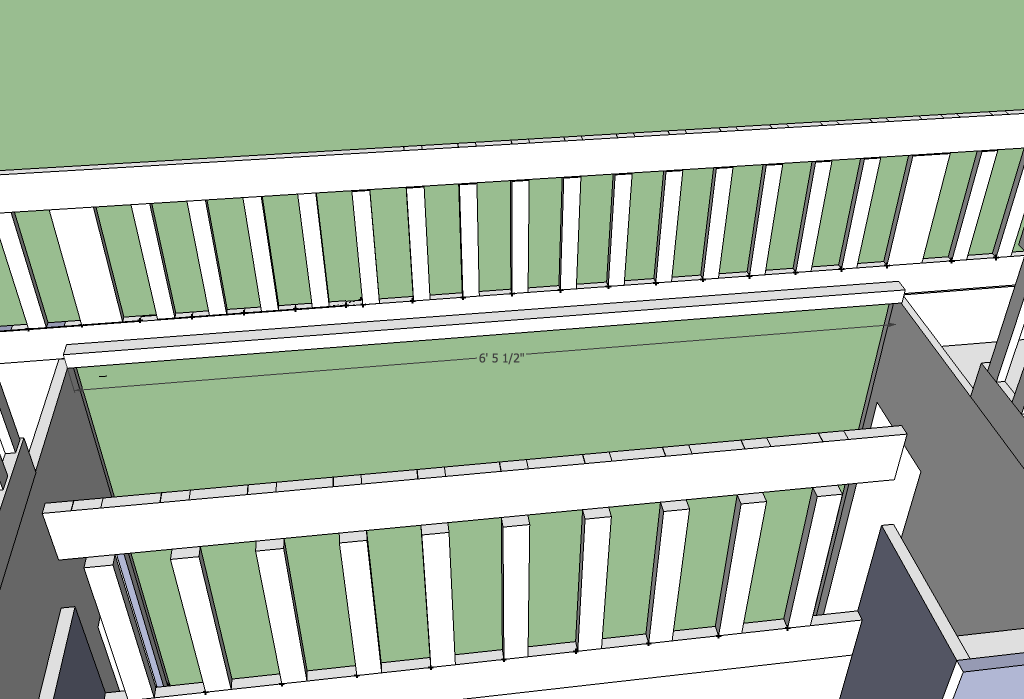
Step 21
Attach other 2x2 inside of the front of the bed, flush with the bottom of the front railing.
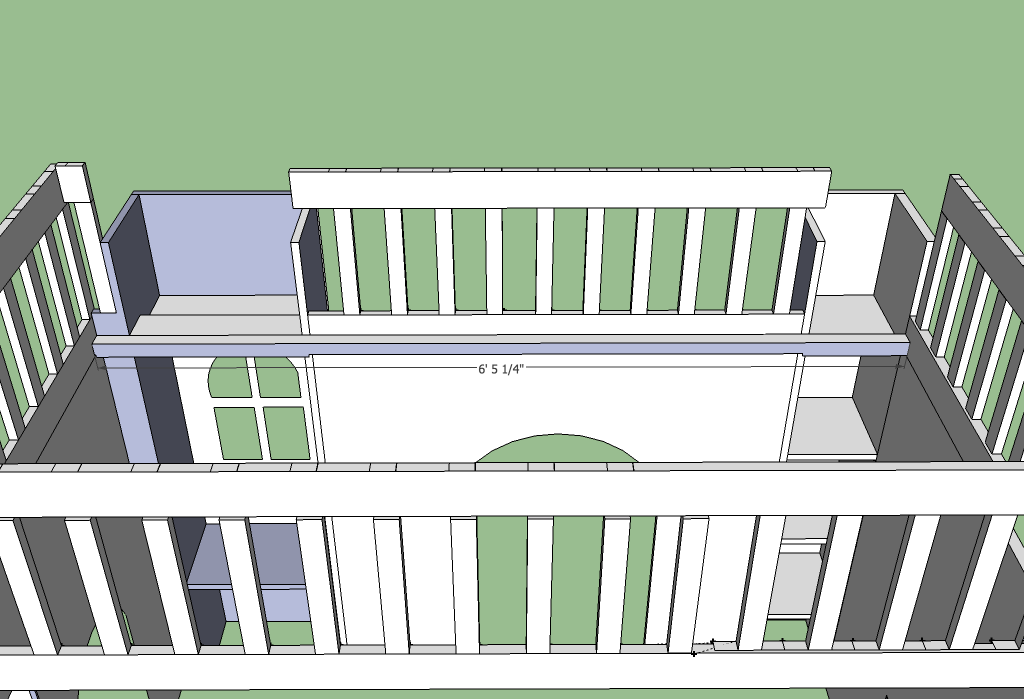
Step 22
Mattress support slats. Cut 1x3s to 40” long. I wanted there to be a lot of support since us adults wanted to be able to be up on the bed, so I placed them every 2 1/2” apart. Use approximately 16 slats, depending on your desire of support. Attach to the 2x2s.
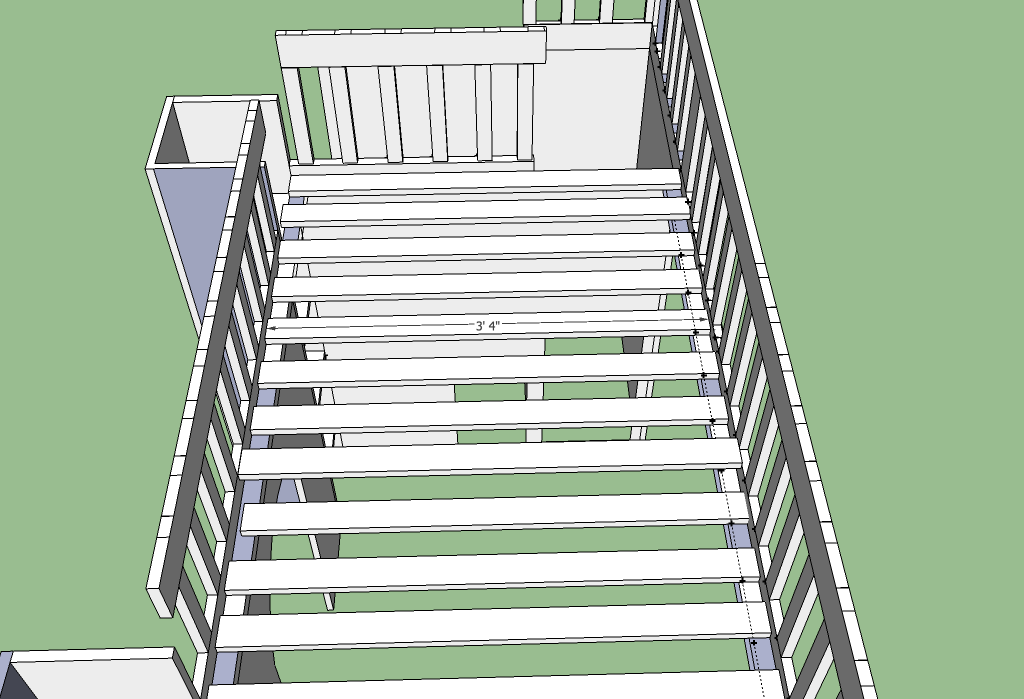
Tower decorations.
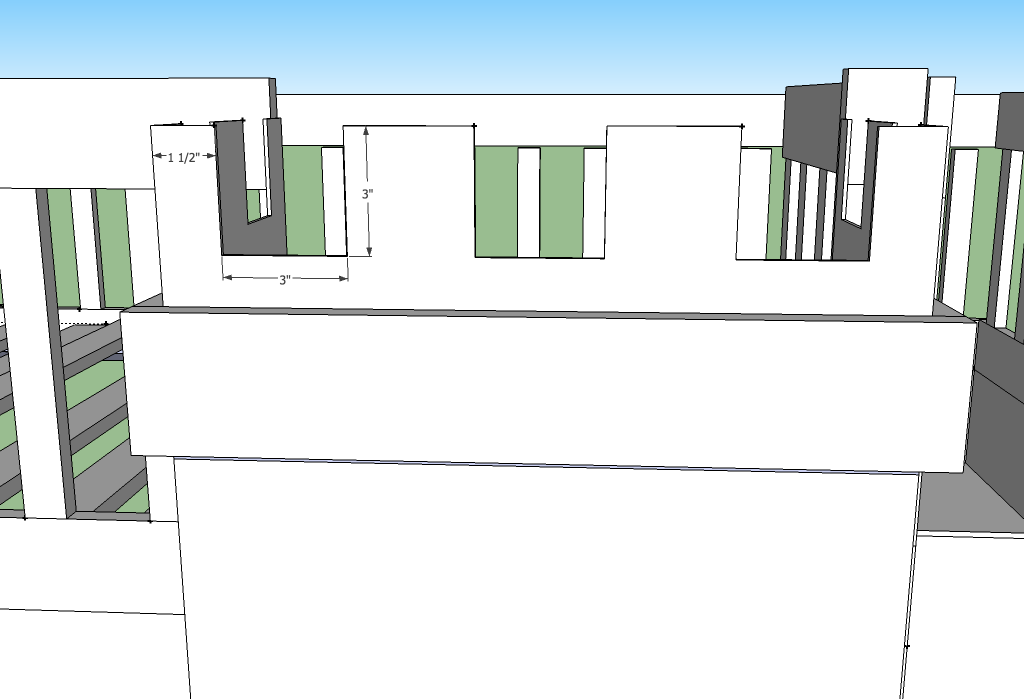
Cut 1x4s to the following legths: four at 10 3/4”, one at 12 1/2”, and one at 19 ½”. Attach these to the top, outside of the tower, about half (1 ¾”) sticking up above the tower.
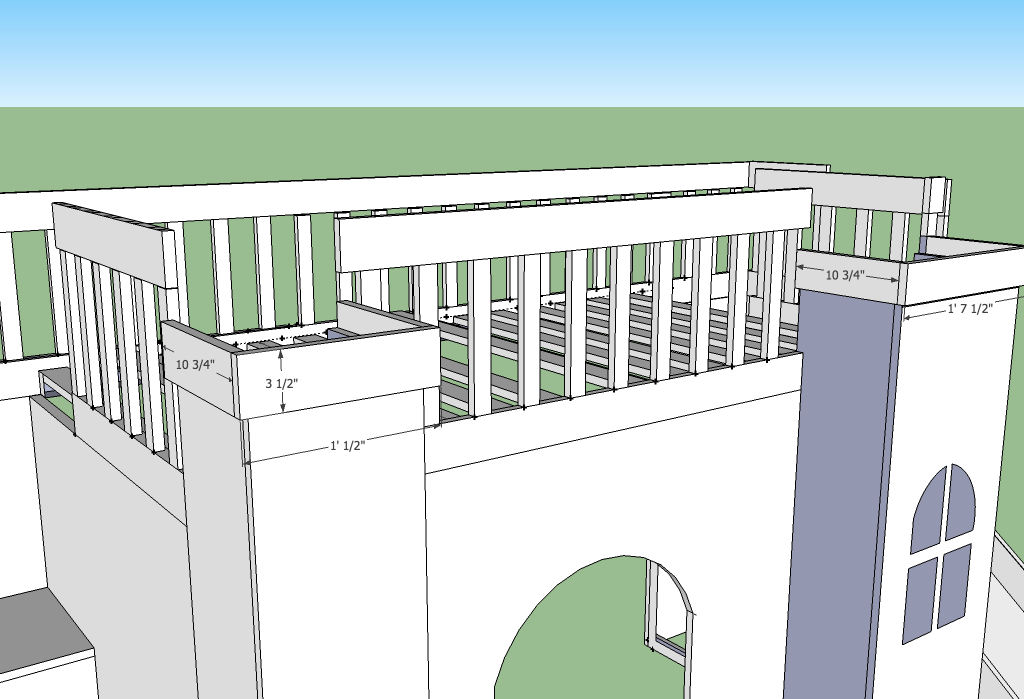
Step 24
Cut 1/8” plywood to be 6” wide. Out of this, cut one at 11 1/8, one at 18” and four at approx. 10” (measure to get exactly how deep you want these to be). Then, cut the up and down parts. I found that cutting down 3”, over 2 ½” or 3”, up 3”, over 2 ½” or 3”, etc. was a good pattern, centering these cuts over the piece of plywood. So, on the front, I might go in from the edge 1 ½”, then start the pattern, ending up with 1 ½” left on the other end. Just play with it and draw it on to make sure you like the results. Then either use your jigsaw or just a knife to cut out. Attach these behind the 1x4’s and they will sit on top of the original tower. Nail to the 1x4’s.
Other finishing touches:
Apply edging to raw edges. See picture of my finished project. I used more 1/8” plywood to make a point on top of the one tower. I used tape and glue to put it together. I wanted to do something over the rails in the front. I again used 1/8” plywood, cut it to an overall size of 27” high by 24” wide, then used a jigsaw to shape it the way I wanted. Paint and screw to the rails. Mine goes above the rails by 2 ½”. If you do that, I suggest putting a 1x3 24” wide behind it to keep the top from getting broken (I didn’t do this at first and part of it got broken right away). I wanted a more finished bottom edge, so I purchased some molding, painted it before installing, then cut using a miter saw and nailed to the bottom of the front of the bed. I really liked the finishing look it gave. Finally, I purchased wall decals so that it really had that princess touch!
Finishing
Sand all surfaces, starting with a medium grit and finishing with fine. Wipe off the dust, fill any holes or gaps with wood filler, and sand smooth once dry. Apply primer if you're painting, then finish with your choice of paint or stain and seal with a durable clear topcoat. For outdoor projects, use exterior-rated primer, paint or stain, and sealer so the piece stands up to the weather.
Source (temporary): https://www.ana-white.com/woodworking-projects/castle-loft-bed-stairs-and-slide