Classic Bunk Beds
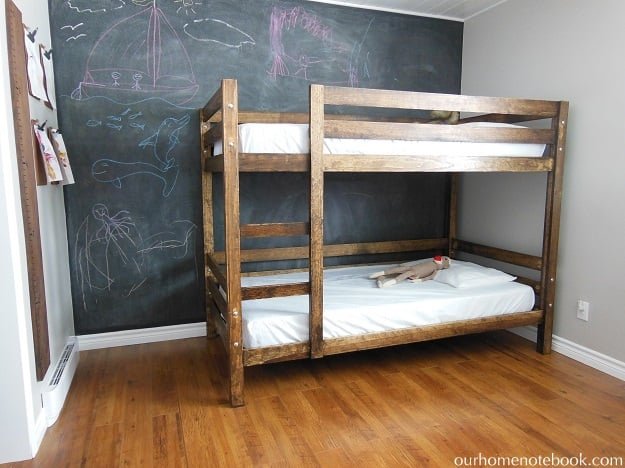
These bunk beds are unique because they are easy to build and can be assembled and disassembled easily. Ladder is integrated into the design. Photo by Our Home Notebook
Specifications
| Project type | Bunk Bed |
|---|---|
| Room | Teens |
| Style | Farmhouse Furniture |
| Difficulty | Intermediate |
| Estimated cost | $50 - $100 |
Dimensions
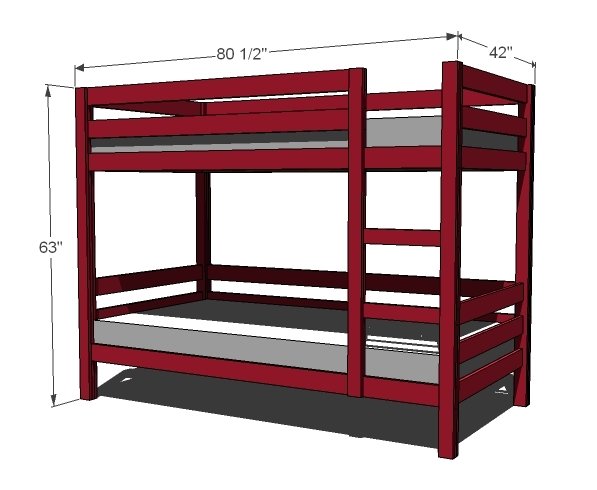
Use the size-specific shopping and cut lists below.
Shopping List
- 11 – 10′ 1×4 Boards
- 4 – 8′ 2×2 Boards
- 9 – 8′ 1×3 Boards (not including wood slats)
- 2″ Self Tapping Wood Screws
- 1 1/4″ Self Tapping Wood Screws
- 1 1/4″ Brad Nails
- Wood Glue
- Wood Filler
- Finishing Supplies
- 16 – 3″ Bolts with washers and nuts
Cut List
- 12 – 1×4 @ 37 1/2″ (End Rails)
- 8 – 1×3 @ 63″ (Solid Leg Pieces)
- 8 – 1×4 @ 80 1/2″ (Back and Front Rails)
- 2 - 1x4 @ 64" (Front Rails)
- 12 – 1×3 @ 3″ (Trim Pieces between Rails)
- 2 – 1×3 @ 22″ (Trim Pieces between Rails)
- 4 – 1×3 @ 8″ (Bottom Trim Pieces)
- 4 – 2×2 @ 75″ (Use Metal braces for a stronger bed)
- 1 – 1×3 @ 55″ (Ladder Side)
- 2 – 1×3 @ 19″ (Ladder Rungs)
- 1 – 1×3 @ 13″ (Ladder Front Trim Piece)
- 6 – 1×3 @ 10″ (Ladder Trim)
- 1 – 1×3 @ 35″ (Front Leg Trim Piece)
- 1x3s @ 39″ (Bed Slats, as shown with 34 total slats)
Tools
- measuring tape
- square
- pencil
- hammer
- safety glasses
- hearing protection
- kreg-jig
- drill
- circular saw
- nailer
- sander
Step-by-step Instructions
Build the Ends
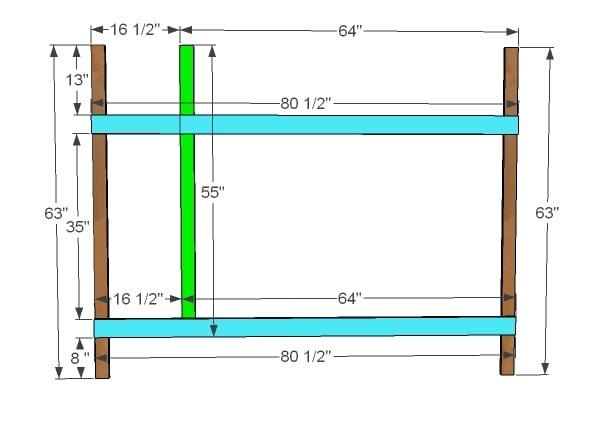
Build two of the ends as shown above. Best joining method is to use pocket hole screws from the insides of the rails into the legs. Other option is to use 2″ screws from the outside of the legs, with a countersink bit. Screws are recommended, because bunk bed are going to take lots of movement, and nails joints will eventually separate out.
Build the Back
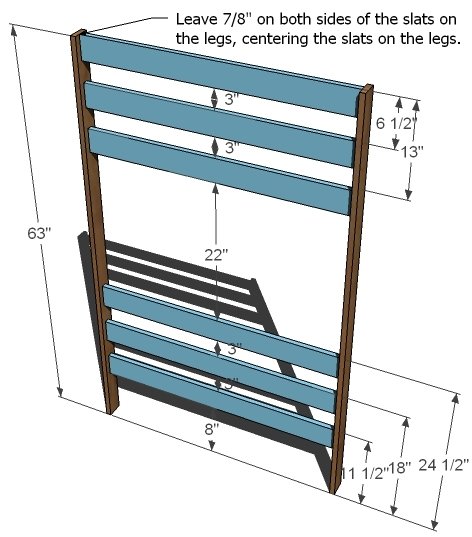
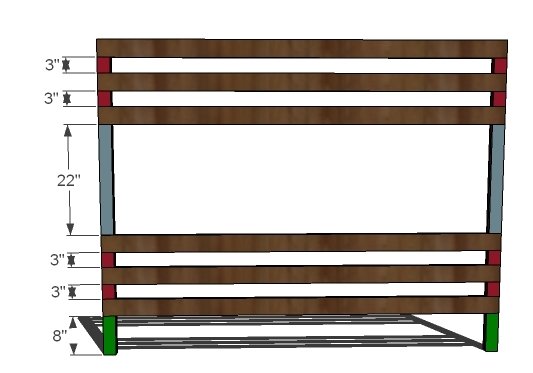
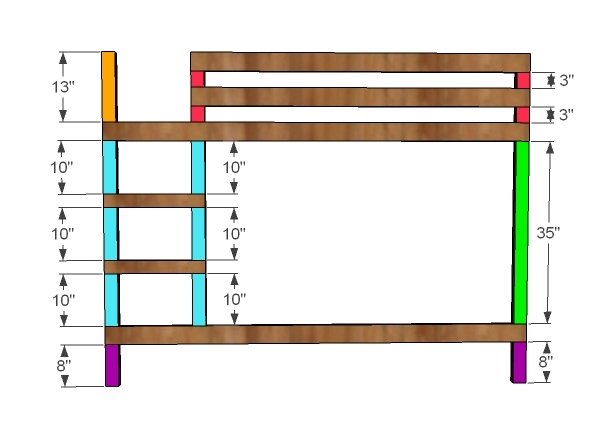
Simply take two of the 1×3 legs @ 63″, and mark as shown in the diagram above. Glue and screw with 1 1/4″ screws the side rails to the legs. On this step it is very VERY important that you check and adjust for square. If the diagonals do not match up, push the outside corners of the longer diagonals together.
Trim the Back
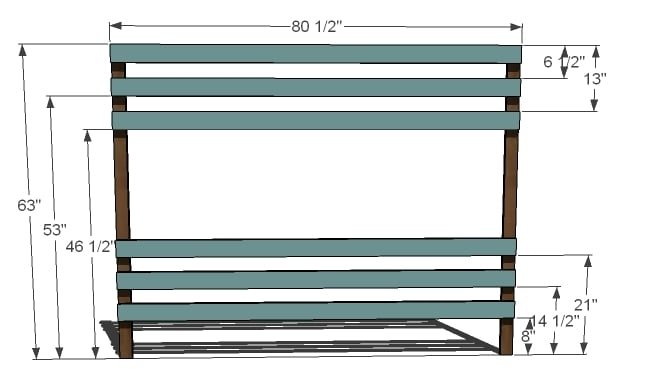
After you have built the back, cut 1×3 pieces to fit the legs between the slats. You can nail these pieces on with a finish nailer and glue, using 1 1/4″ nails. TIP: Don’t cut these pieces prior to building – measure and cut to the opening, to get the exact fit.
Bed Slat Supports
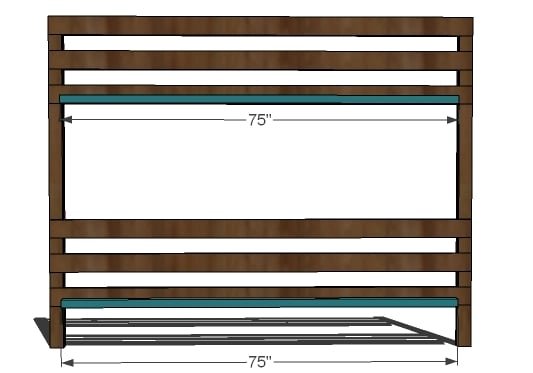
If your child is heavy or you expect the bed to take a large amout of abuse, I recommend purchasing metal braces, and screwing to the inside of the bed. Otherwise, use 2x2s, 2″ screws and WOOD GLUE to attach the bed slat supports to the back slats, keeping bottom edges flush.
Step 5
Rails and Ladder Rungs
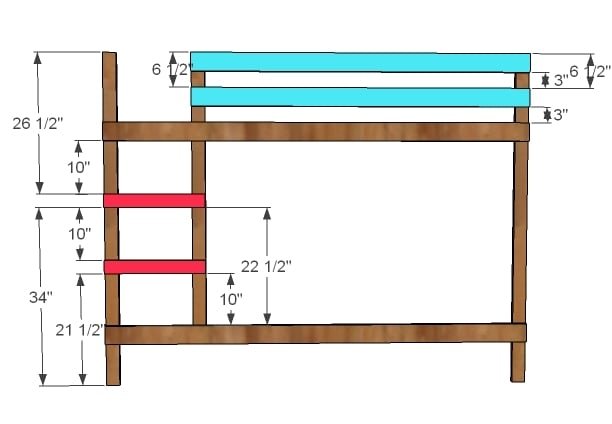
Mark the sides and the ladder piece as shown above. Glue and screw with 1 1/4″ the top bunk rails and the ladder rungs to the legs and the ladder side.
Trim the Front
As you did the back, trim the front, filling in all the spaces with 1×3 boards. Use 1 1/4″ nails or optionally screws and glue.
Step 8
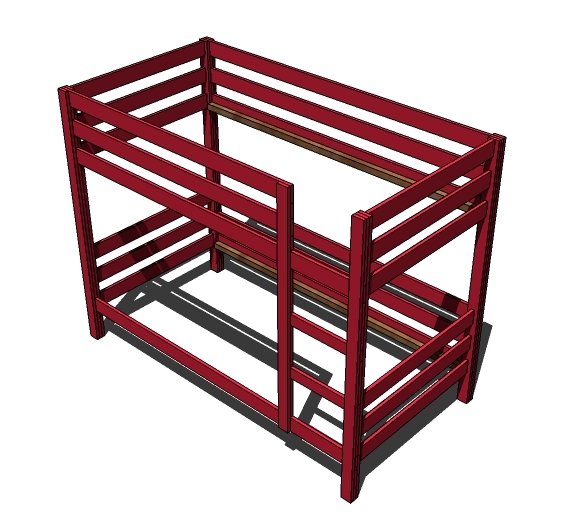
Assembly Assemble the bed by bolting the four pieces together, using 3″ bolts and washer and nuts, four bolts per leg. If you plan on seldom assembly/disassembly of the bed, you could also use 2″ wood screws from the inside of the end legs into the back/front legs.
Step 9
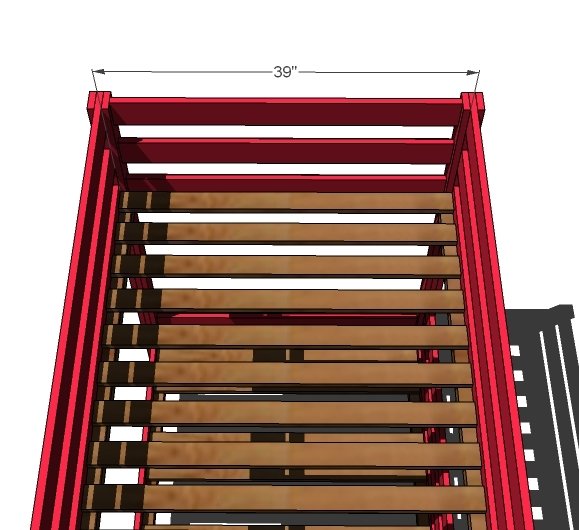
Mattress Slats Your mattress should have recommendations for bed slats. Use 1x3s, cut at 39″, layed on top of the wood slat supports, according to the recommendations of the mattress. Screw down with 1 1/4″ screws.
Finishing
Sand all surfaces, starting with a medium grit and finishing with fine. Wipe off the dust, fill any holes or gaps with wood filler, and sand smooth once dry. Apply primer if you're painting, then finish with your choice of paint or stain and seal with a durable clear topcoat. For outdoor projects, use exterior-rated primer, paint or stain, and sealer so the piece stands up to the weather.
Source (temporary): https://www.ana-white.com/woodworking-projects/classic-bunk-beds