Classic Storage Bed (Queen)
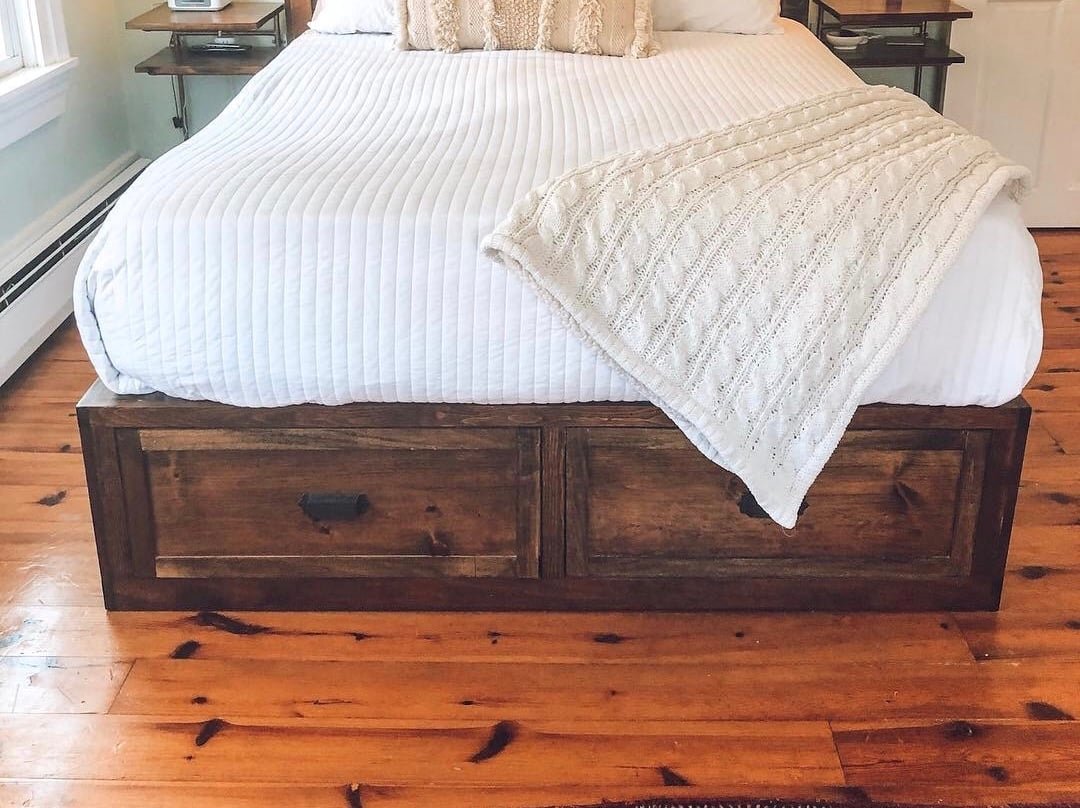
It's simple to build a storage bed! Just build three benches. show you exactly how. This plan is also available in a Standard King version.
Specifications
| Project type | Beds and Bed Frames |
|---|---|
| Room | Bedroom |
| Style | Cottage Style Furniture Plans |
| Difficulty | Intermediate |
| Estimated cost | $150 - $200 |
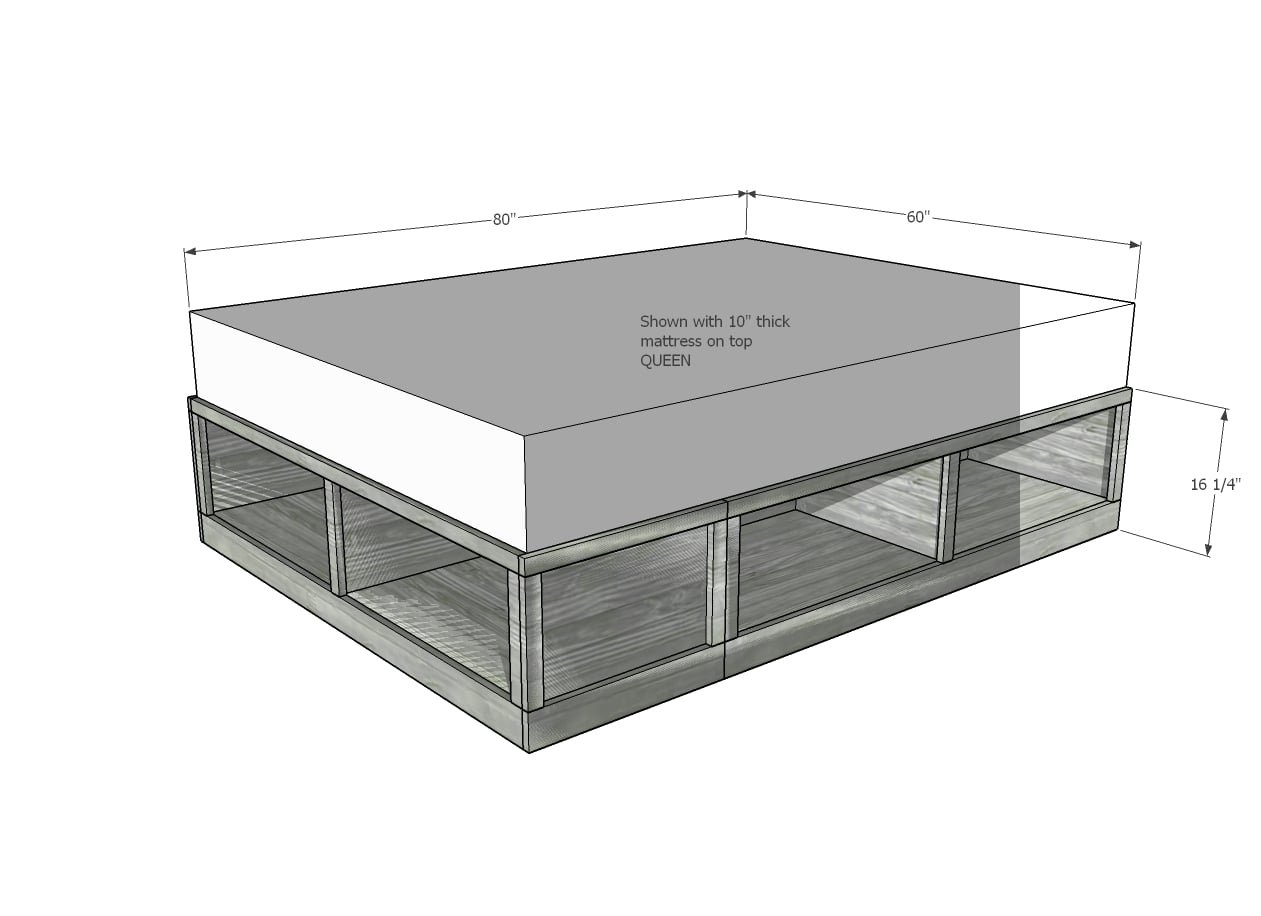
Dimensions
Use the size-specific shopping and cut lists below.
Shopping List
- 3 - 4x8 Sheets of 3/4" Cabinet Grade Plywood, MDF or AC Plywood*
- 1 - 4x8 Sheet of 1/4" thick plywood
- 4 - 1x2 @ 8 feet long
- 3 - 1x4 @ 8 feet long
*For a stained finish, cabinet grade plywood is recommended. For a painted finish you can use MDF (not fun to work with but inexpensive) or AC Plywood (will need more sanding but also less expensive)
OPTIONAL DRAWERS SHOPPING LIST
- 3 - 1x4 @ 8 feet long
- 6 - 1x6 @ 8 feet long
- 1 - sheet of 1/4" thick plywood
- 6 - 18" drawer slides
- 2 - 1x12 @ 8 feet long
Cut List
Carcasses
- 3 - 3/4" plywood @ 19-3/4" x 60"
- 9 - 3/4" plywood @ 19-3/4" x 14-3/4"
- 6 - 3/4" plywood @ 19-3/4" x 28-7/8"
- 3 - 1/4" plywood @ 15-1/2" x 60"
Face Frames
- 3 - 1x2 @ 60"
- 3 - 1x4 @ 60"
- 9 - 1x2 @ 11-1/4"
End Bench
- 2 - 1x4 @ 20-3/4"
- 2 - 1x2 @ 20-3/4"
- 4 - 1x2 @ 11-1/4"
Center Support
- 2 - Scrap plywood strip @ 60" x ~7-1/2"
- Scrap plywood pieces 20" long
OPTIONAL DRAWERS - Should be built to fit openings and drawer slides
- 12 - 1x4 @ 18" - drawer slide cleats
- 12 - 1x6 @ 18" - drawer box sides
- 12 - 1x6 @ ~24-7/8" - drawer box front and back - ADJUST TO FIT YOUR OPENINGS AND DRAWER SLIDES
- 6 - 1/4" plywood @ 18" x ~26-3/8" - drawer bottoms - cut to fit the drawer bottom
- 6 - 1x12 @ 27-1/2" - Drawer Faces
Tools
- measuring tape
- square
- safety glasses
- hearing protection
- kreg-jig
- drill
- circular saw
- compound miter saw
- table saw
- nailer
- sander
Step-by-step Instructions
Step 1
Attach the bench ends and divider to the bench top with 3/4" pocket holes and 1-1/4" pocket hole screws. Pocket holes should be placed about an inch from each edge and centered, three per joint is plenty. TIP: Use the shelf boards (attached in next step) as a spacer to guide placing the divider perfectly centered. BUILD THREE BENCHES.
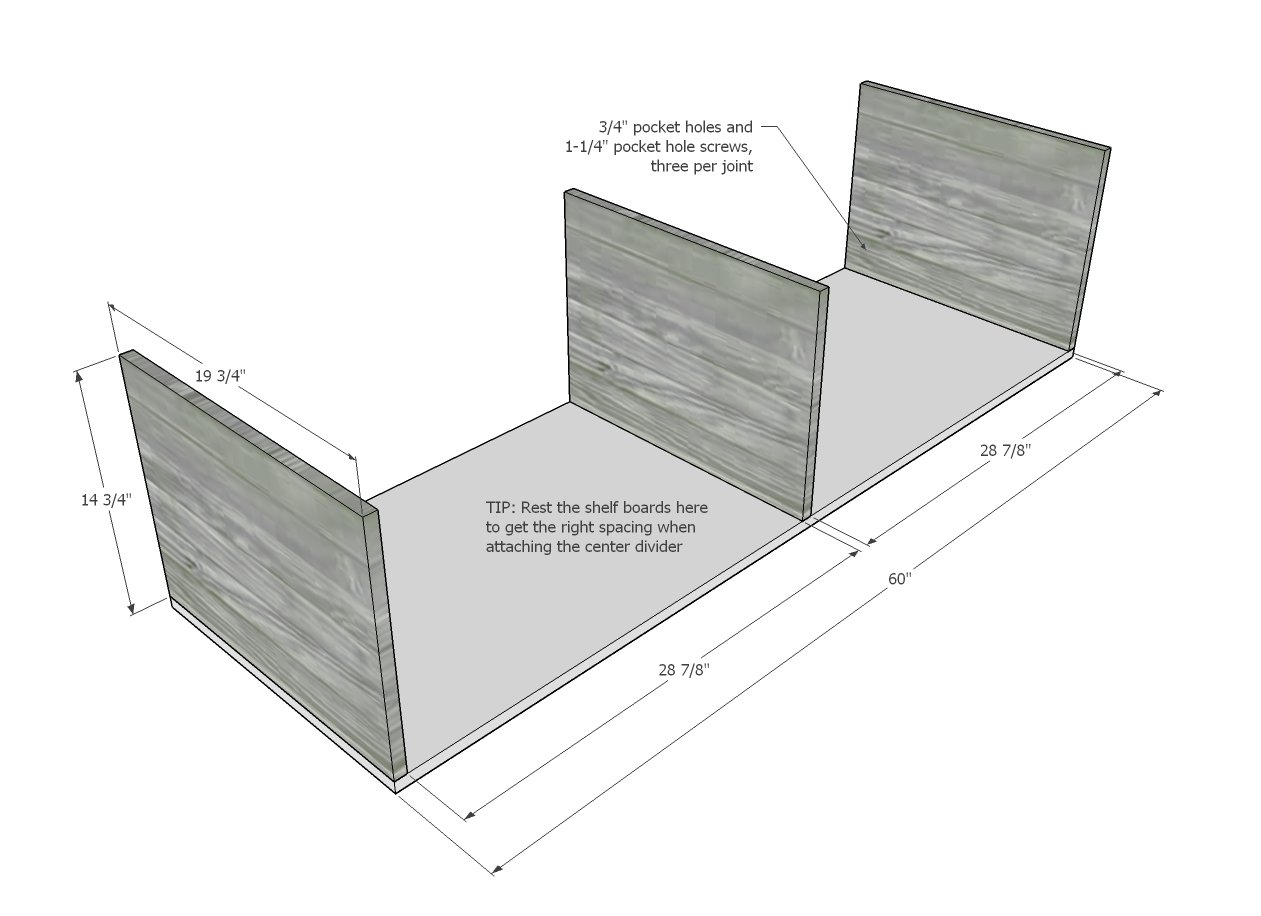
Drill 3/4" pocket holes on each end of the shelves.
Attach to the sides and dividers. Scrap wood blocks can be cut to help with assembly as shown in diagram. CONTINUE FOR ALL THREE BENCHES
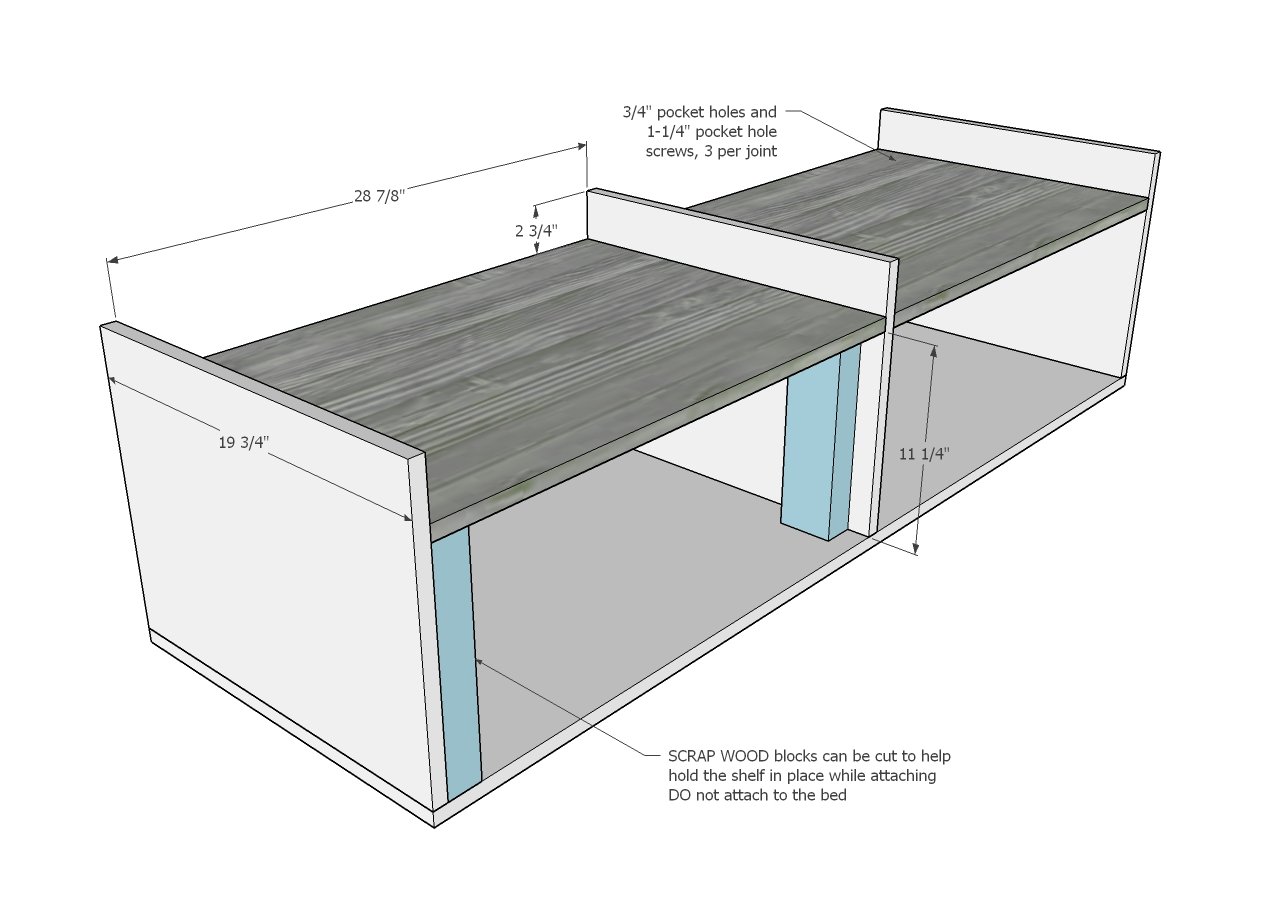
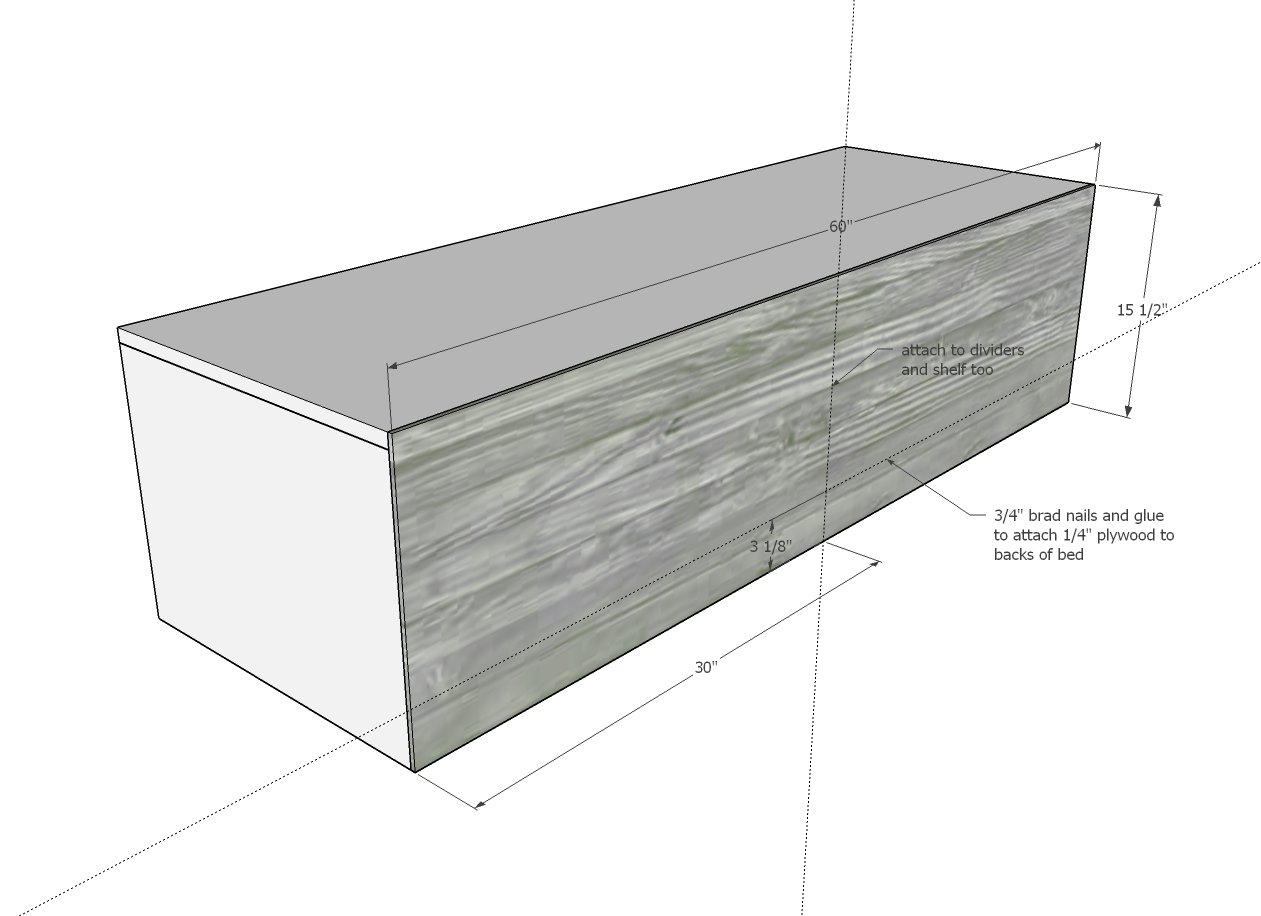
Nail and glue 1/4" plywood backs to all three benches.
CONTINUE FOR ALL THREE BENCHES
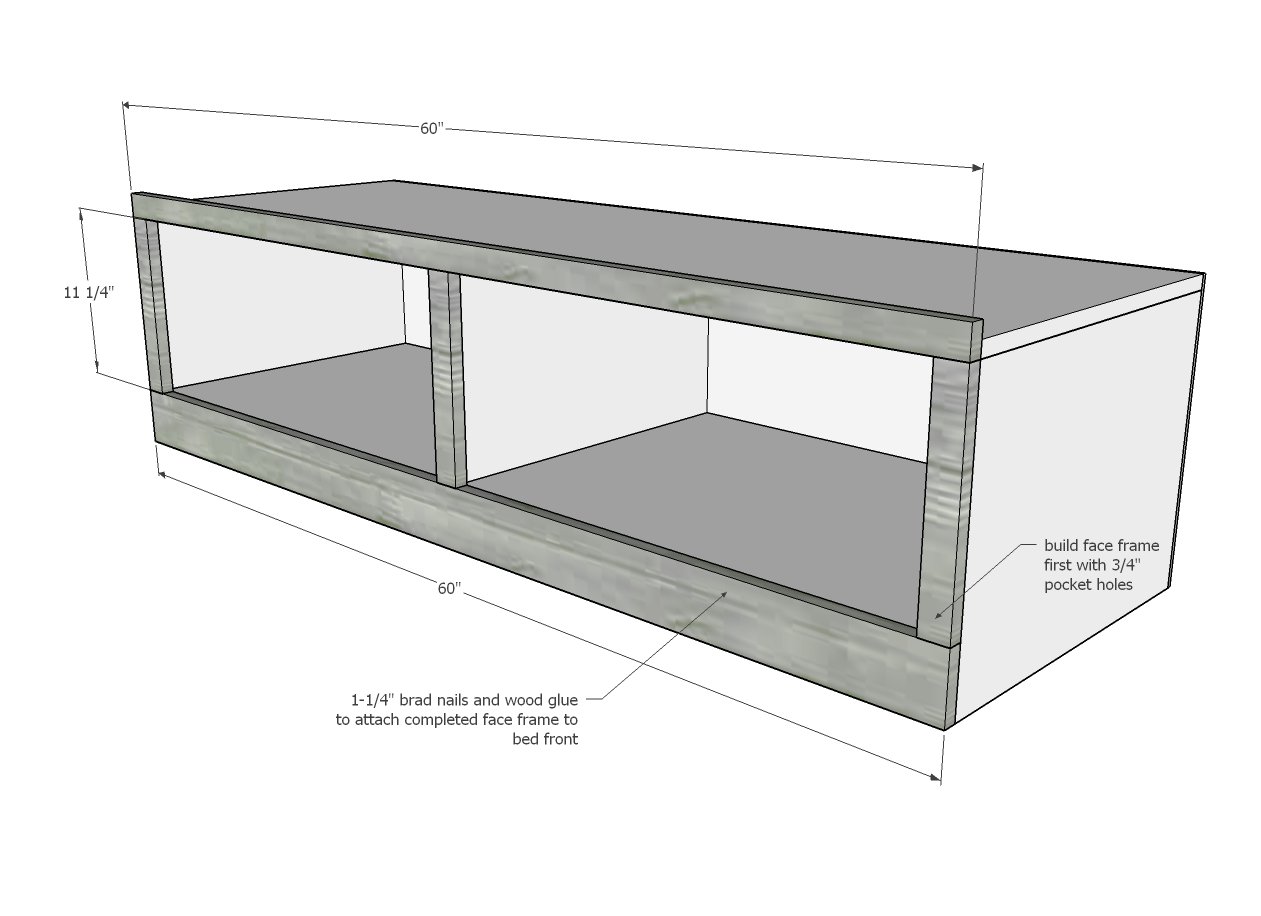
Cut the 1x boards with a miter saw. Build face frames on a flat workbench.
Nail completed face frames to all three benches.
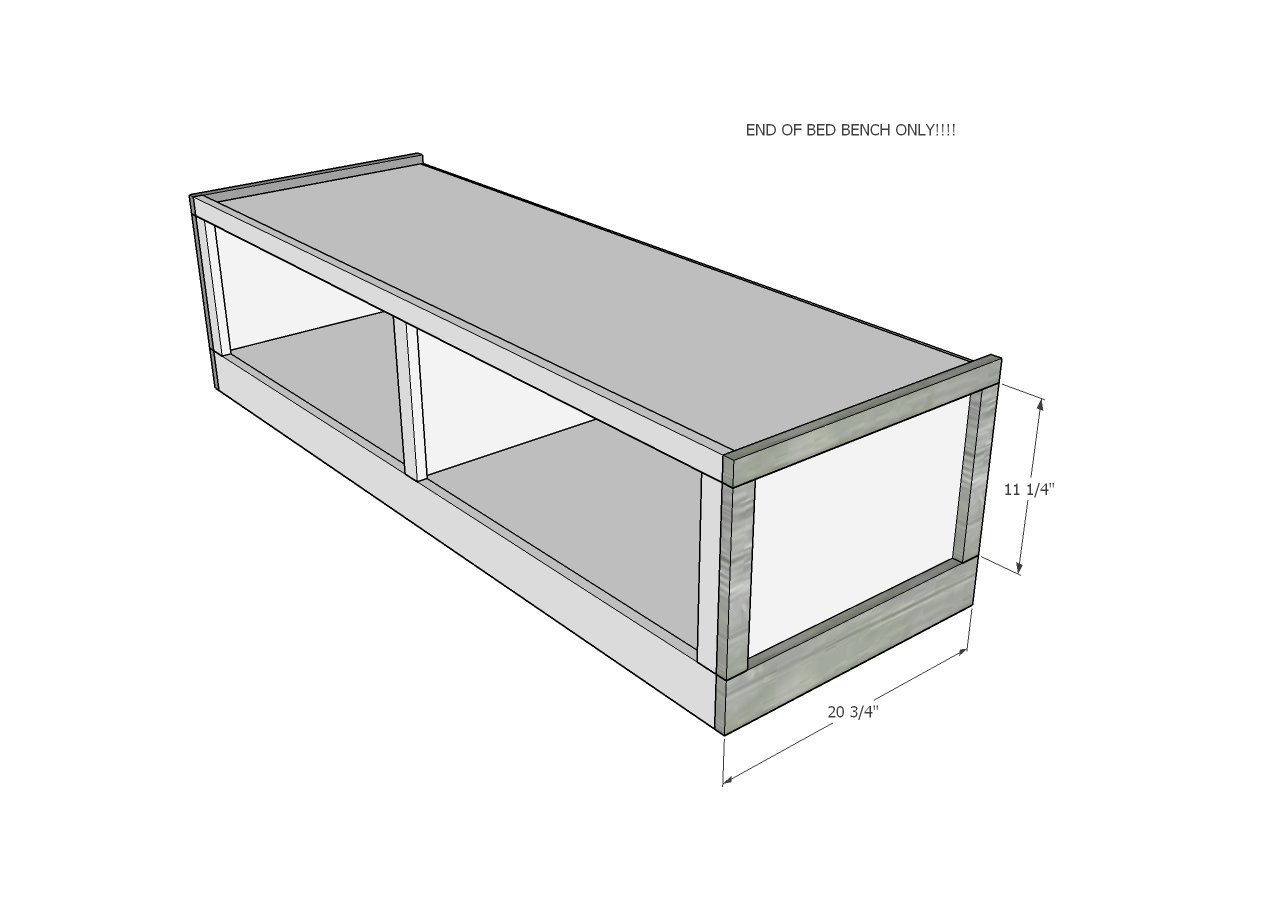
END BENCH ONLY
For just the end bench, build two face frames to trim out ends. Nail and glue to the ends of the end bench only.
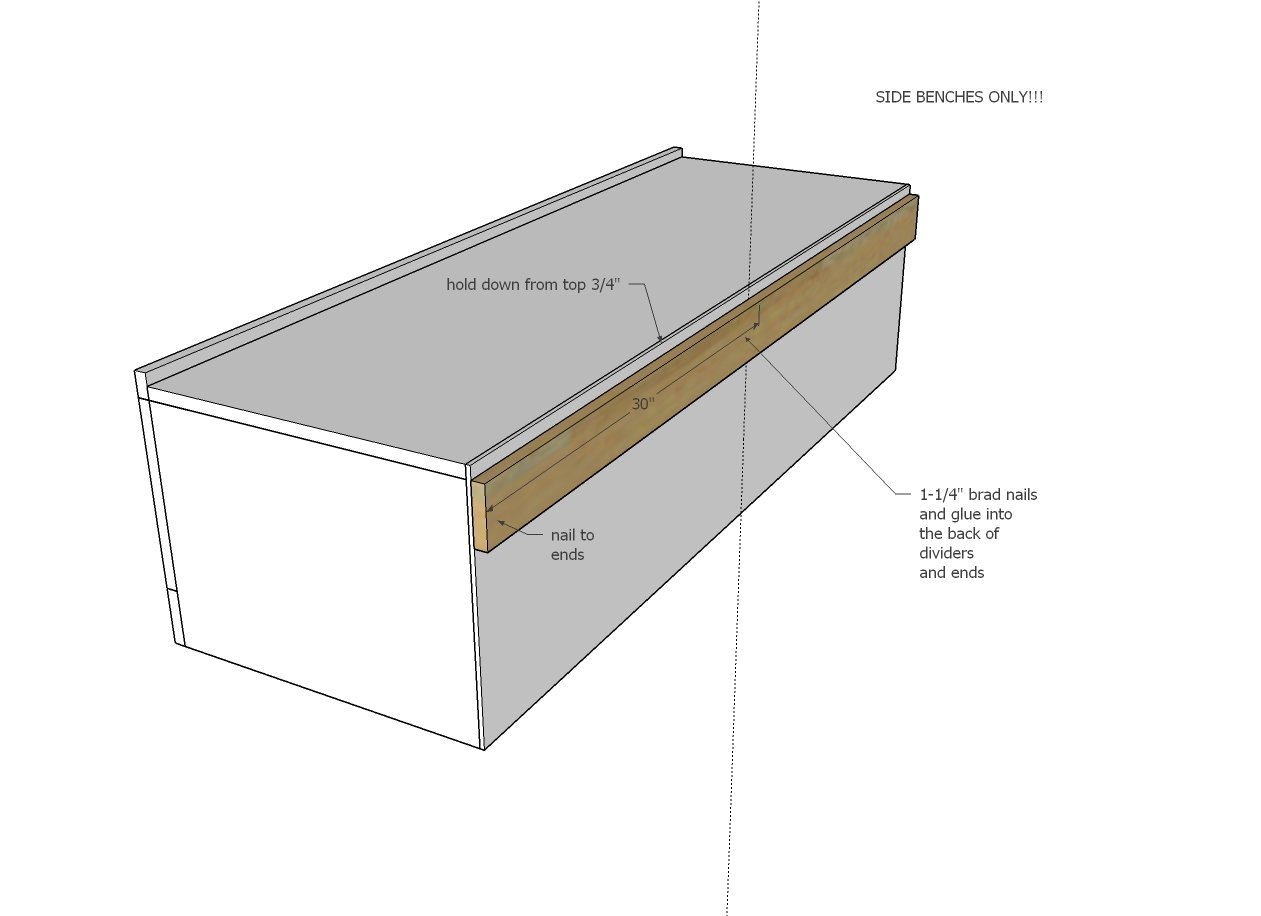
SIDE BENCHES ONLY
Attach 1x4 cleat to the back of the SIDE BENCHES ONLY, held down 3/4" from top of bed. Nail into the divider and end backs with glue.
Arrange the three benches in room.
You can screw together if desired. Lay scrap wood plywood (can be random sized) in the opening in the center of the bed. We recommend screwing down (so it's easy to disassemble the bed at a later time). You can use 1-1/4" pocket hole screws, 1-1/2" self tapping screws would be less expensive.
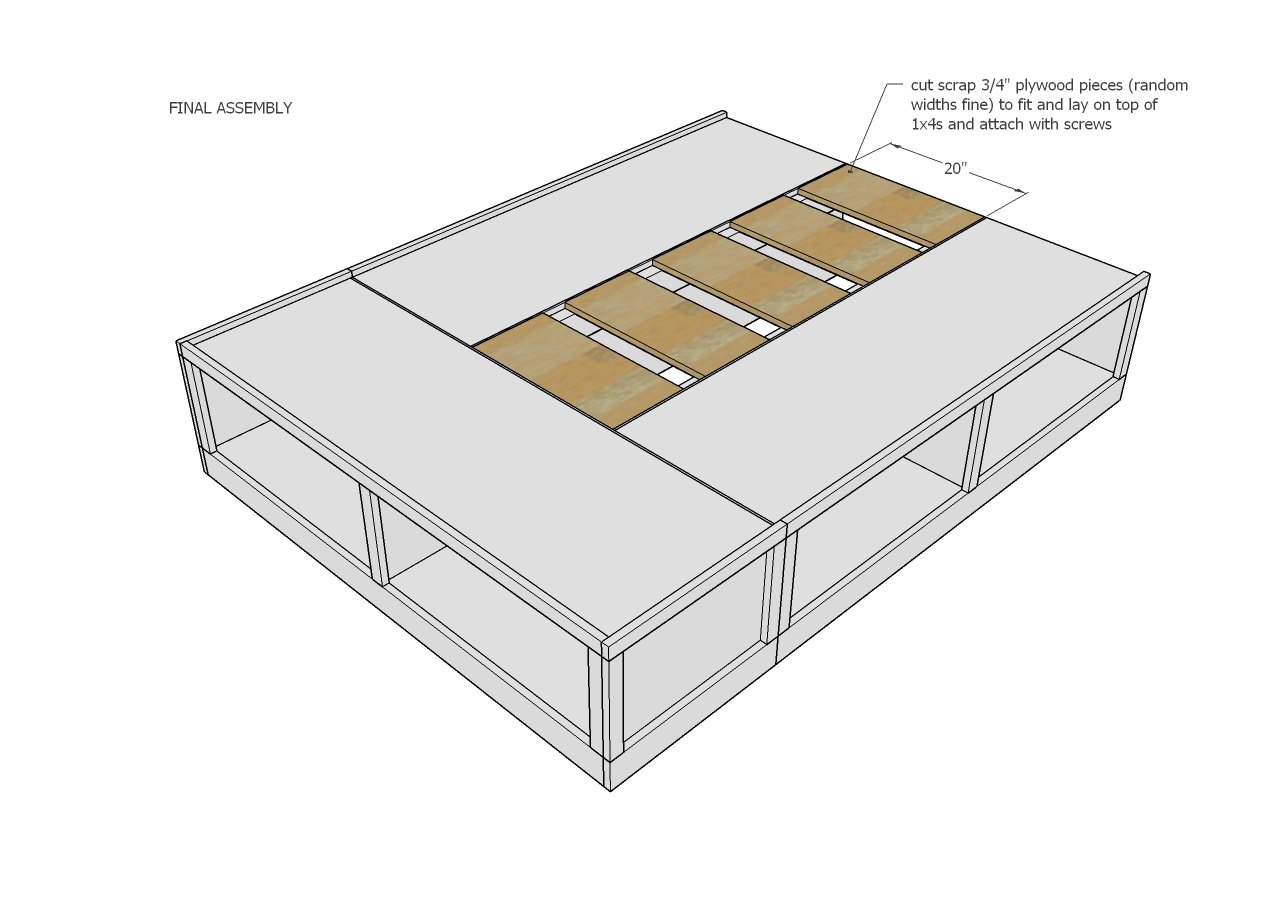
OPTIONAL DRAWERS
Draw a line on 1x4s, 1" up from bottom edge of 1x4. Attach drawer slides to the 1x4, with front edge of drawer slide cabinet member flush with front edge of 1x4. The holes in the center of the drawer slide should line up with your pencil mark, 1" up from bottom edge of 1x4 - so you know your slides are being installed level. Remember that the opposing drawer slide needs to be installed in mirror. Set the 1x4s inside the cubbies and nail to the sides of the cubbies with 1-1/4" brad nails. The front edge should be lined up with the front edge of your plywood carcasses. Build the drawer boxes from 1x6s as shown. The sides should always be 18" to match your drawer slides. The fronts and backs may need to be altered in length to fit your openings and your drawer slides. Build the boxes with 3/4" pocket holes on the outsides and 1-1/4" pocket hole screws. Nail 1/4" plywood to bottom of drawer box with glue and 3/4" brad nails. Install the drawer member slides on the drawer boxes. Fit drawers inside the drawer slides.
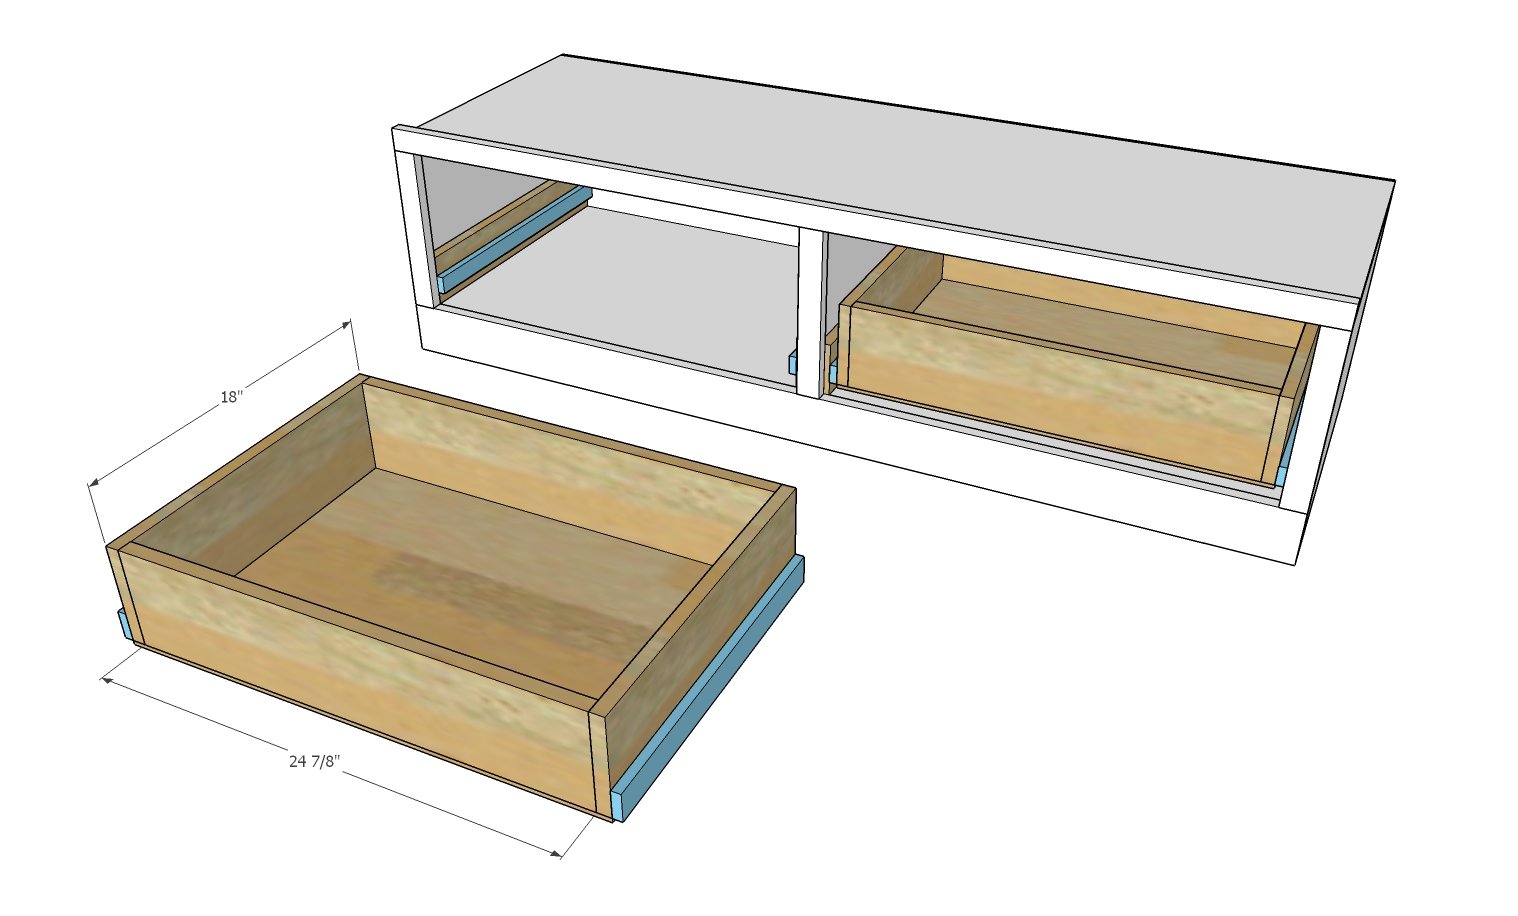
Measure and cut the drawer faces to fit.
You may need to cut the drawer down in size with a table saw. Nail drawer face in a few places to front of drawer box with even gap around all four sides. Avoid nailing where hardware will be placed. Remove drawer and further secure with 1-1/4" screws (you can use pocket hole screws) from inside of drawer. Avoid screws where hardware will be placed.
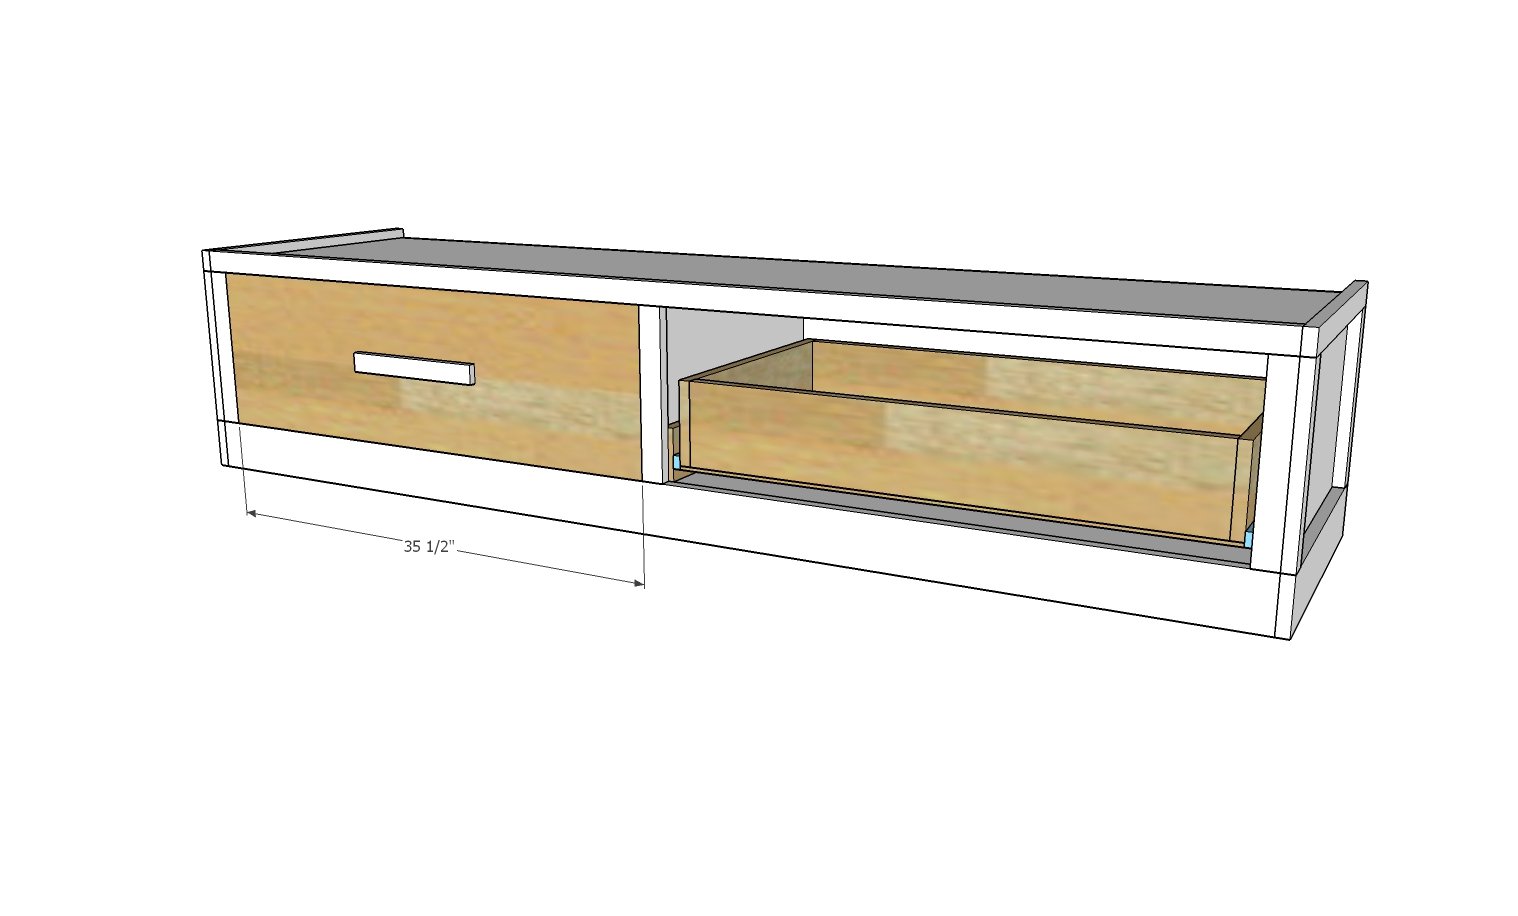
Finishing
Sand all surfaces, starting with a medium grit and finishing with fine. Wipe off the dust, fill any holes or gaps with wood filler, and sand smooth once dry. Apply primer if you're painting, then finish with your choice of paint or stain and seal with a durable clear topcoat. For outdoor projects, use exterior-rated primer, paint or stain, and sealer so the piece stands up to the weather.
Source (temporary): https://www.ana-white.com/woodworking-projects/classic-storage-bed-queen