Classic Storage Wall System Bridge
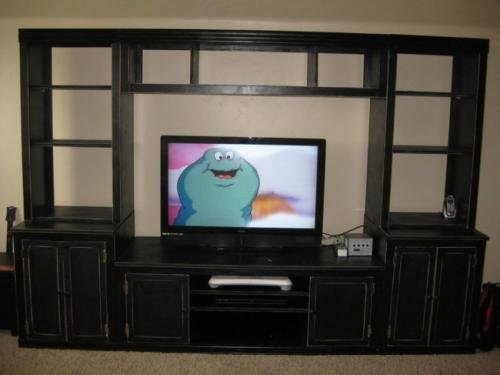
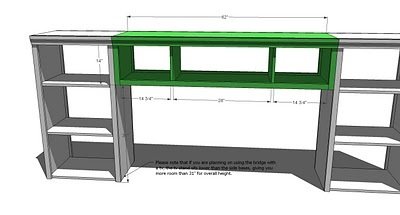
A bridge over your media station can give your storage a built in look and quality. But bridges can often be very expensive and not fit just right. With this simple plan that works with the rest of the Classic Media Storage Collection, you can build your own bridge, fit just perfect for your own tv, without spending a bundle.
Specifications
| Project type | Media and Entertainment Centers |
|---|---|
| Room | Storage Solutions |
| Style | Farmhouse Furniture |
| Difficulty | Beginner Projects |
| Estimated cost | Under $20 |
Dimensions
Use the size-specific shopping and cut lists below.
Shopping List
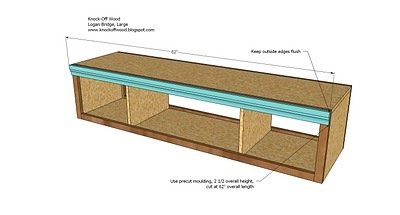
1/2 Sheet of 3/4″ MDF or Plywood, cut into 16 1/2″ Strips, 8′ long 3 – 1×2 1- 1×3 (you will only need 60″) at least 62″ of 2 1/2″ high moulding
Cut List
A) 2 – 1×16 @ 13 1/4” (Sides) B) 1- 1×16 @ 62” (Top) C) 1 – 1×16 @ 60 1/2″ (Bottom) D) 1 – 1×16 @ 12 1/2″ (Centers) E) 4 – 1×2 @ 14″ (Side Trim) E) 1 – 1×3 @ 59″ (Front Top Trim) F) 3 – 1×2 @ 59″ (Back Top and Bottom Trim) Crown Moulding, 2 1/2″ overall height, 62″ Long
Tools
- measuring tape
- square
- pencil
- safety glasses
- hearing protection
- kreg-jig
- drill
- circular saw
- nailer
- sander
Step-by-step Instructions
Step 1
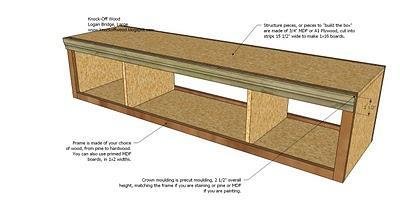
Wood Composition. The above diagram shows the composition of the different pieces. The “box” is made of 3/4″ plywood or MDF, the trim is mostly 1x2s and a 1×3 boards (pine or MDF for paint grade, hardwood to match A1 plywood for staining). The crown moulding can also be MDF or pine for painting, but should match the A1 plywood for staining.
Step 2
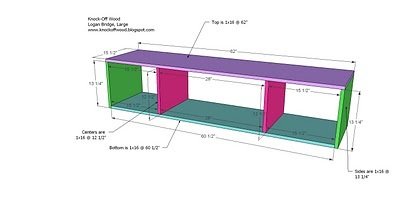
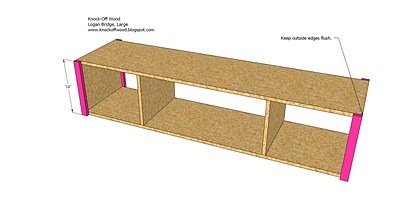
Build the box. Begin by attaching the centers, shown in pink, to the top. Then attach the sides to the top. Finally attach the bottom to the sides and the centers. Use the measurements above to guild you. You should use the 2″ fasteners and glue.
Step 3
Side Trim. Trim the sides, as shown above. Keep outside edges flush. Make sure you fasten the side trim to the top and bottom, and not just the sides. Make sure the bridge is square before attaching. Use the 2″ fasteners.
Step 4
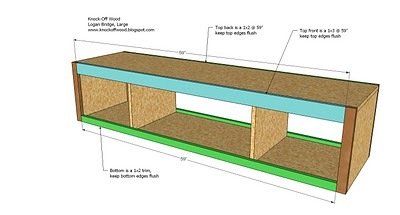
Top, Front and Back, and Bottom Trims. Attach the 1×3 top trim, shown in blue, to the top, as shown above. Then fasten the remaining trim pieces to the back top and the bottom, in green. Keep outside edges flush. Make sure you fasten to the centers too.
Step 5
Finishing
Sand all surfaces, starting with a medium grit and finishing with fine. Wipe off the dust, fill any holes or gaps with wood filler, and sand smooth once dry. Apply primer if you're painting, then finish with your choice of paint or stain and seal with a durable clear topcoat. For outdoor projects, use exterior-rated primer, paint or stain, and sealer so the piece stands up to the weather.
Source (temporary): https://www.ana-white.com/woodworking-projects/classic-storage-wall-system-bridge