Classic Wood Coffee Table with Two Drawers and Shelf
Here's a great coffee table plan made of solid pine boards and simple building techniques, featuring two drawers and a roomy bottom shelf. This is a free, step by step woodworking plan with detailed diagrams, shopping list and cut list to help you build your own coffee table.
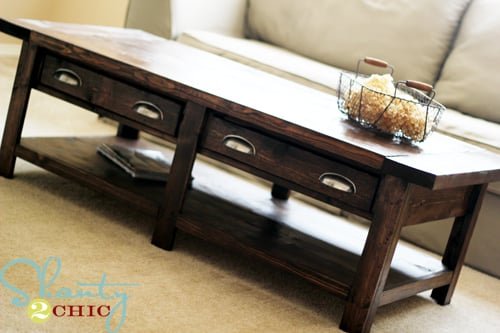
Specifications
| Project type | Coffee Tables |
|---|---|
| Room | living room |
| Style | Farmhouse Furniture |
| Difficulty | Advanced |
| Estimated cost | $100-$150 |
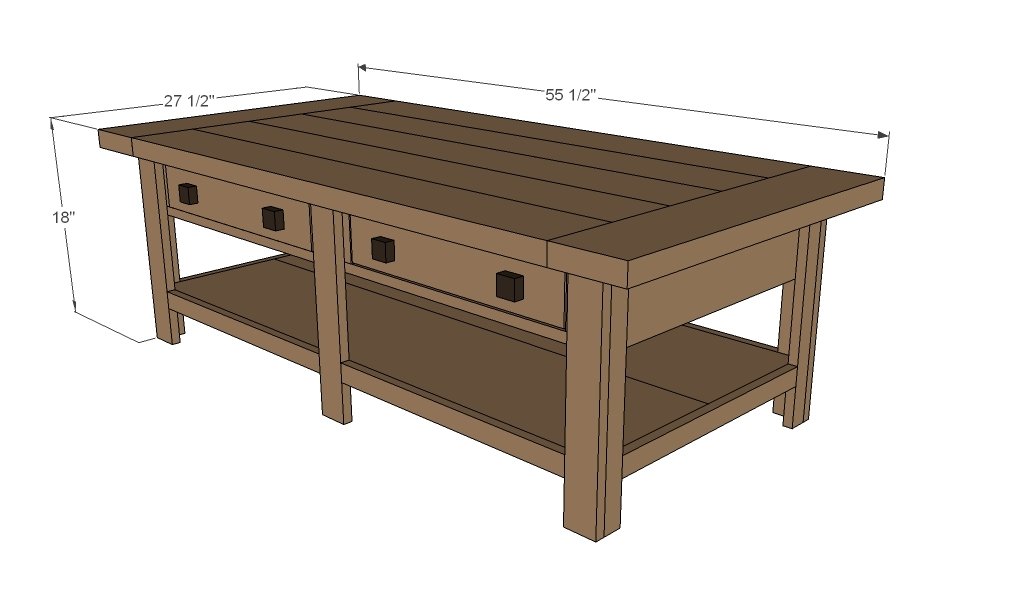
Dimensions
Use the size-specific shopping and cut lists below.
Shopping List
- 1 – 1x12 @ 8 feet long
- 1 – 1x6 @ 8 feet long
- 2 – 2x6 @ 8 feet or stud length
- 1 – 2x6 @ 10 feet long (cut breadboard ends from this board)
- 7 – 1x3 @ 8 feet long
- 2 – 1x2 @ 8 feet long
- 1 – 1x4 @ 4 feet long
- 1 – ¼” thick plywood, ¼ of a sheet
- 2 sets 16” euro side/bottom corner mount white drawer slides
- 4 knobs
- 1 ¼” brad nails
- 2” brad nails
- 1 ¼” pocket hole screws
- 2 ½” pocket hole screws
Cut List
- 2 – 1x12 @ 4 feet long- bottom shelf
- 4 – 1x3 @ 22 ½” long - bottom shelf supports
- 4 – 1x2 @ 16 ½” long - legs
- 6 – 1x3 @ 16 ½” long - legs
- 1 – 1x6 @ 48” long - back apron
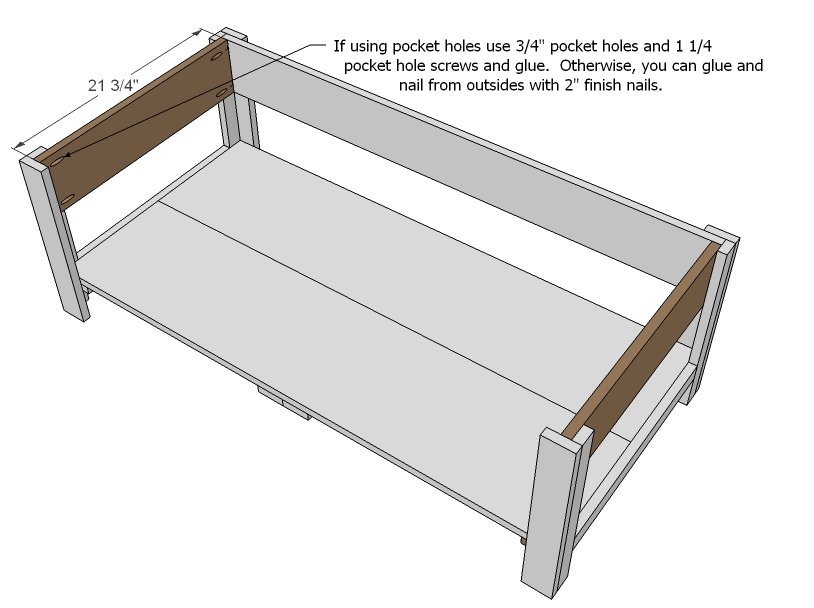
- 2 – 1x6 @ 21 ¾” long - side aprons
- 4 – 1x2 @ 21” long - trim
- 2 – 1x2 @ 19 ½” long - trim
- 4 – 1x3 @ 46 ½” long drawer framing
- 8 – 1x3 @ 3 ¾” long - drawer framing
- 4 – 1x3 @ 16” long - drawers
- 4 – 1x3 @ 17” long - drawers
- 2 – 1x4 @ 19 ¼” long - drawer faces
- 2 – ¼” plywood @ 18 ½” x 16” - drawer bottoms
- 5 – 2x6 @ 44 ½” - top
- 2 – 2x6 @ 27 ½” - top, measure and cut to fit
Recommend cutting as you go to ensure perfect fit
Tools
- measuring tape
- square
- pencil
- safety glasses
- hearing protection
- kreg-jig
- drill
- circular saw
- nailer
- sander
- countersink drill bit
Step-by-step Instructions
Step 1
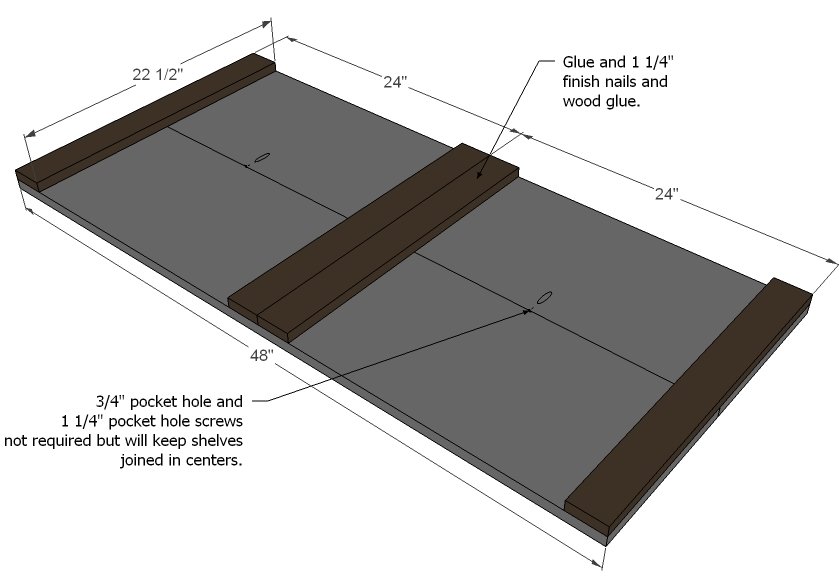
This plan assumes the following board sizes. Make sure you boards are these widths or this plan will not work right. If your boards are a different width, you will need to rip to the right size or adjust the plan to fit your board widths. 1x12 11 ¼” wide x ¾” thick 1x3 2 ½” wide x ¾” thick 1x2 1 ½” wide x ¾” thick 1x6 5 ½” wide x ¾” thick 2x6 5 ½” wide x 1 ½” thick 1x4 3 ½” wide x ¾” thick This is definitely an advanced plan because of all the pieces and the drawers, so make sure you read through entire plan before starting. Also, I would recommend cutting as you go for the best fit on trim boards. Start by attaching 1x3s to bottom of the 1x12s to create the bottom shelf. Use glue and 1 ¼” finish nails. Adjust for square.
Step 2
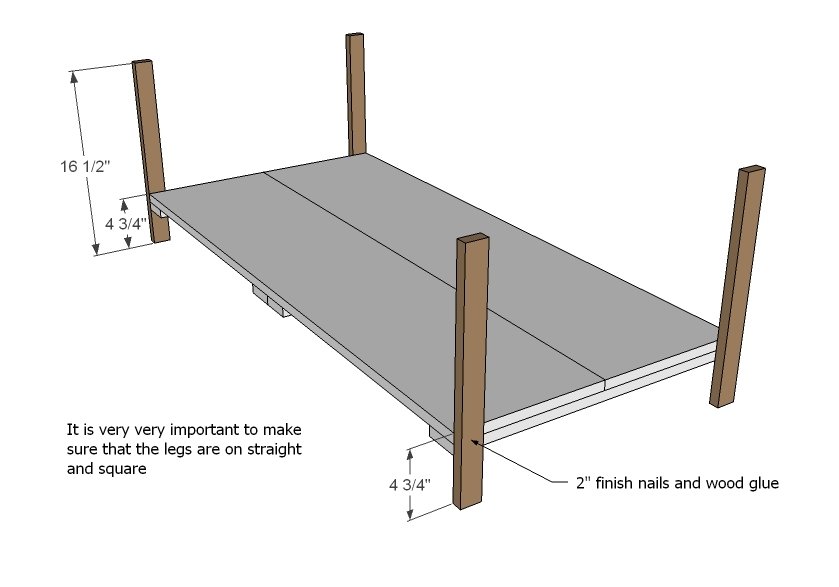
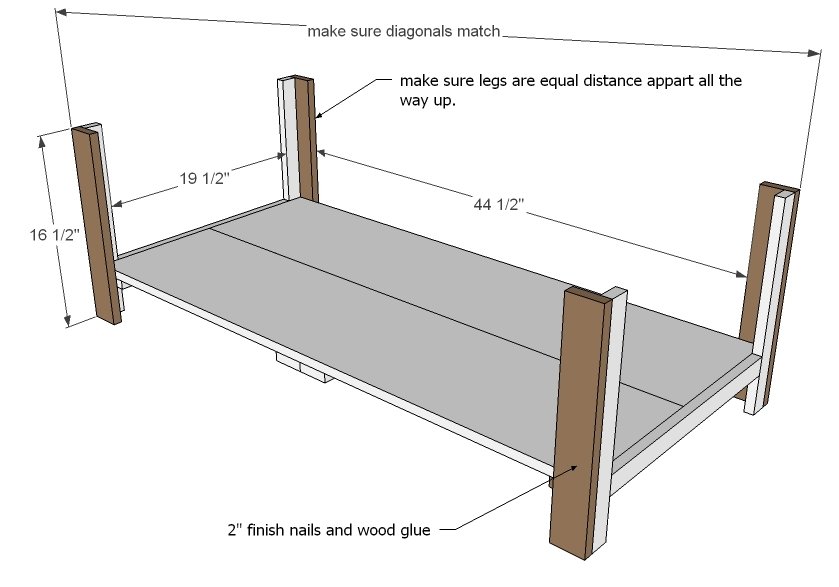
Mark all legs 4 ¾” from base and attach to the bottom shelf. Aternatively, the legs can be attached with pocket holes. Use glue and make sure the legs are attached square, with the distance between the legs equal all the way up.
Step 3
Once the 1x2 legs are on, add the 1x3 legs. Keep outside edges flush to make legs appear as one solid leg and check again for square. Also take a diagonal to ensure the table is square. This is very important because if your box is not square, your drawers will not slide correctly.
Step 4
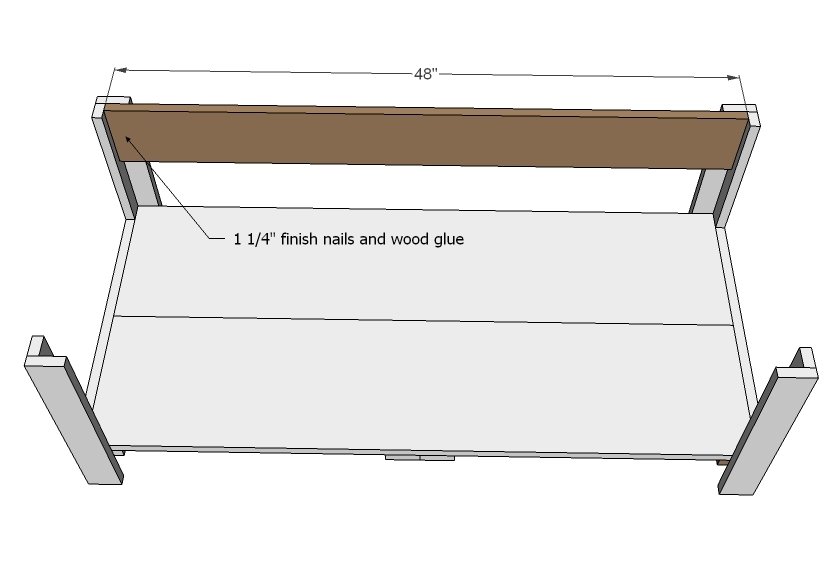
Attach back apron to top back side as shown above. Use glue and 1 ¼” finish nails. Also attach end 1x2s to the back apron with 2” finish nails.
Step 5
Step 6
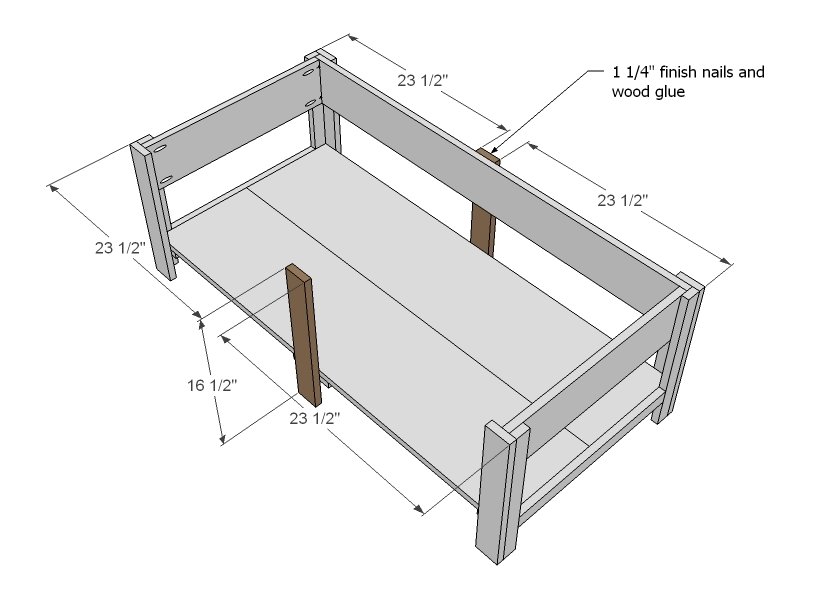
Measure and mark placement of center legs. Nail and glue to project, ensuring legs are placed square with bottom shelf and parallel to end legs with an equal distance between the front legs.
Step 7
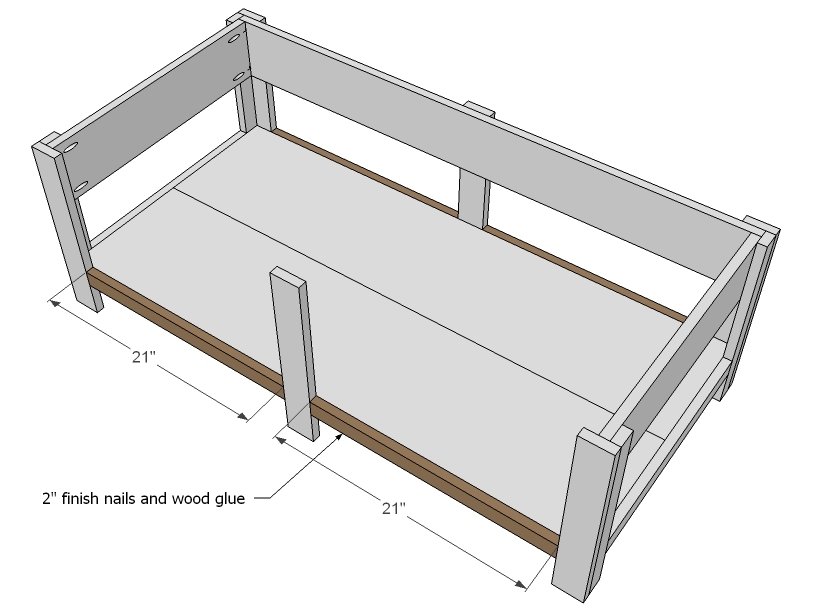
Bottom shelf trim is nailed on flush to top. TIP: Measure and cut to fit for best fit. Attach side trim as well.
Step 8
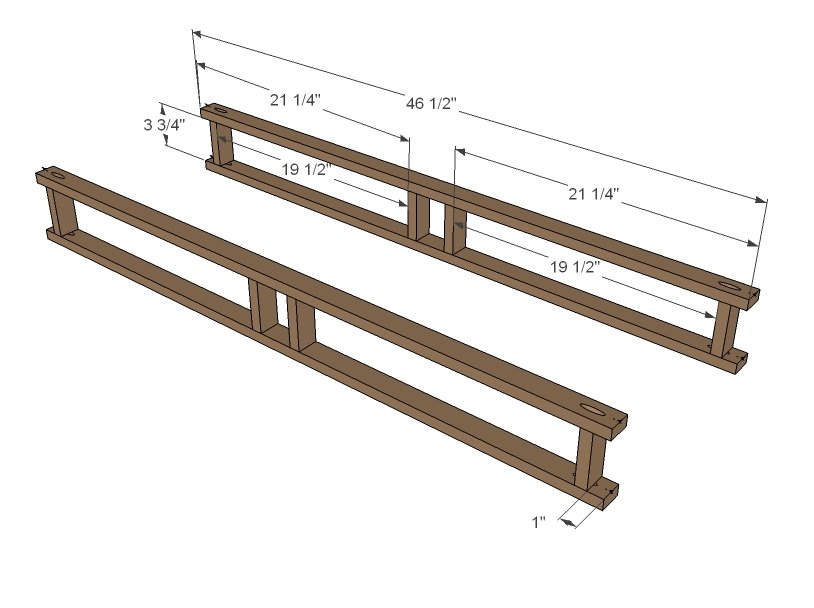
The drawer frames also work to trim out the front of the project, so test after building to make sure they fit correctly. These are made with 1x3 boards for extra strength – if using pocket holes, drill two pocket holes per end. These must be built exactly square and exactly the same for the drawers to slide correctly.
Step 9
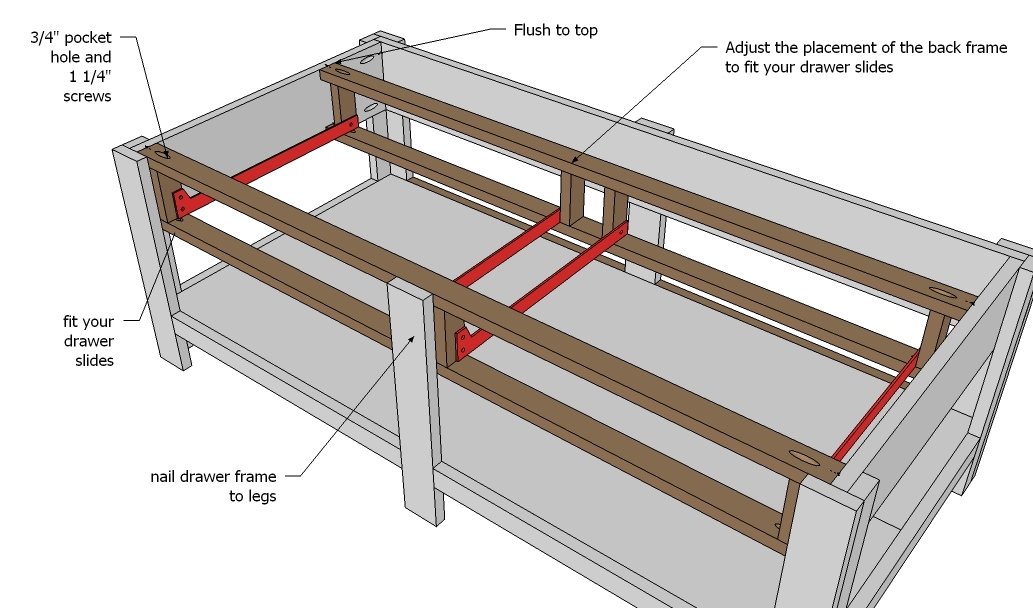
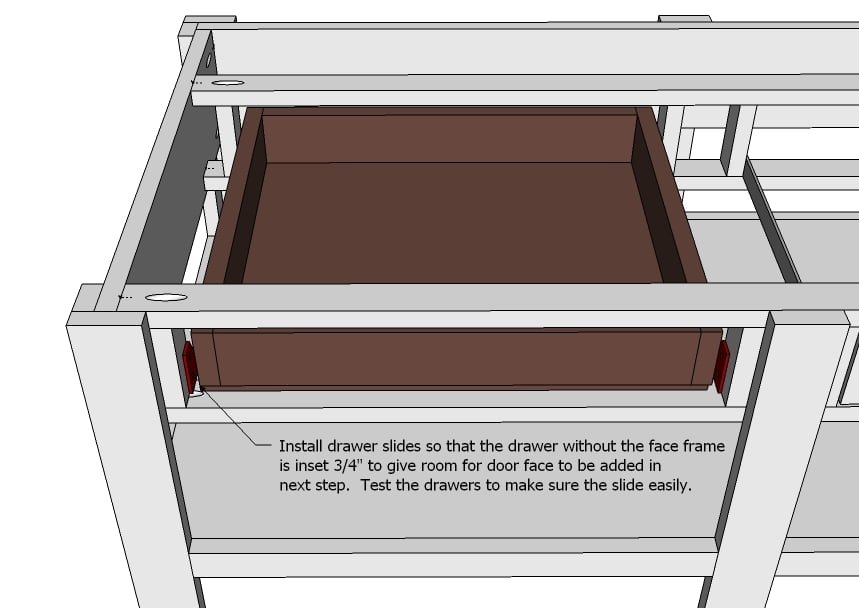
Install drawer frames in coffee table top, flush to the top as shown in diagram. Place back drawer frame to fit your drawer slides as shown in diagram. The slides need to sit ¾” inset from the front of the front frame to allow for the drawer face to hide the slides. Here is a good video showing how to install drawer slides
Step 10
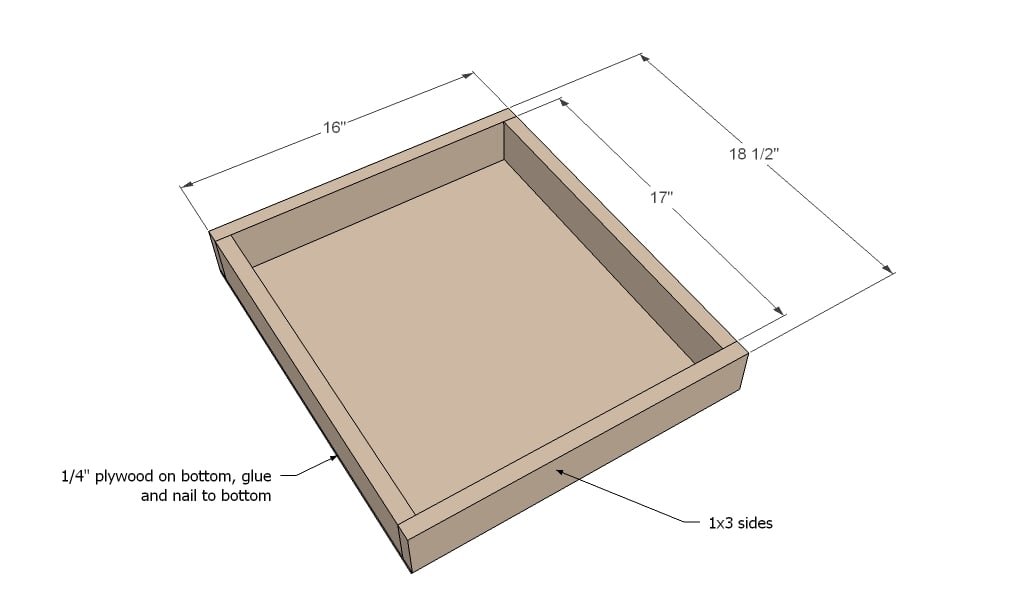
Drawers need to be built 1” less than the opening width to allow for drawer slides. Build drawers from 1x3 boards, and attach plywood to bottom. Attach drawer slide drawer members to bottom of drawers.
Step 11
Fit drawers in cabinet, making sure they slide smoothly and easily. Remember the drawer face still needs to be installed.
Step 12
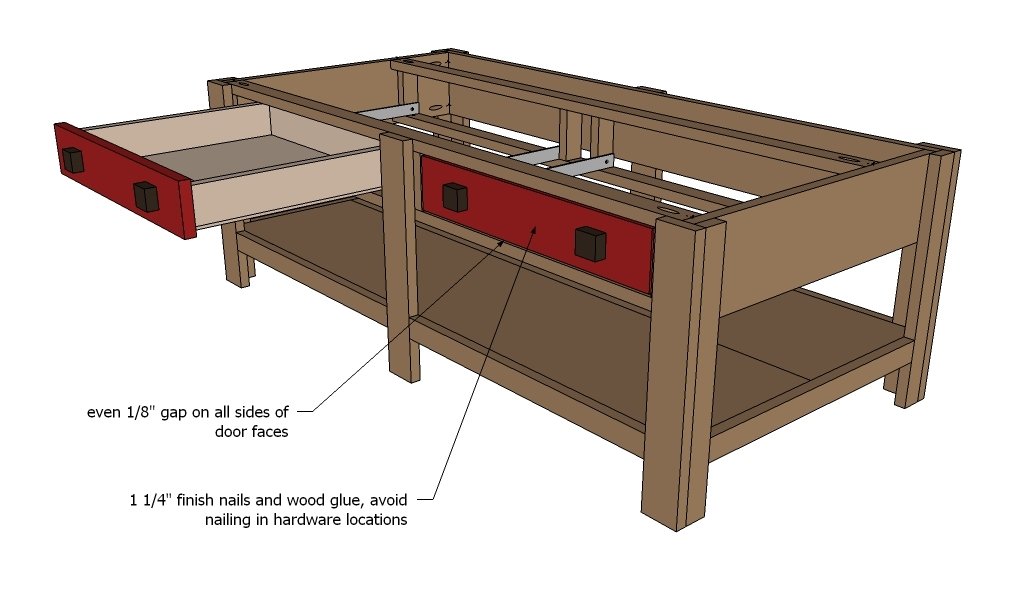
Drawer faces are nailed to drawer box with 1 ¼” finish nails and glue, with an even gap around all sides. Attach hardware – you may need to drill special holes to accommodate the drawer hardware with the double thick face by drilling through drawer box with larger bit sized for screw head, and drilling through face of drawer with bit sized for screw shaft.
Step 13
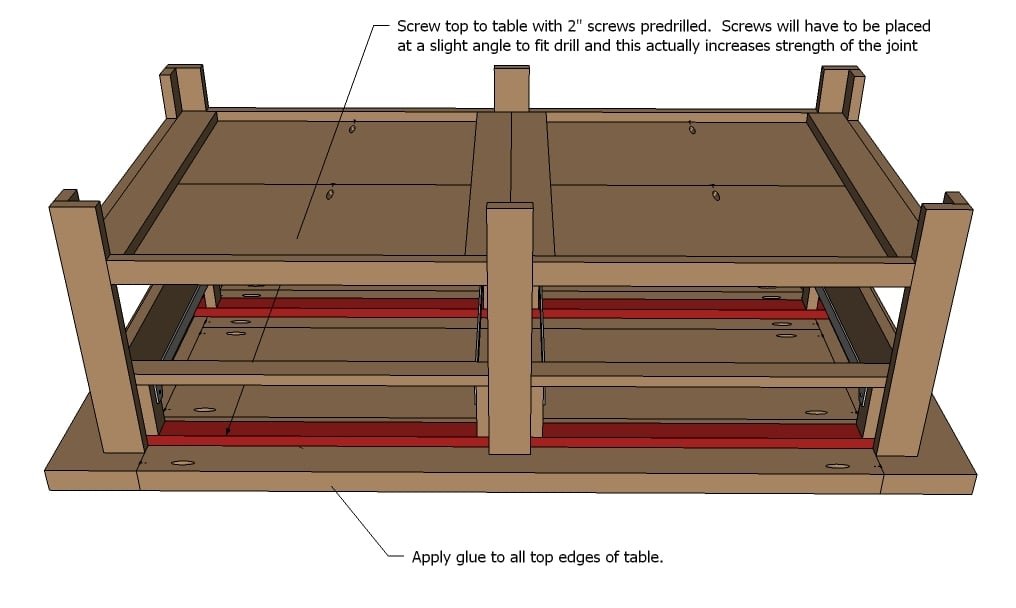
Remove drawers. Attach top to base as shown above with 2” screws and wood glue.
Step 14
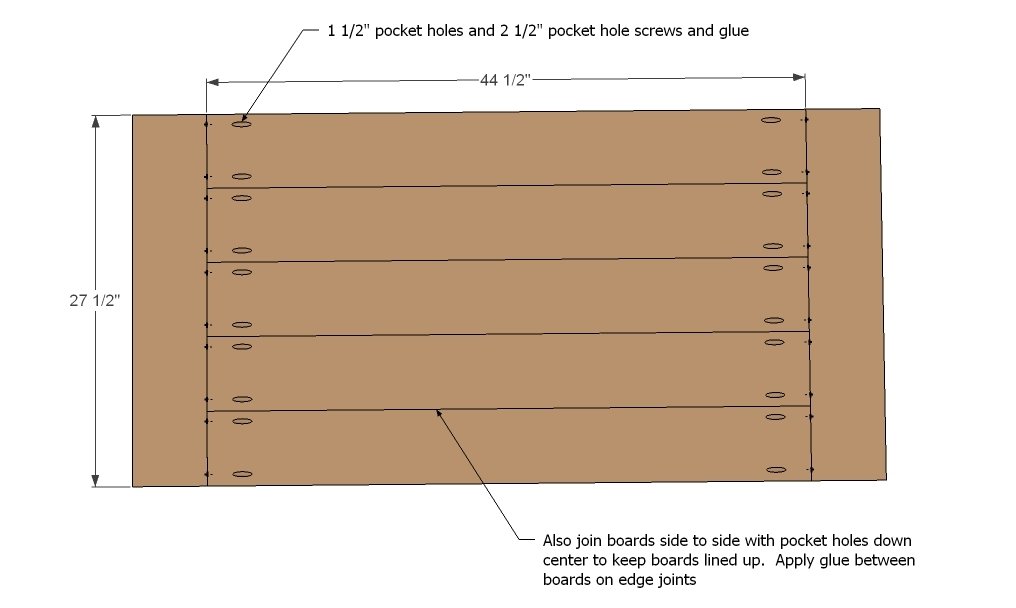
And here's the top diagram.
Finishing
Sand all surfaces, starting with a medium grit and finishing with fine. Wipe off the dust, fill any holes or gaps with wood filler, and sand smooth once dry. Apply primer if you're painting, then finish with your choice of paint or stain and seal with a durable clear topcoat. For outdoor projects, use exterior-rated primer, paint or stain, and sealer so the piece stands up to the weather.
Source (temporary): https://www.ana-white.com/woodworking-projects/classic-wood-coffee-table-two-drawers-and-shelf