Clubhouse Bed
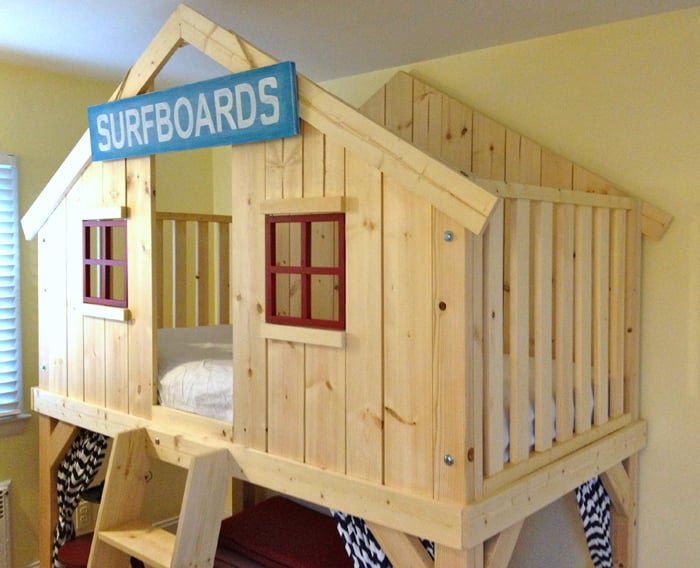
Looking for a creative way to upgrade your kid’s bedroom? This DIY Clubhouse Bed is the perfect combination of loft bed, playhouse, and cozy hideaway —all in one build! Inspired by Pottery Barn’s Eli Fort Bed, this version is designed to be stronger, more affordable, and easy to build using standard off-the-shelf lumber. This bed features a lofted sleeping space above and a play space or reading nook underneath, all enclosed in a charming clubhouse-style frame. Build it with basic tools and follow the step-by-step instructions for a weekend woodworking project that your kids will love for years.
Specifications
| Project type | Beds and Bed Frames |
|---|---|
| Room | Bedroom |
| Style | Children's and Kid's Room Furniture and Toy Plans |
| Difficulty | Intermediate |
Dimensions
Use the size-specific shopping and cut lists below.
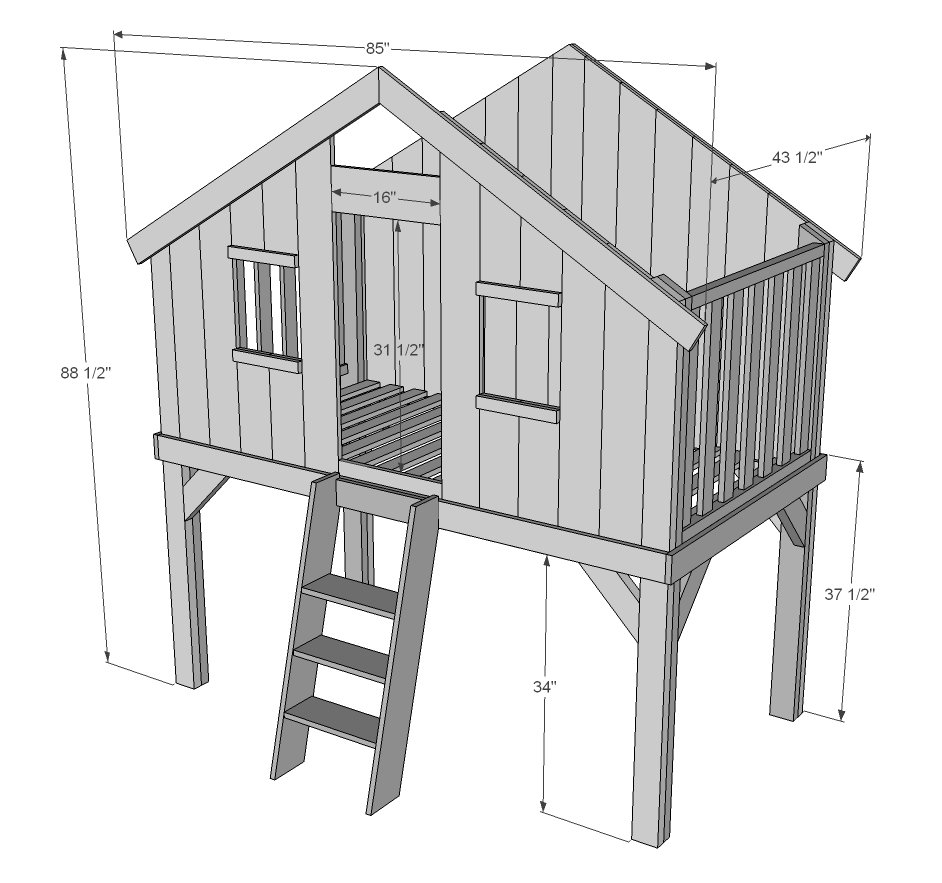
Shopping List
- 2 – 2x2 @ 8 feet long
- 4 – 1x3 @ 8 feet long
- 8 – 2x4 @ 8 feet long
- 5 – 1x4 @ 8 feet long
- 2 - 1x2 @ 8 feet long
- 15 – 1x6 @ 8 feet long
- 1 ¼ and 2 ½ pocket hole screws
- 1 1/4 brad nails
- Wood glue
- 3” self tapping star bit screws or bolts for assembly
- 2” self tapping star bit screws for slats
- Slats (7 – 1x3 @ 8 feet long)
NOTE: Jaime recommends the following changes to the shopping list because her 1x6 board ran a little wide on the front and she wanted gaps between the wood slats. - add 2 - 1x5 @ 8' - decrease 1x6 quantity to 14
Cut List
NOTE: This plan assumes your 1x6 boards are less than 5 1/2" wide. Jaime found that she needed to substitute two of the 1x6 boards on front and back for 1x5 boards to create gaps between the wood slats.
SIDE WALLS (BUILD 2)
- 4 – 2x2 @ 36”
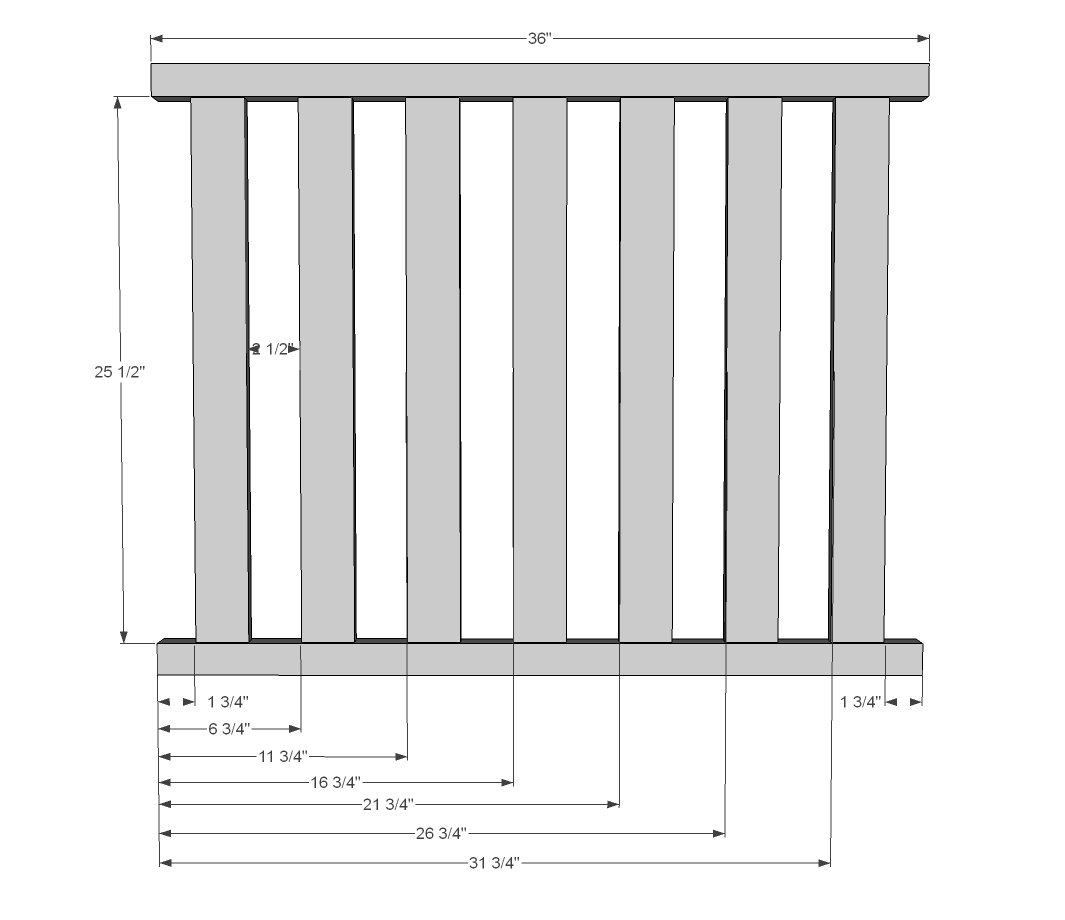
- 14 – 1x3 @ 25 ½”
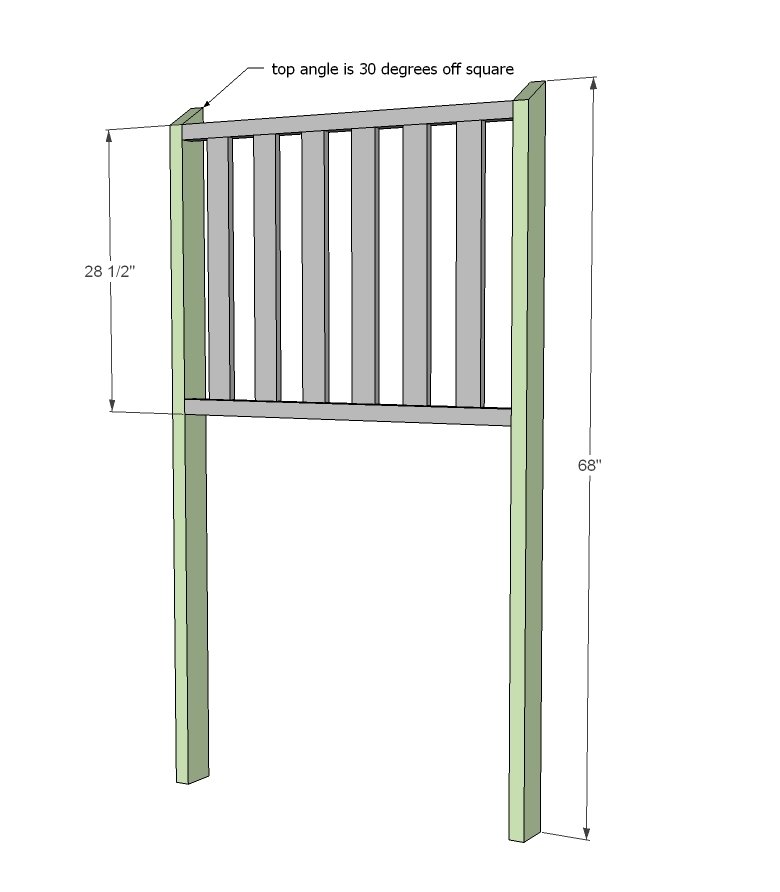
- 4 – 2x4 @ 68” (top end cut at 30 degrees off square, long point measurement)
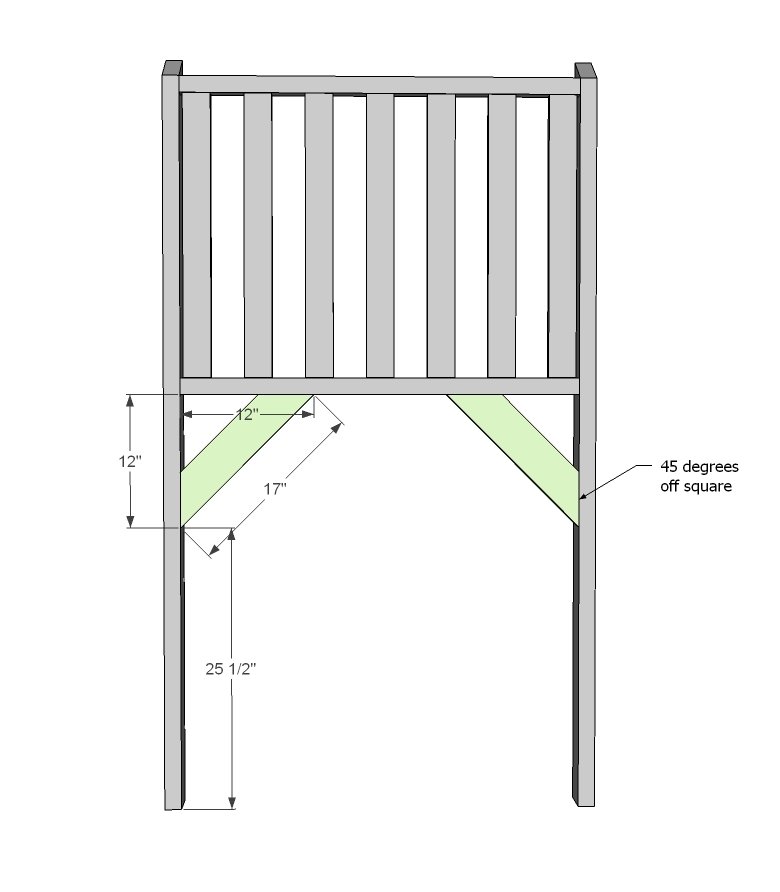
- 4 – 2x4 @ 17” (both ends cut at 45 degrees off square, NOT parallel)
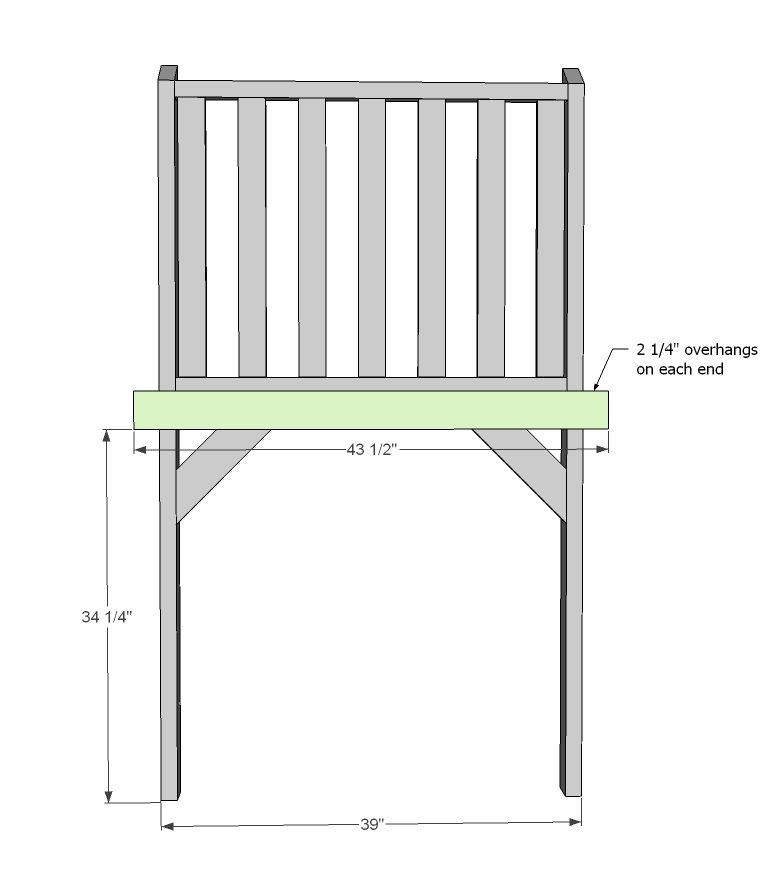
- 2 – 1x4 @ 43 ½”
BACK WALL
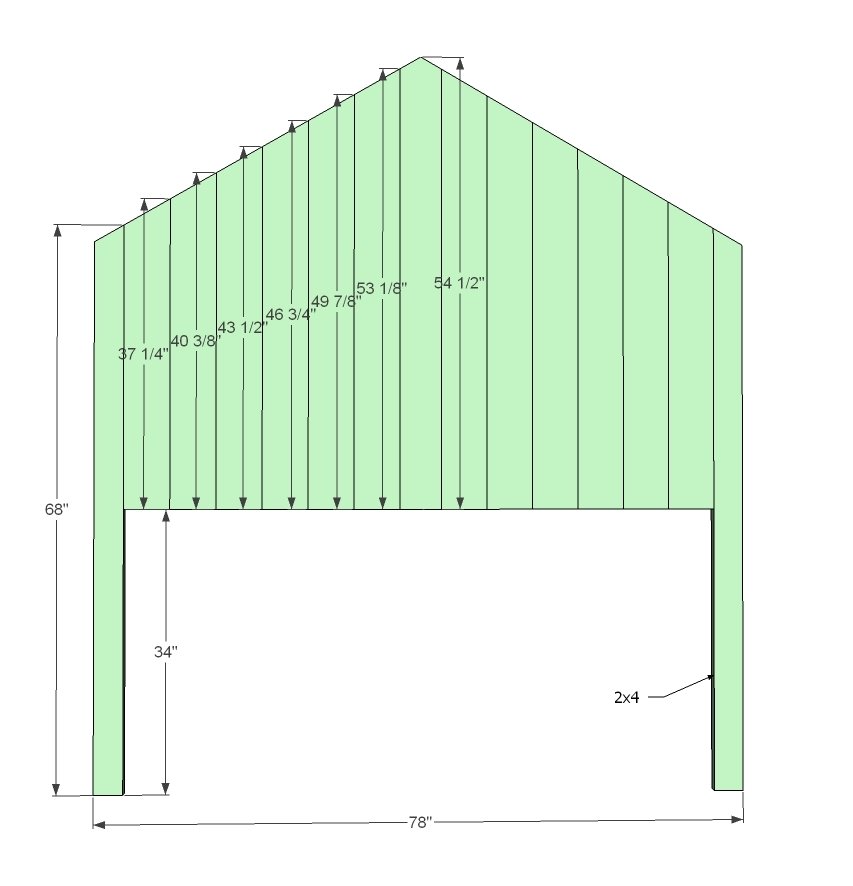
- 2 – 2x4 @ 68” (top end cut at 30 degrees off square, long point measurement)
- 2 – 1x6 @ 37 1/4” (top end cut at 30 degrees off square, long point measurement)
- 2 – 1x5 (Jaime recommends using the 1x5s here instead of 1x6) @ 40 3/8” (top end cut at 30 degrees off square, long point measurement)
- 2 – 1x6 @ 43 1/2” (top end cut at 30 degrees off square, long point measurement)
- 2 – 1x6 @ 46 3/4” (top end cut at 30 degrees off square, long point measurement)
- 2 – 1x6 @ 49 7/8” (top end cut at 30 degrees off square, long point measurement)
- 2 – 1x6 @ 53 1/8” (top end cut at 30 degrees off square, long point measurement)
- 1 – 1x6 @ 54 1/2” (top end cut to dogeared point 30 degrees off square, long point measurement)
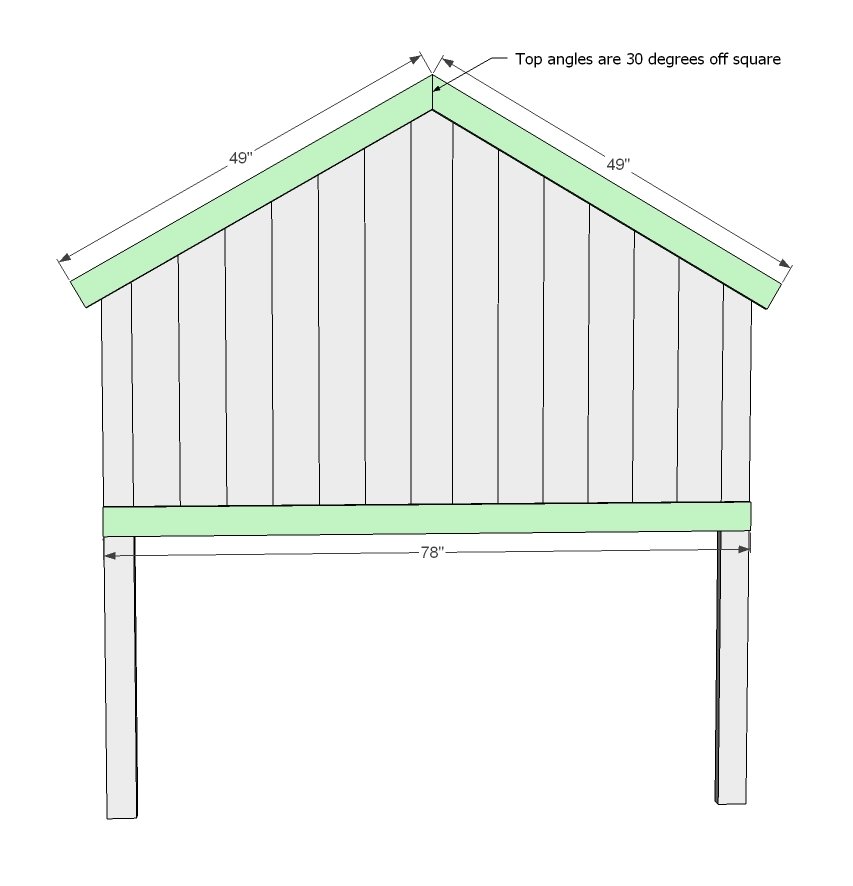
- 1 – 1x4 @ 78”
- 2 – 1x4 @ 49” (one end cut at 30 degrees off square, long point measurement)
- 1 – 1x2 @ 71”(slat rail ledge)
- 2 – 2x4 @ 12” (both ends cut at 45 degrees off square, ends NOT parallel)
FRONT WALL
- 2 – 2x4 @ 68” (top end cut at 30 degrees off square, long point measurement)
- 2 – 1x6 @ 37 1/4” (top end cut at 30 degrees off square, long point measurement)
- 2 – 1x6 @ 40 3/8” (Jaime recommends swapping these out for the 1x5 boards) (top end cut at 30 degrees off square, long point measurement)
- 2 – 1x6 @ 13 7/8” (top end cut at 30 degrees off square, long point measurement)
- 2 – 1x6 @ 17 1/8” (top end cut at 30 degrees off square, long point measurement)
- 4 – 1x6 @ 17 5/8” (under windows)
- 2 – 1x6 @ 49 7/8” (top end cut at 30 degrees off square, long point measurement)
- 2 – 1x6 @ 16” (doorway)
- 1 – 1x4 @ 78”
- 2 – 1x4 @ 49” (one end cut at 30 degrees off square, long point measurement)
- 4 – 1x2 @ 13” (window trim - recommend cutting to fit)
- 1 – 1x2 @ 71” (slat rail ledge)
- 2 – 2x4 @ 12” (both ends cut at 45 degrees off square, ends NOT parallel) - add 2 - 1x2 @ 14.5" (lower window trim interior - add to inside of windows)
LADDER
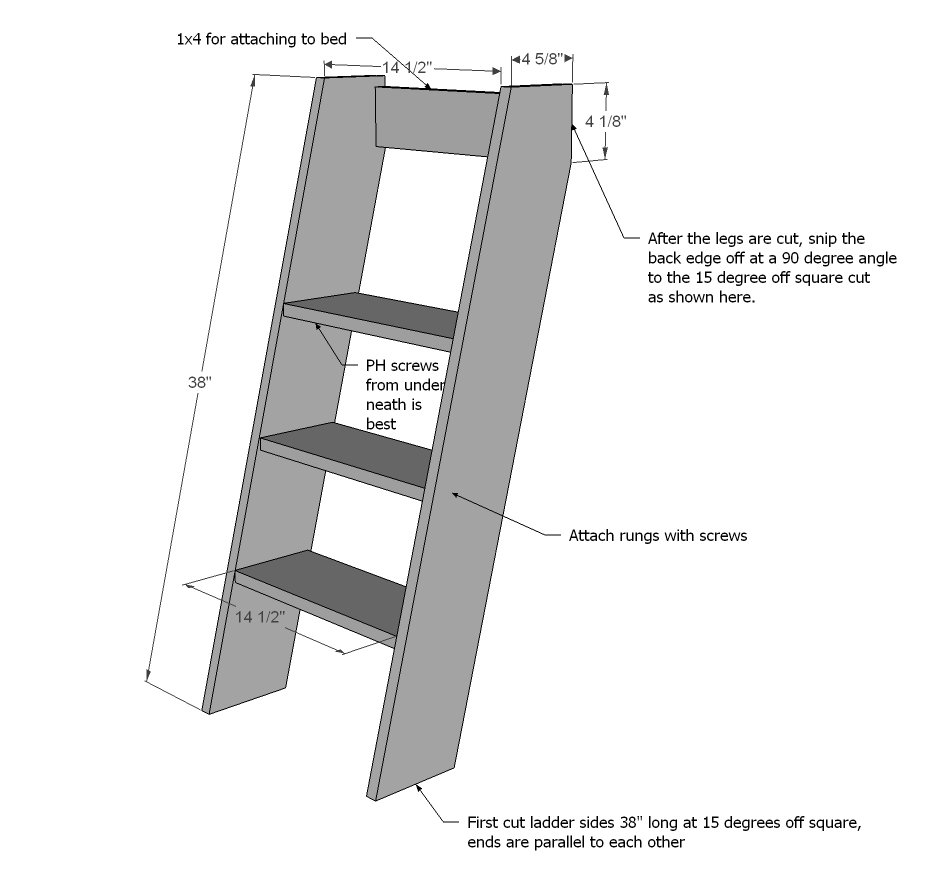
- 2 – 1x6 @ 38” (both ends cut at 15 degrees off square, ends are parallel)
- 3 – 1x6 @ 14 ½”
- 1 – 1x4 @ 14 ½”
SLATS
- Recommend cutting 1x3 @ 40 1/2” long
Step-by-step Instructions
Step 1
Build the walls with 3/4" PHs and 1 1/4" PH screws. Use scrap 1x3 to help with spacing. Fill upper holes with either PH plugs or wood filler.
Step 2
Now add the legs.
Step 3
And then add the cross supports. Jaime used 2 1/2" PH screws through 1 1/2" PHs to attach.
And the trim to the base.
NOTE: Attach 34” up NOT 34 ¼”
Step 5
Step 6
Attach top and bottom trim.
Step 7
This is for the slat system. You can use a 2x2 here too.
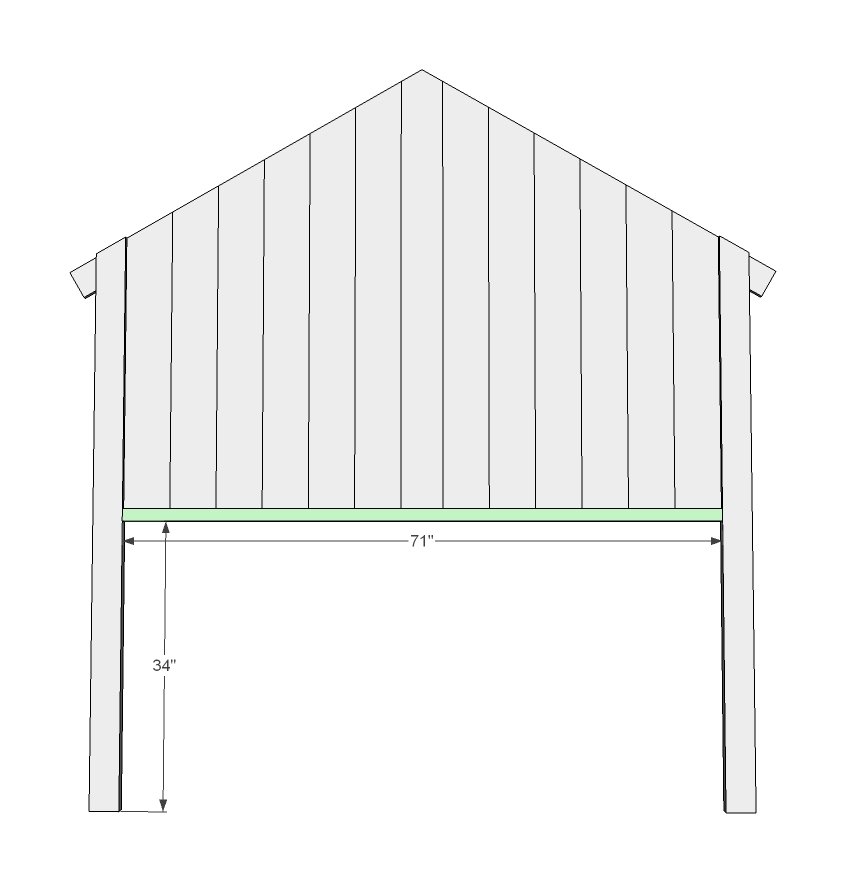
Step 8
And the cross supports.
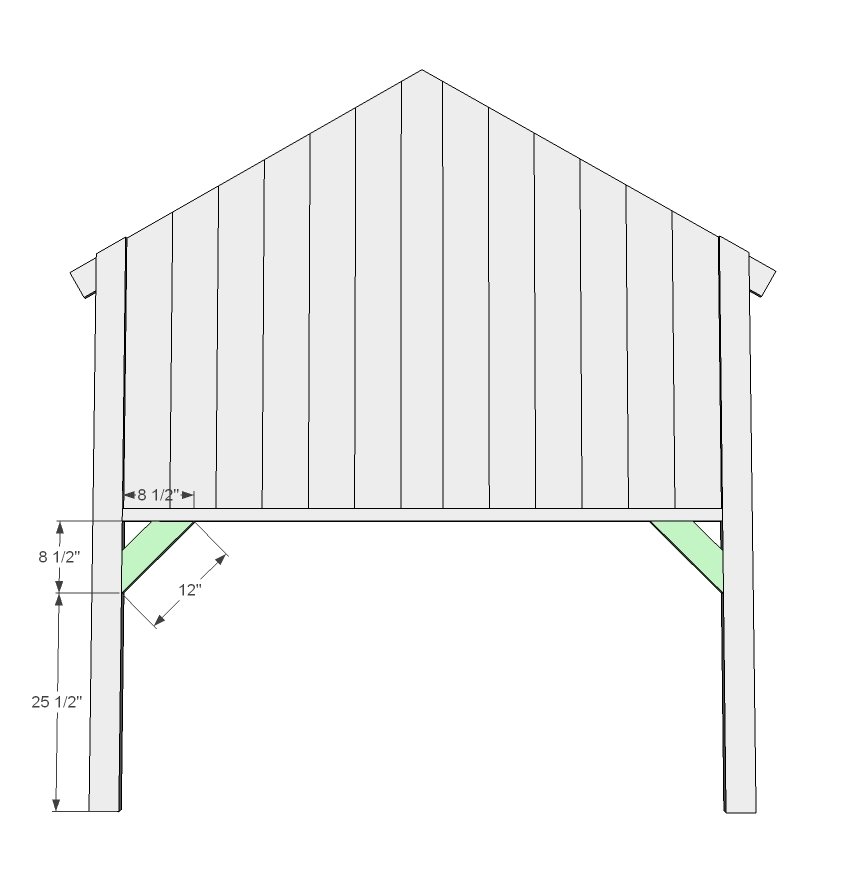
Step 9
Lay out your front wall as you did the back wall.
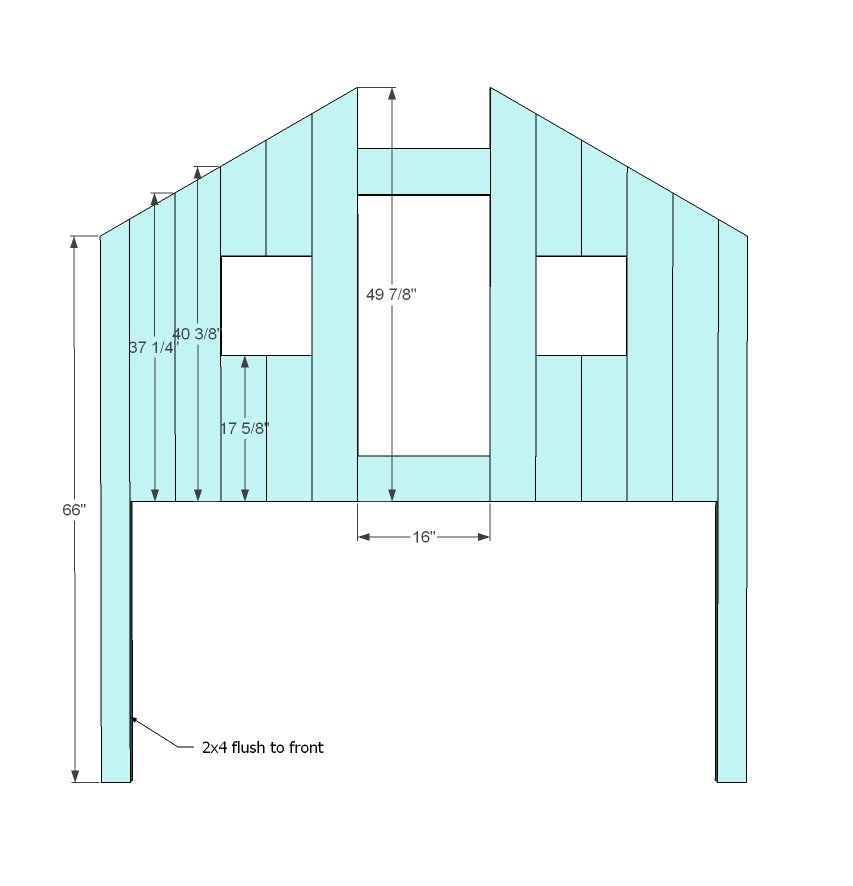
Step 10
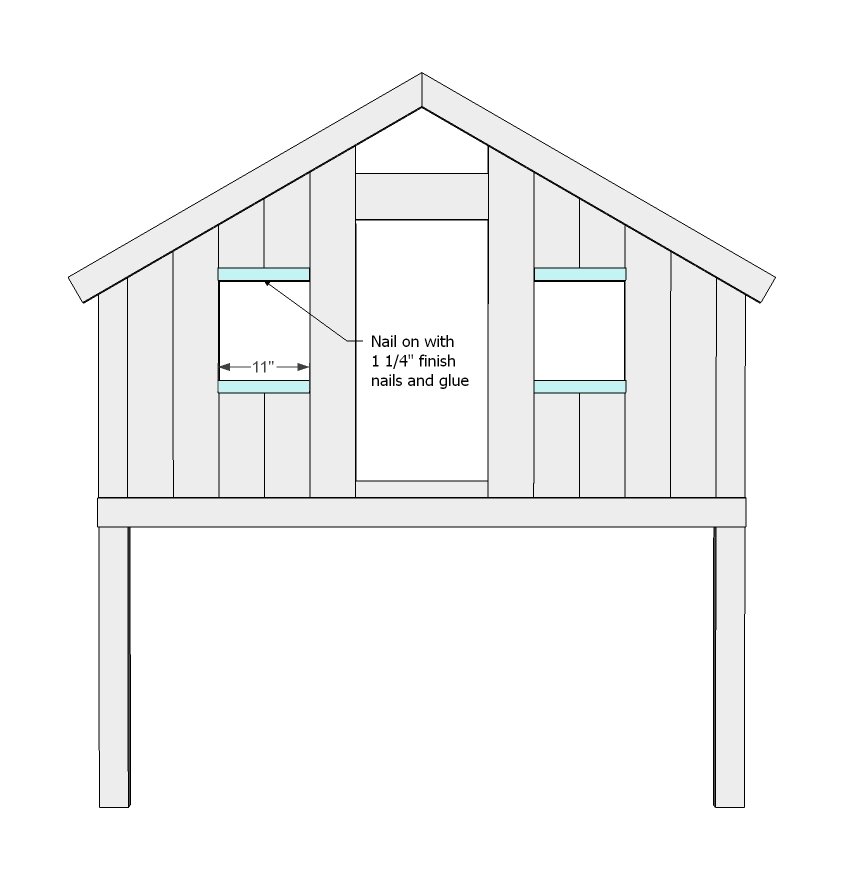
And add the trim.
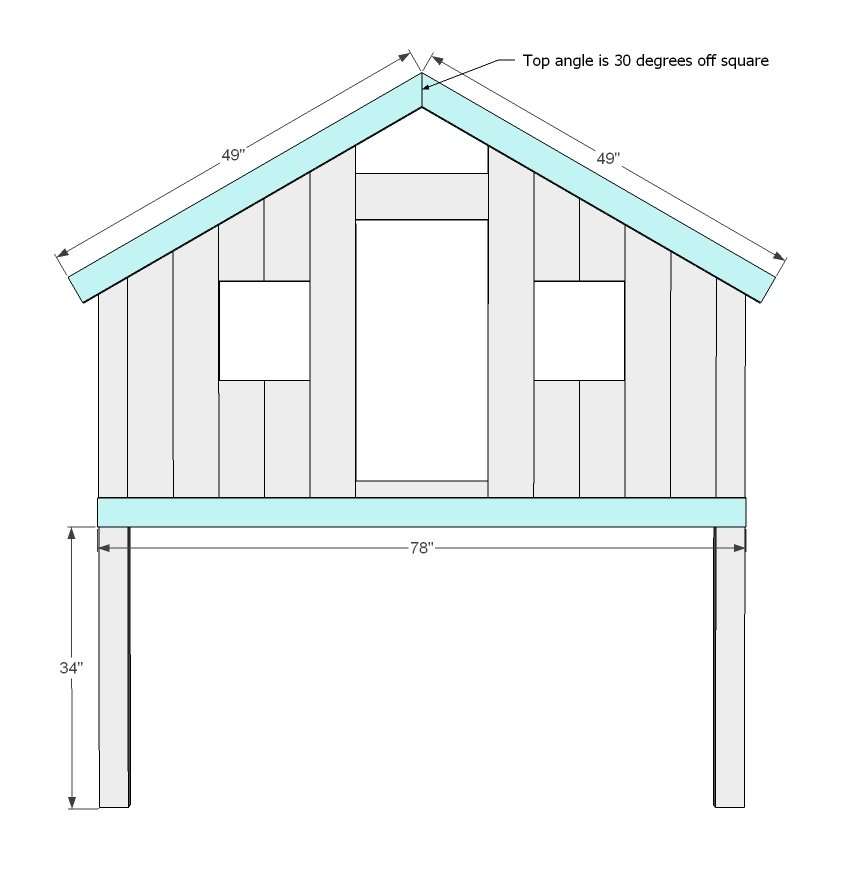
I'd cut the window trim a little long here.
NOTES FROM JAIME: screw on front trim from inside then screw added interior window trim from inside from strength (my kids will definitely lean on this sill and without any side support in the slats I needed to add the extra longer interior trim piece). - I also added a short 1x2 @ 4" piece across the top point on the interior to hold the joint where the angled trim pieces meet, not to mention it provides a sturdy hook for decor.
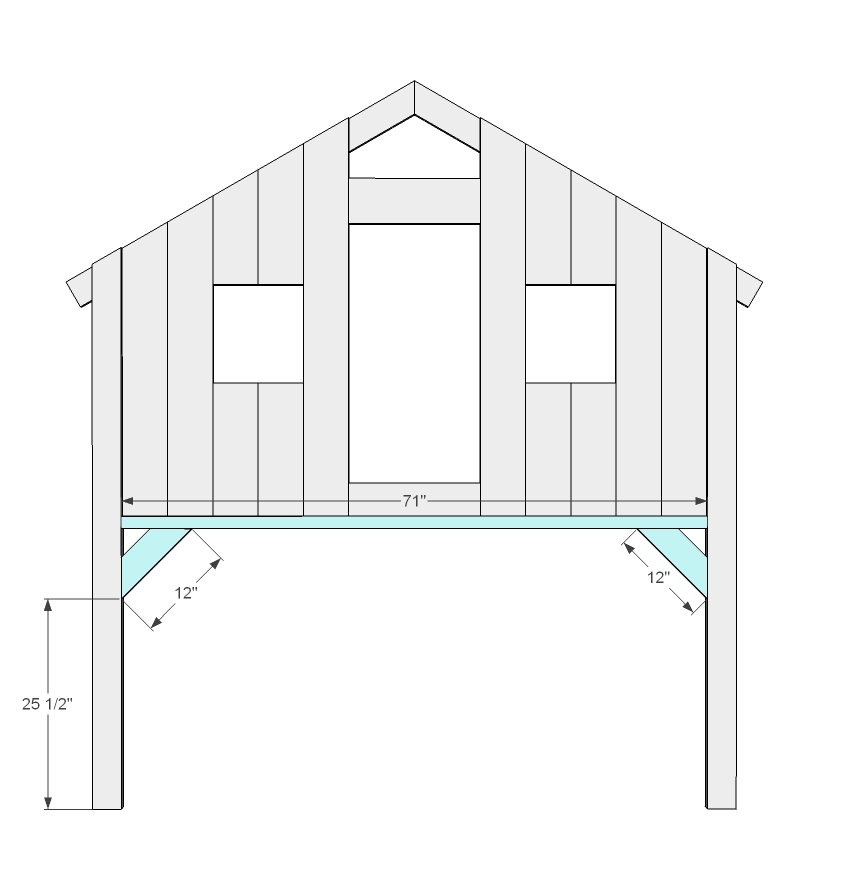
Step 12
And the bottom supports and cross supports.
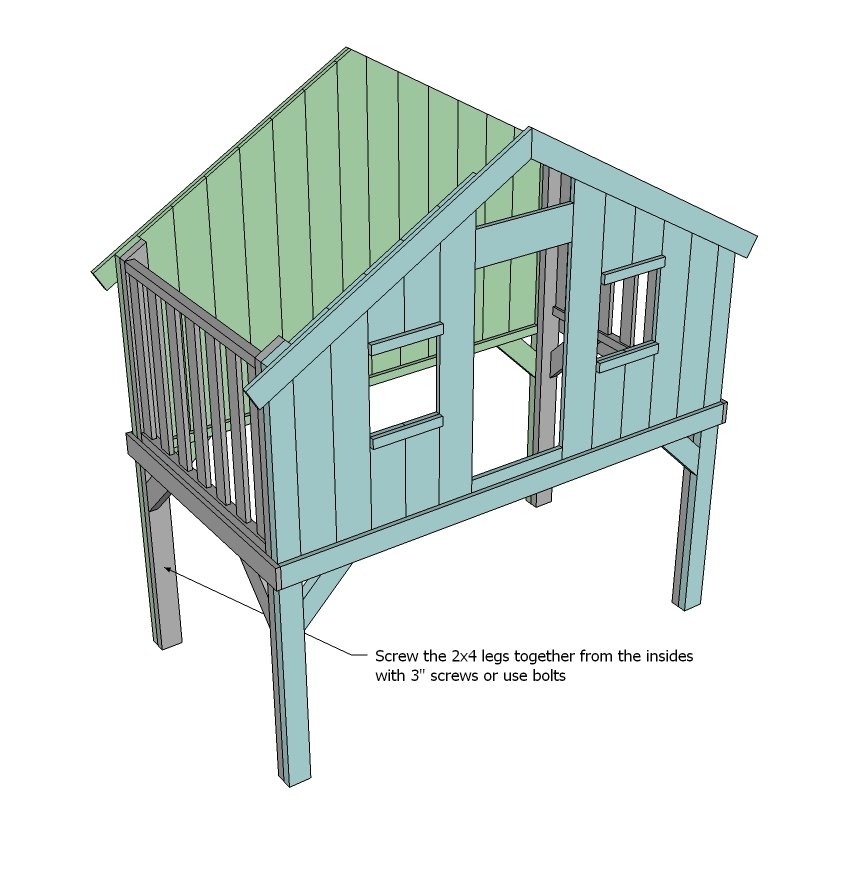
Step 13
Now move the pieces into the room. For the large walls, try going in upside down, and getting one leg through at a time. NOTES FROM JAIME: I used 3/8" lag bolts @ 3 1/2" in 3 spots on each leg
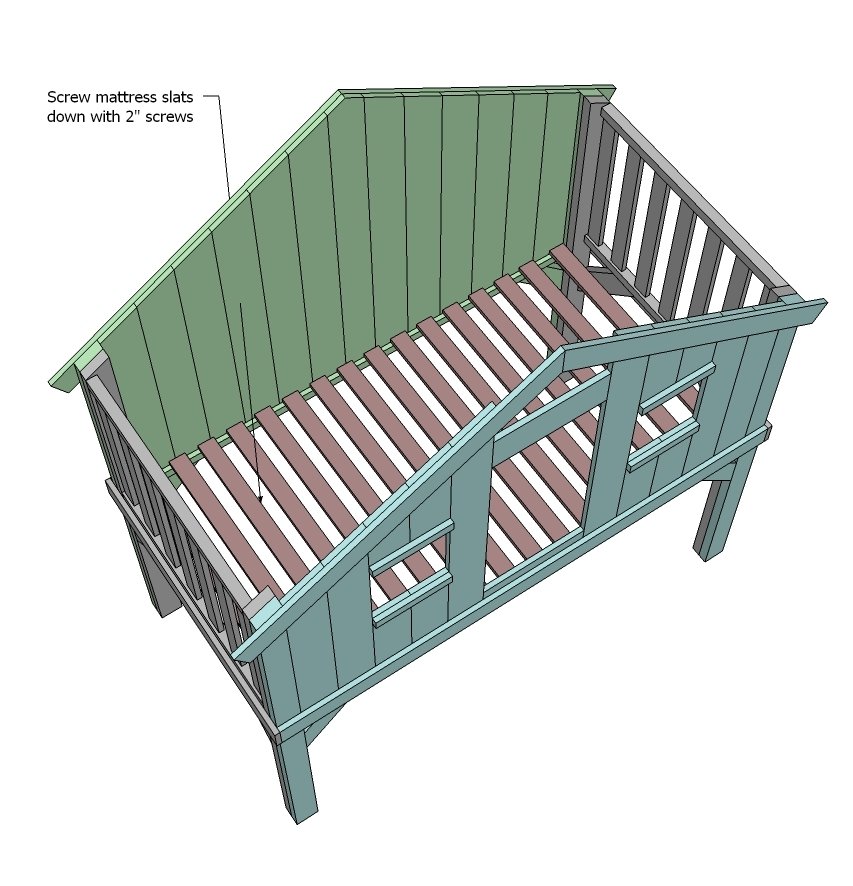
Step 14
Add the slats or bunkie board or box spring.
And then build your ladder and attach.
NOTES FROM JAIME: gap between rungs is 8", attached with 2 - 3/8" carriage bolts @ 3"
Step 16
For the window grid tutorial and lots other tips and construction photos please read Jaime's build post here.
Finishing
Sand all surfaces, starting with a medium grit and finishing with fine. Wipe off the dust, fill any holes or gaps with wood filler, and sand smooth once dry. Apply primer if you're painting, then finish with your choice of paint or stain and seal with a durable clear topcoat. For outdoor projects, use exterior-rated primer, paint or stain, and sealer so the piece stands up to the weather.
Source (temporary): https://www.ana-white.com/woodworking-projects/clubhouse-bed-free-diy-plans