Coffee Table with Inset Top Storage
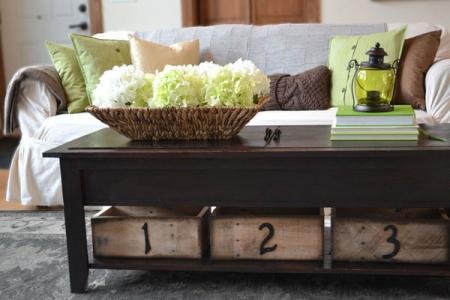
This beautiful coffee table has a secret! The top panels remove, with lots of storage inside. We love it as a play table (legos anyone?) or a workcenter for your laptop, or just a place to store board games, extra blankets, or magazines. This coffee table is easy to build - you'll just need a few tools and some off the shelf lumber. Step by step plans with diagrams by
Specifications
| Project type | Kids Tables and Chairs |
|---|---|
| Room | Storage Solutions |
| Style | Cottage Style Furniture Plans |
| Difficulty | Intermediate |
| Estimated cost | $20 - $50 |
Dimensions
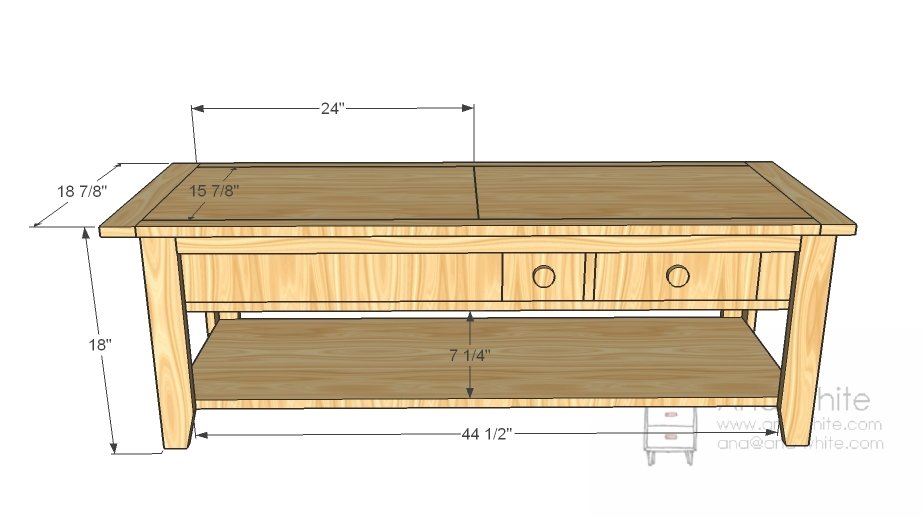
Use the size-specific shopping and cut lists below.
Shopping List
1/2 Sheet of 3/4″ MDF or Hardwood Plywood cut into strips 15 7/8″ wide x 48″ long
2 – 1×3
3 – 1×2
1 – 1×6 – 12 foot long
2″ screws (self tapping wood screws)
1 1/4″ screws (self tapping wood screws)
wood glue and filler and finishing supplies
Cut List
2 – 1×6 @ 48″
3 – 1×6 @ 14-3/8″
2 – 3/4″ MDF or Plywood @ 15-7/8″ x 48″
2 – 3/4″ MDF or Plywood @ 15-7/8″ x 24″ (top inserts)
4 – 1×2 @ 17-1/4″
4 – 1×3 @ 17-1/4″
2 – 1×2 @ 44-1/2″
2 – 1×2 @ 12-7/8″
2 – 1×2 @ 48″
2 – 1×3 @ 18-7/8
Tools
- measuring tape
- square
- pencil
- safety glasses
- hearing protection
- kreg-jig
- drill
- circular saw
- nailer
- sander
- level
- countersink drill bit
Step-by-step Instructions
Step 1
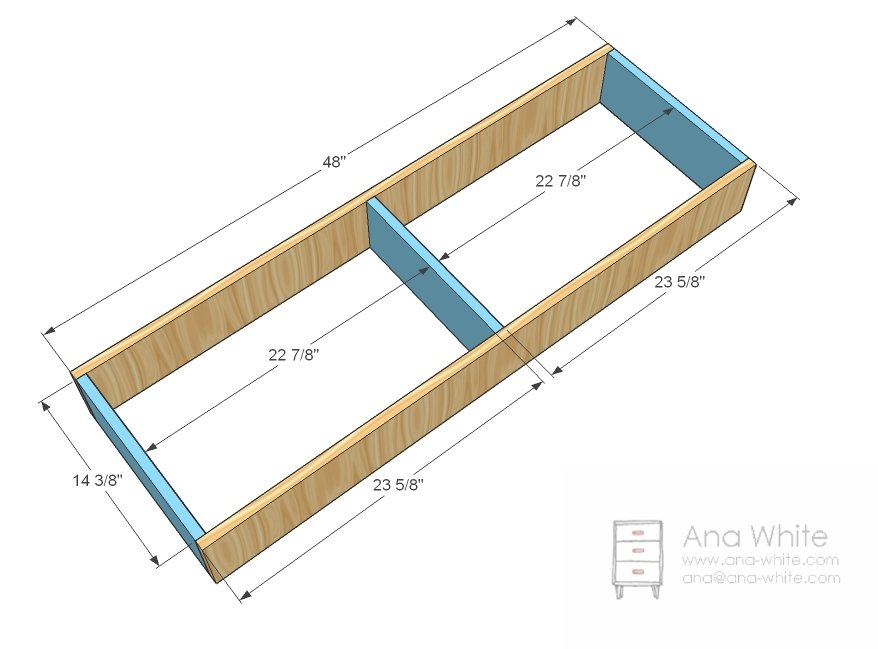
Build the Box for the wooden train table - Mark the sides of the box and predrill holes. Attach the ends and center to the box as shown above. Use 2″ screws and glue or 1 1/4″ pocket hole screws and glue.
Step 2
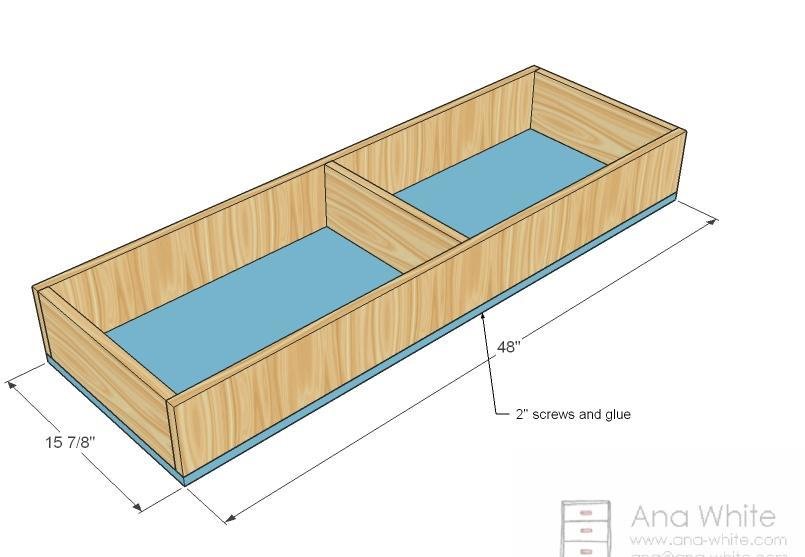
Bottom of Box - Now just screw the bottom of the wooden train table compartment to the sides and dividers as shown above.
Step 3
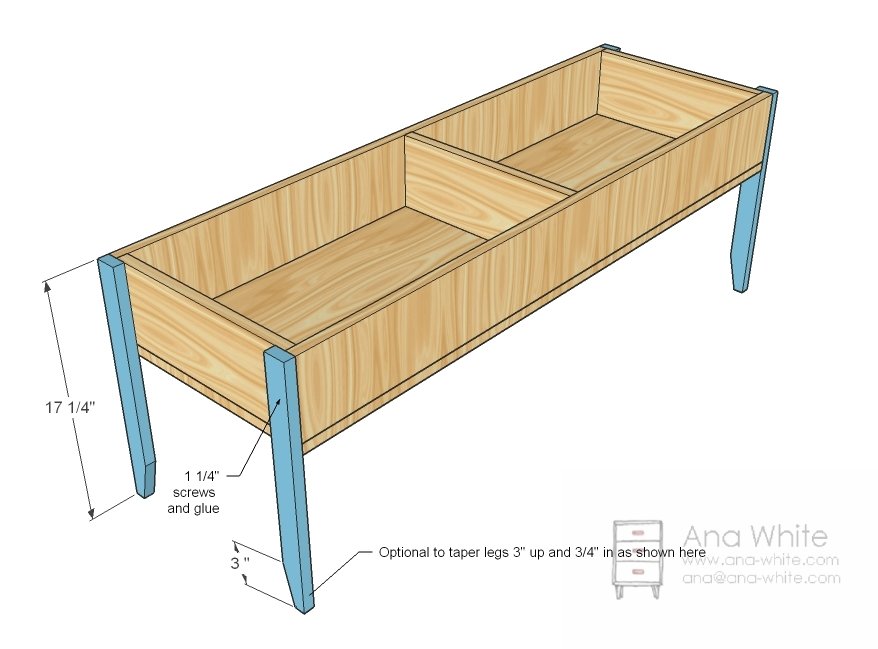
End Legs - Now just screw the end legs on with 1-1/4" screws. I turned the whole thing upside down to do this and screwed the legs from inside to hide. Also, I tapered the legs with a circular saw, but that’s purely decorative.
Step 4
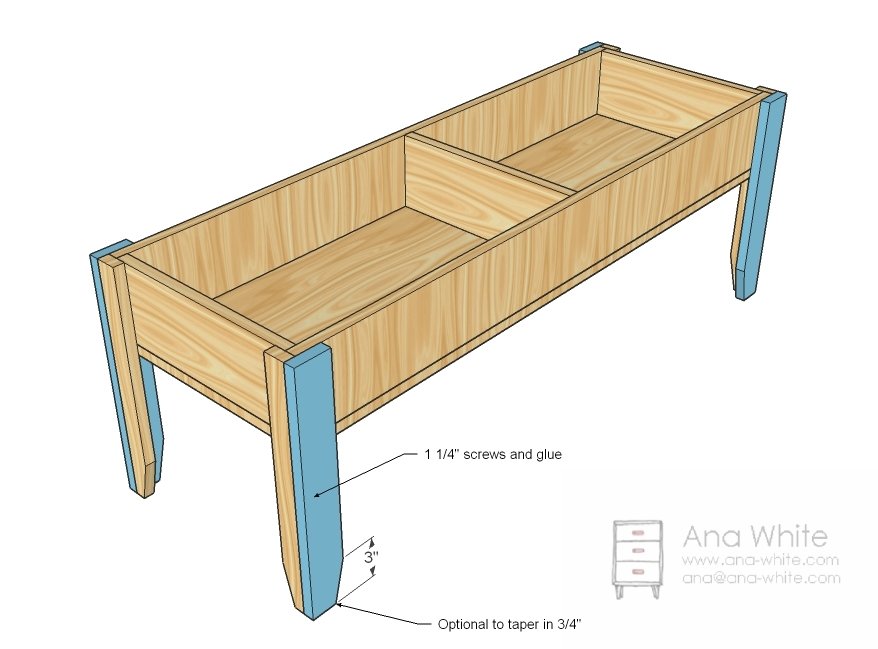
Front and Back Legs Now screw the front and back legs to the box and the side legs with 1 1/4″ screws and glue. I tapered these too as shown above. You could also use nails and glue to hide any holes. Nail holes are much easier to hide than screw holes.
Step 5
Step 6
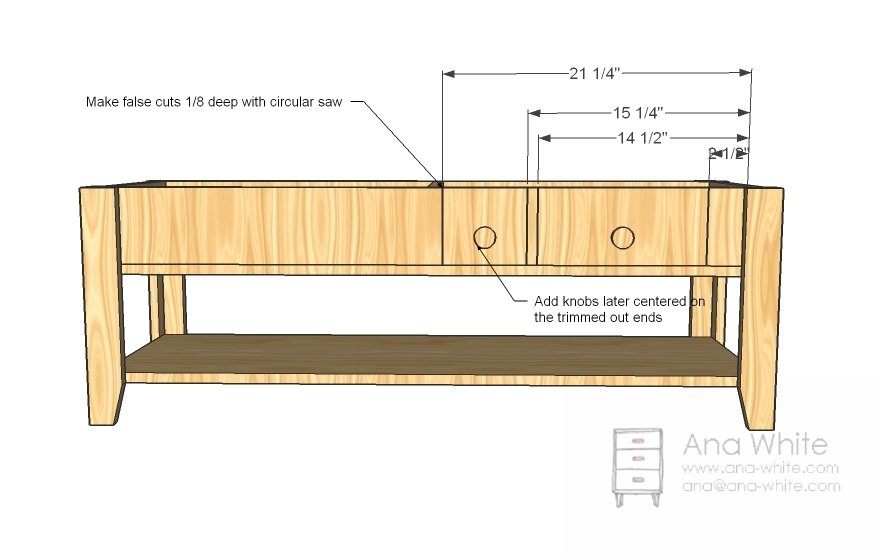
Optional False Drawers To make the coffee table look like it has drawers, just set your circular saw blade to 1/8″ and make cuts as shown above. Hold off on the knobs until you are done with the table. Make the cuts on both sides, on opposite sides.
Step 7
Top Supports Now just screw these on flush to the top with 1 1/4″ screws and glue
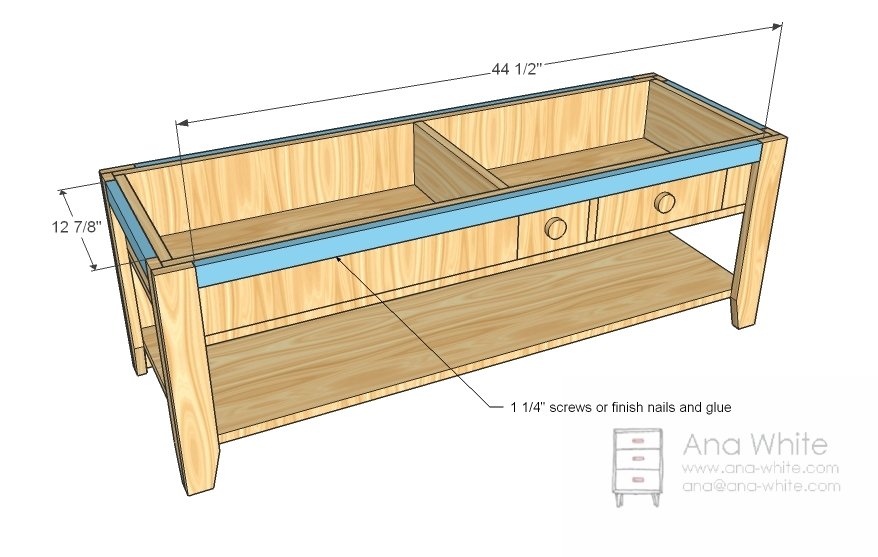
Step 8
Top Sides Now simply screw the top sides to the top as shown above.
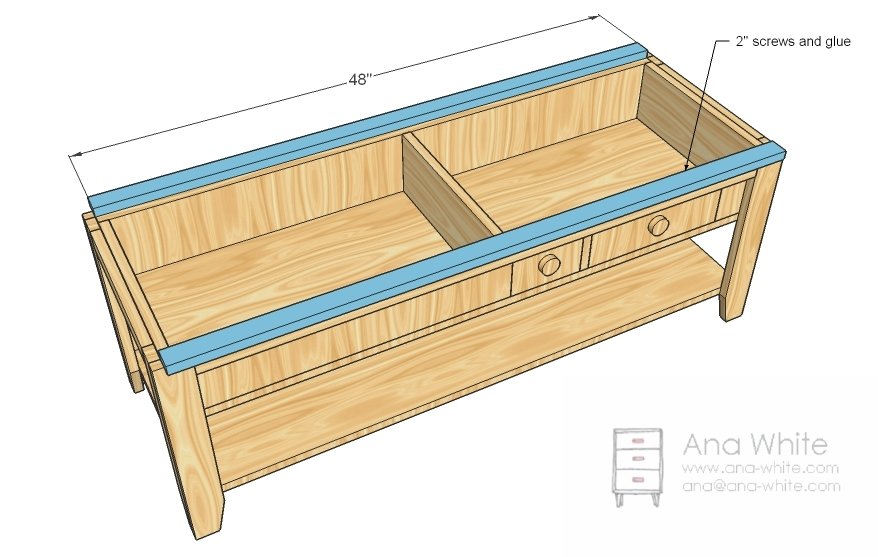
Step 9
Top Ends Now simply screw the top ends on as shown above. If you have a Kreg Jig™, you can also screw the end to the sides for added support.
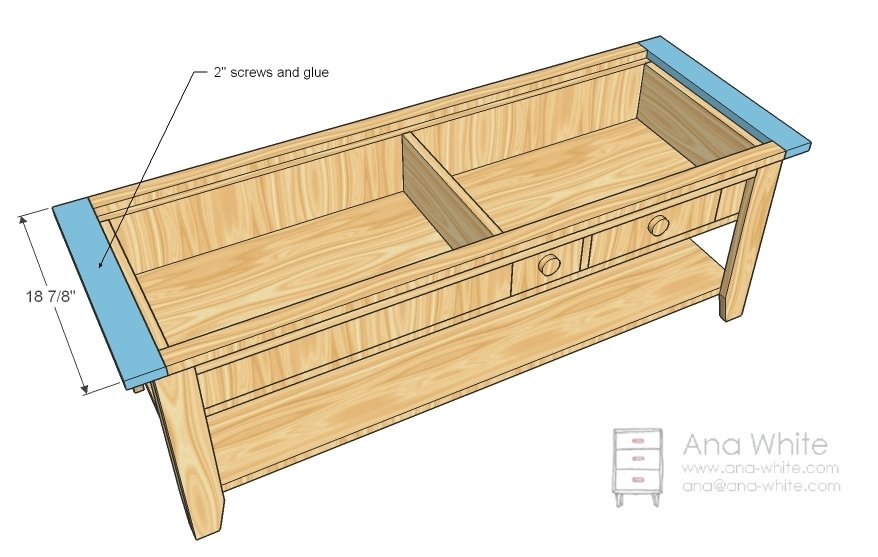
Step 10
Tops Check the fit of the top inserts and sand as needed to insure that the inserts fit properly. If needed, drill a hole in the inserts to use as a handle to pull inserts up with.
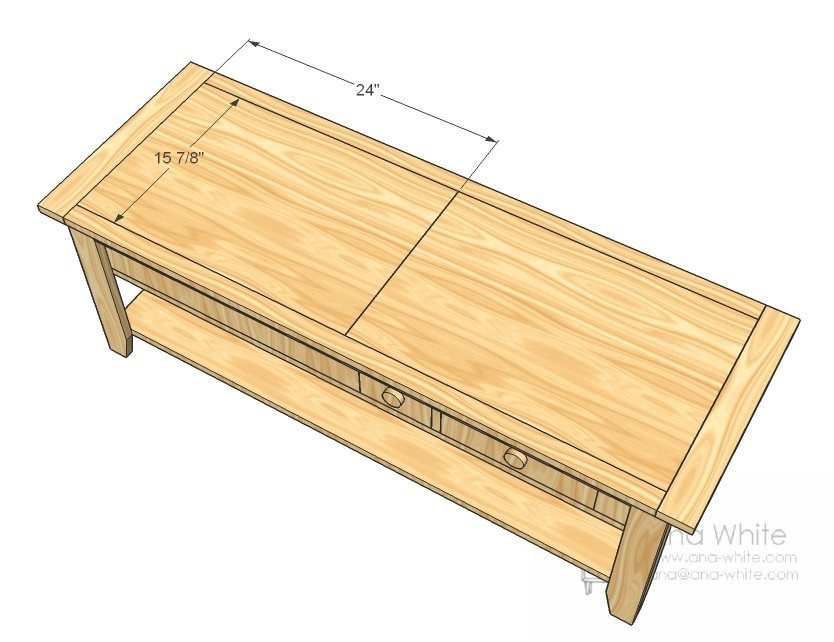
Step 11
And here are those mods for the other version. Don’t taper the legs and just add a middle legs, and trim out the bottom of the box and shelves. It’s really simple.
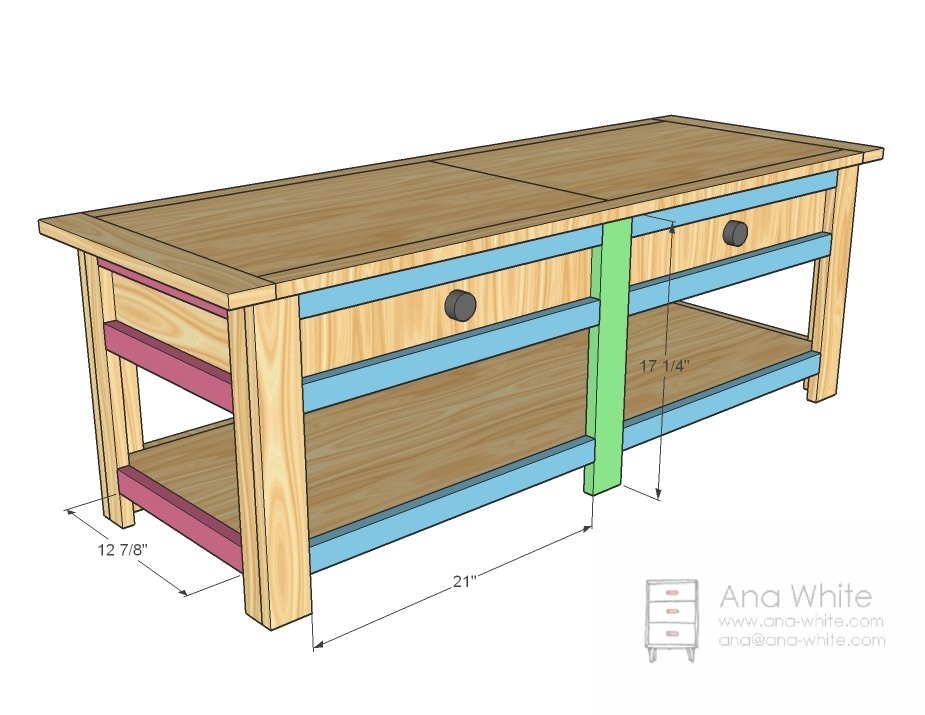
Step 12
I won’t say much more than I’ve been at this one for three days with a hair dryer... but the color is dark walnut. I used Elmer’s wood filler and it took the stain quite well. Thanks for reading! I hope you take a second to let me know if you like this design, so I can continue to post more plans that are similar. Mom to mom, this is a must make.

Finishing
Sand all surfaces, starting with a medium grit and finishing with fine. Wipe off the dust, fill any holes or gaps with wood filler, and sand smooth once dry. Apply primer if you're painting, then finish with your choice of paint or stain and seal with a durable clear topcoat. For outdoor projects, use exterior-rated primer, paint or stain, and sealer so the piece stands up to the weather.
Source (temporary): https://www.ana-white.com/woodworking-projects/coffee-table-inset-top-storage