Cottage Media Console or Narrow Coffee Coffee Table
Free wood working plans! A simple console with two drawers perfect sized for CDs and DVDs. Large bottom shelf perfect for media consoles and books.
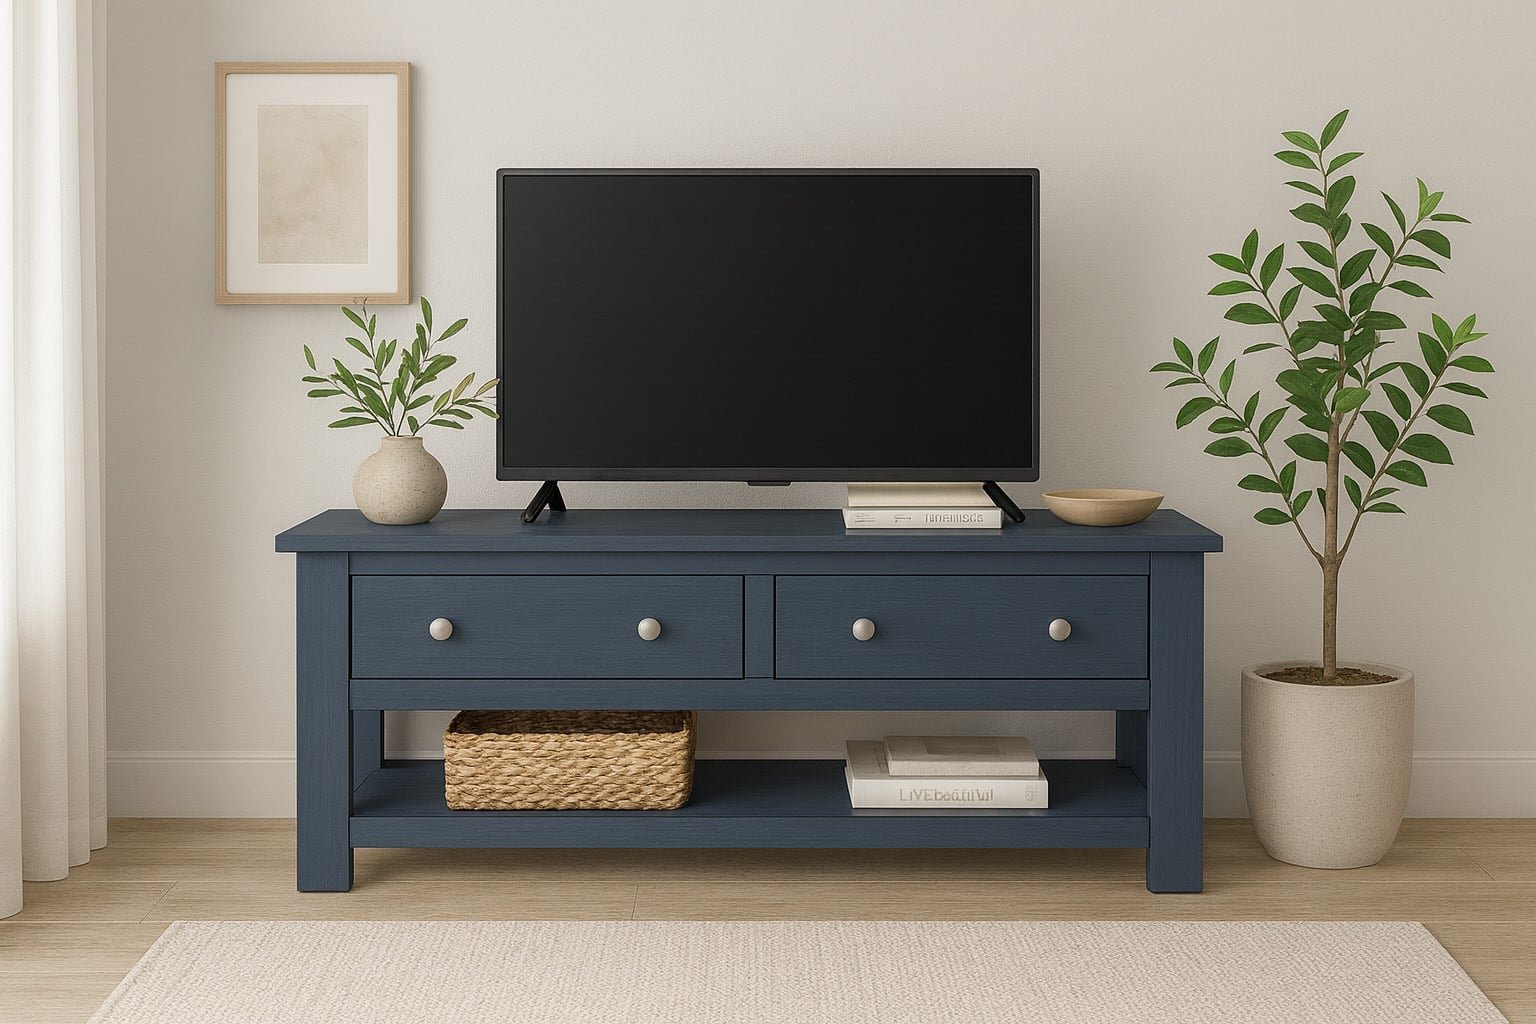
Specifications
| Project type | Console Table Plans |
|---|---|
| Room | living room |
| Style | Cottage Style Furniture Plans |
| Difficulty | Intermediate |
| Estimated cost | $50 - $100 |
Dimensions
Use the size-specific shopping and cut lists below.
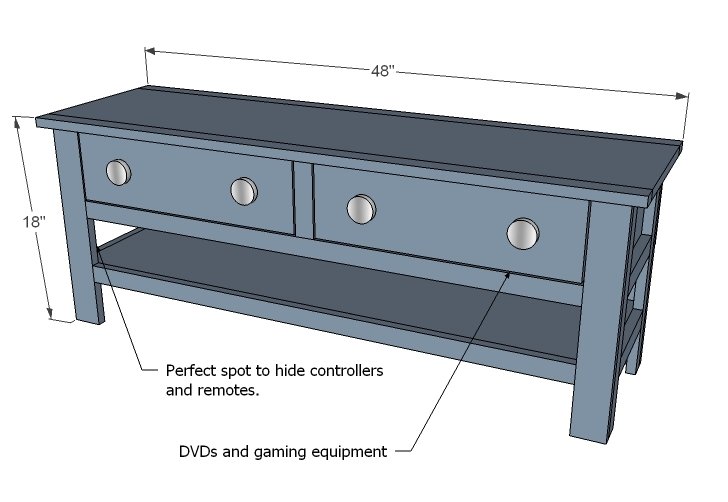
Shopping List
- 2 – 8′ 1×12 board
- 5 – 1×2 boards, 8 feet long
- 1 – 1×3 board, 8 feet long
- 1 – 1×6, 12 feet long
- 1 1/4″ and 2″ brad nails
- 2″ self tapping wood screws or 1 1/4″ pocket hole screws
- wood glue and wood filler
- Sandpaper (120 grit)
- Paint, primer or stain and poly
- Knobs
Cut List
- 2 – 1×12 @ 44 1/2″ (Shelves)
- 4 – 1×2 @ 17 1/4″ (Side Legs)
- 4 – 1×3 @ 17 1/4″ (Front/Back Legs)
- 4 – 1×2 @ 41″ (Shelf Trim)
- 4 – 1×2 @ 8 1/2″ (Side Shelf Trim – adjust to fit the width of your 1x12s minus 3″)
- 2 – 1×12 @ 5 3/4″ (Sides of Drawer Box)
- 4 – 1×2 @ 11 1/2″ (Drawer Guides – match to width of 1x12s)
- 2 – 1×2 @ 5 3/4″ (Front/Back Trim for Center)
- 1 – 1×12 @ 48″ (Top)
- 2 – 1×2 @ 48″ (Top Trim)
- 1 – 1/4″ Plywood @ 7 1/4″ x 46″ (Back Plywood – Optional)
- 2 – 1×12 @ 18″ (Drawer Bottoms)
- 2 – 1×6 @ 18″ (Drawer Backs)
- 4 – 1×6 @ 12 1/4″ (Drawer Sides – adjust to fit the width of 1×12 boards plus 3/4″)
- 2 – 1×6 @ 19 1/2″ (Drawer Fronts)
Tools
- measuring tape
- square
- pencil
- safety glasses
- hearing protection
- drill
- circular saw
- sander
- countersink drill bit
Step-by-step Instructions
Step 1
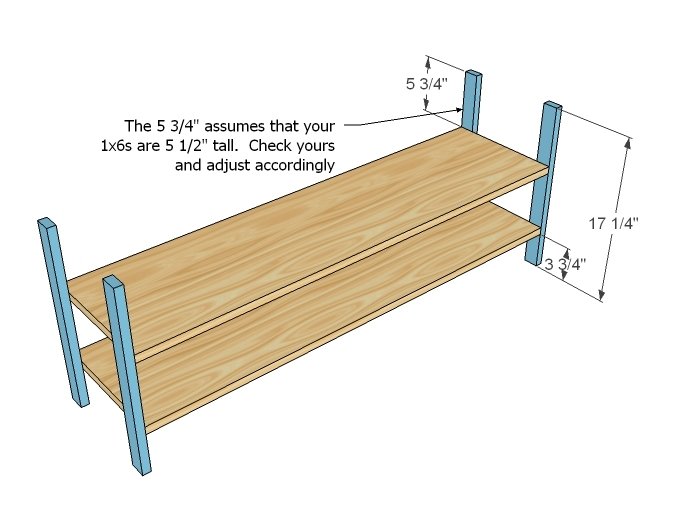
Side Legs Mark your side legs as shown in the diagram above. Predrill holes and attach the shelves to the side legs. Use glue and 2″ screws or pocket hole screws. You can optionally taper your legs as done in the lego table.
Step 2
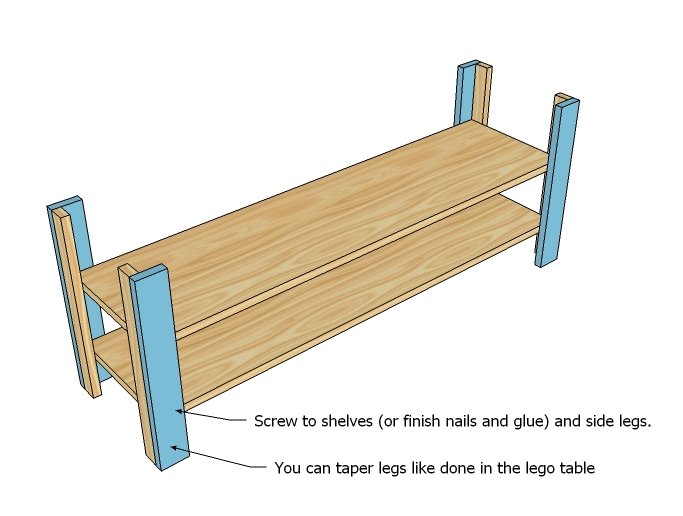
Front/Back Legs Attach the front and back legs. At this step, I would use finish nails and glue if you have a nailer, but screws will do the trick. Just harder to hide if you are staining. If you are painting, don’t sweat screw holes. Wood filler is an amazing thing.
Step 3
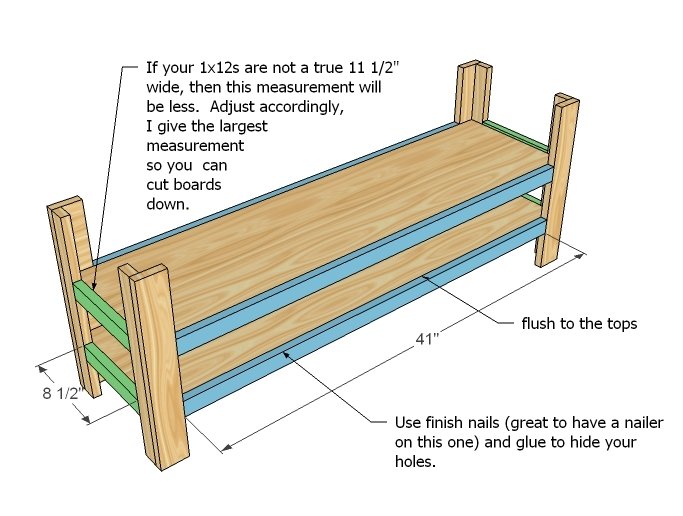
Shelf Trim Trim out the shelves with a nailer and 1×2 trim as shown above. Shelf tops are flush. You can leave the trim off the bottom shelf but the trim is needed on the top shelf.
Step 4
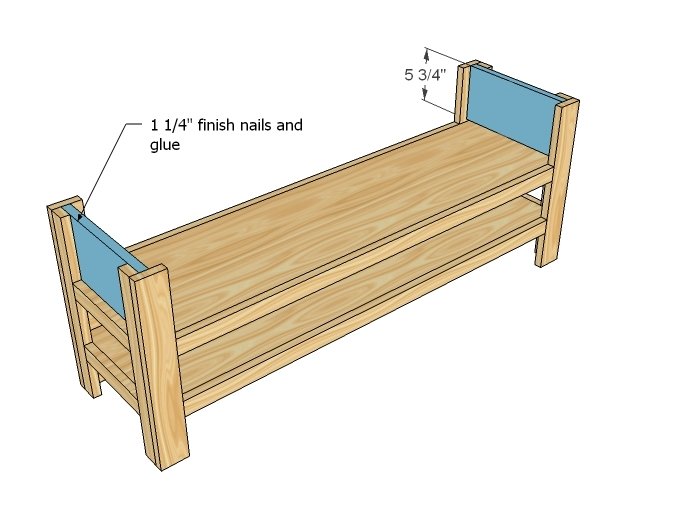
Drawer Box Sides Attach the drawer box sides in place with 1 1/4″ finish nails and glue.
Step 5
Step 6
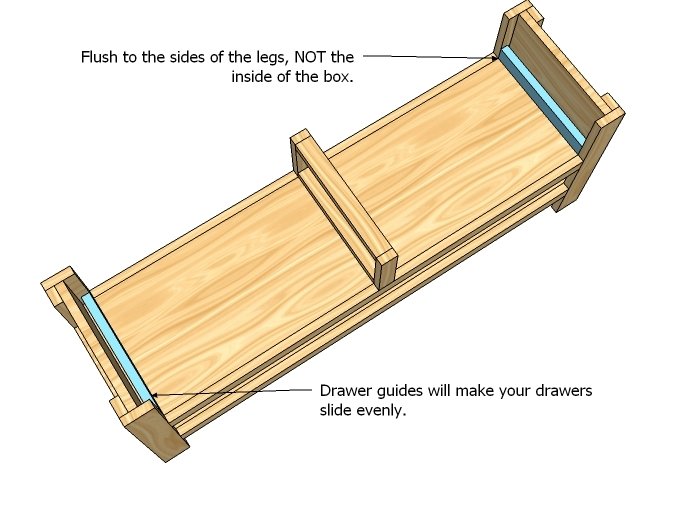
Drawer Guides The drawer guides will keep your drawers straight as they are pushed in. Notice how the drawer guides are flus to the inside of the legs, and not the inside of the drawer box?
Step 7
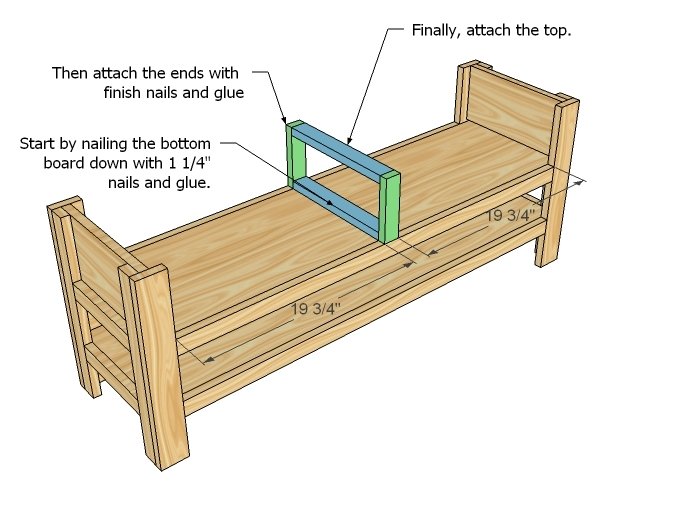
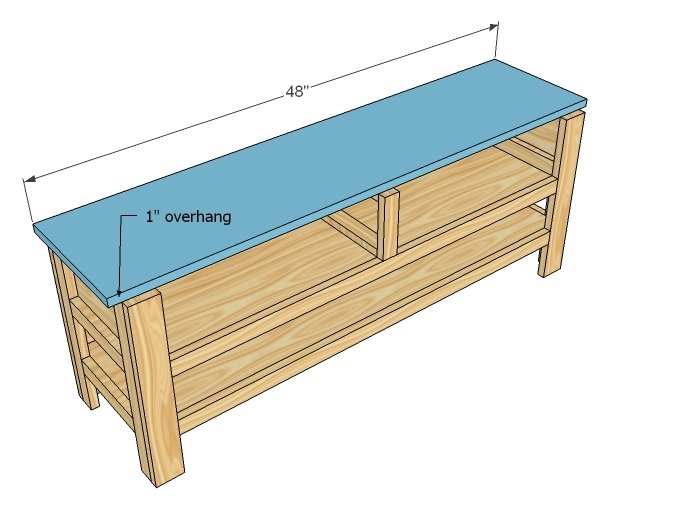
Top Attach the top to the project, overhanging 1″ as shown above.
Step 8
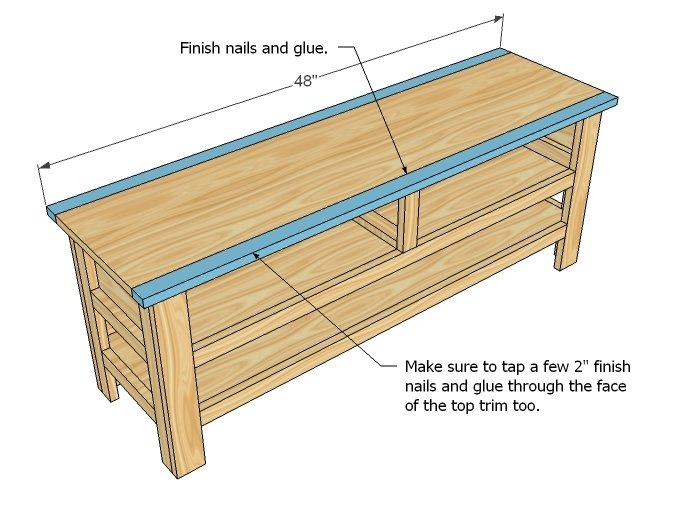
Top Trim Now the top trim. Attach the top trim to the top with 2″ finish nails and glue as directed in the diagram.
Step 9
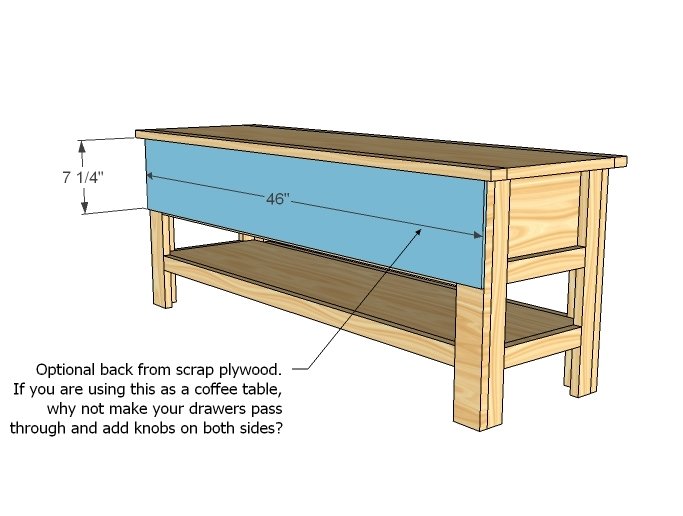
Back This is purely optional. If you choose not to add the plywood to the back, your drawers will pass through – perfect for a coffee table.
Step 10
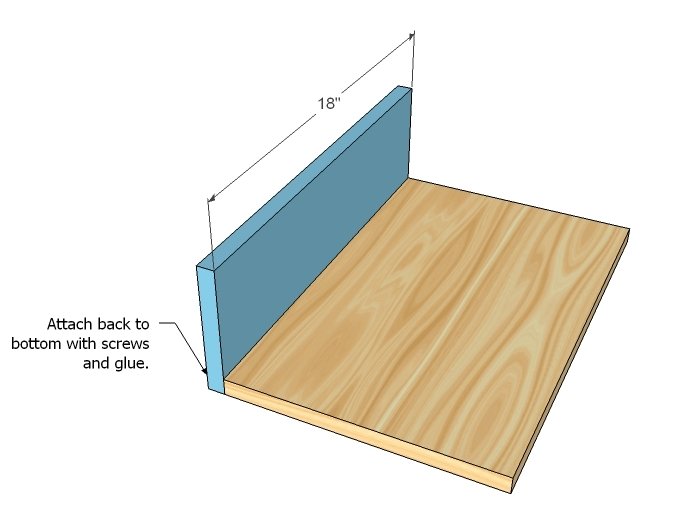
Drawer Backs Attach the drawer backs to the drawer bottom as shown above.
Step 11
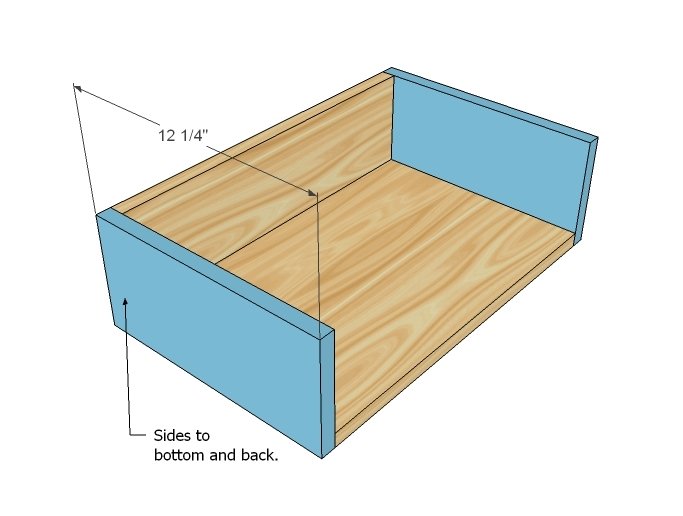
Sides Now attach the sides to the back and bottom.
Step 12
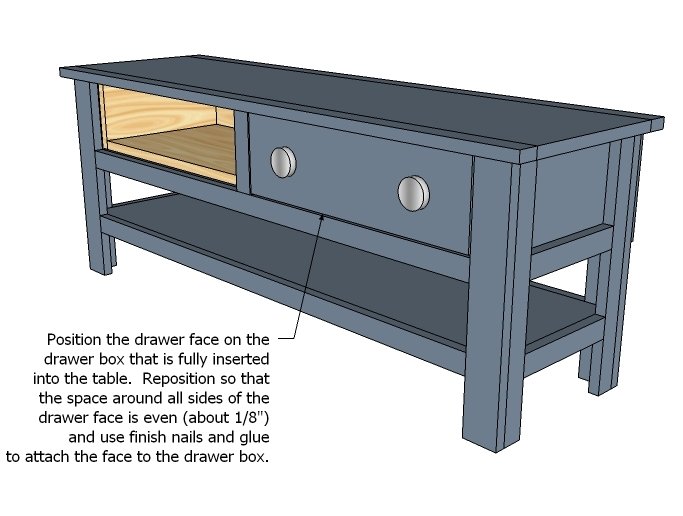
Face Here’s my trick from doing lots of building. Place the drawer box inside of the table, without the face. Line the face up, centering the gap around the face until it’s even and you are satisfied. Nail on with glue and 2″ finish nails around the edges.
Step 13
Finishing To finish, remove drawers and fill all hole with wood filler. Do two coats, as wood filler tends to shrink as it dries. Then sand with 120 grit sandpaper. Clean all sanding residue and wipe down with a damp cloth. Prime and paint or stain as desired. Some tips: paint the insides first. Don’t paint the drawer box bottom, as the drawer opening and closing will just wear it off (opt for a stain). Add handles or knobs.
Finishing
Sand all surfaces, starting with a medium grit and finishing with fine. Wipe off the dust, fill any holes or gaps with wood filler, and sand smooth once dry. Apply primer if you're painting, then finish with your choice of paint or stain and seal with a durable clear topcoat. For outdoor projects, use exterior-rated primer, paint or stain, and sealer so the piece stands up to the weather.
Source (temporary): https://www.ana-white.com/woodworking-projects/cottage-media-console-or-narrow-coffee-coffee-table