Crooked Doghouse
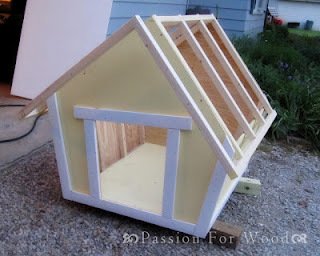
Make a crooked doghouse! from
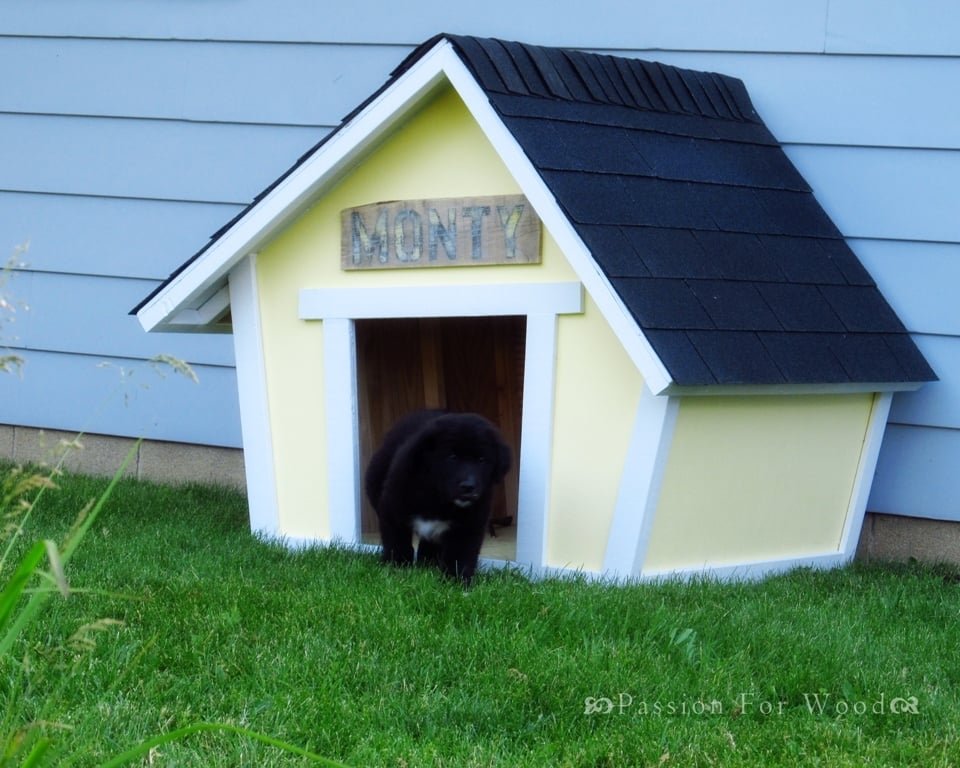
Specifications
| Project type | Other Projects |
|---|---|
| Room | Outdoor |
| Style | Modern Style Furniture Plans |
| Difficulty | Advanced |
| Estimated cost | $100-$150 |
Dimensions
Use the size-specific shopping and cut lists below.
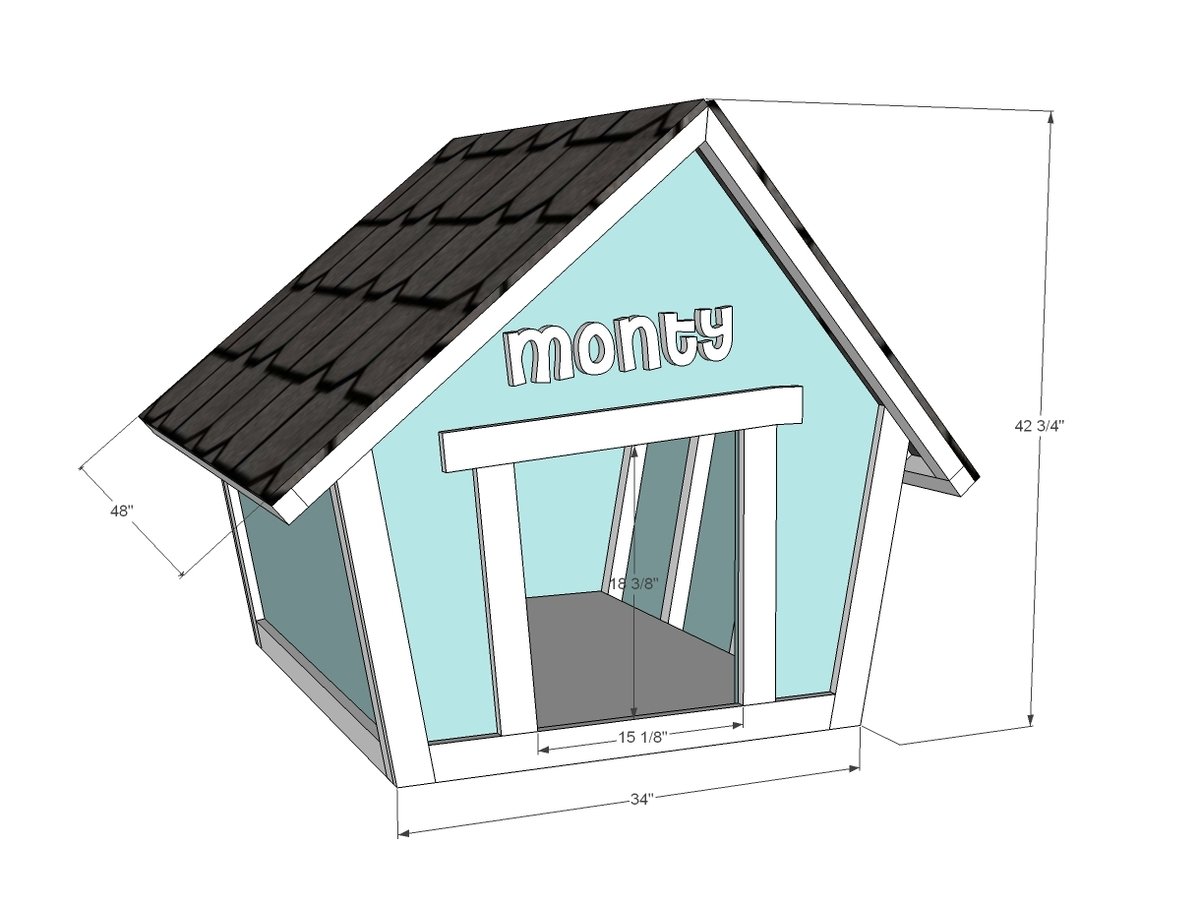
Shopping List
2 ½ sheets ½” exterior plywood
11 – 2x2 @ 8 feet long
4 – 1x3 @ 8 feet long
1 – 1x2 @ 8 feet long
2 ½” PH screws
1” finish nails
Wood glue
2” and 3” wood screws
Cut List
TRUSSES
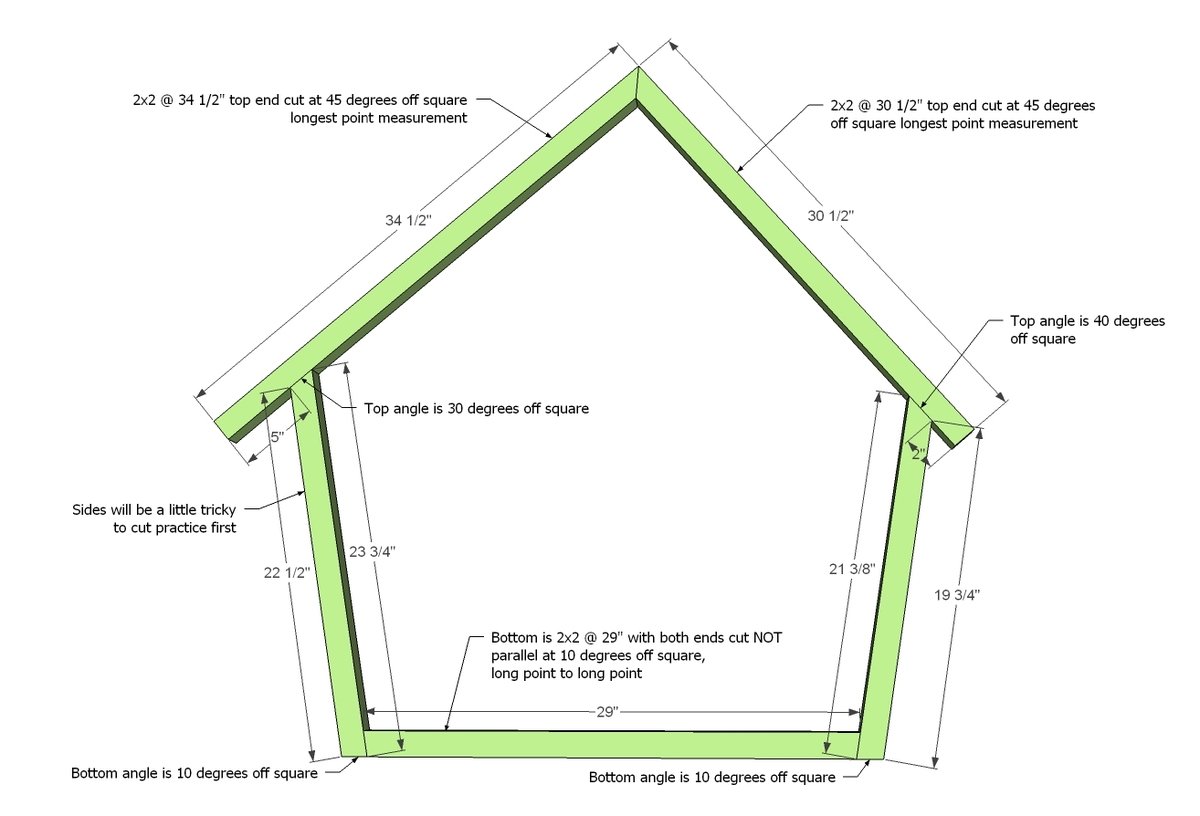
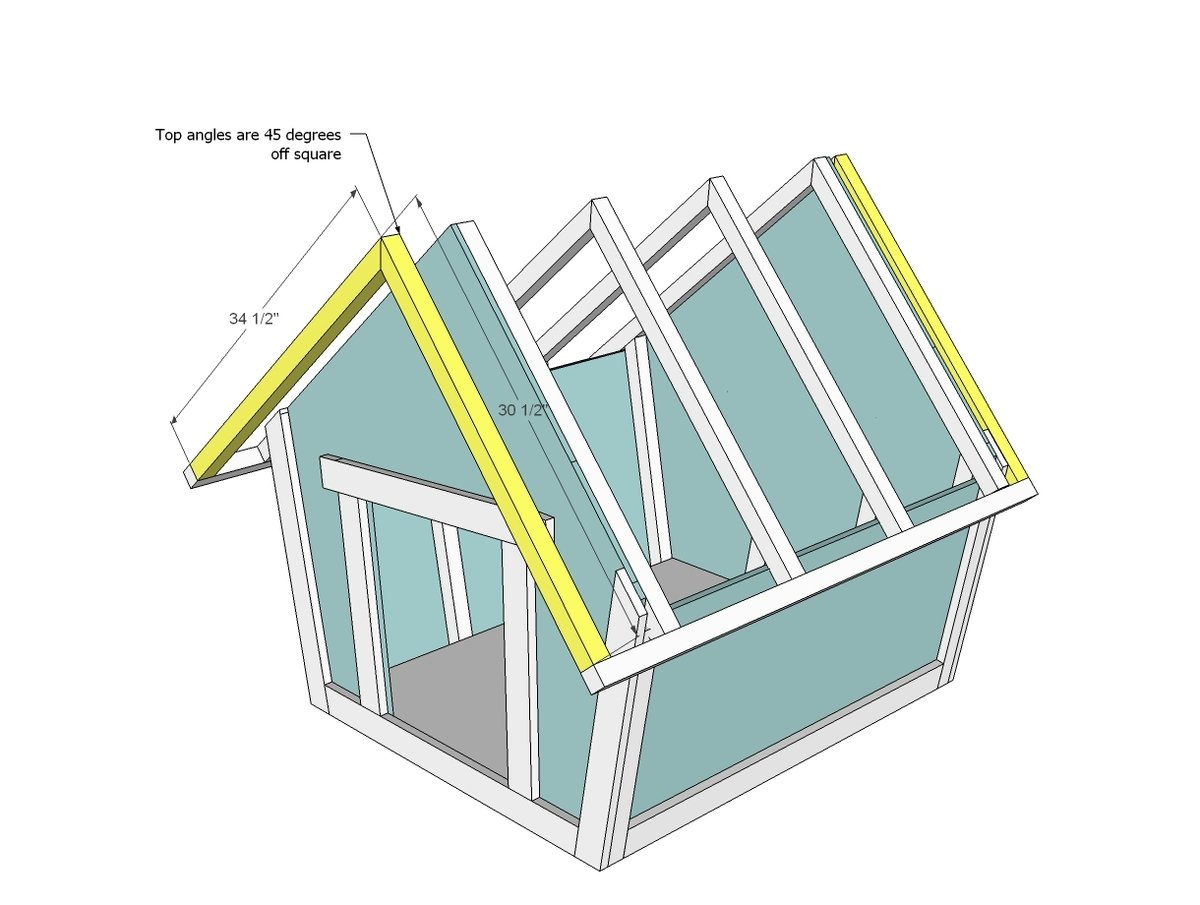
6 – 2x2 @ 34 ½” – top end cut at 45 degrees off square LP
6 – 2x2 @ 30 ½” – top end cut at 45 degrees off square LP
4 – 2x2 @ 29” – both ends cut at 10 degrees off square NOT parallel LP
4 – 2x2 @ 23 ¾” – 30 degrees/10 degrees LP (see in plan for more detail)
4 – 2x2 @ 21 3/8” – 40 degrees/10 degrees LP (see in plan for more detail)
1 – ½” plywood @ 39” x 29” (floor)
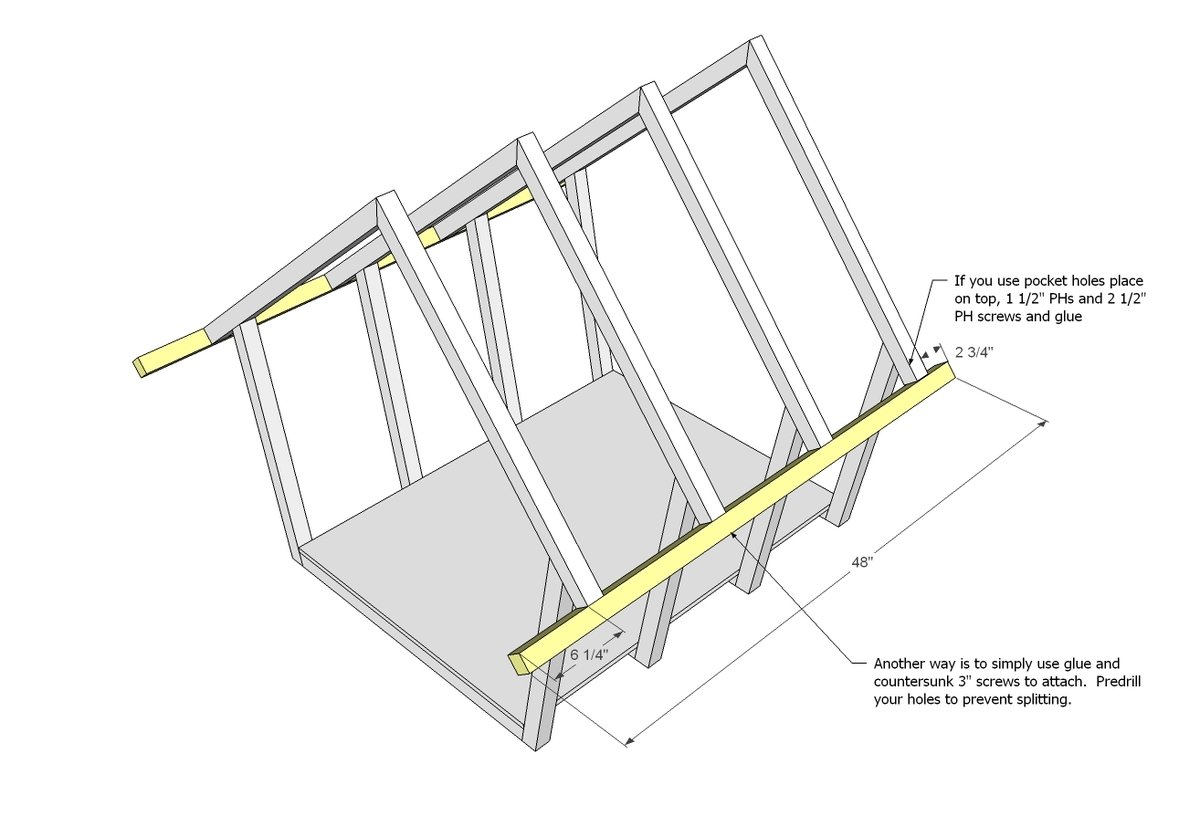
2 – 2x2 @ 48”
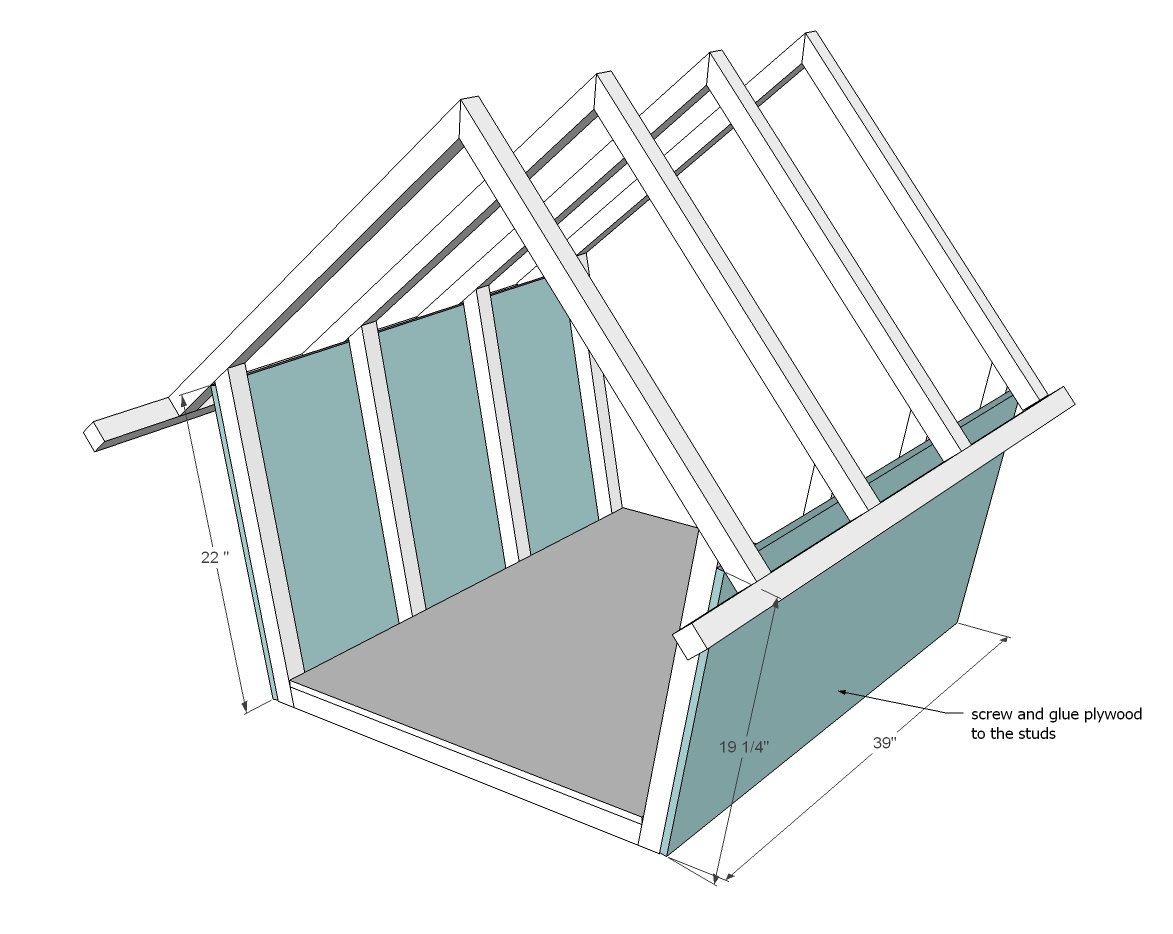
1 – ½” plywood @ 39” x 19 ¼”
1 – ½” plywood @ 39” x 22”
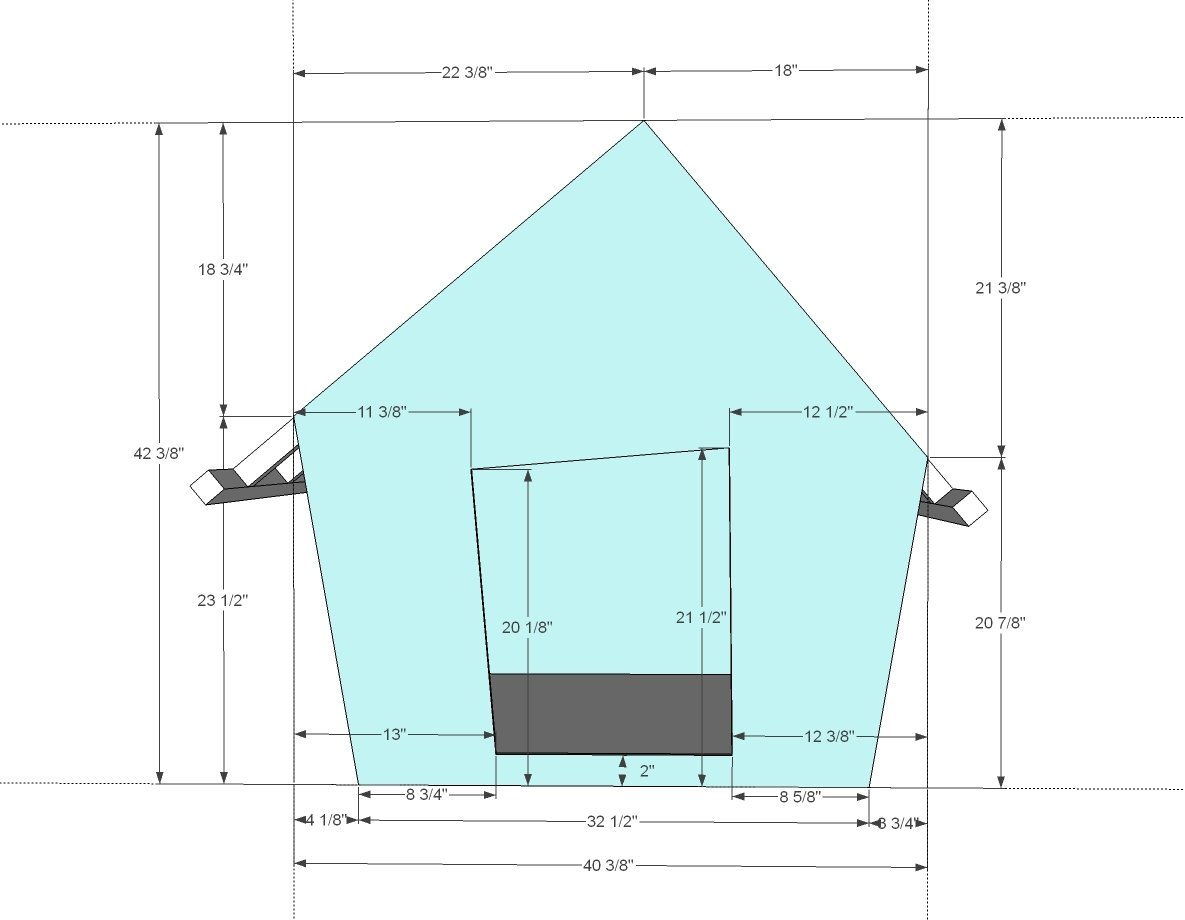
2 – ½” plywood @ 42 3/8” x 40 3/8” (cut shapes from these pieces)
SIDE TRIM
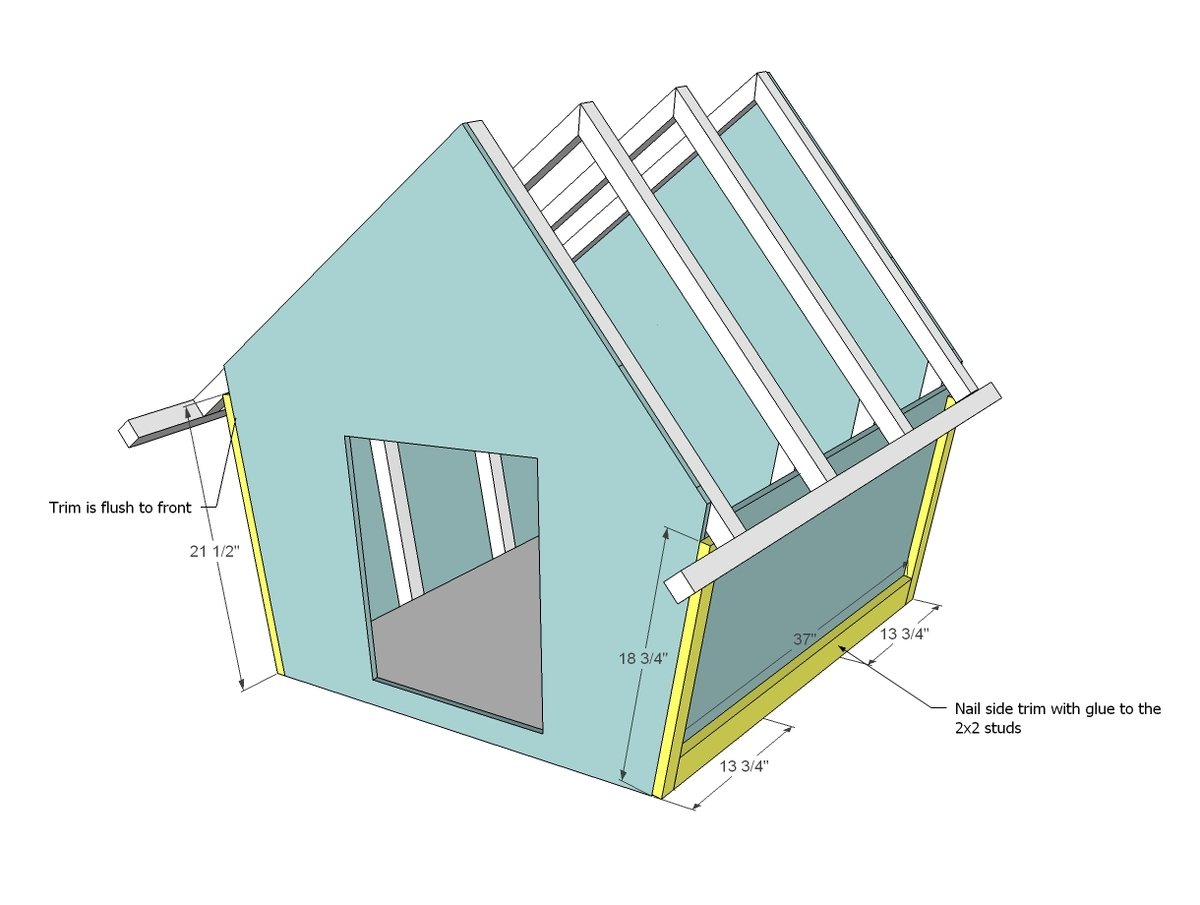
2 – 1x3 @ 37”
2 – 1x2 @ 18 ¾”
2 – 1x2 @ 21 ½”
FRONT/BACK TRIM
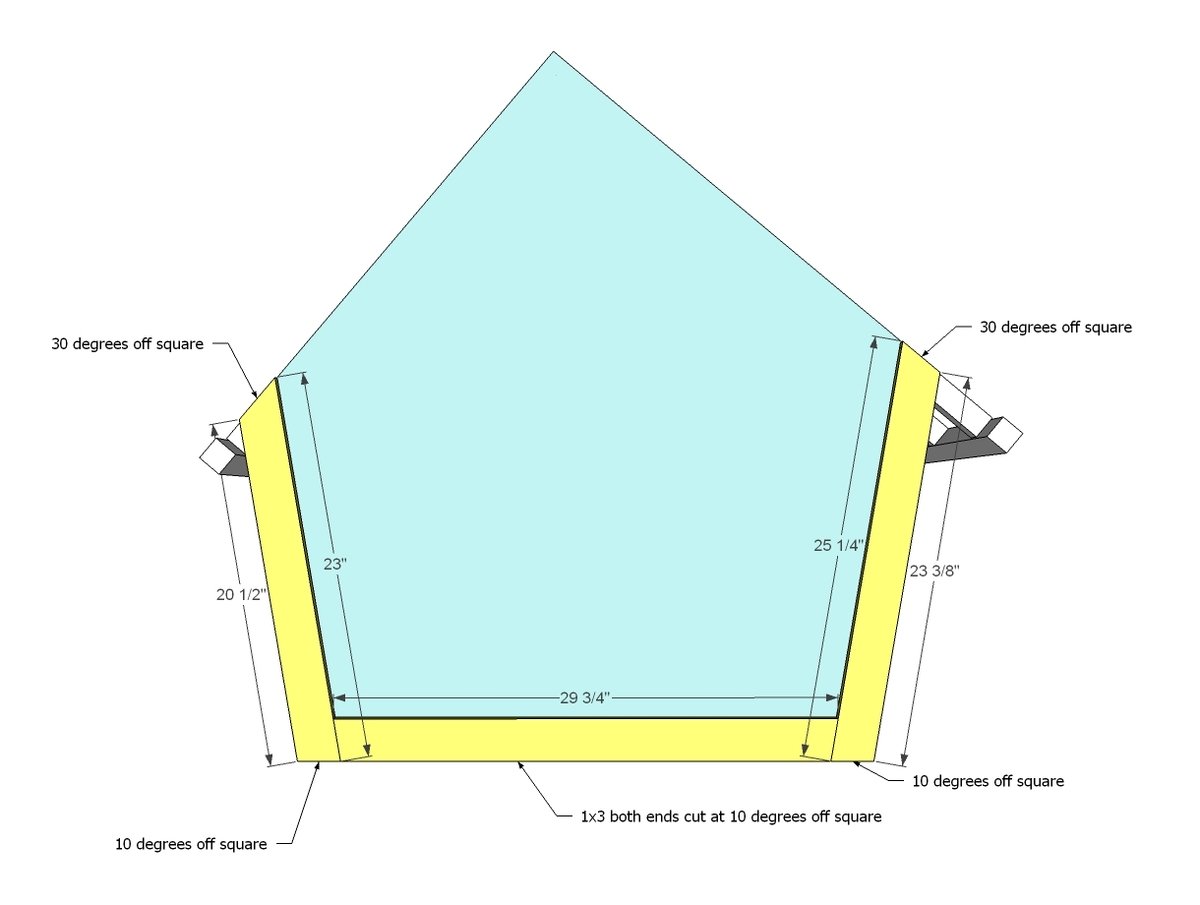
2 – 1x3 @ 29 ¾” – both ends cut at 10 degrees off square LP NOT parallel
2 – 1x3 @ 23” – 40 degrees/ 10 degrees LP (see in plan for more details)
2 – 1x3 @ 25 ¼” - 30 degrees/10 degrees LP (see in plan)
DOOR TRIM
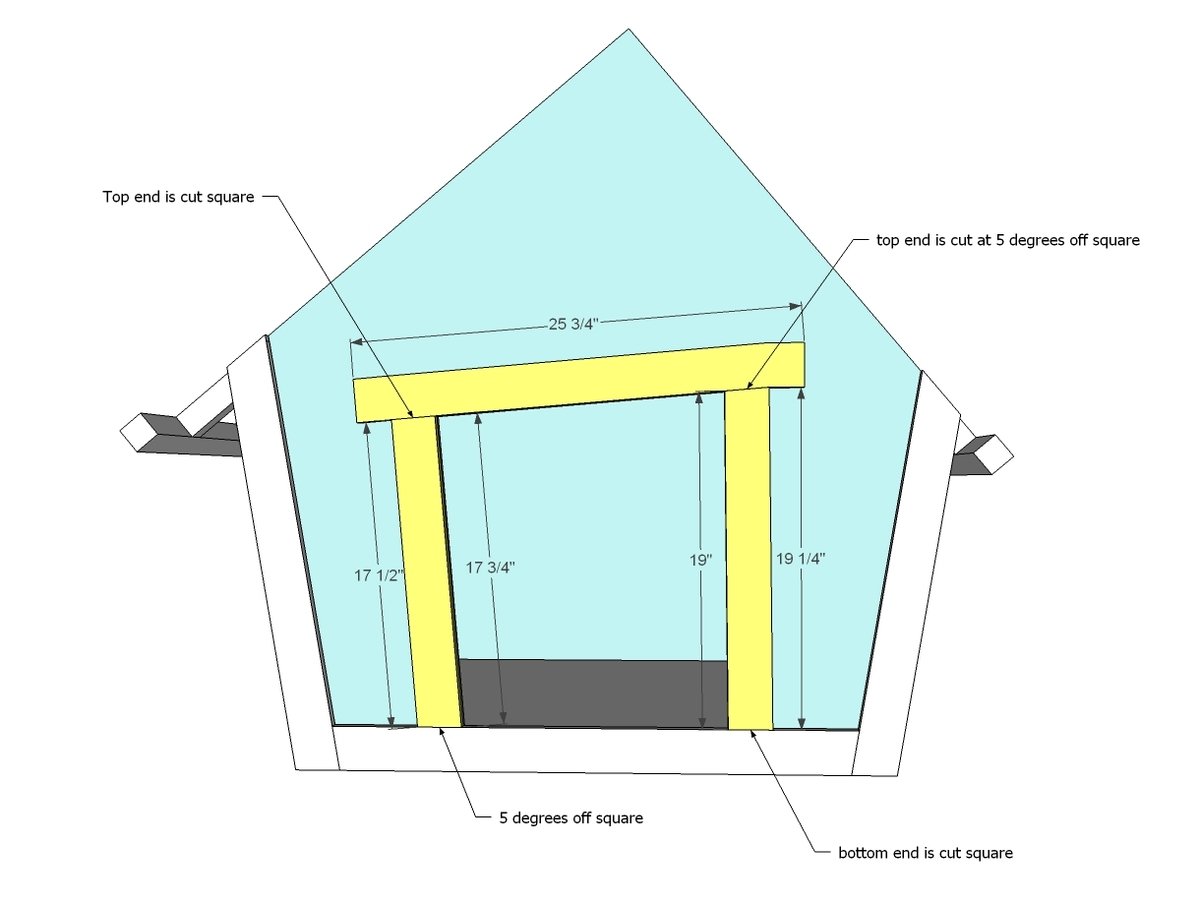
1 – 1x3 @ 25 ¾”
1 – 1x3 @ 17 ¾” - one end cut at 5 degrees off square LP
1 – 1x3 @ 19 ¼” – one end cut at 5 degrees off square LP
ROOF
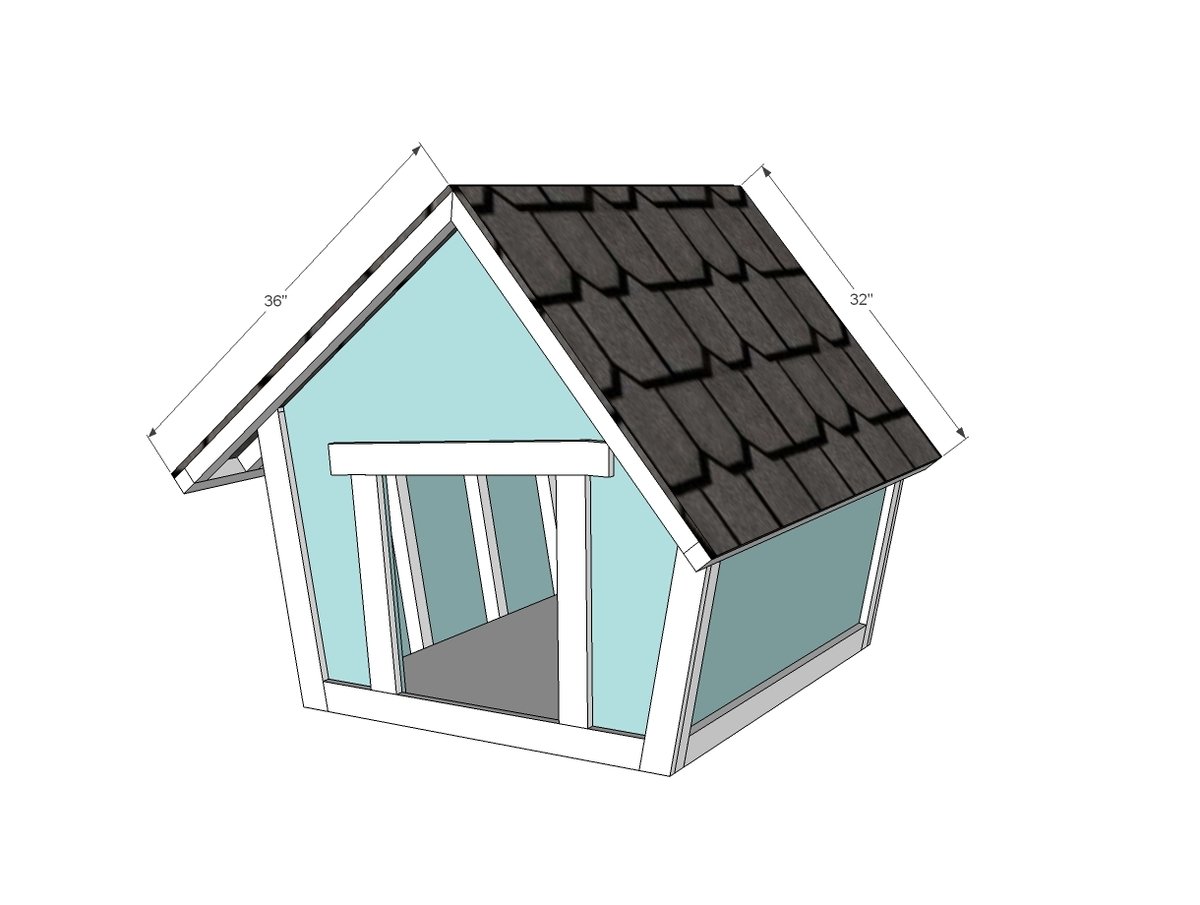
1 – ½” plywood @ 48” x 36”
1 – ½” plywood @ 48” x 32”
*LP stands for longest point measurement
Step-by-step Instructions
Step 1
Build four trusses. Glue and use either countersunk screws or 1 ½” PHs and 2 ½” PH screws. Note – if you do use PHs see step 3 to predrill PHs in ends before assembly.
Step 2
Mark location of trusses on floor plywood. Apply glue to tops of floor plywood. Screw down with 2” screws.
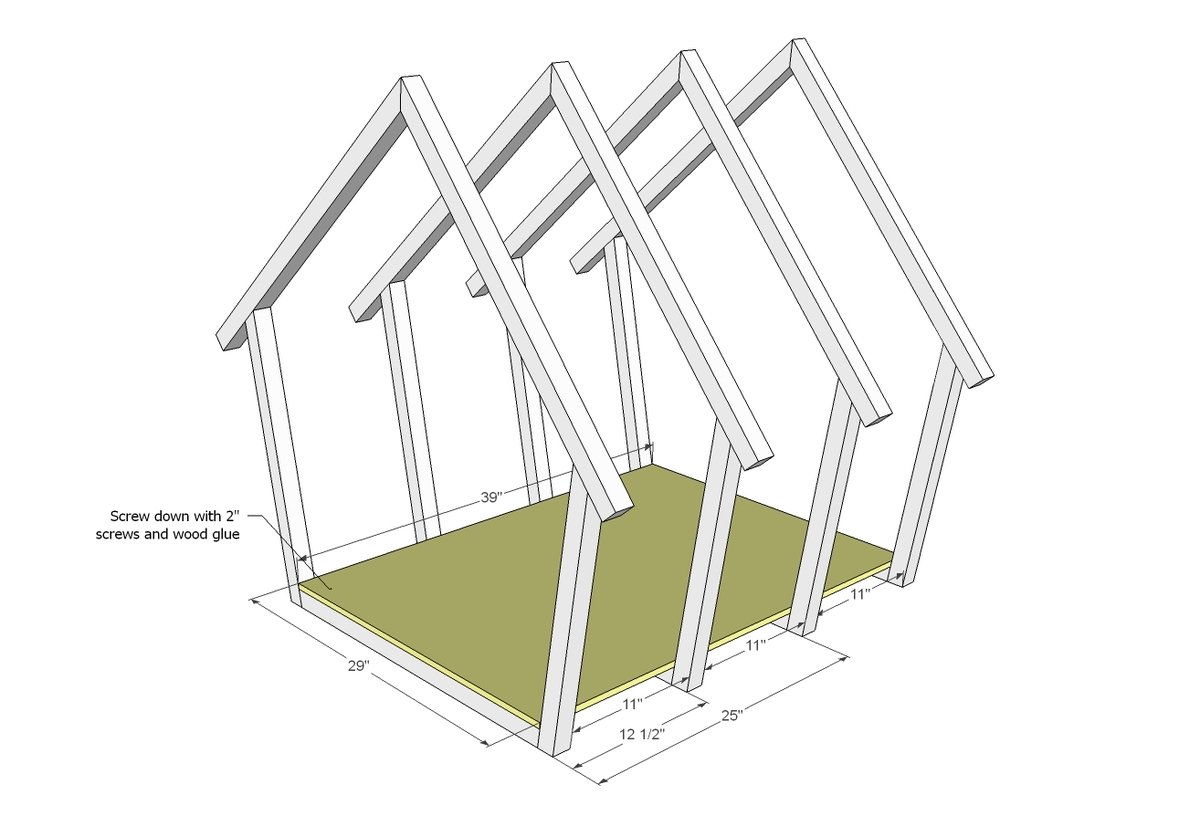
Step 3
Attach the ends as shown in diagram. Use glue.
Step 4
Next, add the side plywood. Use 2” screws and glue.
Step 5
Step 6
Next trim out the sides. Use the 1” nails and glue. Measurements shown are to center of studs for easier nailing.
Step 7
Next trim out front and back as shown in diagram.
Step 8
Then trim out the front door. Use glue and 1” finish nails.
Add the front and back overhang trusses. Make sure you join the tops with screws and glue.
NOTE: you can add ridge poles between the trusses if you feel the doghouse needs the extra support.
Step 10
And then add the roof plywood!
Step 11
Don't forget - go visit Whitney at Passion for Wood for construction details!
Finishing
Sand all surfaces, starting with a medium grit and finishing with fine. Wipe off the dust, fill any holes or gaps with wood filler, and sand smooth once dry. Apply primer if you're painting, then finish with your choice of paint or stain and seal with a durable clear topcoat. For outdoor projects, use exterior-rated primer, paint or stain, and sealer so the piece stands up to the weather.
Source (temporary): https://www.ana-white.com/woodworking-projects/crooked-doghouse