Cupcake Stand
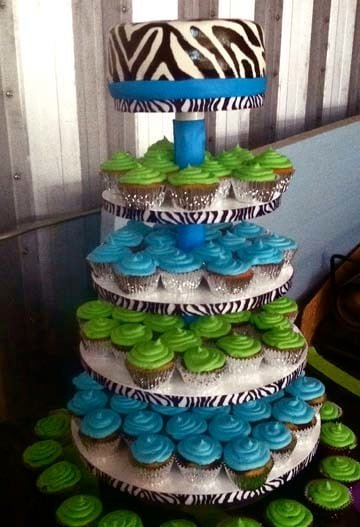
These things have become super popular lately, and I wanted to figure one out for later this summer but had the chance to use one for graduation so a few scraps and $5 in supplies later here it is...Super sturdy, holds close to 100 cupcakes and can be dressed up in any way you see fit.
Specifications
| Project type | Other Projects |
|---|---|
| Room | kitchen |
| Style | Modern Style Furniture Plans |
| Difficulty | Beginner Projects |
| Estimated cost | Under $20 |
Shopping List
Scrap 1/2" plywood. I used a piece that was about 4ft by 18" and another small piece because one of my cirlcles overlapped. If you need new a 2 x 4 ft piece should be more than enough. You'll also need 1" PVC pipe, about 2 feet. For 5 tiers I used 6 1" couplers and 2 1" caps from the plumbing section also. You'll add 2 couplers for each additional tier.
Cut List
Cut successive circles starting at either 6" or 8" in 2 inch increments until you have the desired number of tiers for your stand. Mine are 8" 10" 12" 14" and 16"
Tools
- measuring tape
- pencil
- safety glasses
- drill
- jigsaw
Step-by-step Instructions
Step 1
Cut out all pieces of 1/2" plywood, and fill and sand as needed. The edges don't have to be perfect because they can be hidden with ribbon. Drill a 1 3/8" hole in the center of the middle 3 circles. I couldn't find a bit within my price range so I used a 1 1/4" bit and got creative to make it just a hair bigger.
Step 2
Assemble the top and bottom layers by gluing the pipe caps in the center (I used liquid nails) and using short screws to help hold it so it doesn't topple when full of cake. Make sure the top smallest circle has the cap attached on the bottom side.
Step 3
Once the top and bottom have had a chance to dry assemble the tower....bottom (biggest) circle, insert a 3 " piece of pipe into the cap, coupler, 2 1/2" pipe, stick a circle around the pipe, add another coupler, 2" pipe, coupler, 2 1/2" pipe, circle and so forth until you get to the last coupler, then add another 3" pipe and the top circle. The cap of the top layer should be attached to the bottom side of your circle.
Step 4
I chose to glue some of my pipe pieces together for ease of assembly and dis-assembly but it would probably hold it without being glued. The hubs in this house was afraid pressure would pop the layers apart but I really don't think it would. If you choose to glue make sure you take a second to plan and leave unglued pipes to be able to pop the pieces apart for ease of storing and transporting. Use pipe cleaner and glue not wood glue also! One little trick I used to make it easier to get layers apart is a touch of vaseline inside the couplers that you want to pop apart. Just make sure not to use vaseline on the ones you want to glue or you'll have a mess!
Finishing
Sand all surfaces, starting with a medium grit and finishing with fine. Wipe off the dust, fill any holes or gaps with wood filler, and sand smooth once dry. Apply primer if you're painting, then finish with your choice of paint or stain and seal with a durable clear topcoat. For outdoor projects, use exterior-rated primer, paint or stain, and sealer so the piece stands up to the weather.
Source (temporary): https://www.ana-white.com/woodworking-projects/cupcake-stand