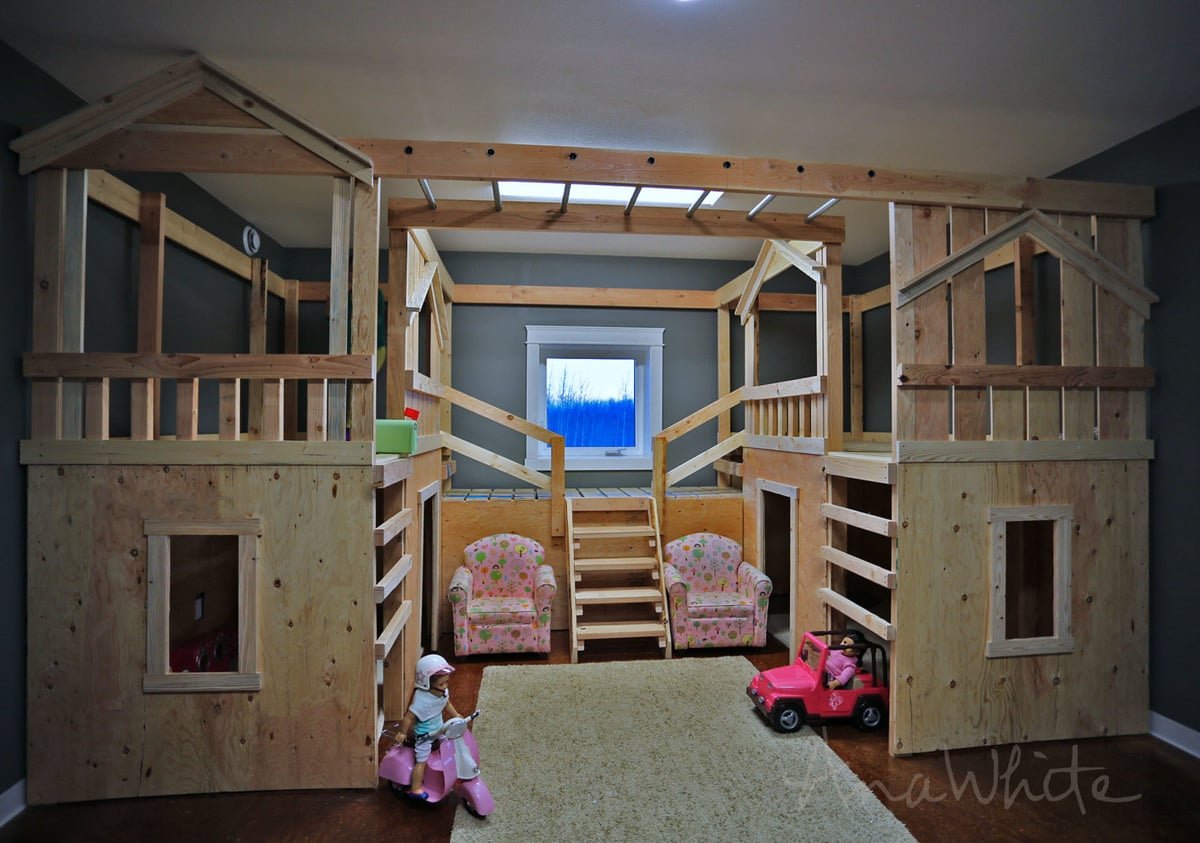
Basement Indoor Playground with Monkey Bars
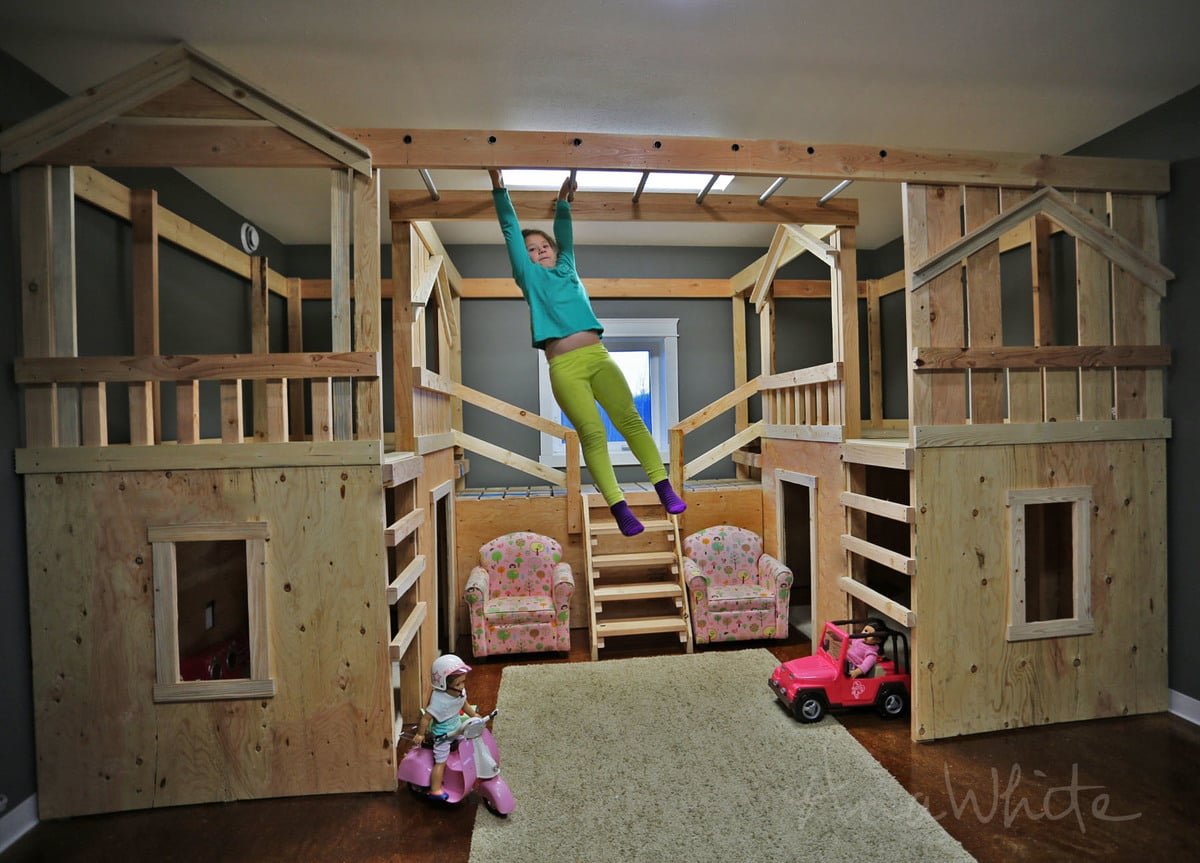
Build a basement indoor playground with monkey bars. Playhouses can be used as beds or bunk beds. Free
Specifications
| Project type | Bunk Bed |
|---|---|
| Room | Bedroom |
| Difficulty | Intermediate |
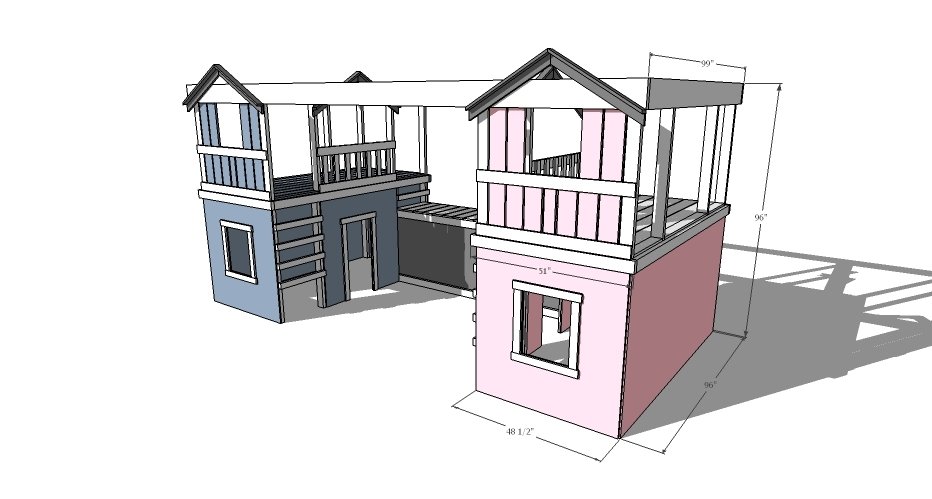
Dimensions
Use the size-specific shopping and cut lists below.
Shopping List
2x4s (we started with 24 and added a few more)
1x4s (we started with 10)
1x6s (we started with 18 - plywood can also be used for decking/floors and may be cheaper)
2x8s (we used 2-16 footers and 4 - 8 footers) - For greater spans you may need a 2x10 or 2x12 or to cross brace
For the little peaked roofs, you'll need 6 1x3s
1/2" thick plywood (we used six total sheets)
We screwed everything together with 2" and 3" self tapping screws with torque heads (saved a ton of work to not have to predrill)
We used 1" pipe (can also use 1" hardwood dowels) for the monkey bars, spaced 12" apart
Cut List
Recommend cutting to fit
Tools
- measuring tape
- square
- pencil
- hammer
- safety glasses
- hearing protection
- kreg-jig
- drill
- circular saw
- jigsaw
- compound miter saw
- sander
- countersink drill bit
Step-by-step Instructions
Step 1
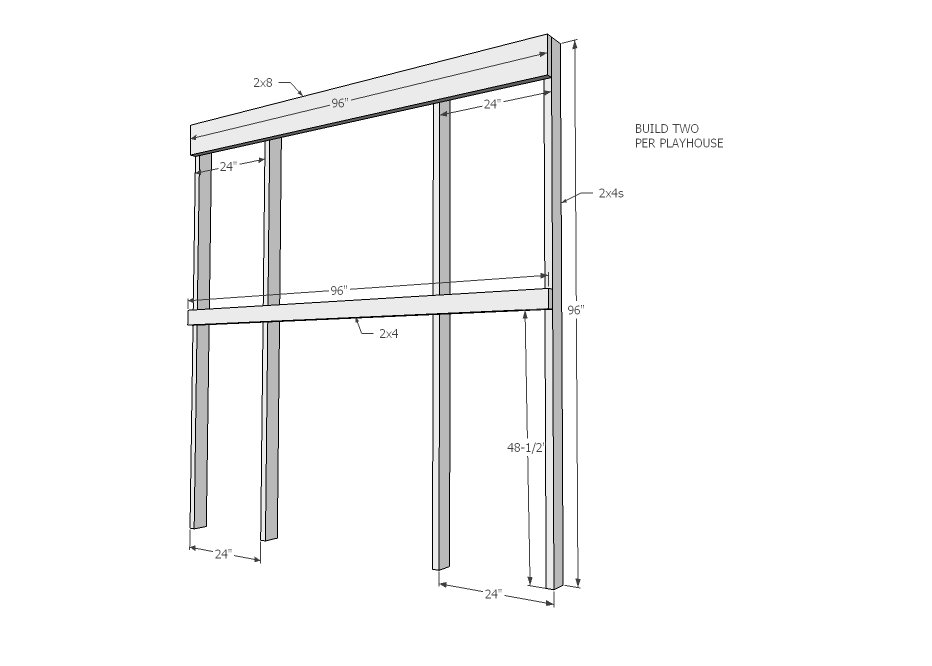
Since our walls are nine feet tall, we just took eight foot long 2x4s and screwed an 8 foot long 2x8 to the top and an 8 foot long 2x4 near the center (see diagram) with 3" wood screws - no cutting required. We made four of these. If you have eight foot ceilings, you can make all the legs stud length (92-5/8") and avoid cutting. One precaution is to check the length of your boards - sometimes they can be off, especially if they are not studs.
Step 2
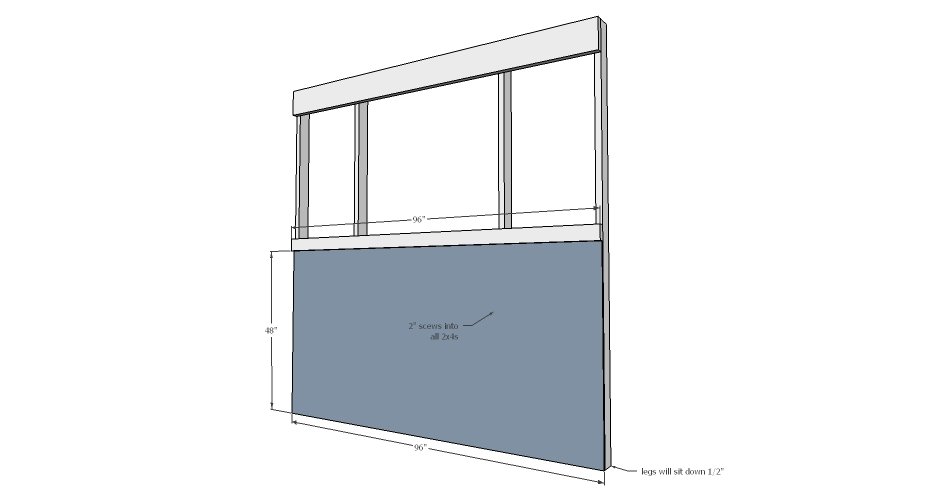
So we made four of the wall frames (for two playhouses). We then took two of the wall frames and completely covered the outside in plywood. This will provide structure and also protect the walls inside the playhouse. All plywood is attached with 2" self tapping wood screws.
Step 3
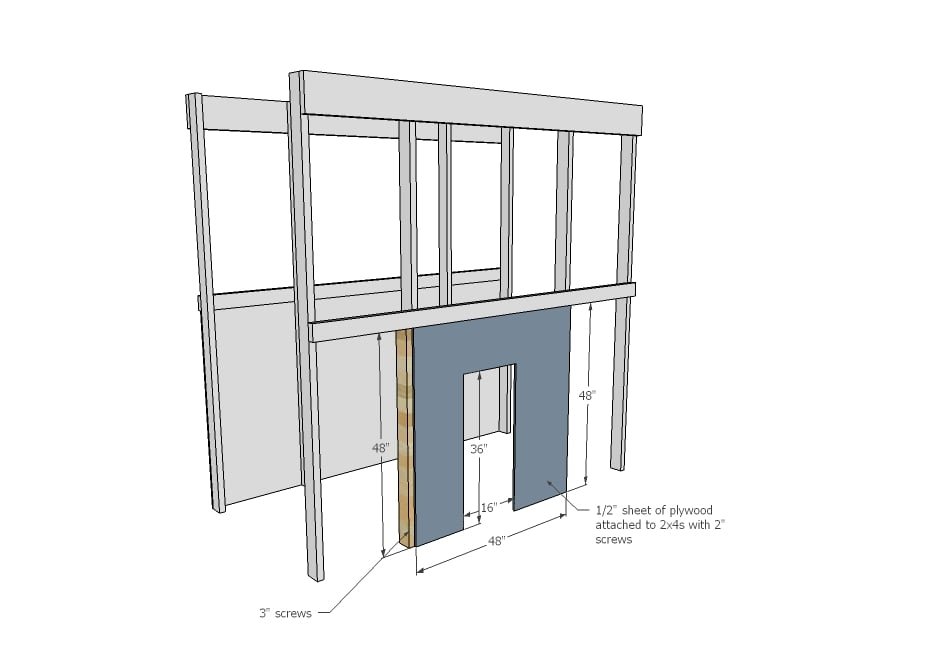
For the remaining two walls, we attached half sheets of plywood. We cut our doors out later on, but you could do that now. Doors and windows were cut out with a jigsaw.
Step 4
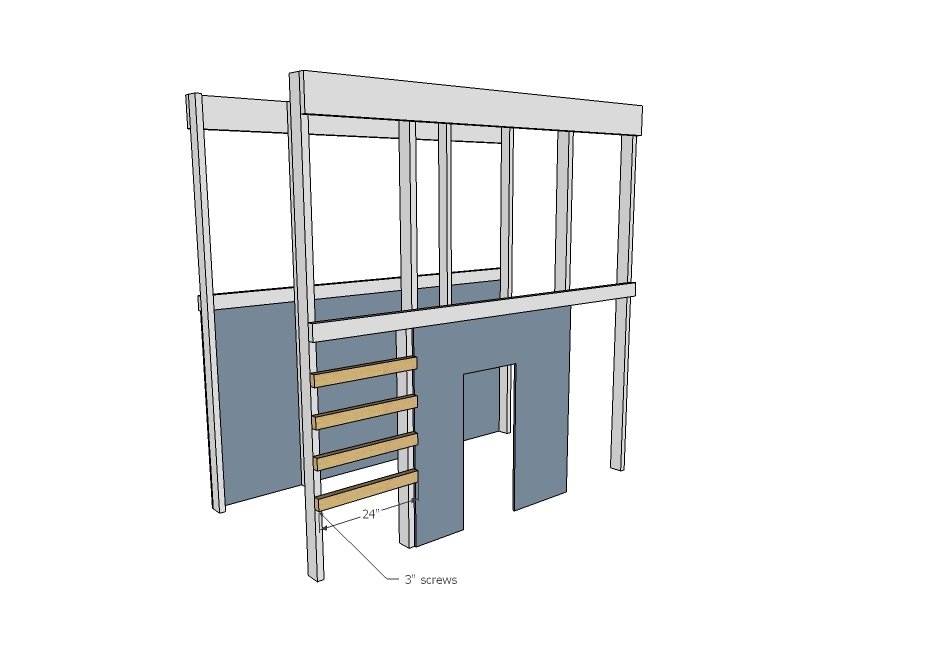
The ladder piece is easy to add on - you can do it now or later on. It's nice to have the ladder rungs to keep these wall pieces from flopping around, but it's also nice to be able to put the rungs up in place so you can judge how far to space them. Use the long screws here.
Step 5
Step 6
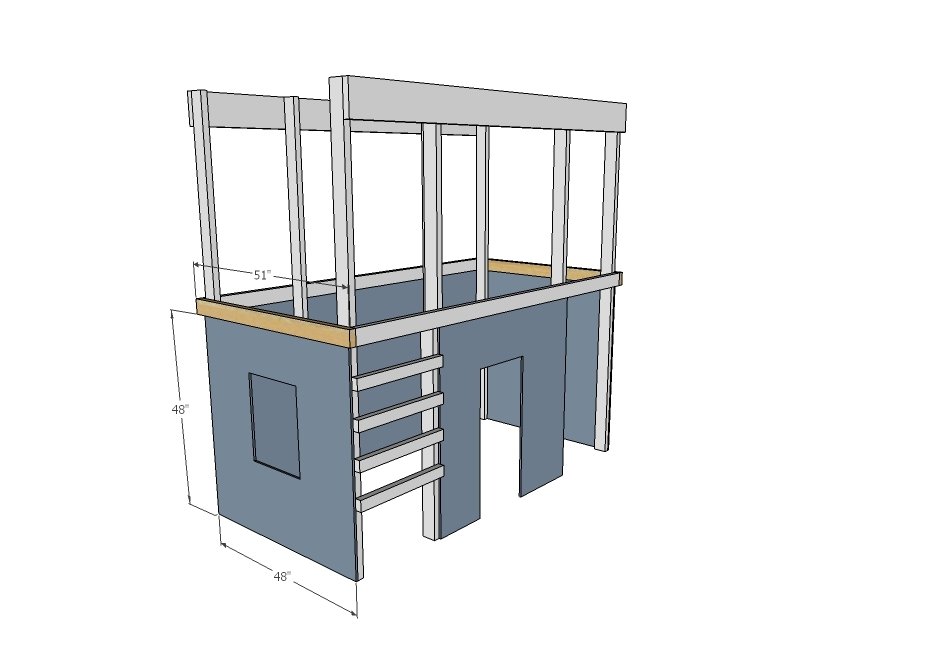
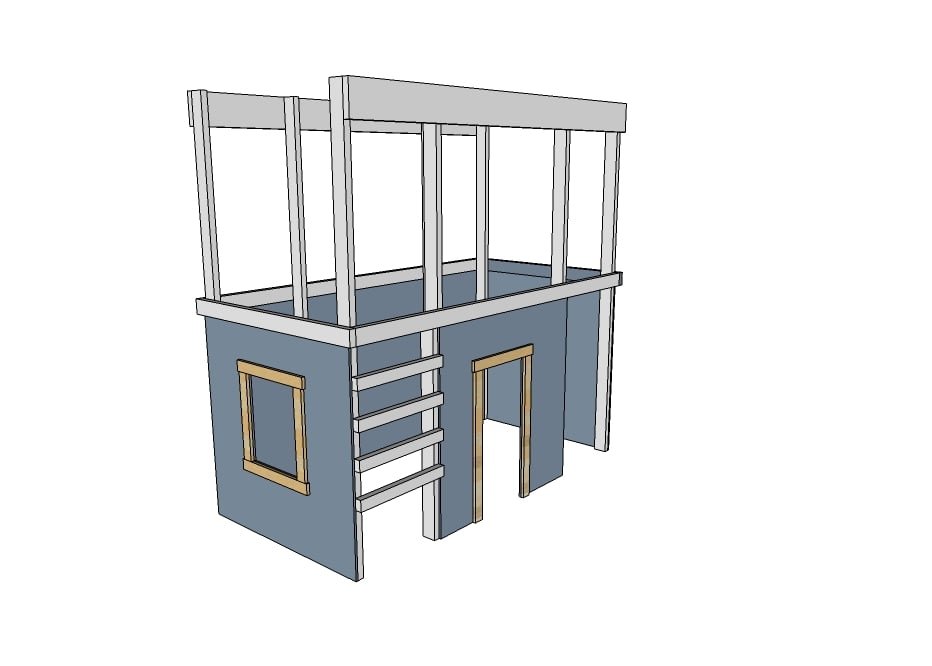
For window and door trim, we Kreg Jigged frames first out of 1x3 boards, and then attached them from the inside to the plywood. You might need 1-1/2" or 1-3/4" screws to prevent the screws from poking through. I recommend skipping to step 9 - putting the floor in - because once you tie the two playhouse together you won't be able to climb behind it and screw the floor framing down.
Step 7
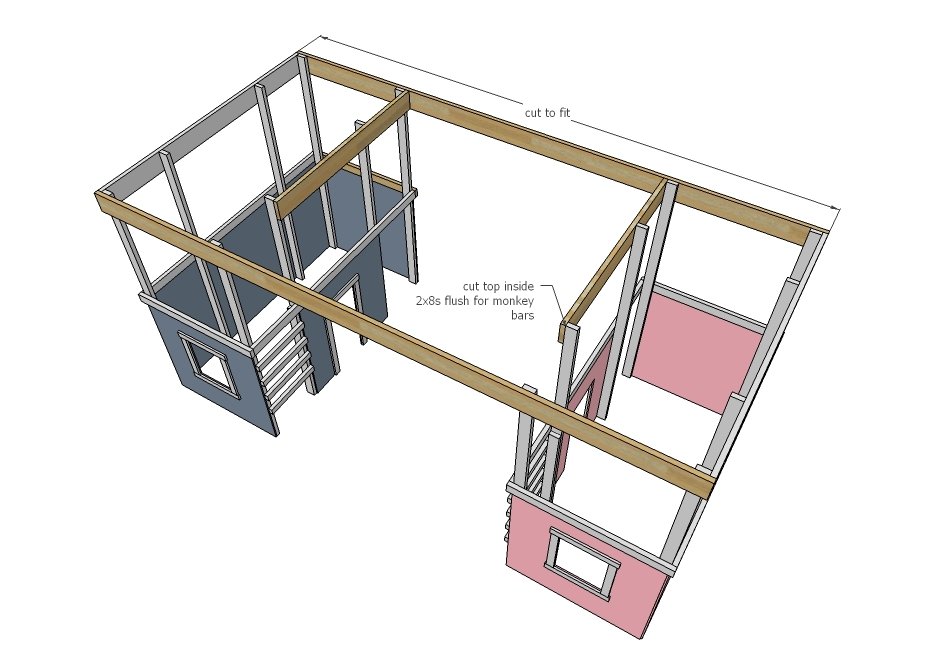
Now to tie in the two playhouses. We spaced the playhouses a little off the wall and then tied them together with long 2x8s cut to fit and screwed on.
Step 8
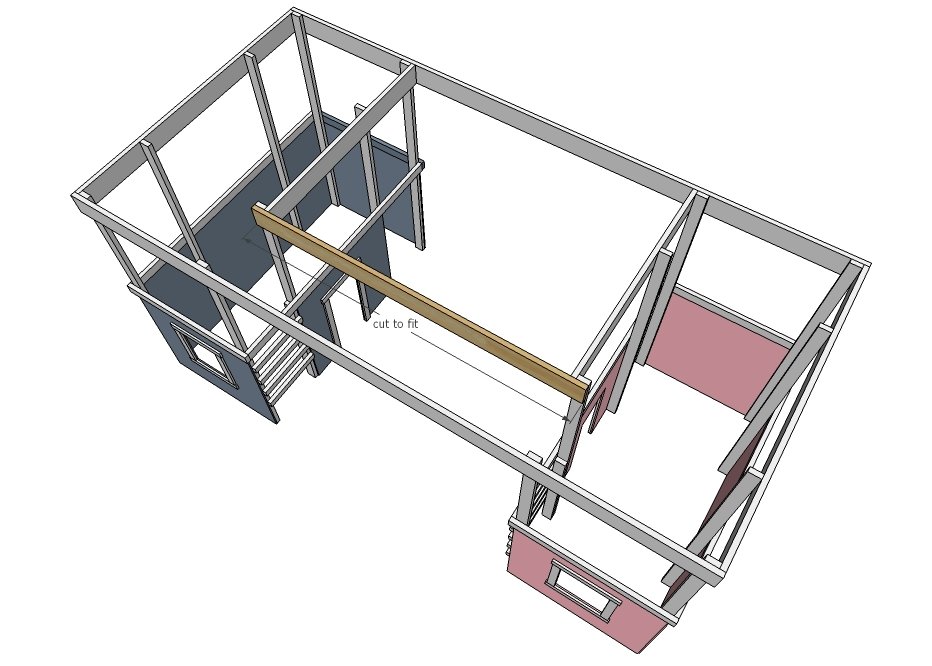
Since we wanted monkey bars, we cut the monkey bar doorway header out and then attached another 2x8 to create a channel for the monkey bars. We then drilled 1" holes for the monkey bars, and spaced them 12" apart. You won't need a monkey bar super close to the playhouse - we could easily have gotten away without the first and last bars. Also to keep the monkey bars in place and not twist, we added a screw through the top of the wood into the top side of the pipe.
Step 9
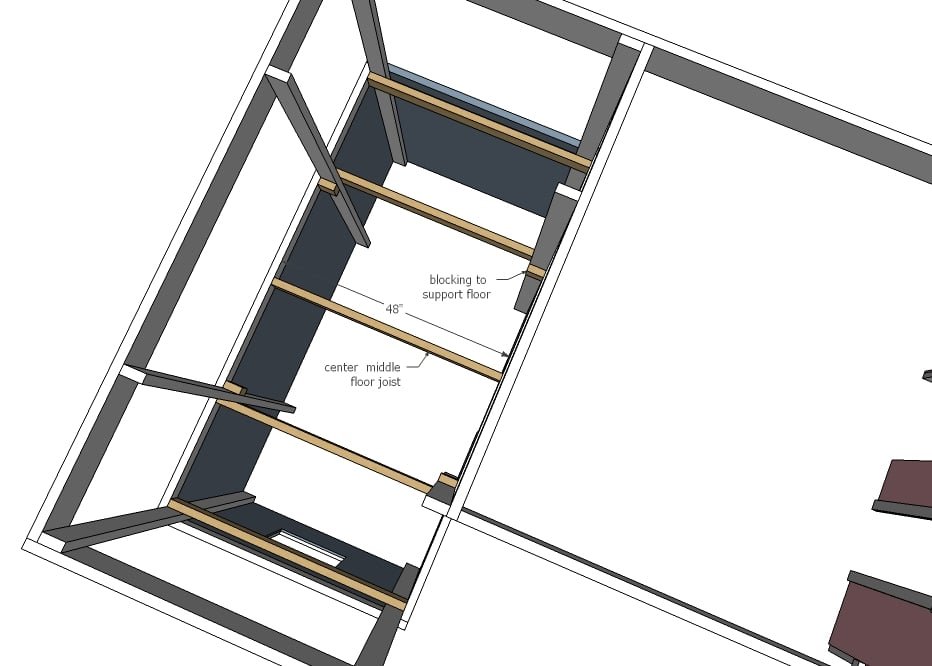
For the floor framing, screw from the outsides the joists in place and also attach to the vertical wall studs. If you can't get behind the playhouse to attach the center one, you can also use a Kreg Jig. Add the blocking pieces as well. Use the longer screws here.
Step 10
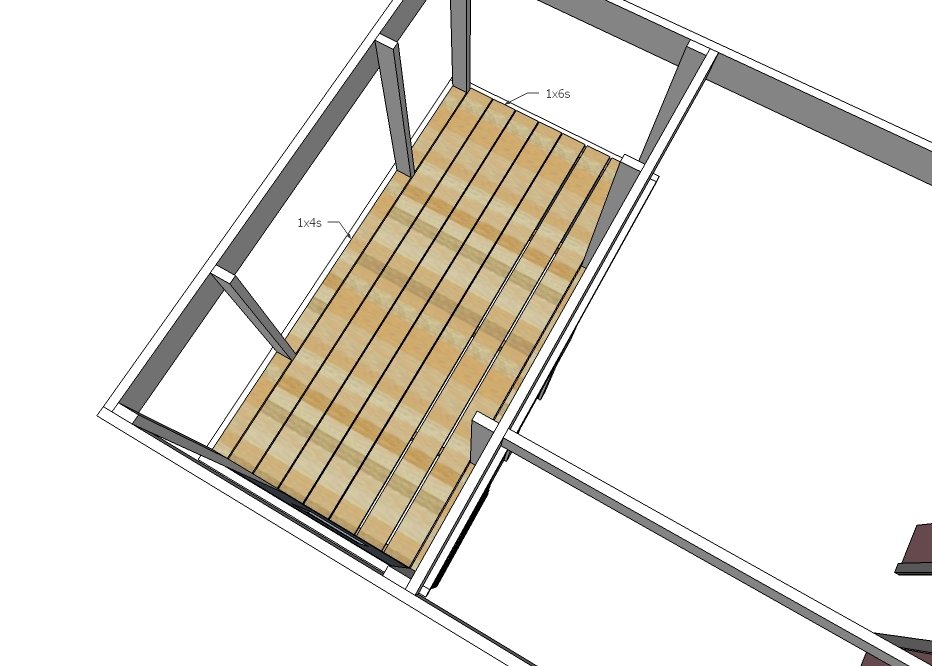
For the floors, screw down 1x4s between the 2x4s, and then fill in the rest with 1x6s. There will be about 3/8" gap in between the boards.
Step 11
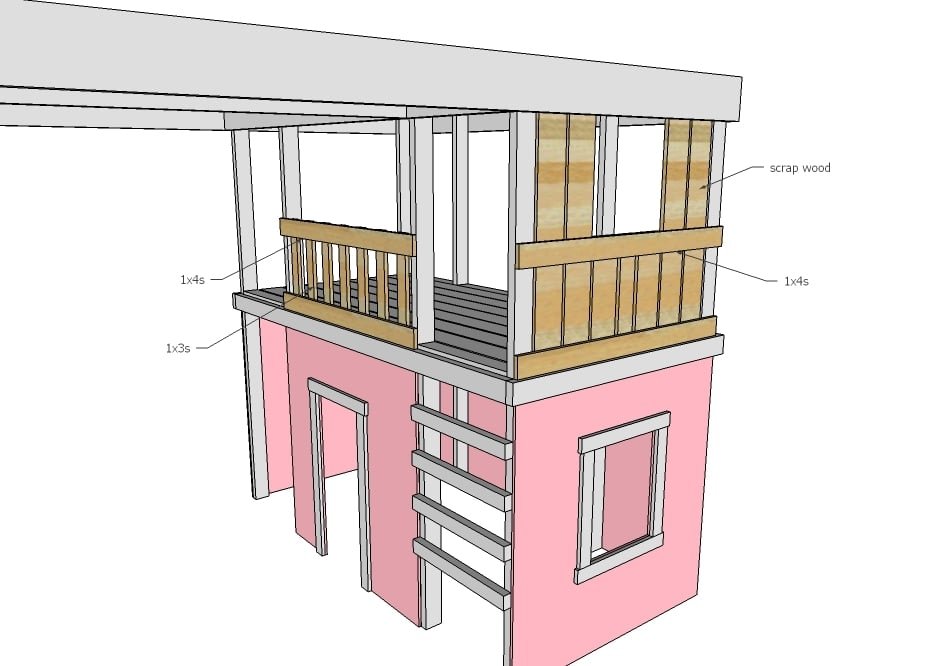
For siding, we pulled scraps from our shop - everything from pine boards to plywood to cedar fence pickets. I had originally wanted to put the boards on crooked, like kids made the playhouse, but it just didn't work out that way. Maybe you'll do yours that way. If you aren't flush against the back wall, you might want to add some boards back there too. Of course, we don't leave our baby unattended, ever, on this.
Step 12
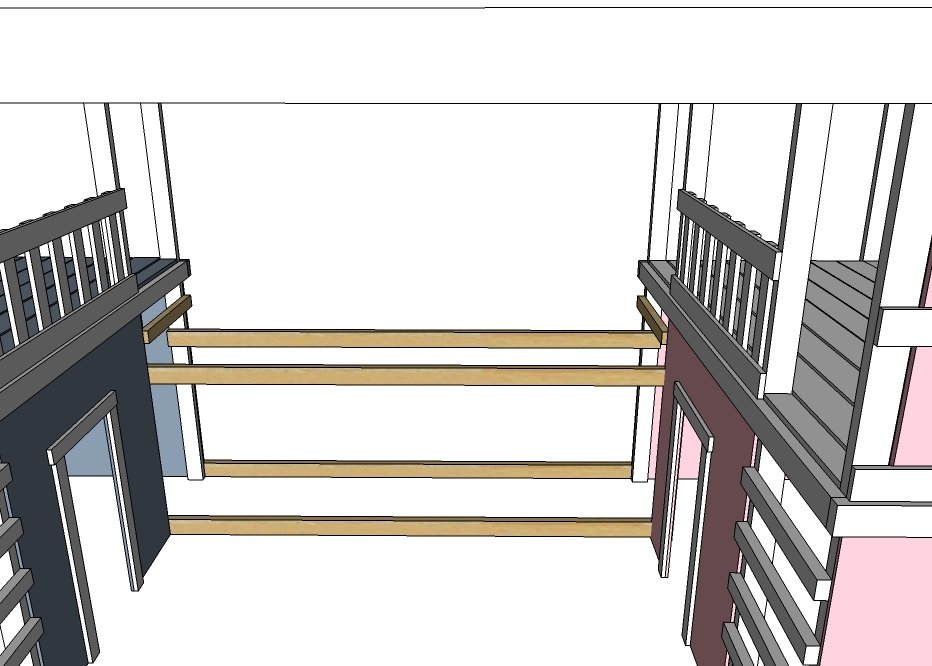
For the bridge, we attached 2x4s between the two playhouses. If you are not putting plywood under the bridge or longer spans, you may need a wider width board to support the bridge (2x6 or 2x8). We also added a ladder rung for climbing up to the upper level and preventing kids from falling through at the end of the bridge.
Step 13
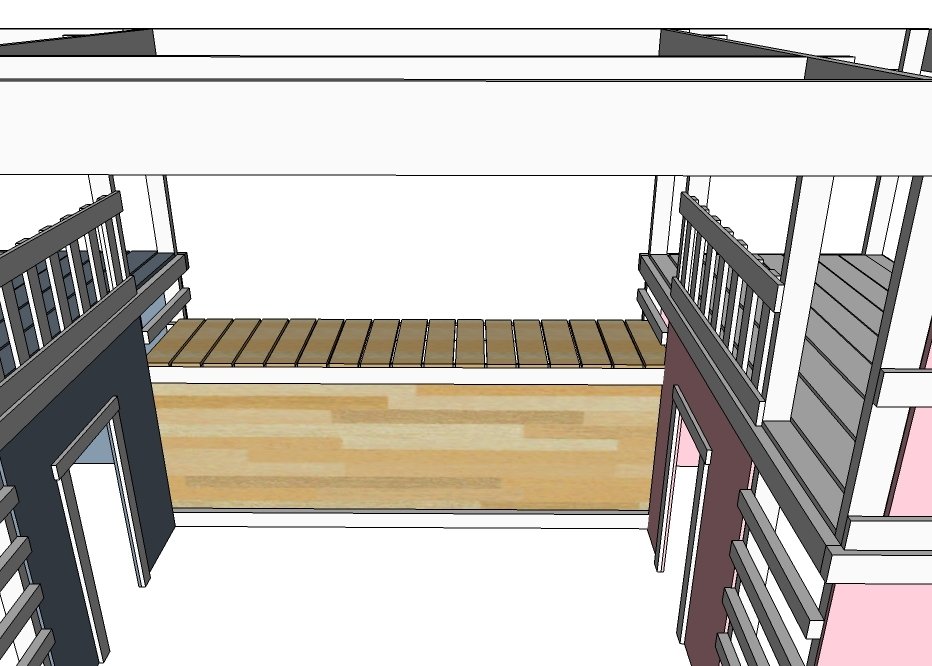
We then covered the top in 1x6 boards and the front in plywood. You could also use scrap boards vertically under the bridge.
Step 14
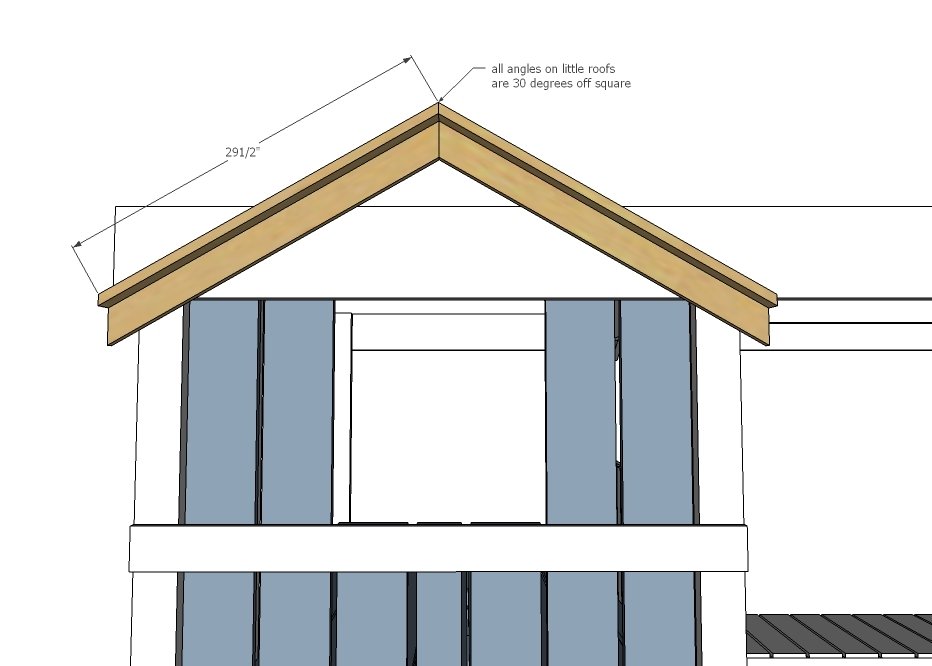
The little roofs added a ton of character and were easy to build. I built them on the ground and then screwed the entire thing up. It's just 30 degree angle and bevel cuts.
Step 15
The last step was the ladder and railing. I'm going to redo the ladder (too steep) so won't post those plans, but you can see how we built it and then added the railing. By the time you get to this step, this will be a piece of cake.
Finishing
Sand all surfaces, starting with a medium grit and finishing with fine. Wipe off the dust, fill any holes or gaps with wood filler, and sand smooth once dry. Apply primer if you're painting, then finish with your choice of paint or stain and seal with a durable clear topcoat. For outdoor projects, use exterior-rated primer, paint or stain, and sealer so the piece stands up to the weather.
Source (temporary): https://www.ana-white.com/woodworking-projects/diy-basement-indoor-playground-monkey-bars