Open Wardrobe Closet with Shelves
Build this simple DIY open wardrobe closet. Designed for small spaces, this compact storage piece is perfect for a dorm room, bedroom, Airbnb, or entryway. With sturdy 2x4 uprights, 1x12 shelving, and a hanging section for clothes, it adds plenty of organization in a clean, modern footprint..aw-plan-ad,.aw-plan-ad * { box-sizing: border-box; }.aw-plan-ad { --aw-pink: #e83f70; --aw-pink-dark: #c92f5d; --aw-black: #252525; --aw-gray: #f5f5f5; --aw-border: #dedede; display: grid; grid-template-columns: minmax(0, 1.08fr) minmax(320px, 0.92fr); max-width: 1050px; margin: 36px auto; overflow: hidden; color: var(--aw-black); background: #ffffff; border: 1px solid var(--aw-border); border-top: 6px solid var(--aw-black); box-shadow: 0 10px 28px rgba(0, 0, 0, 0.1); font-family: inherit; }.aw-plan-ad__photo { position: relative; min-height: 470px; overflow: hidden; background: #eeeeee; }.aw-plan-ad__photo img { display: block; width: 100%; height: 100%; min-height: 470px; object-fit: cover; object-position: center; }.aw-plan-ad__badge { position: absolute; top: 18px; left: 18px; margin: 0; padding: 9px 13px; color: #ffffff; background: var(--aw-pink); box-shadow: 0 4px 12px rgba(0, 0, 0, 0.18); font-size: 0.76rem; font-weight: 800; line-height: 1; letter-spacing: 0.08em; text-transform: uppercase; }.aw-plan-ad__content { display: flex; flex-direction: column; justify-content: center; min-width: 0; padding: clamp(28px, 5vw, 52px); }.aw-plan-ad__kicker { margin: 0 0 10px; color: var(--aw-pink); font-size: 0.8rem; font-weight: 800; line-height: 1.3; letter-spacing: 0.1em; text-transform: uppercase; }.aw-plan-ad h2 { margin: 0; color: var(--aw-black); font-family: inherit; font-size: clamp(2rem, 4vw, 3.15rem); font-weight: 800; line-height: 1.02; letter-spacing: -0.025em; }.aw-plan-ad__intro { margin: 17px 0 24px; color: #555555; font-size: 1.05rem; line-height: 1.6; }.aw-plan-ad__highlights { display: grid; grid-template-columns: repeat(2, minmax(0, 1fr)); gap: 10px; margin: 0 0 25px; padding: 0; list-style: none; }.aw-plan-ad__highlights li { position: relative; min-width: 0; padding: 15px 13px 15px 38px; background: var(--aw-gray); border-left: 3px solid var(--aw-pink); line-height: 1.25; }.aw-plan-ad__highlights li::before { content: "✓"; position: absolute; top: 15px; left: 13px; color: var(--aw-pink); font-size: 1rem; font-weight: 900; }.aw-plan-ad__highlights strong { display: block; color: var(--aw-black); font-size: 0.98rem; font-weight: 800; }.aw-plan-ad__highlights span { display: block; margin-top: 3px; color: #666666; font-size: 0.78rem; line-height: 1.35; }.aw-plan-ad__button { display: flex; align-items: center; justify-content: center; gap: 12px; width: 100%; padding: 17px 22px; color: #ffffff!important; background: var(--aw-pink); border: 2px solid var(--aw-pink); font-size: 0.95rem; font-weight: 900; line-height: 1.2; letter-spacing: 0.08em; text-align: center; text-decoration: none!important; text-transform: uppercase; transition: background 0.2s ease, border-color 0.2s ease, transform 0.2s ease; }.aw-plan-ad__button:hover { color: #ffffff!important; background: var(--aw-pink-dark); border-color: var(--aw-pink-dark); transform: translateY(-2px); }.aw-plan-ad__button:focus-visible { outline: 3px solid var(--aw-black); outline-offset: 3px; }.aw-plan-ad__arrow { font-size: 1.35rem; line-height: 1; }.aw-plan-ad__note { margin: 13px 0 0; color: #777777; font-size: 0.74rem; line-height: 1.45; text-align: center; }.aw-plan-ad__anchor { height: 0; scroll-margin-top: 100px; } @media (max-width: 760px) {.aw-plan-ad { grid-template-columns: 1fr; }.aw-plan-ad__photo,.aw-plan-ad__photo img { min-height: 0; }.aw-plan-ad__photo { aspect-ratio: 4 / 3; }.aw-plan-ad__content { padding: 30px 23px; }.aw-plan-ad h2 { font-size: clamp(2rem, 10vw, 2.75rem); } } @media (max-width: 430px) {.aw-plan-ad__highlights { grid-template-columns: 1fr; } } Beginner Friendly DIY Open Wardrobe Build an Instant Closet Add shelves and hanging space to a bedroom, dorm, rental or entryway—without remodeling or installing a built-in closet. • About $100 to Build Budget-friendly lumber and hardware • Quick + Easy Simple beginner-friendly construction • Moveable Freestanding and easy to relocate when empty • Instant Closet Shelves plus short-hang clothing storage Below ↓ Estimated project cost varies by location, lumber prices and finish.
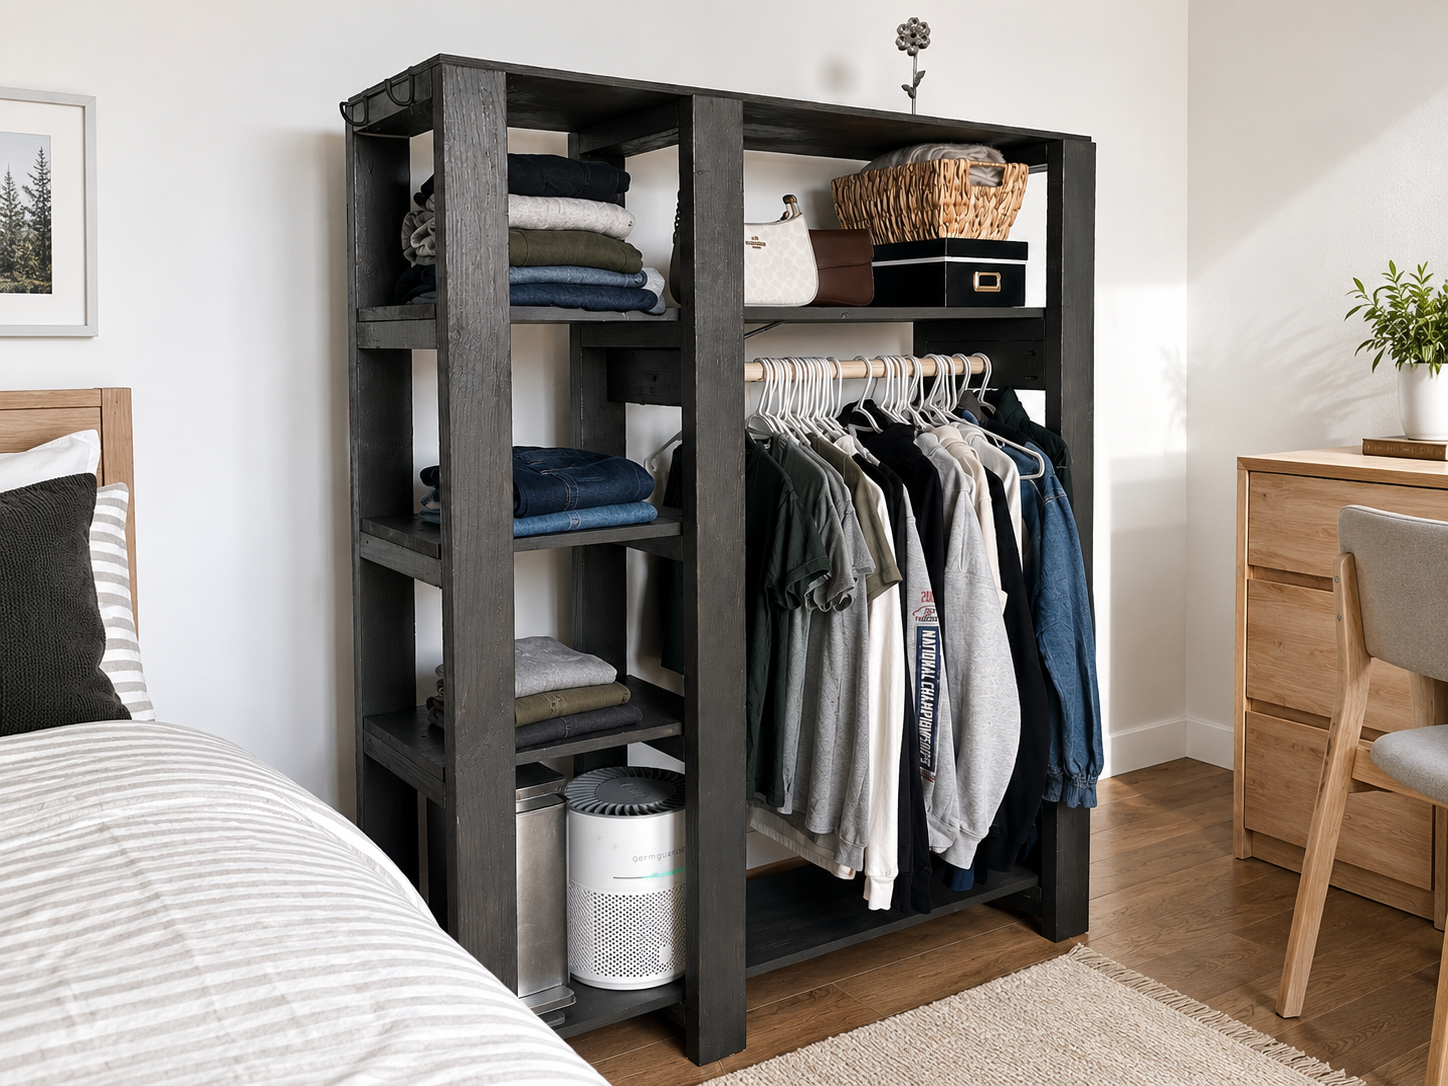
Specifications
| Project type | Storage Woodworking Plans |
|---|---|
| Room | Bedroom |
| Difficulty | Beginner Projects |
Dimensions
Use the size-specific shopping and cut lists below.
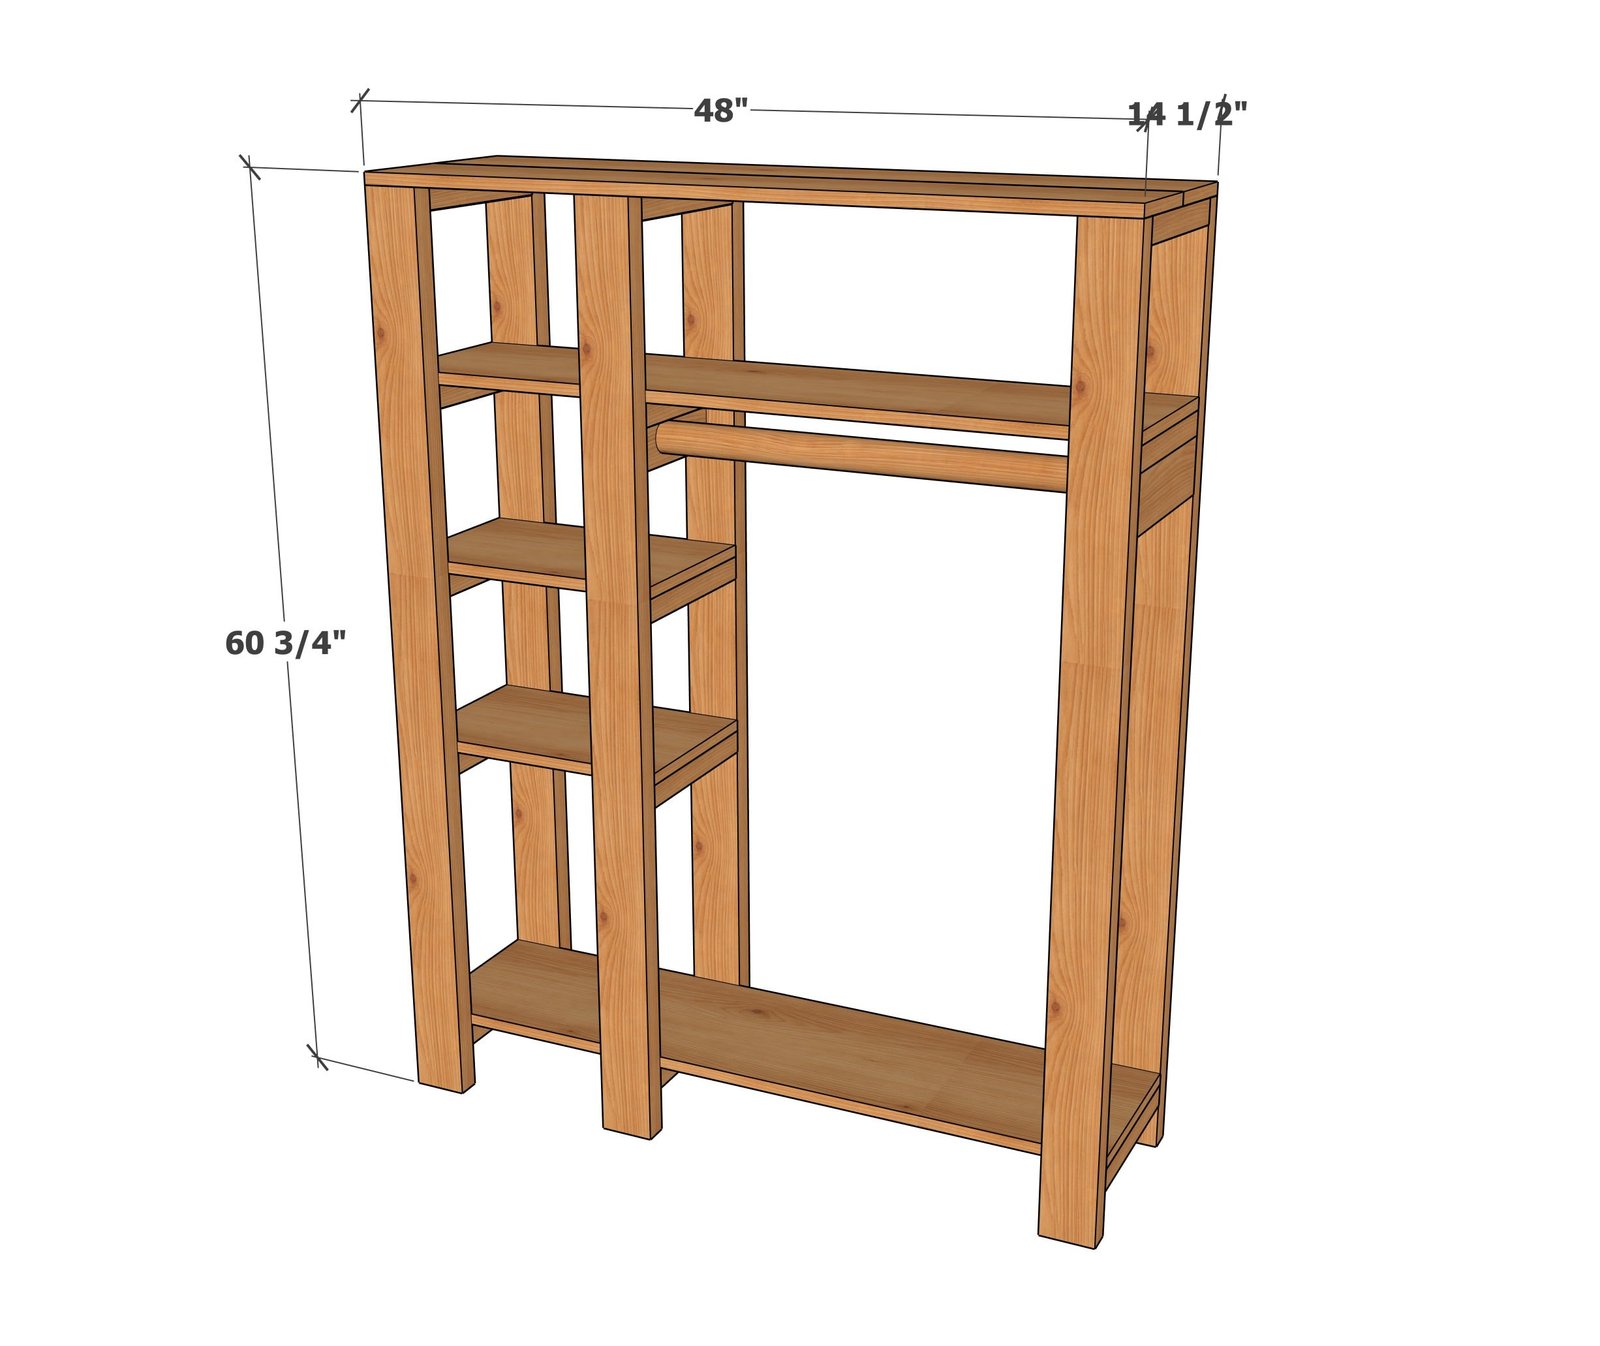
Shopping List
- 6 - 2x4 @ 8 feet long OR 5 - 2x4 @ 10 feet long
- 2 - 1x12 @ 6 feet long
- 1 - 1x8 @ 8 feet long
- 2-3/4" self tapping screws or 2-1/2" pocket hole screws
- 1-3/4" self tapping screws or 1-1/4" brad nails and wood glue
- wood stain
- Closet rod holders
- 30" closet rod dowel
Cut List
- 6 - 2x4 @ 60" (if using the 10' 2x4s, cut to 59-3/4" to get both cuts on one 10' board)
- 15 - 2x4 @ 11-1/2"
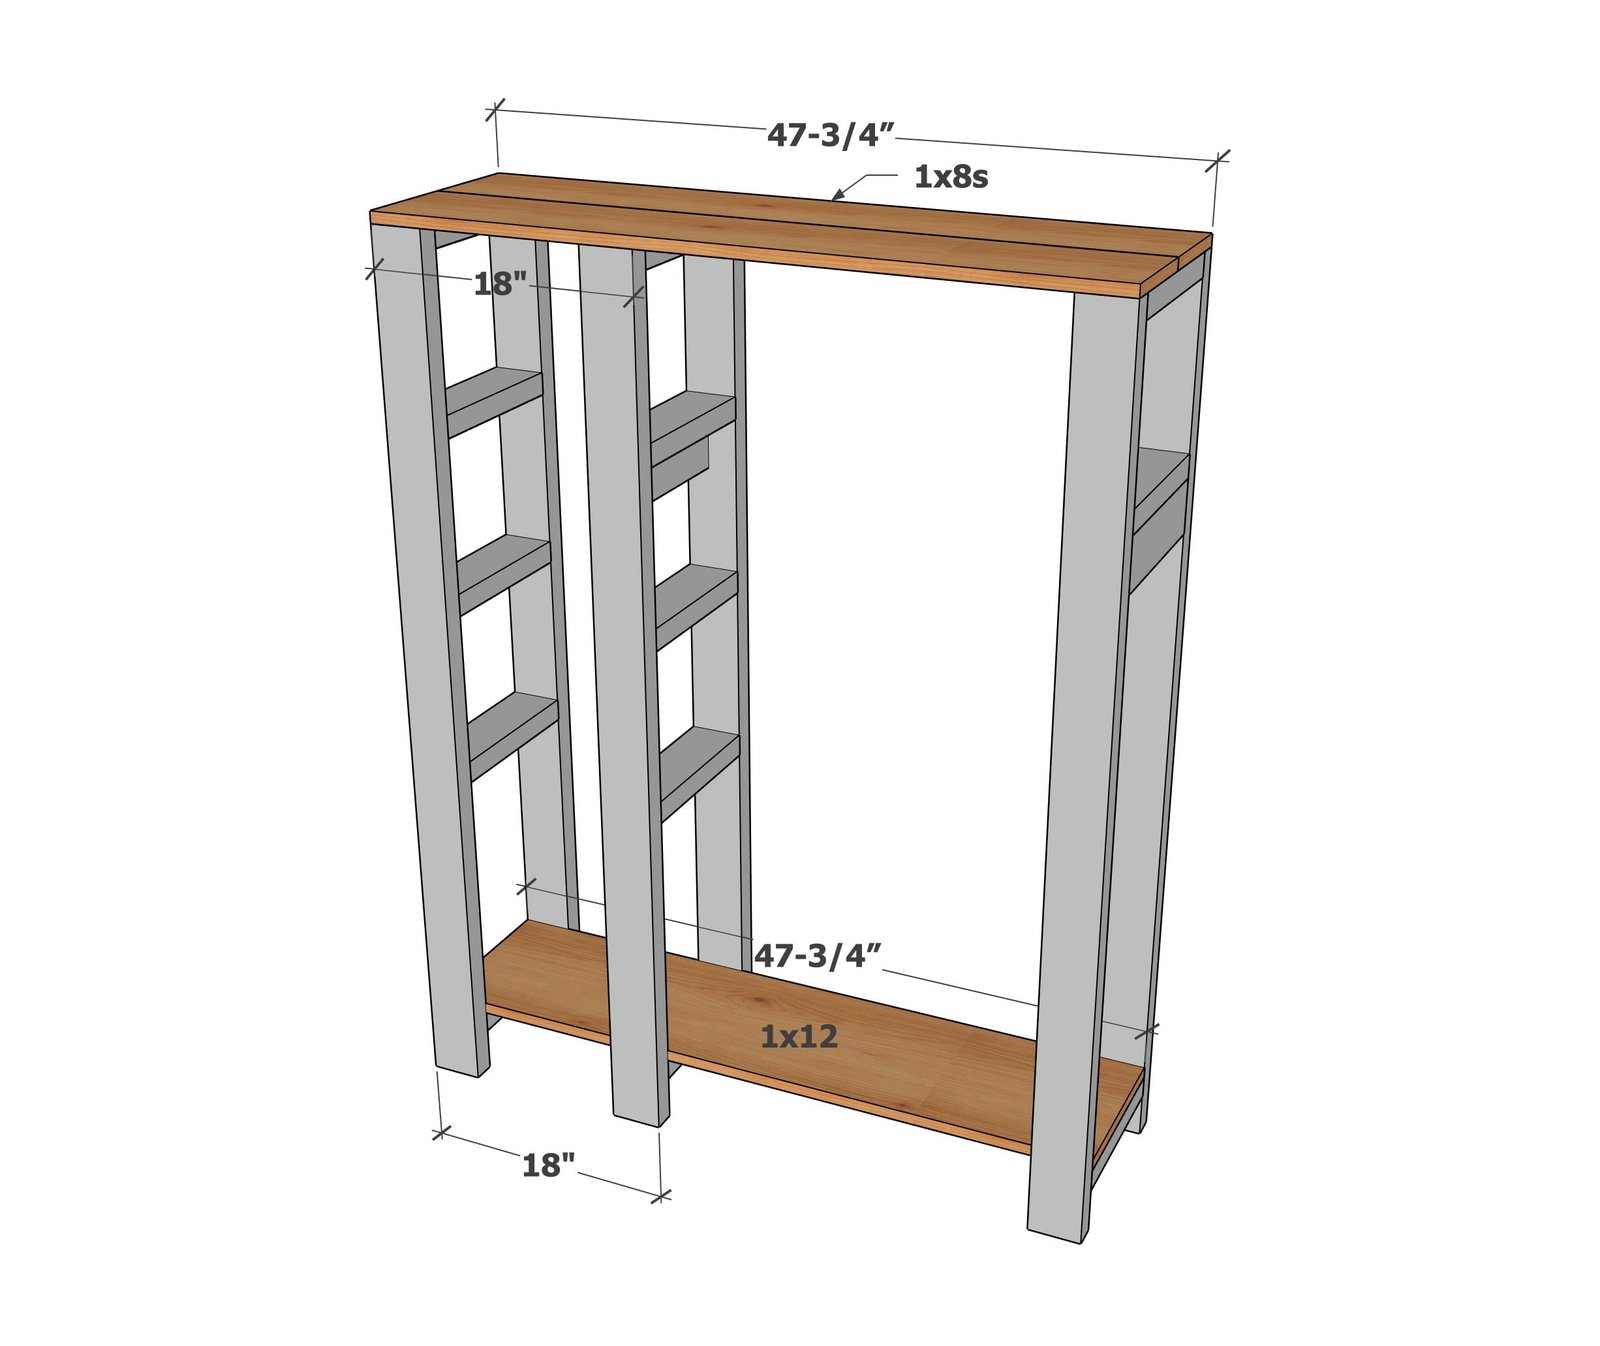
- 2 - 1x8 @ 47-3/4" - top
- 2 - 1x12 @ 47-3/4" - bottom and upper shelf
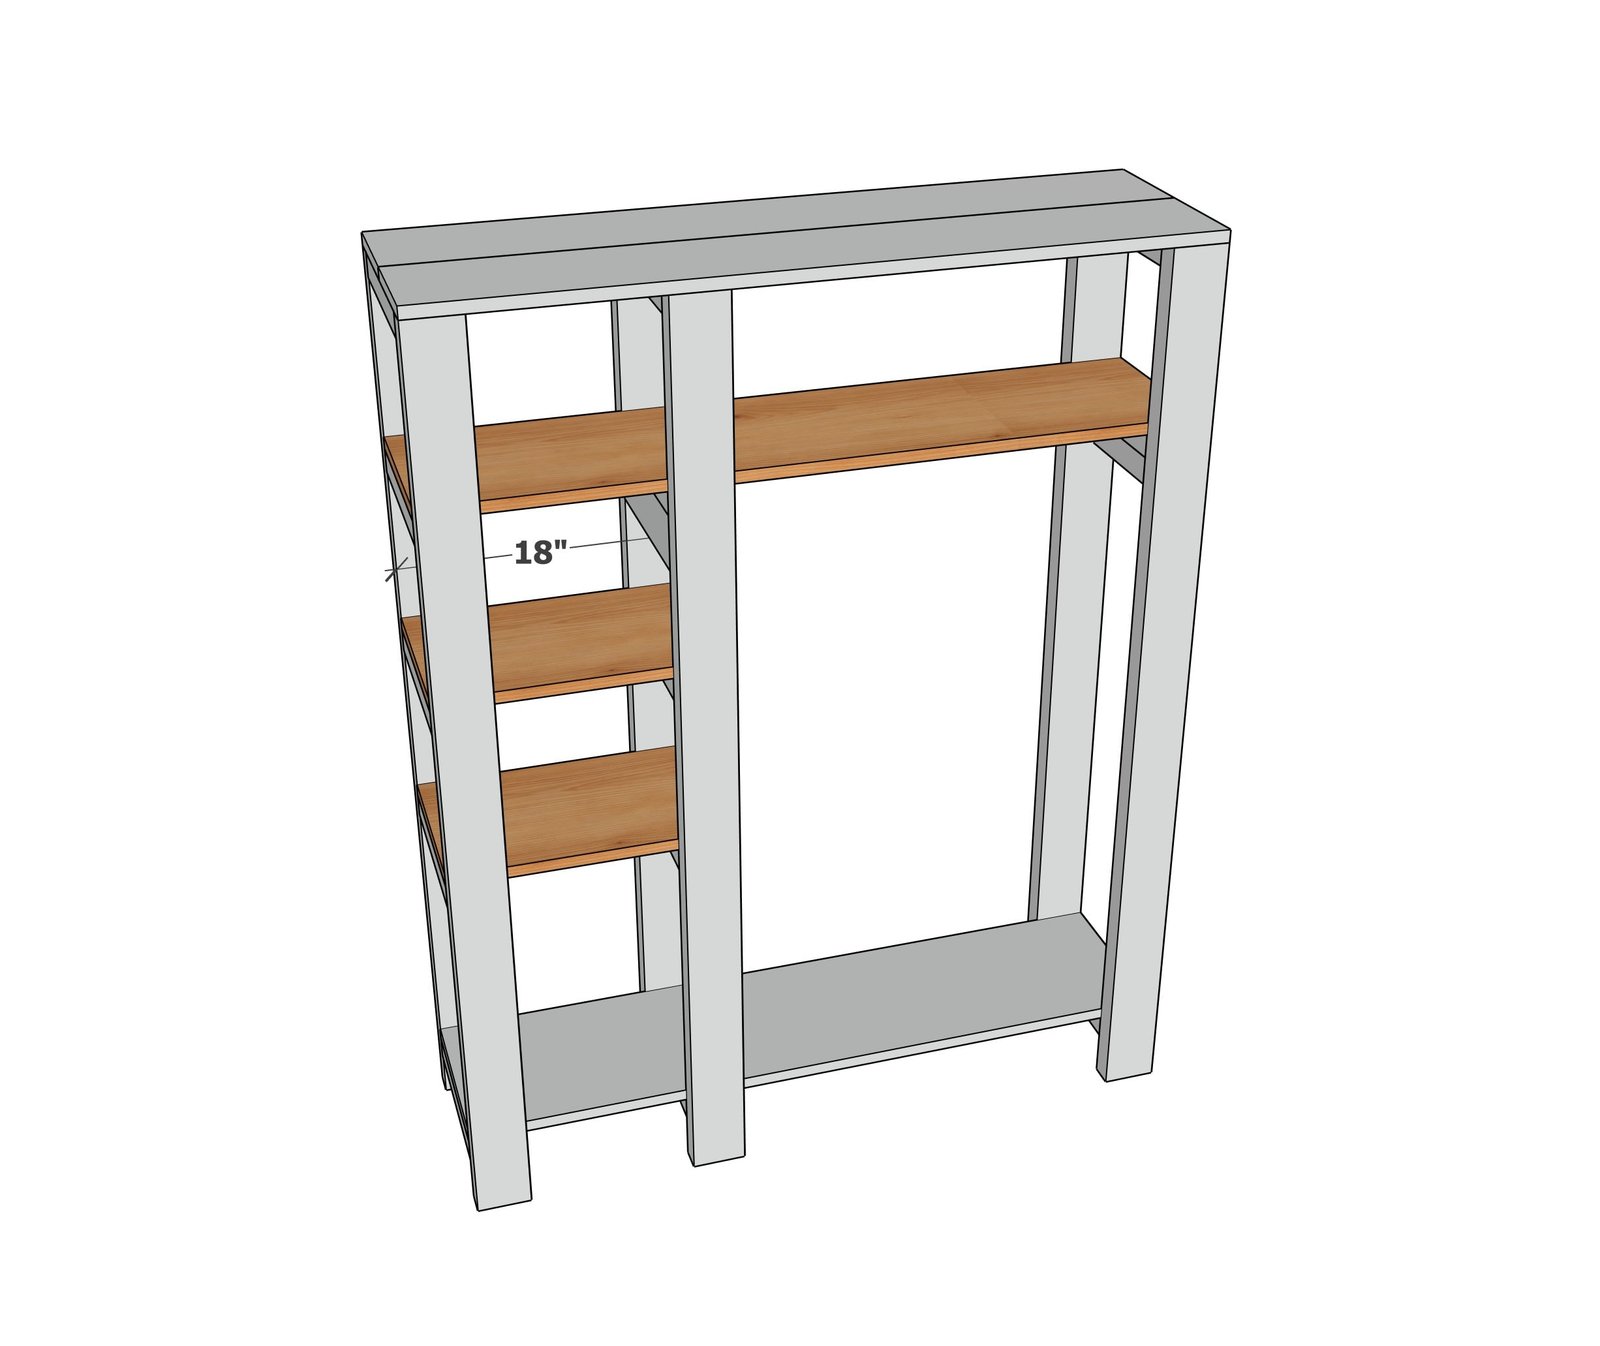
- 2 - 1x12 @ 18" - middle shelves
Tools
- measuring tape
- square
- pencil
- safety glasses
- drill
- circular saw
Step-by-step Instructions
Step 1
Build three identical ladders as shown. For a more polished look, use hidden fasteners like pocket holes. If you don't have a pocket hole jig, then use 2-3/4" self tapping wood screws (two per joint)
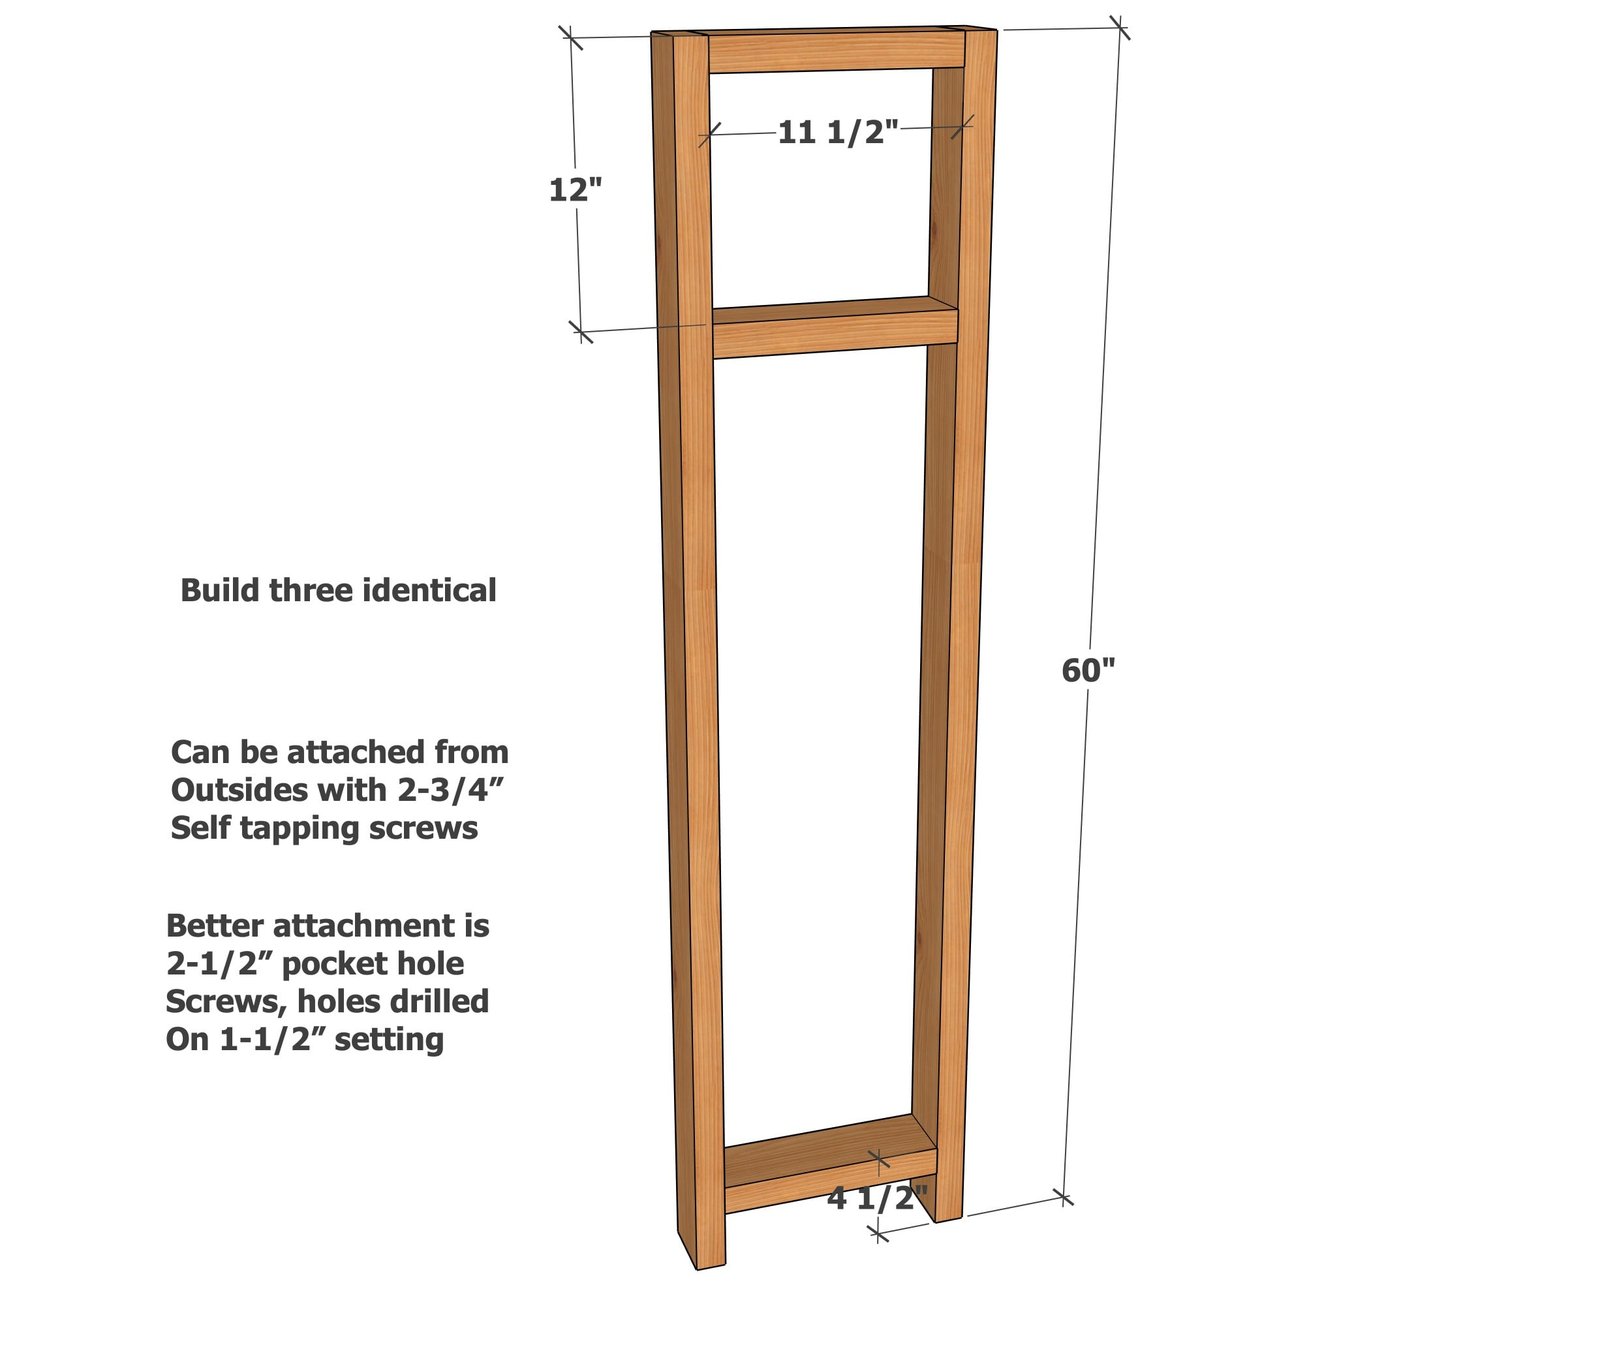
Step 2
Add additional blocking as shown.
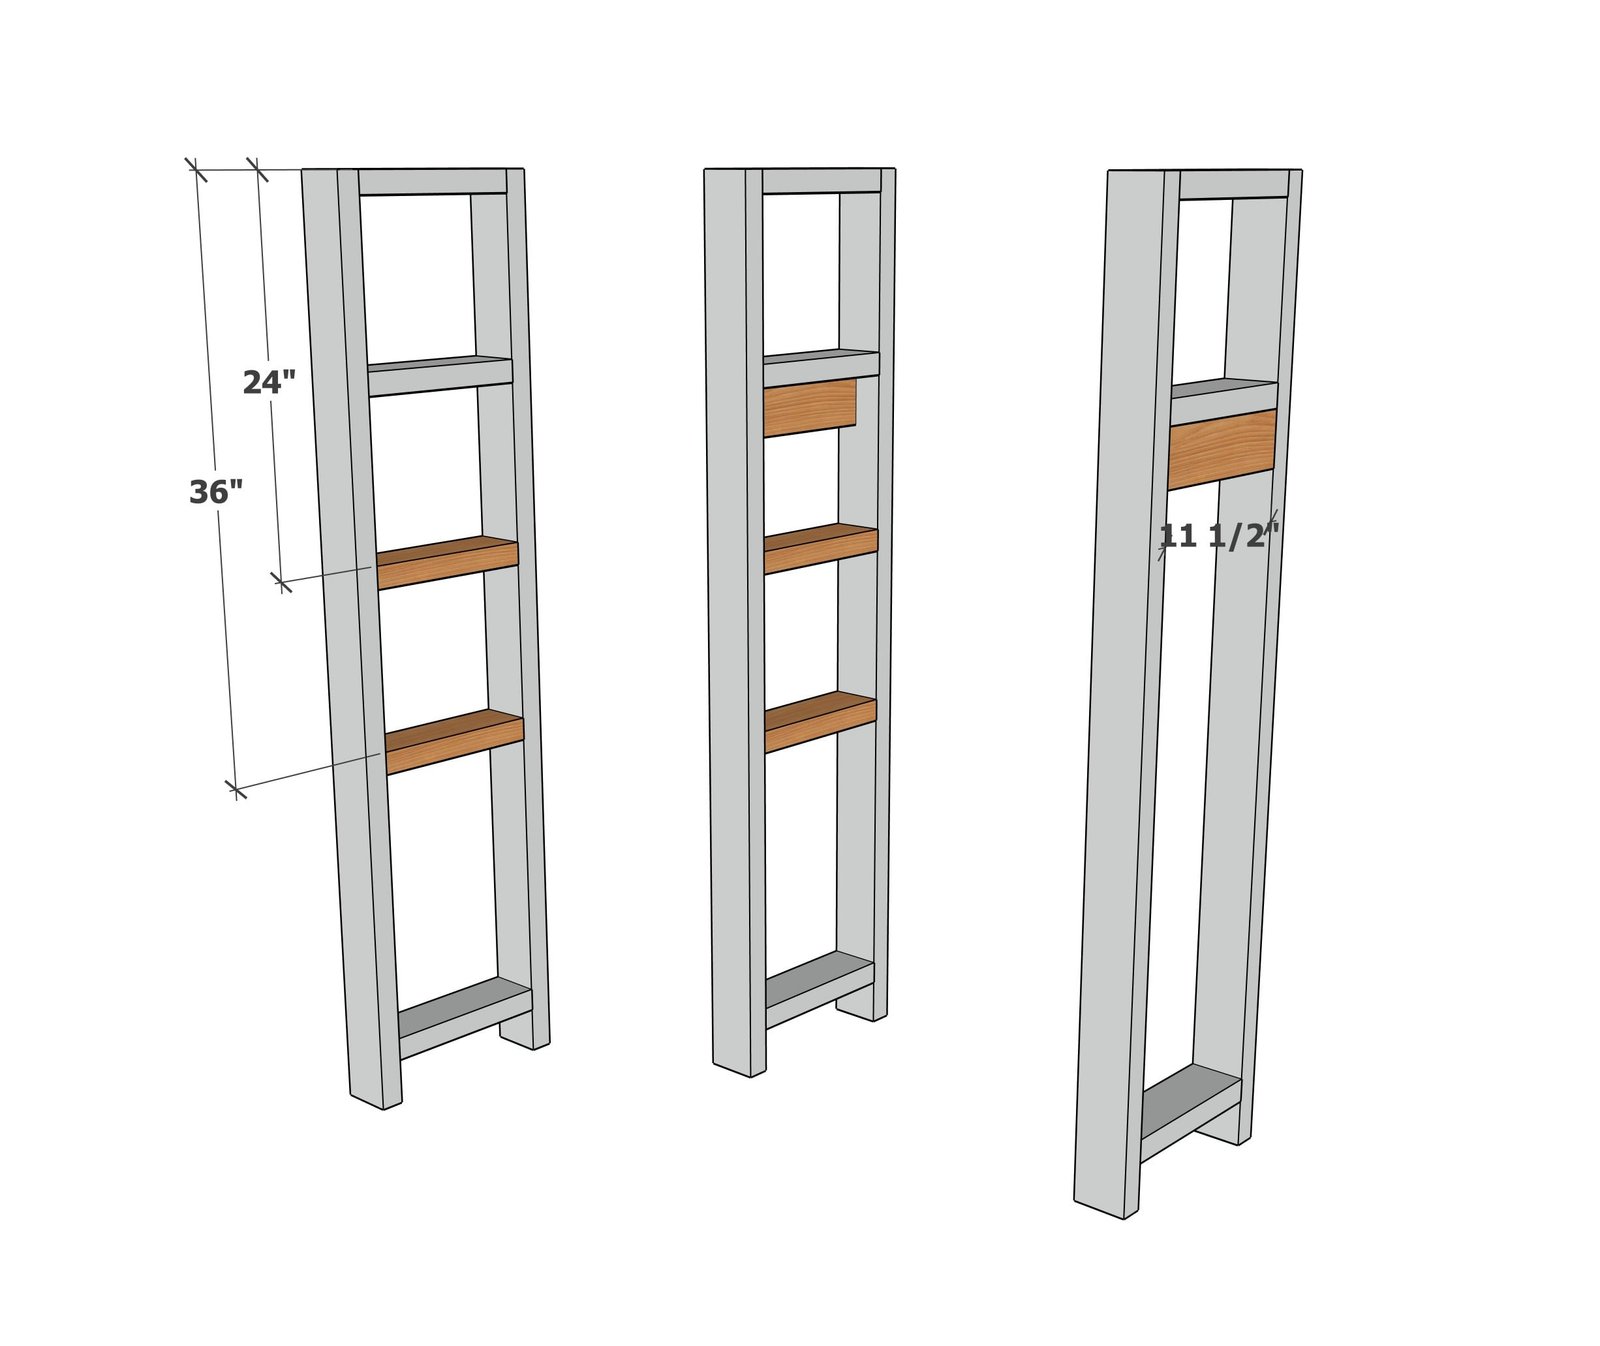
Step 3
Add the top and bottom shelving to the ladders. Use either the shorter screws or the 1-1/4" brad nails to attach.
Step 4
Add remaining shelving.
Step 5
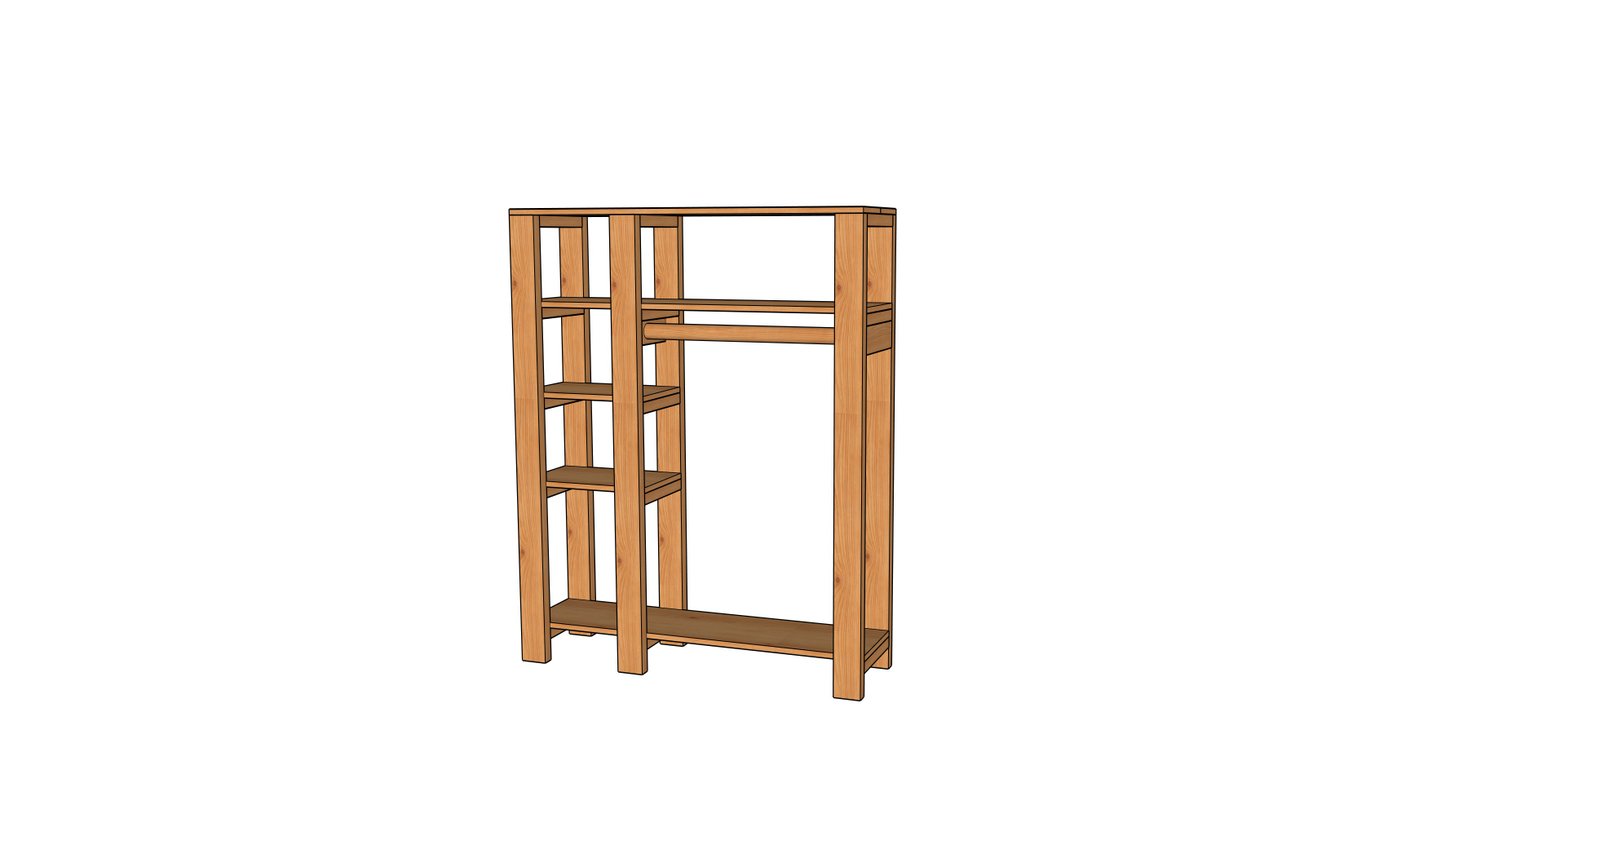
Add the closet rod dowel to the opening part.
Finishing
Sand all surfaces, starting with a medium grit and finishing with fine. Wipe off the dust, fill any holes or gaps with wood filler, and sand smooth once dry. Apply primer if you're painting, then finish with your choice of paint or stain and seal with a durable clear topcoat. For outdoor projects, use exterior-rated primer, paint or stain, and sealer so the piece stands up to the weather.
Source (temporary): https://www.ana-white.com/woodworking-projects/diy-open-wardrobe-closet-shelves-free-plans