Dresser with Open Bottom Shelf
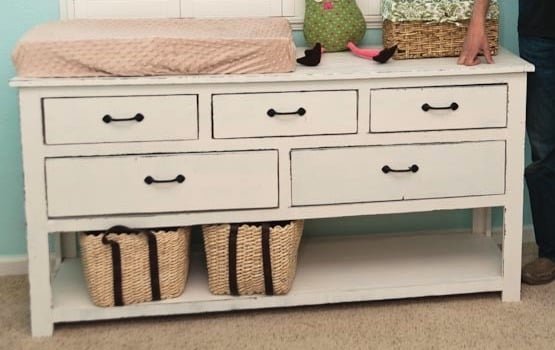
This rustic solid wood dresser features five drawers and one large open bottom shelf. This plan is very similar to this dresser, it differs in that the legs are built using 1x3 and 1x2s in an L shape, instead of a 2x2 leg. Free step by step.
Specifications
| Project type | Dresser Plans |
|---|---|
| Room | Storage Solutions |
| Difficulty | Advanced |
| Estimated cost | $150 - $200 |
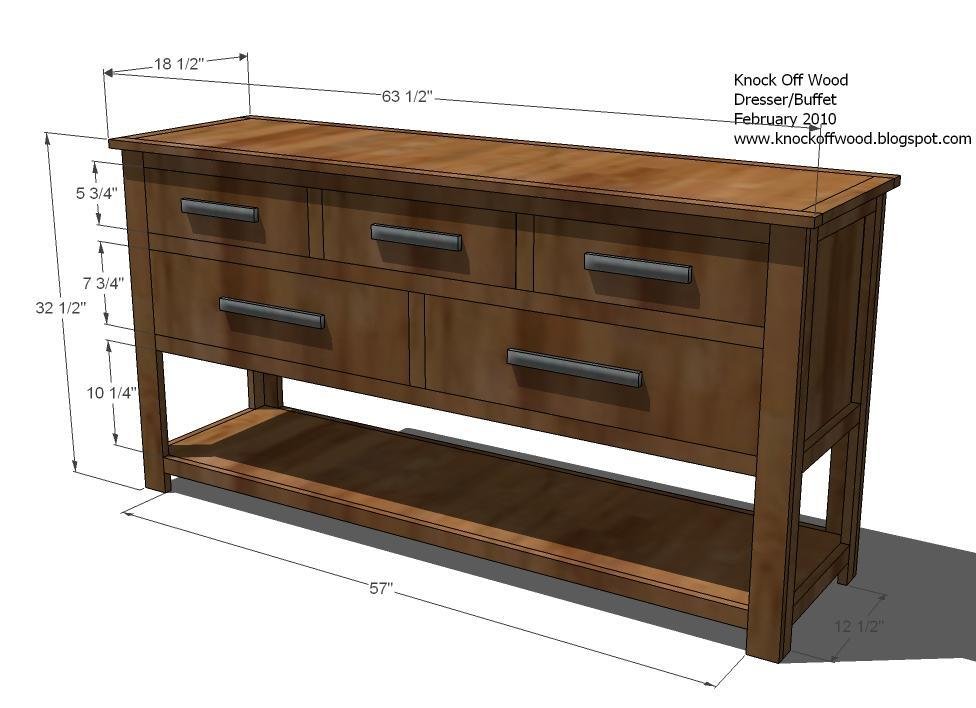
Dimensions
Use the size-specific shopping and cut lists below.
Shopping List
- 2 – 4′x8′ Sheets of 3/4″ MDF or Plywood, cut into 15 1/2″ wide strips, 8′ long
- 1 – 4′x8′ Sheet of 1/4″ MDF or Plywood (can be a scrap, used to cover the back)
- 2 – 1×3 Boards, 8′ Long
- 10 – 1×2 Boards, 8′ Long
- 1 - 1×6 Board, 8′ Long
- 1 – 1×6 Board, 10′ Long
- 2 – 1×8 Boards, 8′ Long
- 5 – Drawer Pulls or Handles
- 2″ Brad Nails
- 1 1/4″ Brad Nails
- Wood Filler
- Wood Glue
- Sand Paper
- Stain, Paint, Varnish, or other finishing supplies
Cut List
Box and Legs
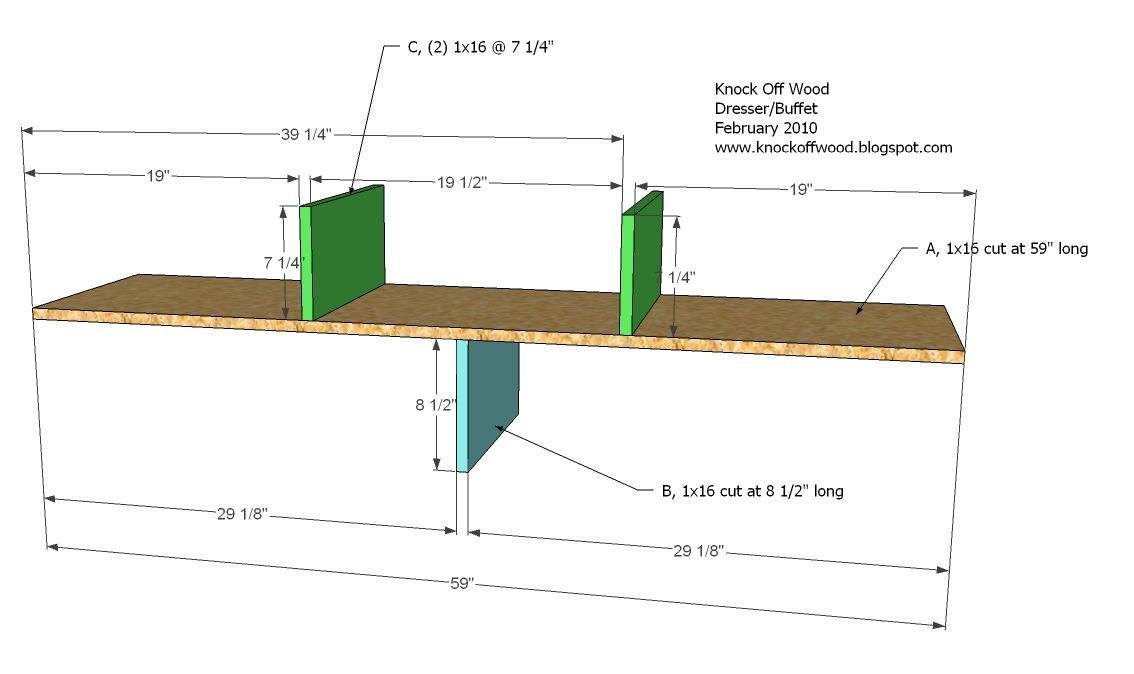
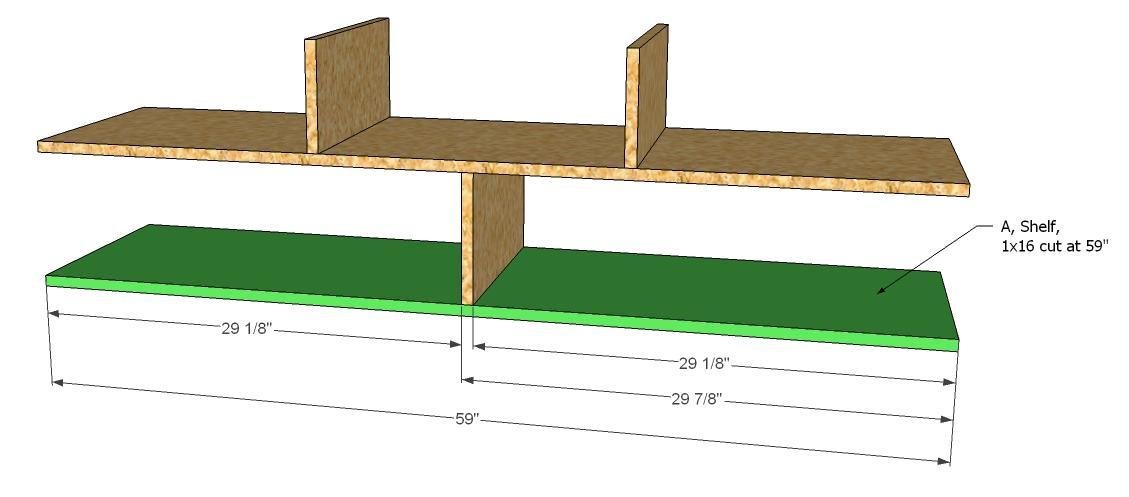
- A) 2 – 1×16 @ 59″ (Shelves for the Drawer Housing)
- B) 1 – 1×16 @ 8 1/2″ (Bottom Partition)
- C) 2 – 1×16 @ 7 1/4″ (Top Partition)
- D) 2 – 1×16 @ 17 1/4″ (Sides)
- E) 2 – 1×16 @ 60 1/2″ (Top and Bottom Shelf)
- F) 4 – 1×2 @ 31 3/4″ (Side Legs)
- G) 4 – 1×3 @ 31 3/4″ (Front and Back Legs)
Trim (I always cut my trim as I go to get perfect joints)
- H) 6 – 1×2 @ 12 1/2″ (Side Trim)
- I) 2 – 1×2 @ 15 1/2″ (Top, Ends)
- J) 2 – 1×2 @ 63 1/2″ (Top, Front and Back Edges)
- K) 8 – 1×2 @ 57″ (Front and Back Shelf Trim)
- L) 2 – 1×2 @ 7 3/4″ (Bottom Partition Trim)
- M) 4 – 1×2 @ 5 3/4″ (Top Partition Trim)
- N) 1 – 1/4″ Plywood or MDF @ 18″ x 59″ (You could actually omit this and the piece would be fine)
Drawers - should be cut to fit
- O) 6 – 1×2 @ 15 1/2″ (Drawer Guides) Top Drawers
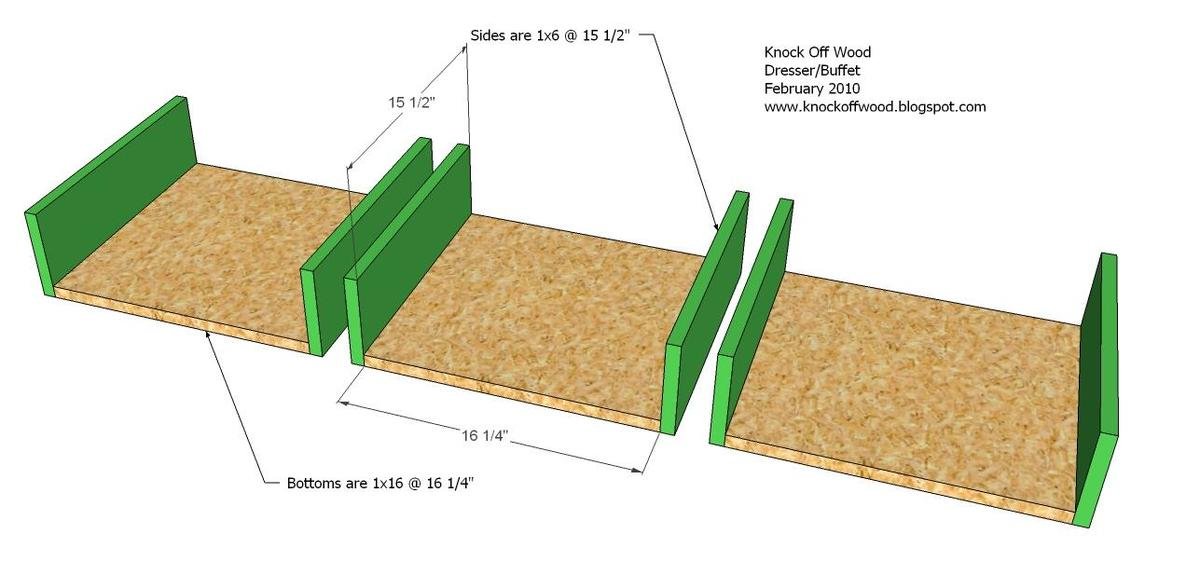
- P) 3 – 1×16 @ 16 1/4″ (Bottoms of Top Drawers)
- Q) 6 – 1×6 @ 15 1/2″ (Sides of Top Drawers)
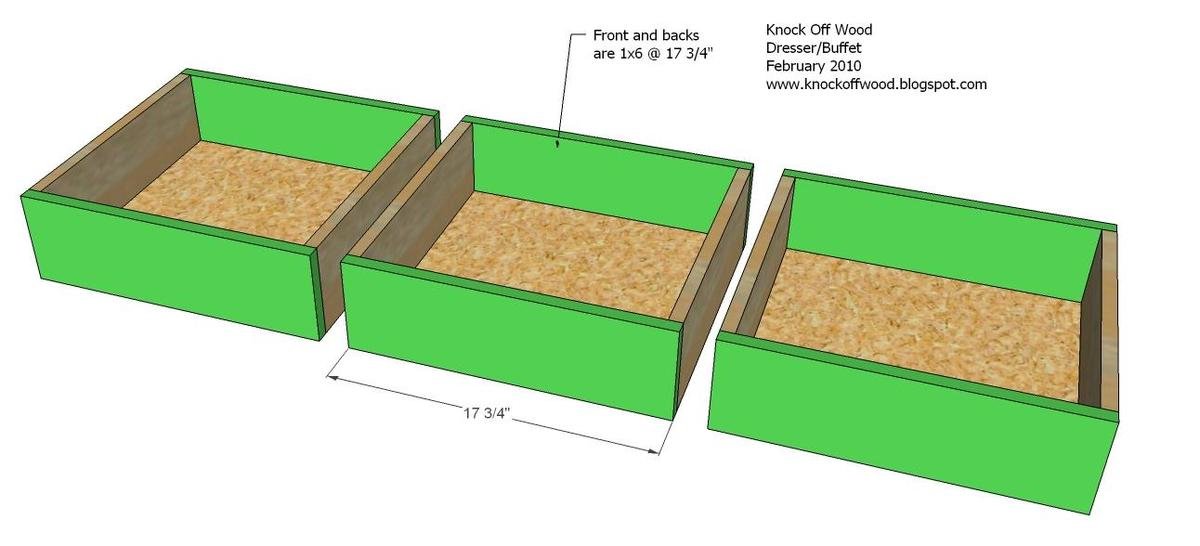
- R) 6 – 1×6 @ 17 3/4″ (Fronts and Backs of Drawers Bottom Drawers
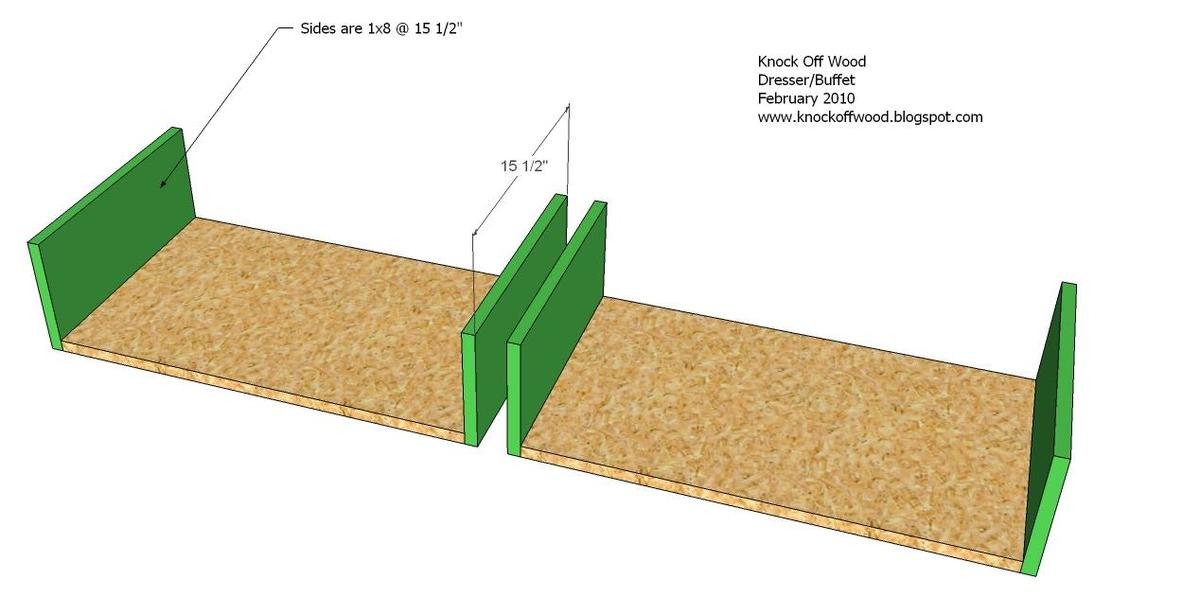
- S) 2 – 1×16 @ 26″ (Bottom of Bottom Drawers)
- T) 4 – 1×8 @ 15 1/2″ (Sides of Bottom Drawers)
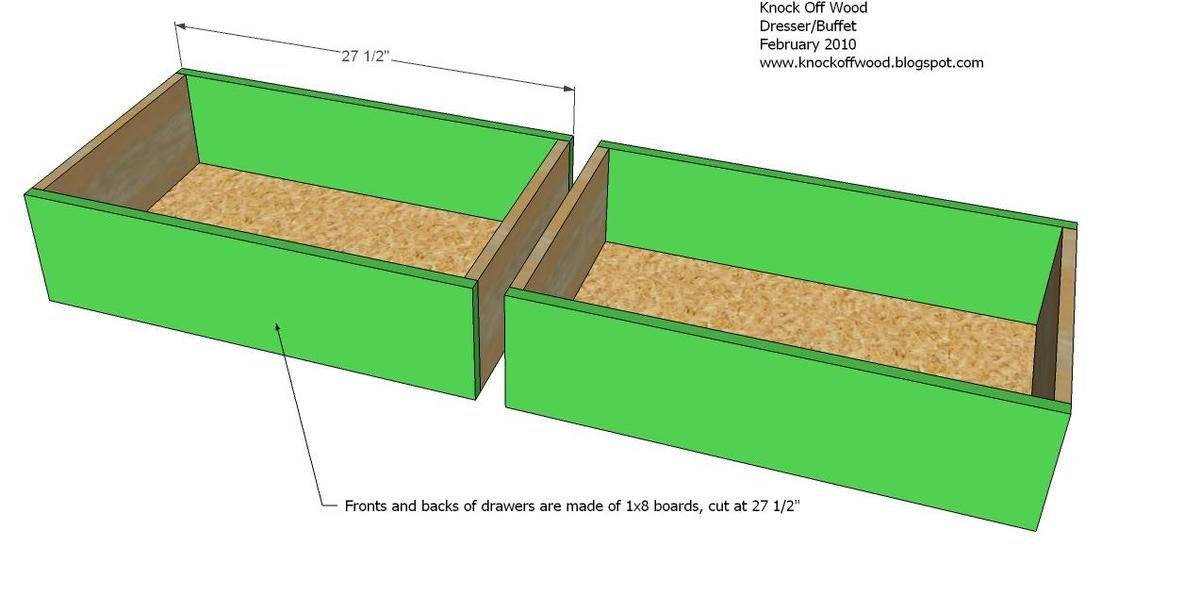
- U) 4 – 1×8 @ 27 1/2″ (Front and Back of Bottom Drawers)
Tools
- measuring tape
- square
- pencil
- safety glasses
- hearing protection
- kreg-jig
- drill
- circular saw
- table saw
- nailer
- sander
Step-by-step Instructions
Step 1
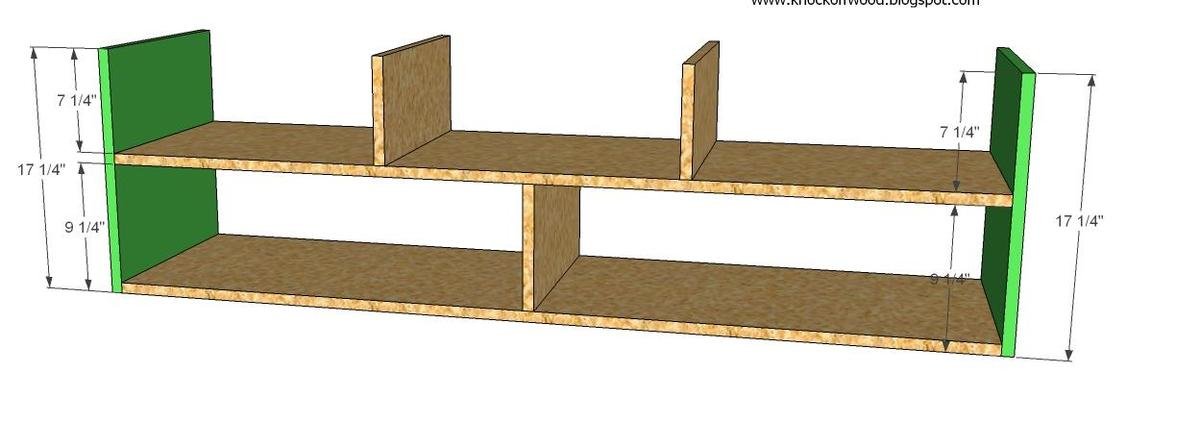
Partitions. Begin by fastening the partitions to one of the shelves, board A, as shown above. Use the meausurements above to guide you. You must be 100% accurate when working with drawers, or your drawers will not slide correctly.
Step 2
Lower Shelf. Add the lower shelf as directed above, using the remaining board A.
Step 3
Sides. Fasten the sides in place, using the measurements above to guide you.
Step 4
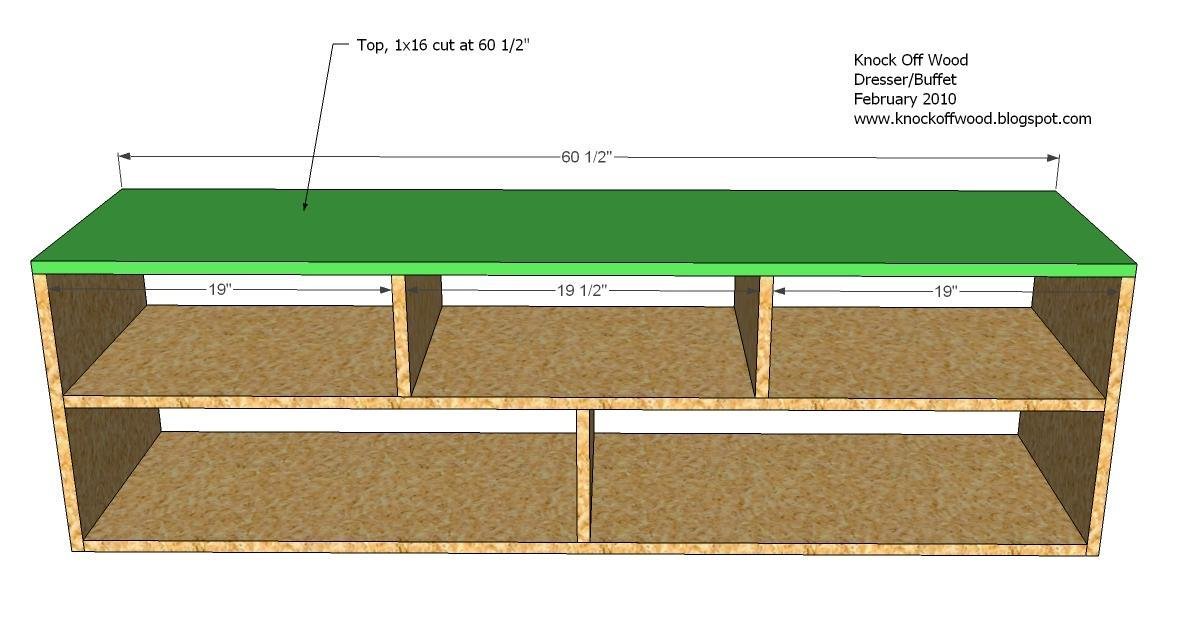
Top. I refer to these first four steps as “building the box.” After building countless pieces of furniture, I now know that most storage pieces are simply a ”box” trimmed out to become a bookcase or dresser or other storage piece. This one is no different. Fasten the top in place, using the measurements above to guide you.
Step 5
Step 6
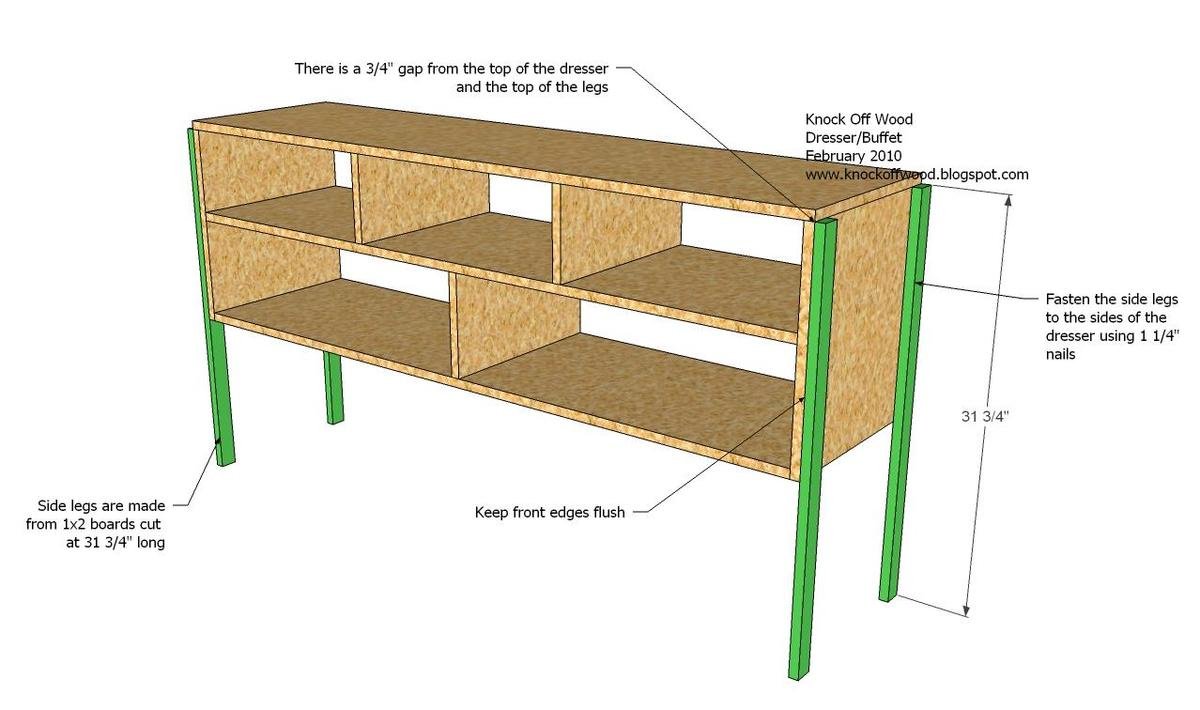
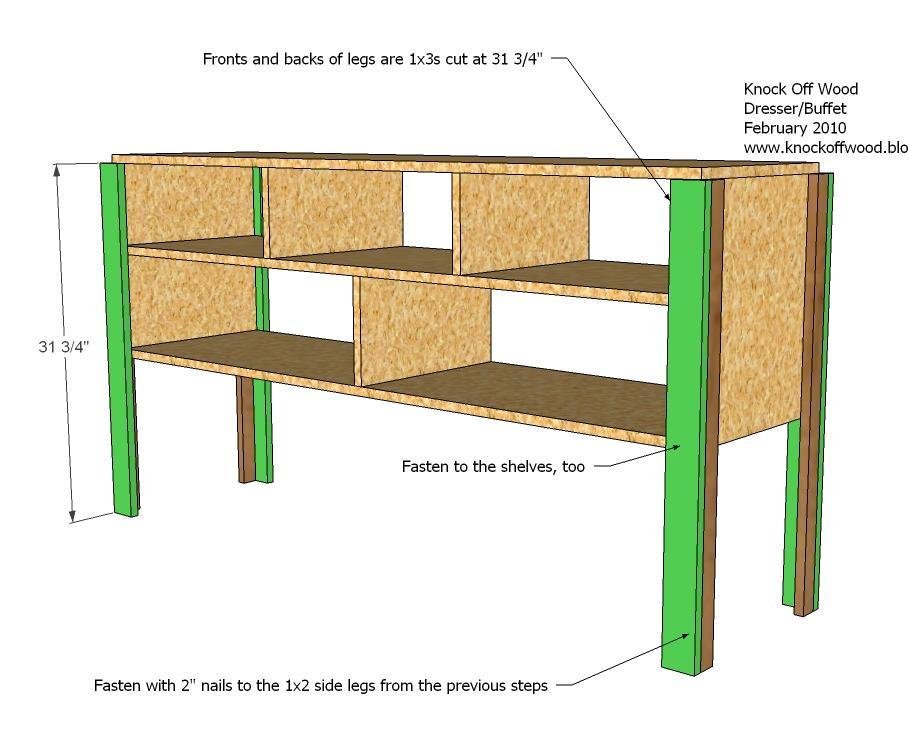
Front and Back Legs. Fasten with the 2″ nails and glue the front and back legs in place, making sure to fasten to the shelves and the side legs. Keep the outside corners of the legs flush.
Step 7
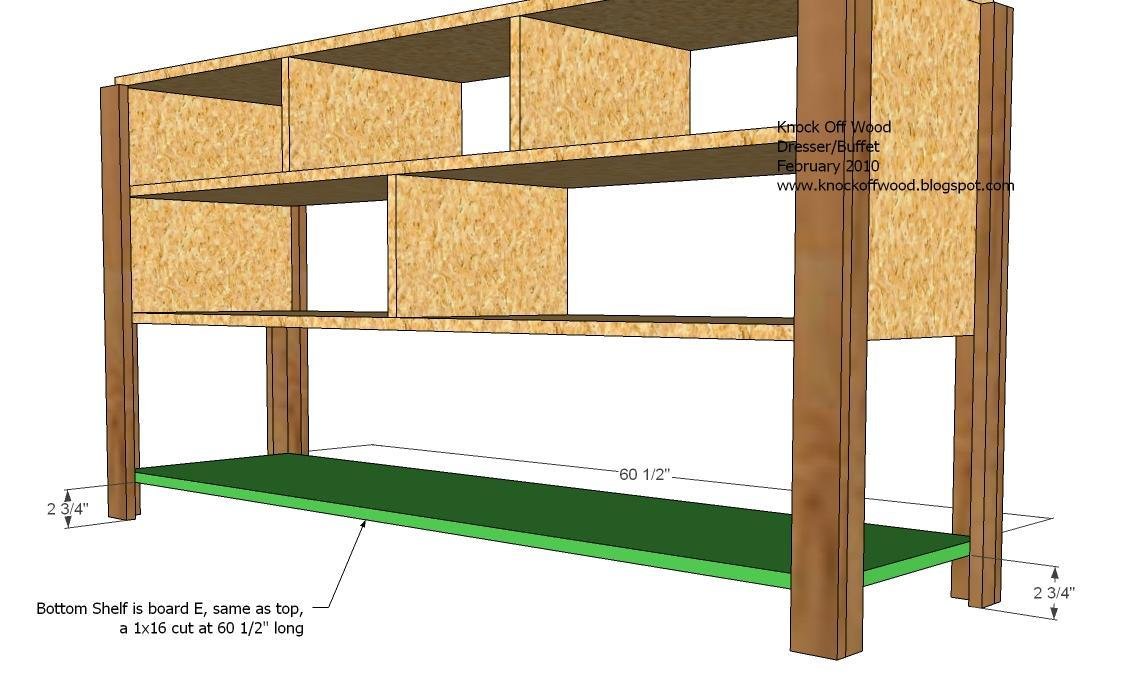
Bottom Shelf. Mark on the legs 2 3/4″ up. This will be the bottom of the bottom shelf. Using the 2″ nails and glue, fasten the bottom shelf in place, as shown above.
Step 8
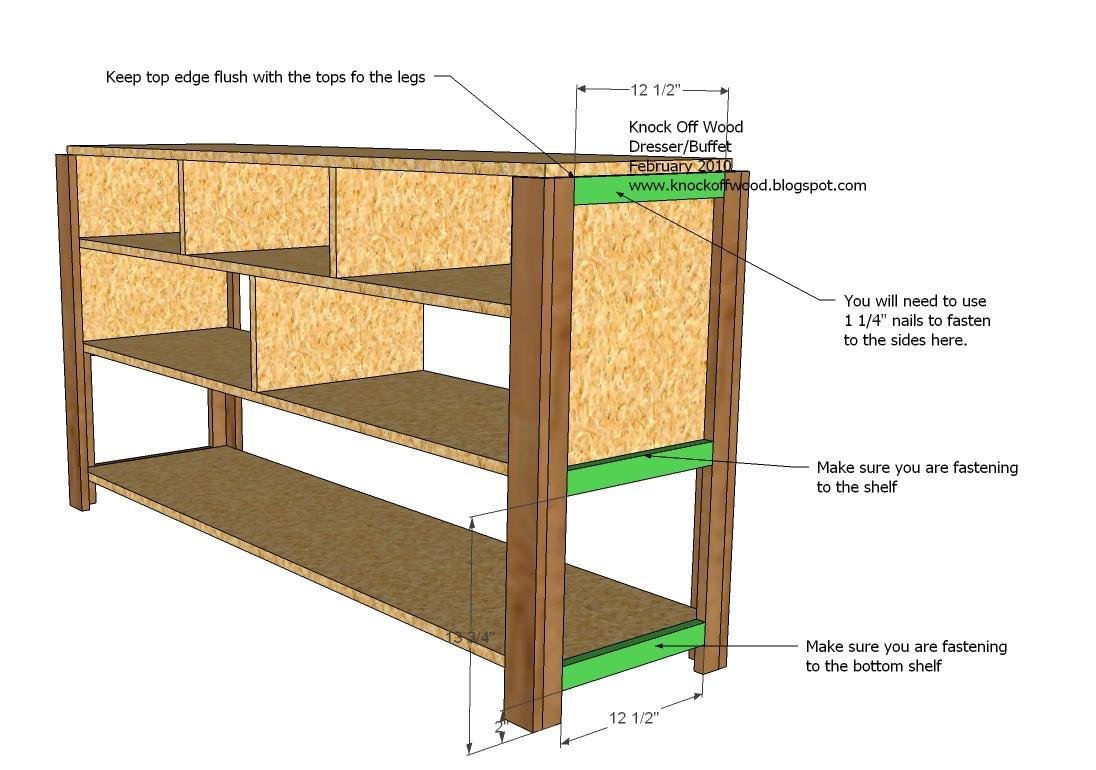
Side Trim. Using the above diagram, fasten the side trim, boards H, to the sides of the dresser. Remember to use 1 1/4″ nails on the top trim piece. Use the measurements to guide the placement, taking note of the top trim piece being flush with the tops of the legs.
Step 9
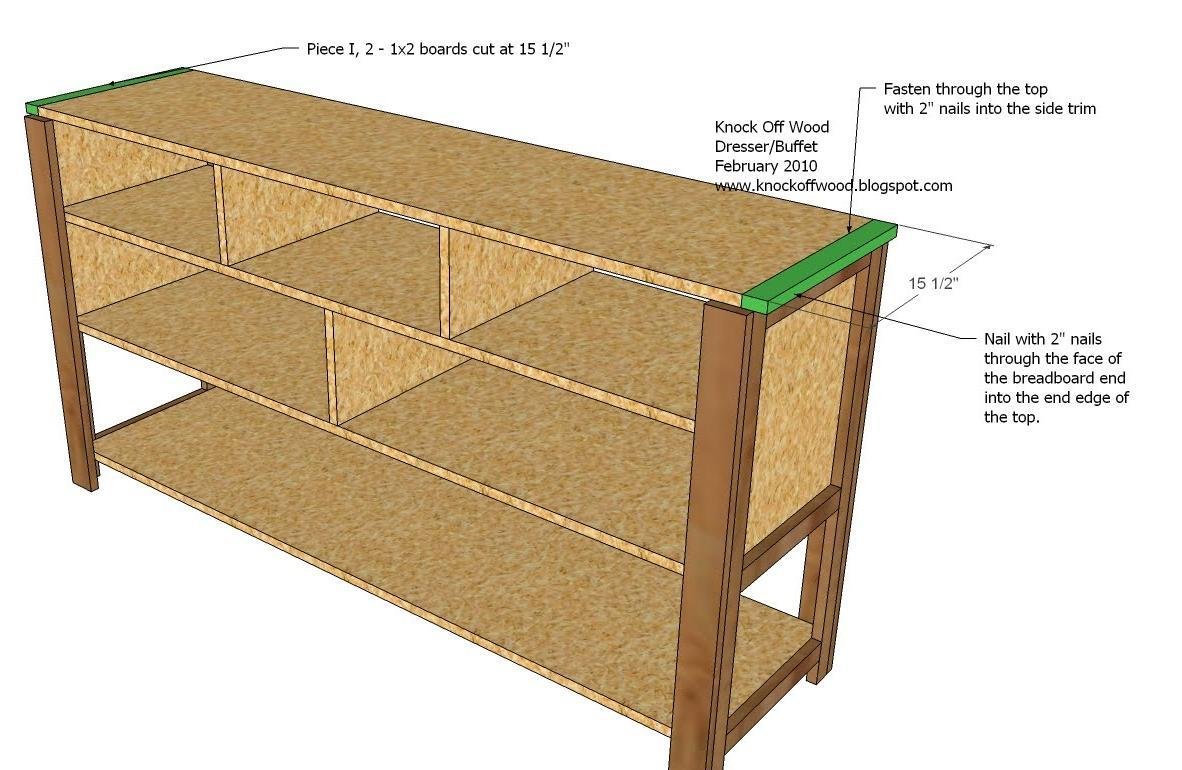
Breadboard Ends. Use boards I to trim out the ends of the dresser top. Follow the above instructions on fastening.
Step 10
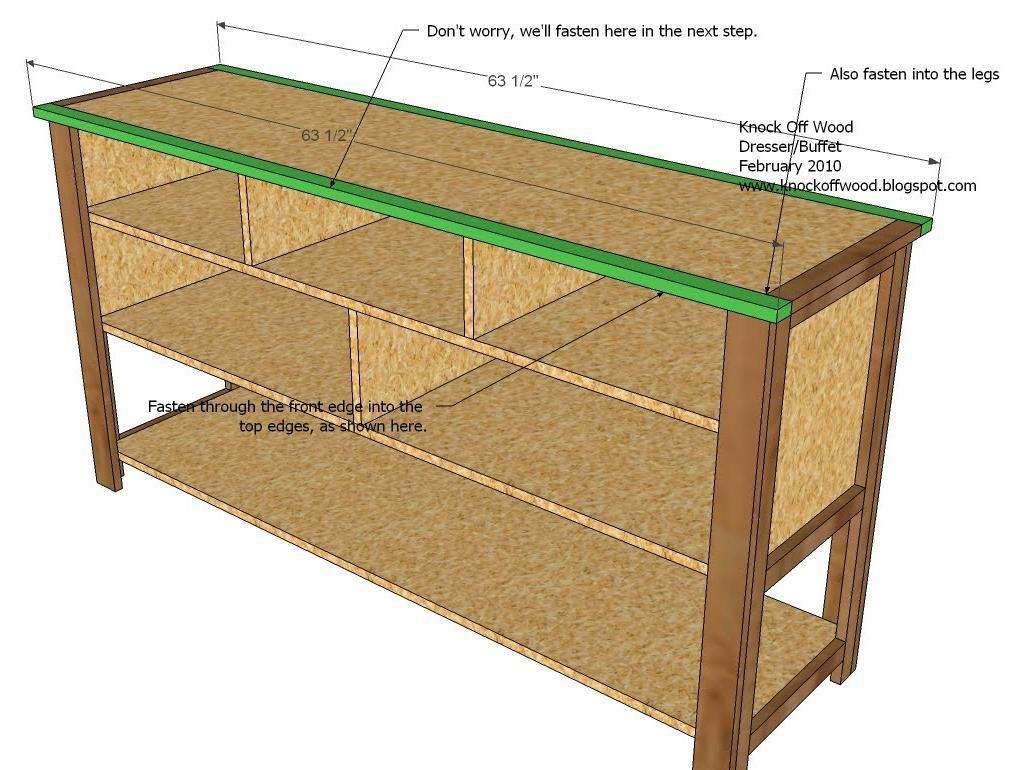
Front and Back Edges. As you did in the previous step, follow the above instructions to fasten the boards J to the front and back of the dresser. Use the 2″ nails to fasten through the face of J into the edges of the top. Also fasten to the legs.
Step 11
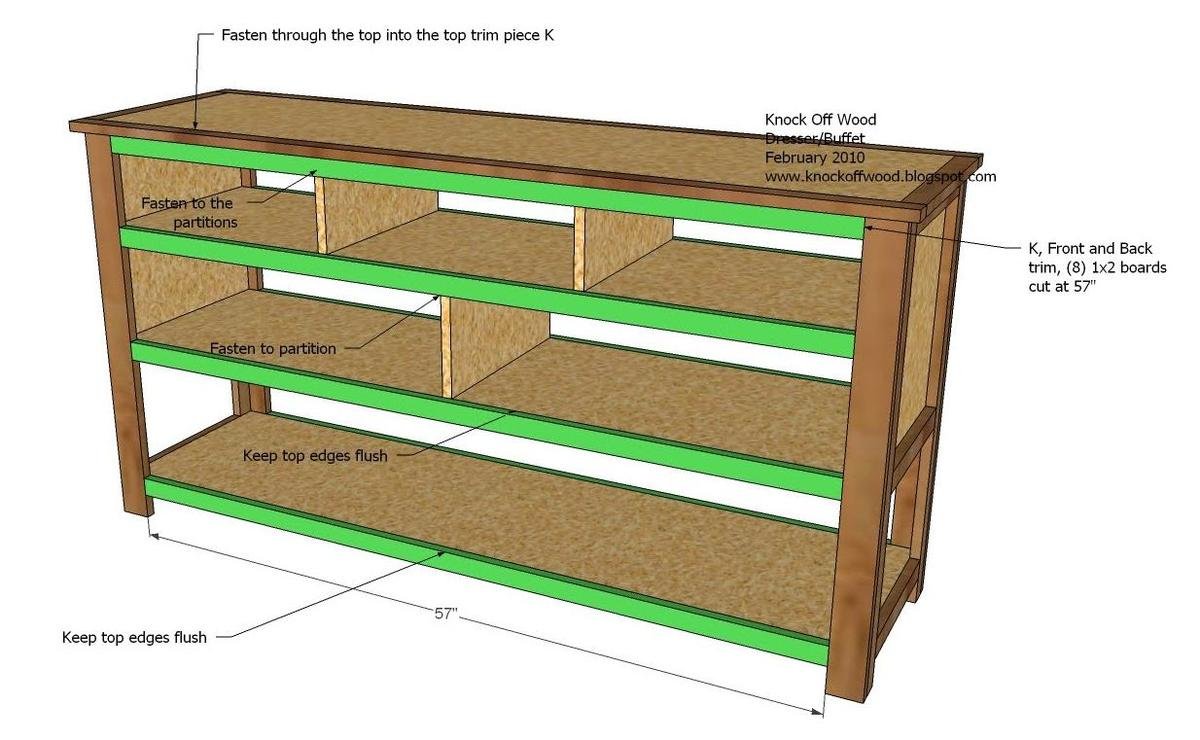
Front and Back Shelf Trim, Boards K. Trim out the shelves as shown above. Notice how both the front and back of the dresser are trimmed. Keep top edges flush.
Step 12
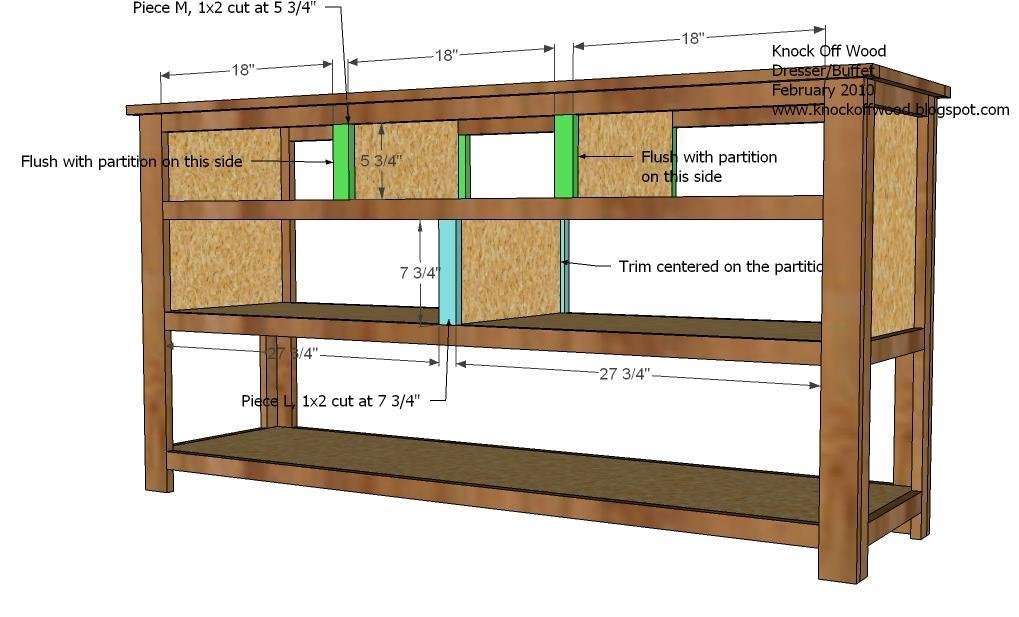
Partition Trim. Follow closely the diagram above to fasten the partition trim pieces, boards L and M, to the partitions. The most important point is the drawer openings must match the above diagram. Again, you will need to do this on the front and back.
Step 13
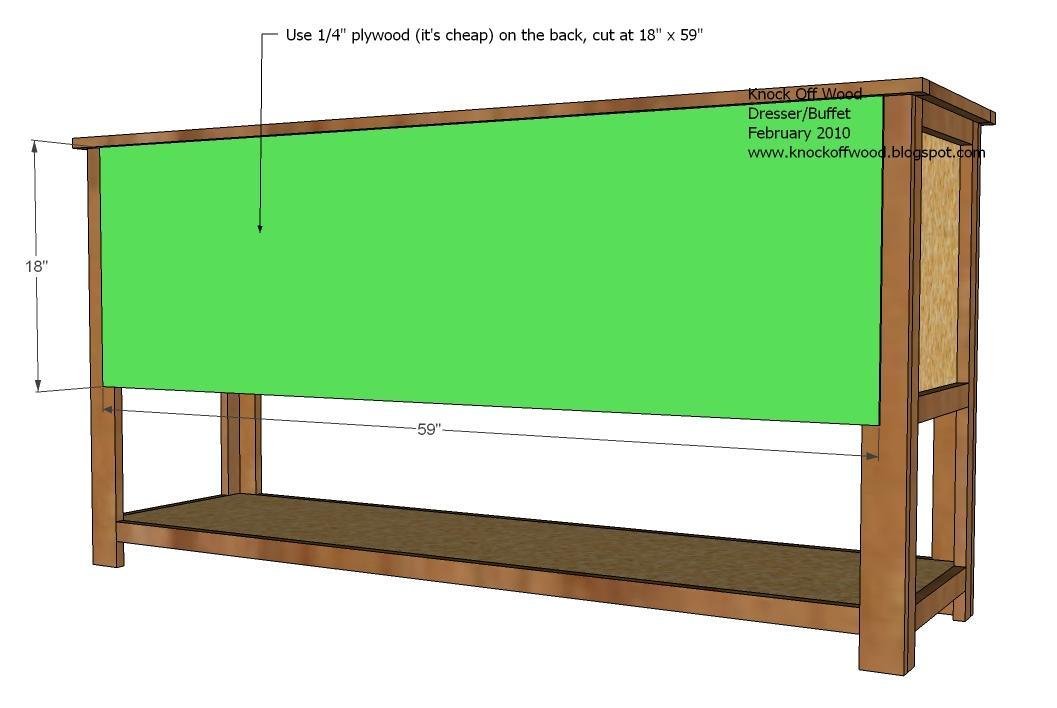
Back, N. Using the 1 1/4″ nails, fasten the back to the back of the dresser. Avoid nailing where there is less than 1 1/2″ of backing.
Step 14
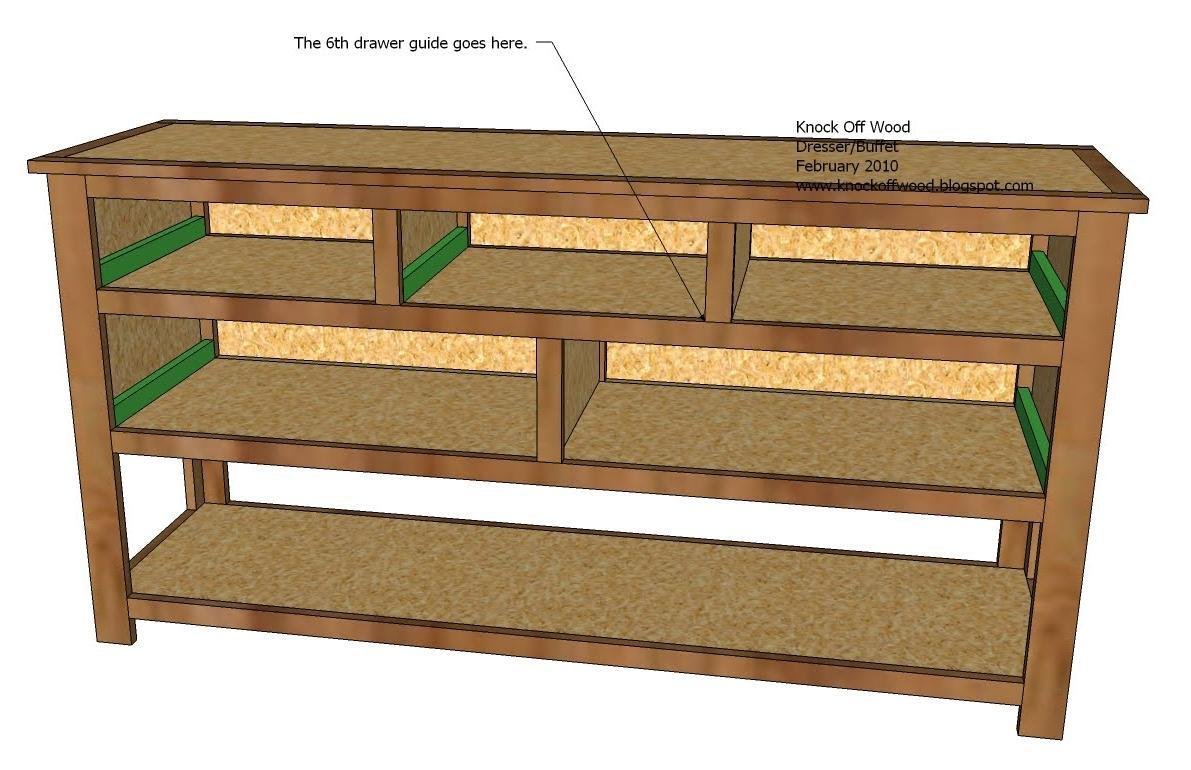
Drawer Guides, O. The drawer guides just need 2 nails each to keep in place. Use the shorter nails and fasten in place. If you cannot fit your nailer into the drawer opening, you can fasten through the face into the end edges of the drawer guides.
Step 15
Top Drawers, P and Q. Fasten the sides of the top drawers to the bottoms, as shown above. A trick to get your drawers to slide better is to bring the bottom piece up slightly. Then rub vasoline on the drawer sides. The bottoms of the drawer sides act as glides, and the bottom of the drawer is not dragging on the bottom shelf. Just 1/4″ would do the trick.
Step 16
Top Drawer Backs, R. Fasten the backs to the top drawers as shown above. See the final diagram for attaching the fronts.
Step 17
Bottom Drawer Sides and Bottom, S and T. Following step 15, assemble the bottom drawers.
Step 18
Bottom Drawer Back, U. Fasten the backs to the drawers, as you did for the top drawers.
Step 19
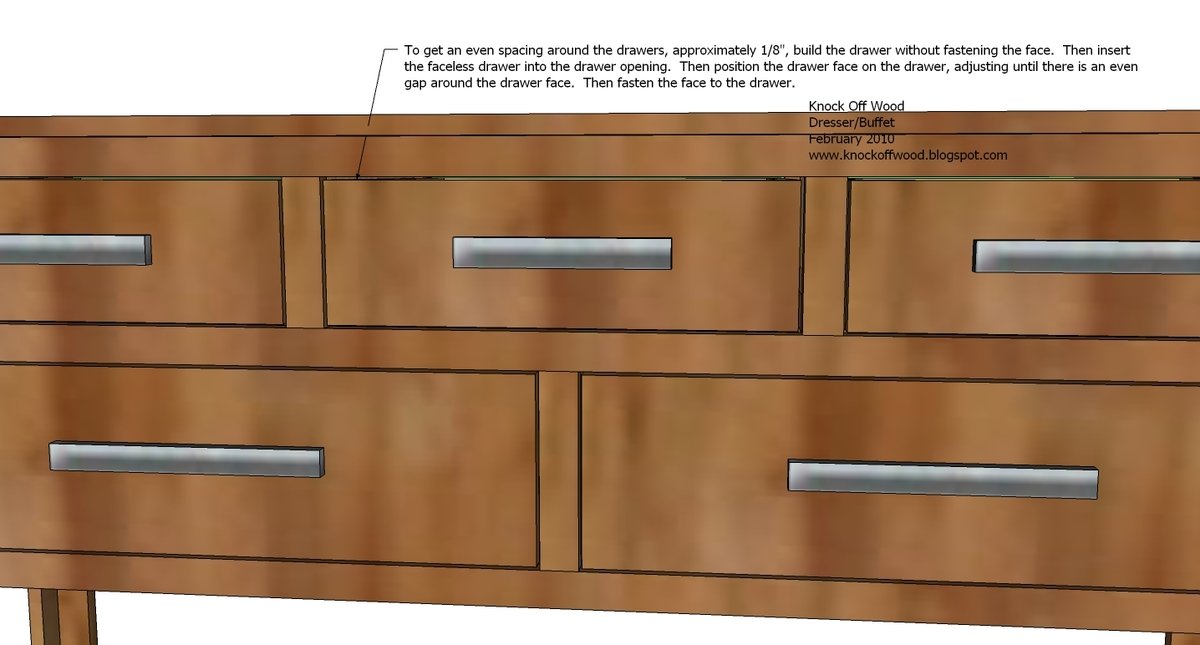
Drawer Faces. Insert the faceless drawers in the correct openings. Position the matching faces on the drawers, keeping approximately 1/8″ gap around the drawer face. As shown above, you want the space to be equal on all sides. When satisfied, use the 2″ nails to fasten the drawer face to the sides and bottom of the drawers.
Finishing
Sand all surfaces, starting with a medium grit and finishing with fine. Wipe off the dust, fill any holes or gaps with wood filler, and sand smooth once dry. Apply primer if you're painting, then finish with your choice of paint or stain and seal with a durable clear topcoat. For outdoor projects, use exterior-rated primer, paint or stain, and sealer so the piece stands up to the weather.
Source (temporary): https://www.ana-white.com/woodworking-projects/dresser-open-bottom-shelf-open-leg-version