Easiest Shiplap Fireplace Tutorial and Video
This is the easiest shiplap fireplace tutorial! For about $550 you can build your own shiplap fireplace bump out (tv and insert not included). Step by step instructions with video and shopping and cut lists from
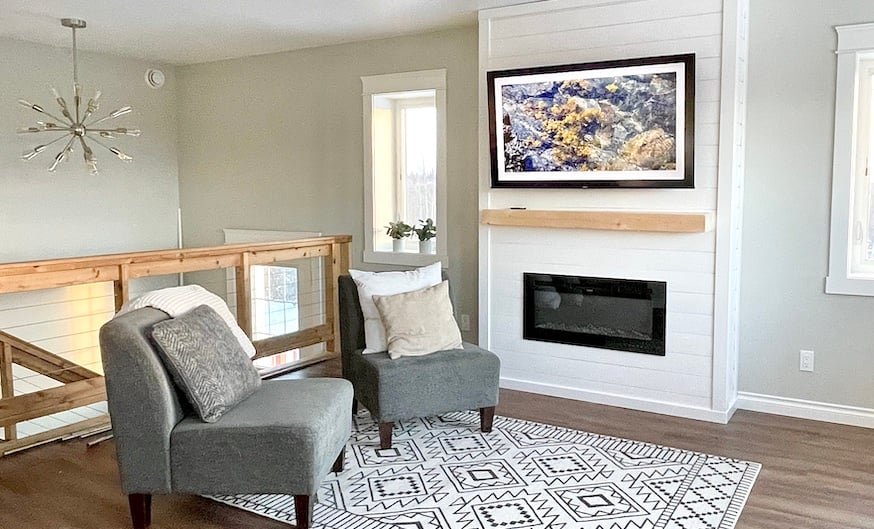
Specifications
| Project type | Home DIY |
|---|---|
| Room | dining room |
| Difficulty | Intermediate |
Dimensions
Use the size-specific shopping and cut lists below.
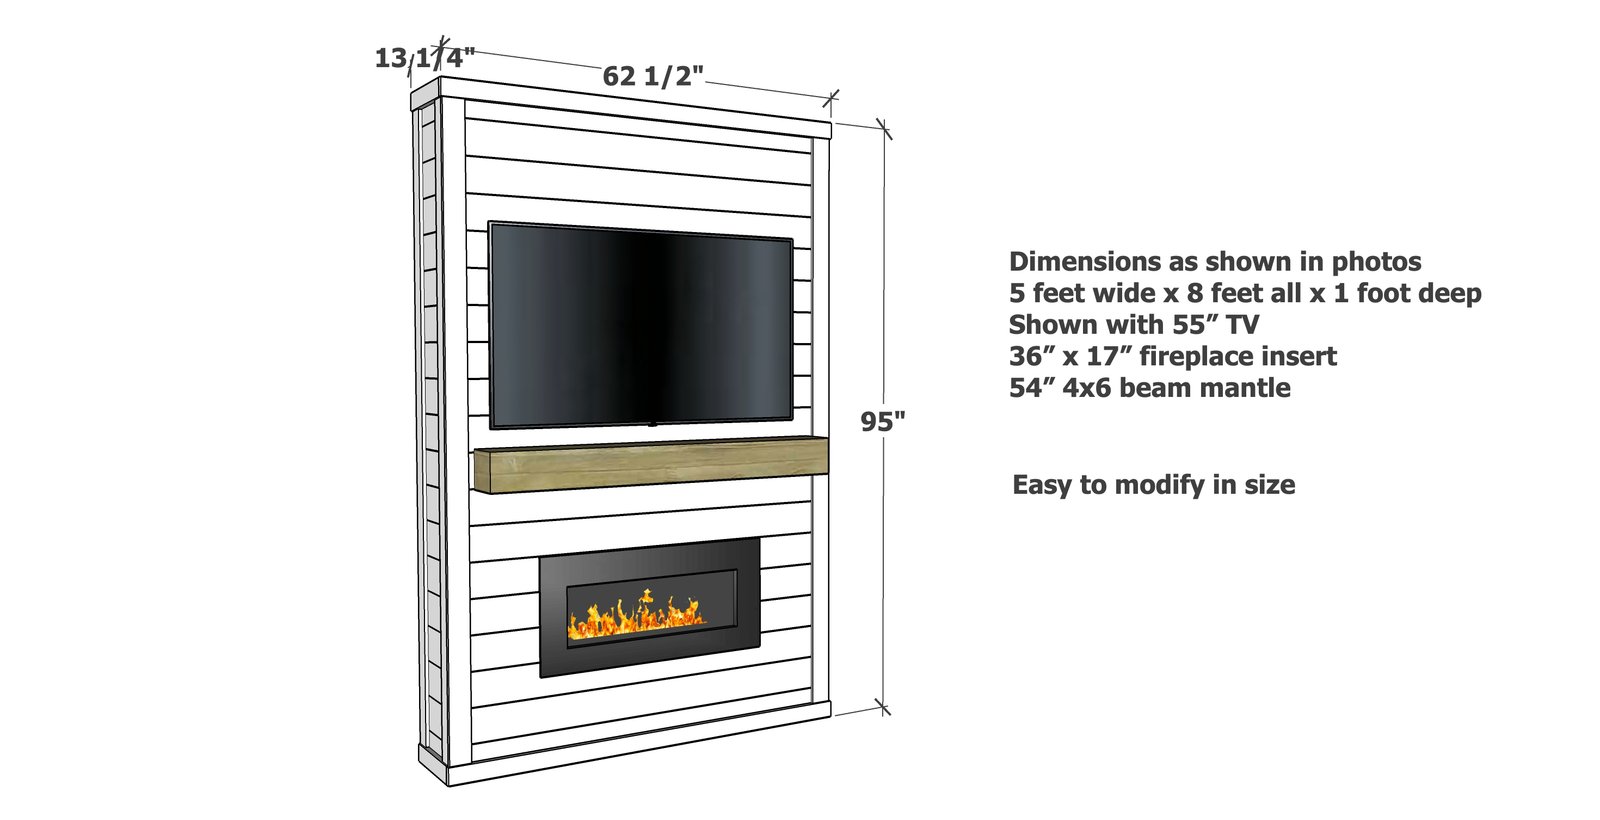
Shopping List
- 8 - 2x4 @ 8 feet long
- 6 - 2x4 @ 10 feet long (cut 57" boards from these boards)
- shiplap boards total of 56 square feet of coverage, 12 lengths ideal for maximum board use
- 8 - 1x3 trim boards - 8 feet long
- 3/4" quarter round or shoe moulding if gap at ceiling needs to be covered
- 54" long 4x6 beam for mantle, also used 4 - 6" long lag screws for attach mantle from back
- 2-1/2" long self tapping star bit screws (pack of 100)
- 1-1/4" brad nails (about 500 total)
- electric fireplace insert, as shown 36" wide x 17 tall (opening was 33" x 16") - I used this one
Cut List
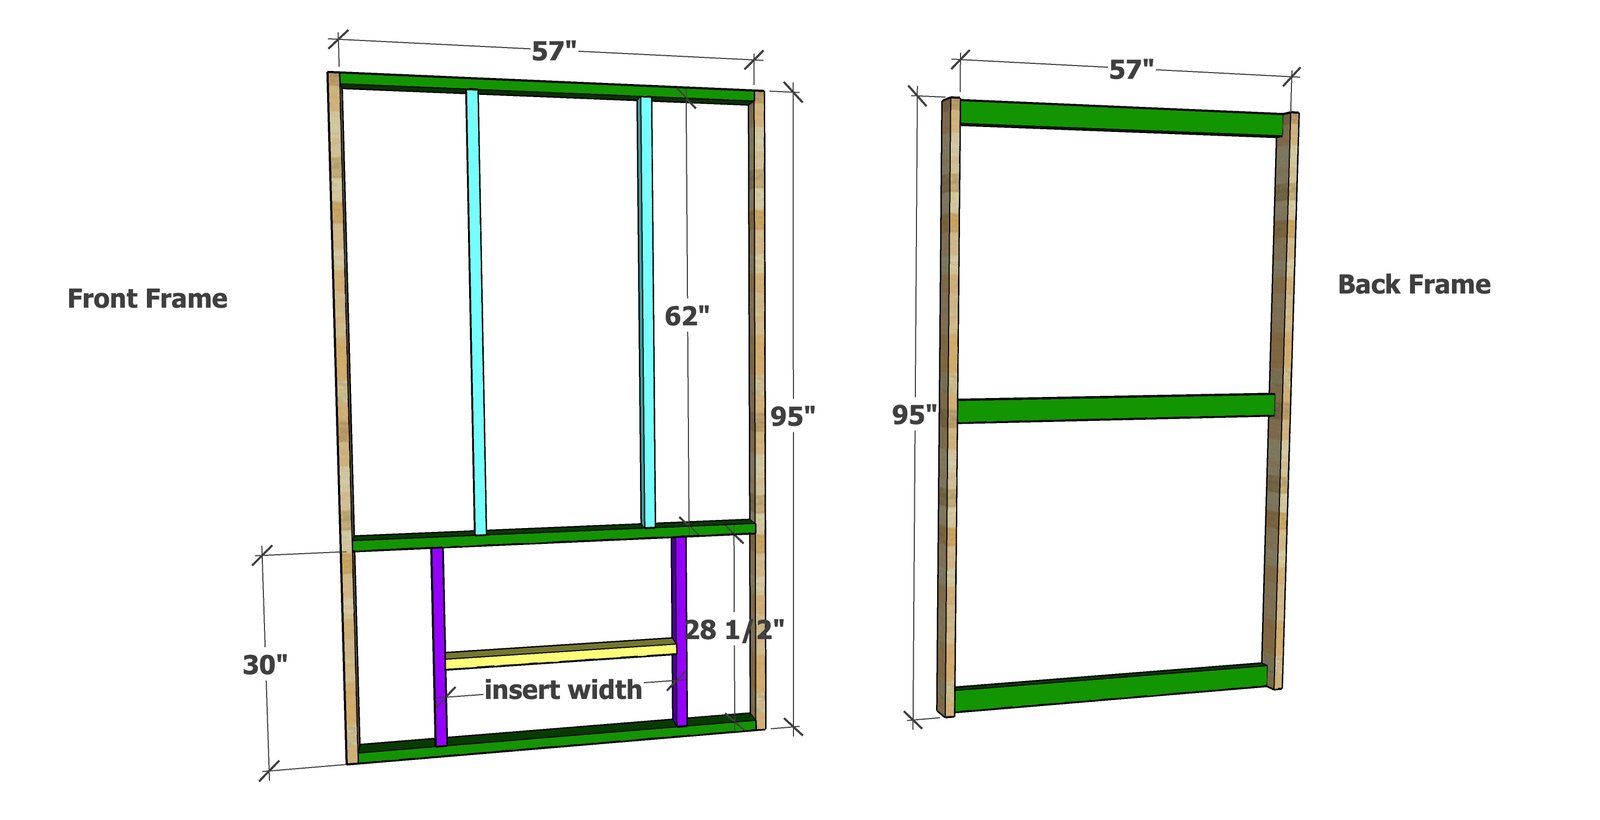
Back Wall Framing
- 2 - 2x4 @ 95" (or 1" less than overall ceiling height)
- 3 - 2x4 @ 57" (or desired width MINUS 3")
Front Wall Framing
- 2 - 2x4 @ 95" (or 1" less than overall ceiling height)
- 3 - 2x4 @ 57" (or desired width MINUS 3")
- 2 - 2x4 @ 28-1/2" (or desired height of fireplace top of opening MINUS 1-1/2")
- 1 - 2x4 @ 33" (or fireplace insert opening width)
- 2 - 2x4 @ 62" (measure and cut to fit if other modifications are made)
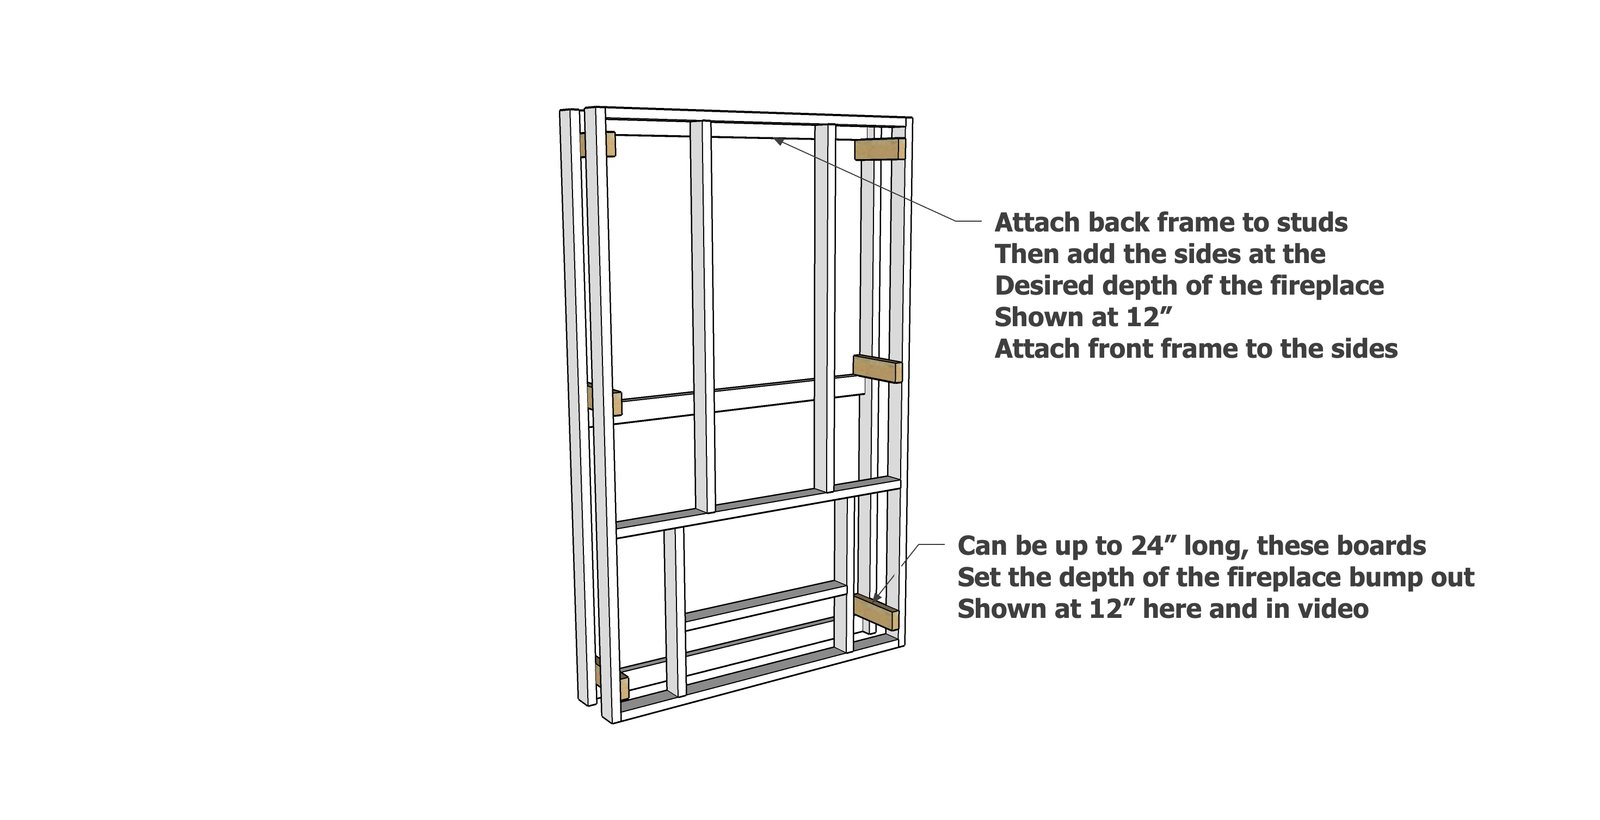
- 2 - 2x4 @ 24" - blocking for supporting a heavy mantle is using
Sides
- 6 - 2x4 @ 12" - or desired depth of the fireplace bumpout
Shiplap cut to fit
Beam as shown is 54" long, 4x6 beam
Trim cut to fit
Tools
- measuring tape
- square
- pencil
- safety glasses
- drill
- circular saw
- nailer
- level
Step-by-step Instructions
Step 1
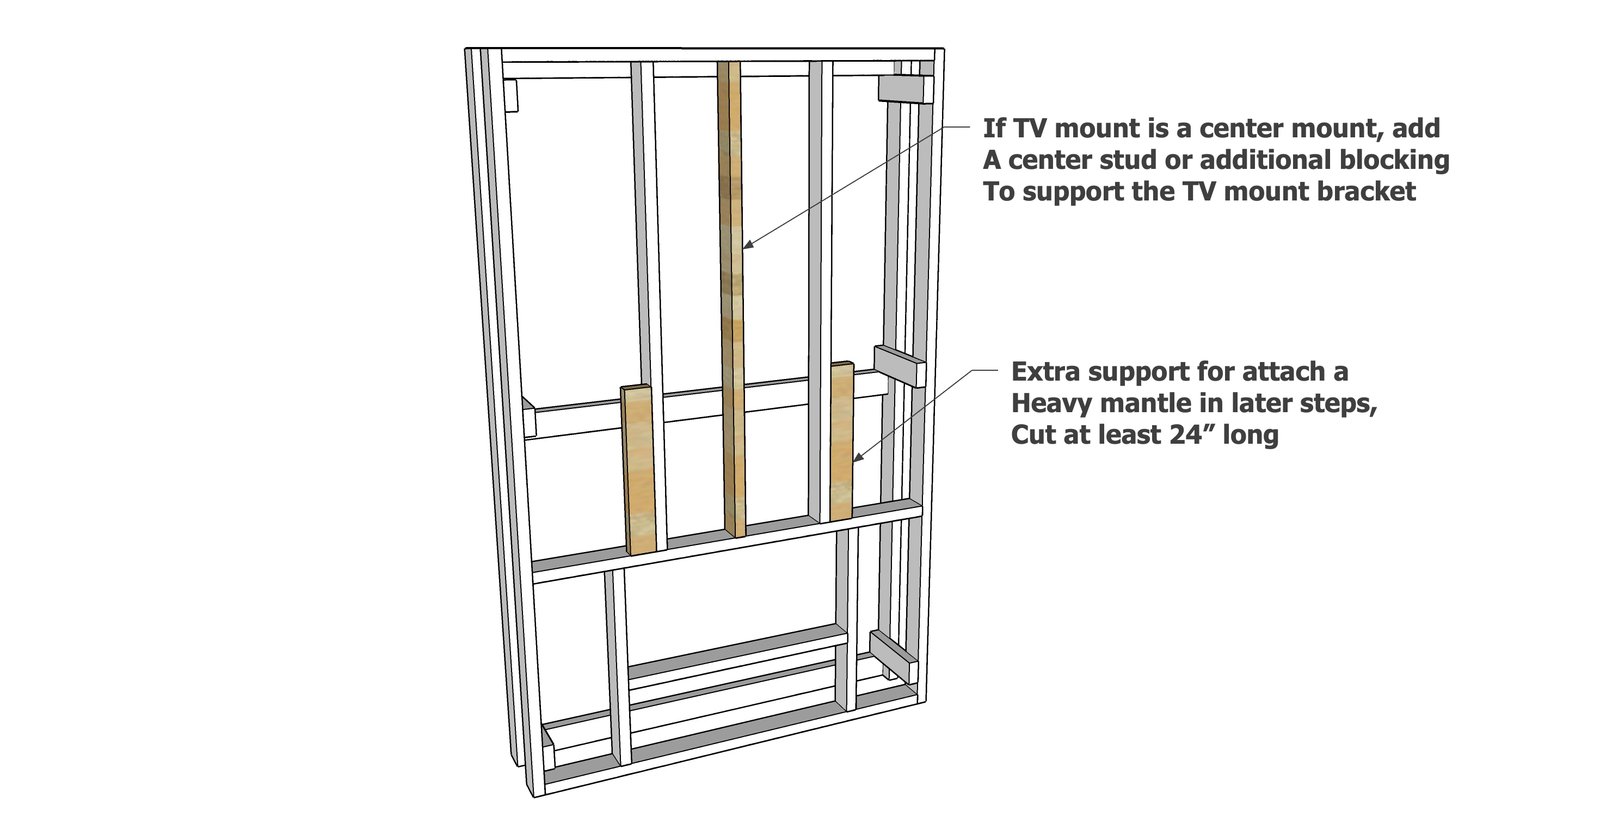
Measure overall ceiling height. The framing should be 1" less in overall height to allow for installation. Cut the sides to match the overall desired height. BACK WALL FRAMING Build the back framing wall with 2-1/2" screws. FRONT WALL FRAMING Build the front wall framing. The center green 2x4 board is placed at the desired top height of the fireplace insert. From there, fill in remaining boards to create the fireplace insert opening framing, following fireplace insert's recommendations. For the upper portion, place the 2x4s (light blue in diagram) so they match your TV mounting bracket.
Step 2
Attach the back wall framing to studs in the wall with 2-1/2" screws through the horizontal 2x4s on the back. Use a level to make sure the back wall framing is attached level to the wall. Then add the side 2x4s as shown. These 2x4s set the desired depth of the fireplace bump out. Then attach the front wall framing to the side 2x4s. Use the 2-1/2" screws.
Step 3
If additional blocking to support a heavy mantle or a center supported TV bracket, add those pieces in now. The support blocking bottom should rest on the horizontal 2x4, to bring the weight load down to the floor.
Shiplap Installation
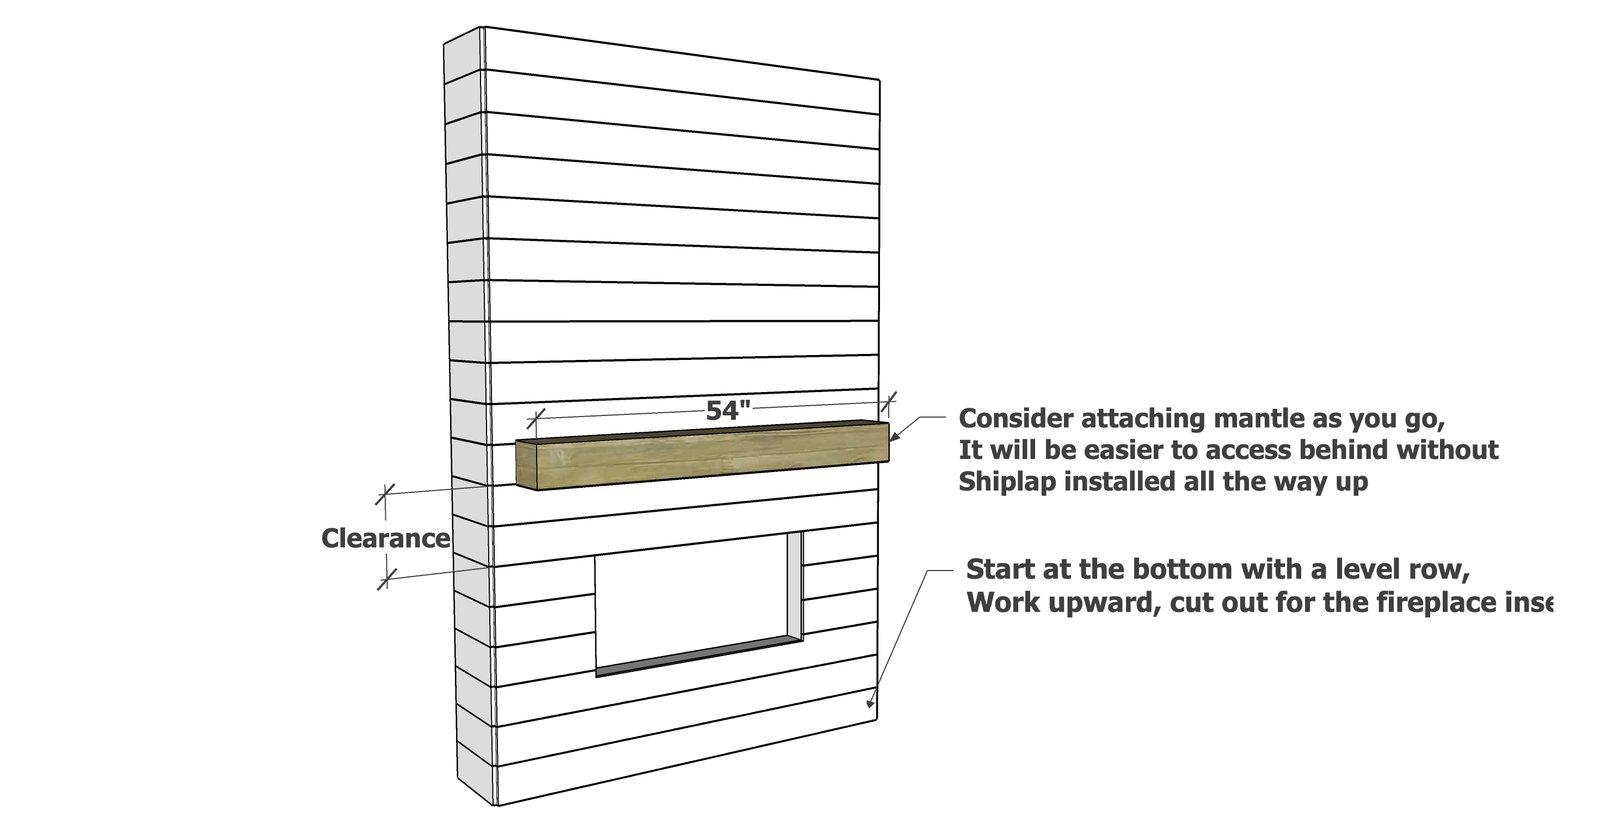
Start at the bottom and set the first row using a level. Attach with 1-1/4" brad nails, two nails per stud. Work upwards, cutting around the fireplace opening. TIP: You can trace the fireplace opening on the inside, with the board held in place, then remove the board and cut out with a jigsaw. Install the mantle as you work upwards while you still have access to the back of the project. There are methods to install mantles from the front but this is easiest way.
Trim installation:
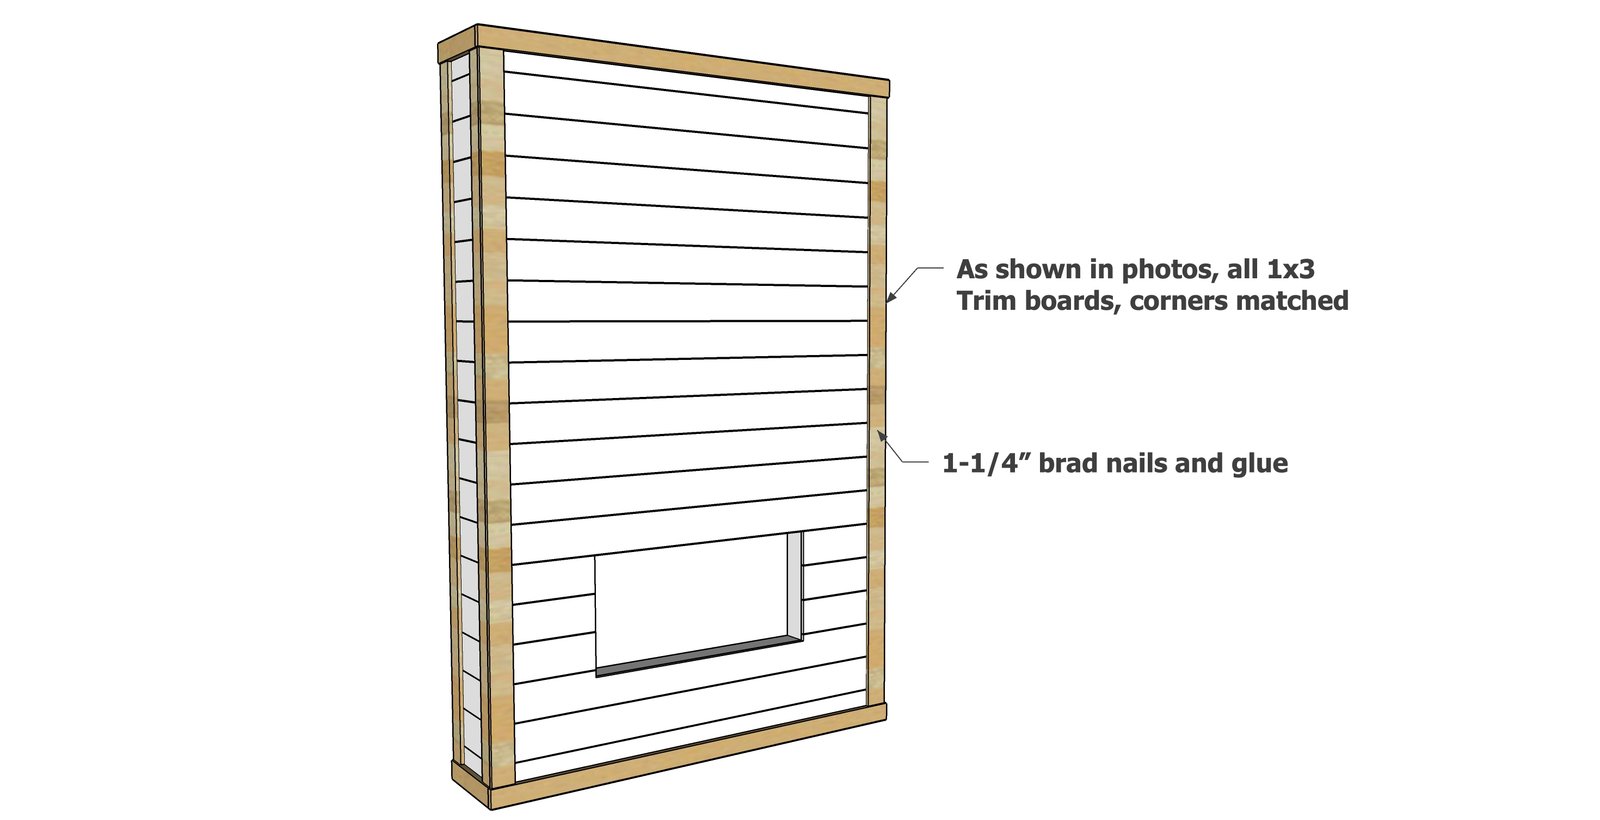
First, install the top and bottom side trim pieces, cut to fit. Then install the top and bottom front trim pieces, cut to fit. Then install the vertical side trim pieces. The front side pieces need to match the plane of the front of the shiplap so a corner works out perfectly when the front trim is added. Finally, install the front vertical trim pieces, with the corner perfectly matched. Use 1-1/4" brad nails. Fill all holes with wood filler and let dry. Sand lightly with 120 grit sandpaper. Remove all sanding residue. Paint or finish as desired.
Step 6
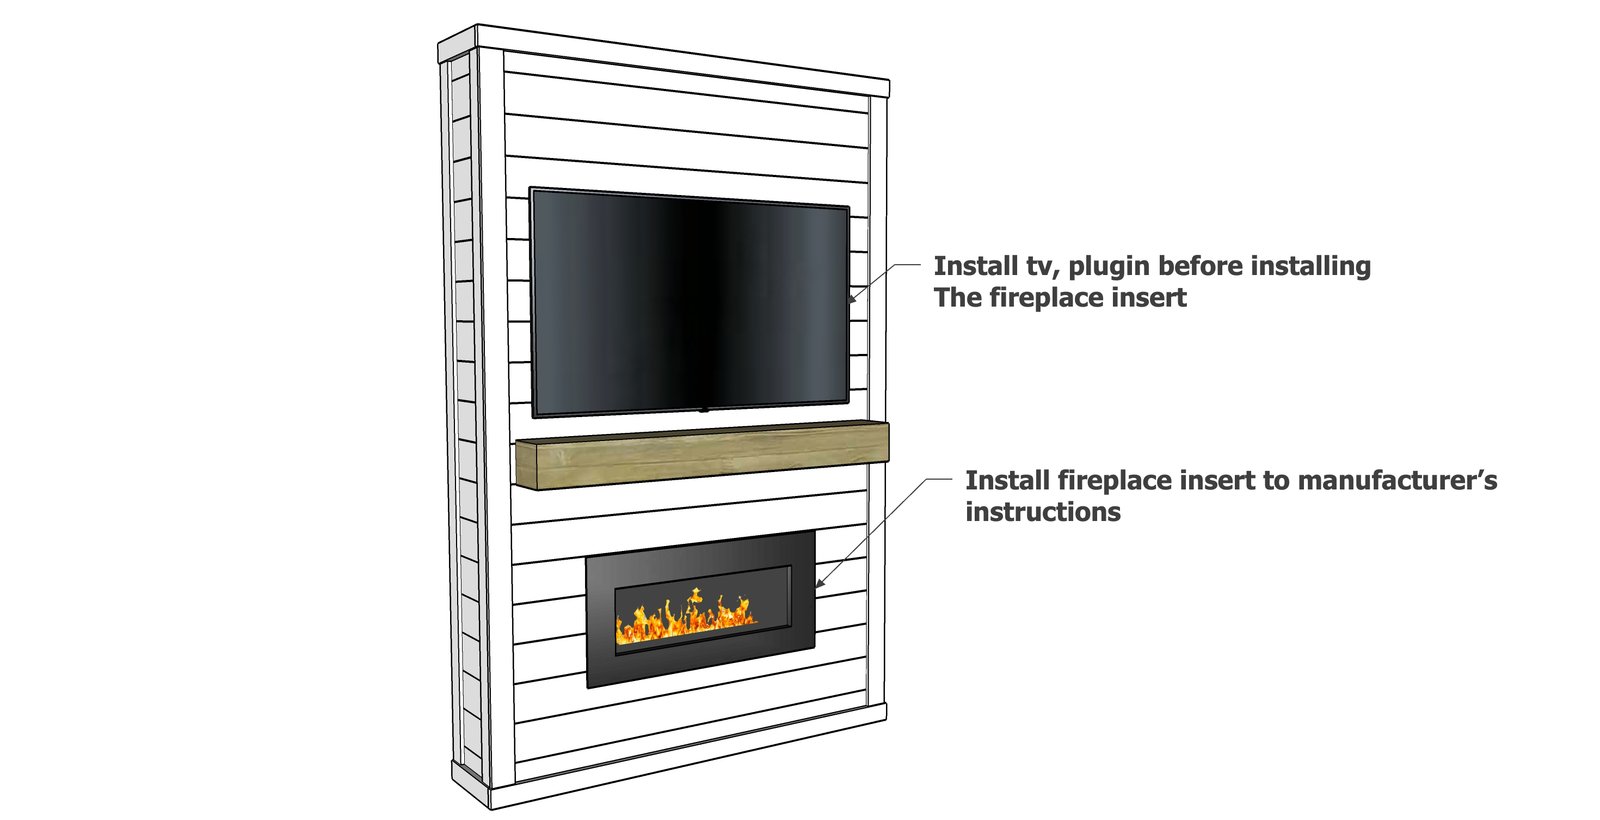
Install the tv and make sure that it is functioning. Once the fireplace insert is installed, the access is gone. Then install the fireplace insert. The fireplace insert is easy to remove if you need to get back inside the framing.
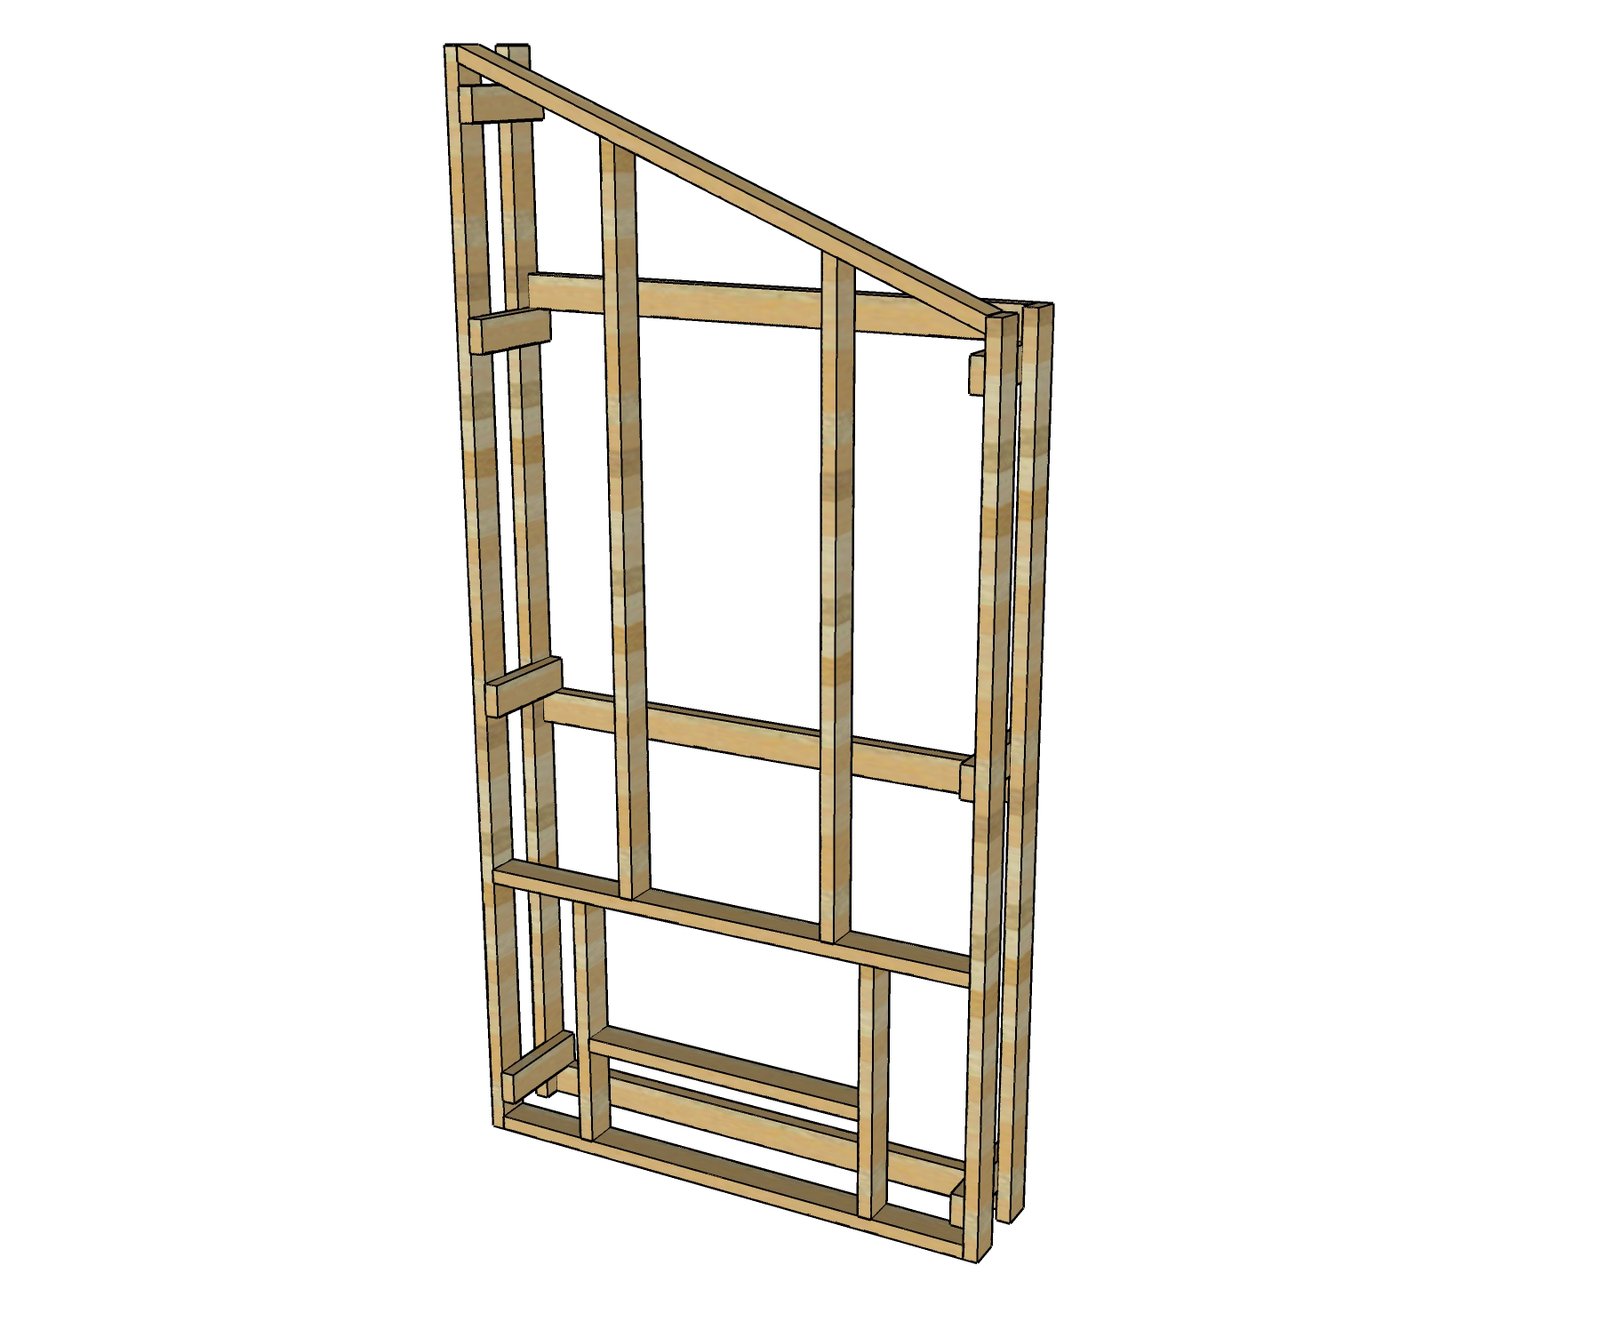
Modification Recommendations for Angled Ceiling
An angled ceiling will definitely produce a few more challenges, but it is still achievable. The main hurdle will be the front wall framing. Once you get the framing done, everything else is just cut to fit over the frame.
Finishing
Sand all surfaces, starting with a medium grit and finishing with fine. Wipe off the dust, fill any holes or gaps with wood filler, and sand smooth once dry. Apply primer if you're painting, then finish with your choice of paint or stain and seal with a durable clear topcoat. For outdoor projects, use exterior-rated primer, paint or stain, and sealer so the piece stands up to the weather.
Source (temporary): https://www.ana-white.com/woodworking-projects/easiest-shiplap-fireplace-tutorial-free-plans-and-video