Entry Table by More Like Home
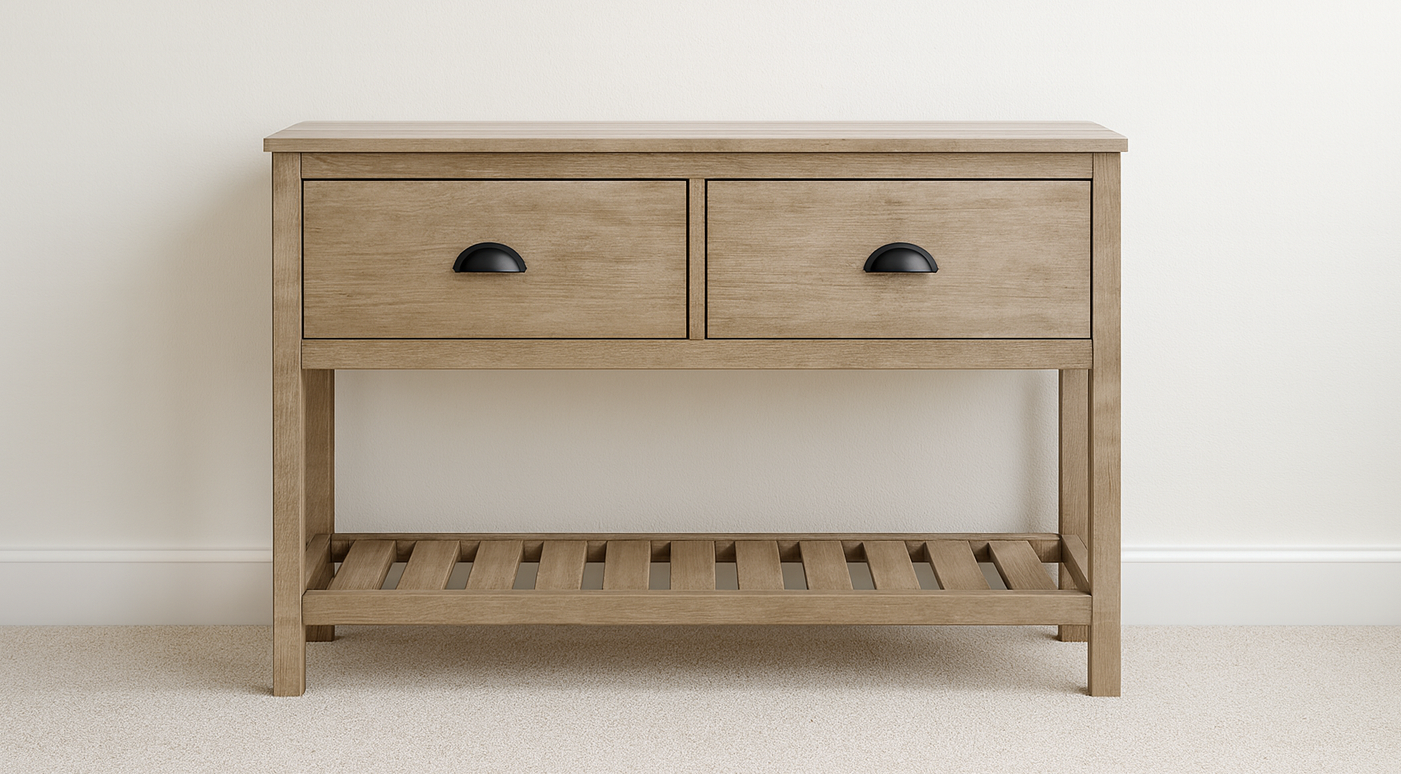
I designed this table to use in our entry way. The two big drawers would be great for hats & gloves, shopping bags, or extra jackets. And the big shelf underneath can hold 3 big baskets to keep all our shoes corralled instead of spread across the floor. It would also make a great buffet or media console! Get the full plans here:…
Specifications
| Project type | Console Table Plans |
|---|---|
| Room | dining room |
| Style | Modern Style Furniture Plans |
| Difficulty | Intermediate |
| Estimated cost | $50 - $100 |
Dimensions
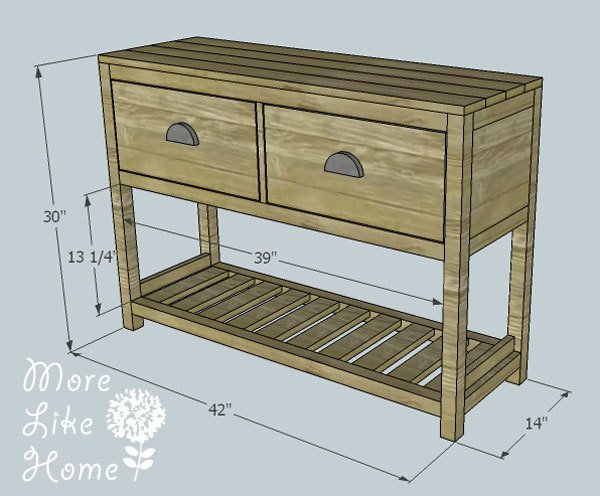
Use the size-specific shopping and cut lists below.
Shopping List
Shopping List:
- 5 - 2x2 @ 8' long
- 1 - 1x10 @ 8' long
- 1 - 1x10 @ 4' long
- 1 - 1x2 @ 4' long
- 1 - 1x3 @ 4' long
- 1 - 1x3 @ 10' long
- 2 - 1x4 @ 8' long
- 1 - 1x8 @ 10' long
- 2 sets of 12" drawer slides
- 2 drawer pulls
- optional - baskets for the shelf
Cut List
- (A) 4 2x2 @ 29 1/4" (legs)
- (B) 6 2x2 @ 11" (side rails)
- (C) 2 1x10 @ 11" (sides)
- (D) 6 2x2 @ 39" (front/back rails)
- (E) 1 1x10 @ 39" (back)
- (F) 1 1x2 @ 9 1/2" (drawer divider)
- (G) 2 1x2 @ 11" (shelf sides)
- (H) 10 1x3 @ 11" (bottom slats)
- (I) 2 1x3 @ 11" (drawer supports)
- (J) 1 1x3 @ 11 3/4" (center drawer support)
- (K) 1 2x2 @ 11" (top support)
- (L) 4 1x4 @ 42" (top)
- (M) 2 1x10 @ 16 5/8" (drawer bottom)
- (N) 4 1x8 @ 16 5/8" (drawer back)
- (O) 4 1x8 @ 10 3/4" (drawer sides)
- (P) 2 1x10 @ 18 7/8" (drawer front)
Tools
- measuring tape
- square
- hearing protection
- kreg-jig
- drill
- compound miter saw
- nailer
- sander
Step-by-step Instructions
Step 1
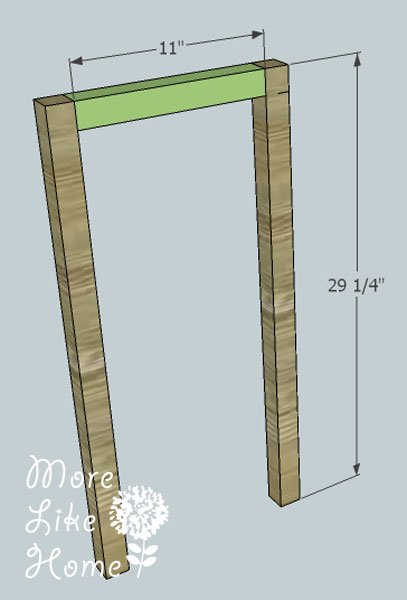
Start by using one side rail (B) to connect two legs (A). You can use a Kreg jig or drill through the legs into the ends of the side rails. Use glue and be sure to keep everything flush across the top and outside edges.
Step 2
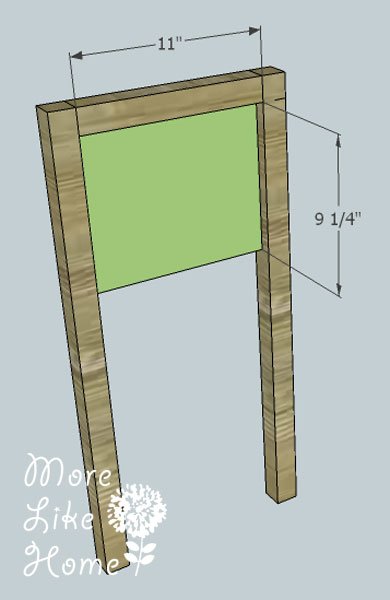
Then install the side panel (C). Slide it right up against the top side rail and keep it flush with the outside edges of the legs (this will make it inset 3/4" on the inside). You can attach it with a Kreg Jig, or by drilling through the legs and side rail into the edges of the side panel.
Step 3
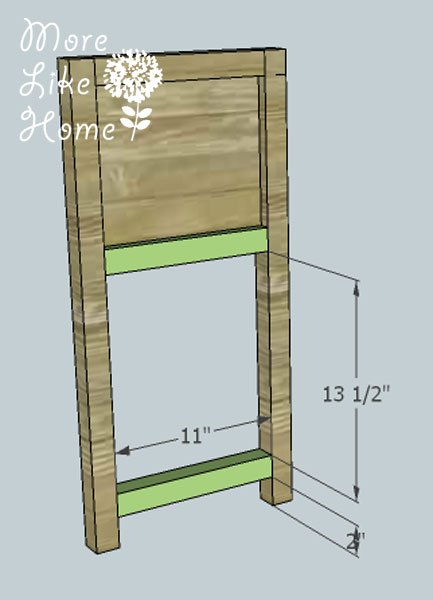
Attach two more side rails (B) as shown below. One should sit against the bottom edge of the side panel and be flush with the inside and outside edges of the legs. The other should be set down 13 1/2" with 2" of space left underneath. You can attach them with a Kreg Jig, or by drilling through the legs into the ends of the side rails. Repeat these steps to build the other side section.
Step 4
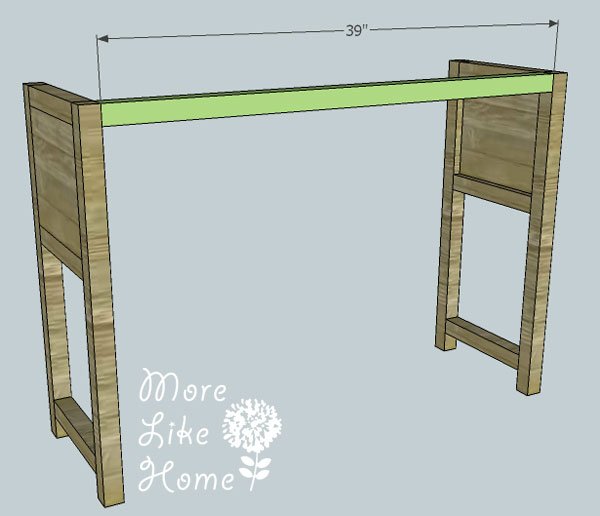
Now we'll start connecting the two side sections. Attach the first front/back rail (D) to the top corners of the side sections like in the pic below. (this will be the back of the table) Keep it flush with the top and back edge of the legs. Attach it using a Kreg Jig or by drilling through the legs into the ends of the back rail, and don't forget to use glue!
Step 5
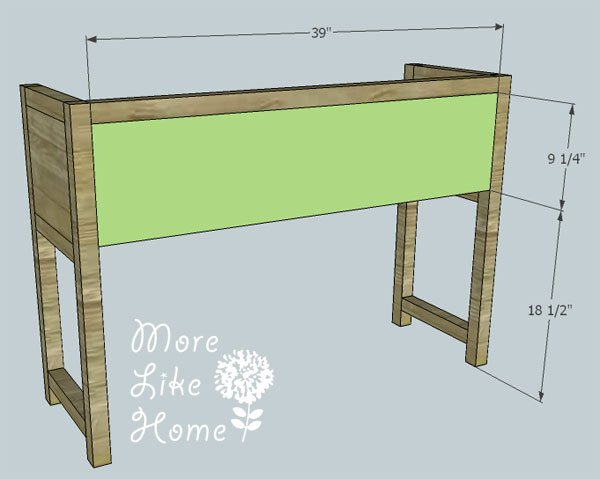
Install the back panel (E). It should sit right up against the top back rail and be flush with what will be the back side of the table (this will leave it inset 3/4" on the inside). Attach it using a Kreg Jig or by drilling through the legs and back rail into the edges of the back panel.
Step 6
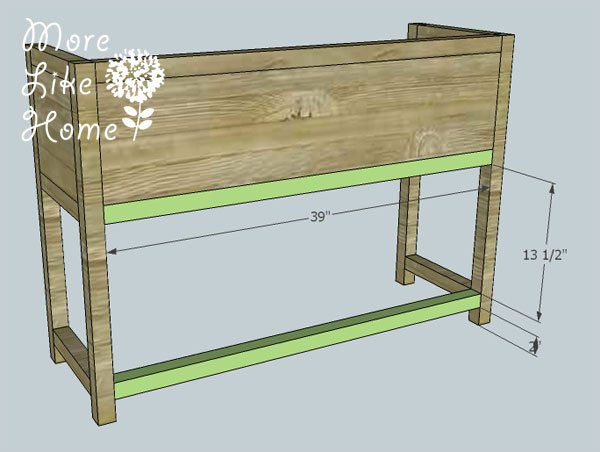
Now install two more back rails (D) as show below. The first should be right up against the bottom of the back panel and flush with the outside edges of the legs. The second should be set down 13 1/2", leaving a 2" space at the bottom of the legs.
Step 7
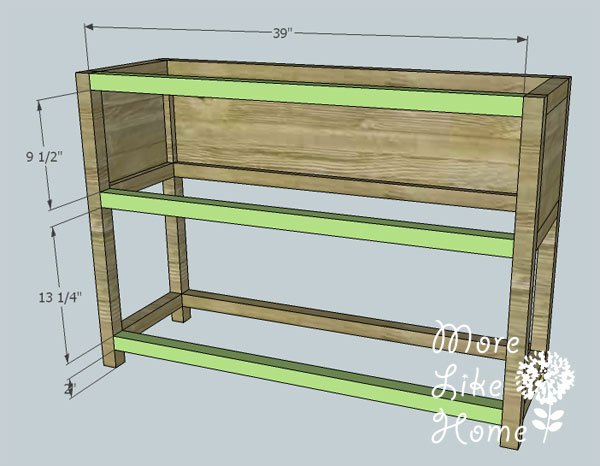
Now install the remaining three front rails. (**these measurements differ slightly from the side and back sections, and they are supposed to!! We need a little extra clearance for the drawer fronts.**) The first one should be flush with the top and outside edges of the legs. The second should be set 9 1/2" down from the top rail, and the third should be 13 1/4" down from the second. This will leave 2"of space at the bottom of the legs.
Step 8
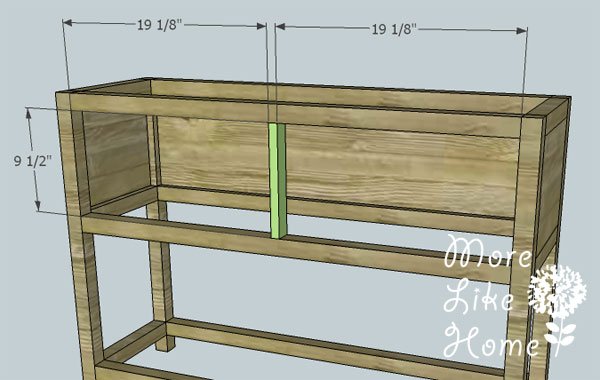
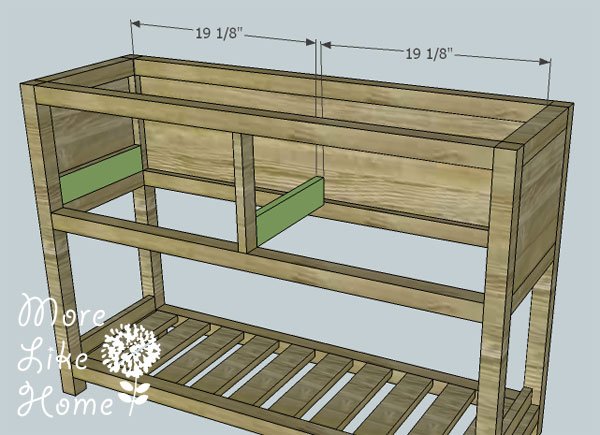
Next install the drawer divider (F). This should be centered in the drawer opening with 19 1/8" on either side. Make sure you measure this distance at both the top and bottom of the divider and make sure it is straight and level! You can attach it with a Kreg Jig or by drilling through the front rails into the ends of the divider. If you haven't checked the table for square yet, go ahead and do it now.
Step 9
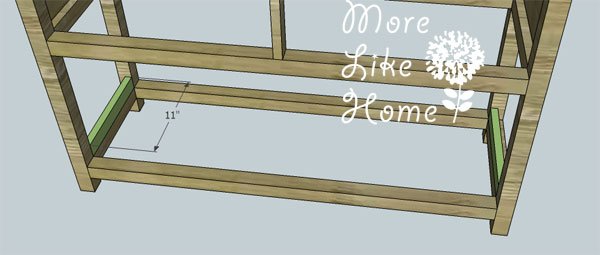
Next you can install the shelf sides (G). You'll put one on each of the bottom side rails. Keep it flush with the inside edge of the rails and legs. You can attach them using a Kreg Jig or by drilling through the legs into the ends of the shelf side boards. These are optional! Since I plan to be sliding baskets in and out all the time I wanted something to keep them in-line so they don't get hung up on the legs. You're welcome to leave these off.:)
Step 10
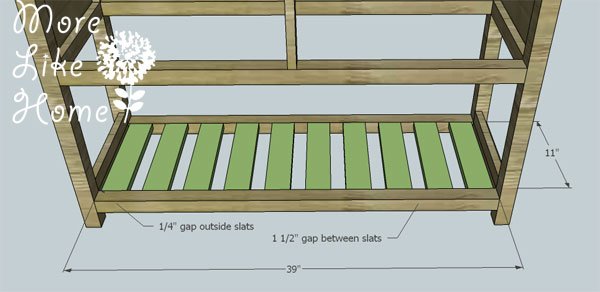
Now we'll install the bottom slats (H). Install the first slat at one side with a 1/4" gap between the slat and the side rail. The slat should be flush with the top edge of the front and back rails. You can attach it using a Kreg Jig or by drilling through the front/back rails into the ends of the slat. Now work your way across installing one slat at a time, leaving 1 1/2" gap between each slat (this will leave 1/4" space between the final slat and the side rail).
Step 11
Install the drawer slide supports (I). One will go on each side setting on top of the center side rails. It should set back into the inset of the side panel. You can install them with a Kreg Jig, or by drilling through the supports into the side panels with 1 1/4" screws - but be careful not to poke all the way through! Then install the center drawer support (J). It will run between the two drawers and be centered with 19 1/8" of space on either side (double check the openings between on either side drawer divider and make the distances on the back match these measurements - it's important that this support run straight back or your slides won't work). The back end of the support will sit on top of the back center rail, so the front end will be about 1/4" above the top edge of the front center rail (the pic doesn't show this part totally right, sorry!). Attach the support using a Kreg Jig or by drilling through the drawer divider and back panel into the ends of the support.
Step 12
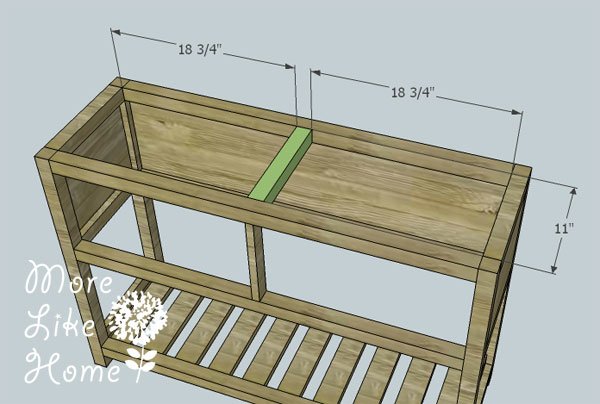
Next install the top support (K). This should be flush with the top edge of the top front/back rail. It should be roughly centered with 18 3/4" of space on either side, but don't sweat if it's not exact.
Step 13
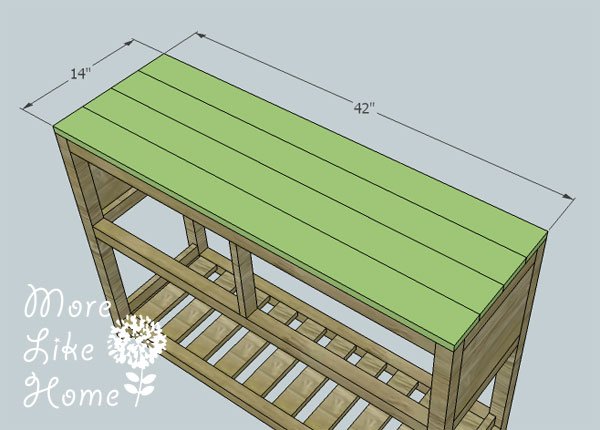
Now we can install the top boards (L). If you have a Kreg Jig, you can start by laying the boards side by side and attaching them to each other, then set the whole top into place. If not, don't worry! Just install the boards one at a time. You can use a Kreg Jig to attach the top boards from underneath, or you can drill down through the top into the side rails and center support (it wouldn't hurt to put a couple screws into the front/back rails too). Make sure you keep all the edges flush.
Step 14
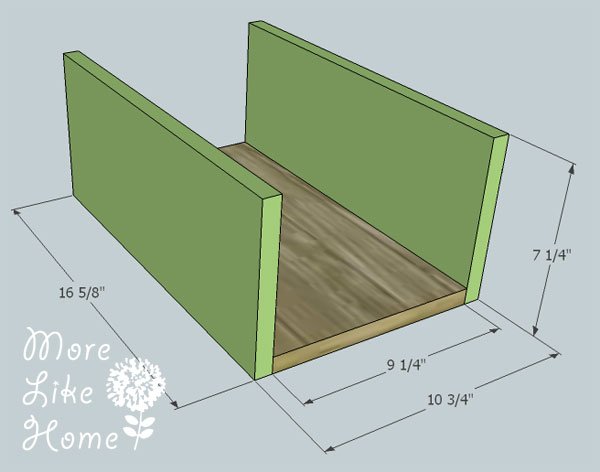
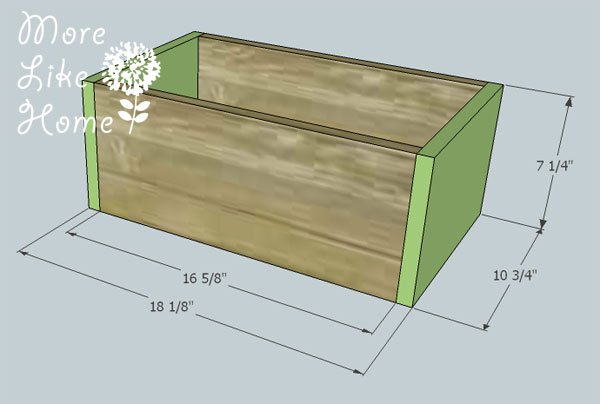
Now we can work on the drawers! Double check the width of your drawer openings and the space between the drawer slide supports. You want your total drawer box to be 1" smaller than the the space between the supports, so if your spaces are different that 19 1/8" you'll need to adjust you drawer width accordingly. Start by attaching a drawer back board (N) to either side of the drawer bottom (M) as shown below. You can use a Kreg Jig or drill through the back boards into the edges of the drawer bottom. Use glue!
Step 15
Then attach the drawer sides (O). Again you can use the Kreg Jig or drill through the drawer sides into the drawer bottom and back boards.
Step 16
Next you can install the drawer slides. You need to make sure the front face of the drawer boxes are set back 3/4" from the front face of the table so your drawer fronts will sit flush when you install them. Follow the instructions with the slides to install them. **note: these plans are for slides that require 1/2" of space on either side of the drawer, read the instructions ahead of time and make your drawers a different size if you need to. The slides will stick past the back of the drawer box a bit. This is okay and will let your drawer open a bit farther than shorter slides.** If you want more room to work on this, you could wait to install the top after the drawers are in place.
Step 17
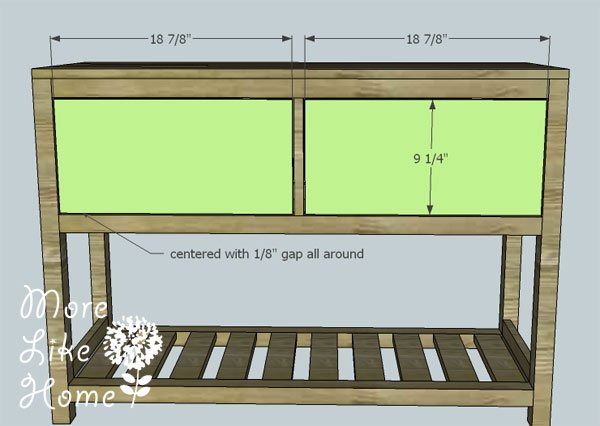
Now attach the drawer fronts (P). Start by double checking the width of your drawer openings and cut your drawer fronts to be 1/4" less than the measurement. With your drawer box in place, center the drawer front in front of it with 1/8" of space all around. Attach the drawer front using glue and a couple finishing nails. This will be easier if someone can help hold it in place, or if you lay the table down on it's back. Once the front is secured enough not to shift anymore you can carefully take the drawer out and set it on a solid surface to add some more nails, or even put a few 1 1/4" screws in from the inside.
Finishing
Sand all surfaces, starting with a medium grit and finishing with fine. Wipe off the dust, fill any holes or gaps with wood filler, and sand smooth once dry. Apply primer if you're painting, then finish with your choice of paint or stain and seal with a durable clear topcoat. For outdoor projects, use exterior-rated primer, paint or stain, and sealer so the piece stands up to the weather.
Source (temporary): https://www.ana-white.com/woodworking-projects/entry-table-more-home