Farmhouse Storage Bed with Drawers (Queen)
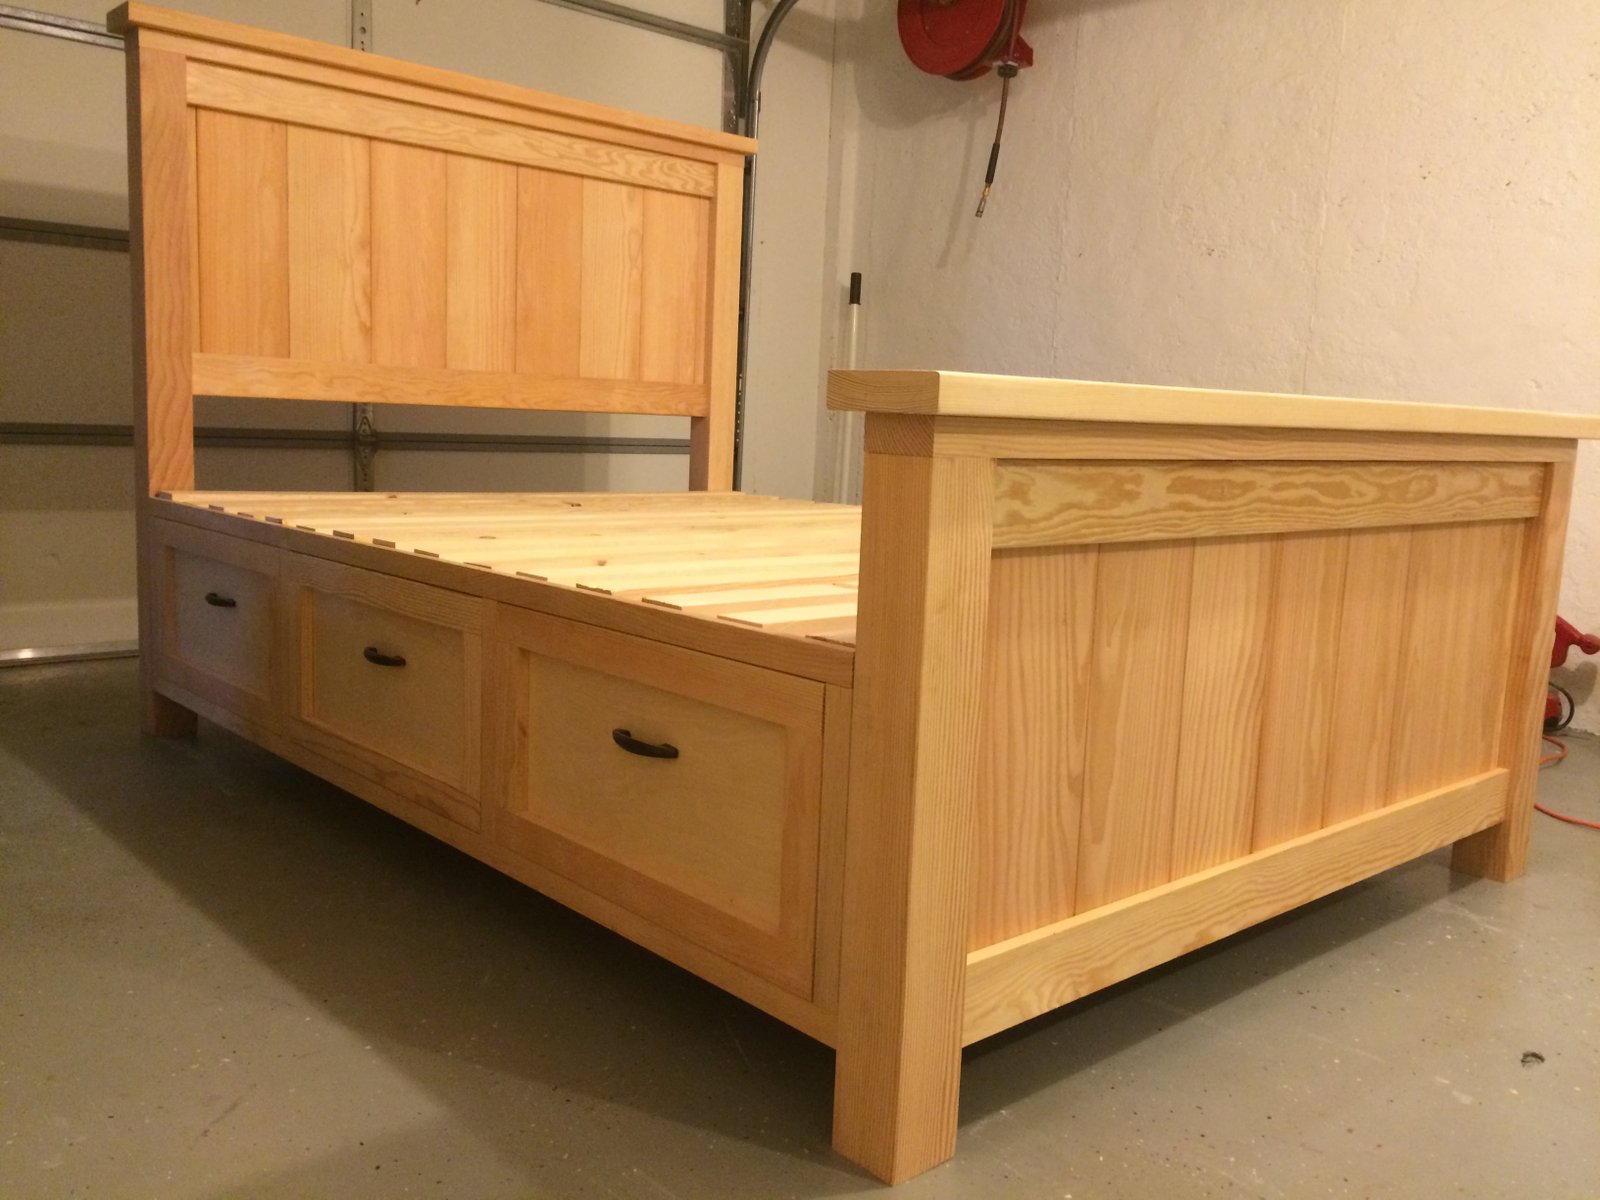
Farmhouse Bed plans for a small space! This bed packs lots of storage in a more compact profile. Detailed step by step plans to help you build your own DIY Farmhouse Bed in queen size. Also check out our Full and Twin Farmhouse Storage Bed plans.
Specifications
| Project type | Beds and Bed Frames |
|---|---|
| Room | Bedroom |
| Style | Farmhouse Furniture |
| Difficulty | Advanced |
| Estimated cost | $150 - $200 |
Dimensions
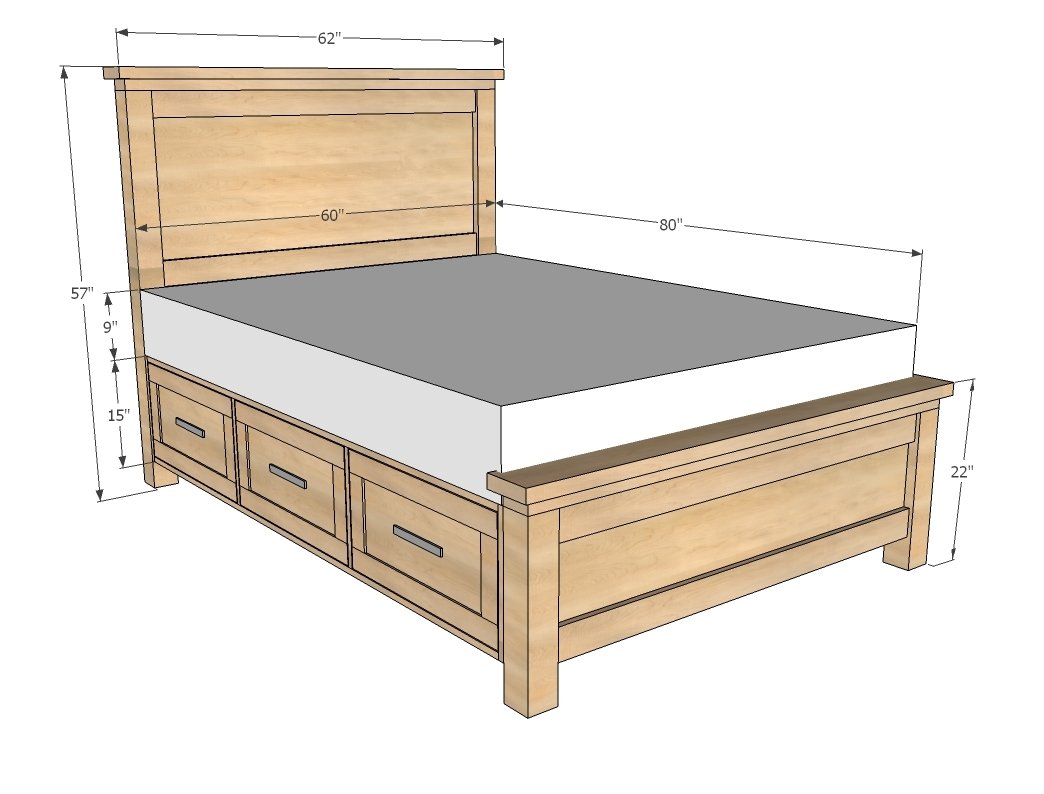
Use the size-specific shopping and cut lists below.
Shopping List
- 3 - Sheets 3/4" Plywood or other sheet goods
- 1 1/2 - Sheets 1/4" Plywood or other sheet goods
- 2 - 4x4 post, 7 feet long
- 2 - 1x4 @ 10 feet long
- 3 - 2x4 @ 10 feet long (cut longest first!)
- 5 - 1x10 @ 8 feet long (OR 1 sheet of 3/4" plywood cut into 5 strips 9 1/4" wide)
- 6 - Euro Style Drawer Slides (the cheapo white ones) 14" long, medium to heavy duty rating
- 2 - 2x6 @ 6 feet long
- 3 - 2x2 @ 8 feet long
- 9 - 1x3 @ 8 feet long
- 5 - 1/4" hobby stock, 2 1/2" wide @ 8 feet long (OR 1/4" plywood cut into strips 2 1/2" wide)
- 4" Screws (if you are not using a pocket hole jig and will be attaching 4x4 legs to panels with screws)
- 6 Knobs or handles
NOTE: Drawers are optional - can be added later or just used as storage shelves. The shopping list DOES include materials for the drawers, so if not building drawers, please adjust shopping list accordingly
Cut List
HEADBOARD
- 1 - 3/4" Plywood @ 26" x 53" (Can substitute planked wood for panel to create a more authentic "farmhouse" look)
- 2 - 1x4 @ 53"
- 2 - 4x4 @ 54"
- 2 - 2x4 @ 53"
- 1 - 2x4 @ 60"
- 1 - 2x6 @ 62"
FOOTBOARD
- 1 - 3/4" Plywood @ 15" x 53" (Can substitute planked wood for panel to create a more authentic "farmhouse" look)
- 2 - 1x4 @ 53"
- 2 - 4x4 @ 19"
- 2 - 2x4 @ 53"
- 1 - 2x4 @ 60"
- 1 - 2x6 @ 62"
STORAGE BOXES
- 4 - 3/4" Plywood @ 15 1/2" x 80 1/4"
- 8 - 3/4" Plywood @ 15 1/2" x 13 1/2"
- 2 - 1/4" Plywood @ 80-1/4" x 15"
SUPPORT & CENTER
- 2 - 2x2 @ 80 1/4"
- 4 - 2x2 @ 16 3/4"
- 18 - 1x3 @ 28 1/2" (Slats to mattress specs)
OPTIONAL DRAWER BOXES
- 12 - 1x10* @ 23 1/4"
- 12 - 1x10* @ 14"
- 6 - 1/4" Plywood @ 24 3/4" x 14"
*Plywood cut into 9 1/4" strips can be substituted for 1x10s, use at least 1/2" thick plywood; for direct conversion to cut list use 3/4" thick plywood
OPTIONAL DRAWER FACES
- 6 - 3/4" Plywood @ 25 1/2" x 13 1/4"
- 12 - 1/4" hobby stock, 2 1/2" wide @ 8 1/4"
- 12 - 1/4" hobby stock, 2 1/2" wide @ 25 1/2"
Tools
- measuring tape
- square
- pencil
- hammer
- safety glasses
- hearing protection
- kreg-jig
- drill
- circular saw
- table saw
- nailer
- sander
- level
- countersink drill bit
Step-by-step Instructions
Step 1
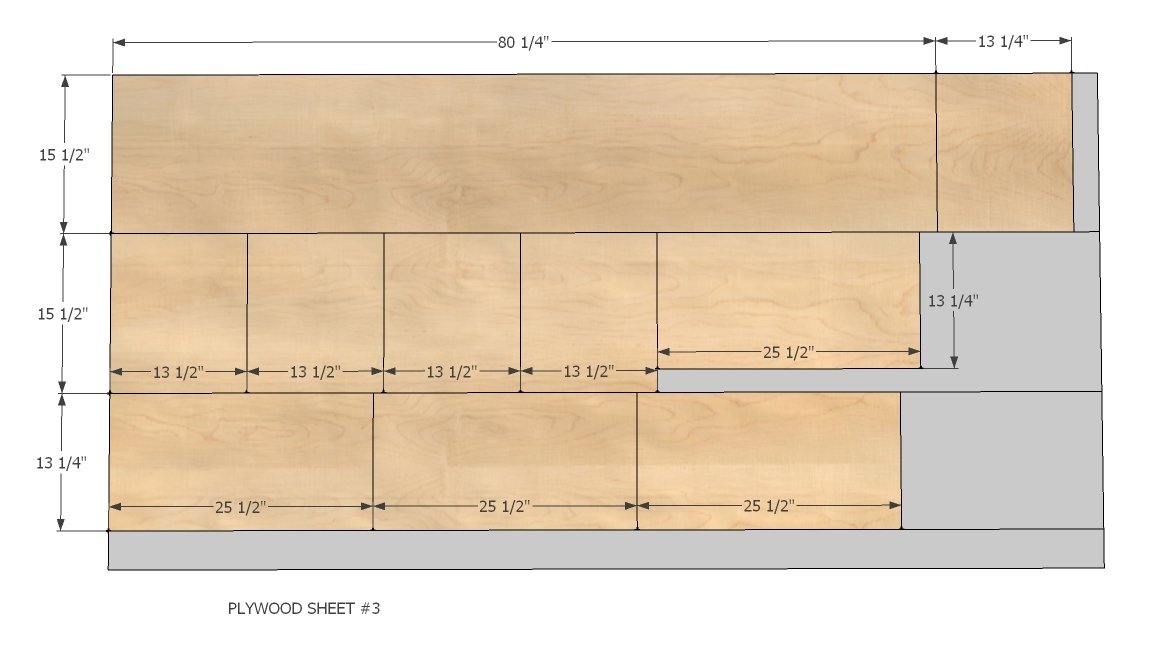
Have your hardware store rip the first piece into three equal sized strips, 15 1/2" wide. Then all you have to do is make the cross cuts at home. These cuts are from the 3/4" thick plywood. NOTE: Measurement should be 15-1/2" x 13-1/2" NOT 13-1/4" - please check with cut list
Step 2
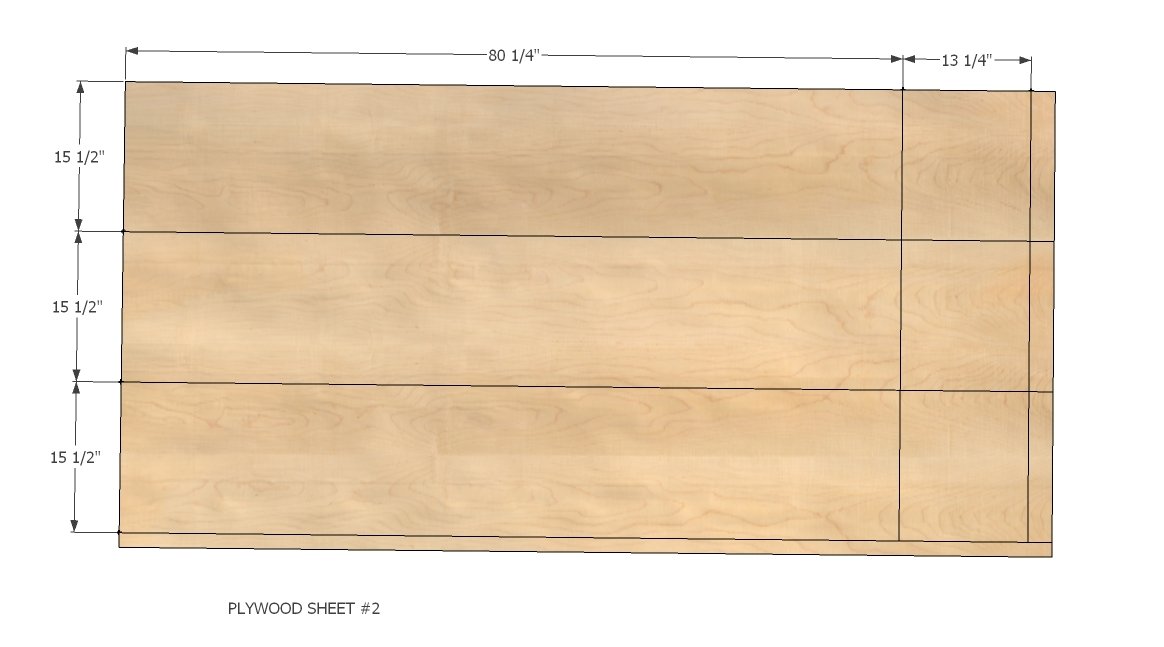
From another sheet of 3/4" plywood, have your hardware store rip into two 15 1/2" strips and one 13 1/4" strip. From these strips cut the following pieces. NOTE: Measurement should be 15-1/2" x 13-1/2" NOT 13-1/4" - please check with cut list
Step 3
From the final 3/4" piece of plywood, cut it cross wise as noted in the diagram, and then cut your headboard and footboard panel from the larger half. From the remaining pieces, cut your remaining drawer faces as shown above.
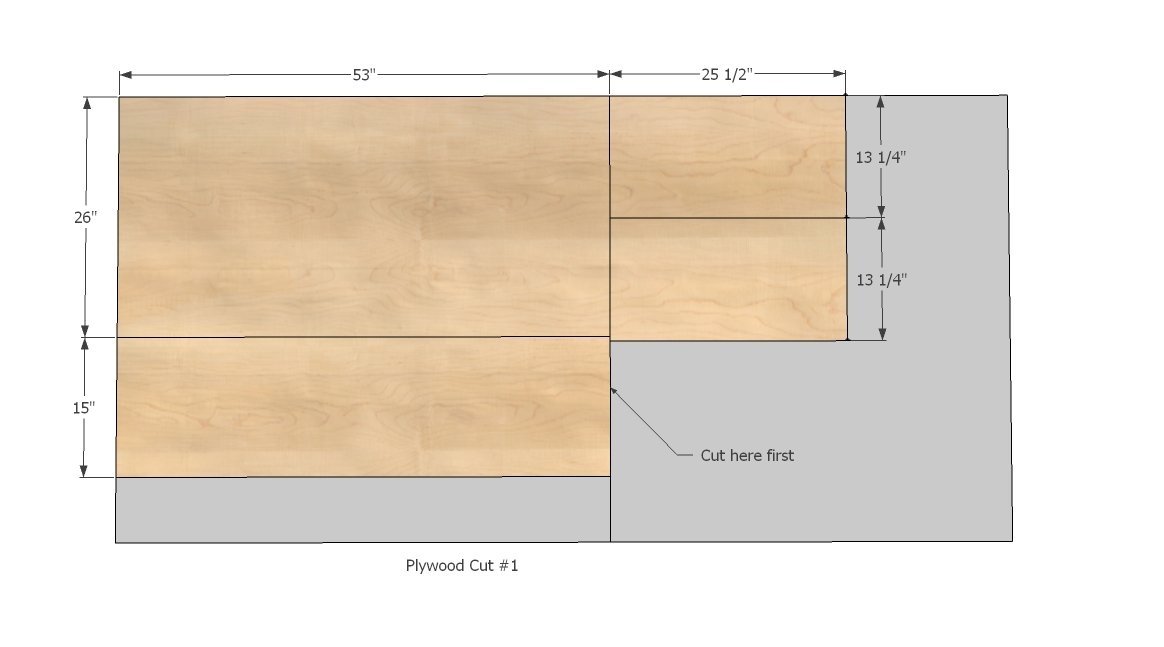
Step 4
From the 1/4" plywood, cut the following pieces. You will need to either purchase an additional 1/2 sheet of plywood for the two remaining drawer bottoms, or you could use leftover 3/4" stock for the remaining two drawer bottoms.
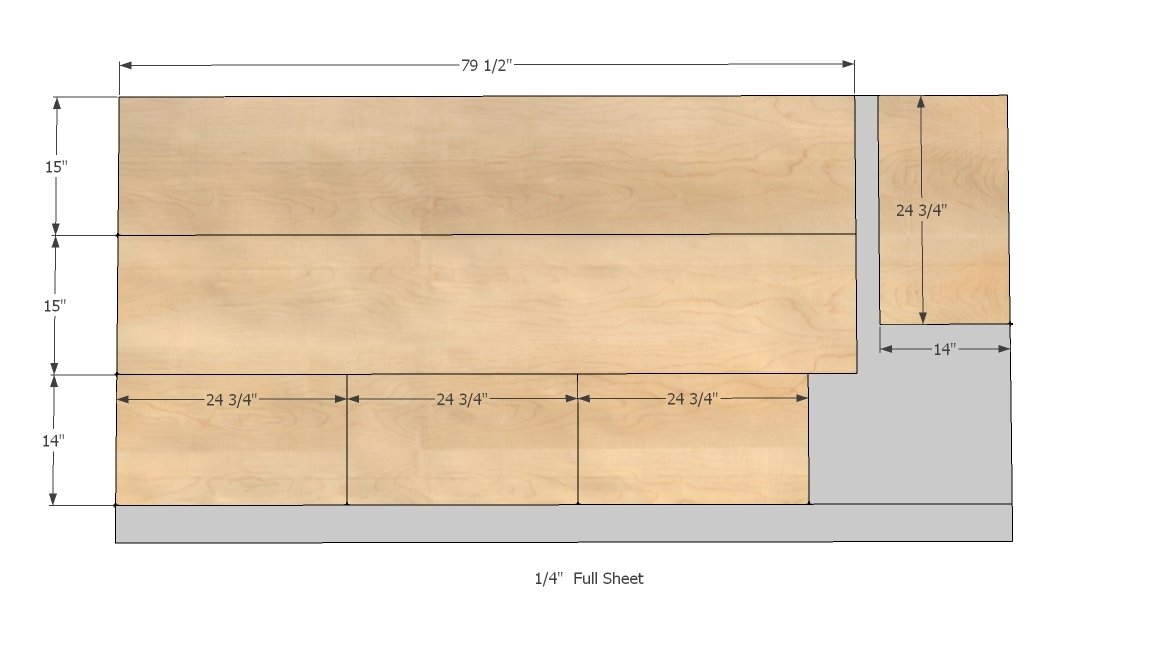
Step 5
The largest cuts on this diagram should be 80-1/4" long, NOT 79-1/2".
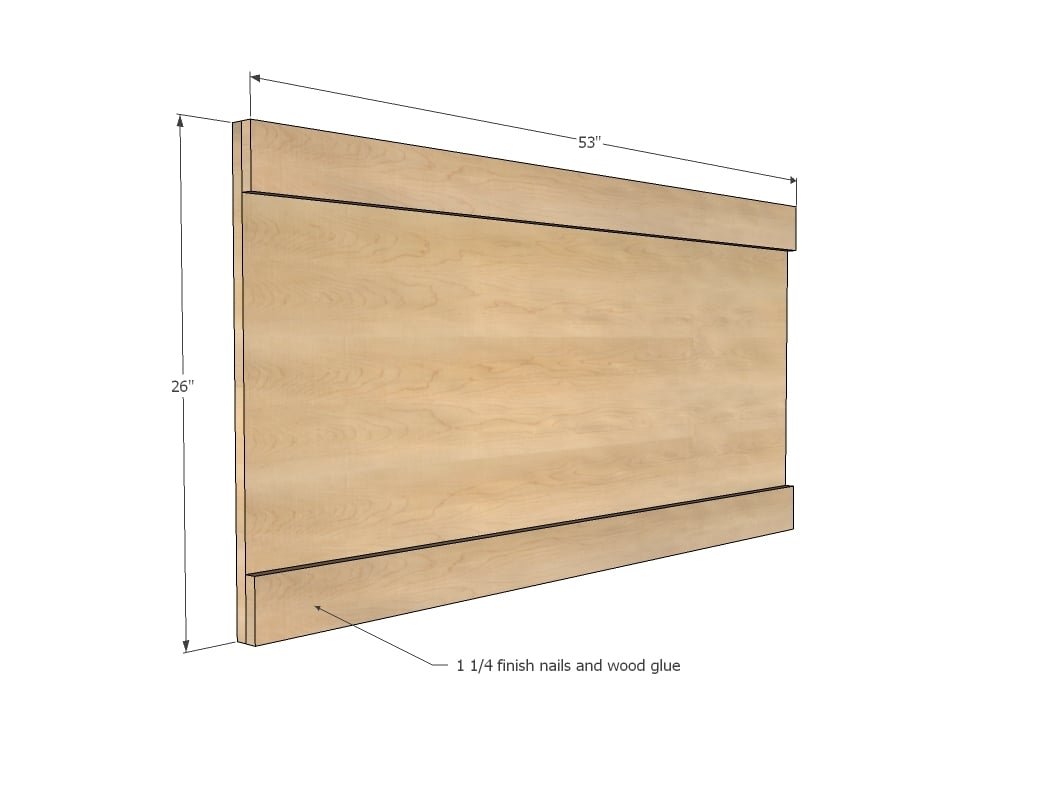
Step 6
This is a relatively easy task if you have a Kreg Jig - simply drill 3/4" pocket holes along sides of panel and attach to legs. Make sure you are leaving 1 1/2" to the back of the panel as shown above (Very important with footboard). If you are using traditional screws, mark the legs where they meet up with the panel at the top and bottom (where the panel is covered in trim. Use a drill bit the size of the screw head to drill a hole 2" deep into the legs. In this hole, use a drill bit the size of the screw head to drill a second hole all the way through the 4x4s. Attach to panel with 4" screws and glue.
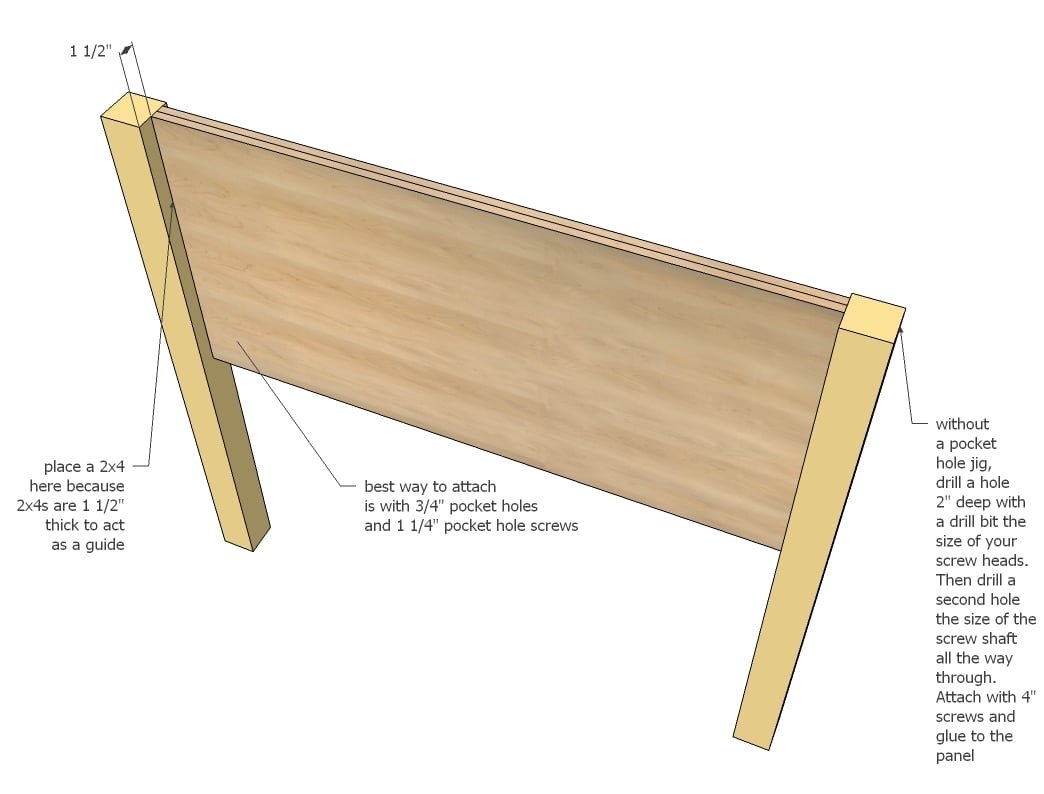
Step 7
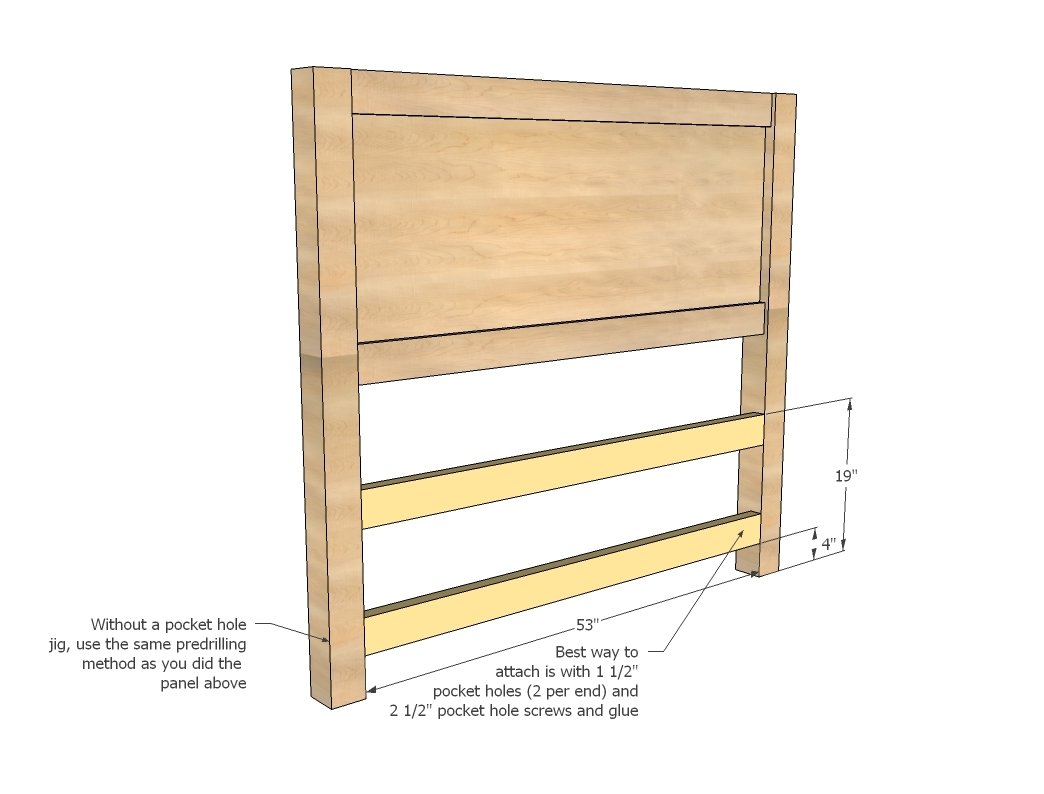
Attach the bottom supports in the same manner as the panel, carefully locating as shown in diagram.
Step 8
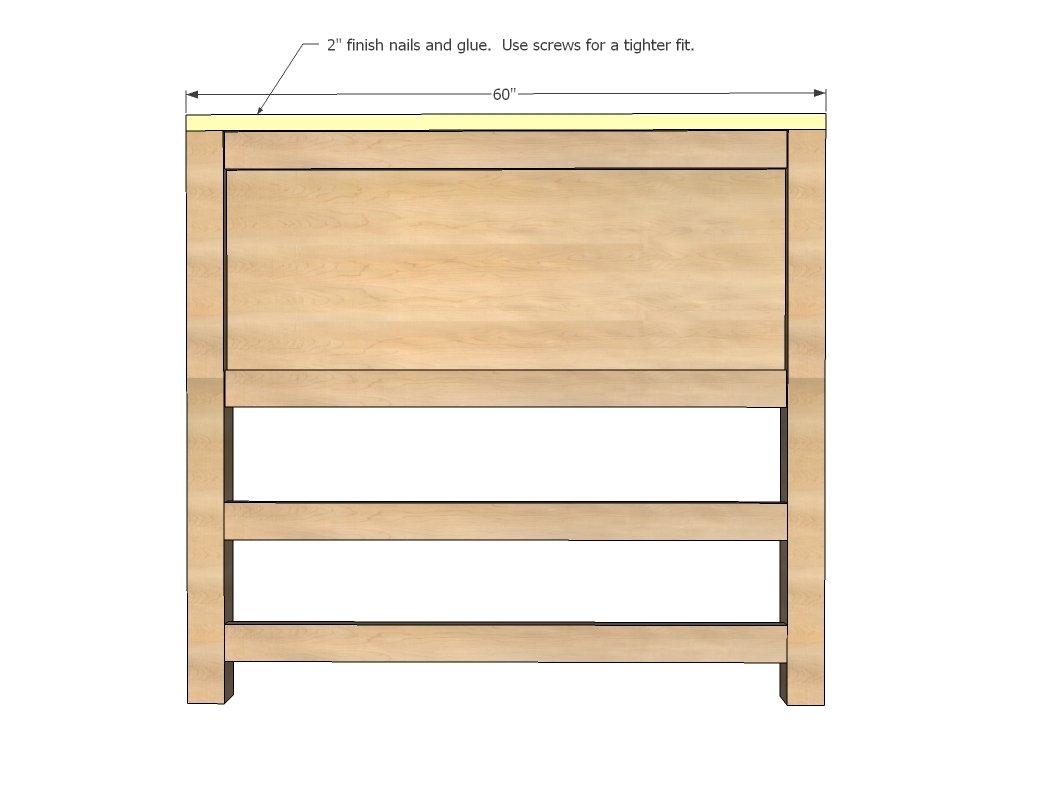
Hooray, an easy step! Attach as shown above.
Step 9
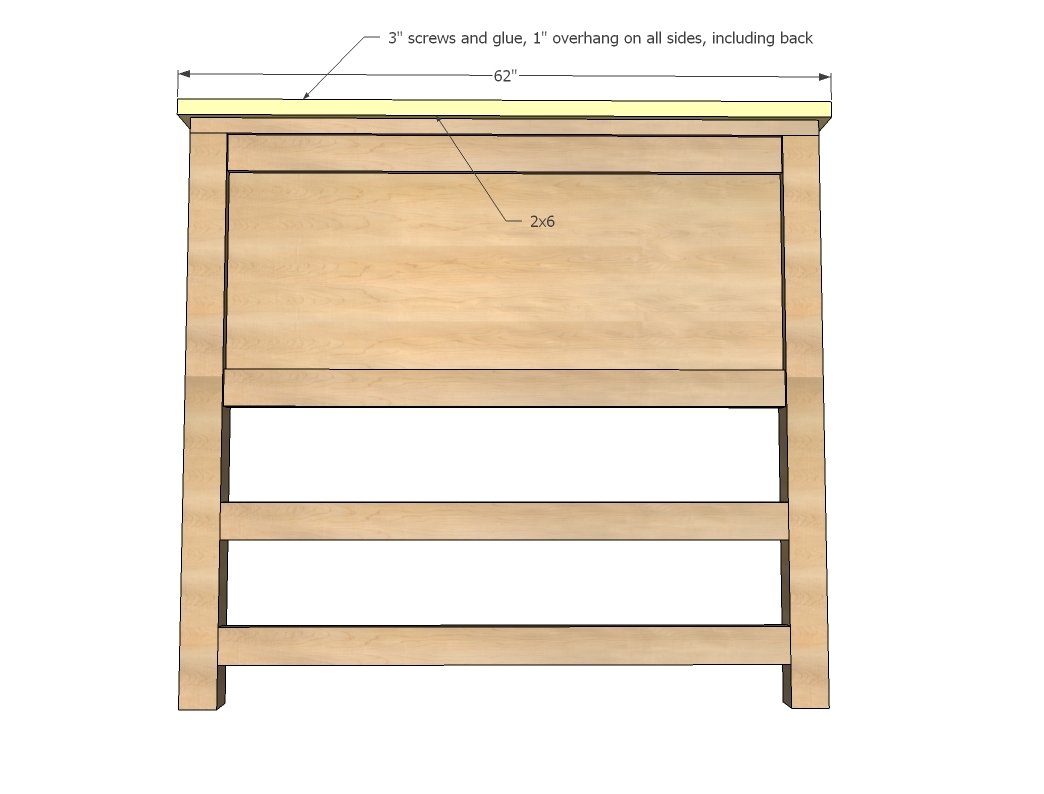
Finally the crown. I'd screw on myself to minimize any gaps.
Step 10
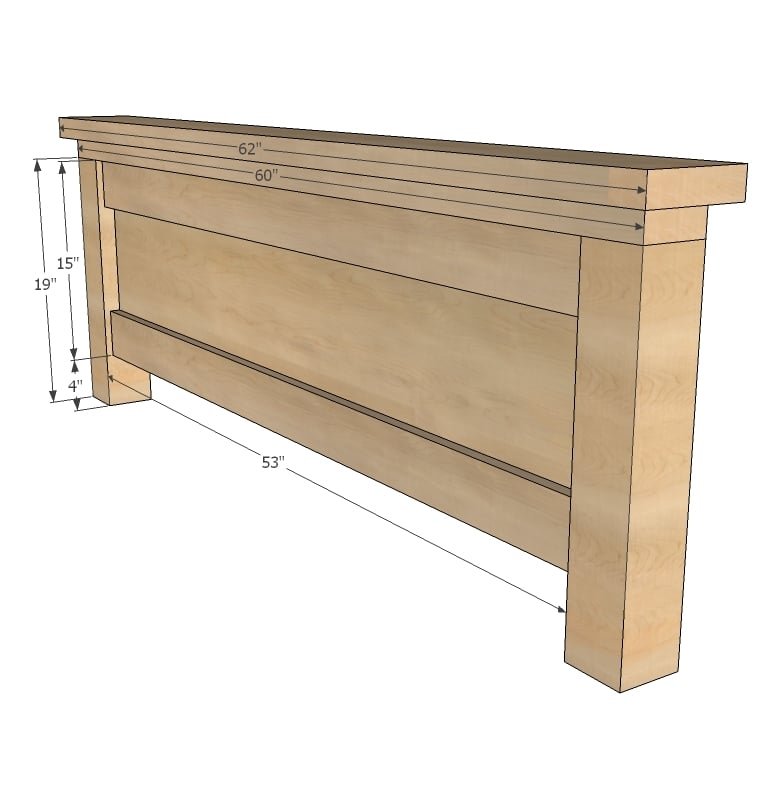
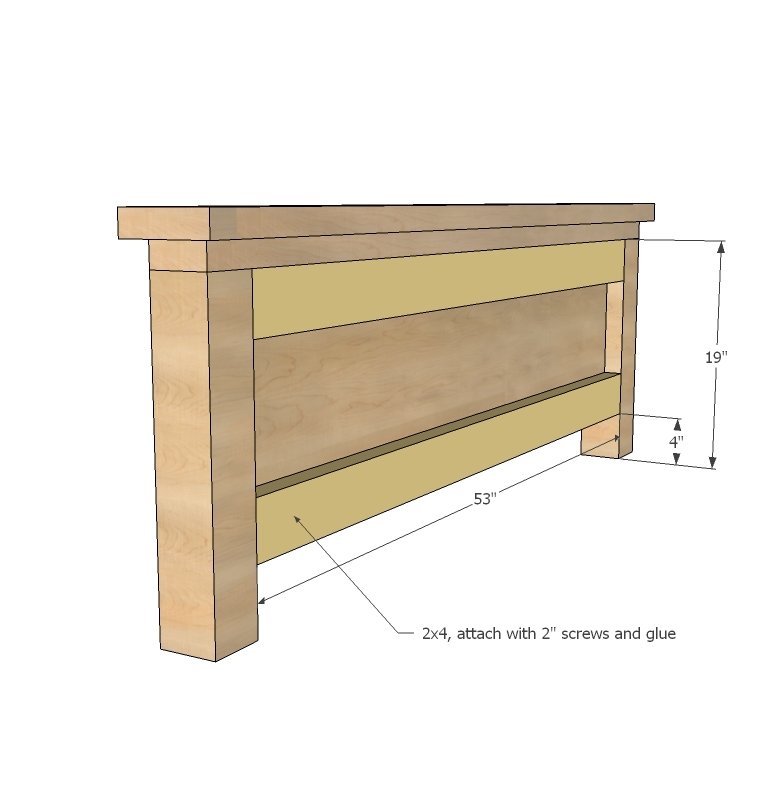
The footboard is built just like the headboard - make sure you leave 1 1/2" to the back of the panel - see next step...
Step 11
This is so your 2x4 spacers fit just right in the backs. Attach with screws and glue.
Step 12
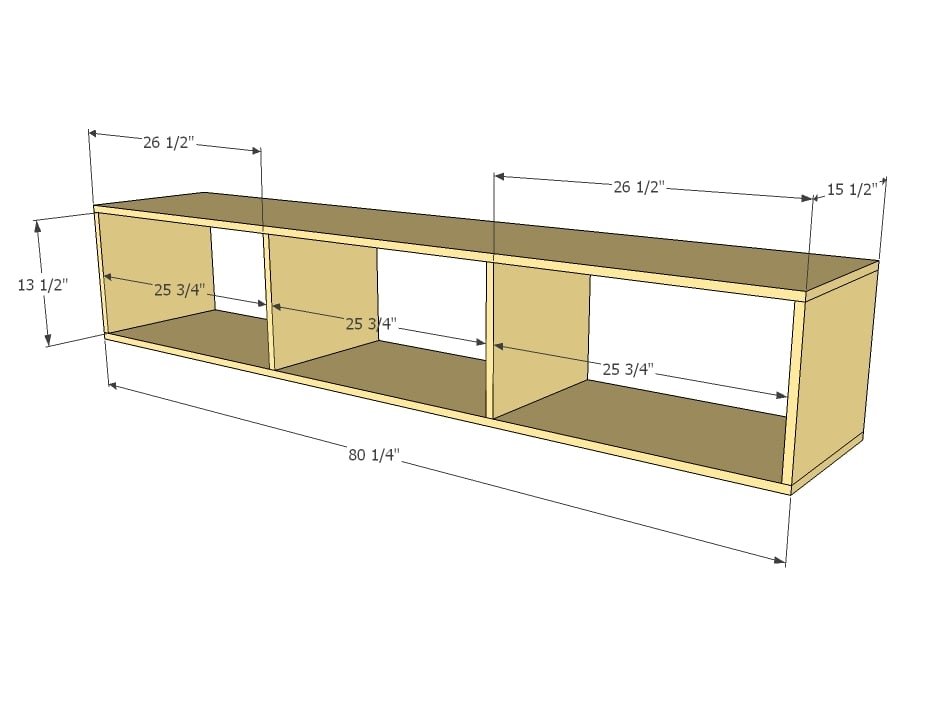
You can build these with either a pocket hole jig or traditional screws. Build square if you are using drawers or your drawers will not slide right.
Step 13
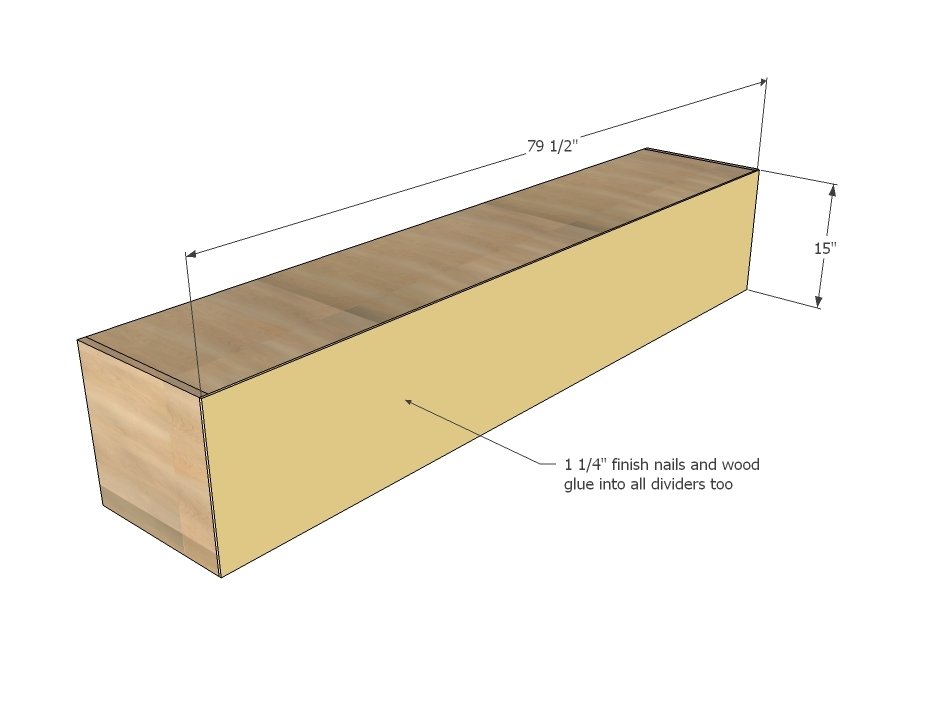
Attach back to the boxes with finish nails and glue. Make sure you nail into all center dividers too. The back will help keep things straight and minimize sagging.
Step 14
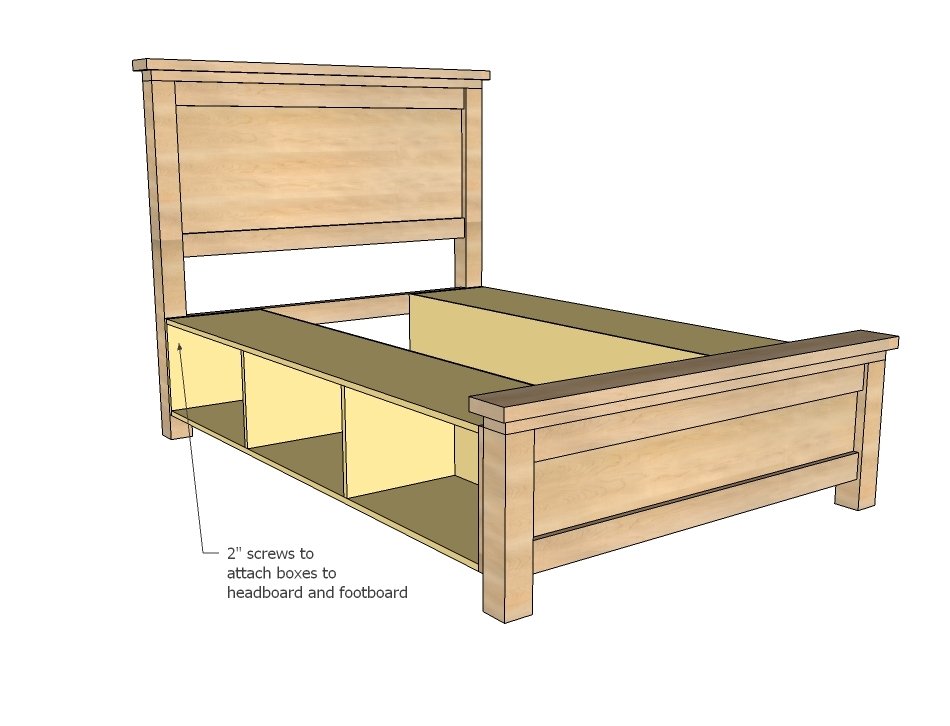
Now this is where things get fun! Take a minute and cut some leftover 4x4s or 2x4s 4" long and use them as blocking to hold the boxes up as you screw to the headboard and footboard. Screw from the inside of the boxes into the legs and supports.
Step 15
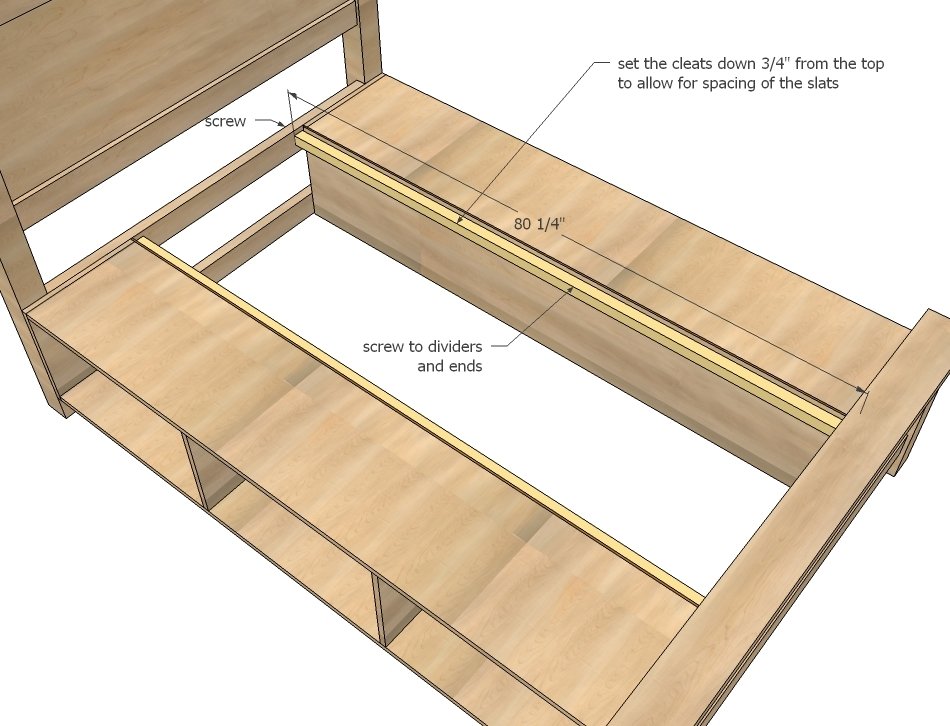
Attach the cleats to the back side of the boxes, leaving 3/4" gap to the top.
Step 16
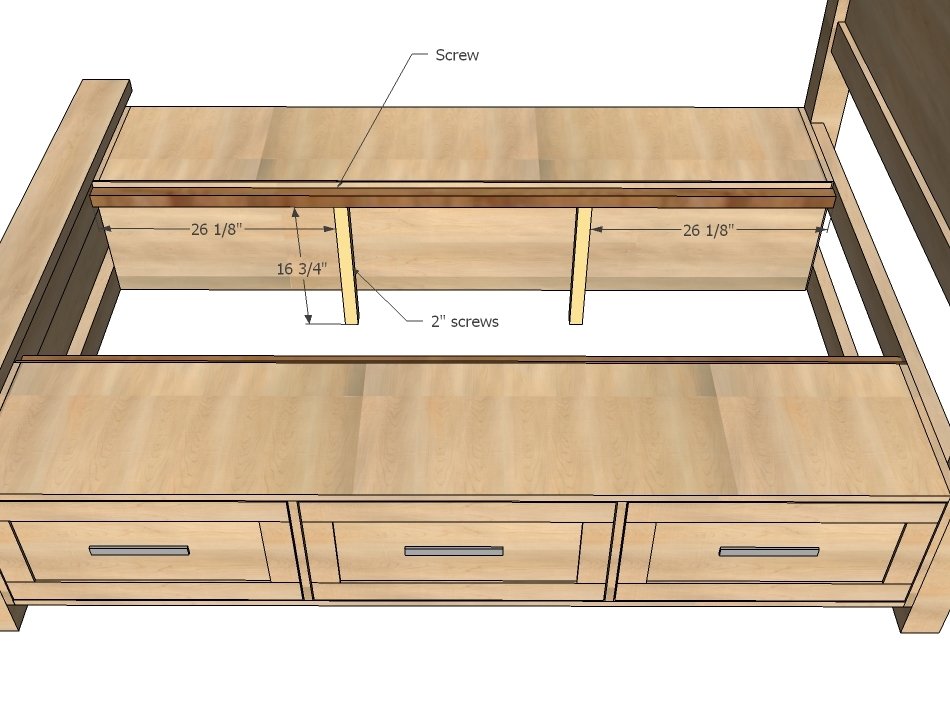
Especially if you move up to a king, you will need to add some support to the center. Some 2x2s "legs" as shown above will never be seen, but add a tremendous amount of support to the bed.
Step 17
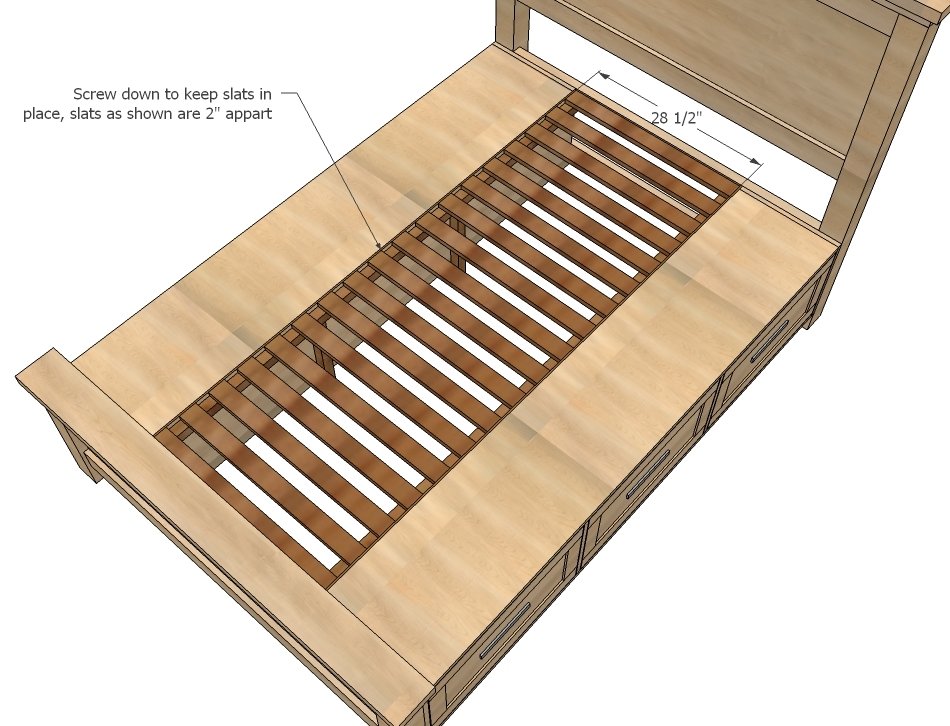
Finally, lay the slats. Per your mattress recommendation, you may need more (or can get away with less) slats.
Step 18
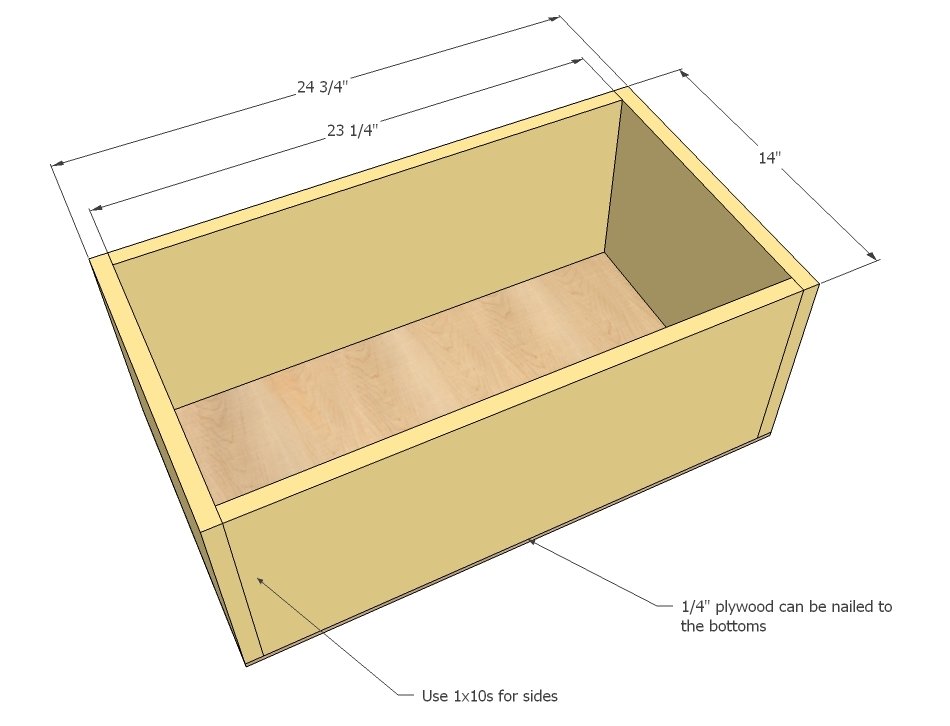
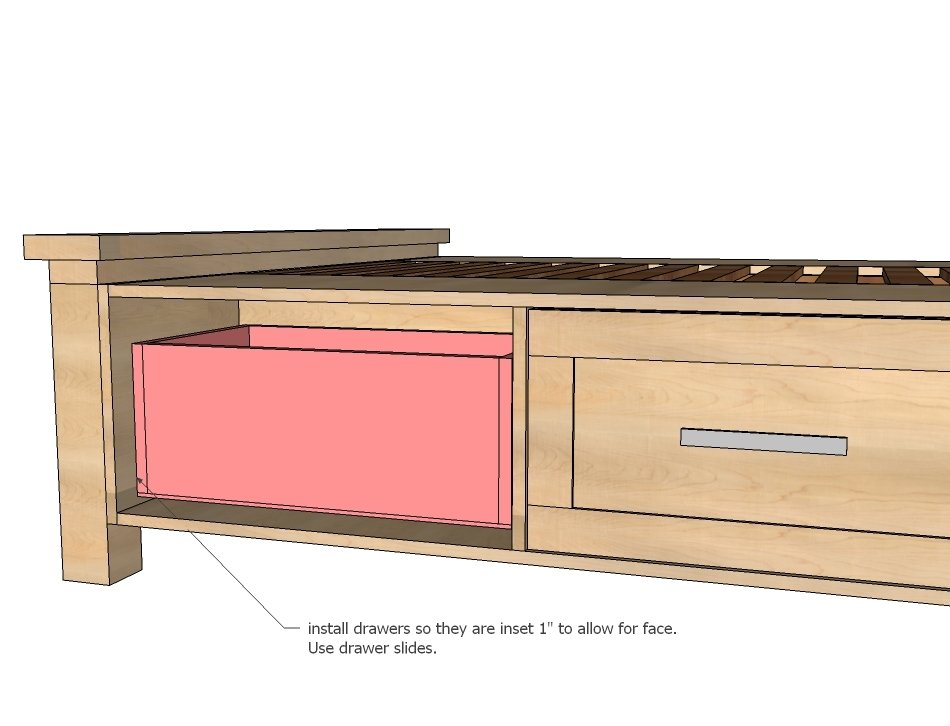
Build six drawers as shown above. Your drawers must be perfectly square to slide properly into the bed. Remember, your drawer should be exactly 1" less than the overall width of the opening, and 1" less deep as well.
Step 19
Install drawers into bed as shown in diagram, using the white euro style drawer slides that cup the bottom corners of the drawers. Make sure drawer sits inset 1" from outside of box to allow for drawer face. Adjust drawer slides until you are satisfied with how the drawer opens/closes.
Step 20
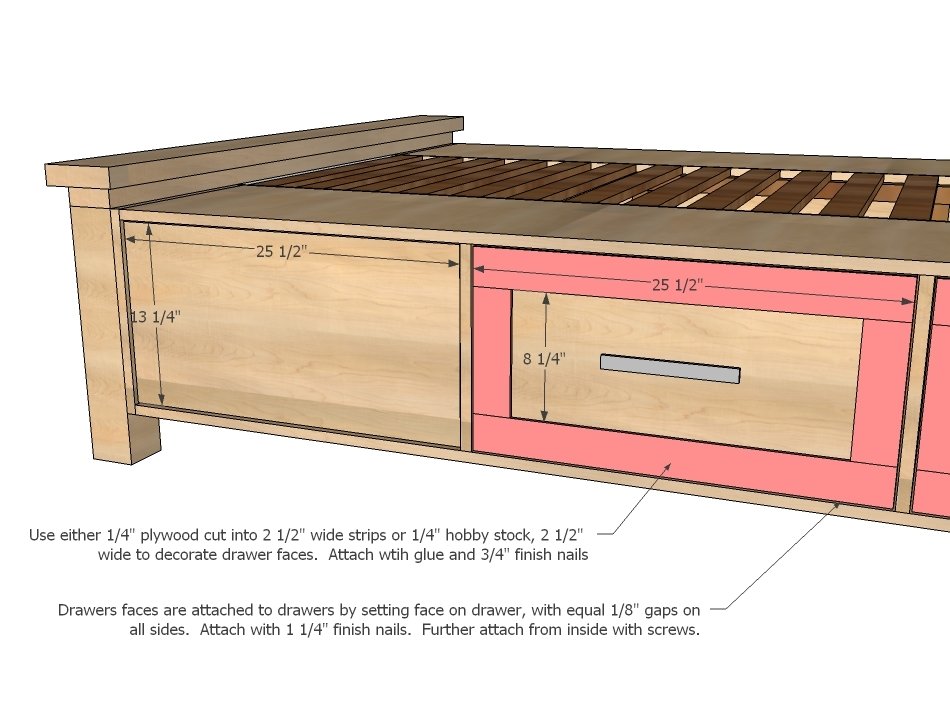
Build the drawer faces by attaching 1/4" hobby stock (or other moulding) to the faces with 3/4" finish nails and glue. Place drawer face on installed drawers, with an 1/8" gap on all sides of drawer face. Attach with 1 1/4" finish nails and wood glue.
Finishing
Sand all surfaces, starting with a medium grit and finishing with fine. Wipe off the dust, fill any holes or gaps with wood filler, and sand smooth once dry. Apply primer if you're painting, then finish with your choice of paint or stain and seal with a durable clear topcoat. For outdoor projects, use exterior-rated primer, paint or stain, and sealer so the piece stands up to the weather.
Source (temporary): https://www.ana-white.com/woodworking-projects/farmhouse-storage-bed-drawers-queen