File Base for the Classic Storage Wall System Desk
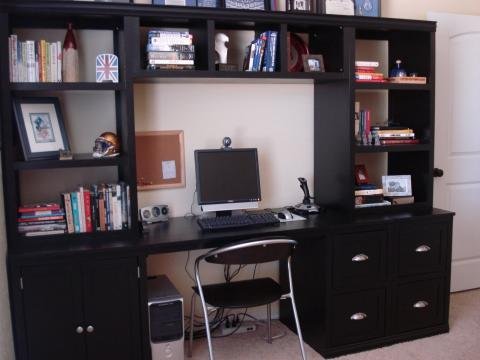
These plans coupled with a few more, and you can create an entire office wall system! This simple plan features two drawers that can be used as a file system, optional base and edge moulding, and a deep countertop space. Drawers use metal drawer guides.
Specifications
| Project type | Desk, Desk Systems and Project Table Plans |
|---|---|
| Room | Storage Solutions |
| Style | Cottage Style Furniture Plans |
| Difficulty | Intermediate |
| Estimated cost | $20 - $50 |
Shopping List
1 – Sheet of 3/4″ A1 Plywood or MDF, made into 1×24 boards
1 – Sheet of 3/8″ Plywood (you won’t need a whole sheet)
1 – Sheet of 1/4″ Plywood (again, you could use a scrap)
1 – 1×2 board, 8′ long
1 – 1×3 board, you will only need 17″
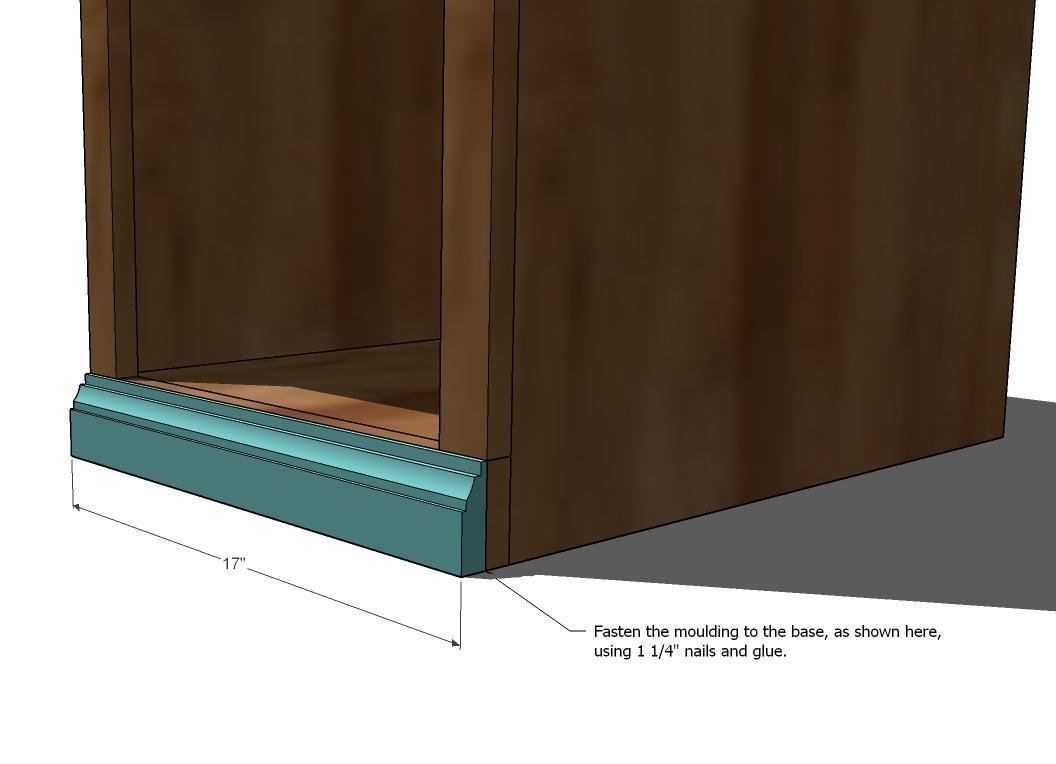
1 – Base moulding, less than 2 1/2″ overall width, 17″ long
1 – 10′ 1×10 board 2 Sets of Undermount Drawer Slides, Less than 23″ Long
5/8″ Brad Nails
1 1/4″ Nails
2″ Nails
Sand Paper
If you cannot find 3/8″ plywood in A1, then you can use the 1/4″ plwood to build your drawer faces. Just cut 2 sets of rails and stiles for your drawers, and apply the rails and stiles to the fronts and backs of the drawer face center.
Cut List
Cut List for the Box
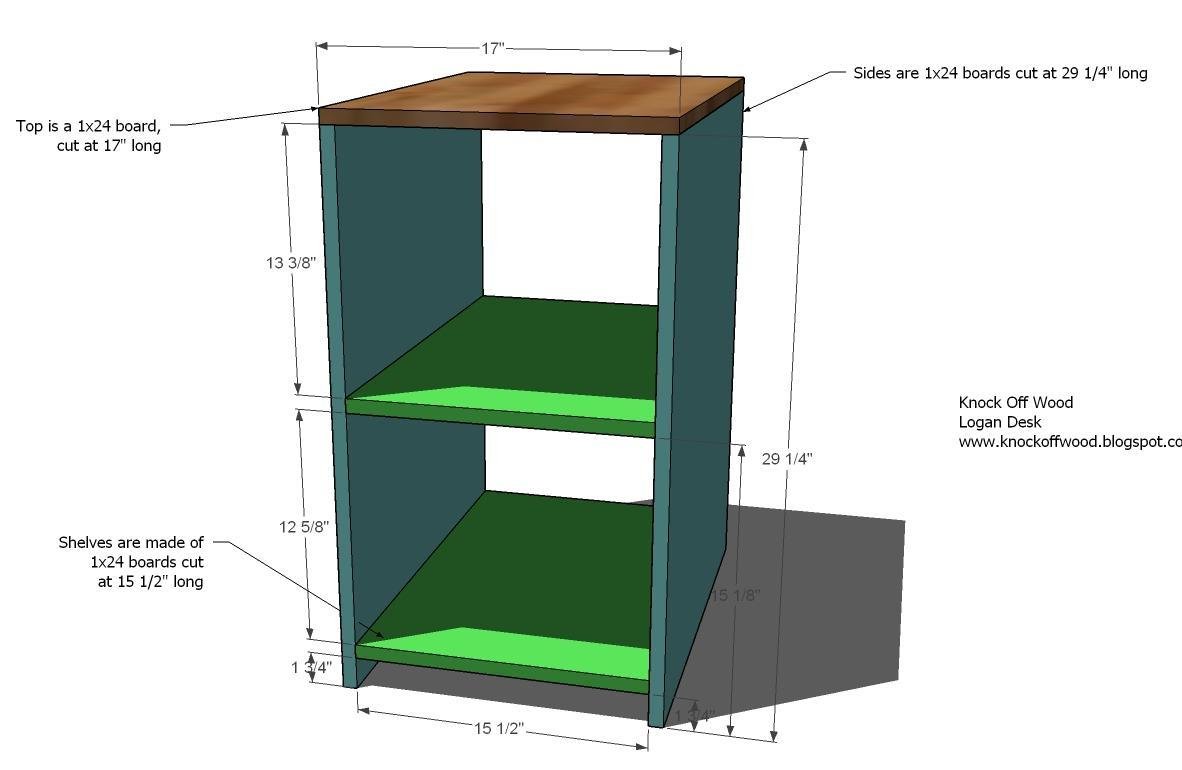
A) 1 – 1×24 @ 17″ (Top)
B) 2 – 1×24 @ 29 1/4″ (Sides)
C) 2 – 1×24 @ 15 1/2″ (Shelves)
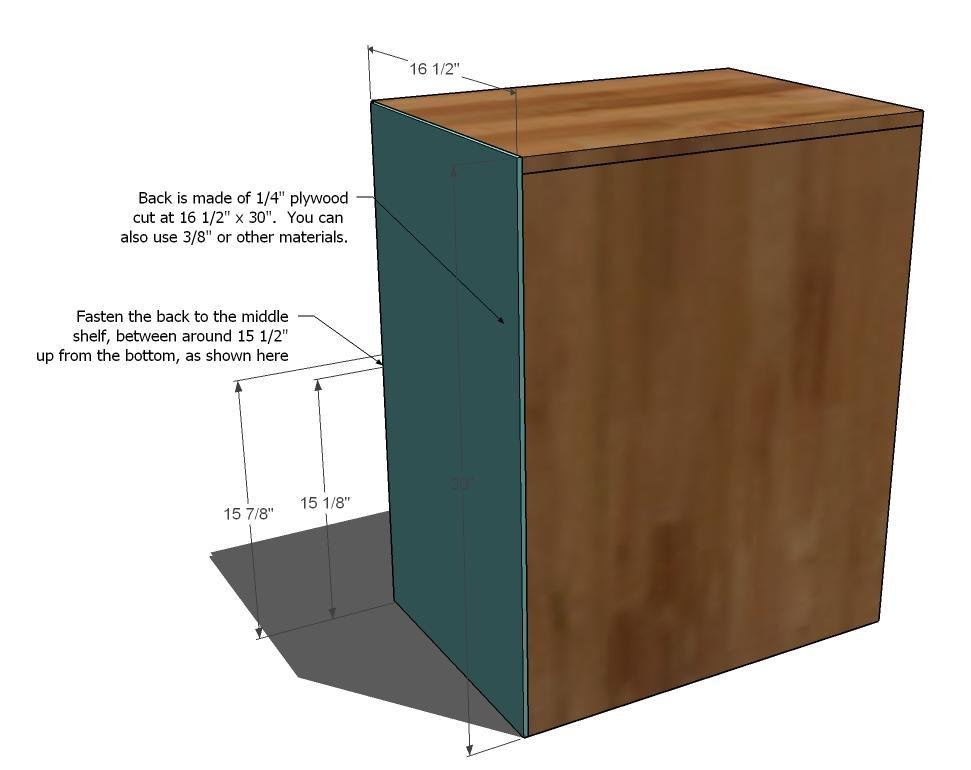
D) 1 – 1/4″ Plywood @ 16 1/2″ x 30″ (Back) Cut List for the Trim
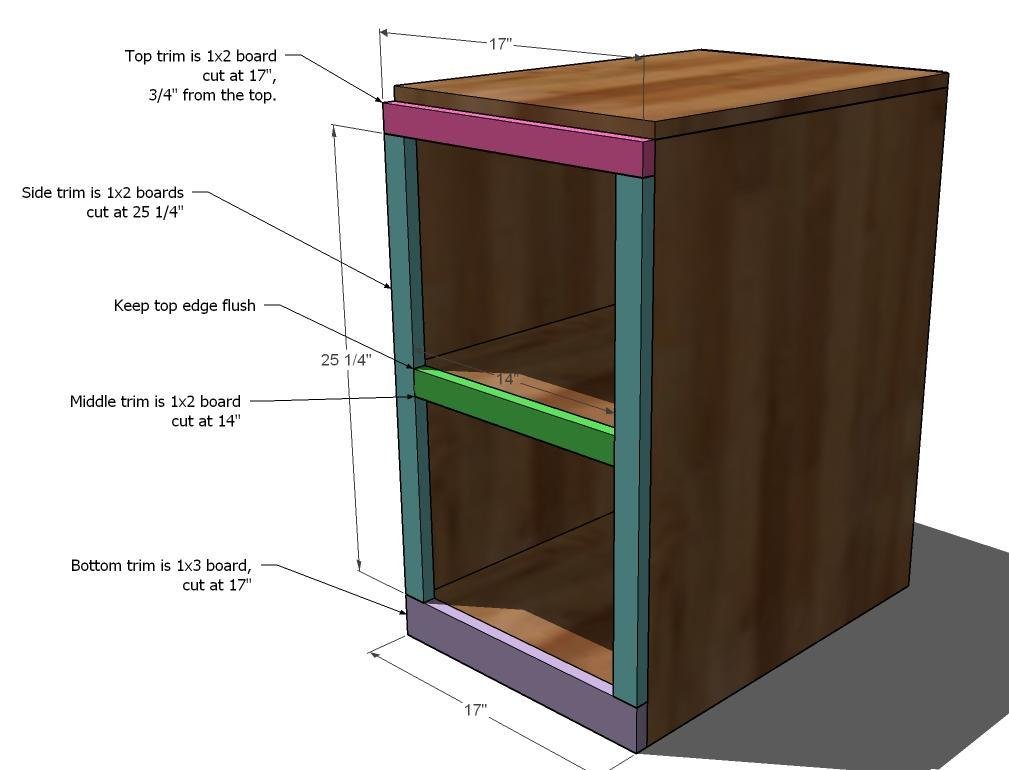
E) 1 – 1×3 @ 17″ (Bottom)
F) 2 – 1×2 @ 25 1/4″ (Side Trim)
G) 2 – 1×2 @ 17″ (Top Trim Pieces)
H) 1 – 1×2 @ 15 1/2″ (Shelf Trim)
I) 1 – 2 1/2″ Base Moulding @ 17″ (Decorative Base Moulding) Cut List for the Drawers
J) 2 – 1×24 @ 12 1/4″ (Bottom of Drawers, you will need to cut 3/4″ off one side to get a bottom measuring 12 1/4″ x 22 3/4″)
K) 2 – 1×10 @ 12 1/4″ (Backs of Drawers)
L) 4 – 1×10 @ 23 1/2″ (Sides of Drawers) Cut List for Drawer Faces
M) 2 – 3/8″ Plywood @ 13 3/4″ x 11 5/8″ (Backs of Drawer Faces)
N) 4 – 3/8″ Plywood cut into 1 1/2″ strips, 11 5/8″ long (Rails)
O) 4 – 3/8″ Plywood cut into 1 1/2″ strips, 10 3/4″ long (Stiles)
Tools
- measuring tape
- square
- pencil
- safety glasses
- hearing protection
- kreg-jig
- drill
- circular saw
- nailer
- sander
Step-by-step Instructions
Step 1
Build the Box. Start by fastening with glue and 2″ fastenerns the shelves to the sides. Then add the top. Check for square and use the measurements above to guide you.
Step 2
Plywood the Back. Add the plywood to the back. Just a note, most furniture stores use cardboard, yes, cardboard for the back of their furniture.
Step 3
Face Frame. Start at the bottom and fasten the bottom, the 1×3, first. Then the sides, then the top, and then the shelf trim. Leave 3/4″ space at the top of the top trim.
Step 4
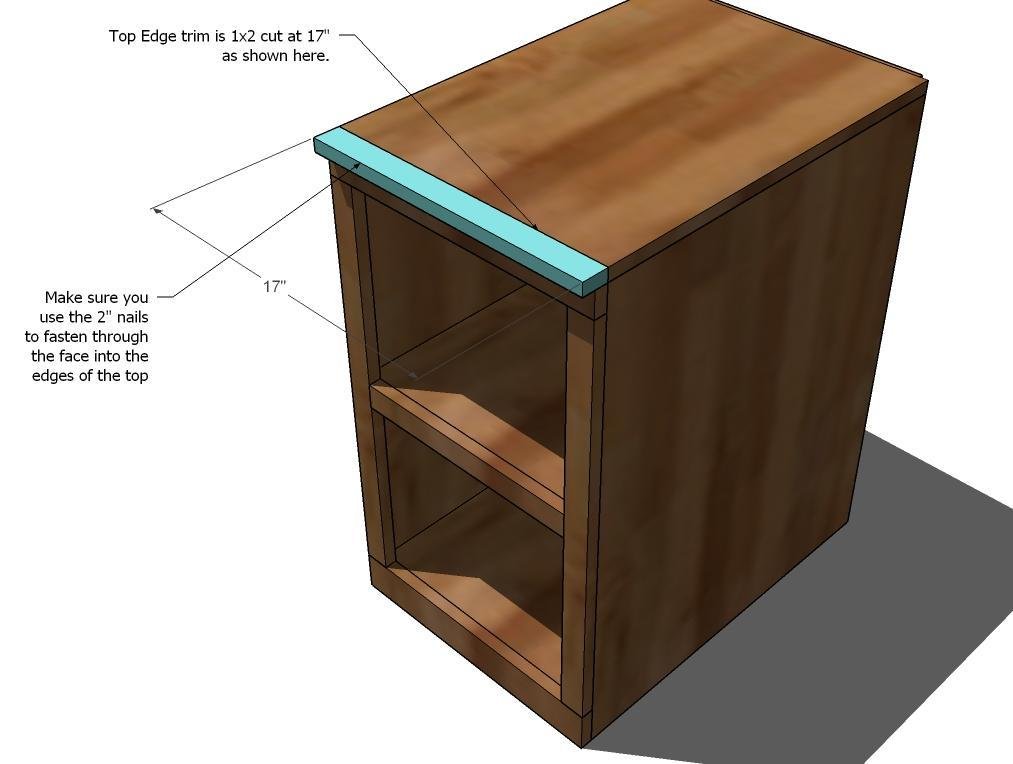
Top Trim. Finish the top trim, as shown above. Make sure you nail through the face of the top trim into the top of the cabinet, as well as into the top trim piece from the previous step.
Step 5
Step 6
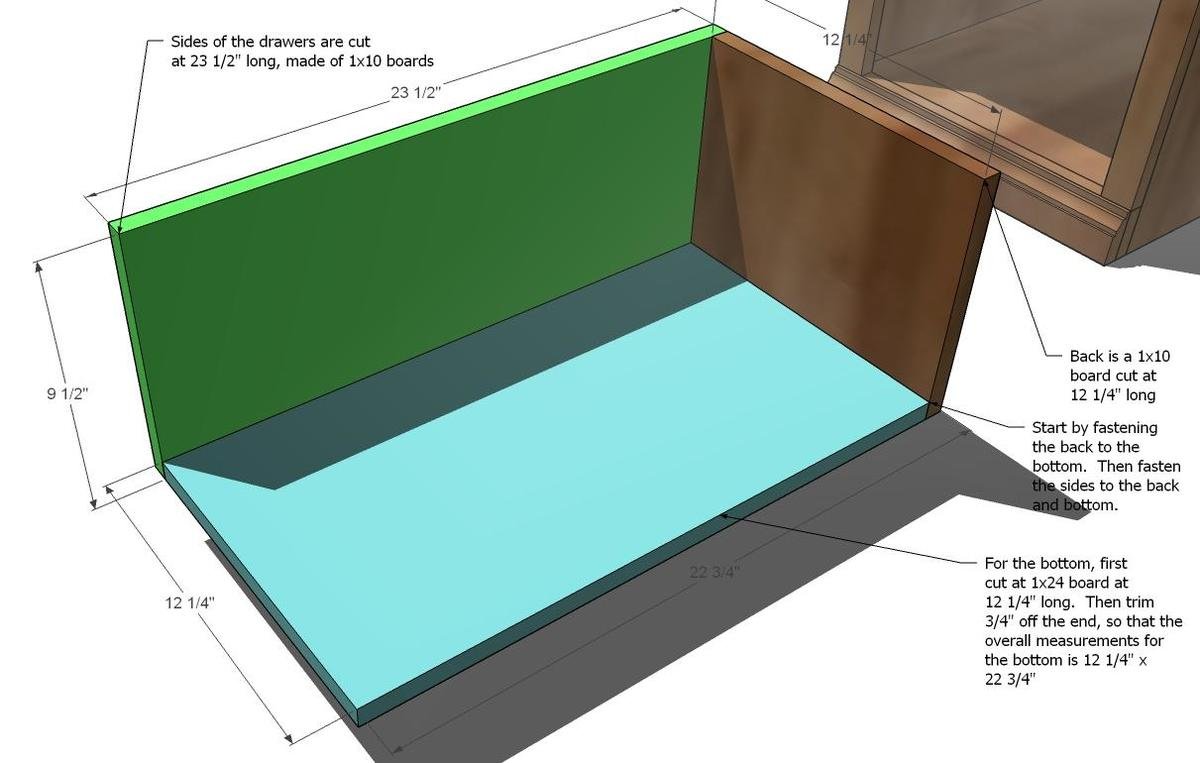
Drawers. Build the drawers by first creating the bottom. Cut the bottom from a 1×24, cut at 12 1/4″ long. Then cut 3/4″ off the 12 1/4″ end, creating a bottom measuring 12 1/4″ x 22 3/4″. Then fasten the back to the bottom. Then the sides. Check for square. Use the undermount drawer slides to attach the faceless drawer into the drawer opening. The drawer will sit flush with the back of the cabinet.
Step 7
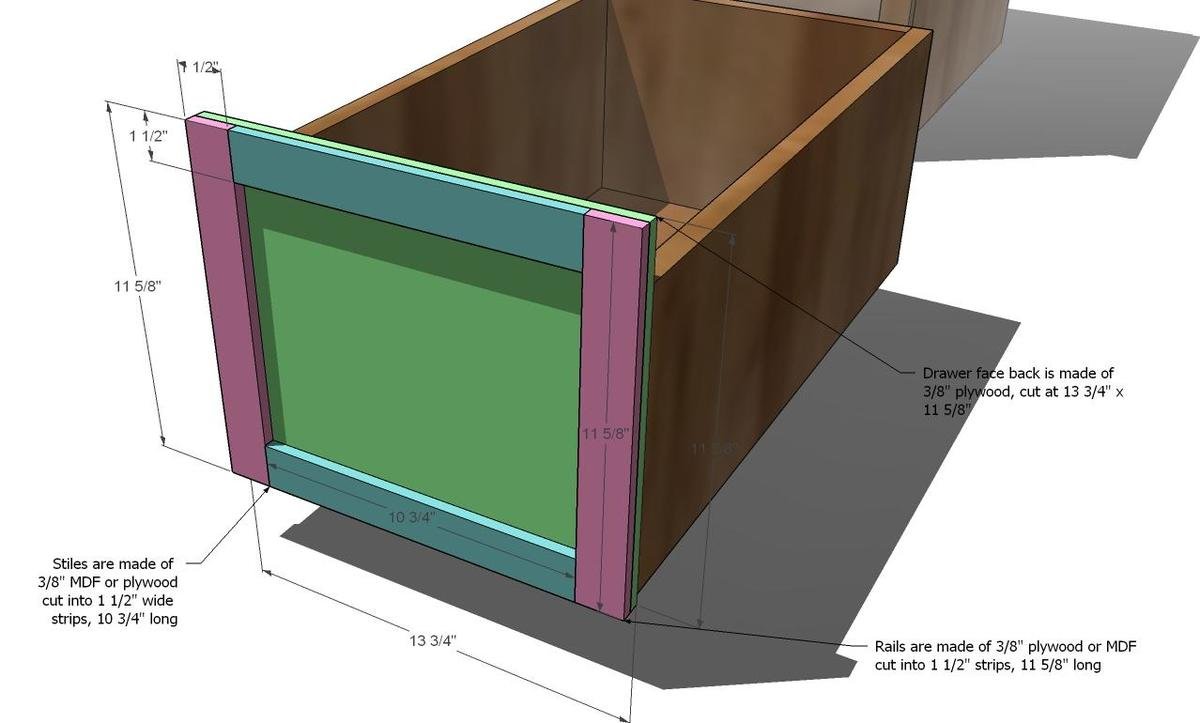
Drawer Face. Build your drawer face by fastening the rails and stiles to the back piece using glue and clamps. You may also wish to use brad nails 5/8″ long, or screws. If you cannot find stock in the correct species 3/8″ thick, you can use 1/4″ thick, but you will need to add rails and stiles to the fronts and backs of your center plywood to obtain the total 3/4″ thickness. With the drawer inserted into the cabinet, arrange the face on the drawer so that there is an even gap around all sides of the drawer face. Then fasten the face the sides and bottom of the drawer.
Finishing
Sand all surfaces, starting with a medium grit and finishing with fine. Wipe off the dust, fill any holes or gaps with wood filler, and sand smooth once dry. Apply primer if you're painting, then finish with your choice of paint or stain and seal with a durable clear topcoat. For outdoor projects, use exterior-rated primer, paint or stain, and sealer so the piece stands up to the weather.
Source (temporary): https://www.ana-white.com/woodworking-projects/file-base-classic-storage-wall-system-desk