Fire Station Loft Bed
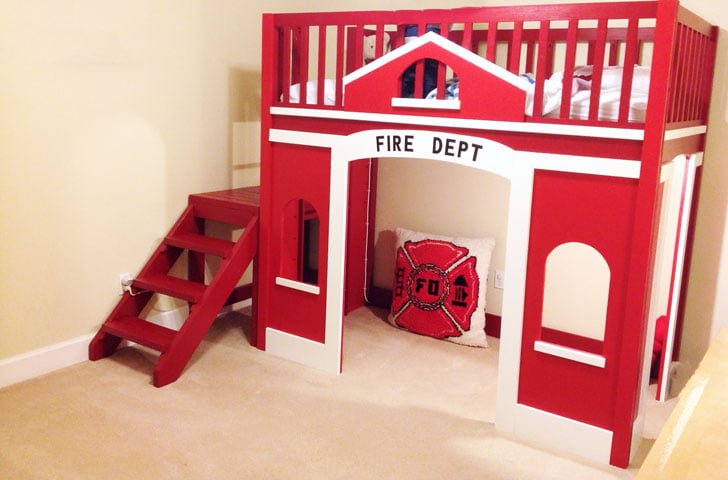
DIY a Fire Station loft bed. This bed features solid wood construction, clever use of materials, and easy panel design for moving and storing. The ladder can be placed on either side, an open back and wide entryway. Create extra room in your child's room on the tightest of budgets by making your own Fire Dept Loft Bed! include…
Specifications
| Project type | Toys |
|---|---|
| Room | Bedroom |
| Style | Children's and Kid's Room Furniture and Toy Plans |
| Difficulty | Intermediate |
| Estimated cost | $150 - $200 |
Dimensions
Use the size-specific shopping and cut lists below.
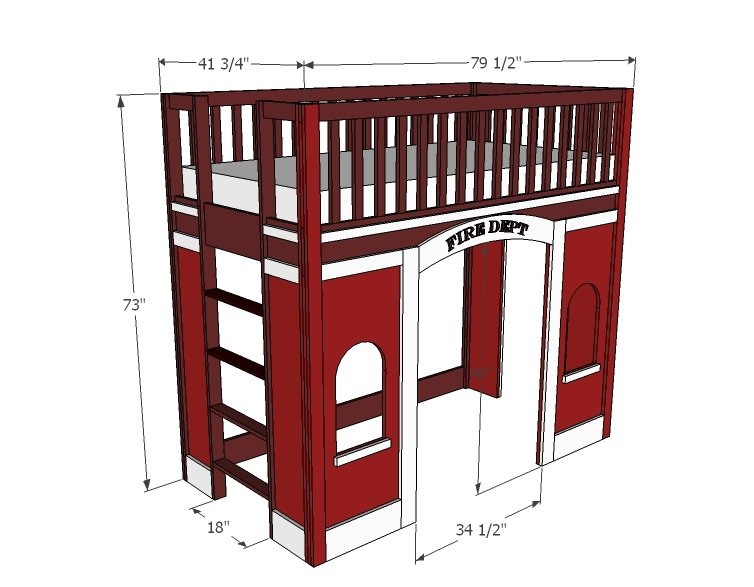
Shopping List
- 14 - 1x3 Boards @ 8 feet long
- 3 - 1x8 @ 8 feet long
- 10 - 1x2 @ 8 feet long
- 2 - 1x6 @ 8 feet long
- 1 - 1x4 @ 10 feet long
- 1 - sheet 3/4" plywood, 8'x4'
- slats not accounted for in cut list
- 2 1/4" or 2 3/8" screws (about 50) for assembly
Cut List
- 2 - 1x3 @ 79 1/2"
- 2 - 1x8 @ 79 1/2"
- 44 - 1x2 @ 15 1/4" (Railing)
- 4 - 1x3 @ 15 1/4" (Railing)
- 10 - 1X3 @ 73" (Legs)
- 1 - 1x6 @ 79 1/2"
- 2 - 1x3 @ 42 1/2"
- 1 - 1x3 @ 38"
- 1 - 1x8 @ 38"
- 2 - 1x3 @ 9 1/4"
- 2 - 1x8 @ 9 1/4"
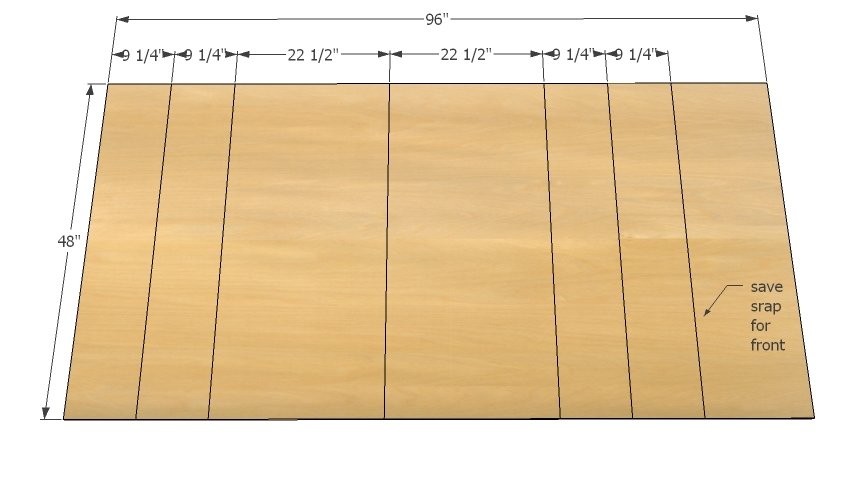
- 4 - 3/4" Plywood @ 48" x 9 1/4"
- 2 - 3/4" Plywood @ 48" x 22 1/2"
- 2 - 2x4 @ 74 1/2"
- Slats cut at 39 1/2"
TRIM (Full Side)
- 2 - 1x6 @ 6 3/4"
- 2 - 1x3 @ 6 3/4"
- 2 - 1x3 @ 49"
- 1 - 1x2 @ 38"
TRIM (Ladder Side)
- 2 - 1x6 @ 9 1/4"
- 2 - 1x3 @ 9 1/4"
- 2 - 1x2 @ 9 1/4"
- 1 - 1x8 @ 18"
- 4 - 1x3 @ 18"
TRIM (Front)
- 1 - 1x2 @ 74 1/2"
- 2 - 1x3 @ 16 1/2"
- 2 - 1x6 @ 16 1/2"
- 2 - 1x4 @ 49 1/2"
- 2 - 1x2 @ 11 1/2"
- 1 - 1x8 @ 34 1/2" - cut arch shape out
Tools
- measuring tape
- square
- pencil
- safety glasses
- hearing protection
- kreg-jig
- drill
- circular saw
- jigsaw
- nailer
- sander
- countersink drill bit
Step-by-step Instructions
Step 1
This bed is shown built with PureBond Formaldehyde Free Plywood in Birch. You will need one sheet of plywood, cut carefully as shown above. Make sure you consider the saw blade width as you cut. Cut, measure, cut, measure and so on. Save the scrap piece to use as a decorative front.
Step 2
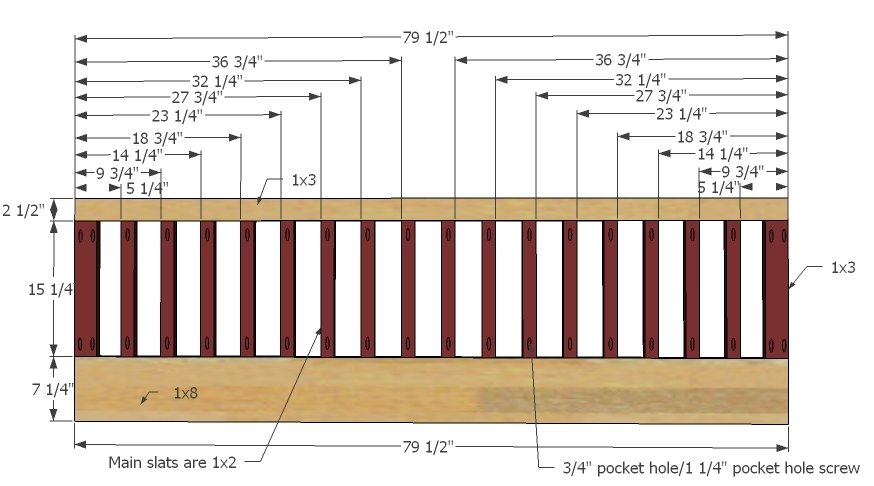
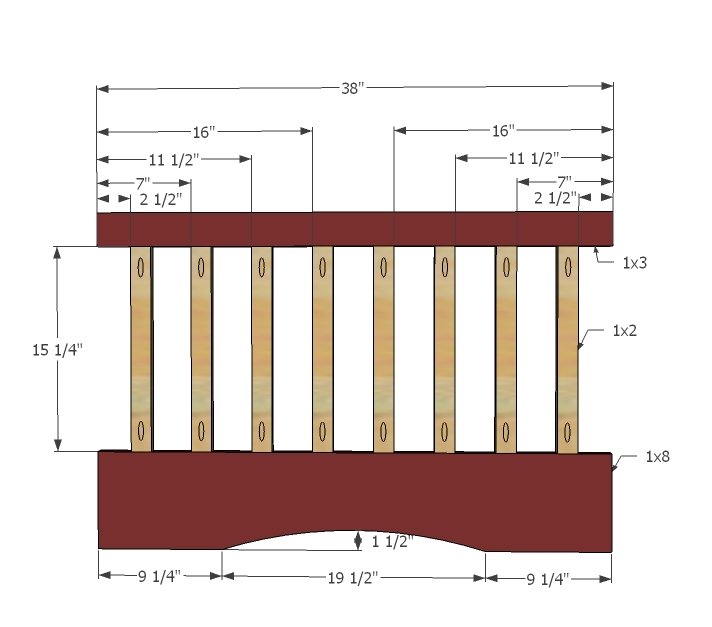
You will need to build two of these. Mark the tops and bottoms as shown in diagram. Drill Kreg Jig pocket holes on each end of each slat, as shown in diagram. Attach with pocket holes and glue.
Step 3
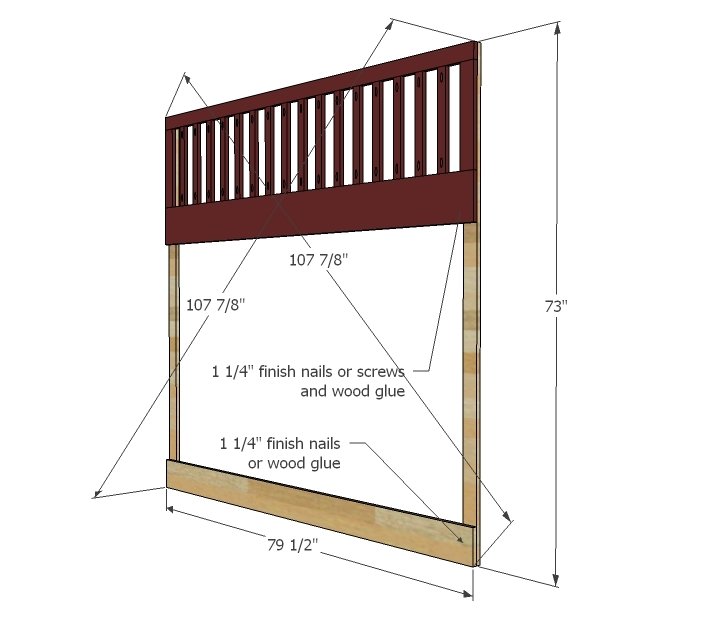
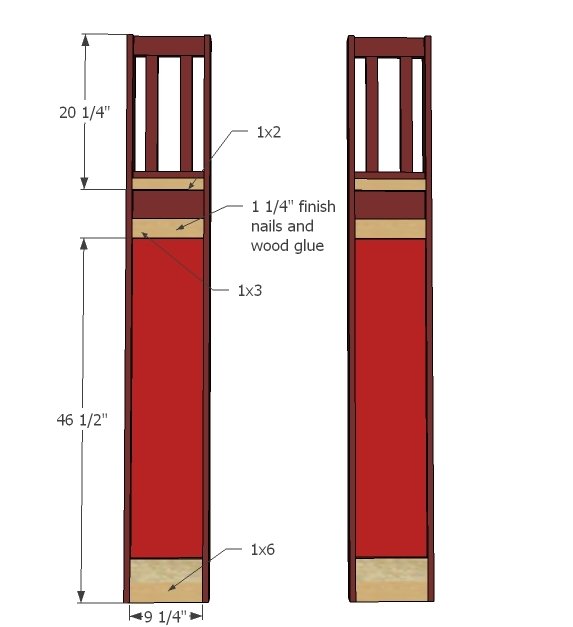
Take one of the completed railings and attach it to 1x3 legs with 1 1/4" finish nails and wood glue. Then attach the bottom 1x6 to the bottom as shown in diagram. Take a diagonal to make sure the back is square and adjust if necessary - this is very important to ensuring your bed is square.
Step 4
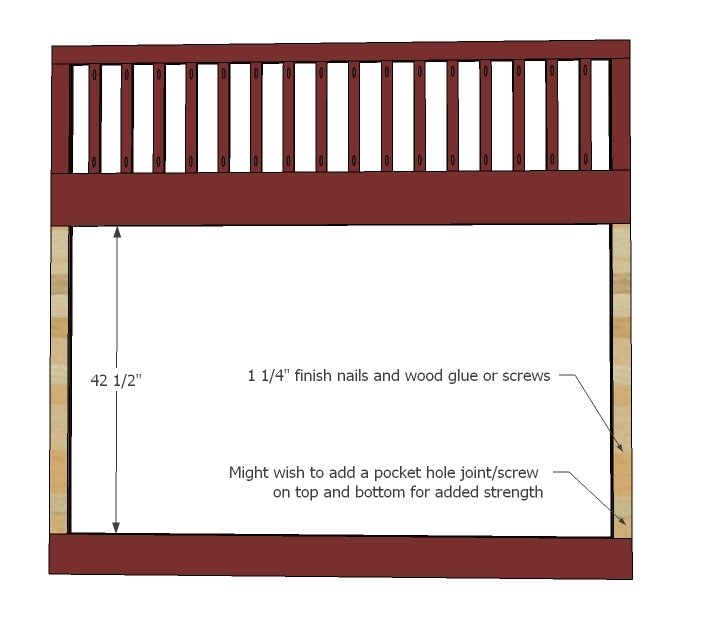
Now simply fill in the empty spaces with 1x3s and 1 1/4" finish nails. Keep the outside edge flush to make the legs look like solid blocks. This completes the back, set aside.
Step 5
Step 6
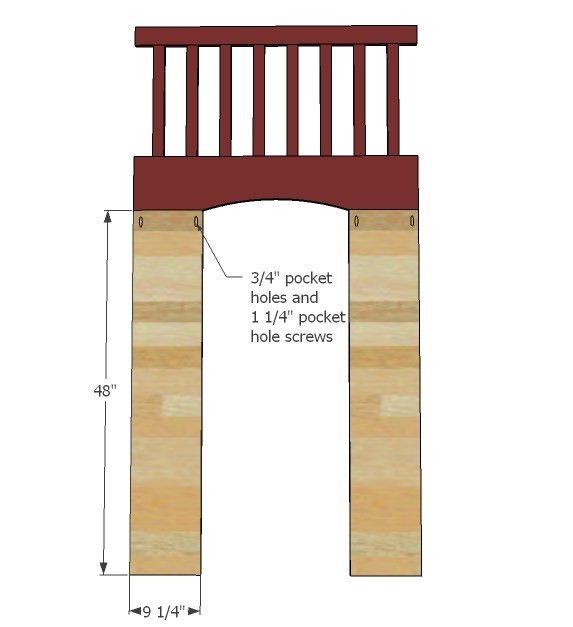
Attach smaller pieces of plywood to bottoms of the 1x8 as shown in diagram.
Step 7
With pocket holes facing up, lay the panel down on top of 1x boards, to raise 3/4" above your work surface. Attach sides with either 3/4" pocket holes and 1 1/4" pocket hole screws or 2" screws or finish nails from outsides and glue.
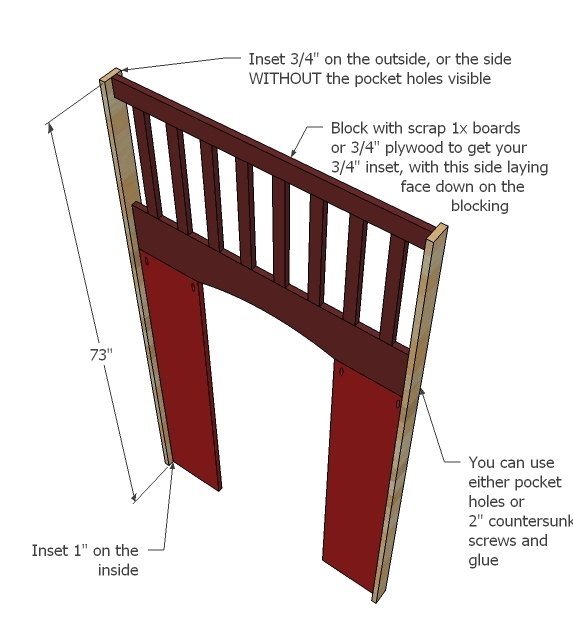
Step 8
Add trim as shown in diagram, using 1 1/4" finish nails and wood glue. This completes the full side, set aside.
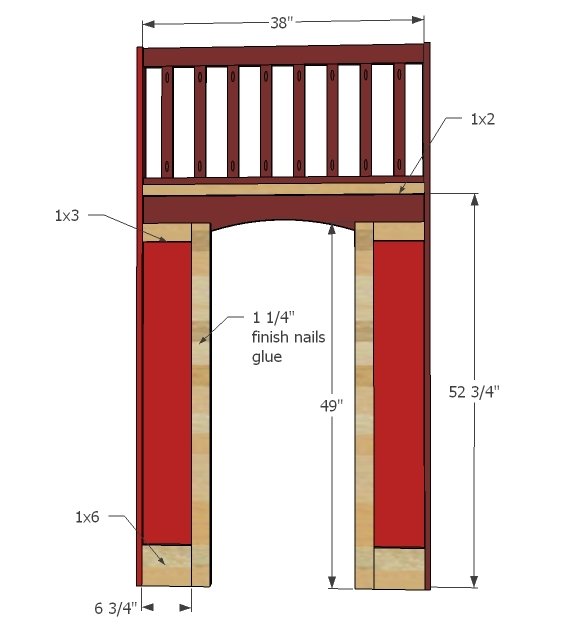
Step 9
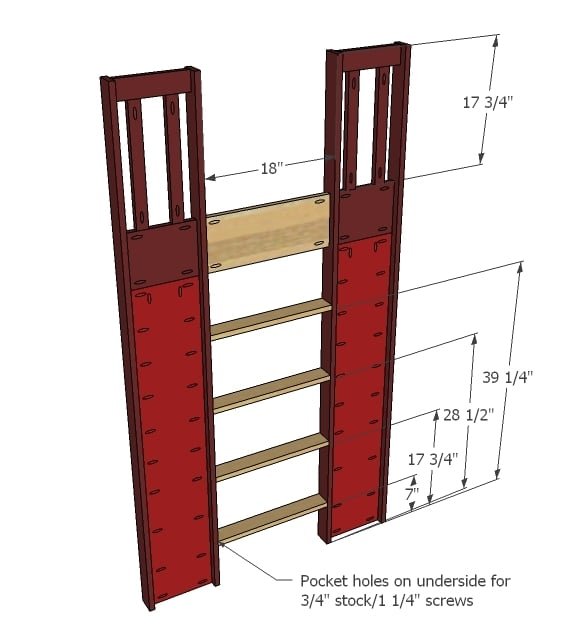
On the ladder side, construct two panels as shown above.
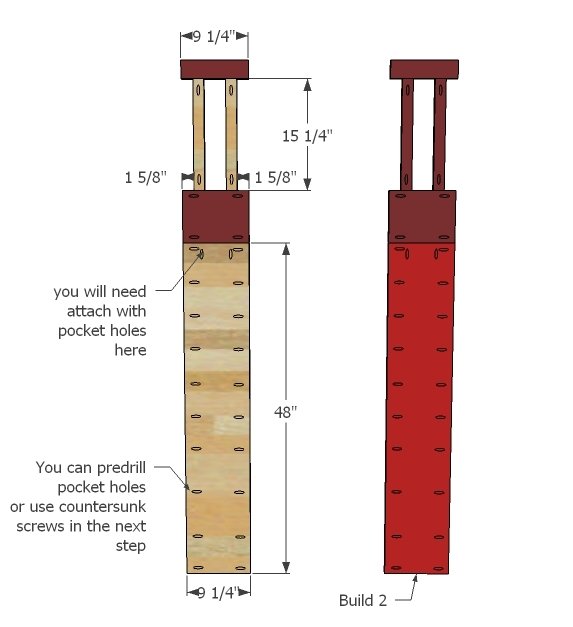
Step 10
With pocket holes facing upward, elevate 3/4" using 1x boards and attach sides with either pocket holes or 2" fasteners and glue.
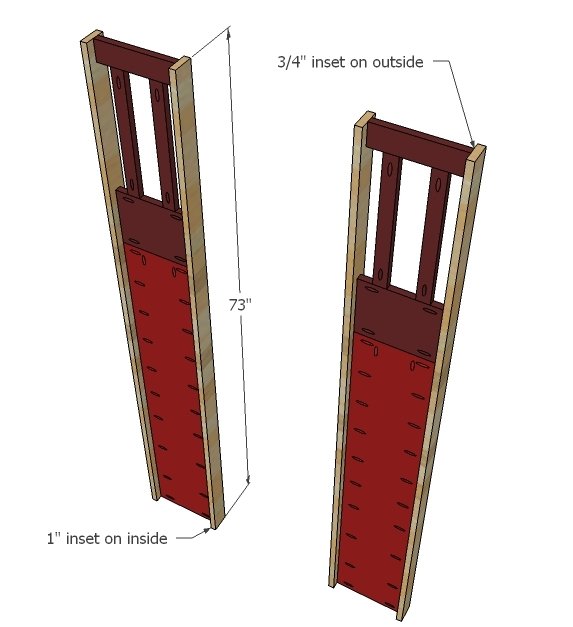
Step 11
Followed by trim.
Step 12
And then add the ladder pieces to create the ladder. This completes the ladder side panel, set aside.
Step 13
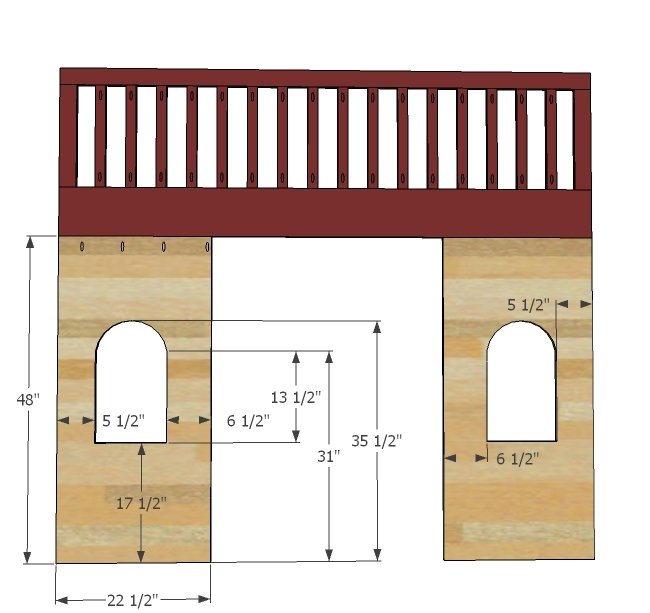
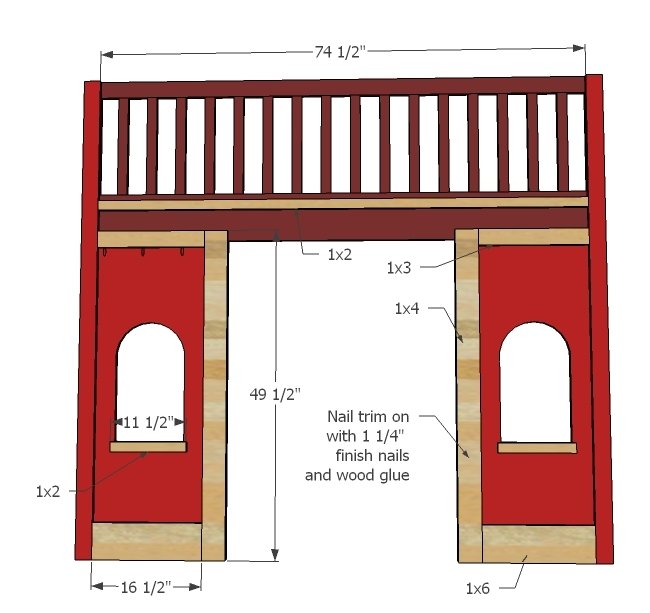
For the front, use the remaining top railing and attach to the large pieces of plywood. You may wish to cut the windows out prior. Use 1 1/4" pocket holes through 3/4" pocket holes to attach. Note that the windows are not exactly centered on the panels, with the smaller margin to the outsides.
Step 14
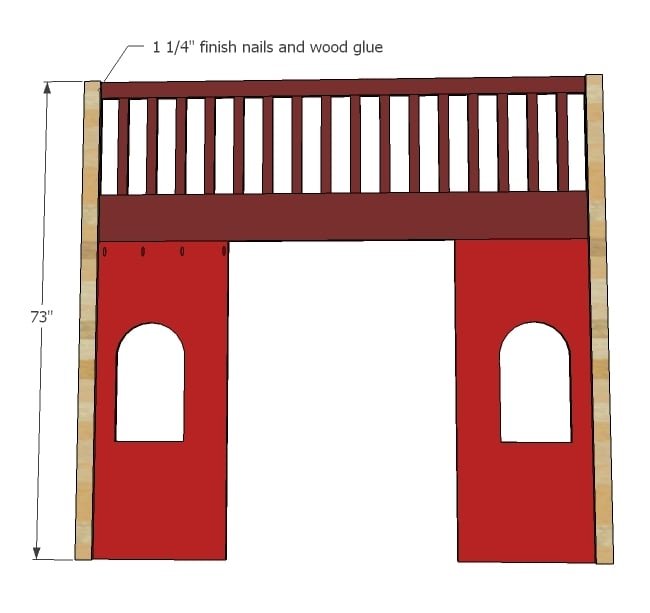
Lay remaining 1x3 legs on top with outside edges flush and glue and nail down with 1 1/4" finish nails.
Step 15
Fun step time for trim!
Step 16
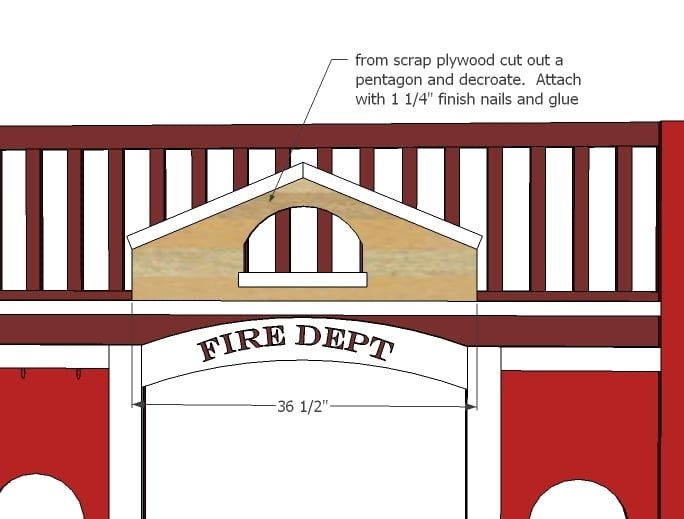
With your scrap piece of plywood cut out a decorative gable end, with window, and trim with 1x2s. Attach above doorway to railing with 1 1/4" finish nails and glue. This completes the front panel, it's time to assemble!
Step 17
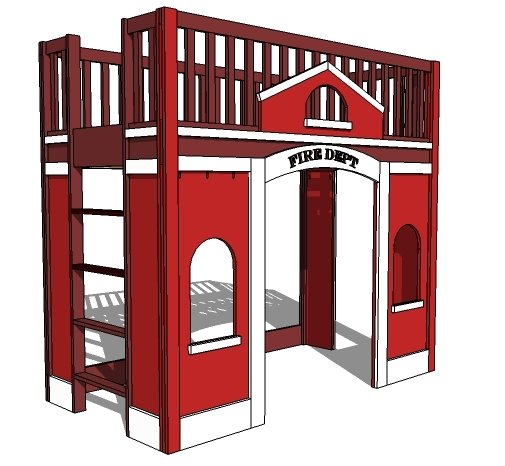
From the insides of the bed, use 2 1/4" screws to attach panels to each other, keeping outside edges flush to create the illusion of a solid leg. Screws should be every 6-8 inches, from bottom all the way to top. Predrill holes.
Step 18
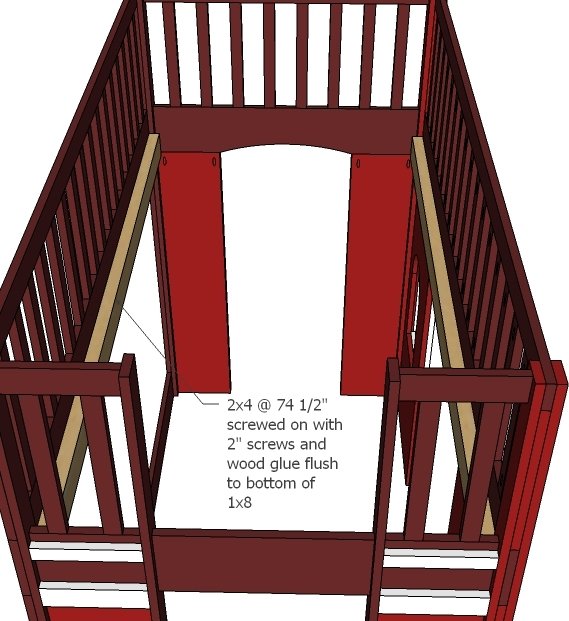
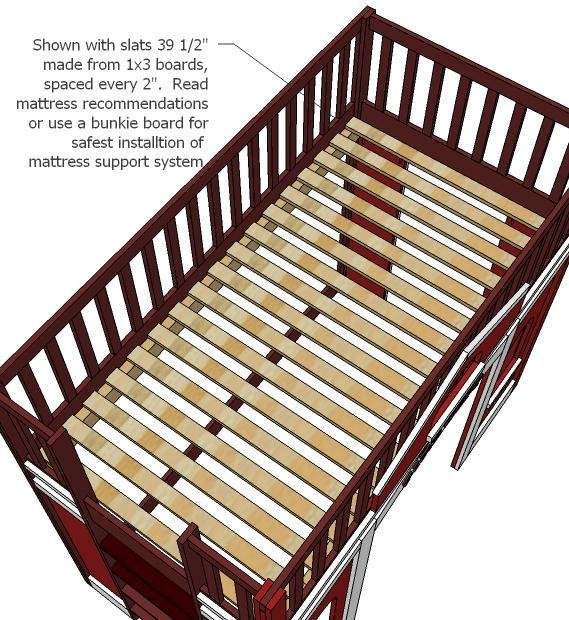
You can actually do this on the ground before assembly - add 2x4 cleats to front and back panels. This will create considerable strength and give you something to set your bunkie board or slats on.
Step 19
When it comes to slats, you should always refer to the mattress recommendations or use a bunkie board. Make sure you screw slats down if you choose to use slats. To further beef up the bed, add two more 2x4s running parallel to the cleats on either side of the ladder (for example, you wish to create a full size loft bed).
Finishing
Sand all surfaces, starting with a medium grit and finishing with fine. Wipe off the dust, fill any holes or gaps with wood filler, and sand smooth once dry. Apply primer if you're painting, then finish with your choice of paint or stain and seal with a durable clear topcoat. For outdoor projects, use exterior-rated primer, paint or stain, and sealer so the piece stands up to the weather.
Source (temporary): https://www.ana-white.com/woodworking-projects/fire-station-loft-bed