Fire Truck Loft Bed
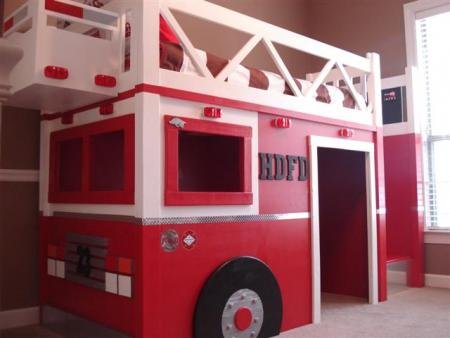
How to build a fire truck loft bed. to build a fire engine loft bed.
Specifications
| Project type | Toys |
|---|---|
| Room | Bedroom |
| Style | Children's and Kid's Room Furniture and Toy Plans |
| Difficulty | Intermediate |
Dimensions
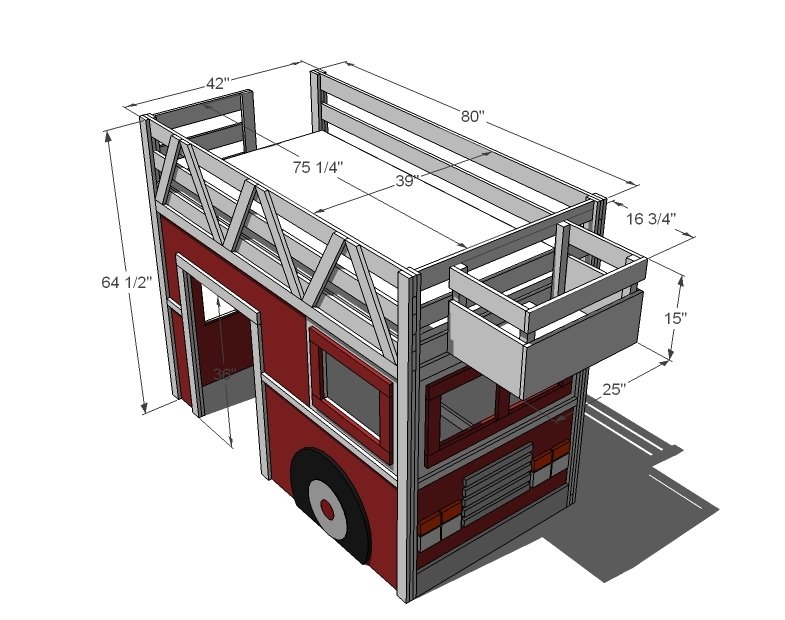
Use the size-specific shopping and cut lists below.
Shopping List
2 - sheets 3/4" plywood or MDF
4 - 1x2 @ 8 feet long
16 - 1x3 @ 8 feet long (does not include slats)
8 - 1x4 @ 8 feet long
2 - 1x6 @ 8 feet long
1 - 2x2 @ 4 feet long (add two more for 2x2 cleats for slats)
1 - 1x10 @ 6 feet long
3" bolts for bolting bed together
Cut List
FRONT WALL 1 - 3/4" plywood 48" x 80"
2 - 1x3 @ 64 1/2"
3 - 1x4 @ 80"
4 - 1x3 @ 3"
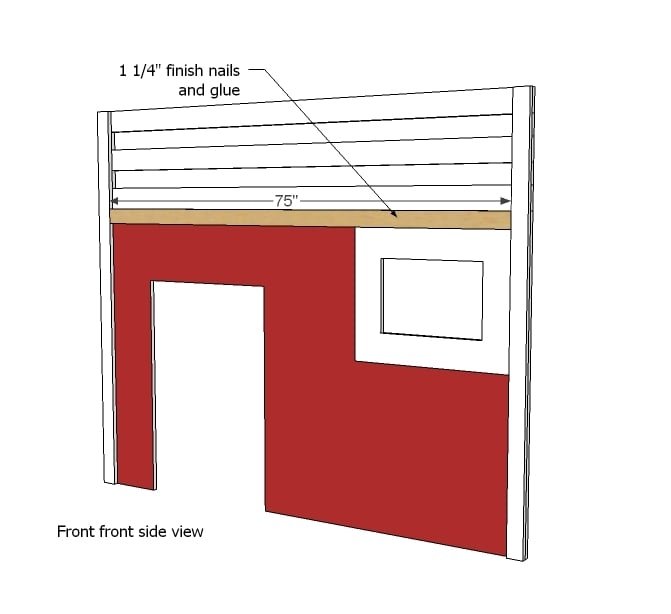
1 - 1x3 @ 75"
2 - 1x3 @ 36"
1 - 1x3 @ 29"
2 - 1x3 @ 21 1/2"
1 - 1x3 @ 11"
1 - 1x2 @ 40"
1 - 1x2 @ 6"
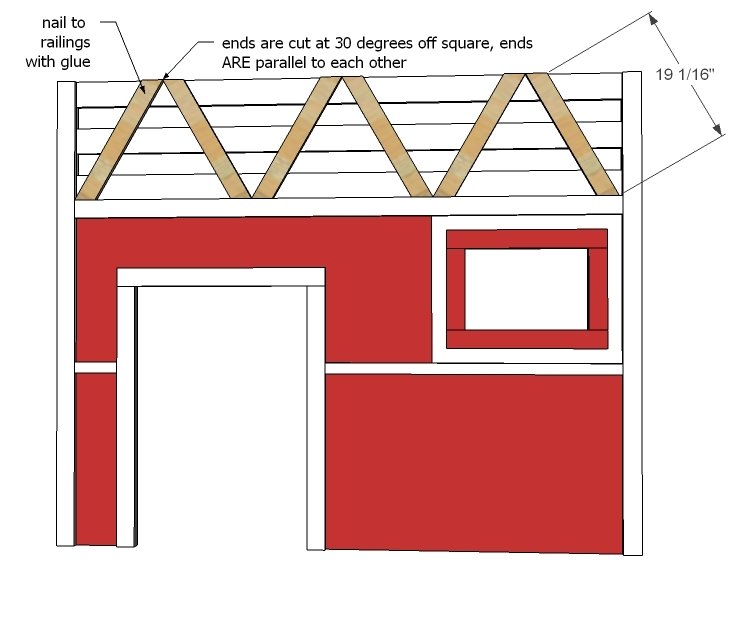
6 - 1x3 @ 19 1/16" (both ends cut at 30 degrees off square, ends ARE parallel to each other)
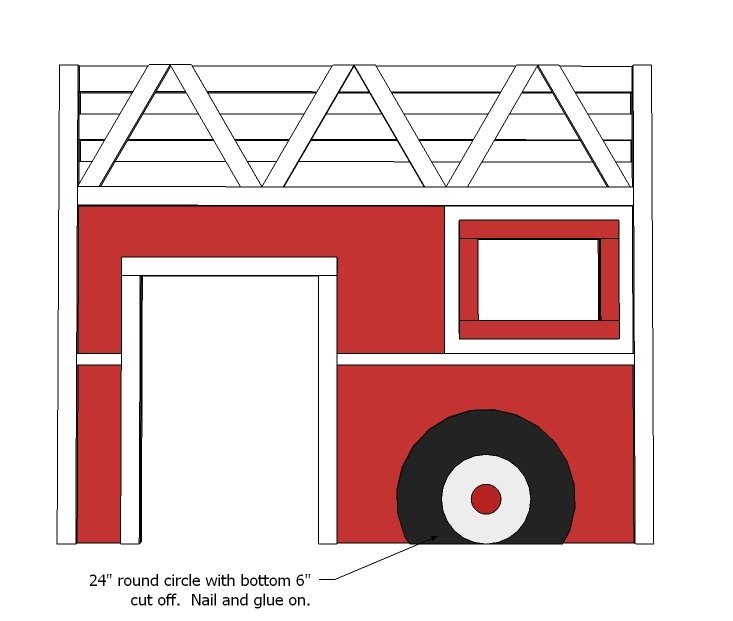
1 - 24" diameter round tabletop or scrap 3/4" plywood for wheel
WINDSHIELD SIDE WALL
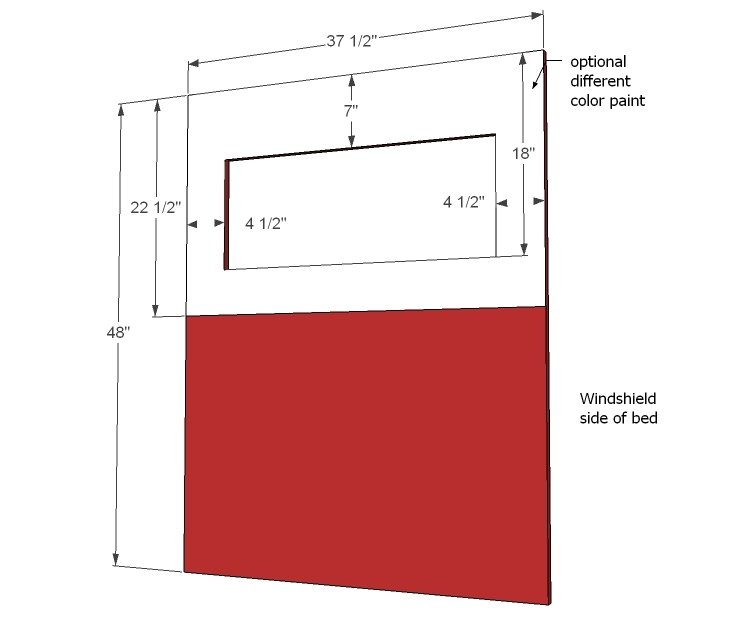
1 - 3/4" plywood @ 48" x 37 1/2"
2 - 1x3 @ 64 1/2"
3 - 1x4 @ 37 1/2"
2 - 1x3 @ 33 1/2"
3 - 1x3 @ 11"
1 - 1x6 @ 37 1/2"
1 - 1x2 @ 37 1/2"
1 - 1x3 @ 37 1/2"
5 - 1x2 @ 16"
4 - 1x3 @ 4 1/2"
4 - 1x4 @ 4 1/2"
LADDER SIDE WALL
1 - 3/4" plywood @ 48" x 37 1/2"
3 - 1x3 @ 64 1/2"
3 - 1x4 @ 21 3/4"
1 - 1x3 @ 37 1/2"
1 - 1x6 @ 37 1/2"
1 - 1x2 @ 20"
1 - 1x2 @ 4"
2 - 2x2 @ 48"
5 - 1x2 @ 15 3/4"
BACK OPEN WALL
2 - 1x3 @ 64 1/2"
2 - 1x4 @ 80"
1 - 1x6 @ 80"
1 - 1x3 @ 80"
4 - 1x3 @ 3"
2 - 1x3 @ 43 1/2"
MATTRESS SUPPORT SYSTEM
2 - 1x2 @ 75" (use 2x2 here for additional support)
1x3 cleats @ 39" wide OR bunkie board or other support system
BUCKET
2 - 1x10 @ 16"
2 - 1x4 @ 16"
4 - 2x2 @ 14 1/4"
1 - 1x4 @ 25"
1 - 1x10 @ 25"
1 - 3/4" plywood @ 23 1/2" x 16"
Tools
- measuring tape
- square
- pencil
- hammer
- safety glasses
- hearing protection
- kreg-jig
- drill
- circular saw
- jigsaw
- compound miter saw
- nailer
- sander
- level
- countersink drill bit
Step-by-step Instructions
Step 1
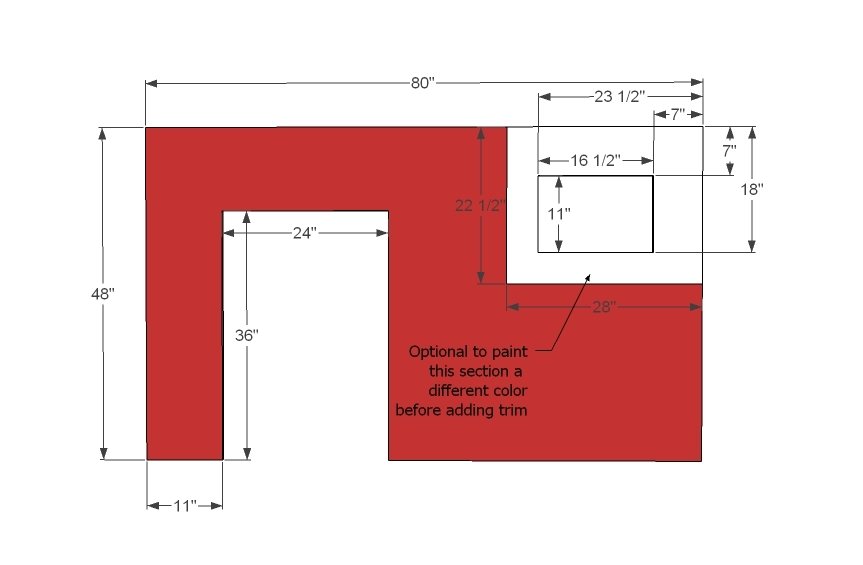
Start by cutting out the front panel carefully as shown here. If you want, you can paint the plywood first - thus the white square around the window.
Step 2
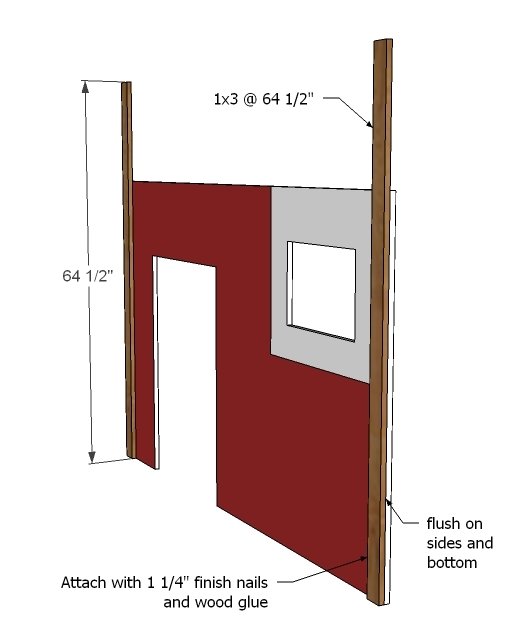
Next add the legs to the outside. You can nail from the back side to hide nail holes. Keep outside and bottom edges flush.
Step 3
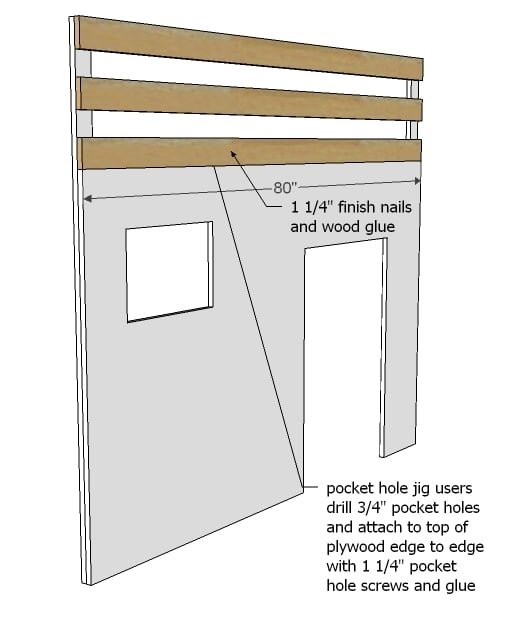
Now add the railings to the top. If you have a Kreg Jig, drill 3/4" pocket holes facing downward along the bottom edge of the railings to attach to plywood. If you don't have a pocket hole jig, no worries, in the next bit, we'll reinforce the plywood to bottom railing joint.
Step 4
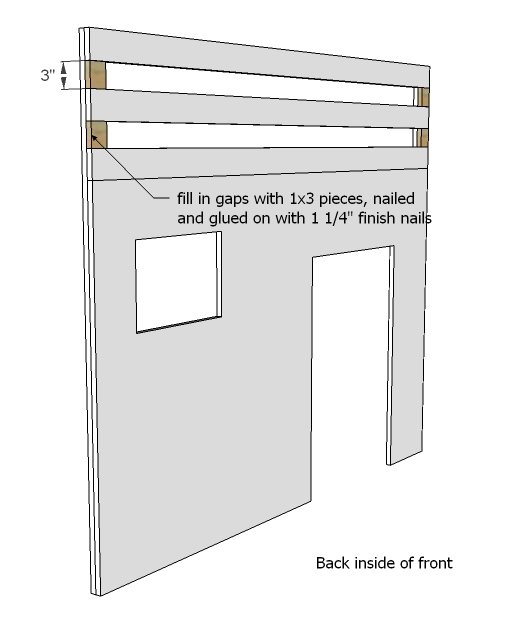
Fill in the legs with spacers. I'd cut these to width for the perfect fit.
Step 5
Step 6
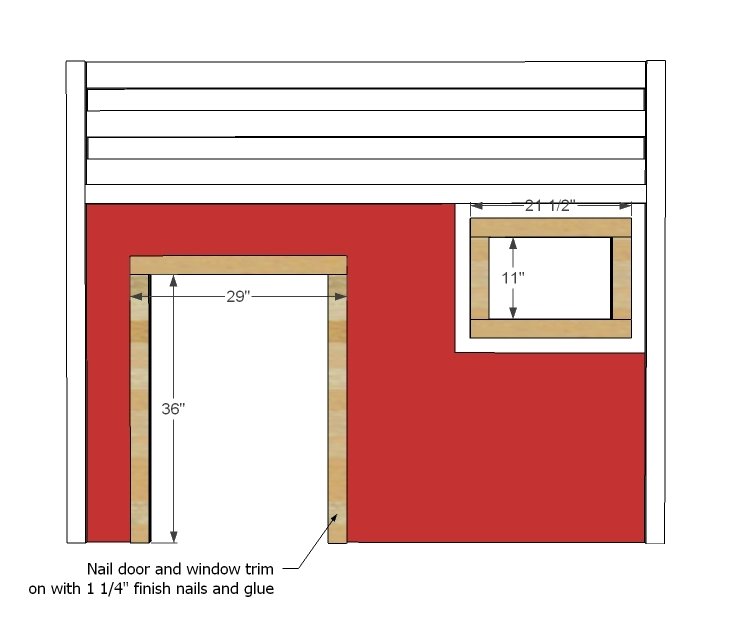
Now simply trim out windows and doors. If you have a pocket hole jig, you can build the frames separate, and then attach as a single piece.
Step 7
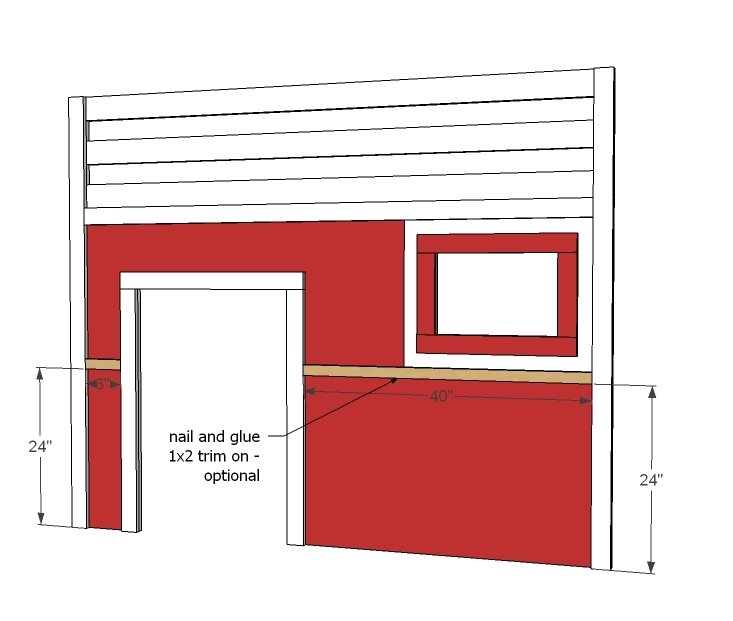
This trim is optional, but I added it for the ladder side and also to give you a clean spot to start and stop painting. What about painting it silver?
Step 8
These pieces are decorative as well, but do help to hold the front railings together. And they look like a ladder! Brilliant Jeff!
Step 9
Jeff used a 24" round from the home improvement store and cut off the bottom six inches to create the wheel. You can also use scrap plywood to cut out the wheel.
Now we are on the windshield side.
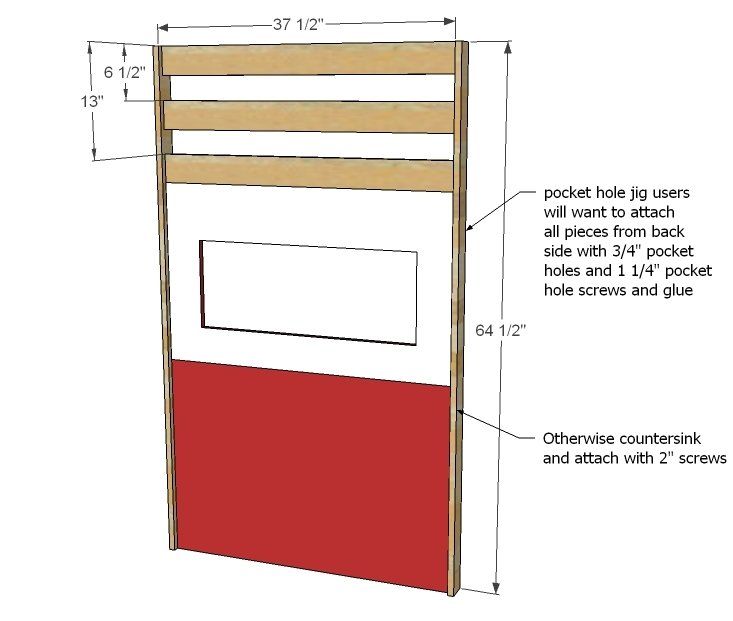
Cut out the windshield as shown here. NOTE for those of you without a pocket hole jig - you may wish to leave a 2 1/2" strip of plywood down the center for the center of the windsheild trim (see step 12).
Now add the legs and top railings.
From the outside, plywood is inset 3/4" on legs. Just use a scrap 1x board as a spacer to guide you.
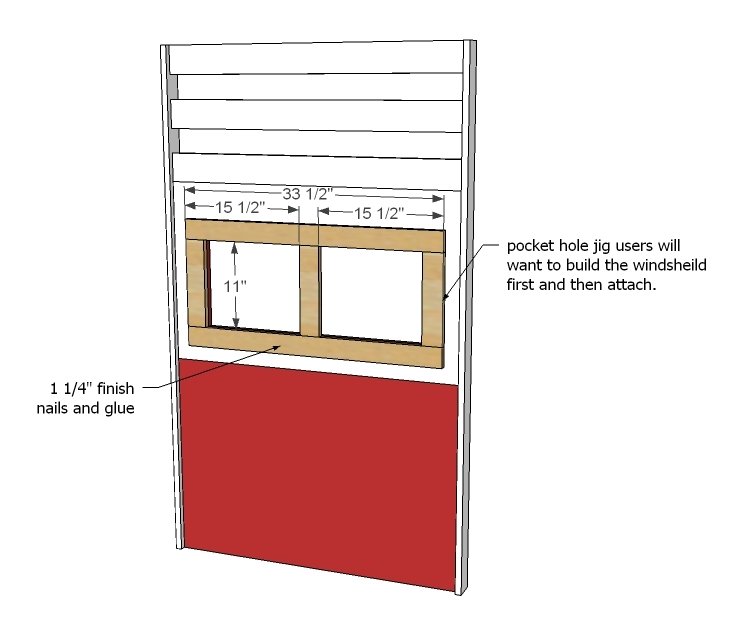
Step 12
Build your windshield and then attach as shown here.
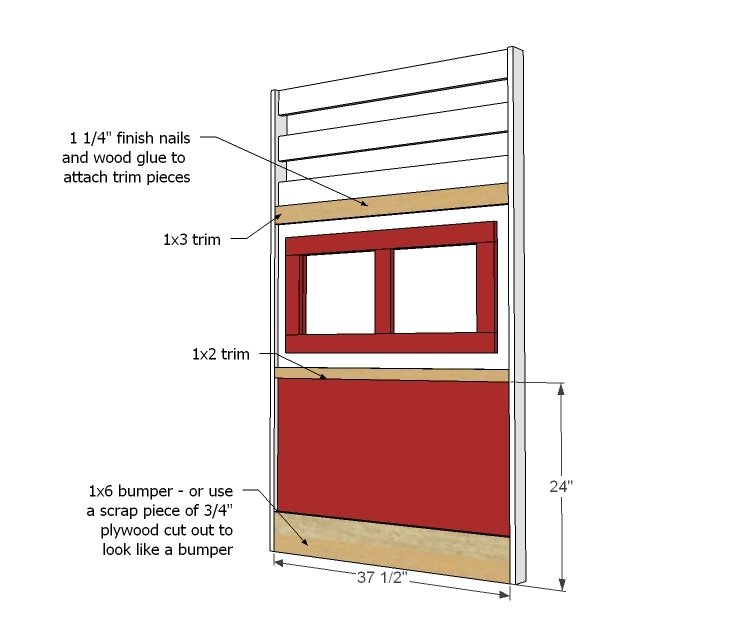
Step 13
And now trim out the front. Keep the top 1x3 trim level with the 1x3 trim added on the front side to cover the plywood to bottom railing joint.
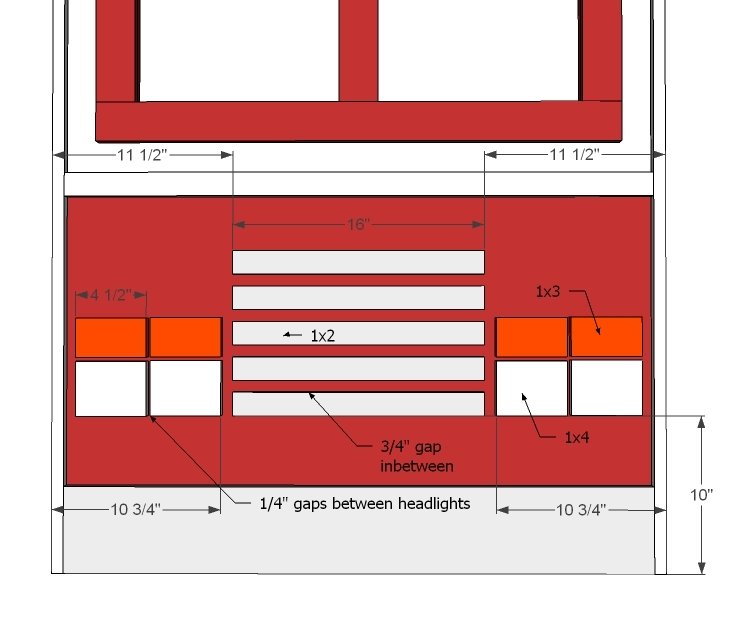
Step 14
Tim to use up some of those scraps!
Step 15
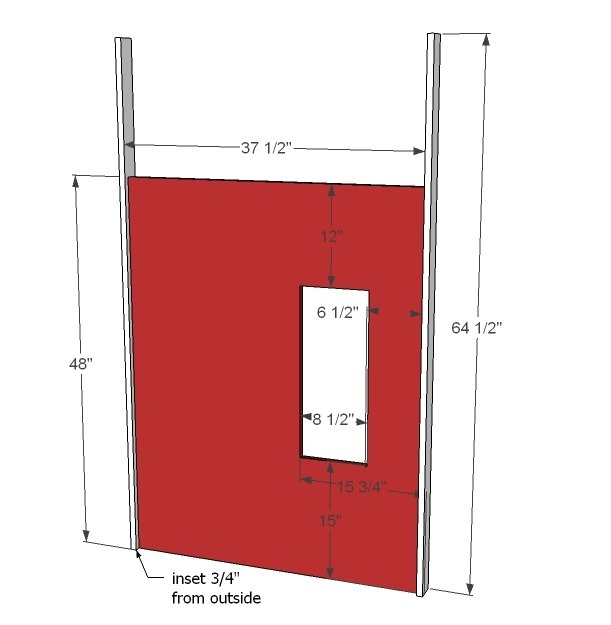
Now we are on the ladder side. Cut out the plywood and window and attach legs, 3/4" inset from outside side.
Step 16
Make sure the ladder support is square all the way up to the side legs.
Add trim and railings.
NOTE: you can also fill in railing spaces with 1x3 scraps.
Step 18
Build ladder as shown and attach to trim with screws or bolts.
Step 19
Now we have moved to the back wall. Attach railings and base trim to the legs. Take a diagonal and make sure your back wall is square. For heavier loads, consider adding an additional leg down the center.
Step 20
Now the bed is ready for construction. You can do this in the room... after you have painted. I recommend bolting legs together for the easiest assembly/disassembly.
Step 21
Attach cleats (use 2x2s with 2" screws and glue for more "meat" to screw the slats down) evenly and then your mattress support system.
Step 22
By this time, building the bucket is going to be a no brainer!
Finishing
Sand all surfaces, starting with a medium grit and finishing with fine. Wipe off the dust, fill any holes or gaps with wood filler, and sand smooth once dry. Apply primer if you're painting, then finish with your choice of paint or stain and seal with a durable clear topcoat. For outdoor projects, use exterior-rated primer, paint or stain, and sealer so the piece stands up to the weather.
Source (temporary): https://www.ana-white.com/woodworking-projects/fire-truck-loft-bed