Framed Three Shelf Bookshelf
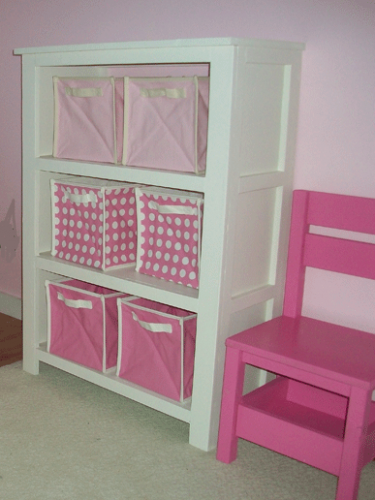
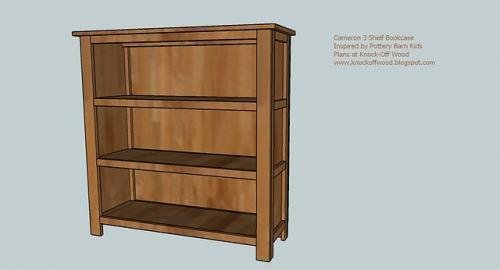
I love this bookshelf because of it’s simple sturdy design, the exposed legs (exposed legs make a room look bigger), and the perfect sizing. It's plenty big and fits lots of books, bins, blankets and more. Build out of plywood or 1x12s. from.
Specifications
| Project type | Media and Entertainment Centers |
|---|---|
| Room | Storage Solutions |
| Style | Children's and Kid's Room Furniture and Toy Plans |
| Difficulty | Beginner Projects |
| Estimated cost | $50 - $100 |
Dimensions
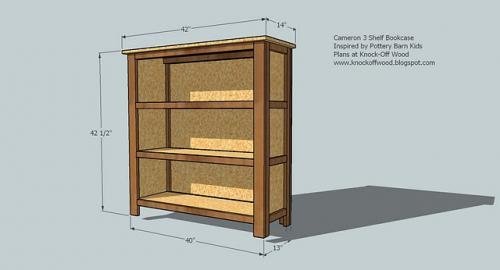
Use the size-specific shopping and cut lists below.
Shopping List
- 3 - 1x12 @ 8 feet long OR 1 sheet of 3/4" plywood ripped into four strips, each 11-1/4" wide x 8 feet long
- 6 – 8′ length 1x2s (I use the $1 pine furing strips, but you could use maple, poplar, MDF, oak and others)
- 2 – 8′ length 1x3s (matching the 1x2s above)
- 1 – 1/4″ Sheet plywood, mdf, or other backer material
- 2″ Nails
- 1 1/4″ Nails
- 12′ Iron On Edge Banding (About $6 for 25 foot roll, very effective and easy to use)
Cut List
- A) 2 – 1×12 @ 38 1/4″ OR 3/4″ MDF or Plywood @ 11 1/4″ x 38 1/4″ (Sides)
- B) 3 – 1×12 @ 37″ OR 3/4″ MDF or Plywood @ 11 1/4″ x 37″ (Shelves)
- C) 4 – 1×2 @ 41 3/4″ (Sides of the Legs)
- D) 4 – 1×3 @ 41 3/4″ (Fronts and Backs of the Legs)
- E) 2 – 1×2 @ 37″ (Inside Top Trim)
- F) 8 – 1×2 @ 35″ (Outside Top Trim and Shelf Trim)
- G) 1 – 1/4″ Plywood @ 38 1/2″ x 40″ (you can use beadboard, 1/2 plywood, paneling, etc)
- H) 8 – 1×2 @ 8 1/4″ (Side Shelf Trim) - measure and cut for best fit
- I) 1 – 1×12 @ 42″ and 1×3 @ 42″ OR 3/4″ MDF or Plywood @ 14″ x 42″ (Top)
Tools
- measuring tape
- square
- safety glasses
- hearing protection
- drill
- circular saw
- sander
Step-by-step Instructions
Step 1
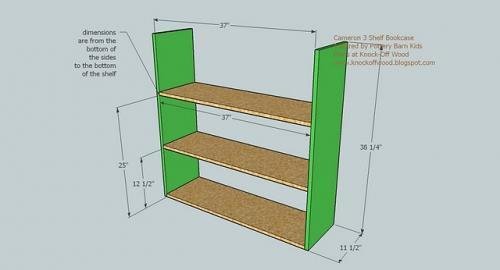
Build the Box. Start by nailing through the sides, A (green) into the shelves, B (wood), as shown above. Use the measurements in the above diagram to guide you. You can also use screws or 3/4" pocket holes and 1-1/4" pocket hole screws.
Step 2
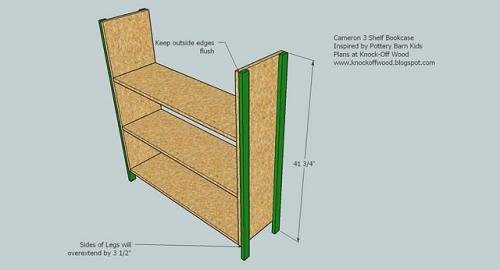
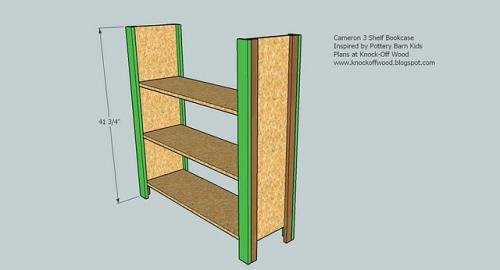
Side Legs. Use the 1 1/4″ nails to nail the sides of the legs, C (Green), to the sides, A, of the bookcase, as shown above. Keep outside edges flush. The legs, C, will over-extend the sides,A, by 3 1/2″.
Step 3
Front and Back Legs. In the same manner as the side legs, but with 2″ nails, fasten the front and back legs, D (green), to the side legs, C, shelves, B, and sides A.
Step 4
Attach the top trim with 1-1/4" brad nails and glue.
Step 5
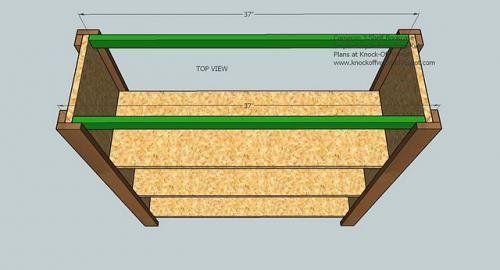
Top Outer Trim. Using 2 of the boards F (shown in green above), fasten as shown above. Use glue and 1 1/4″ nails. Keep the top edges flush.
Step 6
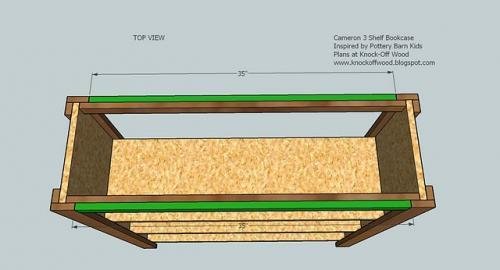
Trimming out the Shelves. Using the remaining 6 boards F, (shown in green above), trim out the edges of all the shelves. Keep all top edges flush with the shelves. Use the 2″ nails and glue.
Step 7
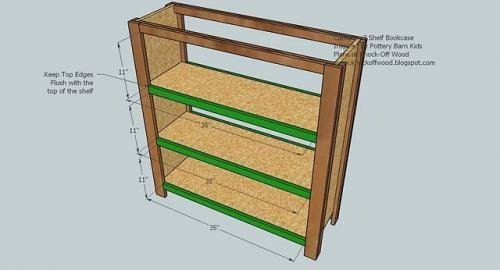
Covering the back. Attach the back plywood, G, as shown above in green. Use the 1 1/4″ nails and glue. Make sure you mark and nail into all the shelves.
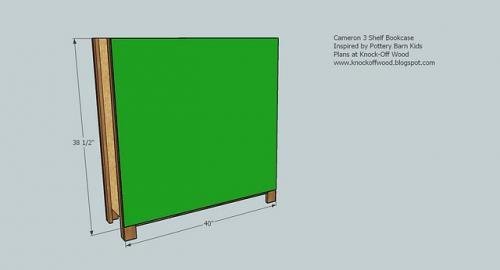
Step 8
Side Trim Pieces. Using te 1 1/4″ nails, nail the side trim pieces in place as shown above. The measurements shown are from the top to the top of the trim.
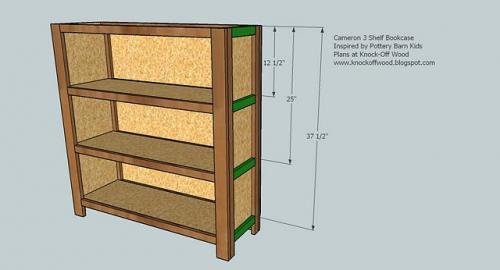
Step 9
Attach the top as shown above. If you are using plywood or MDF, simply position the plywood so it overextends 1″ on the front and side edges and glue and nail in place. You will also need to add edge banding to finish out the plywood edges if you are using plywood.
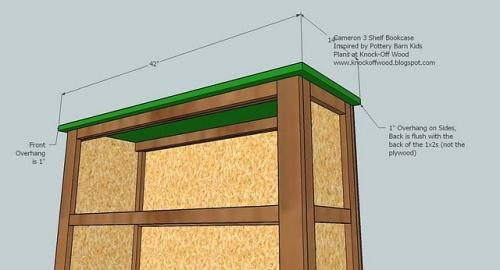
Step 10
Attaching the planked pine top. If you are using the pine boards, first attach the 1×3 as shown above in green. Keep back edge flush with the back of the 1×2 (not the plywood). Overhang each side 1″. Nail in place. Then add the 1×12 to the front in the same manner.
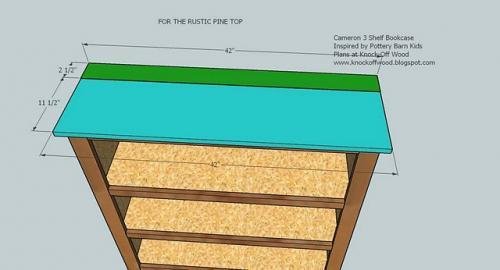
Step 11
Finishing. Fill nail holes with putty. Sand. Attach the edge banding to the plywood if you used 3/4″ plywood for the top. Stain or paint if desired.
Finishing
Sand all surfaces, starting with a medium grit and finishing with fine. Wipe off the dust, fill any holes or gaps with wood filler, and sand smooth once dry. Apply primer if you're painting, then finish with your choice of paint or stain and seal with a durable clear topcoat. For outdoor projects, use exterior-rated primer, paint or stain, and sealer so the piece stands up to the weather.
Source (temporary): https://www.ana-white.com/woodworking-projects/framed-three-shelf-bookshelf