Freestanding Ladder Bookcase
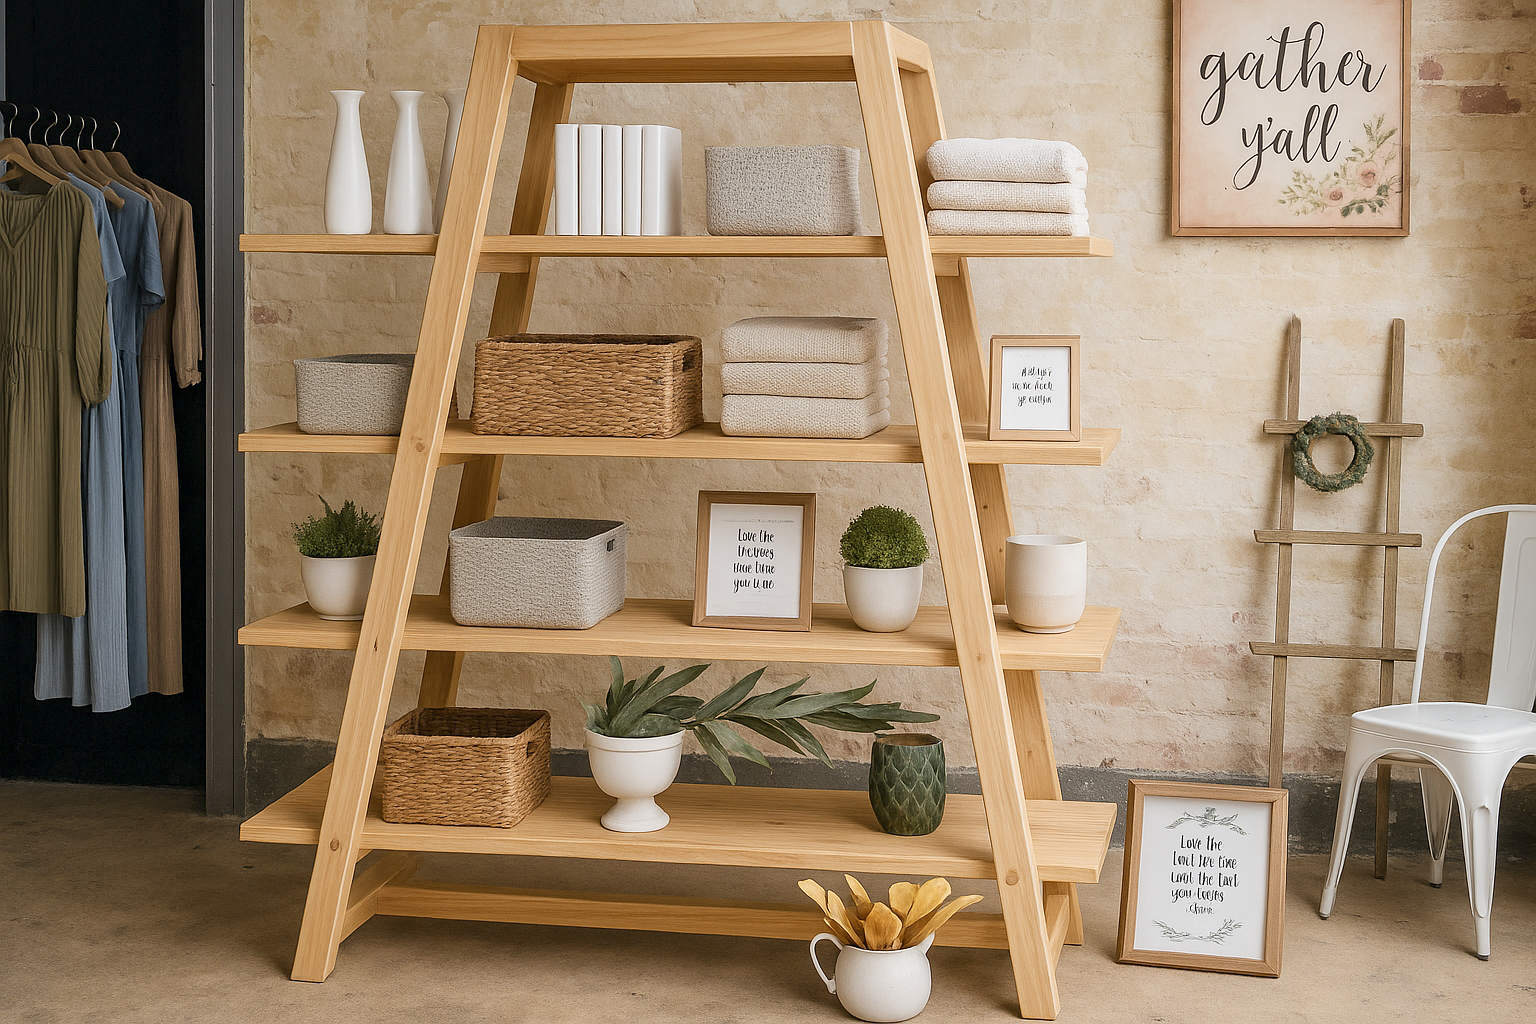
Build your own ladder bookshelf, great for storage and decor, can be used as a room divider and display shelf! from
Specifications
| Project type | Bookshelf and Bookcase Plans |
|---|---|
| Room | Storage Solutions |
| Style | Modern Style Furniture Plans |
| Difficulty | Advanced |
| Estimated cost | scraps |
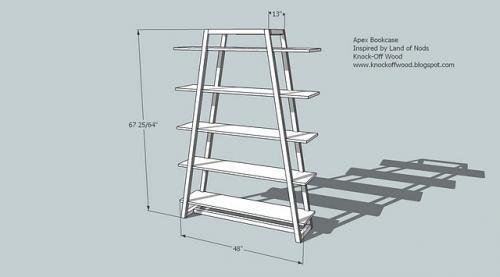
Dimensions
Use the size-specific shopping and cut lists below.
Shopping List
- 3 - 1x12 @ 8 feet long
- 1 - 1x12 @ 4 feet long
- 9 - 1x2 @ 8 feet long
- 1 - 2x2 @ 8 feet long
Cut List
- 4 - 1x2 @ 68 1/2" (Sides)
- 4 – 1×2 @ 6″ (Bottom Trim-both ends at 10 degrees parallel to each other)
- 16 – 1×2 @ 13 1/8″ (Trim Between Shelves-both ends at 10 degrees parallel to each other)
- 4 – 1×2 @ 4 1/2″ (Top Trim - both ends at 10 degrees parallel)
- 5 - 1×12 @ 48″
- 2 - 1x2 @ 22 1/2" short point to short point, ends at 10 degrees NOT parallel to each other
- 2 - 1x2 @ 19 1/2" short point to short point, ends at 10 degrees NOT parallel to each other
- 4 – 2×2 @ 10″
- 1 - 2x2 @ 43 1/4″ short point to short point
Tools
- measuring tape
- square
- safety glasses
- hearing protection
- compound miter saw
- nailer
- sander
- level
Step-by-step Instructions
Step 1
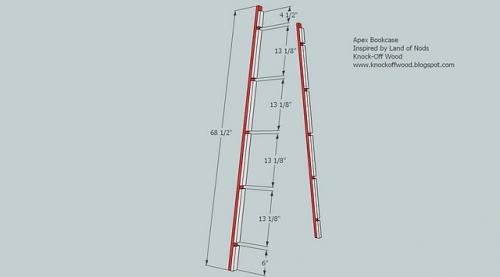
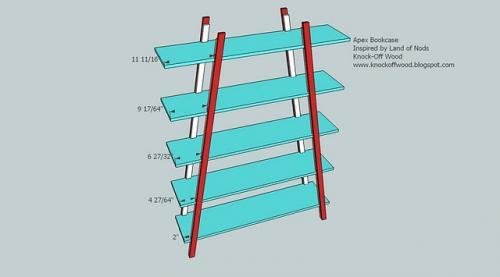
LEGS: First cut you outler leg trim at 68 1/2 from a 1×2 board. Not that you will cut the legs at a 10 degree angle on both ends. You will need four of the outer leg trim pieces (shown in red above). Then cut the inner leg trim pieces, at 10 degree angles, overall dimensions listed above. You will need: 4 – 1×2 @ 6″ (Bottom Trim) 16 – 1×2 @ 13 1/8″ (Trim Between Shelves) 4 – 1×2 @ 4 1/2″ (Top Trim) Cut both ends at 10 degrees as shown above.
Step 2
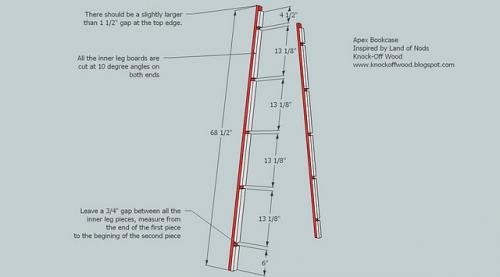
SPACERS: Nail the inner leg trim pieces to the outer leg trim piece, as shown above. Leave a 3/4″ gap between all boards, resulting in slightly over 1 1/2″ gap at the top. Use glue and 1 1/4″ nails.
Step 3
SHELVES: Cut 5 - 1×12 @ 48″ (you can cut the shelves slightly smaller to get two shelves out of 1 eight foot long board). Fit the shelves in the gaps left between the inside leg trim pieces. Use the measurements above to help guid you centering the shelves on the legs. Nail the shelves in place using 2″ nails and glue, through the outer legs into the shelves.
Step 4
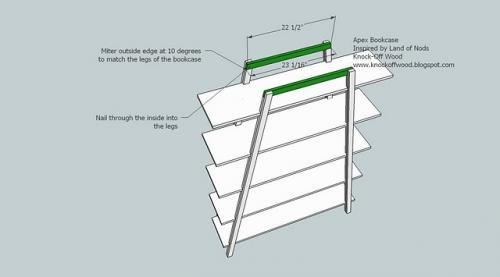
INSIDE TOPS: Measure the distance between the top two legs and cut from a 1×2, both ends mitered at 10 degrees, 2 boards approximately 23″ long, 22 1/2″ on the short point to short point measurement. Nail in place using the 1 1/4″ nails and glue.
Step 5
Step 6
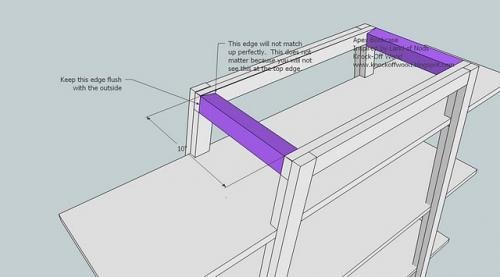
TOPS: Cut 2 – 2×2 @ 10″ and predrill from the outside of the legs into the ends of the 2×2. Keep the outside edges flush.
Step 7
Leg Bases: Cut 2 more 2x2s @ 10″, and predrill and screw in place, as shown above. Keep the inside edge flush, lining up the bottom inside corner of the 2×2 with the bottom inside edge of the legs.
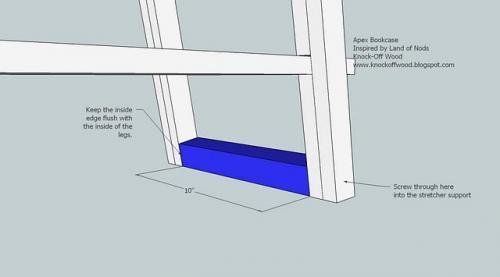
Step 8
Measure from the midpoint of the 2 boards from step 7 and cut a stretcher, approximately 43 1/4″ short point to short point, from a 2×2. The ends are mitered at 10 degrees. Predrill and use screws to fasten.
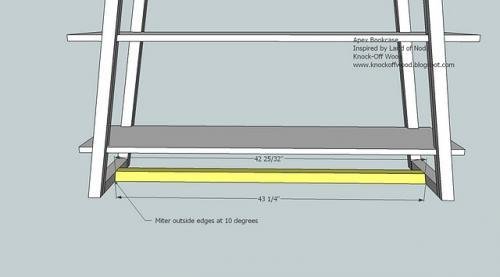
Finishing
Sand all surfaces, starting with a medium grit and finishing with fine. Wipe off the dust, fill any holes or gaps with wood filler, and sand smooth once dry. Apply primer if you're painting, then finish with your choice of paint or stain and seal with a durable clear topcoat. For outdoor projects, use exterior-rated primer, paint or stain, and sealer so the piece stands up to the weather.
Source (temporary): https://www.ana-white.com/woodworking-projects/freestanding-ladder-bookcase