Heavy Duty Adirondack Chair Plans with Back Leg and Footstool
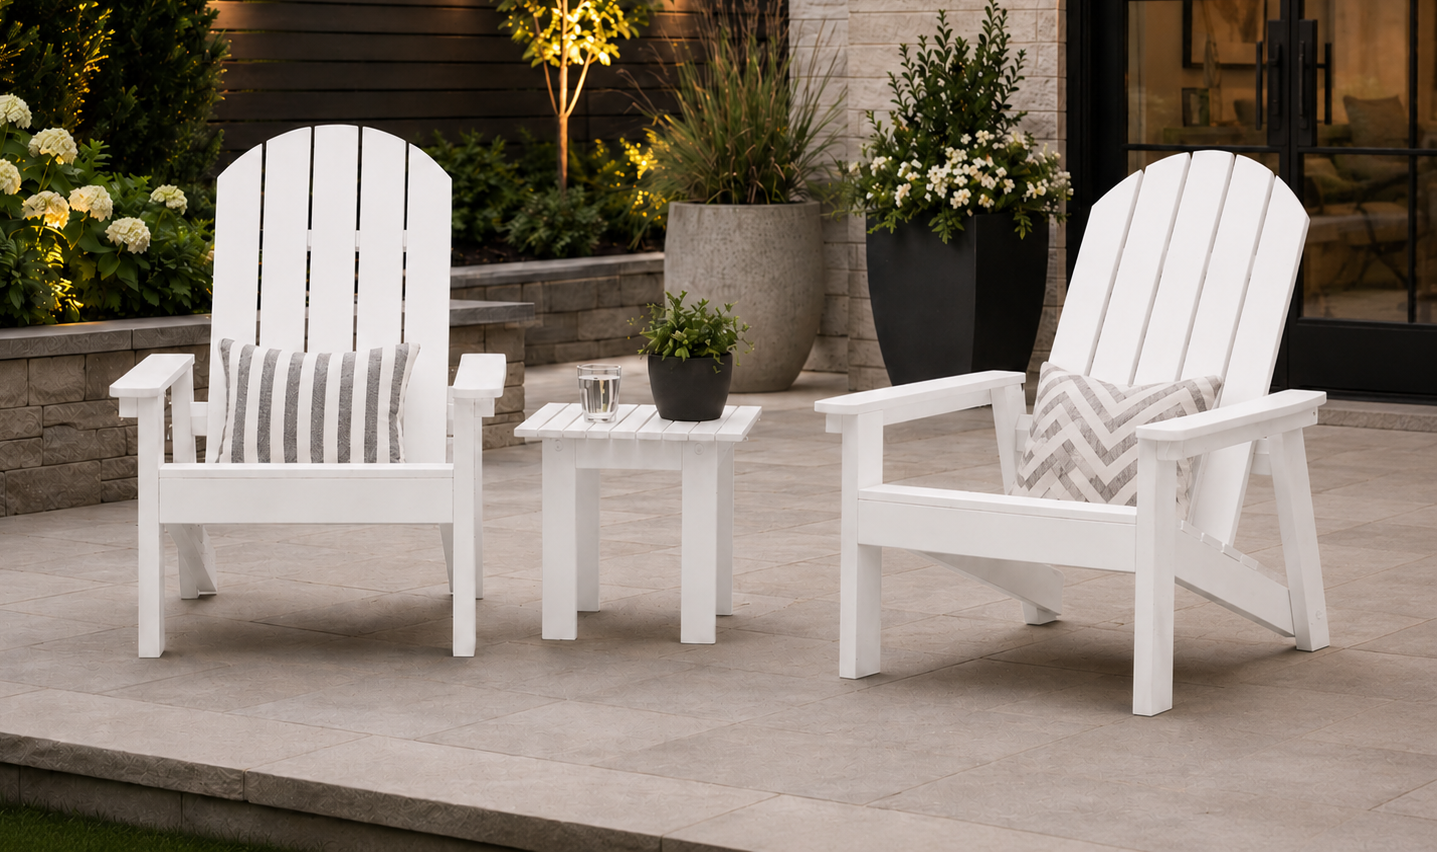
Build the ultimate backyard seating with these heavy duty Adirondack chair plans, designed for strength, comfort, and long-lasting outdoor use. This is one of the most popular DIY chair builds for a reason — it’s beginner-friendly, budget-conscious, and incredibly sturdy - thanks to an added back leg for additional support. Unlike traditional Adirondack chairs, this design uses a full 2x4 frame with an added back leg, creating a rock-solid base that holds up to years of use while actually being easier to build. The wide seat, deep recline, and supportive angles make it comfortable enough to enjoy for hours — no cushions needed. include everything you need to build with confidence: • Step-by-step instructions and diagrams • Complete shopping and cut lists • Beginner-friendly techniques • Optional matching footstool for added comfort The result is a classic Adirondack look with upgraded durability — perfect for patios, fire pits, decks, or cabins. Builders love this plan because it’s simple, affordable, and proven — it’s been built thousands of times by DIYers of all skill levels. If you’re looking for a chair that’s easy to build, strong enough for everyday use, and comfortable without extras, this is the one to make. ALSO CHECK OUT THIS PLAN: We also have a modern version here. MORE PLANS IN THIS COLLECTION: This plan includes a footstool. You can also build a matching coffee table and a matching side table. Check out all our outdoor furniture plans here.
Specifications
| Project type | Outdoor Seating, Lounging and Accents |
|---|---|
| Room | Outdoor |
| Difficulty | Beginner Projects |
| Estimated cost | $20 - $50 |
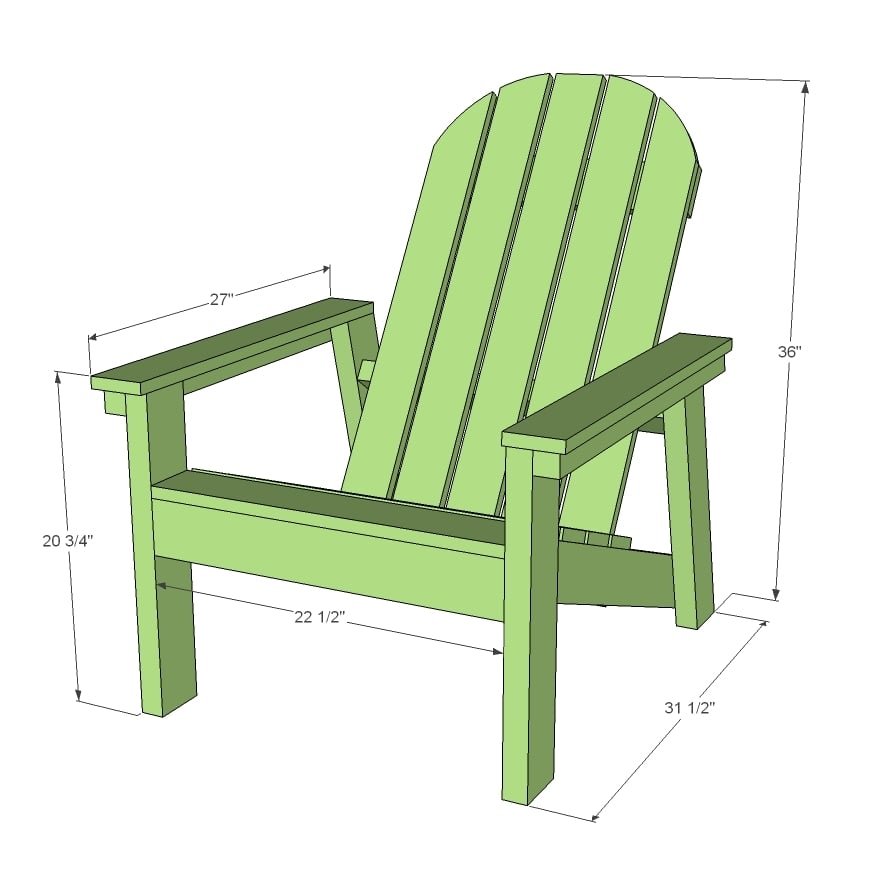
Dimensions
Use the size-specific shopping and cut lists below.
Shopping List
- 3 – 2×4 @ 8 feet long
- 1 – 2×2 @ 6 feet long
- 4 – 1×4 @ 8 feet long
- (30) 2 1/2” self tapping wood screws
- (60) 2” self tapping wood screws
- (20) 1 1/4” wood screws
- exterior appropriate wood glue
Cut List
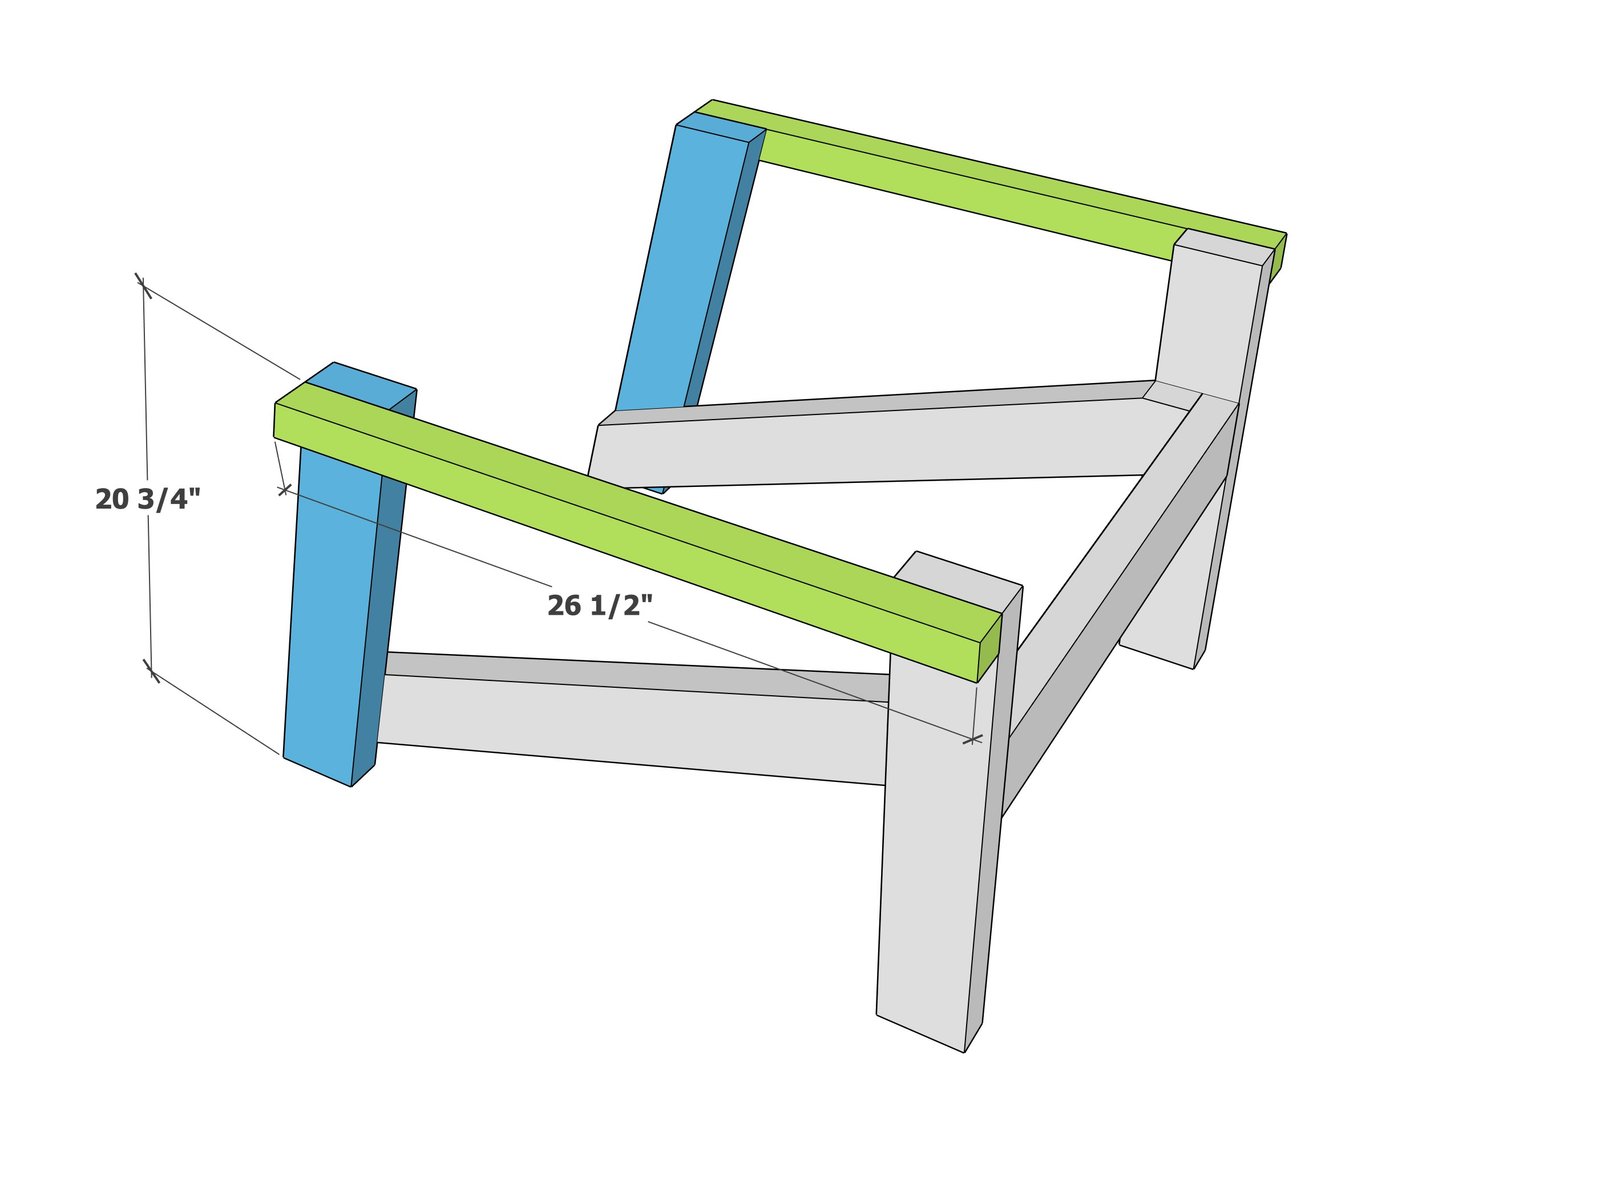
2 - 2x4 @ 20 3/4” long with BOTH ends cut PARALLEL at 15 degrees off square, long point to short point measurement (back legs)
2 - 2x4 @ 20” (front legs)
2 - 2x2 @ 26-1/2” long, longest point measurement, ONE end cut at 15 degrees off square (arm support)
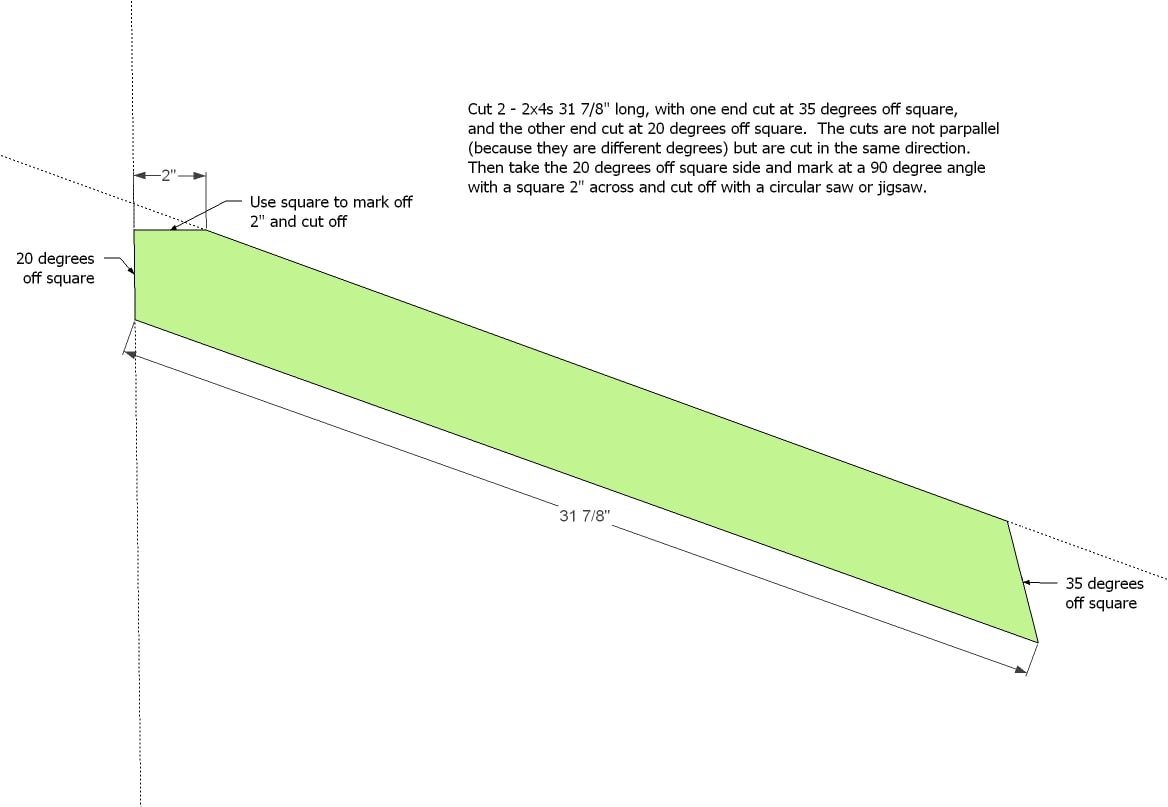
2 - 2x4 @ 31 7/8” long, ONE end cut at 35 degrees off square OTHER END cut at 20 degrees off square - cut angles in the same direction but will not be parallel as they are different degrees - see step 1 (stringers)
2 - 2x4 @ 22 1/2” (front apron and back support)
5 - 1x4 @ 22 1/2” (seat slats)
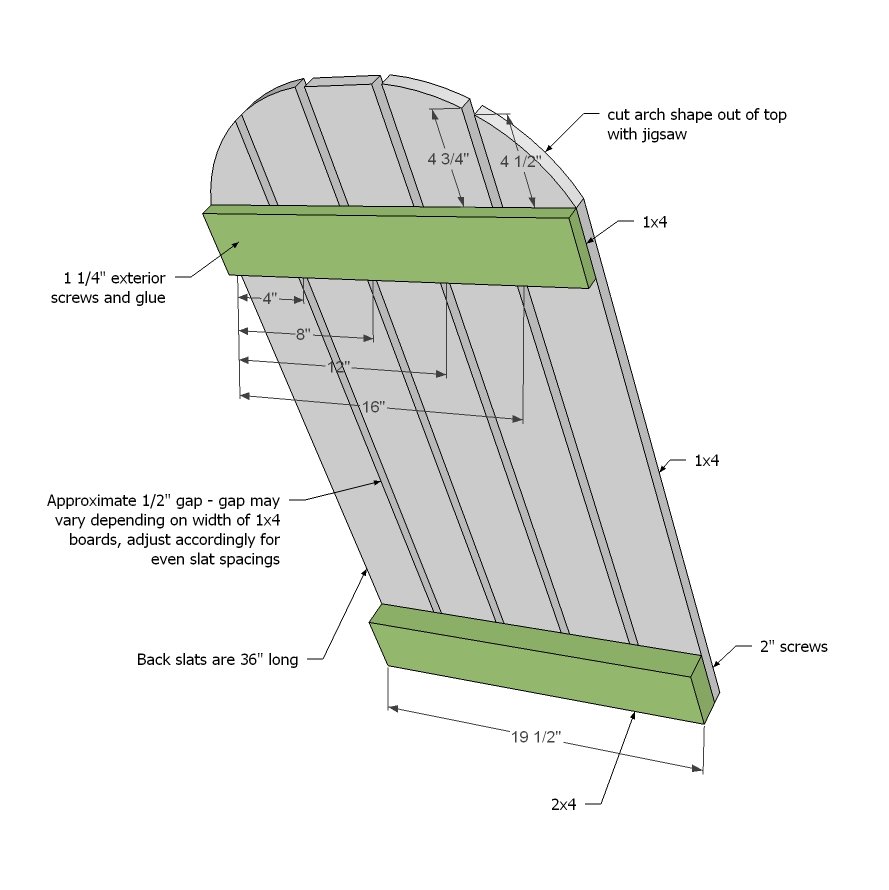
5 - 1x4 @ 36” (back slats)
1 - 1x4 @ 19 1/2” (back top support)
1 - 2x4 @ 19 1/2” (back base support)t
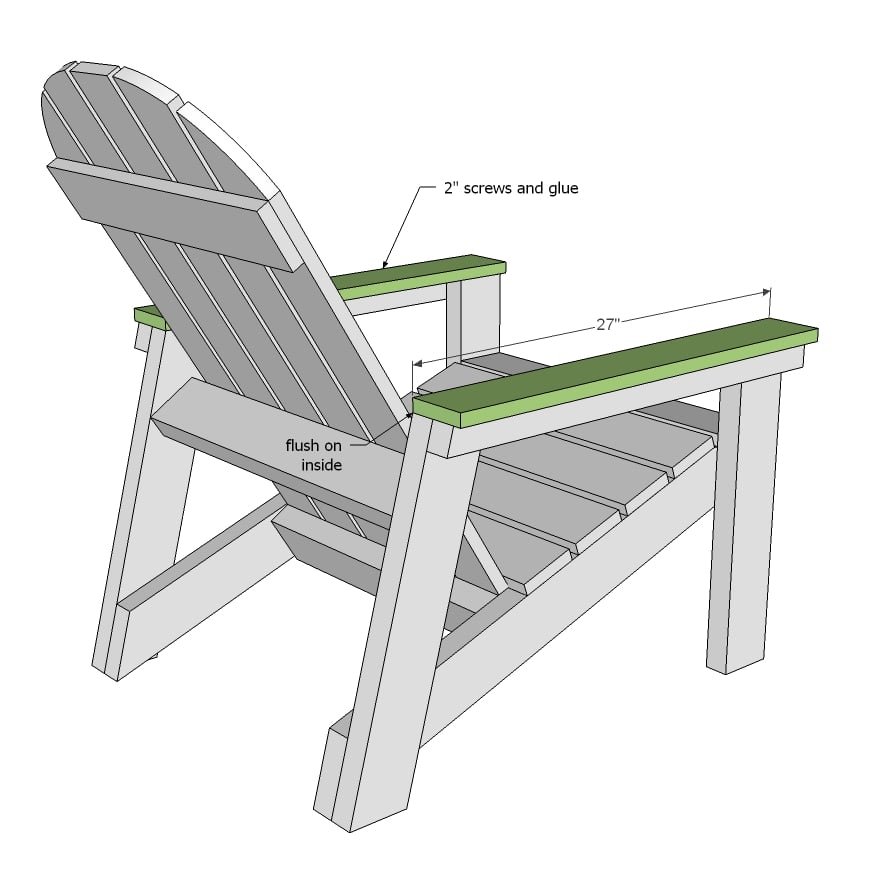
2 - 1x4 @ 27” (arm rests)
Tools
- measuring tape
- square
- pencil
- safety glasses
- hearing protection
- drill
- jigsaw
- compound miter saw
- sander
Step-by-step Instructions
Step 1
From stretcher board, cut off top portion by marking with a square and cutting off with a jigsaw. Do this on both stretcher boards.
Step 2
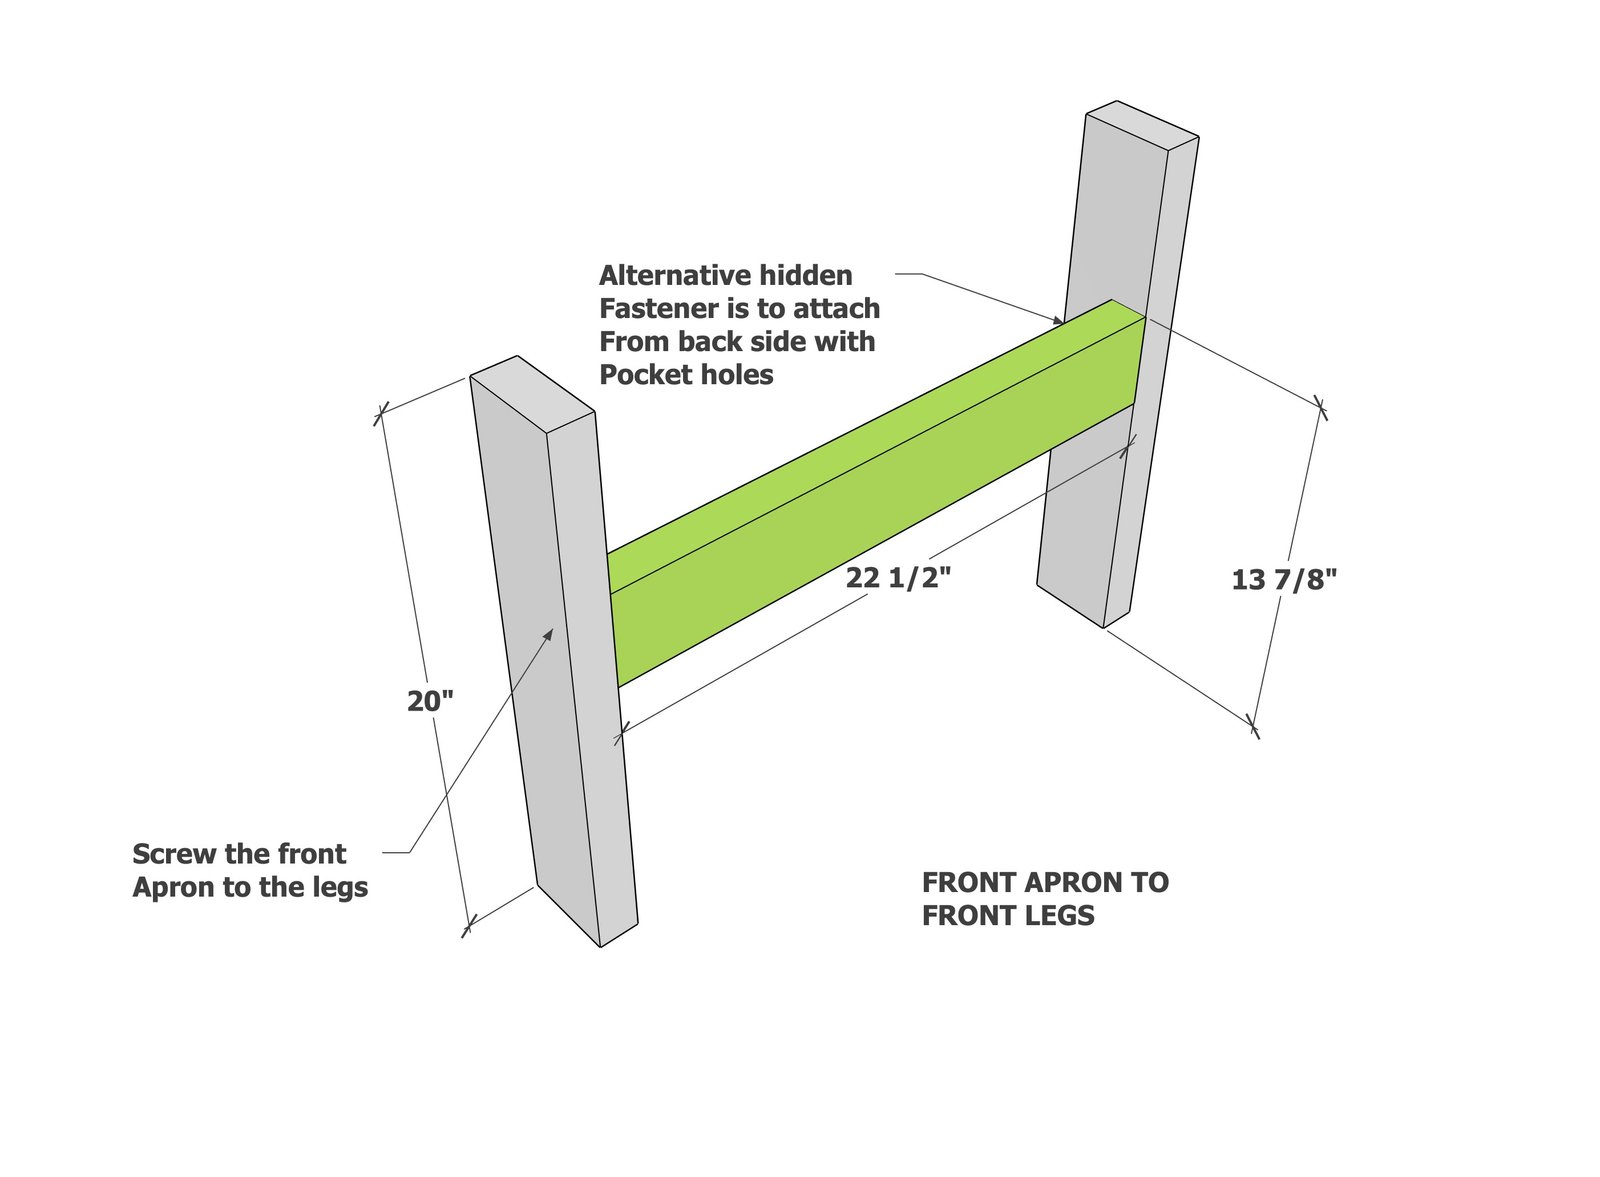
Start by attaching the front apron (2x4 @ 22-1/2") to the two legs as shown in the diagram, using two 2-3/4" self tapping star bit screws per joint.
Step 3
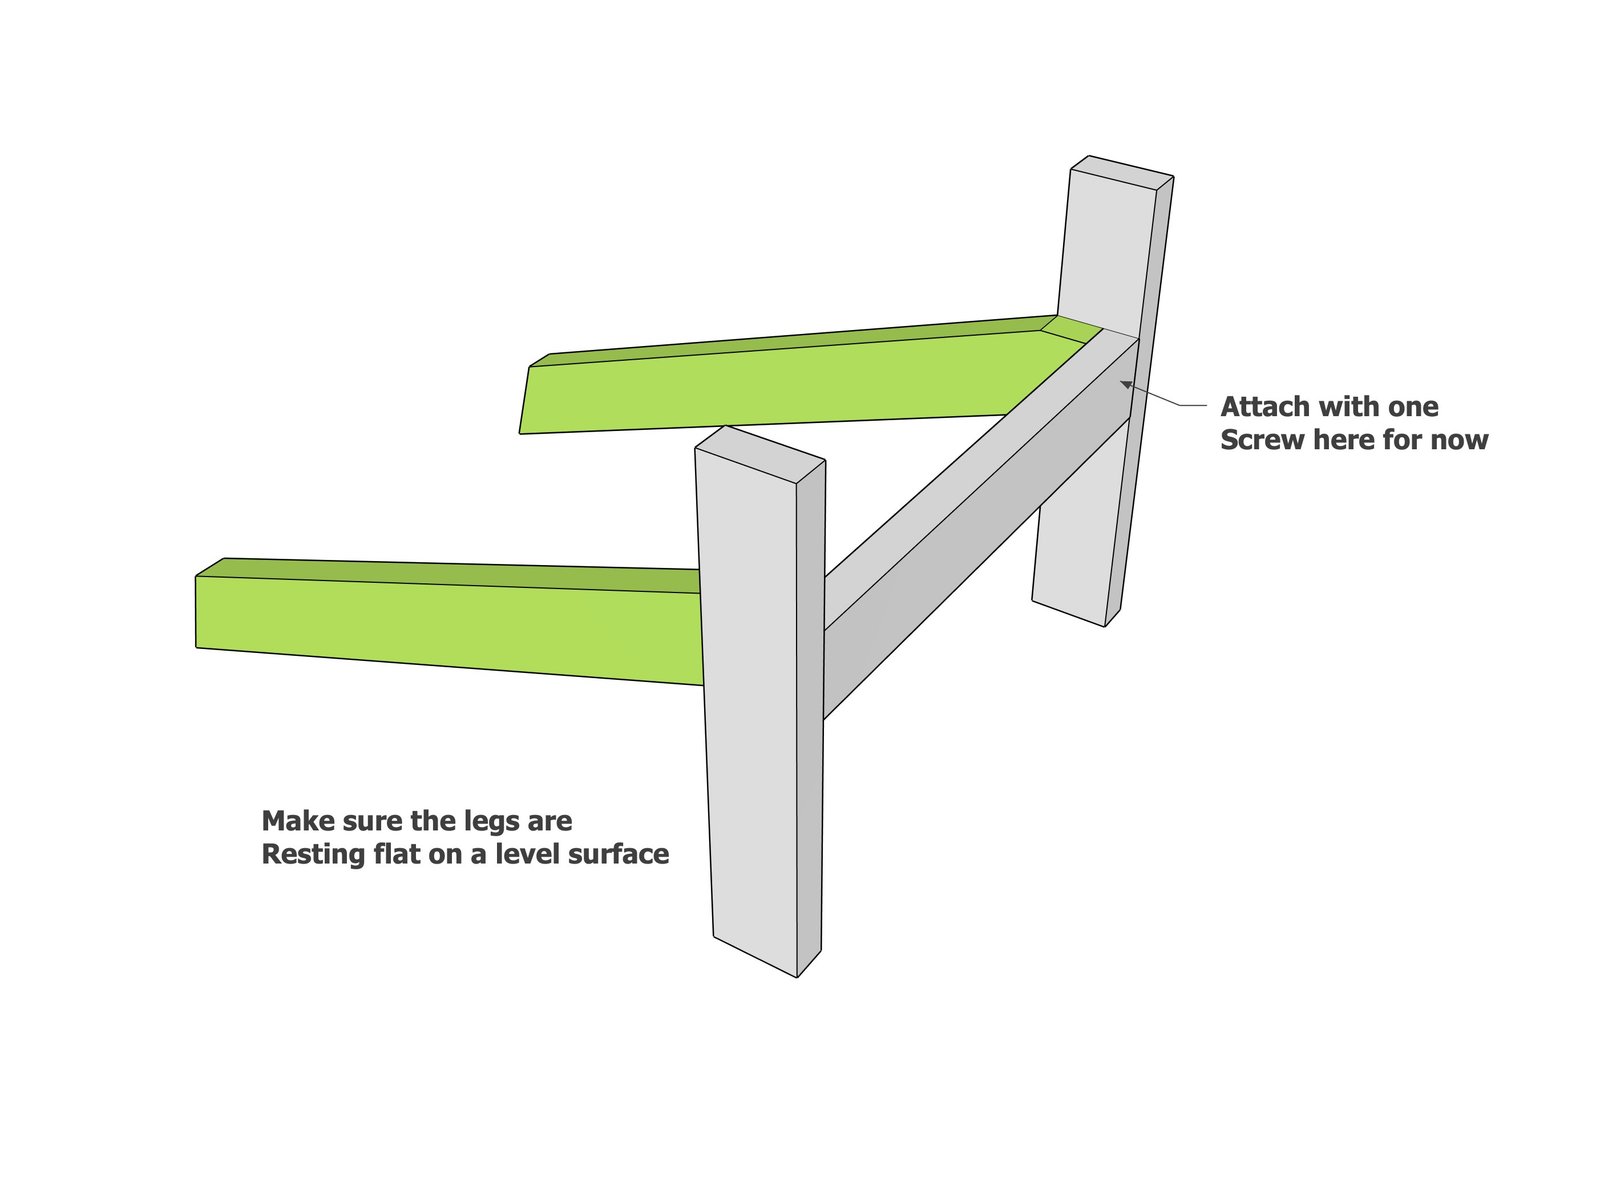
Set the project upright on a flat level surface. Attach the seat stringers to the front apron with just 1 SCREW for now, make sure the chair sits flat on the surface and does not rock.
Step 4
Attach the back leg and the 2x2 arm support as shown, making sure the chair continues to sit flat ad not rock. Finishing screwing the stringer to the legs and add more screws until the frame is solid.
Step 5
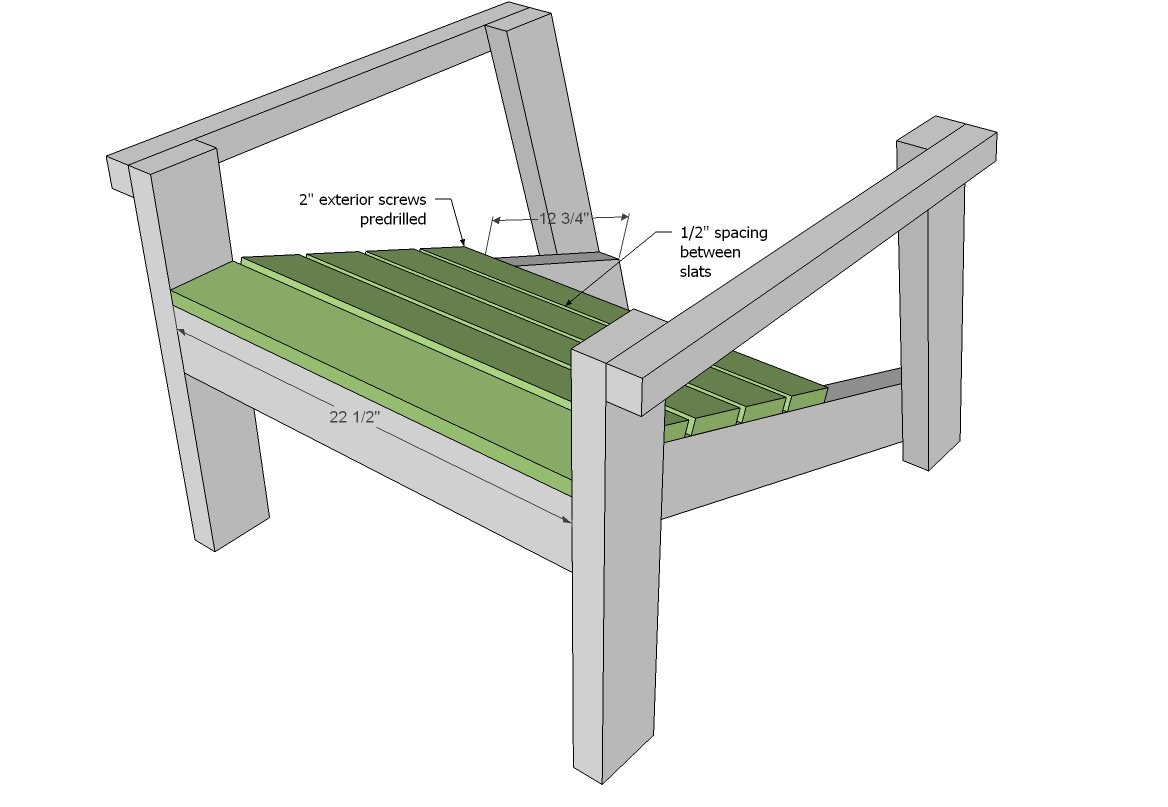
Begin at the front of the chair and attach seat slats to stretcher with 2” screws and glue. Leave a 1/2” gap between seat slats.
Step 6
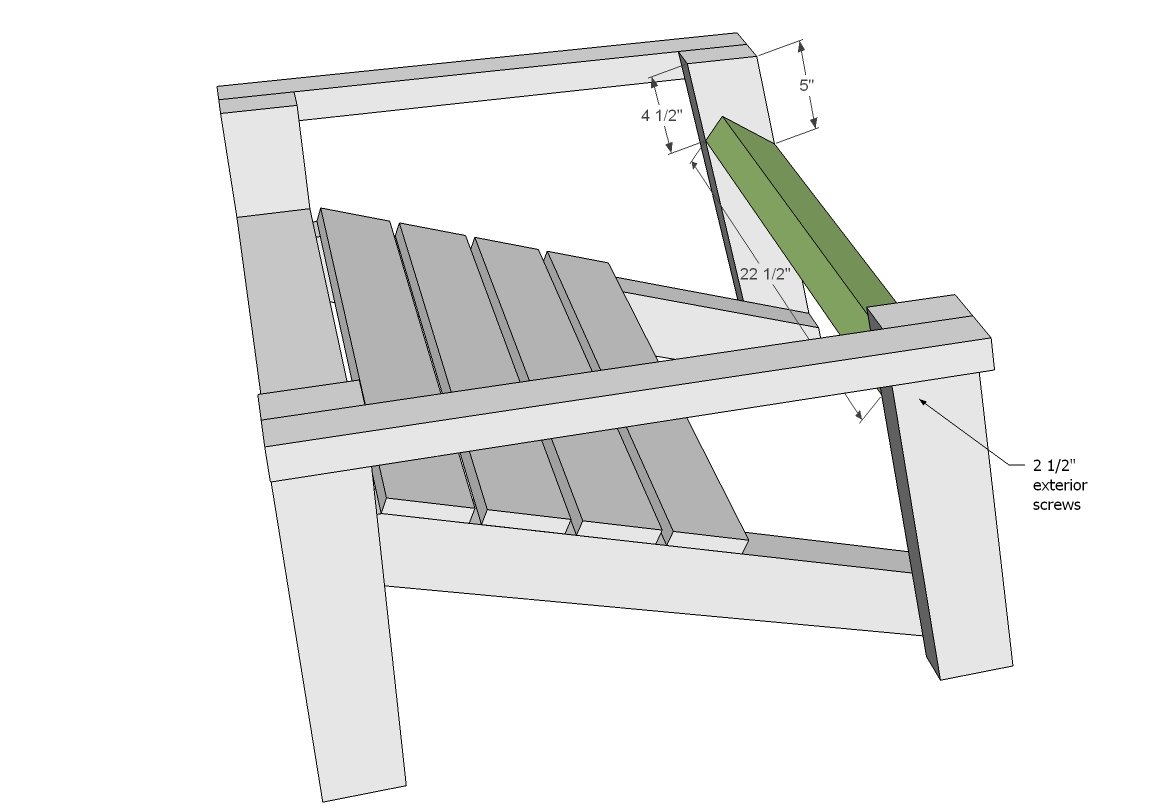
Attach back support to back legs with 2 1/2” exterior screws, matching up measurements in diagrams.
Step 7
Build back by attaching all back boards to seat back base support, leaving approximately 1/2” gap in between. Then attach at top with 1 1/4” screws. Cut arch shape on back top using a large round object to guide you.
Step 8
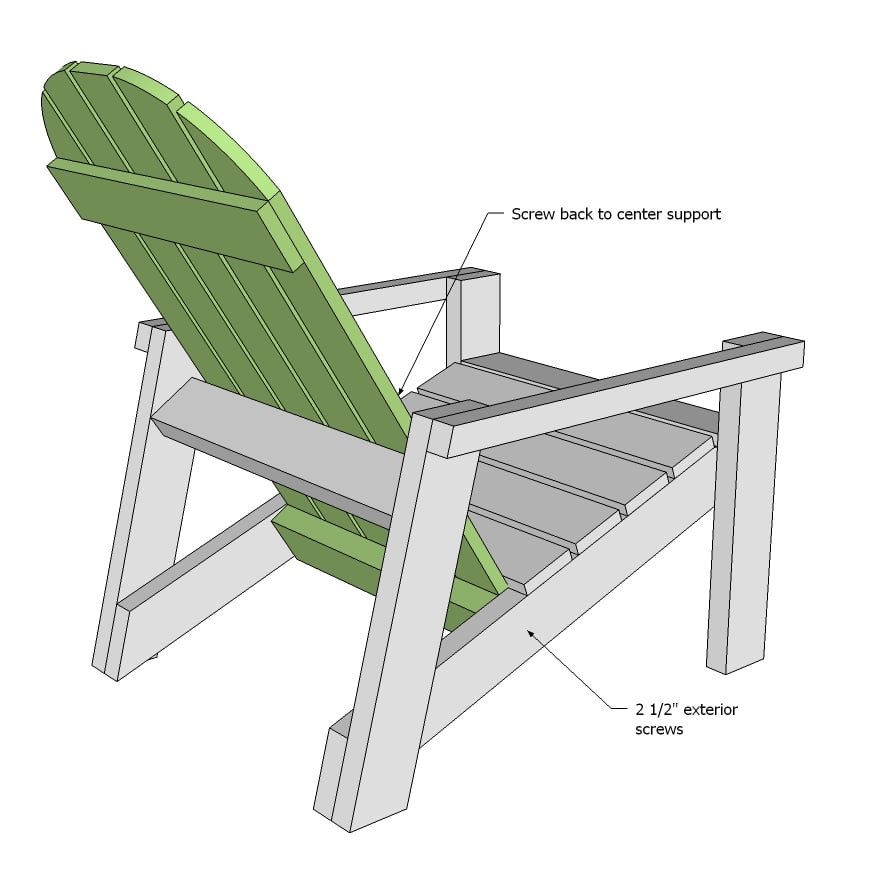
Place back inside chair and secure in place with 2 1/2” exterior screws. Also screw back to back support with 2” exterior screws.
Step 9
Secure armrests to arm supports and tops of legs with screws and glue.
Optional Adirondack Footstool Plans
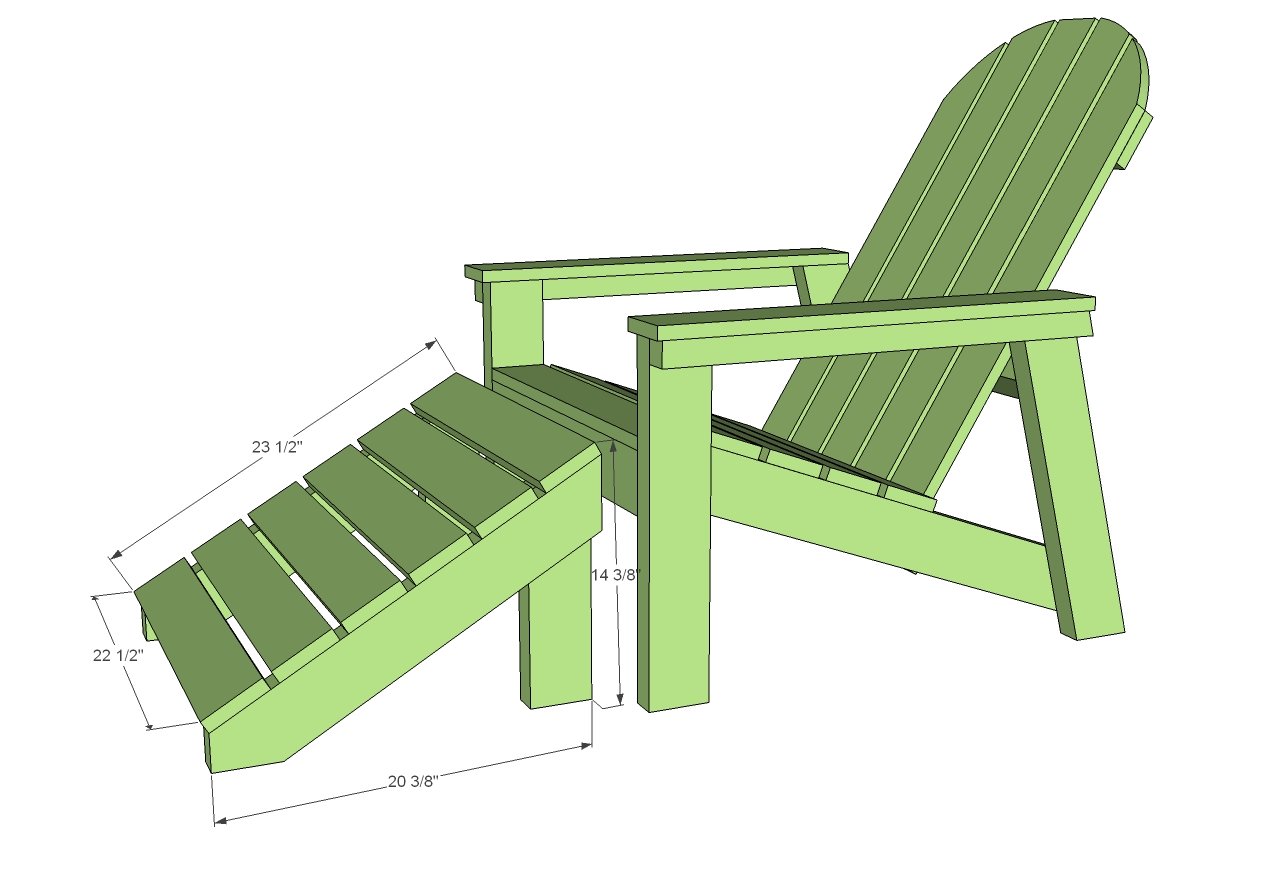
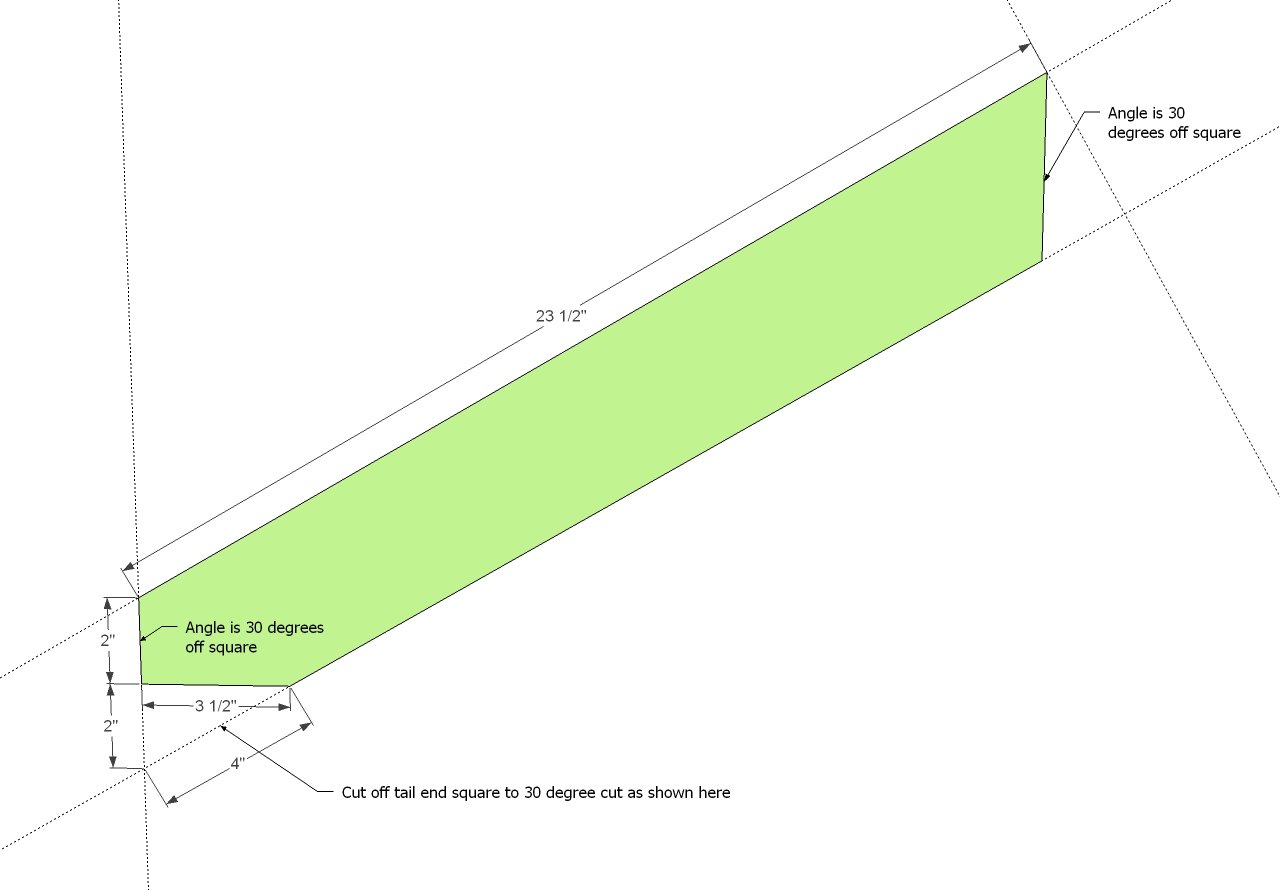
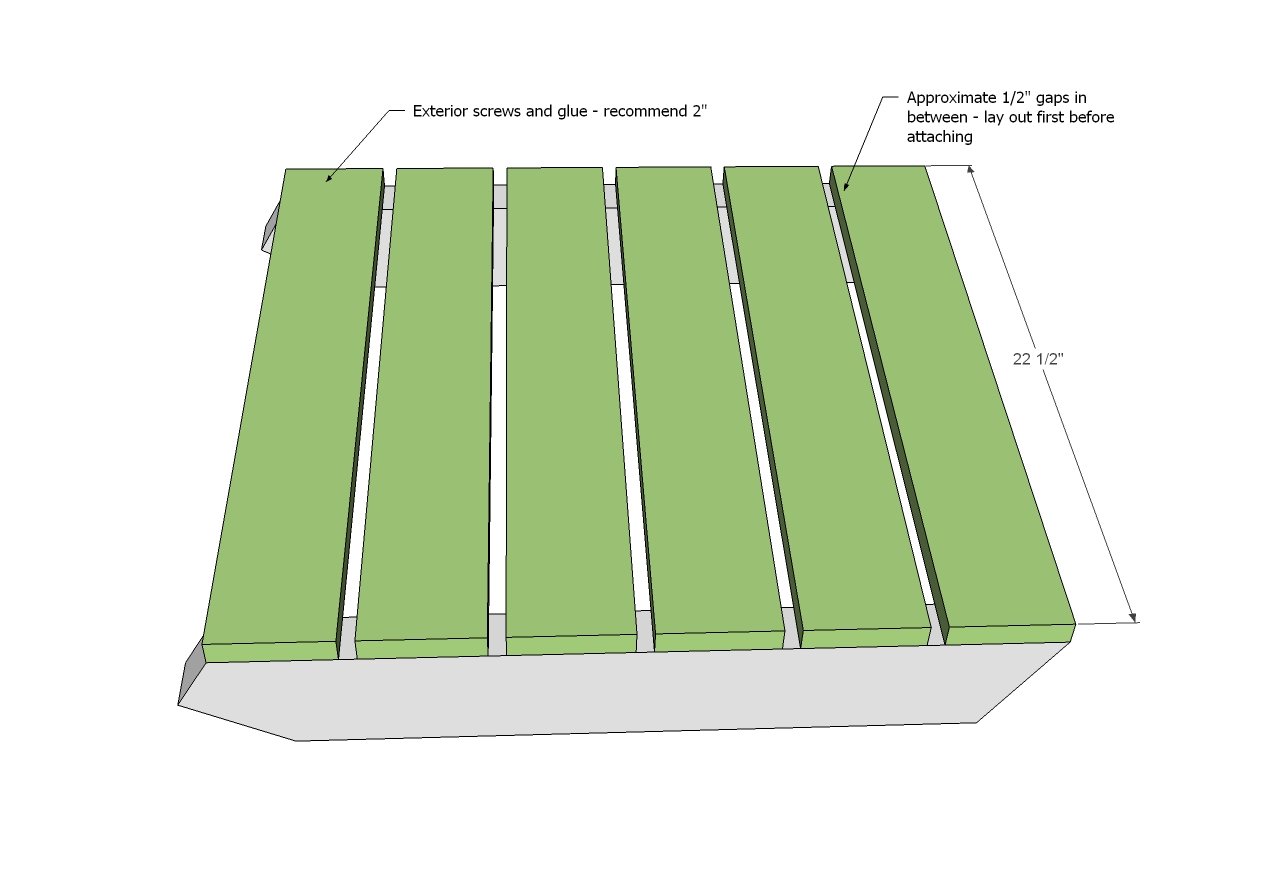
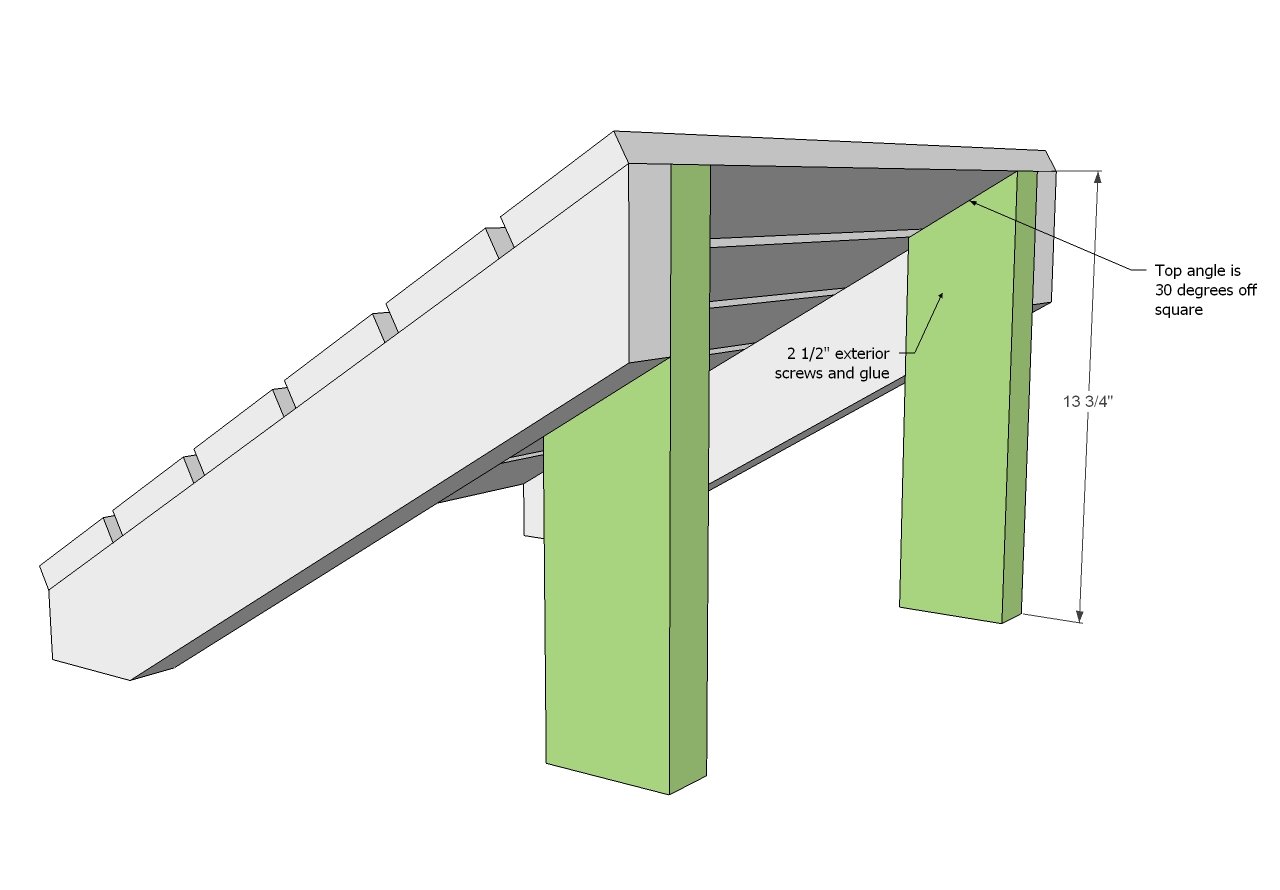
Adding a footstool to your adirondack chair will increase the comfort! We've included the plans below that match this adirondack plan. FOOTSTOOL SHOPPING LIST 1 - 2x4 @ 8 feet long or stud length 1 - 1x4 @ 12 feet long 2” and 2 1/2” exterior screws FOOTSTOOL CUT LIST 2 - 2x4 @ 23 1/2” long with both ends cut at 30 degrees off square, parallel to each other, long point to short point measurement (stringers) 6 - 1x4 @ 22 1/2” (top boards) 2 - 2x4 @ 13 3/4” long with one end cut at 30 degrees off square, longest point measurement (legs)
Step 11
Cut the adirondack foot stool stringers with a compound miter saw first. Then use a square to mark the cut off and cut with jigsaw or circular saw.
Step 12
Use 2" screws and glue to attach the deck boards on top of the stringers.
Step 13
Attach legs with 2-1/2" screws to insides of the stringers to complete the footstool.
Finishing
Sand all surfaces, starting with a medium grit and finishing with fine. Wipe off the dust, fill any holes or gaps with wood filler, and sand smooth once dry. Apply primer if you're painting, then finish with your choice of paint or stain and seal with a durable clear topcoat. For outdoor projects, use exterior-rated primer, paint or stain, and sealer so the piece stands up to the weather.
Source (temporary): https://www.ana-white.com/woodworking-projects/heavy-duty-adirondack-chair-plans-back-leg-and-footstool