Hidden Desk Apothecary Cabinet
Here's how to create an office or desk system anywhere! The beautiful cabinet is actually a desk with hidden stools! This is a to build your own console table that converts to a desk system. The include step by step diagrams, shopping and cut list and lots of photos by
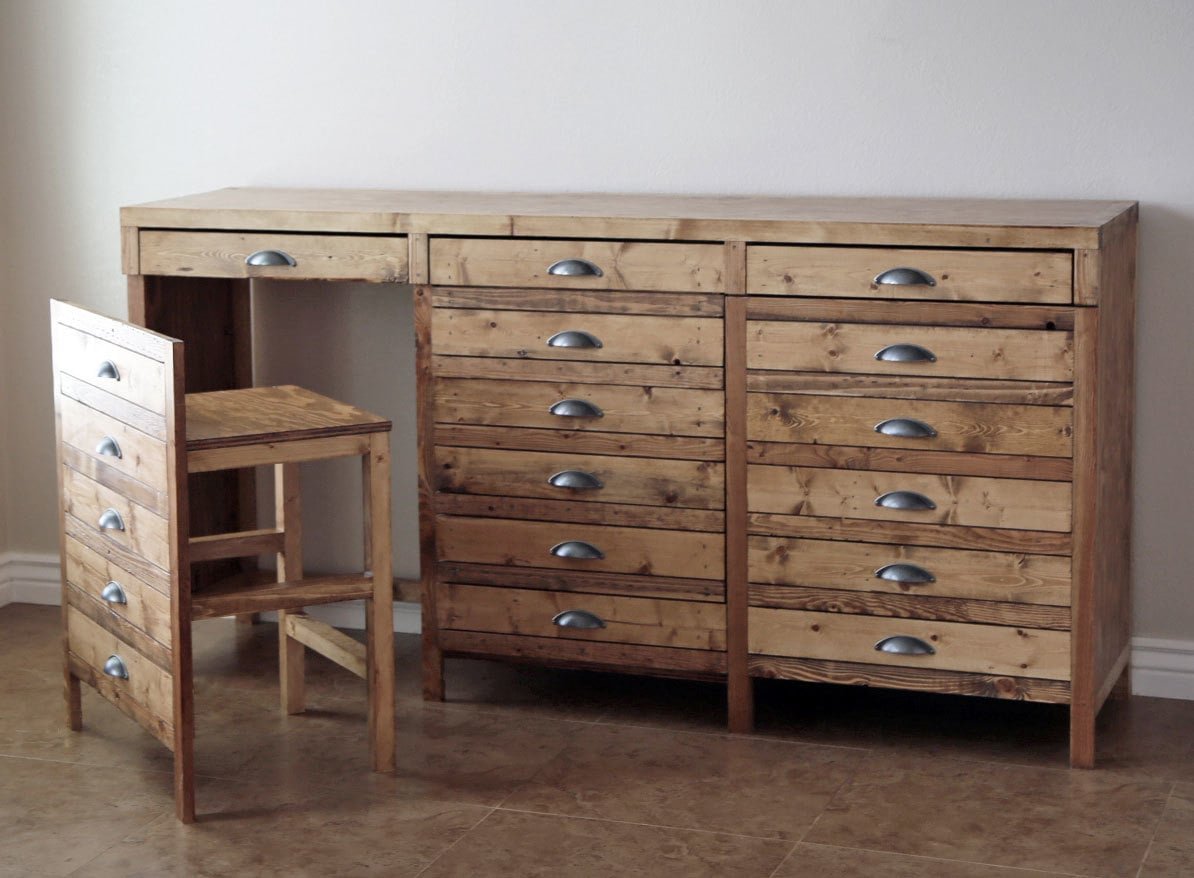
Specifications
| Project type | Stools |
|---|---|
| Room | Storage Solutions |
| Style | Farmhouse Furniture |
| Difficulty | Advanced |
Dimensions
Use the size-specific shopping and cut lists below.
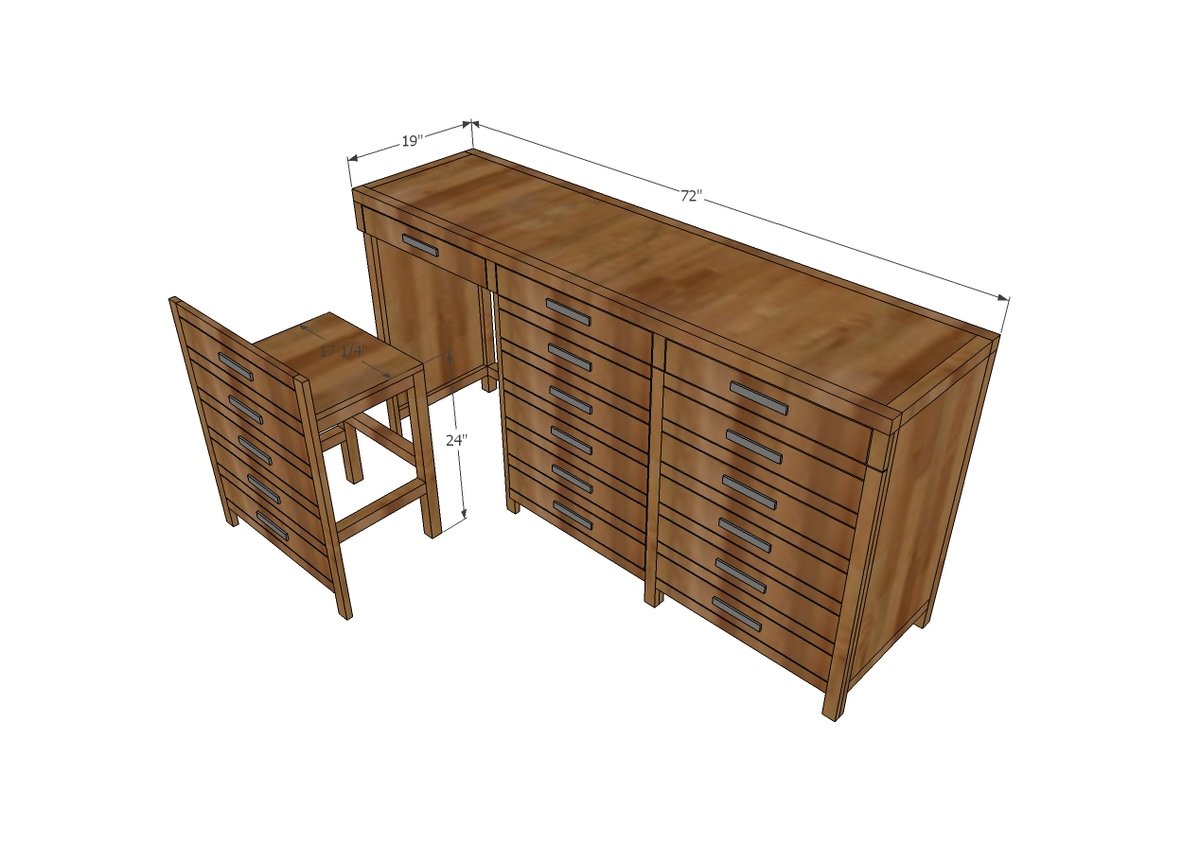
Shopping List
- 1 sheet 3/4" plywood ripped into strips 15-3/4" wide x 8 feet long
- 1 sheet of 1/4" plywood for drawer bottoms
- 7 - 2x2 @ 8 feet long
- 7 - 1x2 @ 8 feet long
- 1 - HARDWOOD 1x2 @ 12 feet long
- 2 - 1x3 @ 8 feet long
- 2 - 1x8 @ 8 feet long and
- 1 - 1x8 @ 4 feet long
- 5 - 1x4 @ 8 feet long
- 18 - cup bin pulls (I got mine from D.Lawless)
- 5 - 18" drawer slides (I use Liberty Euro white ones available at Home Depot)
- Also recommend nail on plastic glides for all bottoms to allow stools to slide in easily.
Cut List
CABINET
- 1 - 3/4" plywood @ 15-3/4" x 69" (top)
- 4 - 2x2 @ 15-3/4" (end trim)
- 2 - 2x2 @ 72" (top front trim)
- 2 - 3/4" plywood @ 15-3/4" x 30" (sides)
- 2 - 3/4" plywood @ 15-3/4" x 32-1/4" (dividers)
- 4 - 2x2 @ 34-1/2" (back legs)
- 3 - 2x2 @ 22" (back supports)
- 4 - 1x2 @ 34-1/2" (front trim)
- 6 - 1x2 @ 22" (front drawer trim)
- 4 - 1x2 @ 3-5/8" (front trim)
DRAWERS
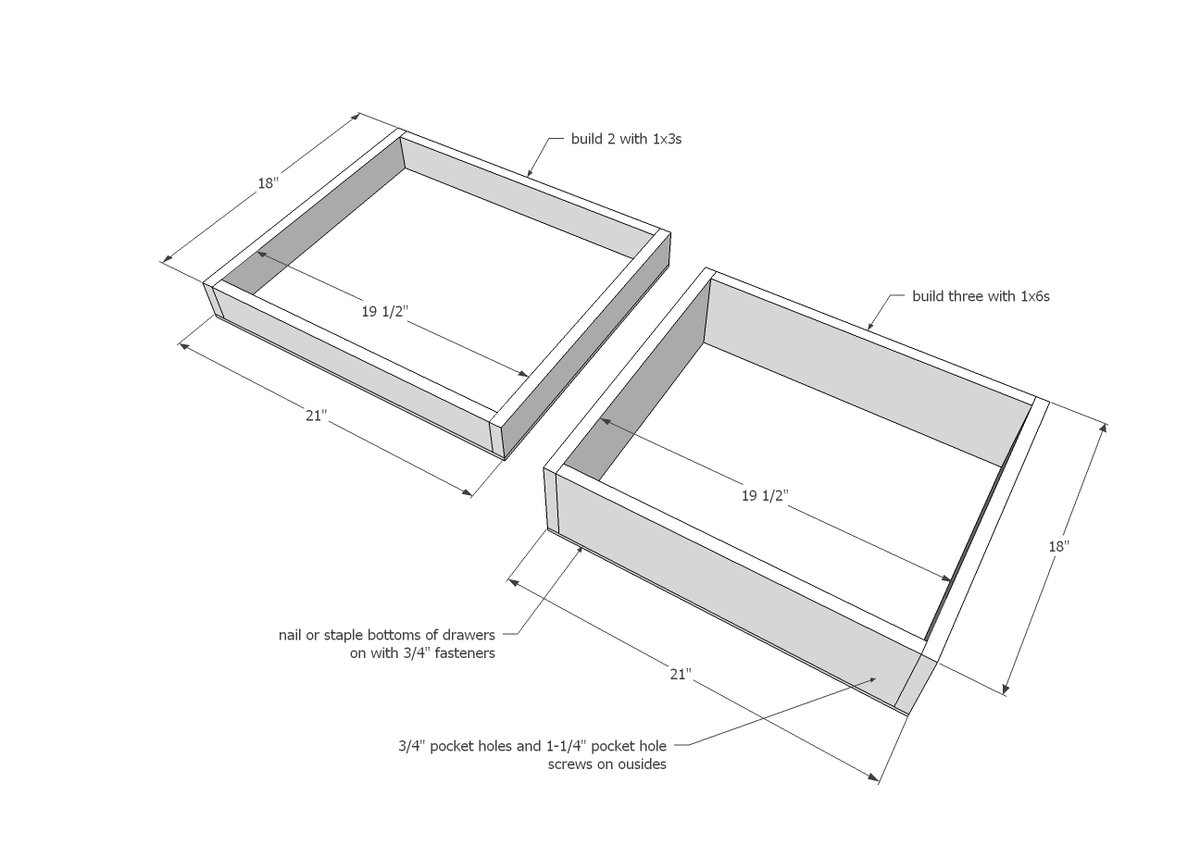
- 4 - 1x3 @ 18"
- 4 - 1x3 @ 19-1/2"
- 6 - 1x8 @ 18"
- 6 - 1x8 @ 19-1/2"
- 5 - 1/4" plywood @ 21" x 18"
- 8 - 1x4 @ 21-3/4" (drawer faces)
- 3 - 1x2 @ 21-3/4" (drawer faces)
STOOLS
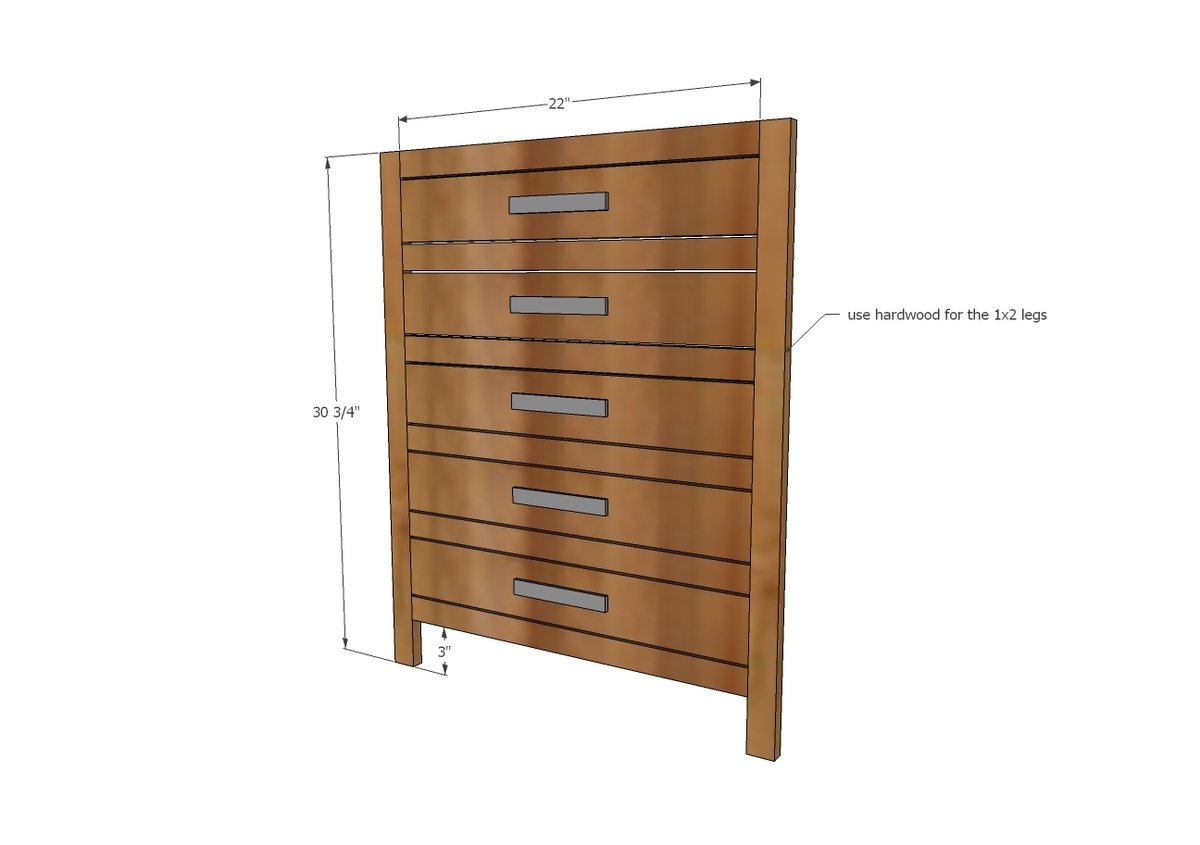
- 4 - 1x2 @ 30-3/4" - USE HARDWOOD (stool legs)
- 12 - 1x2 @ 22"
- 10 - 1x4 @ 22"
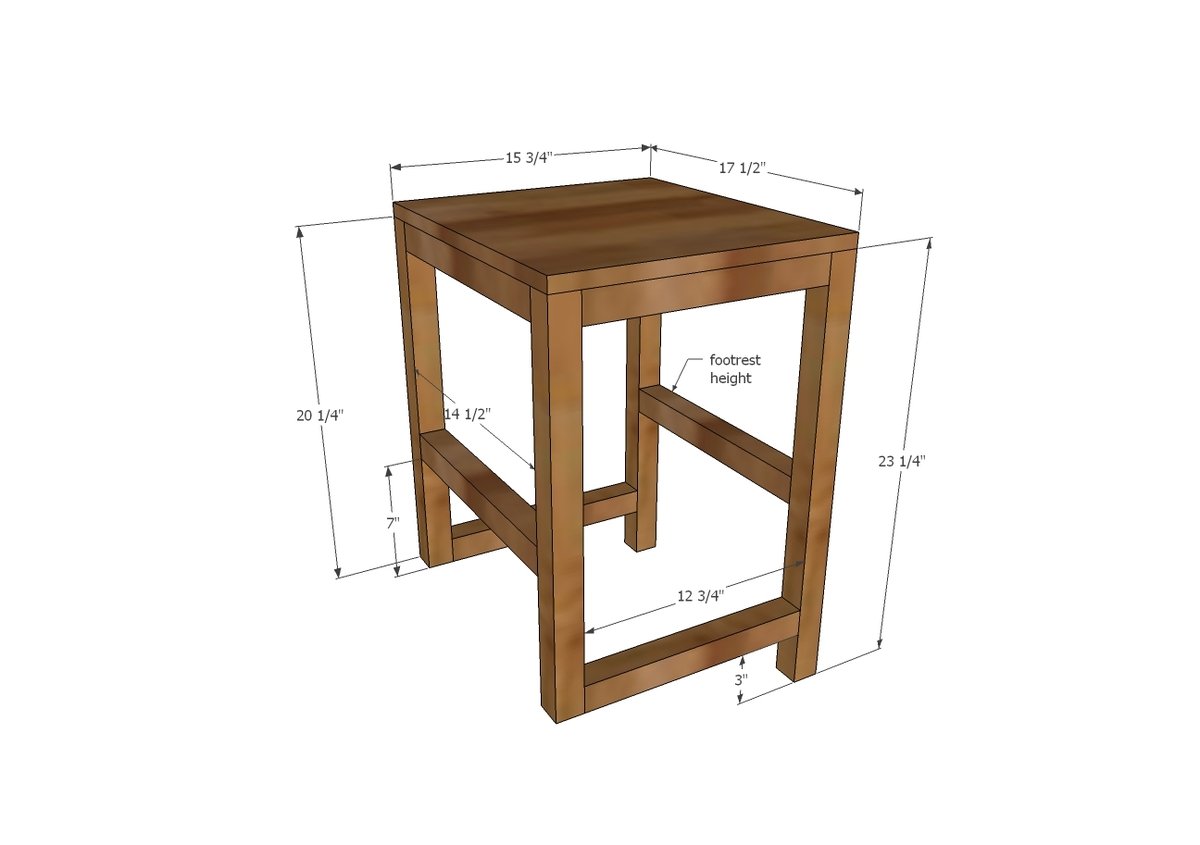
- 2 - 3/4" plywood @ 15-3/4" x 17-1/2"
- 2 - 2x2 @ 20-1/4"
- 2 - 2x2 @ 23-1/4"
- 2 - 2x2 @ 14-1/2"
- 2 - 2x2 @ 12-3/4"
Tools
- measuring tape
- square
- pencil
- safety glasses
- hearing protection
- kreg-jig
- drill
- compound miter saw
- table saw
- nailer
- sander
Step-by-step Instructions
Step 1
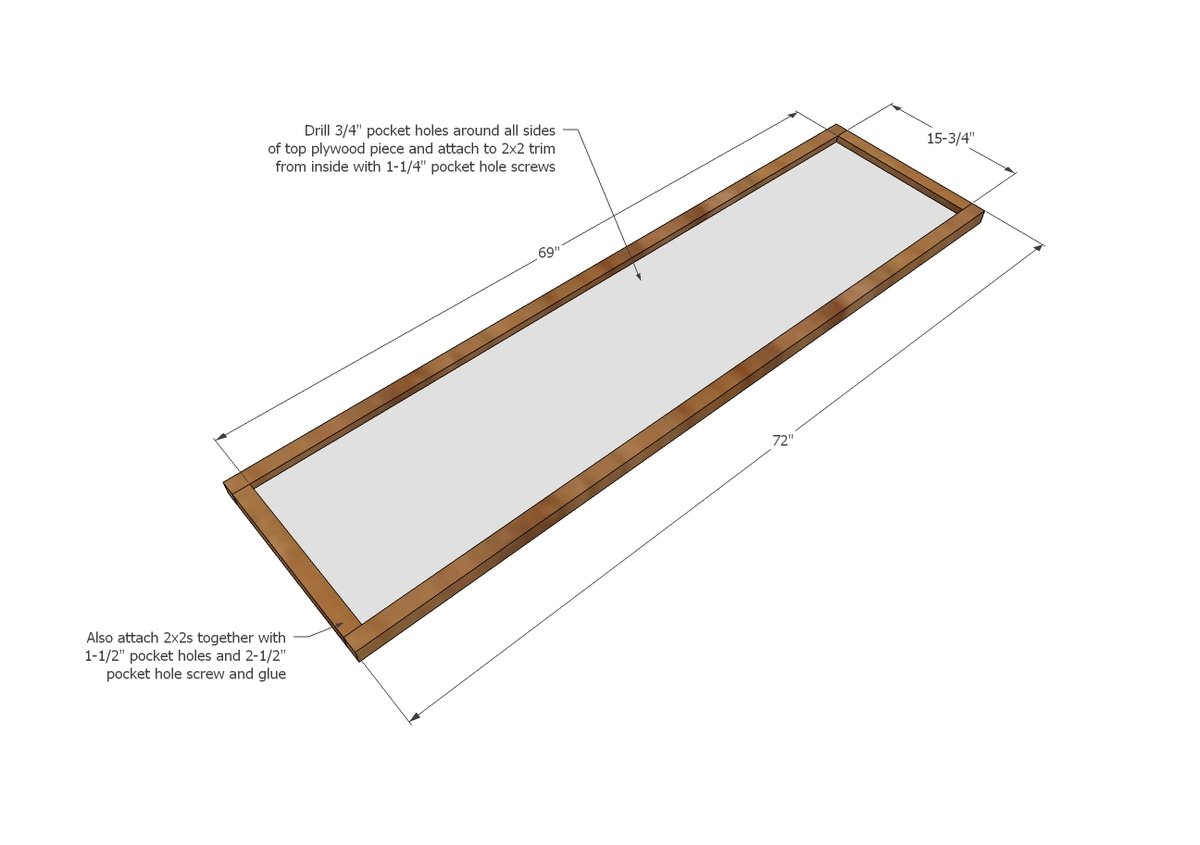
There's alot of different ways to build the cabinet, ultimately I decided building the top first was the way to go just because the top is the most visible and should be prioritized. Drill 3/4" pocket holes around all four sides of the top plywood piece. Drill a 1-1/2" pocket hole on each end of the 2x2 end trim. Then attach 2x2 sides and front/back with 1-1/4" pocket hole screws.
Step 2
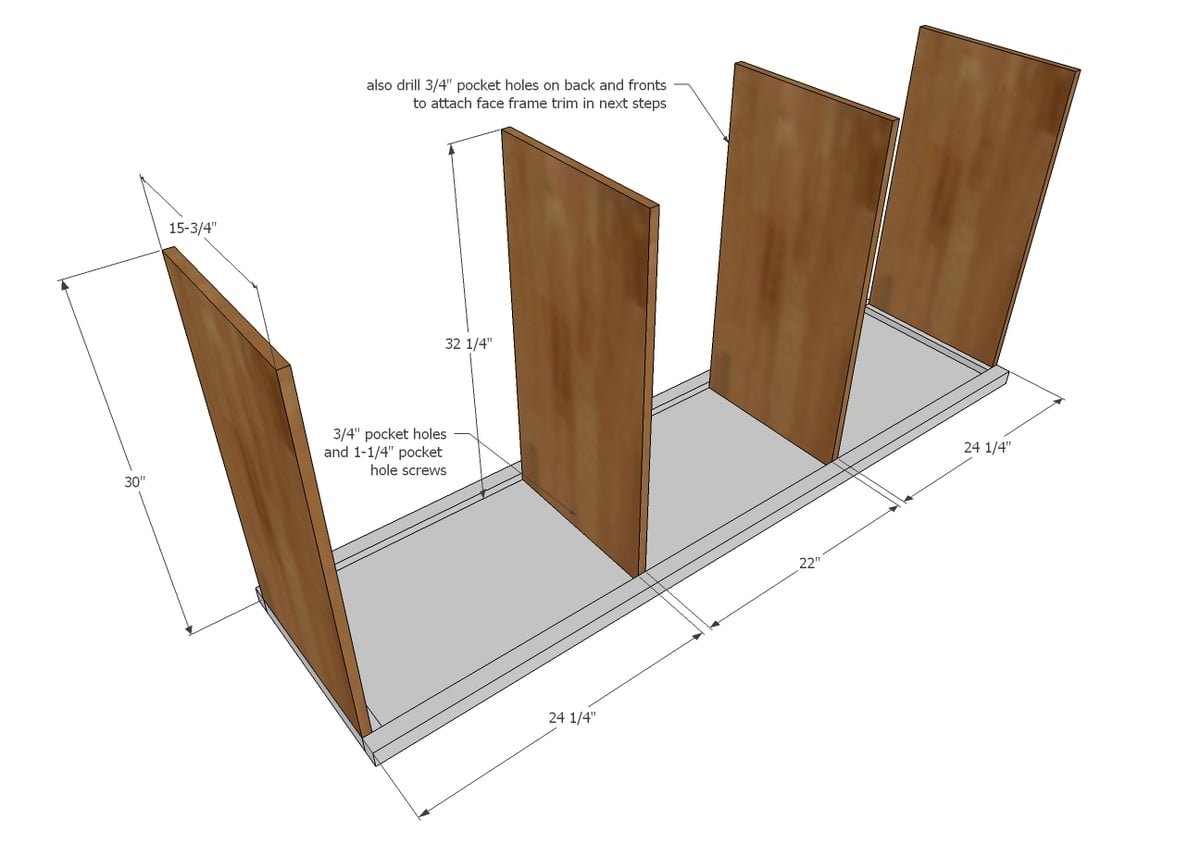
Next the sides and dividers. Drill 3/4" pocket holes along top, front and back edges. Also drill 3/4" pocket holes along bottom edge of sides (not needed on dividers) Assemble with 1-1/4" pocket hole screws and glue, hiding pocket holes on insides. It is very important that these pieces are placed square to the cabinet, to avoid issues with drawers.
Step 3
Drill a 1-1/2" pocket hole on top of all the 2x2 leg pieces. Drill 1-1/2" pocket holes on each end of the 22" long 2x2 pieces. Build the back frame first, then attach to the back of the cabinet.
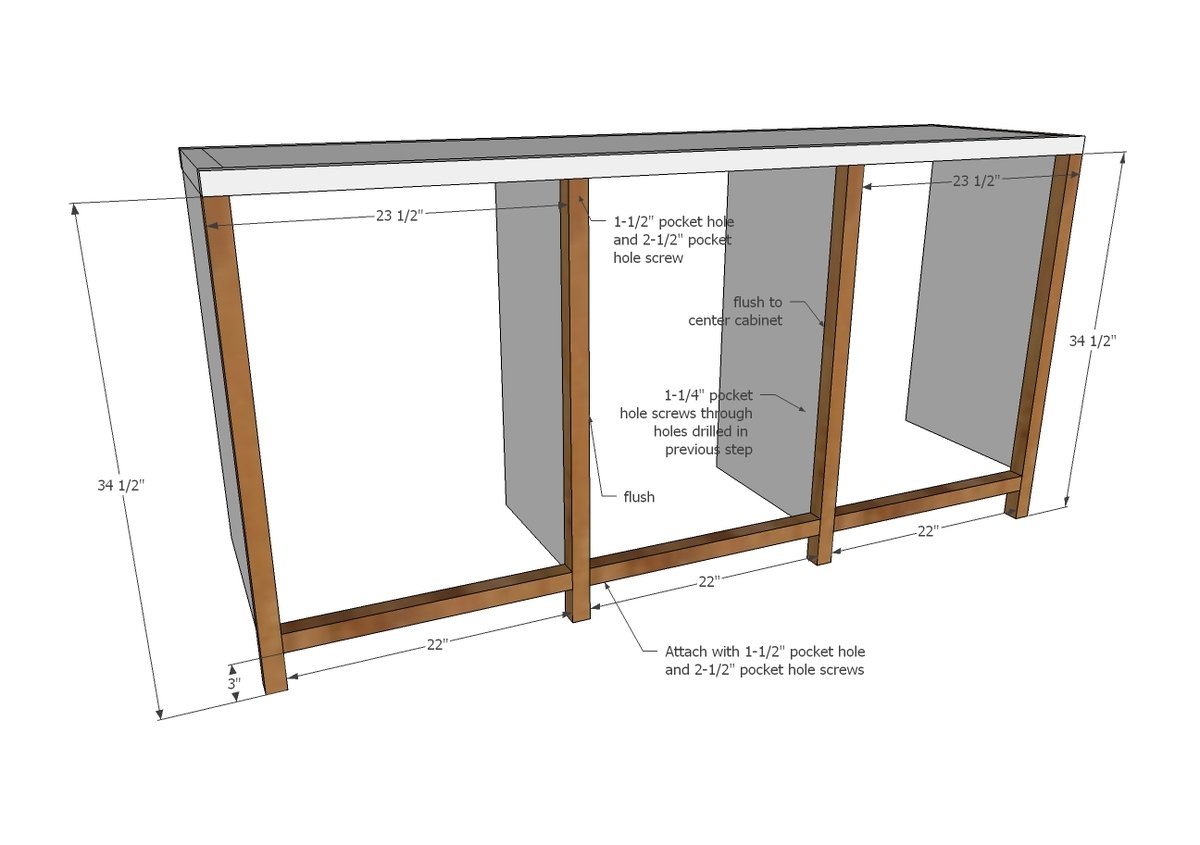
Step 4
Drill a 1-1/2" pocket hole screw on one end of bottom trim pieces. Attach to plywood sides and back.
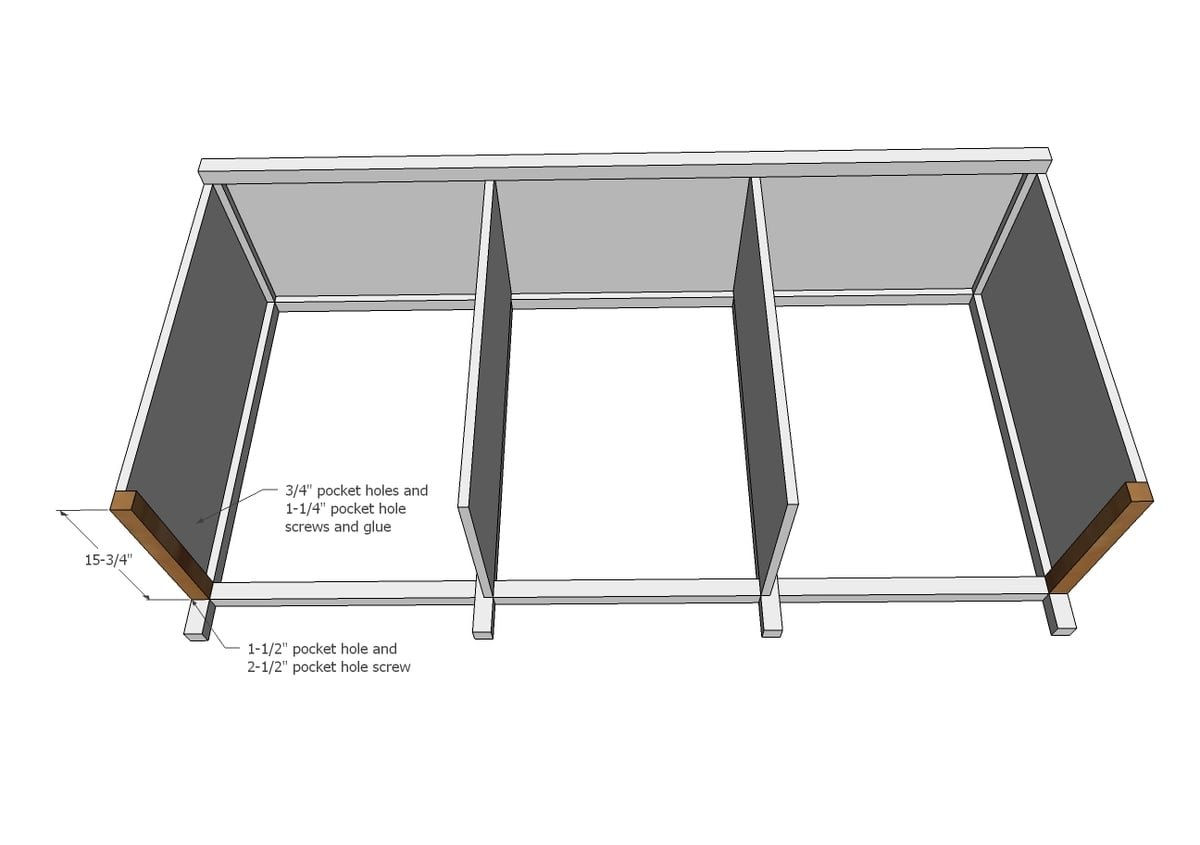
Step 5
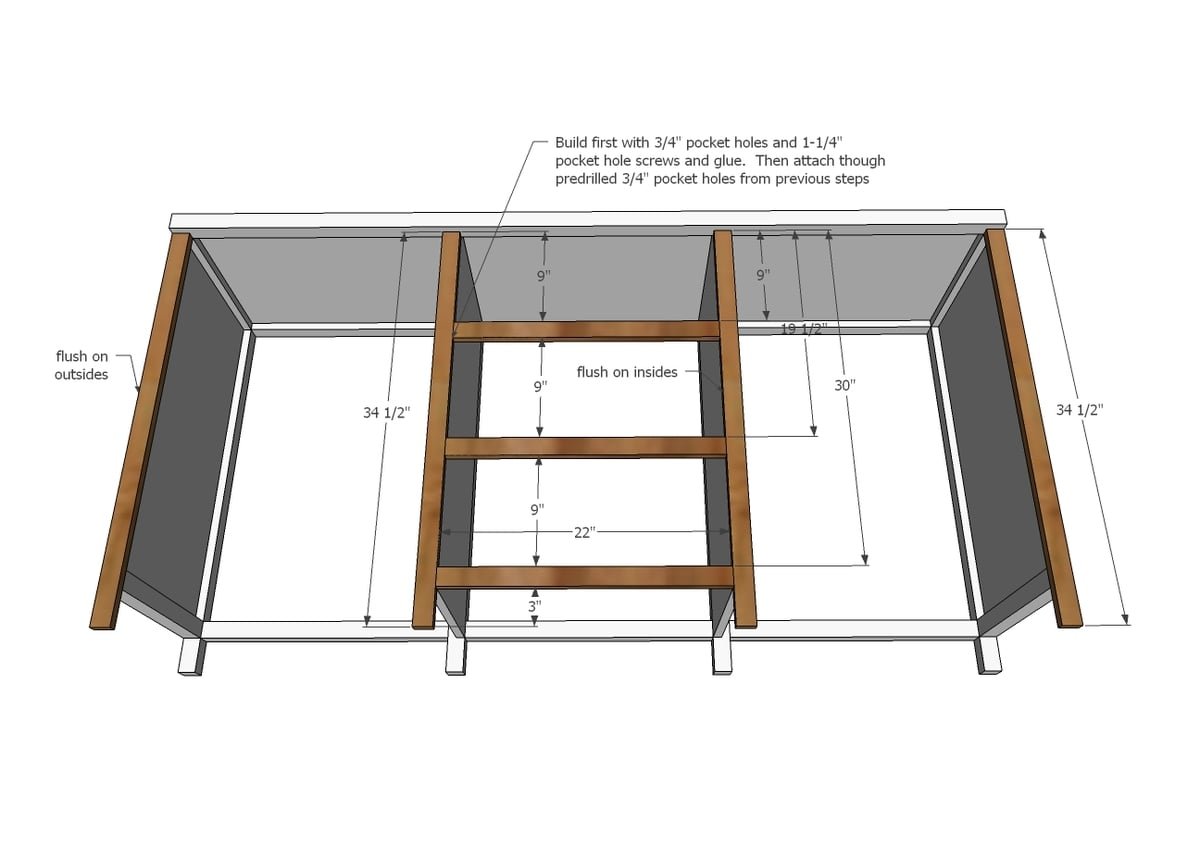
Step 6
Attach 1x2 trim pieces to front with 1-1/4" brad nails.
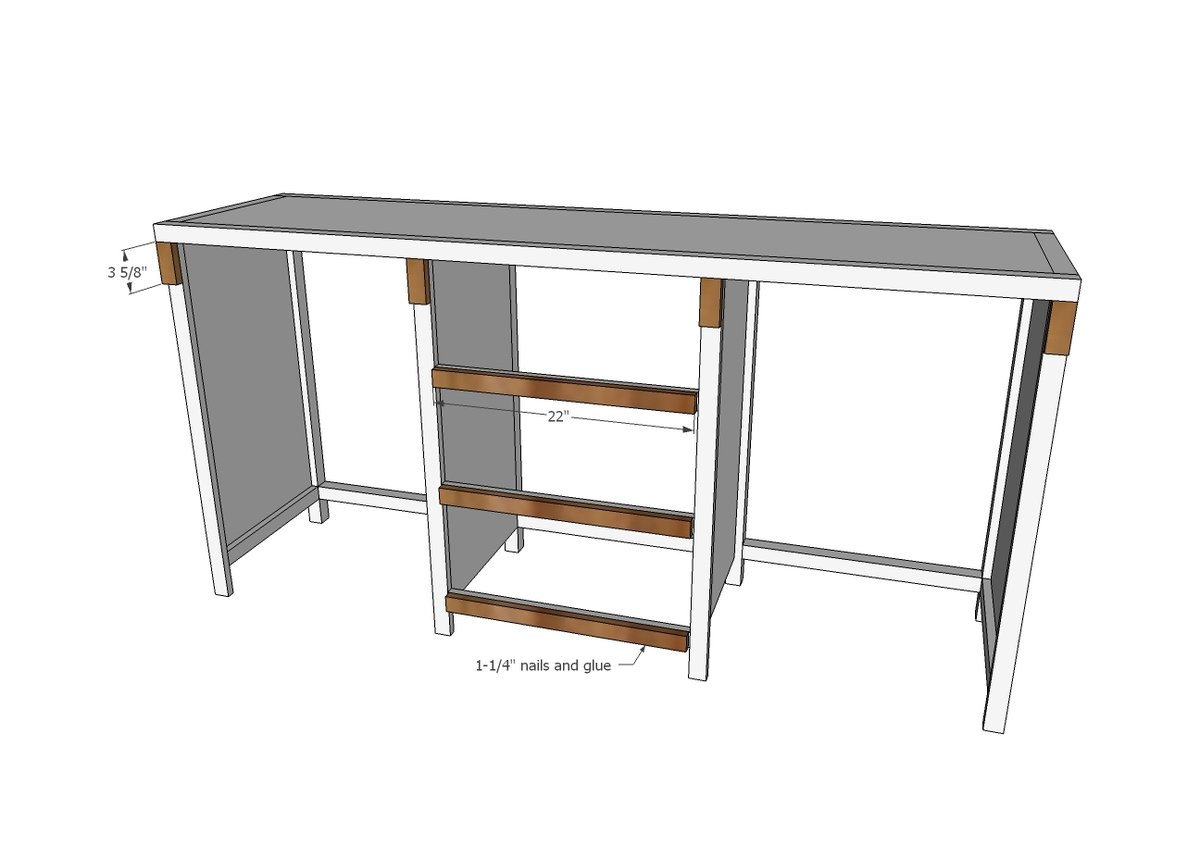
Step 7
Build drawers to fit opening and drawer slides. These drawers assume drawer slides need 1/2" clearance on each side and are bottom corner mount euro style drawer slides (the white ones). Make sure drawers are built square. NOTE: Larger drawers are 1x8 construction.
Step 8
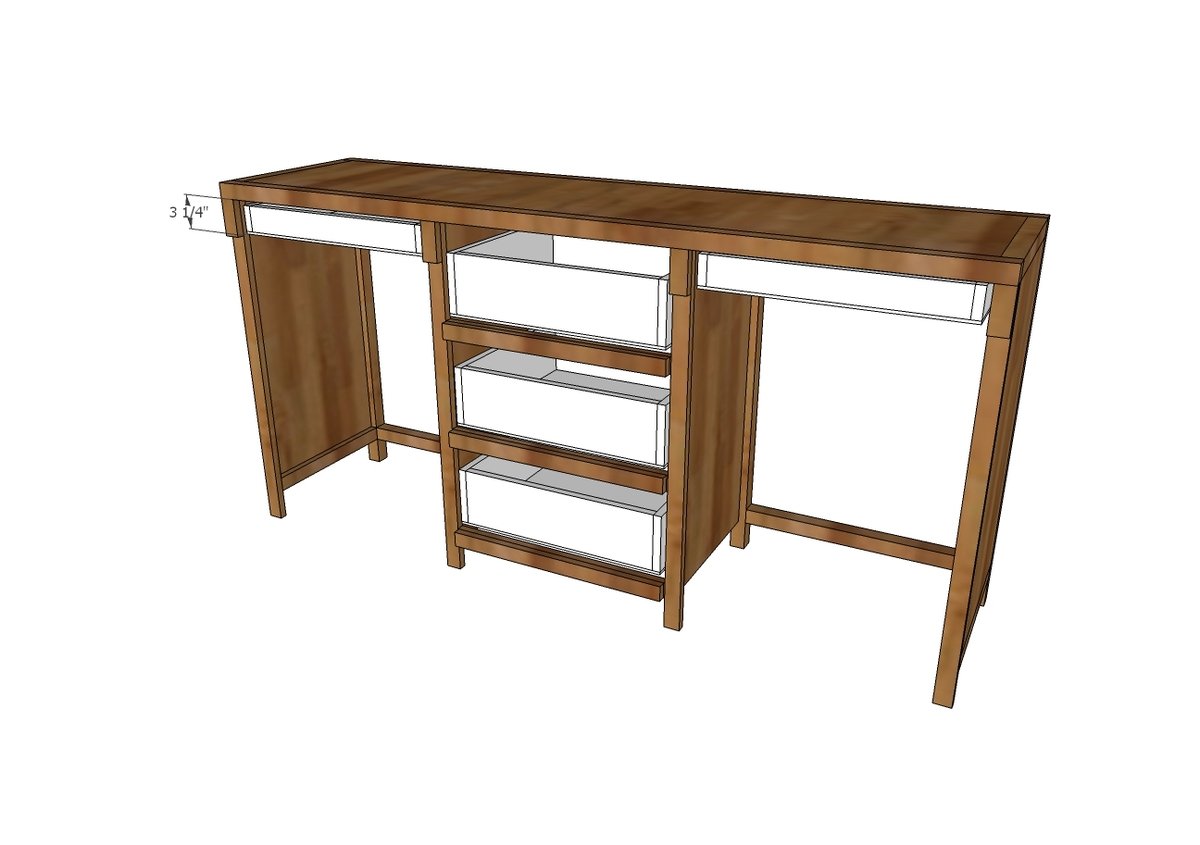
Install drawers in lowest position that will be covered by drawer faces (see next step) using drawer slides.
Step 9
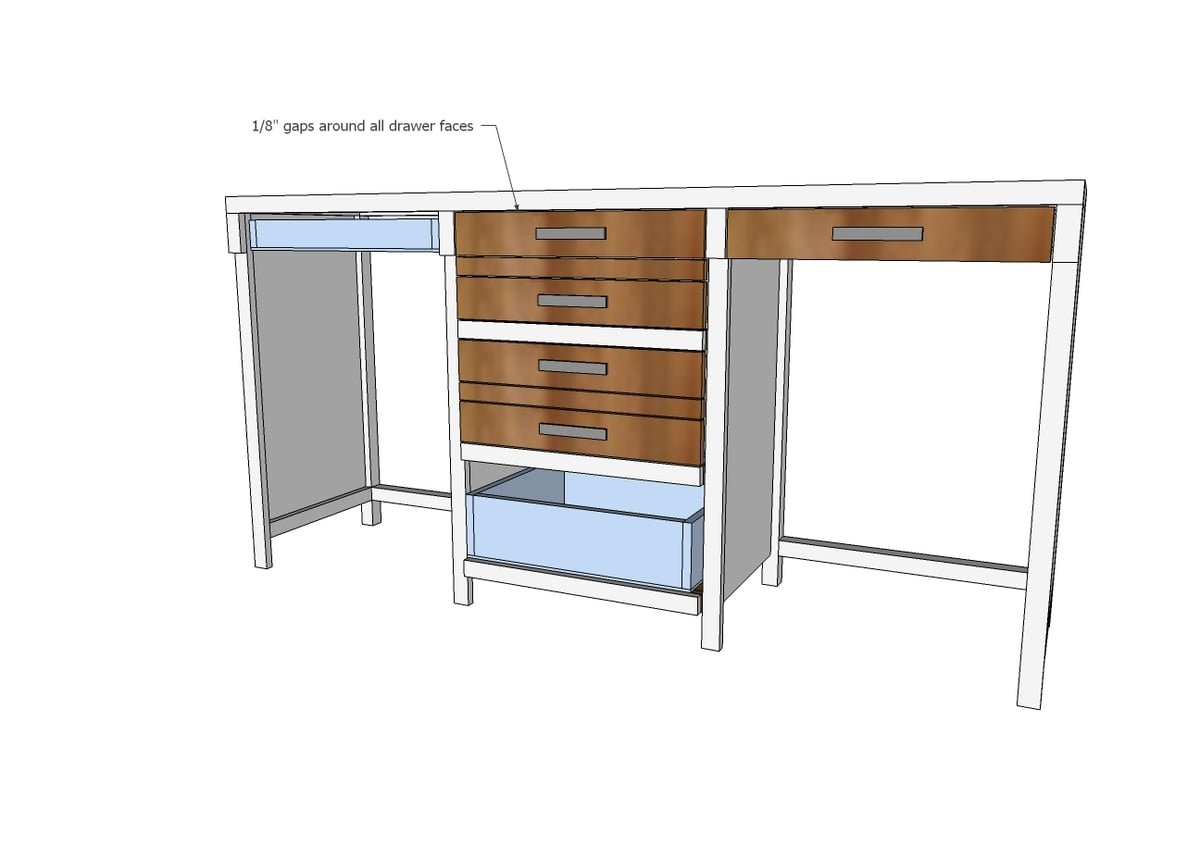
Attach drawer faces with 1-1/4" nails and wood glue to the drawers. NOTE: It may be easier to attach hardware before attach drawer faces to boxes.
Step 10
Use 3/4" pocket holes and 1-1/4" pocket hole screws to build stool backs. Use glue at all joints. NOTE: Use hardwood for the legs to increase strength.
Step 11
Build stool using 1-1/2" pocket holes and 2-1/2" pocket hole screws. Hide pocket holes on top (to be hidden by stool top) and bottom (hidden on underside). Attach stool top with 1-1/4" nails and glue.
Step 12
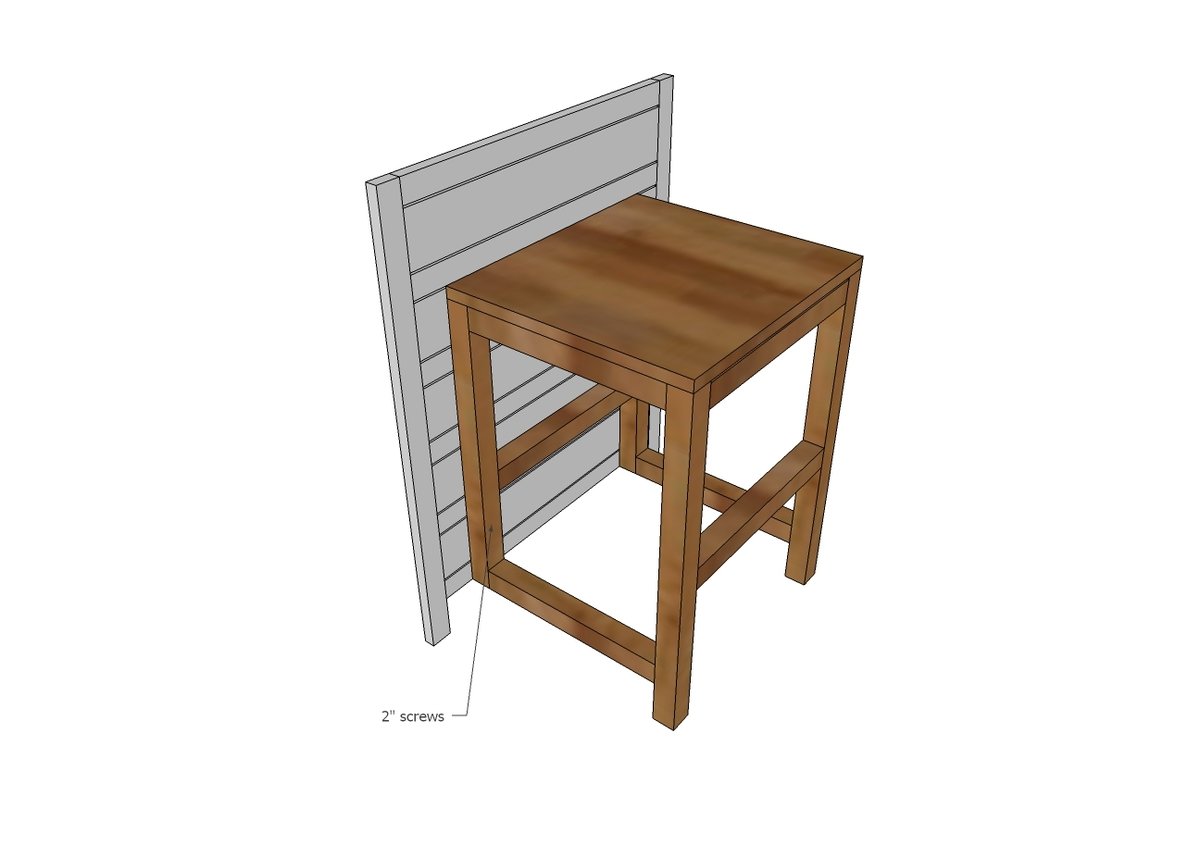
Attach stool to back with 2" screws and wood glue.
Finishing
Sand all surfaces, starting with a medium grit and finishing with fine. Wipe off the dust, fill any holes or gaps with wood filler, and sand smooth once dry. Apply primer if you're painting, then finish with your choice of paint or stain and seal with a durable clear topcoat. For outdoor projects, use exterior-rated primer, paint or stain, and sealer so the piece stands up to the weather.
Source (temporary): https://www.ana-white.com/woodworking-projects/hidden-desk-apothecary-cabinet