House Bed Frame
to build a twin sized house bed frame that is shaped like a modern tiny house! You'll need basic wood building tools and some off the shelf lumber to create this dream kids bed. Plans are for twin sized house bed frame.
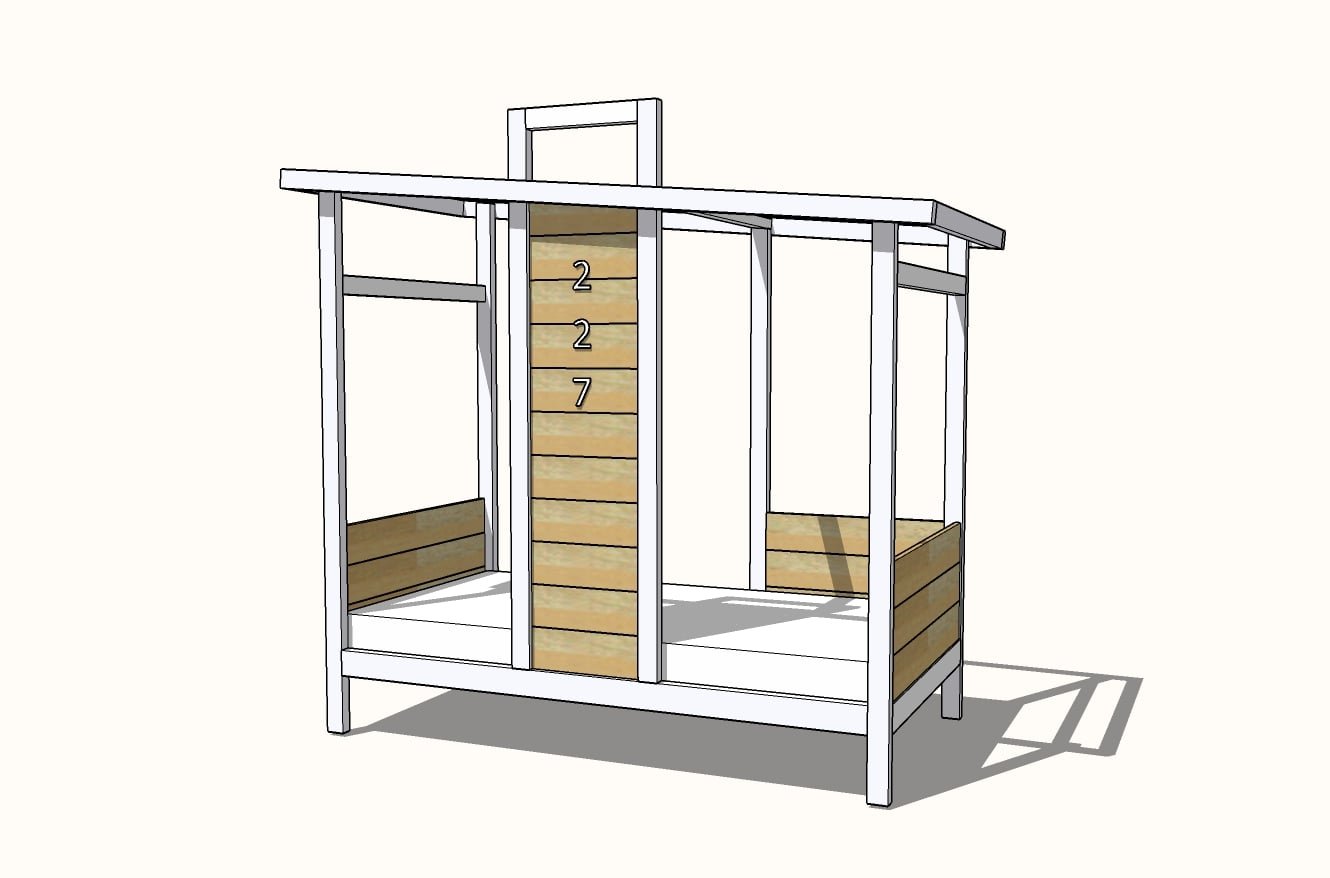
Specifications
| Project type | Twin Beds and Twin Bed Frames |
|---|---|
| Room | Bedroom |
| Style | Modern Style Furniture Plans |
| Difficulty | Intermediate |
Dimensions
Use the size-specific shopping and cut lists below.
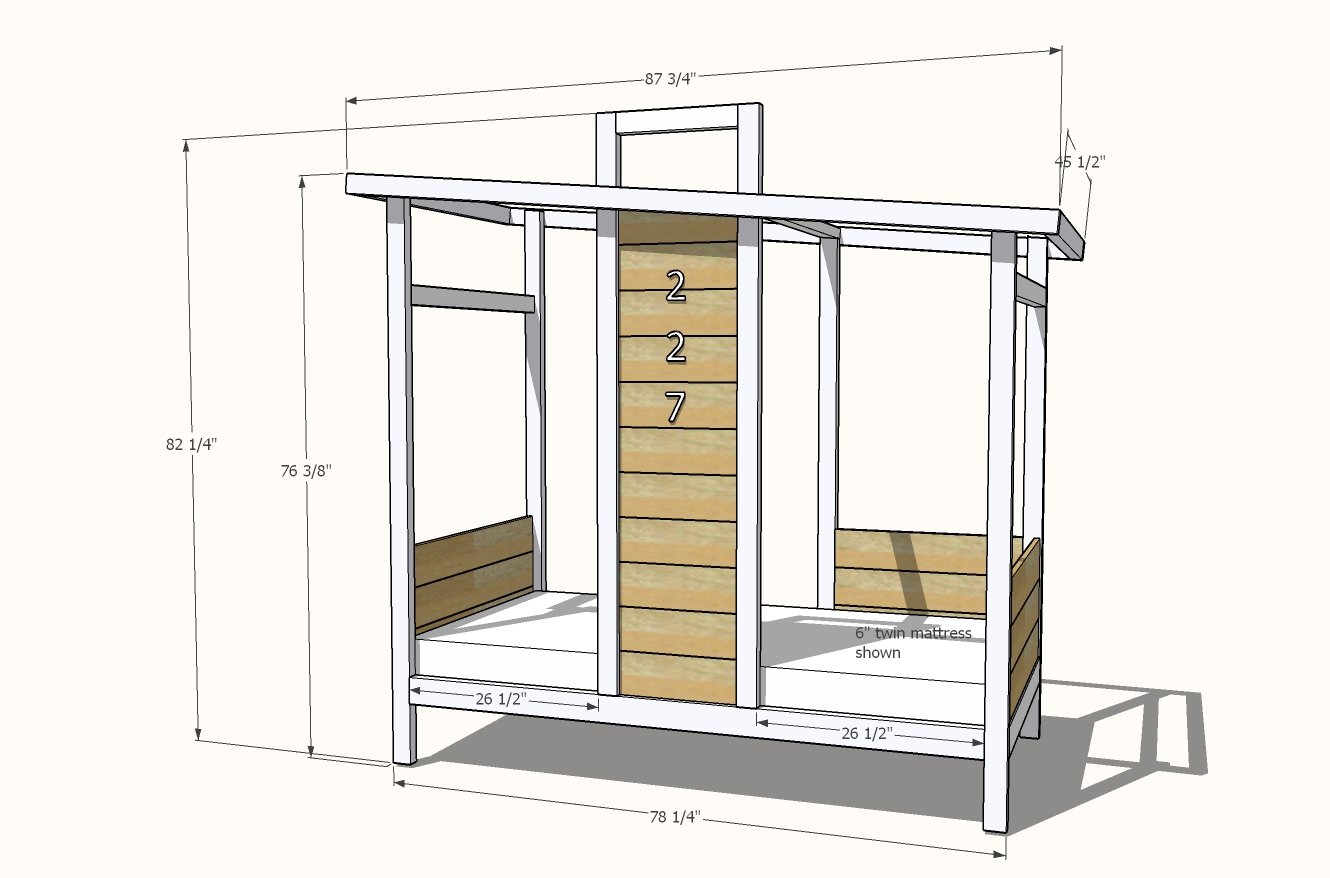
Shopping List
- 9 - 2x3 @ 8 feet long or stud length, find good straight boards
- 3 - 2x4 @ 8 feet long or stud length
- 2 - 2x2 @ 8 feet long (can be furring strips)
- 6 - 1x4 furring strips @ 8 feet long (for bed slats)
- 6 - 1x6 @ 8 feet long (will be used for the wood panels)
- 2 - 1x3 @ 8 feet long
- 2 - 1x2 @ 8 feet long
- 60 - 2-3/4" self tapping construction screws (can be between 2-1/2" and 3" long, prefer #8 or #9 size)
- 50 - 1-1/4" coarse Kreg Pocket Hole Screws
- 25 - 2-1/2" Kreg Pocket Hole Screws
- 3/8" wood dowel for filling pocket holes, about 3 feet
- 1-1/4" brad nails
- wood glue
- Paint with primer or wood stain
Cut List
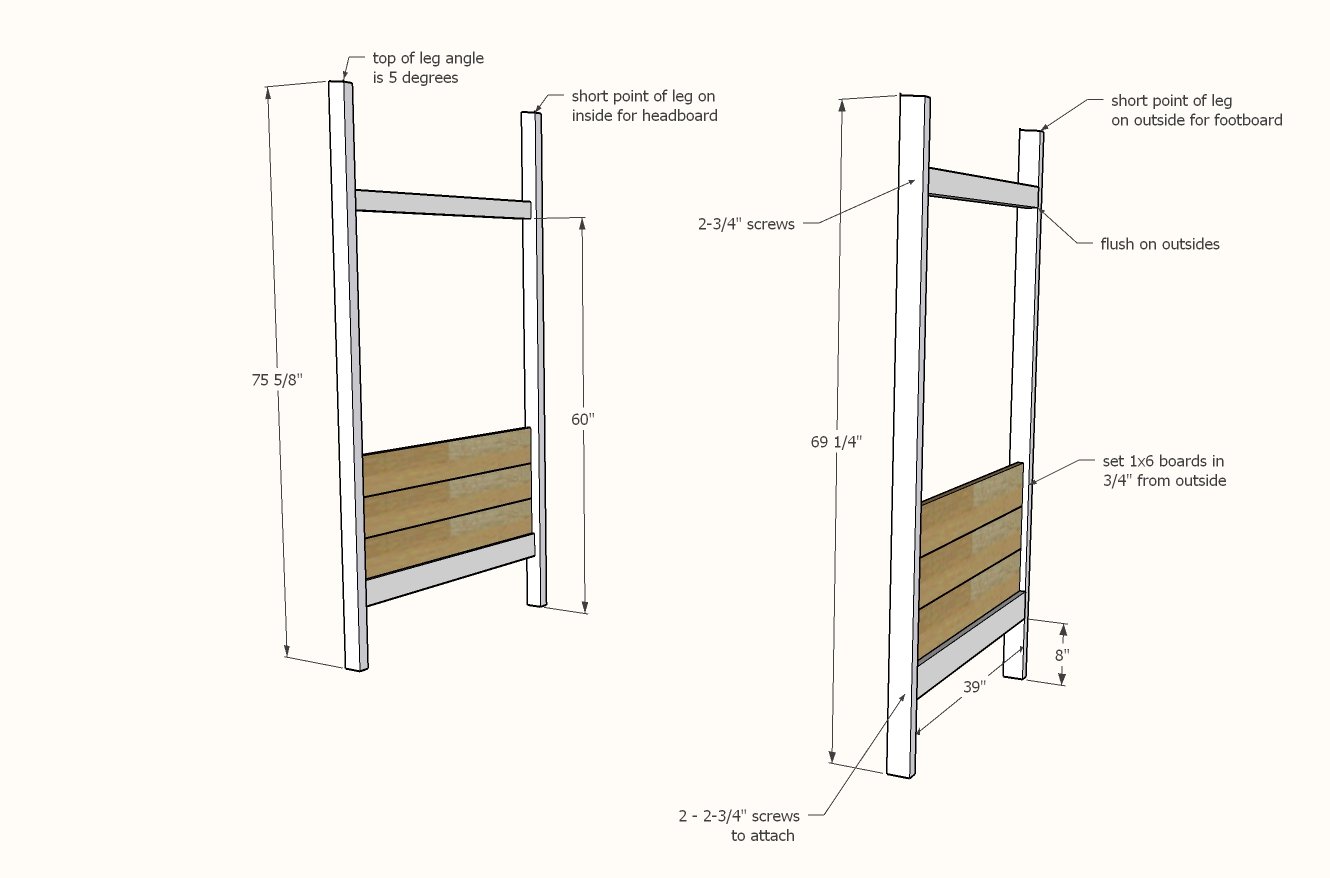
Headboard and Footboard
- 2 - 2x3 @ 75-5/8 - longest point measurement, one end cut at 5 degrees off square
- 2 - 2x3 @ 69-1/4" - longest point measurement, one end cut at 5 degrees off square
- 2 - 2x4 @ 39" - bottom support
- 2 - 2x3 @ 39" - top support
- 6 - 1x6 @ 39" - wood panels
Bed Frame System
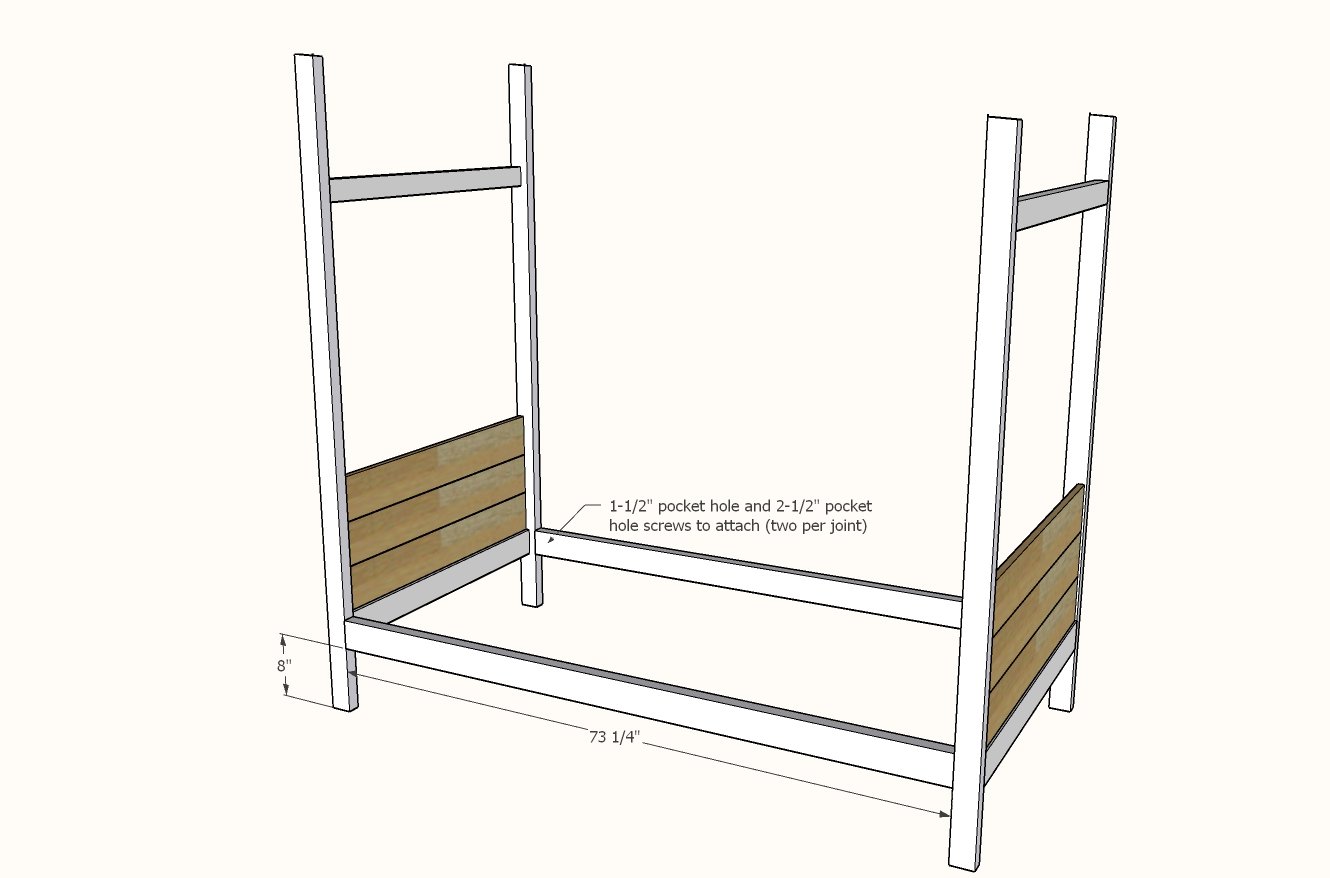
- 2 - 2x4 @ 73-1/4" - siderails
- 2 - 2x2 @ 75-1/4" - inside cleats
- 12 - 1x4 @ 39" - bed slats
Roof
- 2 - 2x3 @ 88-1/2" - sides
- 2 - 2x3 @ 42" - ends
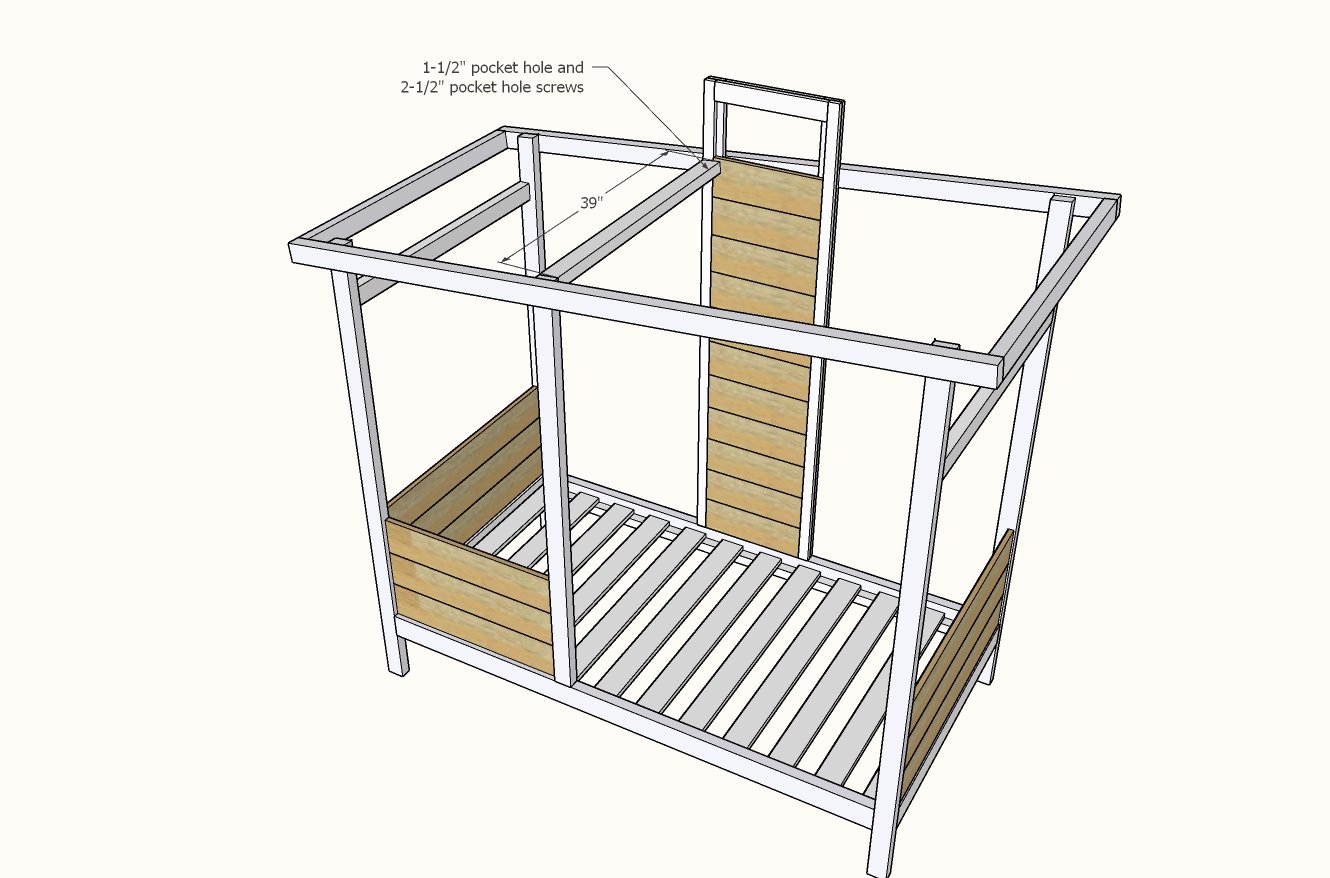
- 1 - 2x3 @ 39" - center of roof (installed in last step)
Back Wall
- 1 - 2x3 @ 60" - long point measurement, one end cut at 5 degrees off square
- 3 - 1x6 @ 27-1/4" - back wall panel
Front Wall
- 2 - 1x3 @ 70-3/4" - front frame
- 1 - 1x3 @ 13-3/4" - front frame
- 2 - 1x2 @ 70-3/4" - back frame
- 1 - 1x3 @ 15-3/4" - back frame
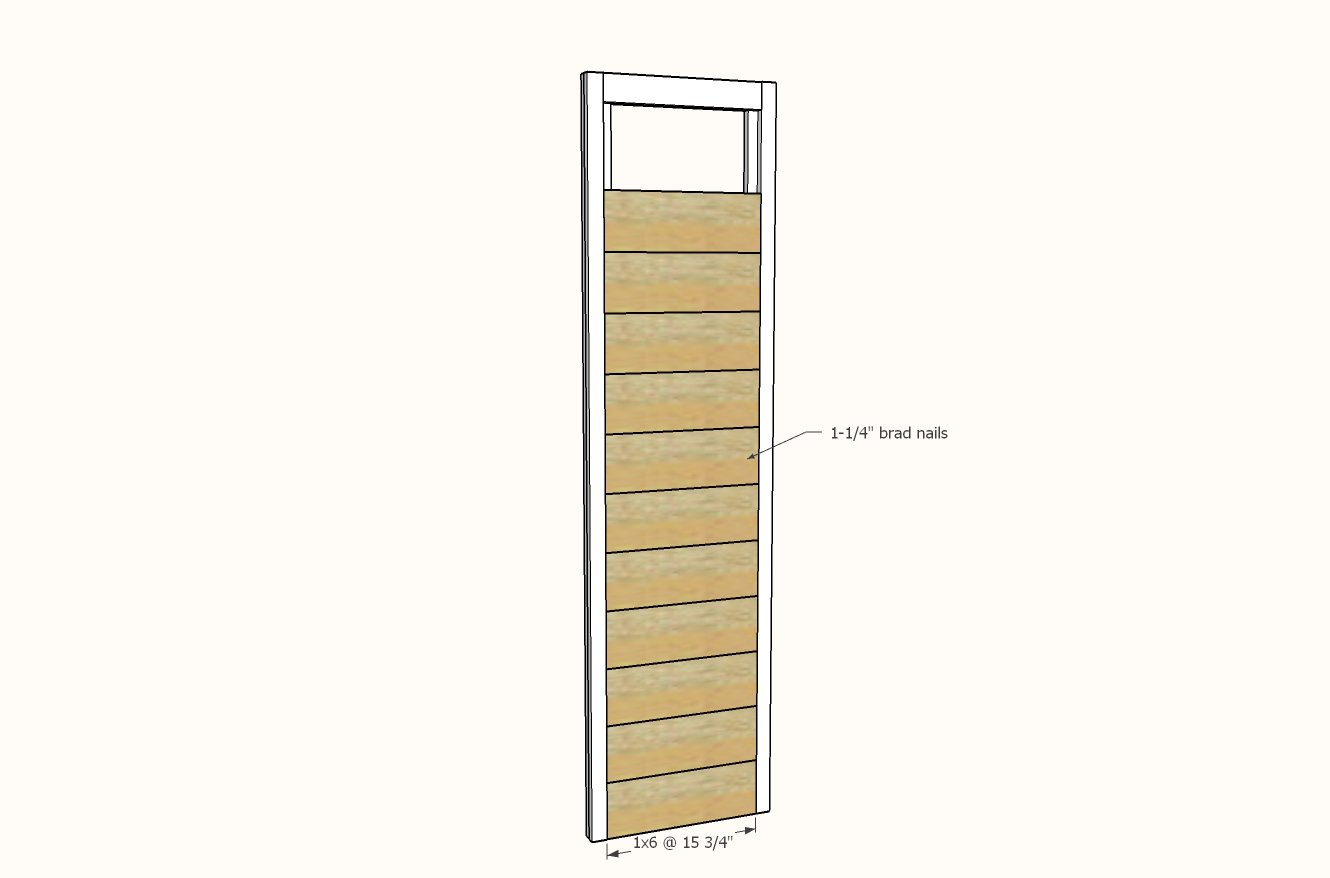
- 11 - 1x6 @ 15-3/4" - front wall panel boards
Tools
- measuring tape
- pencil
- safety glasses
- hearing protection
- kreg-jig
- drill
- compound miter saw
- nailer
- sander
Step-by-step Instructions
Build the frame for the headboard and footboard first using 2-3/4" self tapping construction screws.
Glue and add the 1x6 panel boards with 3/4" pocket holes and 1-1/4" pocket hole screws. I recommend two pocket holes per each end of the 1x6 boards, and one in the center, joining the 1x6 boards together edge to edge. Insert the 3/8" dowel into the pocket holes and use a flush trim hand saw to cut off the excess to fill the pocket holes. Paint or stain the headboard and footboard. Since this bed is too large to fit through a standard doorway, I recommend painting or staining the remaining pieces in portions, and then bringing all the pieces into the room for final assembly.
Drill two 1-1/2" pocket holes on each end of the siderails.
Attach to the headboard and footboard panels with 2-1/2" pocket hole screws.
Build the roof section on the ground with construction screws at corners. Paint or stain.
At assembly, bring flush to top of legs and attach with construction screws from insides, with a 5" overhang on each end.
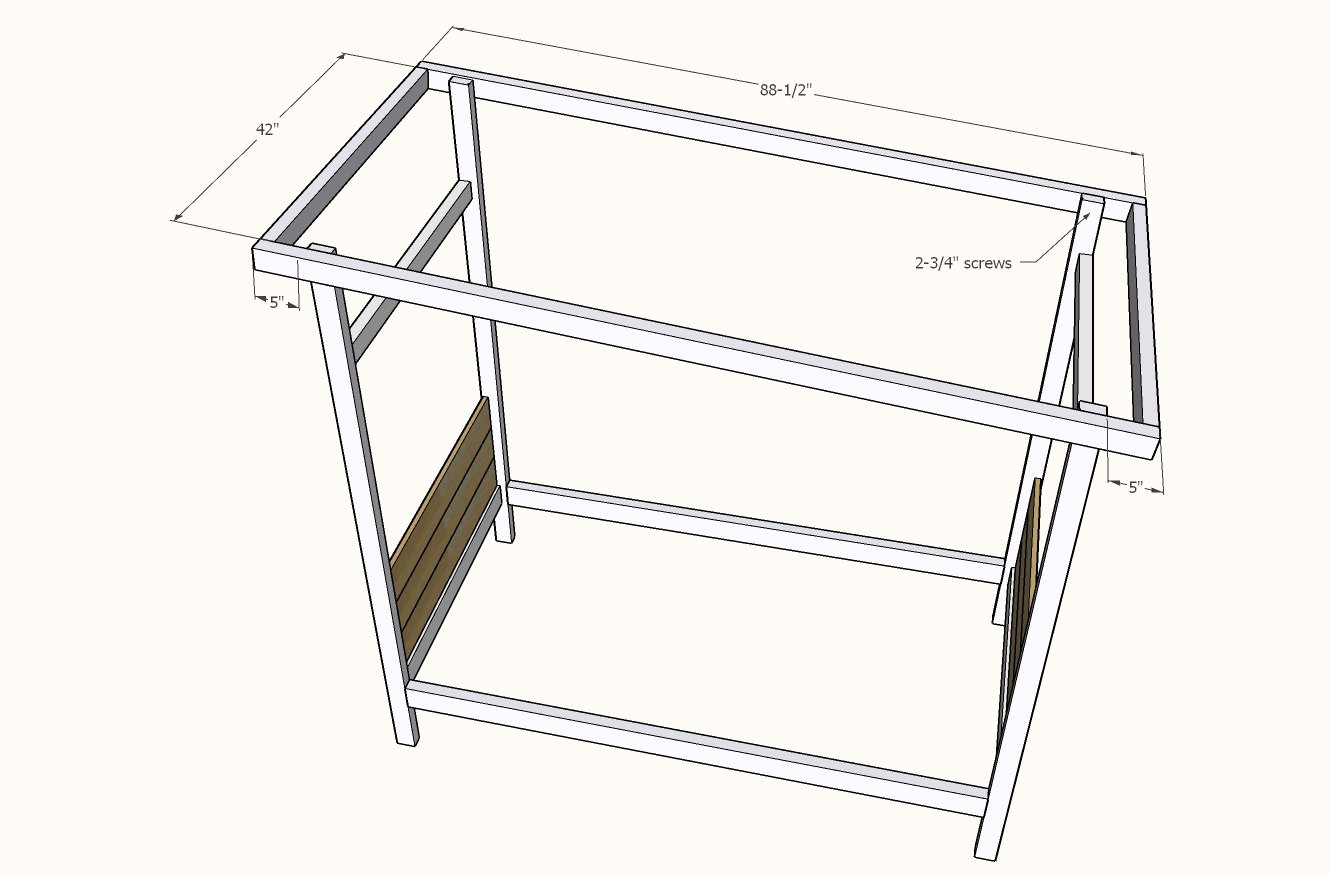
Drill 1-1/2" pocket holes on straight cut end of back wall 2x3.
Attach to the siderail. Attach at top with construction screws. Attach 1x6 wood panel boards in between and fill pocket holes with the wood dowel and cut off excess. NOTE: For easy disassembly, DO NOT glue the pocket hole plugs so they could be removed
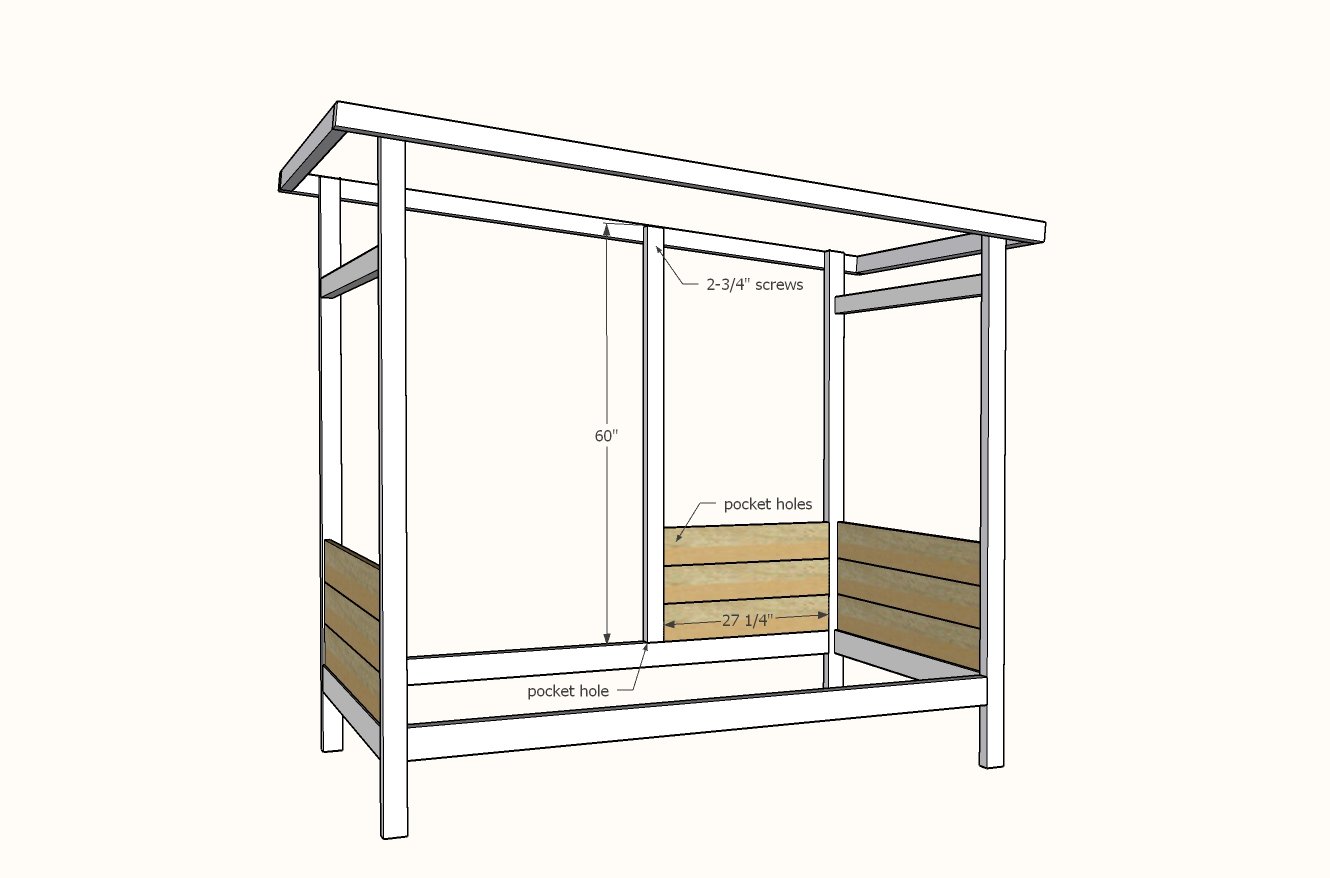
Step 5
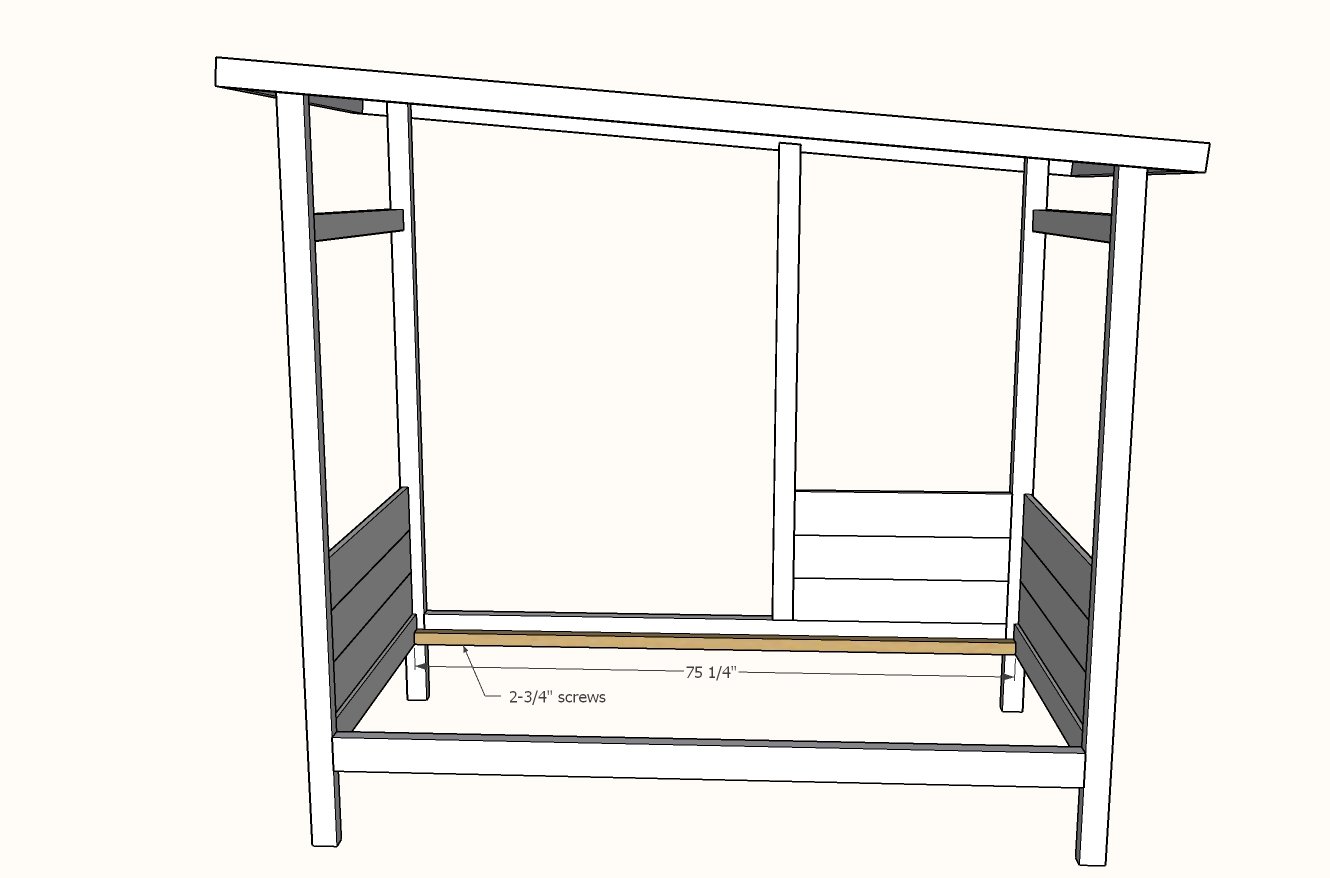
Attach cleats to the siderails, flush to the bottom, with 2-3/4" construction screws and glue. Also screw to the legs for added support.
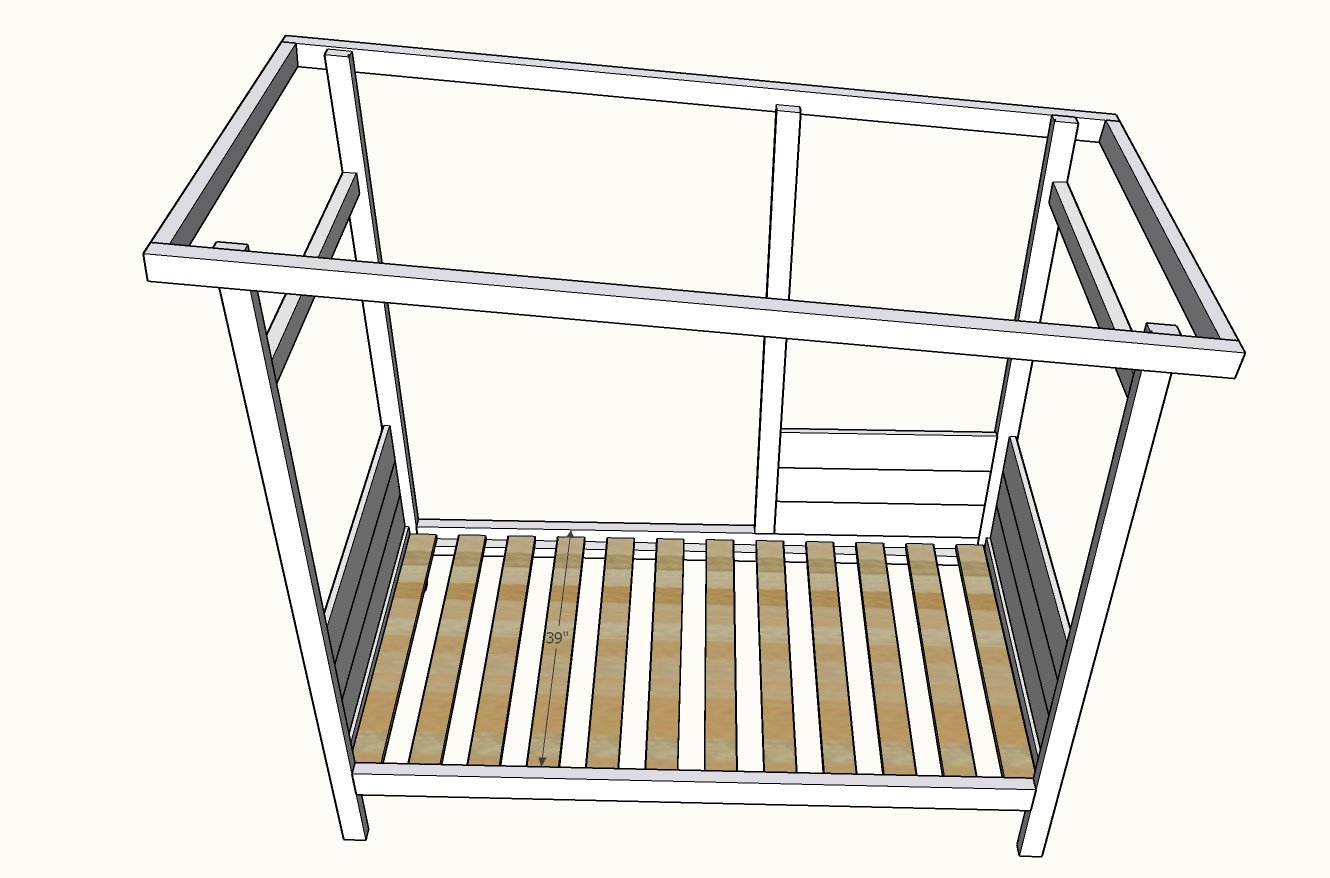
Place slats in bed with a 3" gap in between. Nail down with 1-1/4" brad nails.
NOTE: For easy disassembly, use 1-1/4" to 2" long self tapping screws instead.
For the front wall, drill two 3/4" pocket holes on each end of the shorter 1x3 piece.
Attach to the long 1x3s with 1-1/4" pocket hole screws.
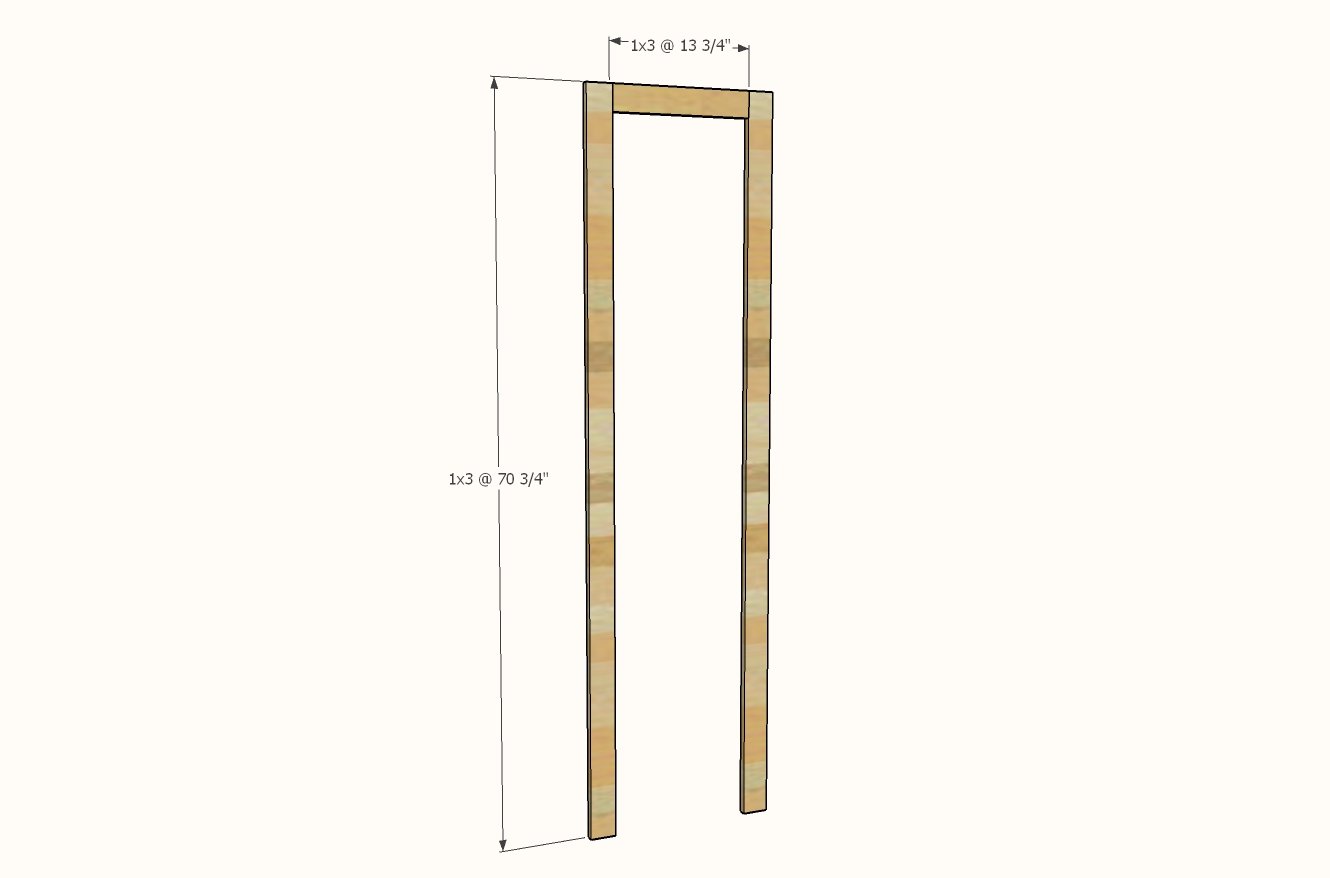
Step 8
Glue and nail the inner frame to the back side of the outer frame.
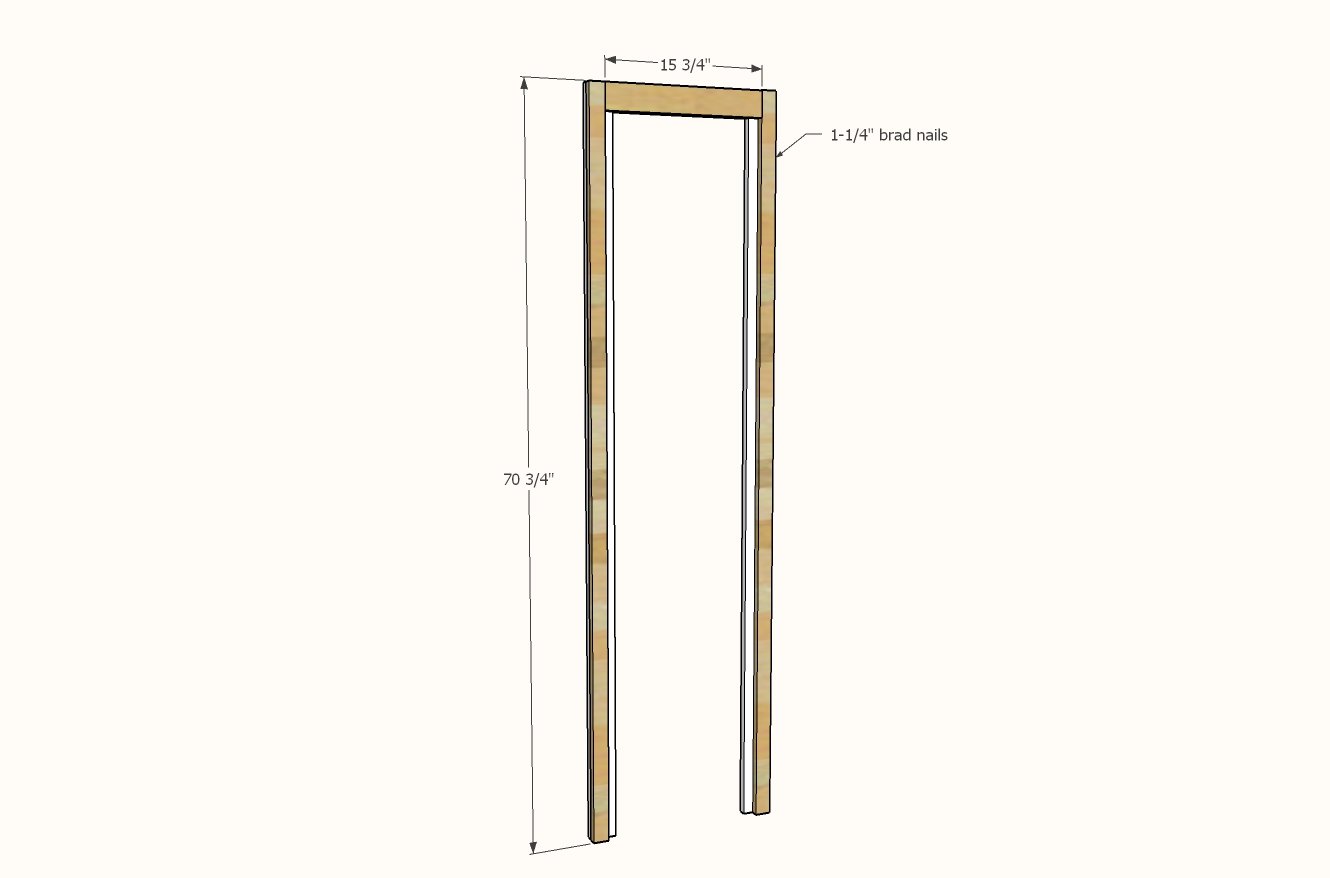
Glue and nail the 1x6 panel boards to the outer frame.
Drill 1-1/2" pocket hole on each end of the bottom (where the 1x2 overlaps the 1x3) for attaching to the siderail in next step.
Attach front wall to the siderail.
Attach at top with construction screws.
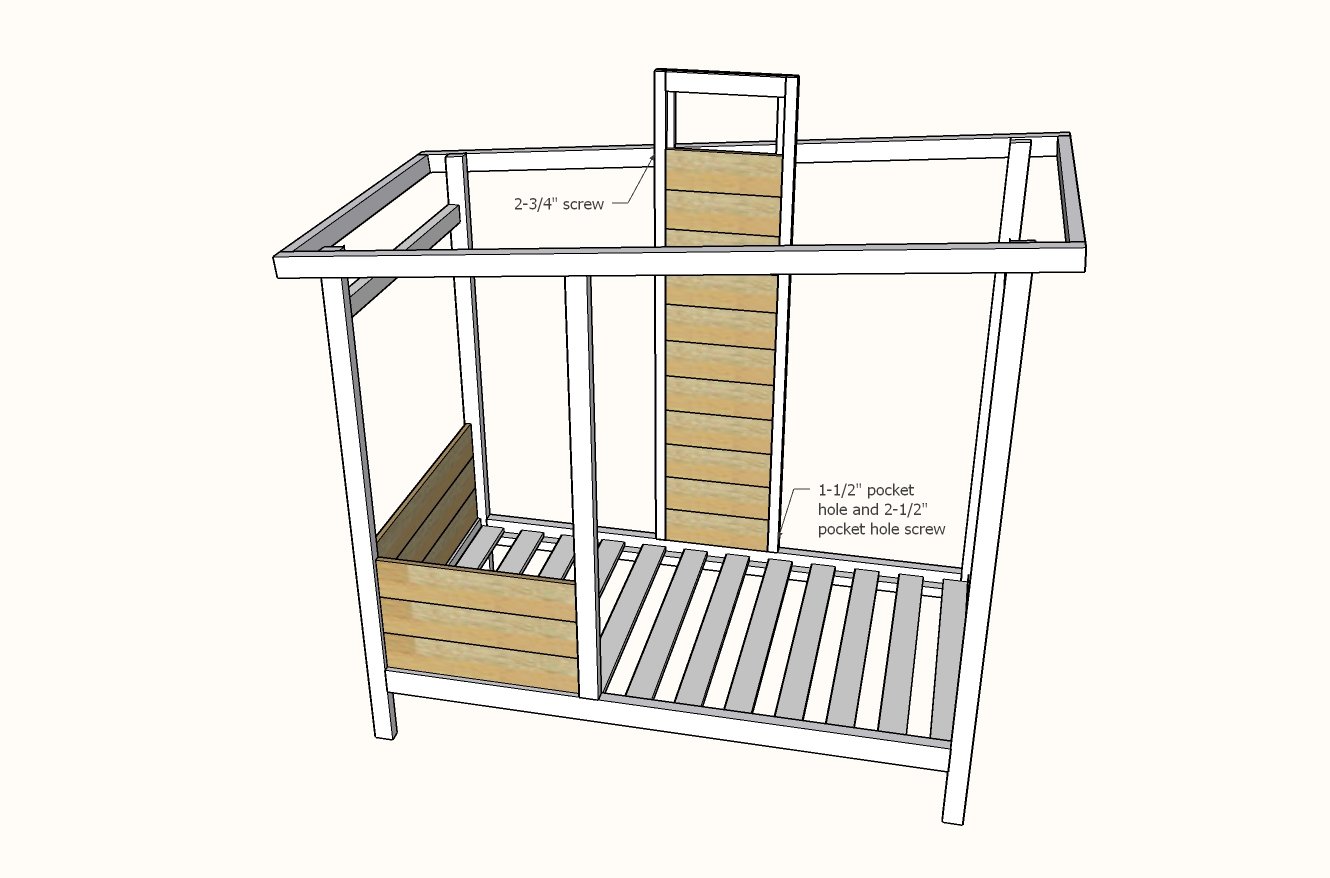
Drill two 1-1/2" pocket holes on each end of the 2x3 roof piece.
Attach to the back wall upright and the front wall with 2-1/2" pocket hole screws.
Finishing
Sand all surfaces, starting with a medium grit and finishing with fine. Wipe off the dust, fill any holes or gaps with wood filler, and sand smooth once dry. Apply primer if you're painting, then finish with your choice of paint or stain and seal with a durable clear topcoat. For outdoor projects, use exterior-rated primer, paint or stain, and sealer so the piece stands up to the weather.
Source (temporary): https://www.ana-white.com/woodworking-projects/house-bed-frame-modern-tiny-house-shape