How to Build 1x12 Bookshelves with Pine Boards (With Free Custom Configurator, Diagrams & Photos)
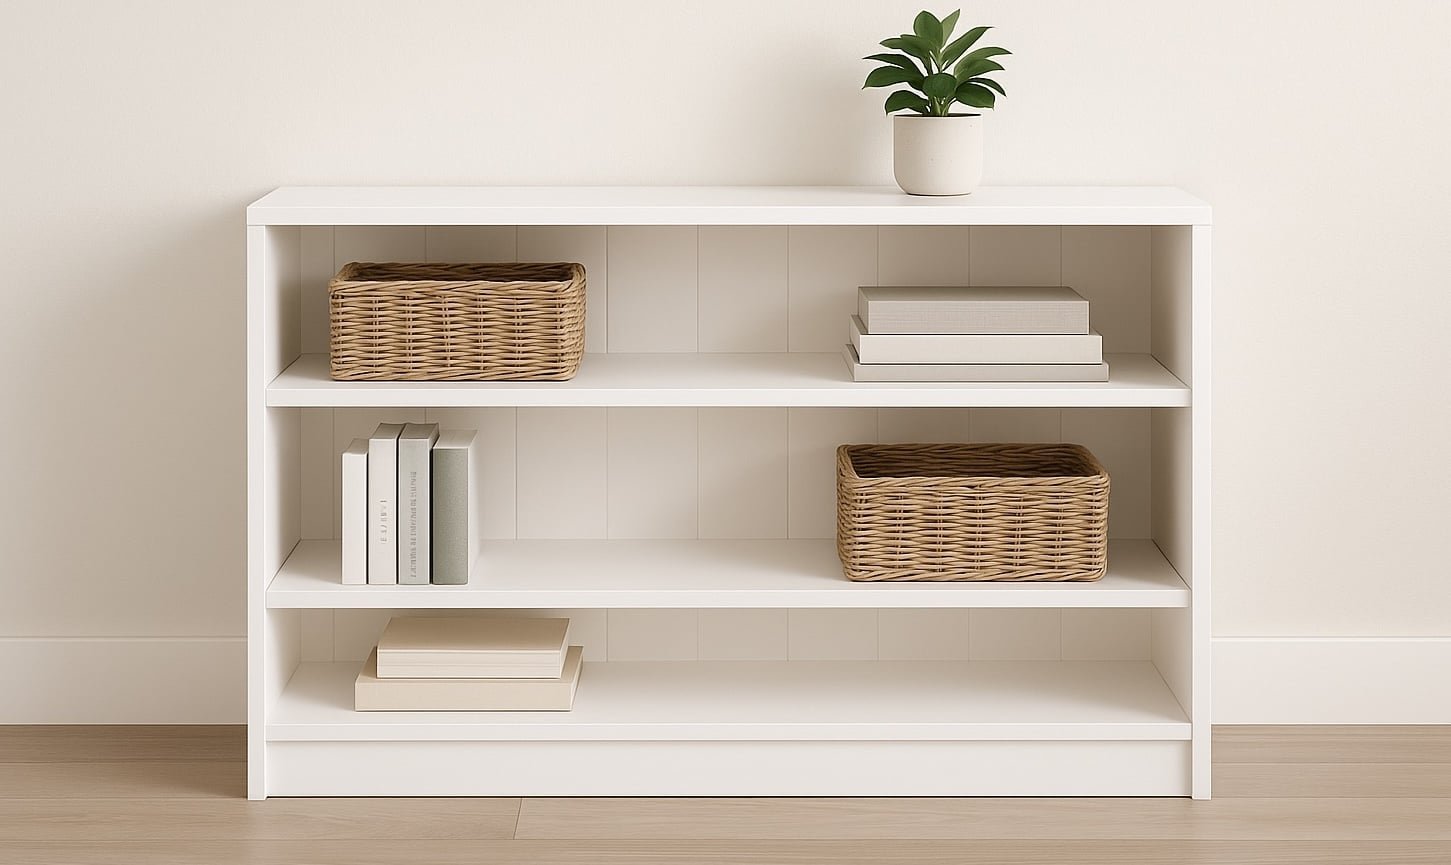
Build your own beautiful, solid pine bookshelves from 1x12 boards, with and custom configurator! These easy-to-build shelves are sturdy, affordable, and fully customizable—just pick your size, get your cut list, and start building. Perfect for beginners or anyone wanting stylish storage that fits your space and your style. Free
Specifications
| Project type | Nightstands |
|---|---|
| Room | Storage Solutions |
| Style | Modern Style Furniture Plans |
| Difficulty | Beginner Projects |
| Estimated cost | $50 - $100 |
Dimensions
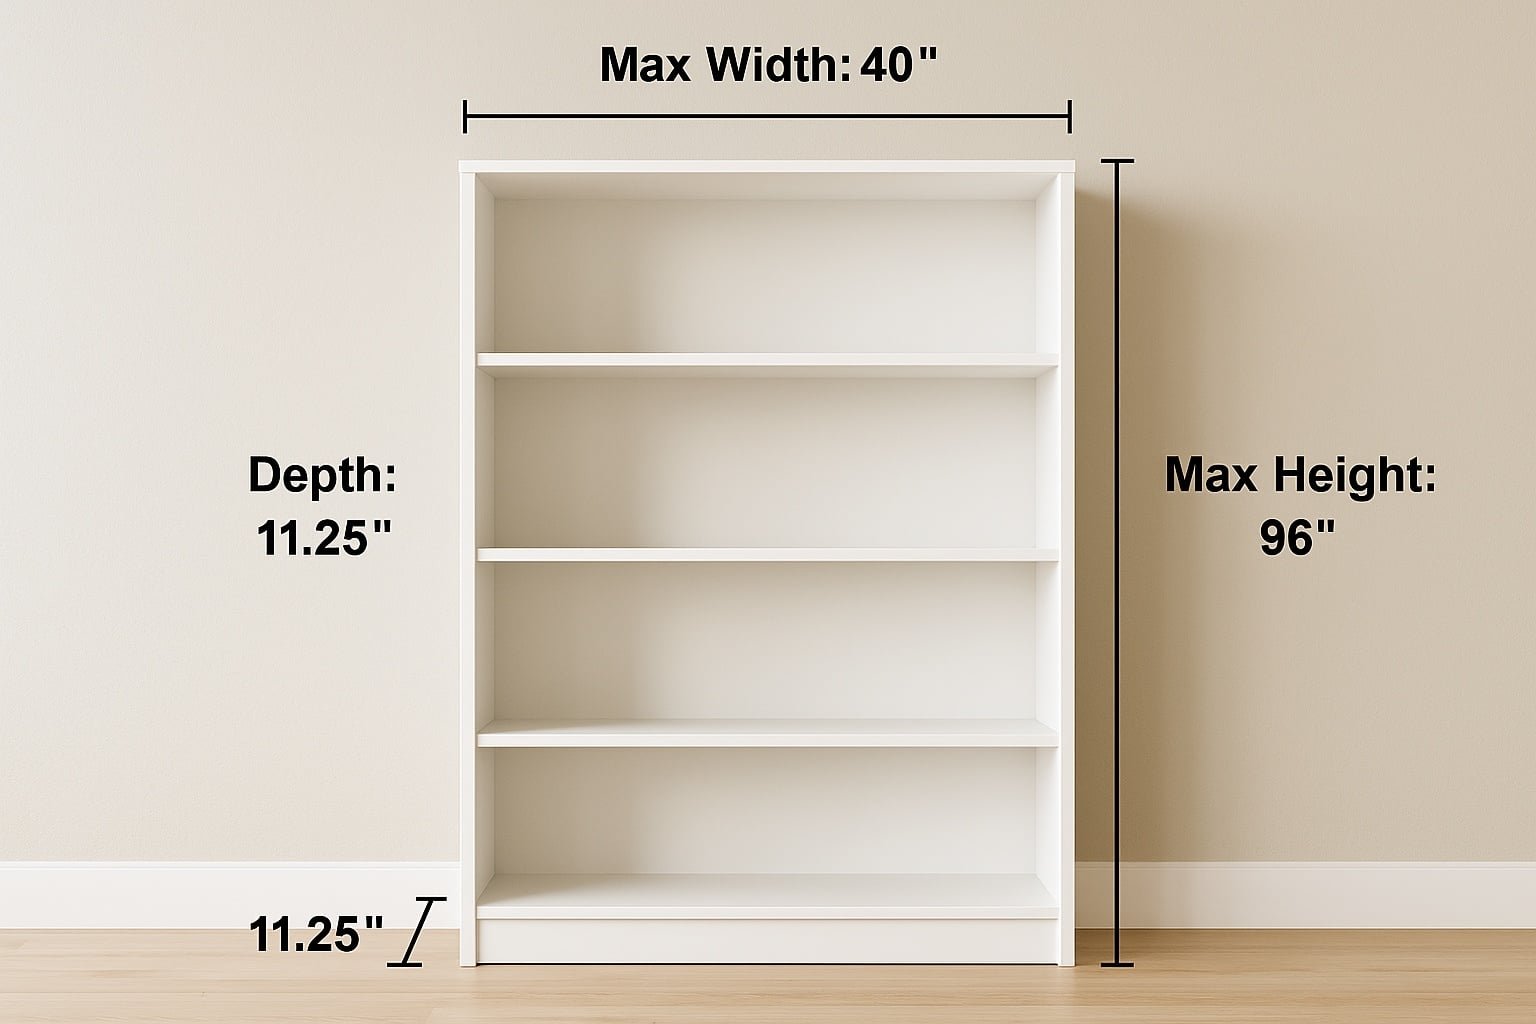
Use the size-specific shopping and cut lists below.
Shopping List
- 1x12 boards for the main carcass
- 1x3 board for the toekick
- 1/4" smooth plywood for the back
- fastener of choice: 1-1/4" brad nails and glue, 2" self tapping screws or 1-1/4" pocket hole screws
- to attach the back, 3/4" staples or brad nails
- medium grit sandpaper
- wood filler
- paint or wood stain of your choice
Tools
- measuring tape
- square
- pencil
- safety glasses
- drill
- circular saw
- nailer
- sander
Step-by-step Instructions
Configure Your Custom Bookshelf with Our Free Interactive Tool
Use our free bookshelf configurator tool to size your custom bookshelf. Use the cut list it generates to figure boards needed and make your cuts using a stationary saw. #bookshelf-configurator { font-family: sans-serif; max-width: 1000px; margin: 2rem auto; padding: 1rem; background: #f9f9f9; display: flex; gap: 2rem; flex-wrap: wrap; } #bookshelf-configurator.inputs { flex: 1 1 300px; min-width: 280px; } #bookshelf-configurator.output { flex: 1 1 400px; min-width: 320px; } #bookshelf-configurator label { display: block; margin: 1rem 0 0.25rem; } #bookshelf-configurator input { width: 100%; padding: 0.5rem; margin-bottom: 1rem; } #bookshelf-configurator pre { background: #fff; border: 1px solid #ccc; padding: 1rem; overflow-x: auto; } #bookshelf-configurator button { background: #ef476f; color: white; padding: 0.5rem 1rem; border: none; border-radius: 5px; cursor: pointer; } #diagram { background: #fff; border: 1px solid #ccc; padding: 1rem; text-align: center; } canvas { width: 100%; height: auto; max-width: 250px; } Bookshelf Configurator Height (max 96"): Width (max 40"): Number of Shelves (min 1): Generate Plan function generatePlan() { // Safer parse with fallbacks let height = parseFloat(document.getElementById('height').value); let width = parseFloat(document.getElementById('width').value); let shelfCount = parseInt(document.getElementById('shelf_count').value); if (isNaN(height) || height 96 || width > 40) { alert('Height must be ≤ 96" and width ≤ 40".'); return; } const toeKick = 2.5; const topThickness = 0.75; const shelfThickness = 0.75; const sideThickness = 0.75; const spacing = (height - topThickness - toeKick - (shelfCount * shelfThickness)) / shelfCount; const sidesHeight = height - topThickness; const topWidth = width; const shelfWidth = width - 1.5; // Cut List Output (your format) let output = `Distance between shelves vertically: ${spacing.toFixed(2)}"\n\nCut List:\n`; output += `sides (2) 1x12 @ ${sidesHeight.toFixed(2)}"\n`; output += `top (1) 1x12 @ ${topWidth.toFixed(2)}"\n`; output += `shelves (${shelfCount}) 1x12 @ ${shelfWidth.toFixed(2)}"\n`; output += `back panel (1) 1/4" plywood @ ${height.toFixed(2)}" x ${width.toFixed(2)}"\n`; output += `toe kick (1) 1x3 @ ${shelfWidth.toFixed(2)}"\n`; document.getElementById('output').textContent = output; drawDiagram(height, width, shelfCount, spacing, sidesHeight, topWidth, shelfWidth, toeKick, topThickness, shelfThickness, sideThickness); } function drawDiagram(height, width, shelfCount, spacing, sidesHeight, topWidth, shelfWidth, toeKick, topThickness, shelfThickness, sideThickness) { const canvas = document.getElementById('bookshelfCanvas'); const ctx = canvas.getContext('2d'); ctx.clearRect(0, 0, canvas.width, canvas.height); // Padding as before const padding = 20; const drawableHeight = canvas.height - 2 * padding; const drawableWidth = canvas.width - 2 * padding; const scaleH = drawableHeight / height; const scaleW = drawableWidth / width; const scale = Math.min(scaleH, scaleW); const scaledWidth = width * scale; const scaledHeight = height * scale; const left = (canvas.width - scaledWidth) / 2; const top = (canvas.height - scaledHeight) / 2; ctx.strokeStyle = '#000'; ctx.lineWidth = 2; // Draw sides ctx.strokeRect(left, top + topThickness * scale, sideThickness * scale, (height - topThickness) * scale); ctx.strokeRect(left + scaledWidth - sideThickness * scale, top + topThickness * scale, sideThickness * scale, (height - topThickness) * scale); // Draw top ctx.strokeRect(left, top, scaledWidth, topThickness * scale); // Draw toe kick ctx.strokeStyle = '#444'; const toeKickY = top + (height - toeKick) * scale; ctx.strokeRect(left + sideThickness * scale, toeKickY, (scaledWidth - 2 * sideThickness * scale), toeKick * scale); // Draw bottom shelf above toe kick ctx.strokeStyle = '#000'; const bottomShelfY = top + (height - toeKick - shelfThickness) * scale; ctx.strokeRect(left + sideThickness * scale, bottomShelfY, (scaledWidth - 2 * sideThickness * scale), shelfThickness * scale); // Draw remaining shelves above bottom shelf for (let i = 1; i
Step 2
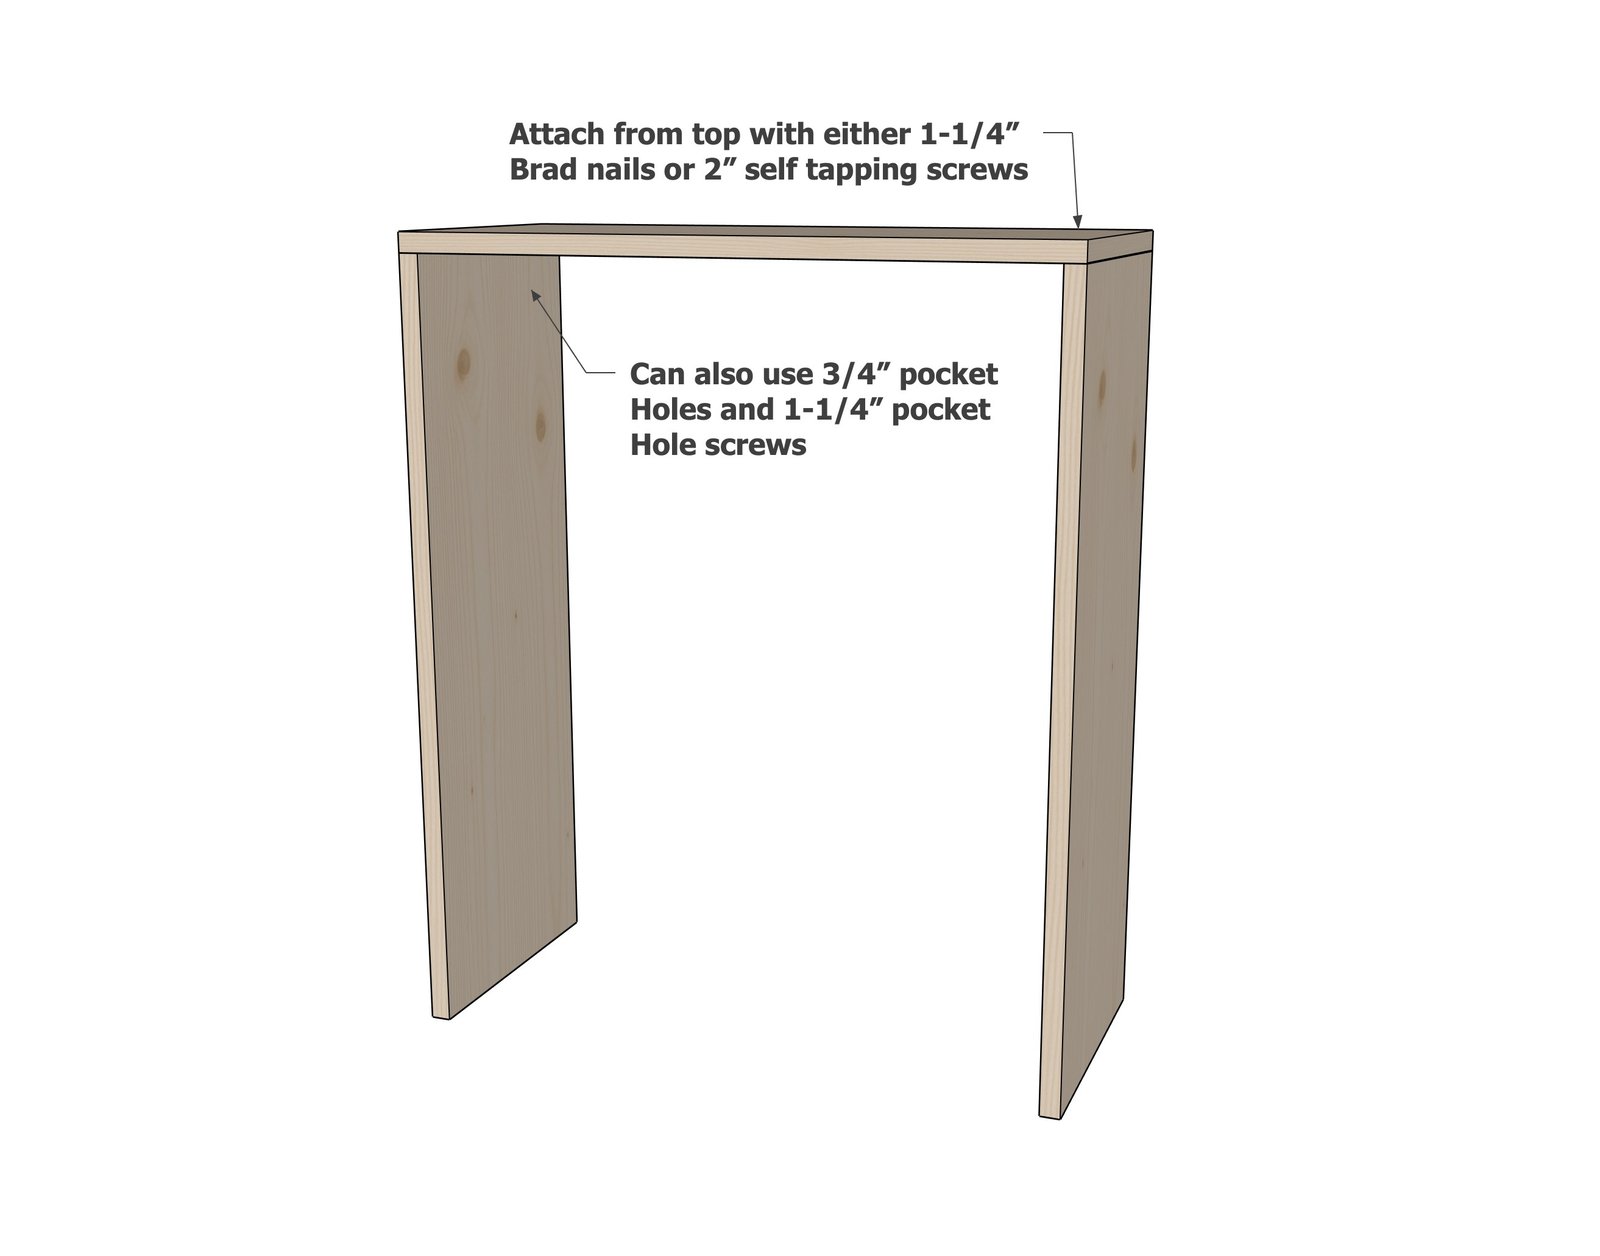
The sides get attached to the top, so the outside edges are flush. Use either the 1-1/4" brad nails, 2" self tapping star bit wood screws, or 3/4" pocket holes and 1-1/4" pocket holes to attach.
Step 3
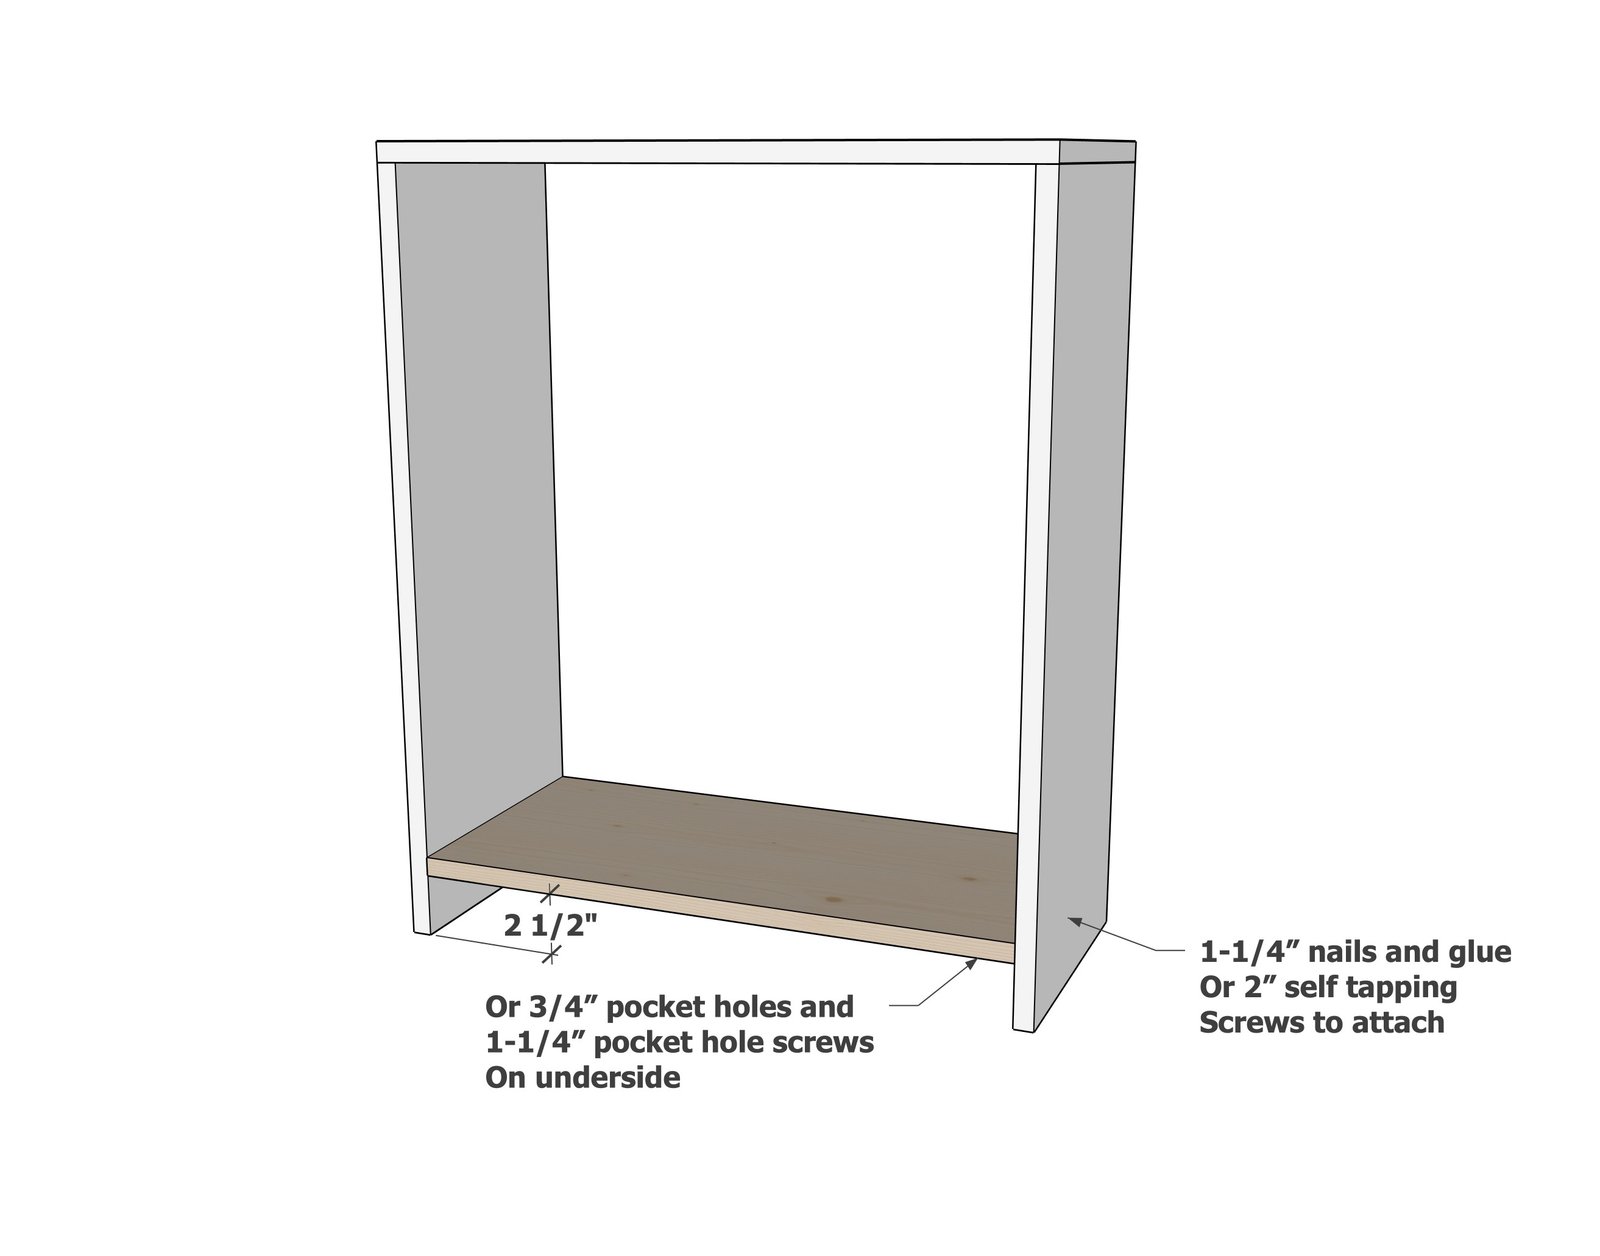
Mark the legs up 2-1/2" on the insides, on both front and back. Then attach the bottom shelf, so there is a 2-1/2" space under the bottom shelf, with the same method of joinery as the top.
Step 4
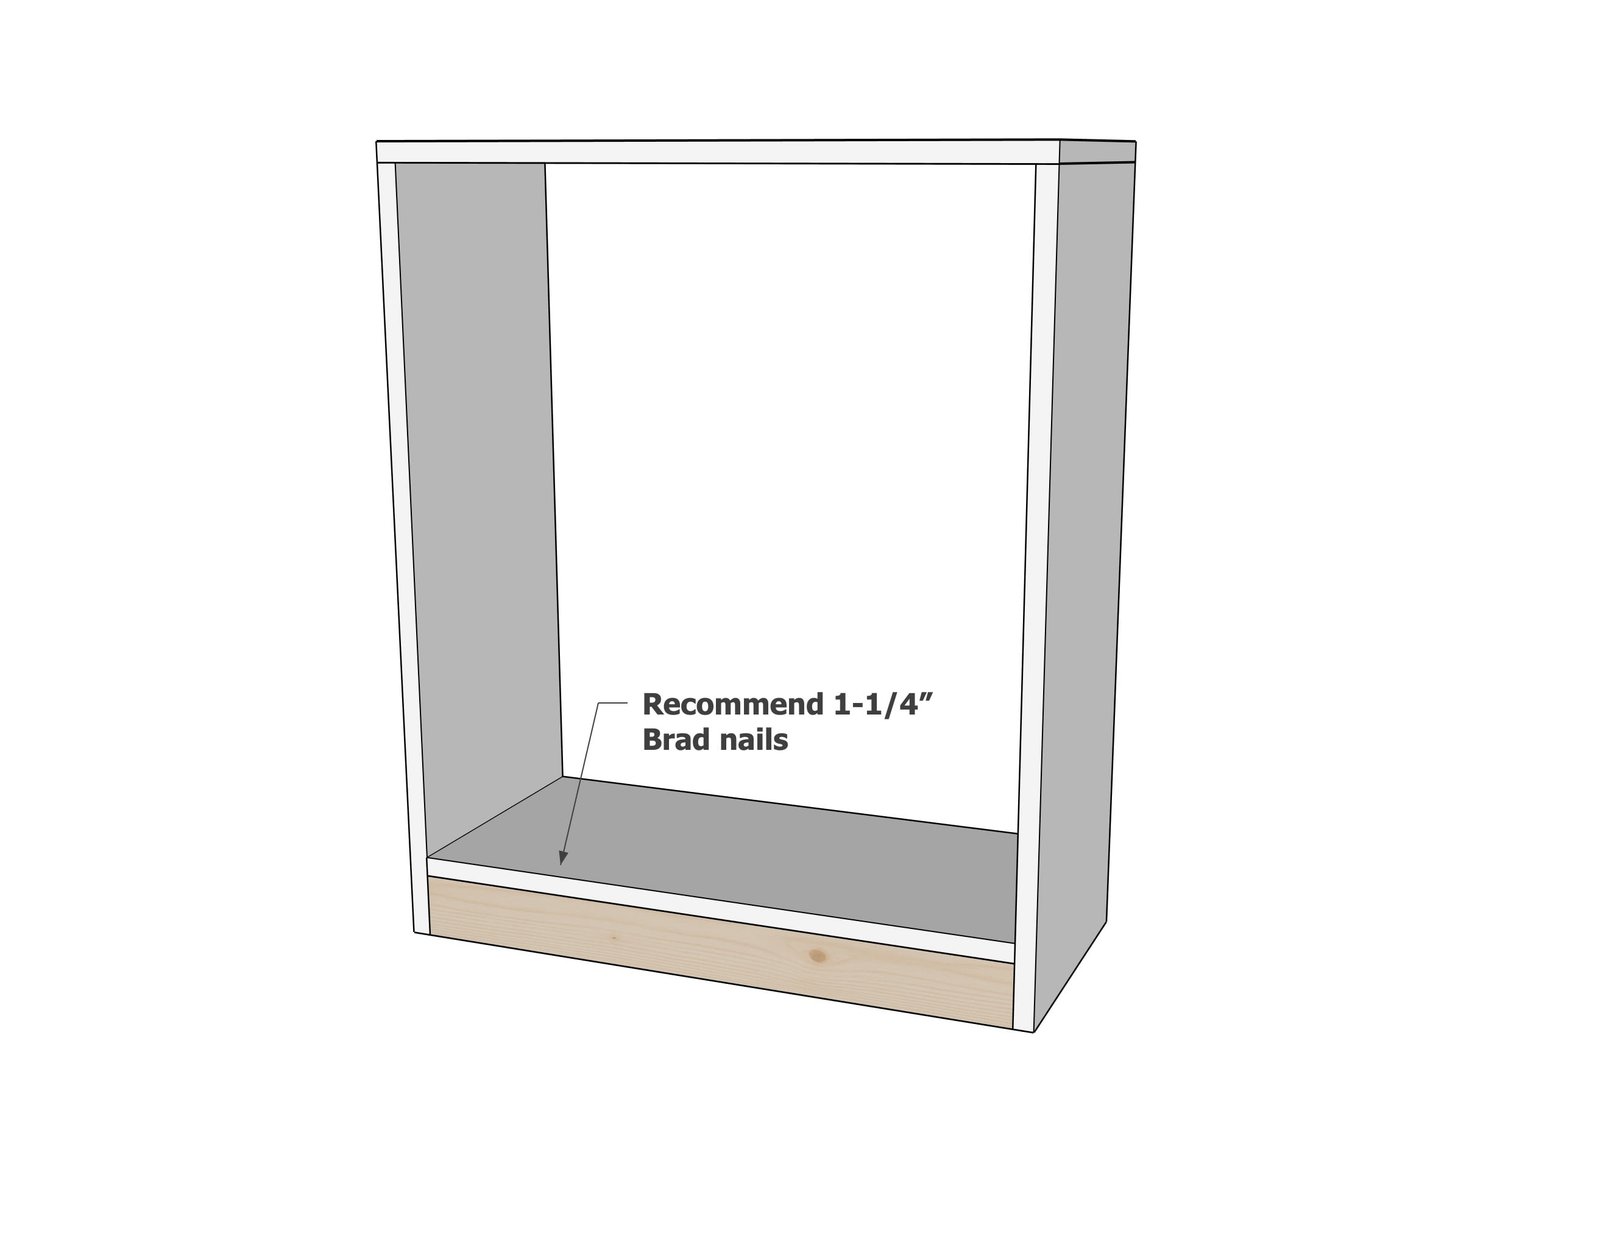
This step is to add the 1x3 toe kick. Place inside the bookshelf footer and attach on sides and from bottom shelf using the 1-1/4" brad nails and glue (preferred) or self tapping screws or pocket hole screws.
Step 5
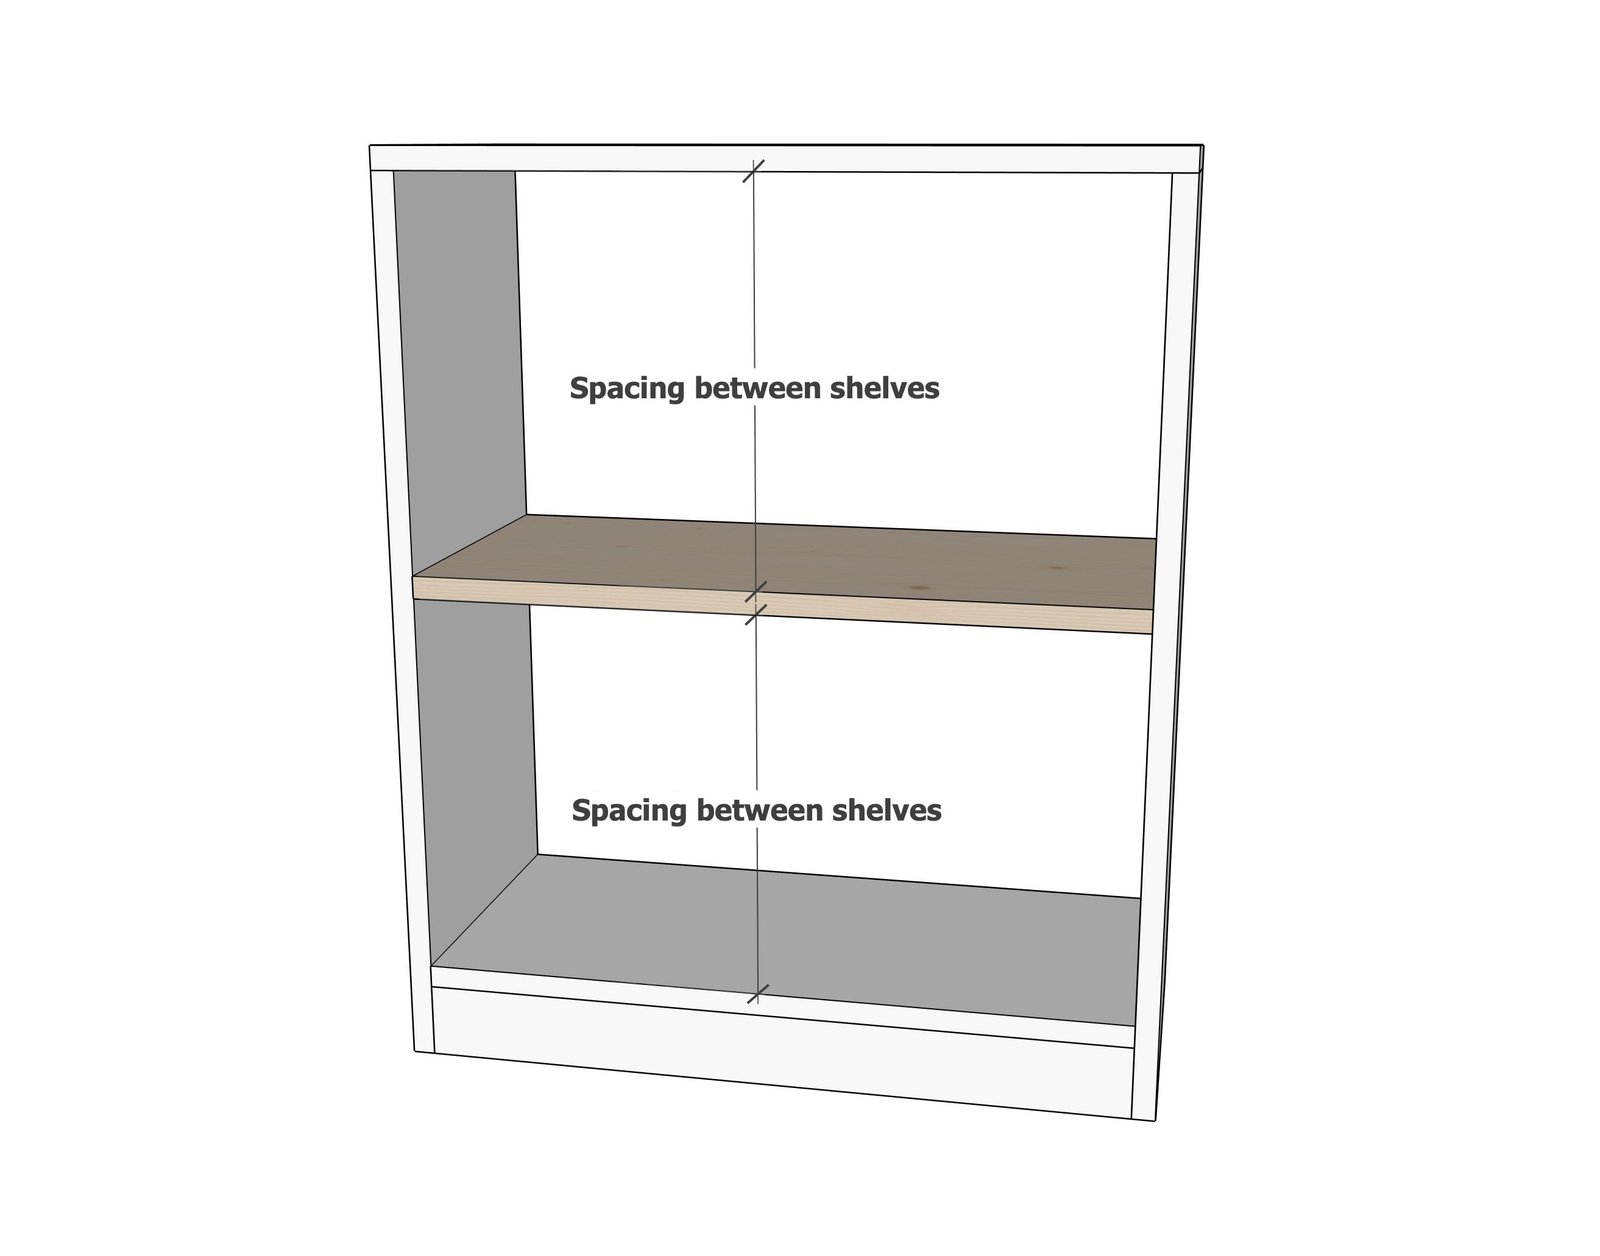
Add the shelves using the spacing between shelves for equal distanced shelves, or space as desired. Shelves can be added with nails, screws or pocket holes.
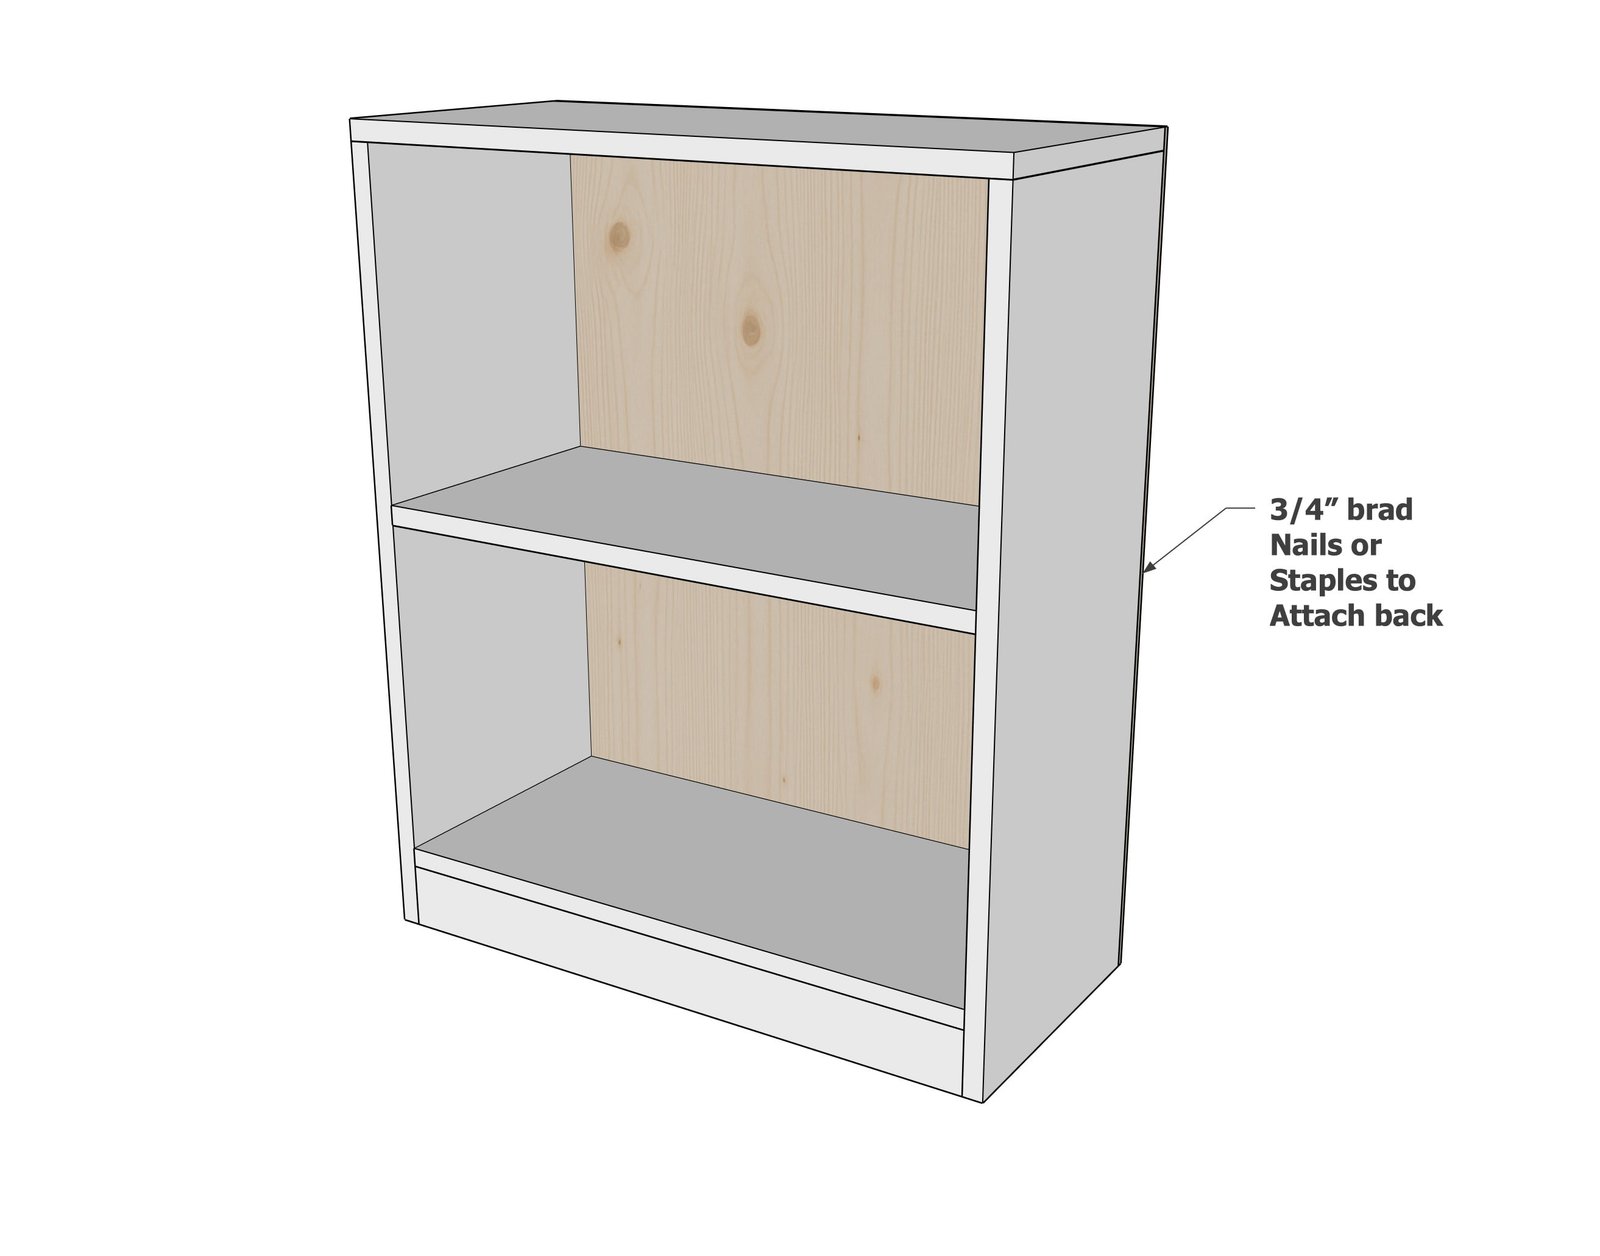
Measure and cut the back plywood with a circular saw or table saw.
Attach to the back and all shelves with glue and 3/4" brad nails or stapes. Make sure outside edges are flush to 1x2 back edges, to square up the bookshelf.
Finishing
Sand all surfaces, starting with a medium grit and finishing with fine. Wipe off the dust, fill any holes or gaps with wood filler, and sand smooth once dry. Apply primer if you're painting, then finish with your choice of paint or stain and seal with a durable clear topcoat. For outdoor projects, use exterior-rated primer, paint or stain, and sealer so the piece stands up to the weather.
Source (temporary): https://www.ana-white.com/woodworking-projects/how-build-1x12-bookshelves-pine-boards-free-custom-configurator-diagrams