Hudson Dresser
This project is advanced, not only because of the need for careful layout and measurements, but also because of the tools needed. A table saw is just about required to rip a number of parts for the drawers, and a miter saw will make cutting the many 45 degree cuts much easier. Certainly, you could construct this piece without either of these tools, but it will be a test of your sawing prowess.
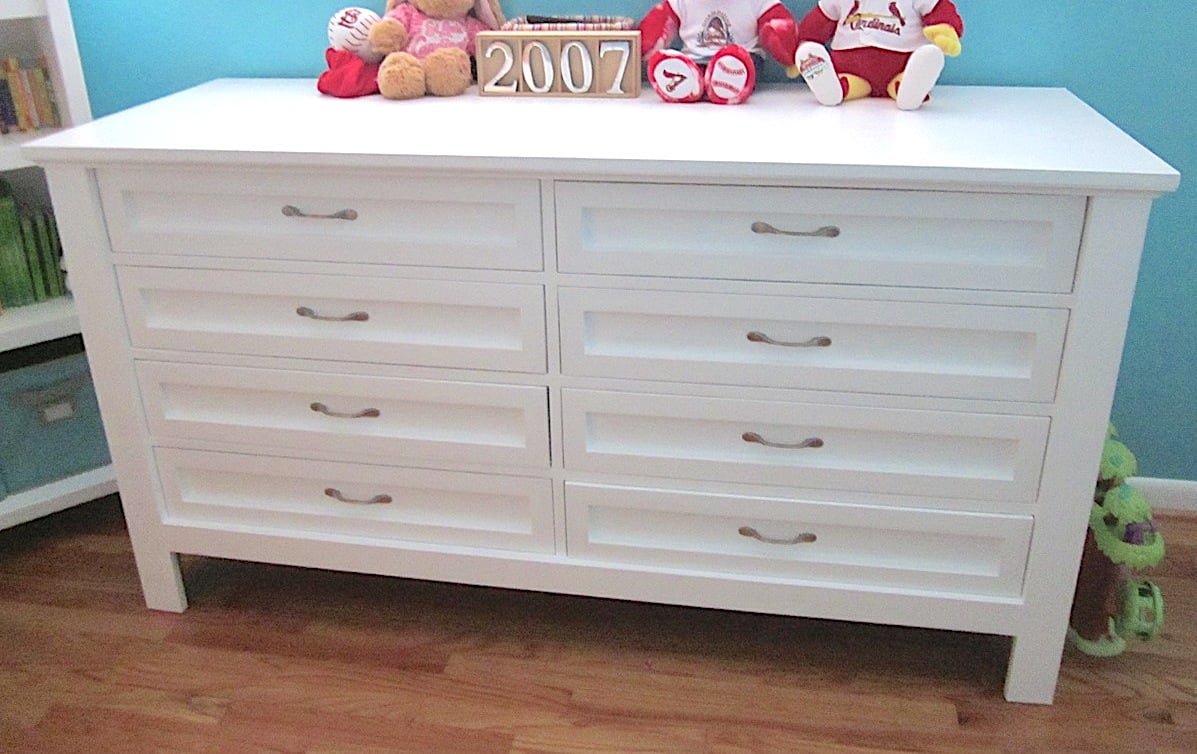
Specifications
| Project type | Dresser Plans |
|---|---|
| Room | Bedroom |
| Style | Modern Style Furniture Plans |
| Difficulty | Advanced |
| Estimated cost | $150 - $200 |
Dimensions
Use the size-specific shopping and cut lists below.
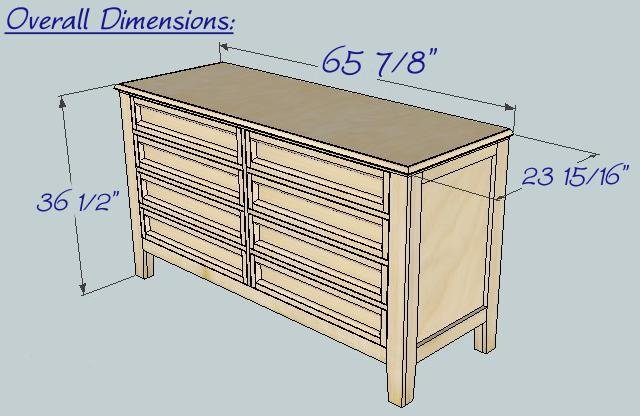
Shopping List
- 1 Sheet of ¼” Ply For Drawer Bottoms, Drawer Fronts and End Panels – One good side
- 1 Sheet of ¼” Ply For Back – Not seen
- ½ Sheet (2′ x 8′) of 3/4” Ply For Top – One good side or can use MDF if painting
- 1 Sheet ¾” Ply For Drawer Case – Not seen
- 4 2×2 8′
- 1 2×4 8′
- 2 1×3 8′
- 8 1×4 8′
- 10 1×6 8′
- 1 ¾” Cove molding 10′ “See step 8 for molding profile”
- 7 ¾” Quarter round 8′ or 5 @ 10′
- 8 pair 20” drawer glides
- Knobs or Handles for 8 – 28” wide drawers
- Box of 2” Trim-head Screws and appropriate driver bit
- 1½“ Finish nails
- Wood Glue
- 2” wood screws
- 1 ¼” Pocket hole screws
Cut List
Drawer Case:
- 2 Case Sides 22 x 26½ ¾” Ply
- 1 Case Top 20½ x 62½ ¾” Ply
- 1 Case Bottom 22 x 60 ¾” Ply
2×2 Frame
- 3 Long Rails 2×2 – 63”
- 2 Front End Rails 2×2 – 27 1/4”
- 2 Back End Rails 2×2 – 26 1/2”
- 2 Bottom Corners 2×2 – 19”
Ends:
- 4 End Rails 1×3 –17¼
- 2 Front Legs 1×3 – 35¼ (Rip down to 2¼”)
- 2 Back Legs 1×4 – 35¼ (Rip down to 3”)
- 2 End Panels 19 x 28 ¼”
Ply Front:
- 2 Front Legs 1×4 –35¼ (Rip down to 3′)
- 1 Front Top Rail 58 1/2 x ¾
- 1 Front Bottom Rail 1×3 – 58 1/2
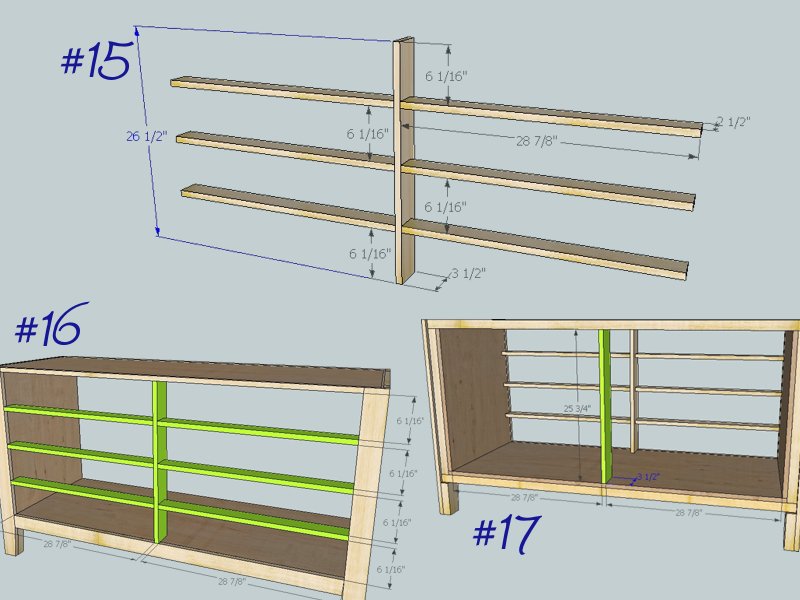
- 1 Center Divider 1×4 – 26½
- 6 Drawer Dividers 1×4 – 28 7/8
- 1 Rear Support 1×4 – 25¾
Top: 64½ x 23¼ ¾” Ply or MDF
Drawers:
- 8 Drawer Faces – 5 13/16 x 28 5/8 ¼” Ply
- 8 Drawer Bottoms – 21 x 27 5/8 ¼” Ply
- 4 Top Drawer Sides 1×6 – 21 (Rip down to 4 1/2")
- 4 Top Drawer Ends 1×6 – 26 1/8 (Rip down to 4 1/2")
- 12 Lower Drawer Sides 1×6 – 21
- 12 Lower Drawer Ends 1×6 – 26 1/8
- 16 Drawer Face Stiles – 1 x 5 13/16 (Rip out of 1×4)
- 16 Drawer Face Rails – 1 x 26 5/8 (Rip out of 1×4)
Back: 29½ x 63 ¼”
Ply Trim:
- 2 Top Cove Ends – 25” Rough Cut
- 1 Top Cove Front – 68” Rough Cut
- 2 Top 5/8 Quarter Round 25” Rough Cut
- 1 Top 5/8 Quarter Round – 68” Rough Cut
- Remainder of trim measure and cut to fit drawer fronts.
Tools
- measuring tape
- square
- pencil
- hammer
- safety glasses
- hearing protection
- kreg-jig
- drill
- compound miter saw
- table saw
- nailer
Step-by-step Instructions
Drawer Case
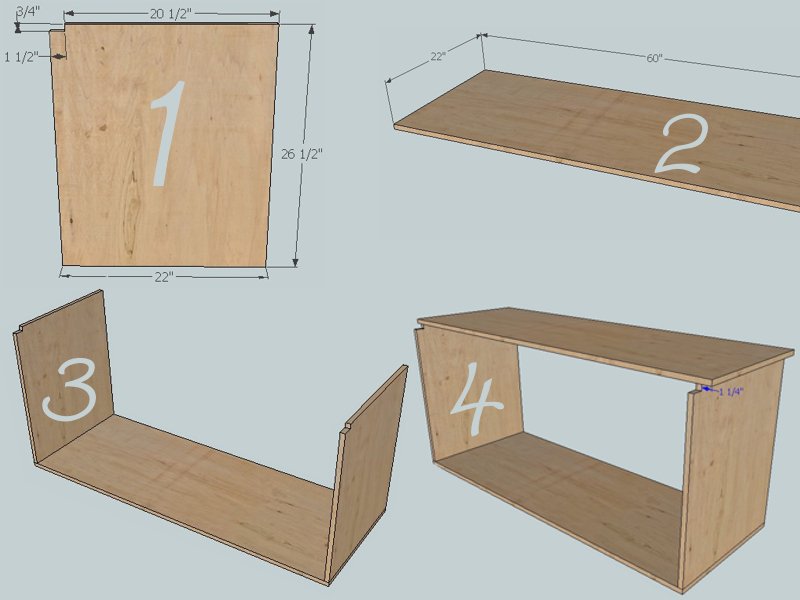
Start by cutting a ¾” by 1½“ notch out of both drawer box side panels as shown in #1. The 60 x 22 piece is the bottom of the drawer case. Attach the side panels using 4 – 2” wood screws per joint. Pocket holes can also be used. The top of the case measures 62½ by 20½. It gets installed flush front and back with an overhang of 1¼” on each side.
2×2 Frame
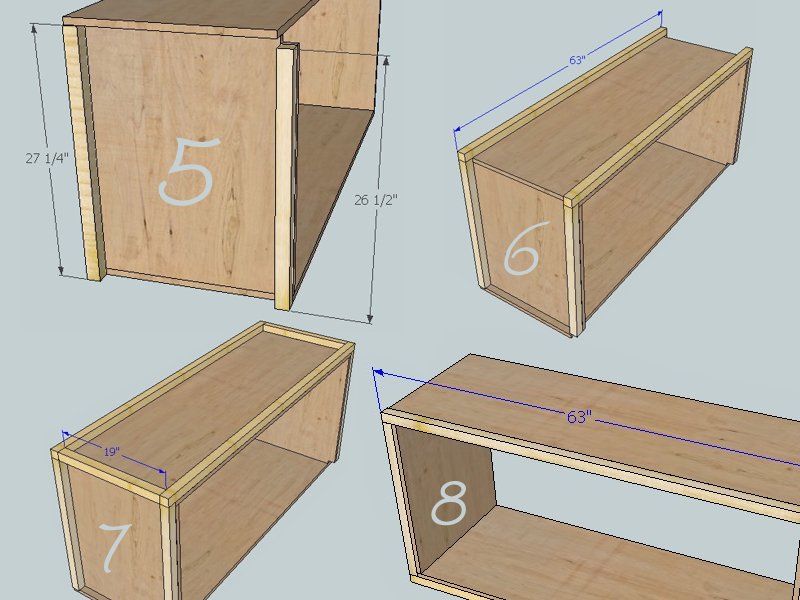
During this section it is important that all of the joints and edges line up flush and even, to avoid troubles later on in the assembly. Begin installing the frame by attaching 2×2 pieces to both ends as shown in #5. These pieces should hang past the top of the case by 1/4”. Drive 2” screws into the 2×2′s from the inside of the case. Flip the unit over for #6 and add the two bottom rails. The 19” pieces are attached by driving screws in from the ends as this piece isn’t up against the case. Predrill to avoid splitting. Or use pocket holes. Flip the unit back upright for #8. This 2×2 sits right in the notches cut earlier.
End Panels
The two ends of the dresser are mirror images of each other. The front and back leg are different sizes, with the back leg being larger. Keep this in mind as you assemble. Drill 2 pocket holes in each end of the 17 ¼” rails, about 1” in from the edges. Screw the panel together keeping the faces flush. Take the 18½ x 27½ piece of 1/4” ply and align it as shown in # 9. The dimensions shown are the minimum distance necessary so stay inside of them by about ¼”. Apply a small bead of glue around the inside edge of the frame and finish nail the plywood to the frame. Take the completed end panels and attach them to the case with 2” finish nails. 2” Trim head screws are another option. The panels are flush with the top and front of the case. Make sure that the larger leg is to the back.
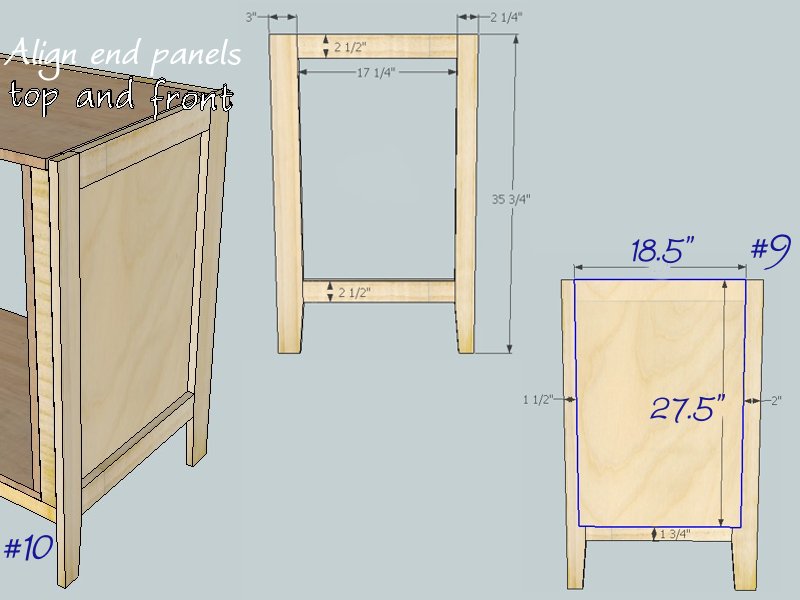
Legs and Feet
Attach the fronts of the front legs. #11 Trim head screws into the 2×2 are recommended here. #12 Next apply the face pieces between the front legs with finish nails. Flip the unit on its top. #13 shows the dimensions of the feet. It is much easier and safer to make the angled cuts first, then cut the pieces to length. Once cut, clamp the feet in position, fastening the feet through the legs with trim head screws. Drive additional screws down into the 2×2 frame.
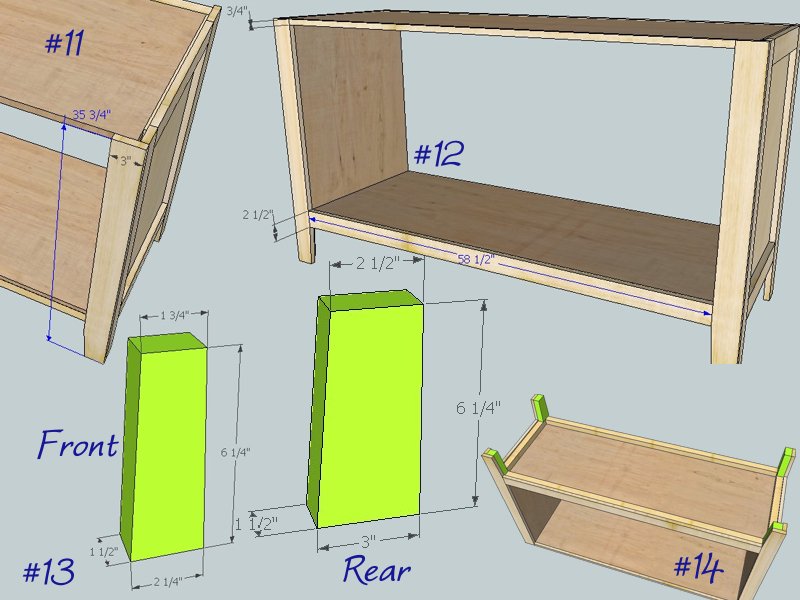
Step 5
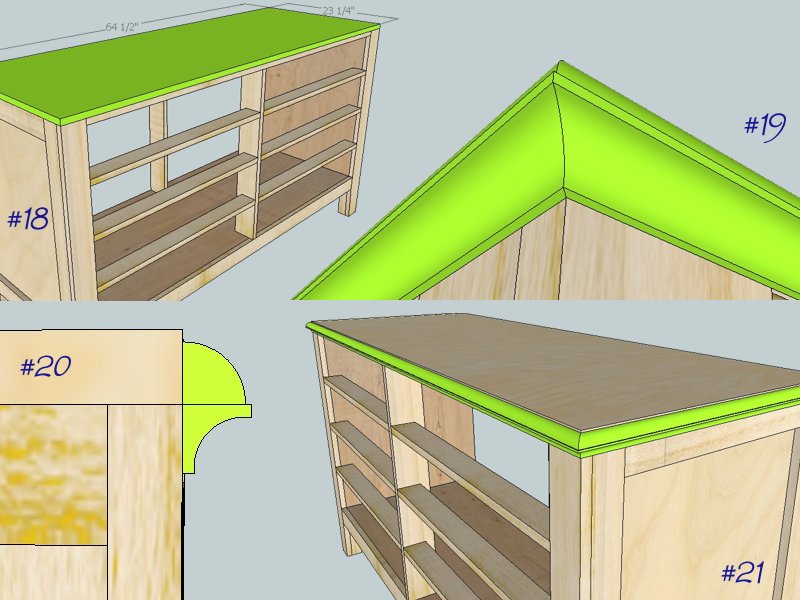
Top and Trim
Lay the 64½ by 23 ¼ plywood on top of the dresser. Align it so the front and side edges are flush with the edges of the case. Attach the top by driving 1 ¼” pocket hole screws up through the top of the drawer case. No need to drill anything, we’re just using the screws. After the top is secure begin adding the trim. #19 Start by mitering one end of the cove molding and aligning it on the side of the case. The top edge of the cove molding should run even with the bottom edge of the plywood. #20 Finish nail it on and carefully saw the excess off using the back of the dresser as a guide. Next cut the corresponding miter on an end and run the piece across the front of the dresser. Use clamps to hold the trim in place, then mark the uncut end where it touches the front corner of the dresser. That line will be the short side of your miter. Cut and attach the front piece of cove. Then cut the third piece, nail it on and cut it off flush. The quarter round goes on in the same process. #21
Assemble Drawers
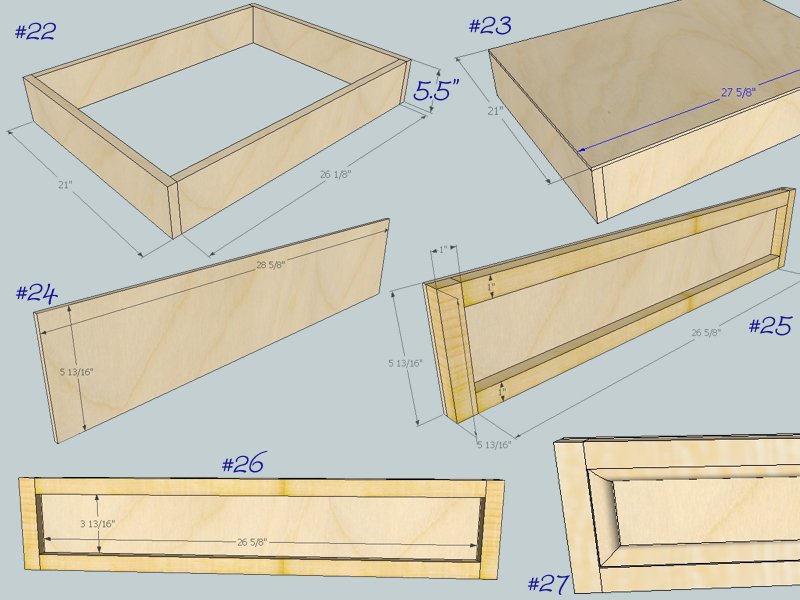
The drawers are a simple box with a plywood bottom nailed on. #22 The top two drawers are an inch shallower than the other six. Pocket holes are drilled on both ends of the 26 1/8” pieces. Once again locate the holes 1” from the outside edges. Begin constructing the drawer boxes, making sure to put the pocket holes to the outside of the drawers. They will be hidden later by the drawer fronts. #23 When all the drawer boxes are assembled attach the plywood bottoms. The plywood should line up flush on all sides to prevent problems fastening the drawer slides. A thin bead of glue and finish nails secure them to the drawers. Allow the glue to dry and begin creating the drawer fronts. The drawer fronts consist of three components; a ¼” plywood back, an outer frame of ¾x 1” wood, and an inner frame of quarter round. #24 Apply a thin layer of glue to the back of each outer frame piece, align it with the edges of the plywood back and clamp it in position. Finish nail from the back side through the ¼” plywood. Attach one end, then the two center pieces and finally attach the other end. #25 Once all of the outer frames are secure, the quarter round trim can be installed. Ideally the measurements of the panel will match those shown in #26. Measure and cut the shorter end pieces first, then the longer sides. It may be necessary to flex the longer pieces slightly to get them to fit in position. When all four quarter round pieces are in place finish nail them. Angle the nails so they are driven into the outer frame and not just to the plywood. Layout and drill the holes for the knobs or handles now. It is easier to do this on the flat backside of the drawer face.
Install Drawers
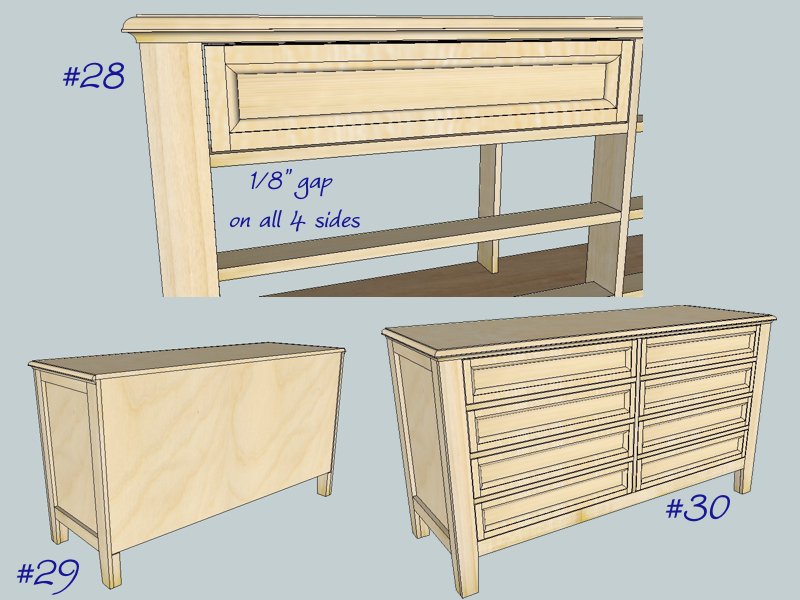
Install the drawer slide hardware on the drawer boxes and into the dresser. Position the drawer glides so the front face of the drawer box is 1” back from the face of the dresser. After all the drawers are in place the drawer faces can go on. Use 1/8” shims to keep the gap around the drawer face even. #28 Drive 2” finish nails through the outer frame of the drawer face into the drawer box. When the drawer faces are secure finish drilling all the holes for knobs/handles. Add the knobs after finishing is complete. #29 The back panel is simply nailed on with finish nails. Drive a finish nail every 6″ along the outside edges.
Finishing
Sand all surfaces, starting with a medium grit and finishing with fine. Wipe off the dust, fill any holes or gaps with wood filler, and sand smooth once dry. Apply primer if you're painting, then finish with your choice of paint or stain and seal with a durable clear topcoat. For outdoor projects, use exterior-rated primer, paint or stain, and sealer so the piece stands up to the weather.
Source (temporary): https://www.ana-white.com/woodworking-projects/hudson-dresser