Hutch with Doors for the Modular Playroom Media Wall Collection
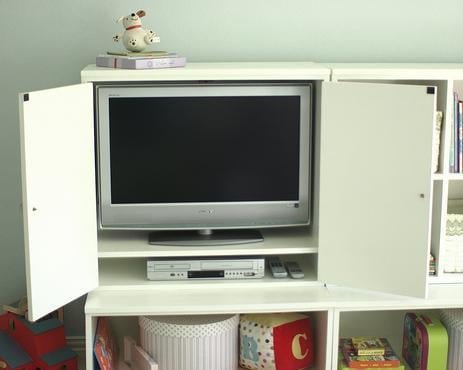
A cute storage piece that hides everything... even a TV! Works with the Modular Playroom Storage Collection to tidy up not just children's rooms, but any room of the home. Special thanks go to our readers for sharing their photos.
Specifications
| Project type | Bookshelf and Bookcase Plans |
|---|---|
| Room | Storage Solutions |
| Style | Children's and Kid's Room Furniture and Toy Plans |
| Difficulty | Intermediate |
| Estimated cost | $20 - $50 |
Dimensions
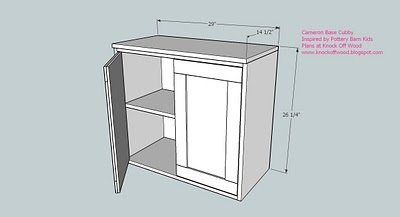
Use the size-specific shopping and cut lists below.
Shopping List
- 1 - Sheet of 3/4" Plywood ripped into strips 11-1/4" wide or 1x12 boards
- 1/4 Sheet of 1/4" Plywood, paneling, hardboard or MDF (back and door rails and stiles)
- 1/4 Sheet of 1/2" Plywood, paneling, hardboard or MDF (doors)
- 1 - 1x2 @ 4 feet long
Cut List
IMPORTANT: If you are matching this plan to other plans in this collection, ensure the heights and depths match.
Cutting List for ONE Hutch
A) 2 – 3/4″ MDF or Plywood @ 25 1/2″ x 14″ (Sides)
B) 1 – 3/4″ MDF or Plywood @ 27 1/2″ x 14″ (Bottom)
C) 1 – 3/4″ MDF or Plywood @ 27 1/2″ x 13″ (Shelf)
D) 1 – 3/4″ MDF or Plywood @ 29″ x 14 1/2″ (Top)
E) 1- 1/4″ MDF or Plywood @ 29″ x 26 1/4″ (Back)
F) 1 – 1×2 @ 27 1/2″ (Top Trim)
Cutting List for TWO Doors (to fit on 1 Hutch from above)
G) 2 – 1/2″ MDF or Plywood @ 23 3/4″ x 13 1/2″ (Back of Doors)
H) 4 – 1/4″ MDF or Plywood @ 13 1/2″ x 2 1/2″ (Door Rails)
I) 4 – 1/4″ MDF or Plywood @ 18 1/2″ x 2 1/2″ (Door Stiles)
Tools
- measuring tape
- square
- pencil
- safety glasses
- hearing protection
- kreg-jig
- drill
- circular saw
- jigsaw
- nailer
- sander
Step-by-step Instructions
Step 1
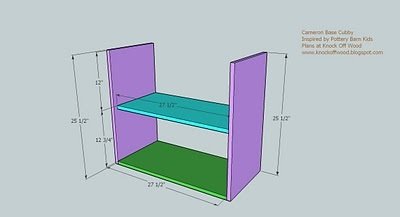
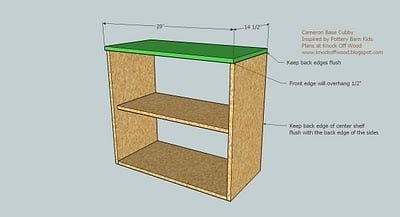
Build the Box. As I often say, build the box. It seems whenever we build a storage piece, it is essentially a “box” that is trimmed out. This one is no different. Simply fasten the sides to the bottom and the shelf, using the measurements above to guide you. Keep back edges flush.
Step 2
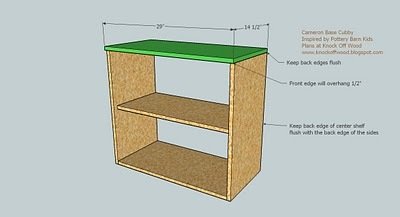
Top. Fasten the top to the hutch, keeping back edges flush. The front will overhang 1/2″.
Step 3
Back. Use 1 1/4″ nails or screws and glue to fasten the back in place as shown above. Make sure you fasten to the center shelf, top, sides and bottom.
Step 4
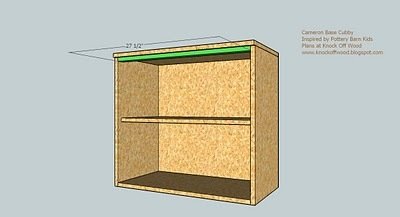
Top Trim. Add the top trim as shown above. Use the 1 1/4″ fasteners to secrure the top trim ot the top of the hutch. Then use the 2″ fasteners to fasten the sides to the end edges of the top trim.
Step 5
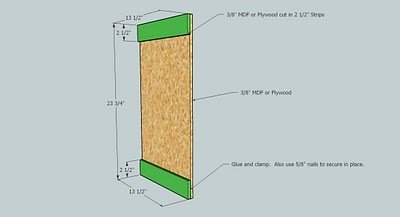
Rails and Back. Glue and fasten using 5/8″ staples or nails the rails to the the back of the doors, as shown above. Make sure edges are flush.
Step 6
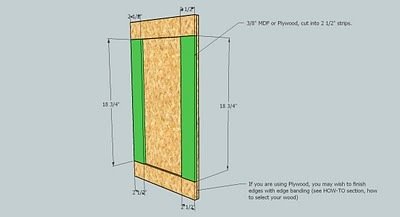
Stiles. Glue and fasten your stiles in place, as directed in step 2. Lay the door flat to dry, and clamp or stack heavy objects on top of the door. You want to make sure your doors dry flat.
Finishing
Sand all surfaces, starting with a medium grit and finishing with fine. Wipe off the dust, fill any holes or gaps with wood filler, and sand smooth once dry. Apply primer if you're painting, then finish with your choice of paint or stain and seal with a durable clear topcoat. For outdoor projects, use exterior-rated primer, paint or stain, and sealer so the piece stands up to the weather.
Source (temporary): https://www.ana-white.com/woodworking-projects/hutch-doors-modular-playroom-media-wall-collection