Kitchen Island with Open Shelving
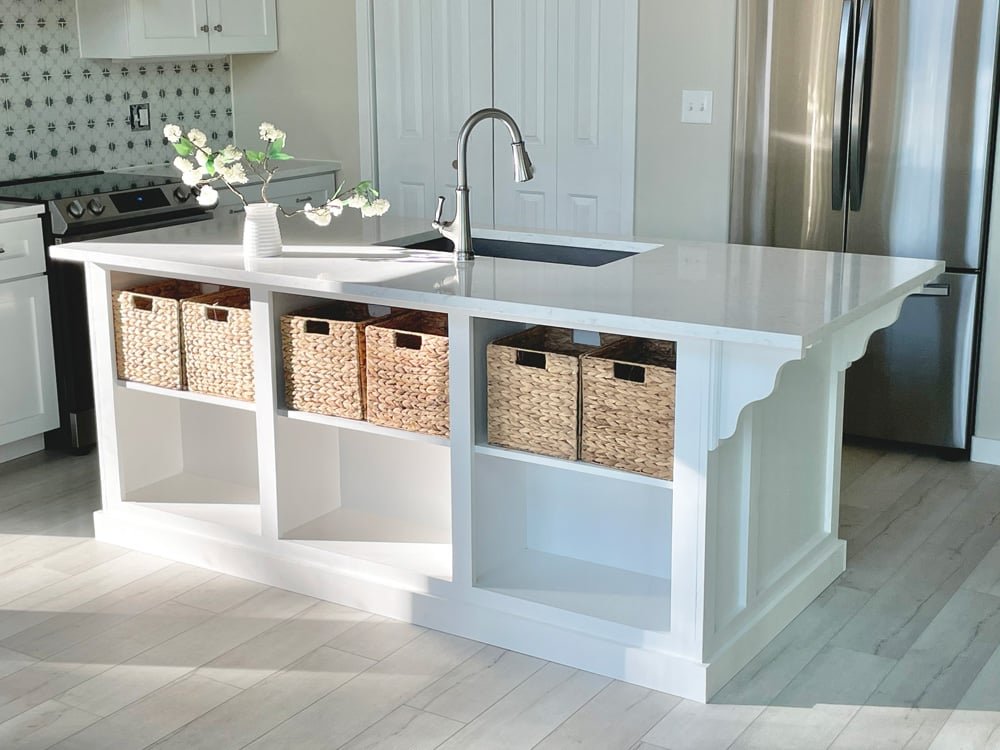
for building your own kitchen island with sink, dishwasher and open shelving. Space for five stools, seating on two sides. Includes video tutorial. By
Specifications
| Project type | Kitchen Island Plans |
|---|---|
| Room | kitchen |
| Difficulty | Advanced |
Dimensions
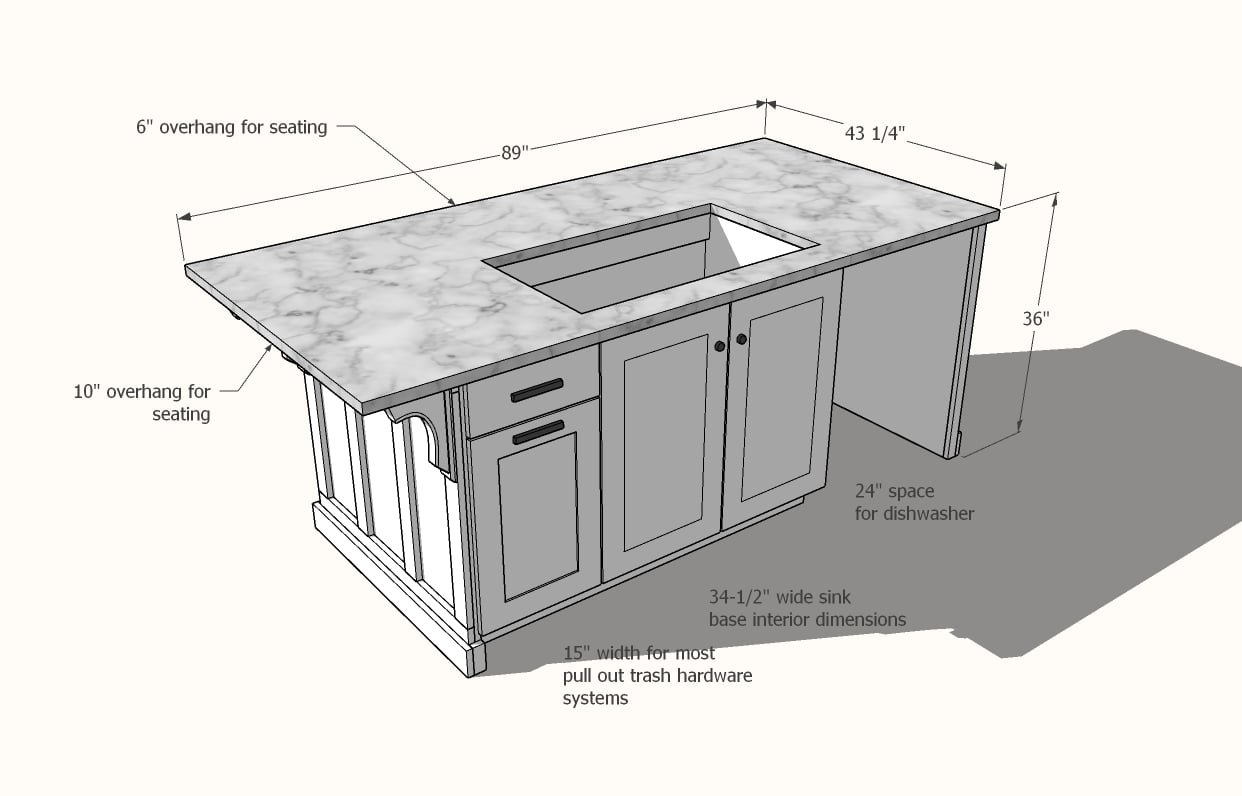
Use the size-specific shopping and cut lists below.
Shopping List
- 2 Sheets of 3/4" thick hardwood plywood (or use Shelf Help to have plywood precut and edgebanded and shipped to you)
- Edge banding for front exposed edges of plywood
- 1 - 4x8 sheet of 1/2" hardwood plywood
- 5 - 1x2x8' trim boards
- 2 - 1x6x8' trim boards
- 1 - 1x3x10' trim board
- 3 - 1x4x8' trim boards for drawers and baseboard
- 6 - 1x3x8' furring strips or similar for bay supports
- 1 set of 20" full extension drawer slides
- 1 - double trash pull out with max width of 15"
- 2 sets of Concealed Hinges, Frameless Half Overlay
- 2 - 9" x 12" corbels
- 1-1/4" pocket hole screws (About 120, coarse thread recommended)
- 1-1/4" brad nails and wood glue
- Countertop sourced seperately
- Door sizes shown in cut list and diagrams
Cut List
Plywood Carcass Pieces - front edges should be edge banded
- 5 - 3/4" plywood @ 23-1/4" x 34-1/2"
- 1 - 3/4" plywood @ 23-1/4" x 15"
- 4 - 3/4" plywood @ 11-1/4" x 34-1/2"
- 6 - 3/4" plywood @ 11-1/4" x 24-1/2"
- 1 - 1/2" plywood @ 76-1/2" x 34-1/2" - back
Trim (should be measured and cut to fit)
- 1 - 1x2 @ 76-1/2"
- 1 - 1x6 @ 76-1/2"
- 4 - 1x2 @ 27-1/2"
- 2 - 1x2 @ 35-3/4"
- 2 - 1x6 @ 35-3/4"
- 4 - 1x3 @ 27-1/2"
- 4 - 1x2 @ 27-1/2" - mid stiles on ends, can be 1x3s
- 1 - 1x2 @ 34-1/2" - dishwasher end panel trim
- 1x4 baseboard should be measured and cut to fit
Drawer (should be cut to fit)
- 2 - 1x4 @ 20" - drawer sides
- 2 - 1x4 @ ABOUT 12-1/2" - Measure and cut to fit after installing the drawer sides inside the cabinet
- 1 - 1/2" plywood @ ABOUT 14" x 20" - measure and cut to fit
Doors and Drawer Faces
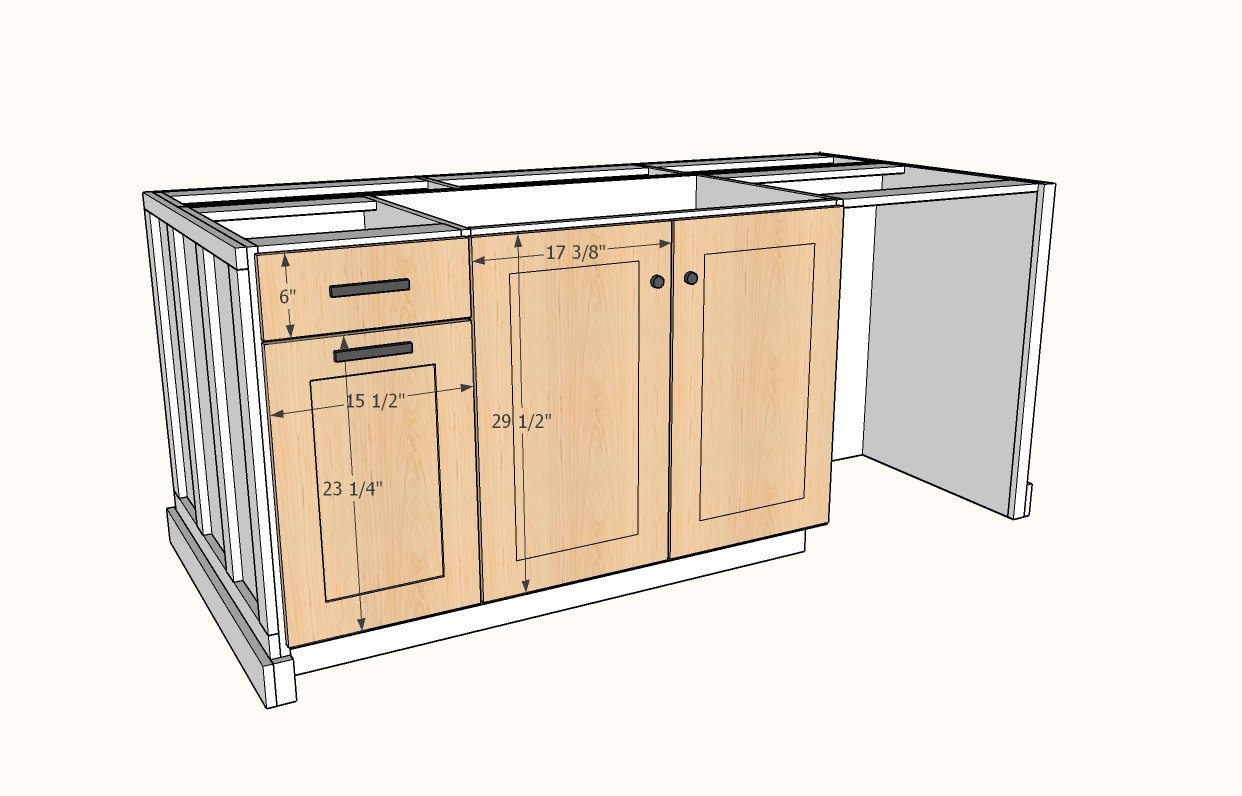
- 6" x 15-1/2" - Drawer Face on Trash Pull Out
- 23-1/4" x 15-1/2" - Door on Trash Pull Out
- 2 @ 17-3/8" x 29-1/2" - Doors on Sink Base
Tools
- measuring tape
- square
- pencil
- safety glasses
- hearing protection
- kreg-jig
- drill
- circular saw
- nailer
- sander
Step-by-step Instructions
Step 1
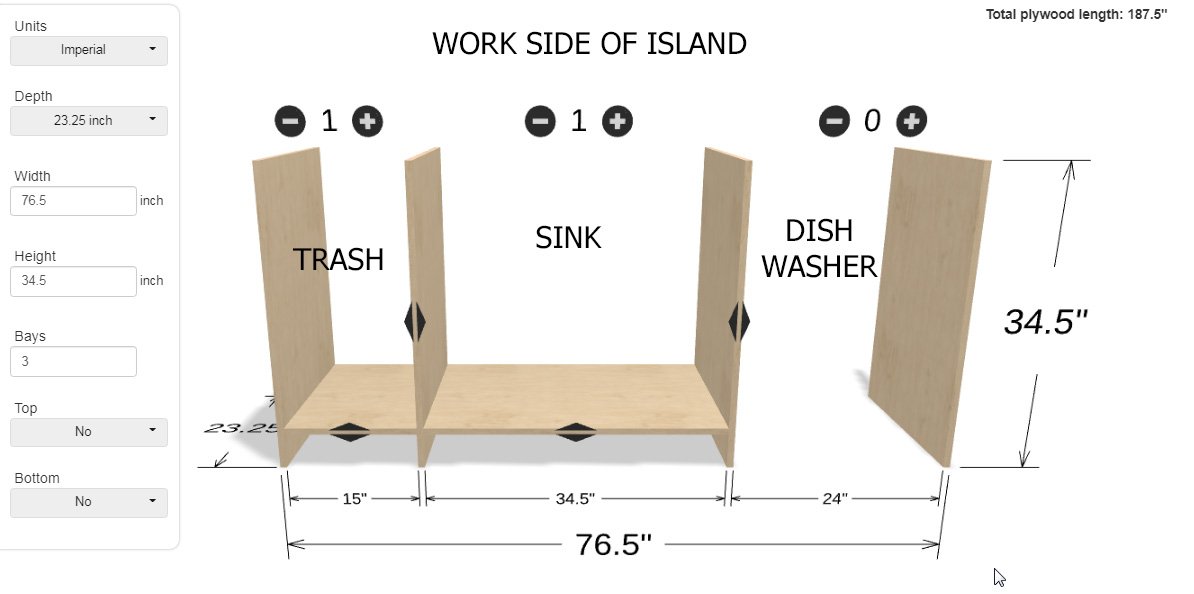
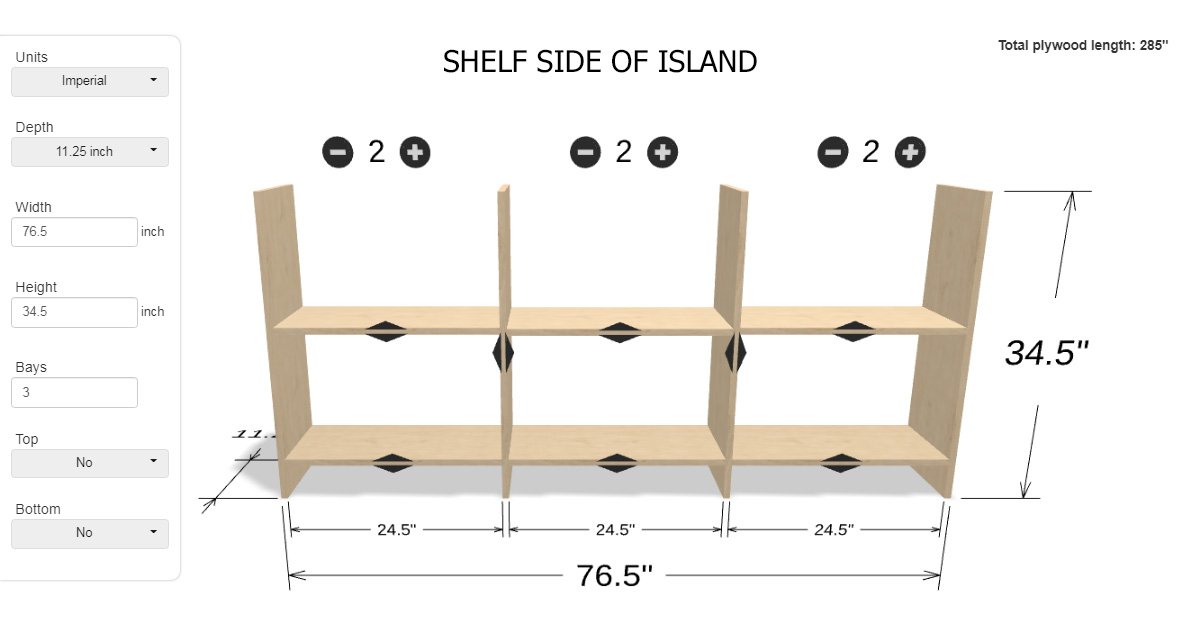
A big part of this project is cutting the plywood pieces for the cabinets and open shelves. I have listed the cuts needed in the cut list, but you can also use our Shelf Help cutting service to have the pieces cut and shipped direct to you. Here is the two configurations you will need if you use Shelf Help.
Start by building the sink base.
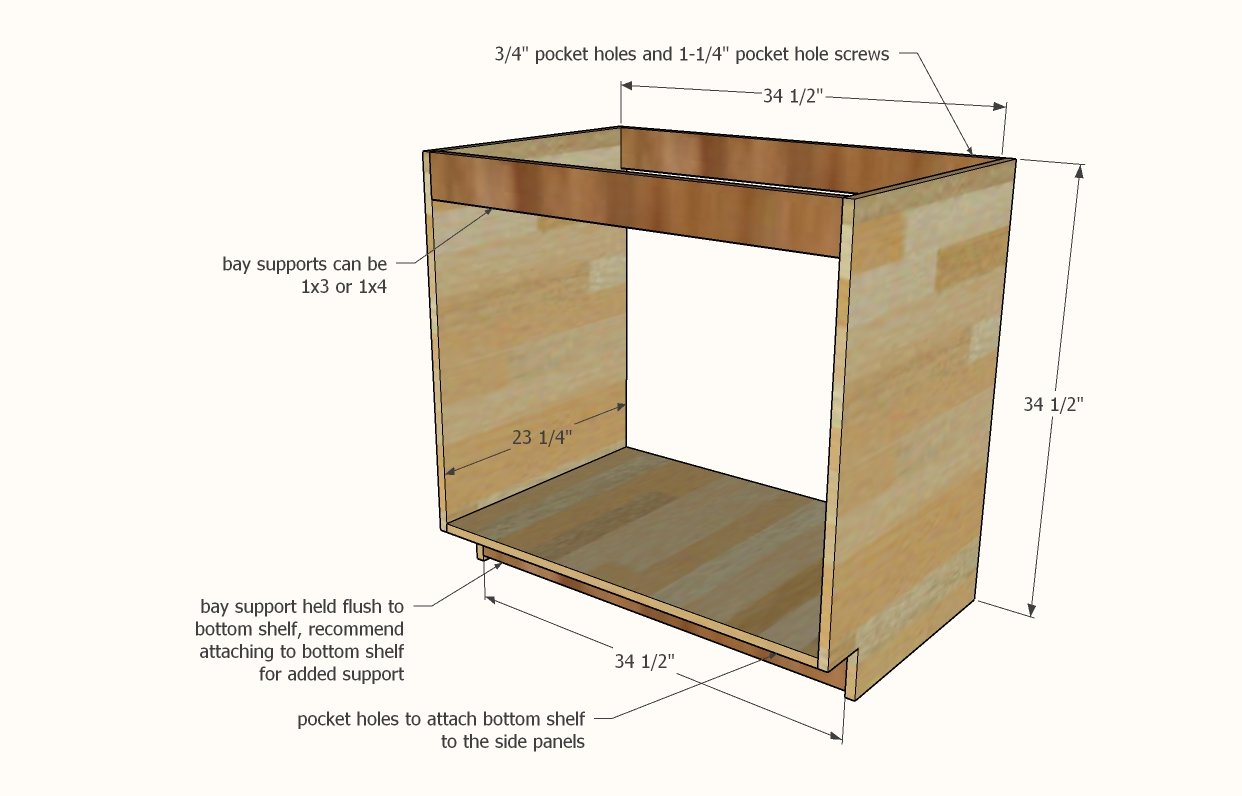
Cut out toekicks in the front edges of the plywood, 4" x 4", using a jigsaw. Use 3/4" pocket holes and 1-1/4" pocket hole screws to attach the shelf to the sides, bottom is flush to toekick cut out (there will be a 4" space under the shelf). Cut three bay supports from 1x3 or 1x4 boards and attach with pocket holes to further strengthen the cabinet. Notice how the top bay supports are run vertically? Sinks are so big these days, this will give you maximum clearance for a sink.
Step 3
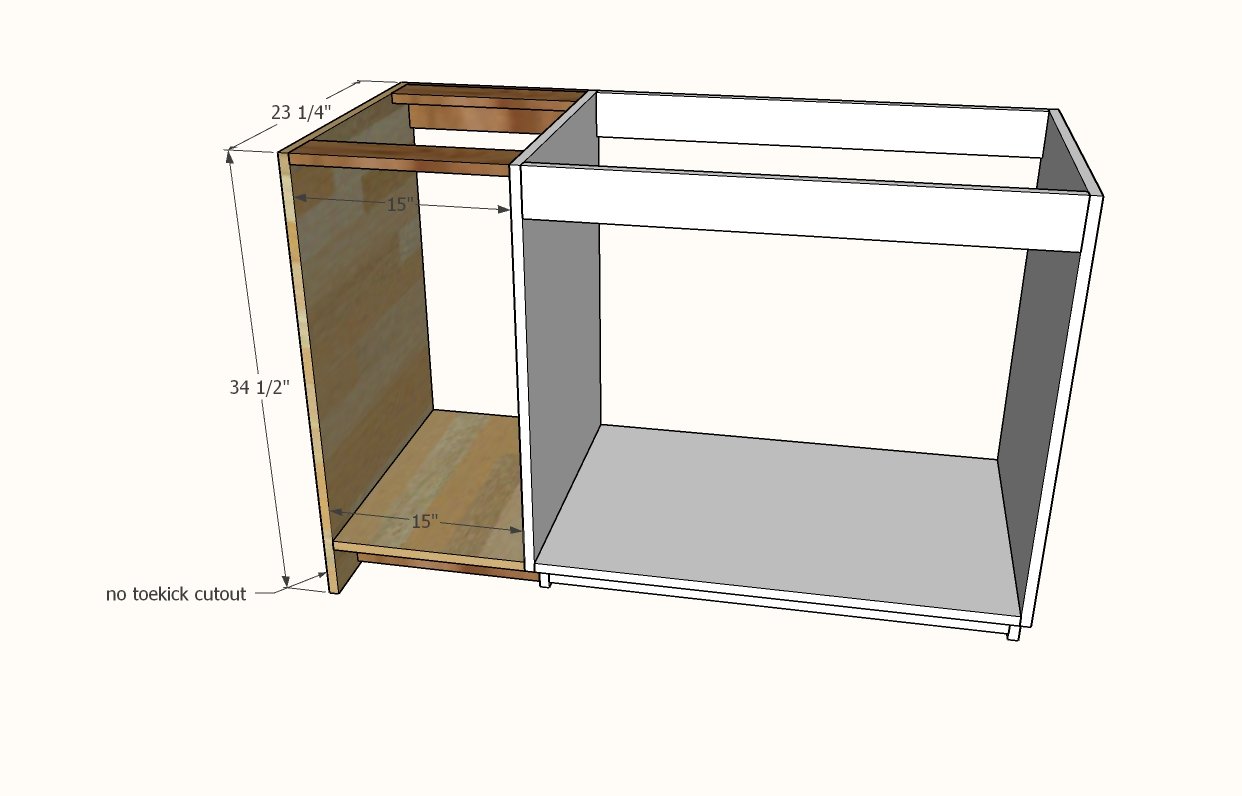
Repeat these steps for the trash cabinet panel and shelf, and strengthen with bay supports.
Step 4
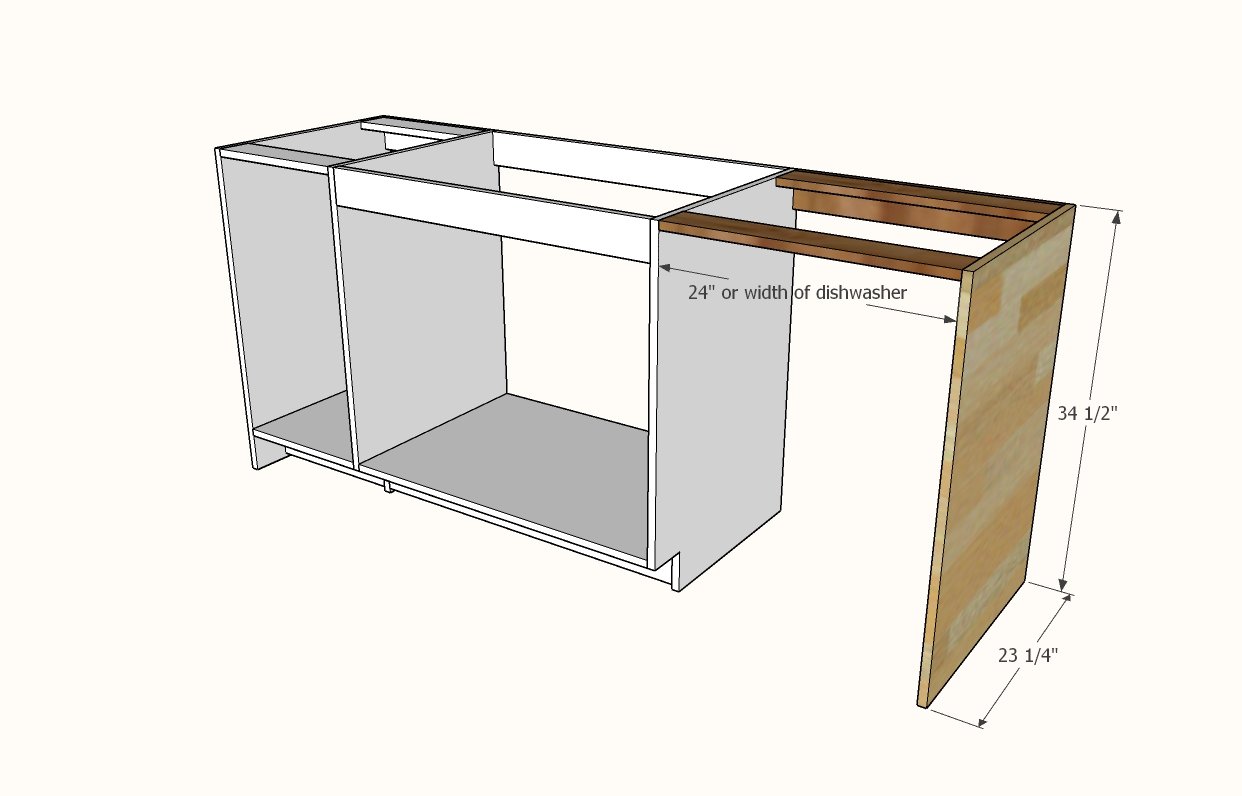
Repeat these steps for the dishwasher panel. Please double check the clearance needed for your dishwasher - 24" is a standard, but some dishwashers need more. Add the bay supports - you may not be able to add the top front bay support depending on your dishwasher clearance needed. I also recommend a bay support at the bottom back for further support. TIP: You can also drill pocket holes facing downward in the dishwasher panel for attaching the panel to the floor on installation.
Step 5
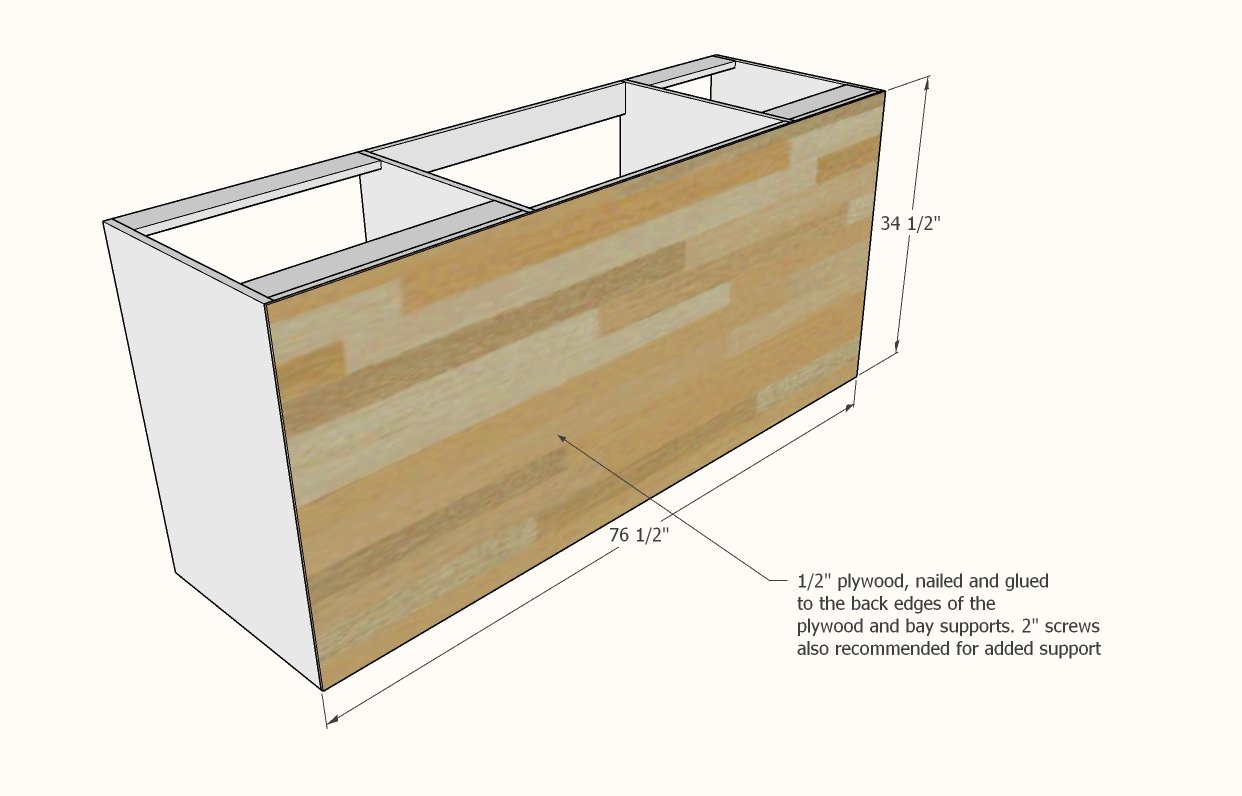
Cut 1/2" plywood with a circular saw and attach to the back with glue and 1-1/4" brad nails. I also recommend adding some screws (you can use the pocket hole screws) to strengthen the joints.
Step 6
Build the open shelf carcass with 3/4" pocket holes and 1-1/4" pocket hole screws. Attach through the bay supports to the back plywood. NOTE: I also added bay supports at the very bottom and attached at the bottom too.
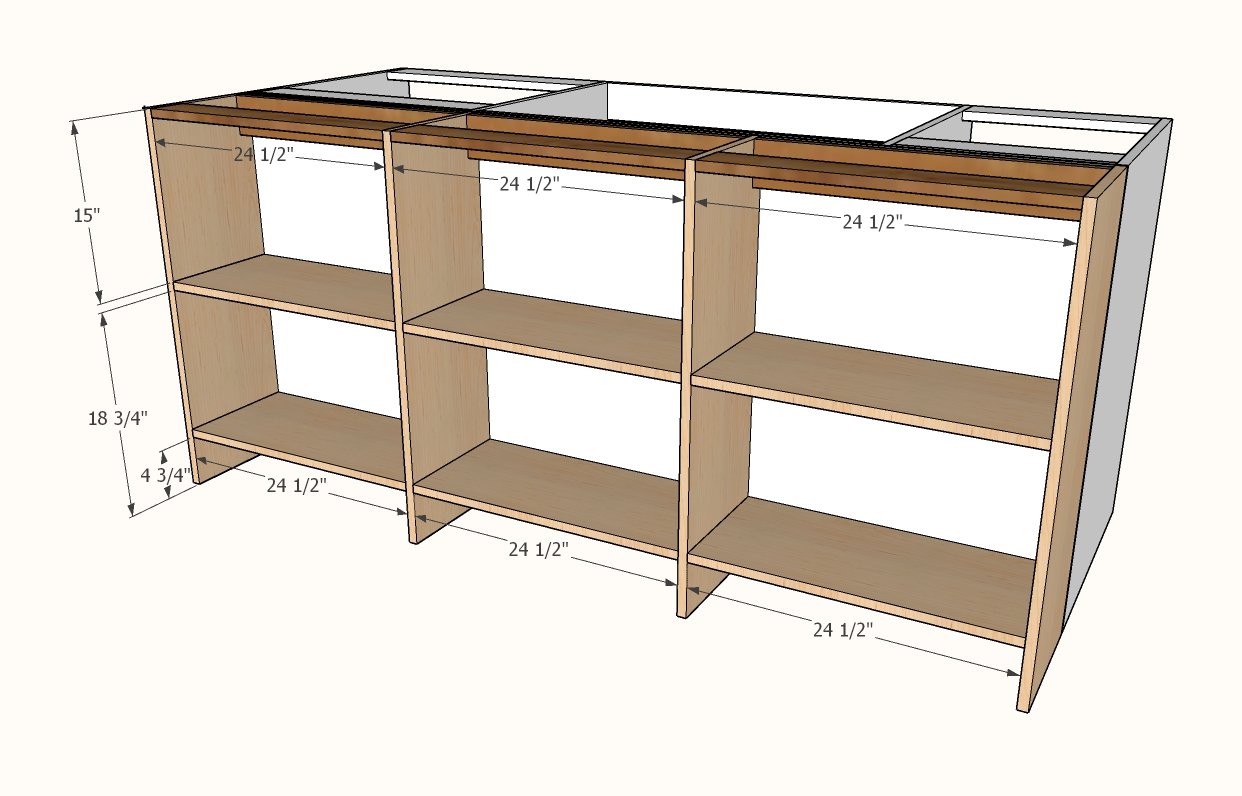
Measure and cut the top and bottom trim to fit.
Nail on with 1-1/4" brad nails and glue. Then measure the 1x2 stiles (vertical) trim and nail and glue to the front edges of the plywood.
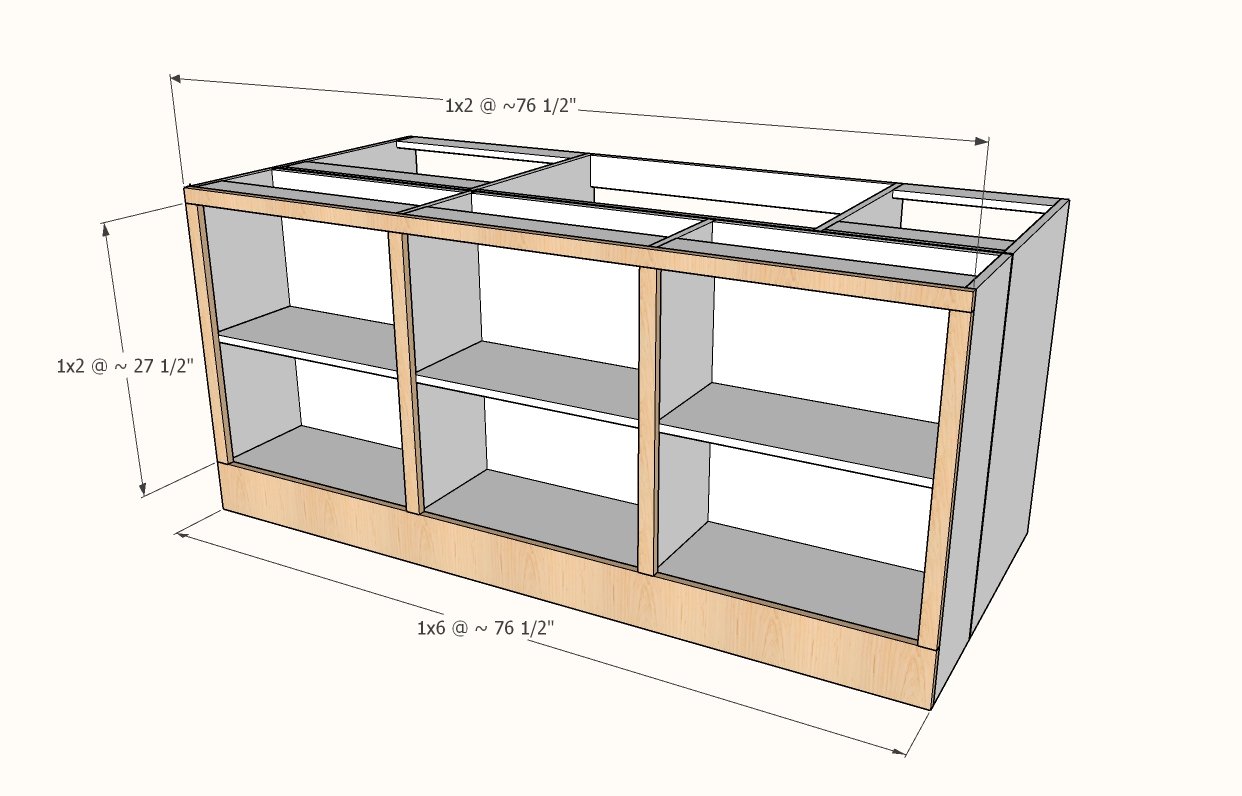
Step 8
Repeat these steps for the side trim, but use 1x3s for the stiles (so the corbels have a wider board to land on). You can use 1x2s for the mid-stiles. Do both sides.
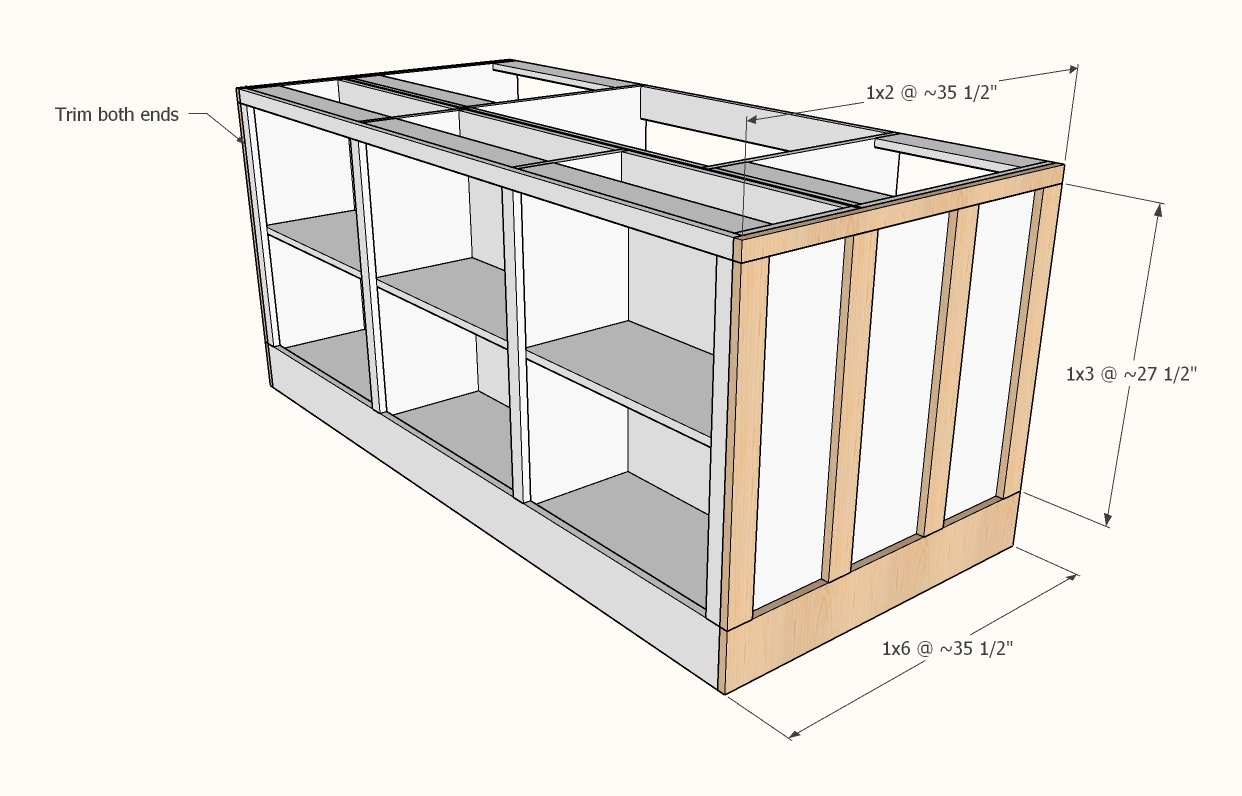
Step 9
Measure and cut a 1x2 to trim out front edge of dishwasher panel. Nail and glue in place.
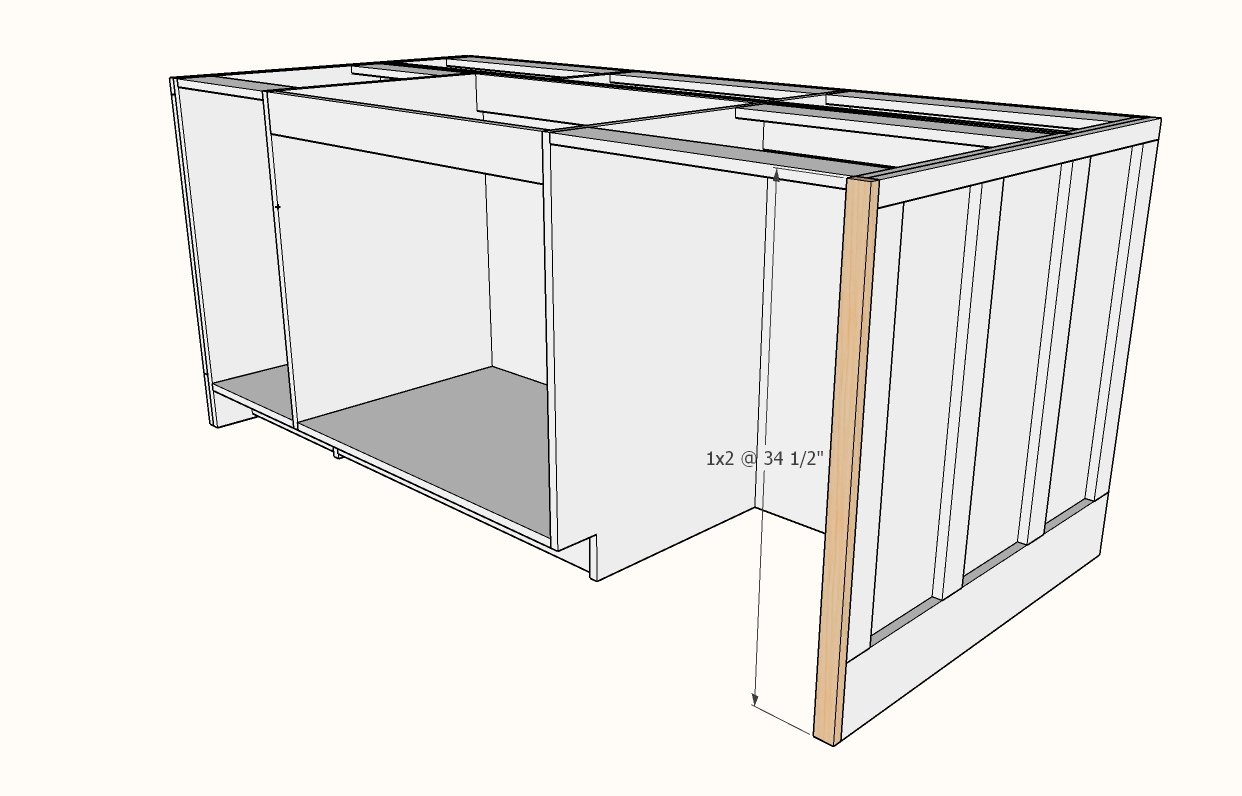
Step 10
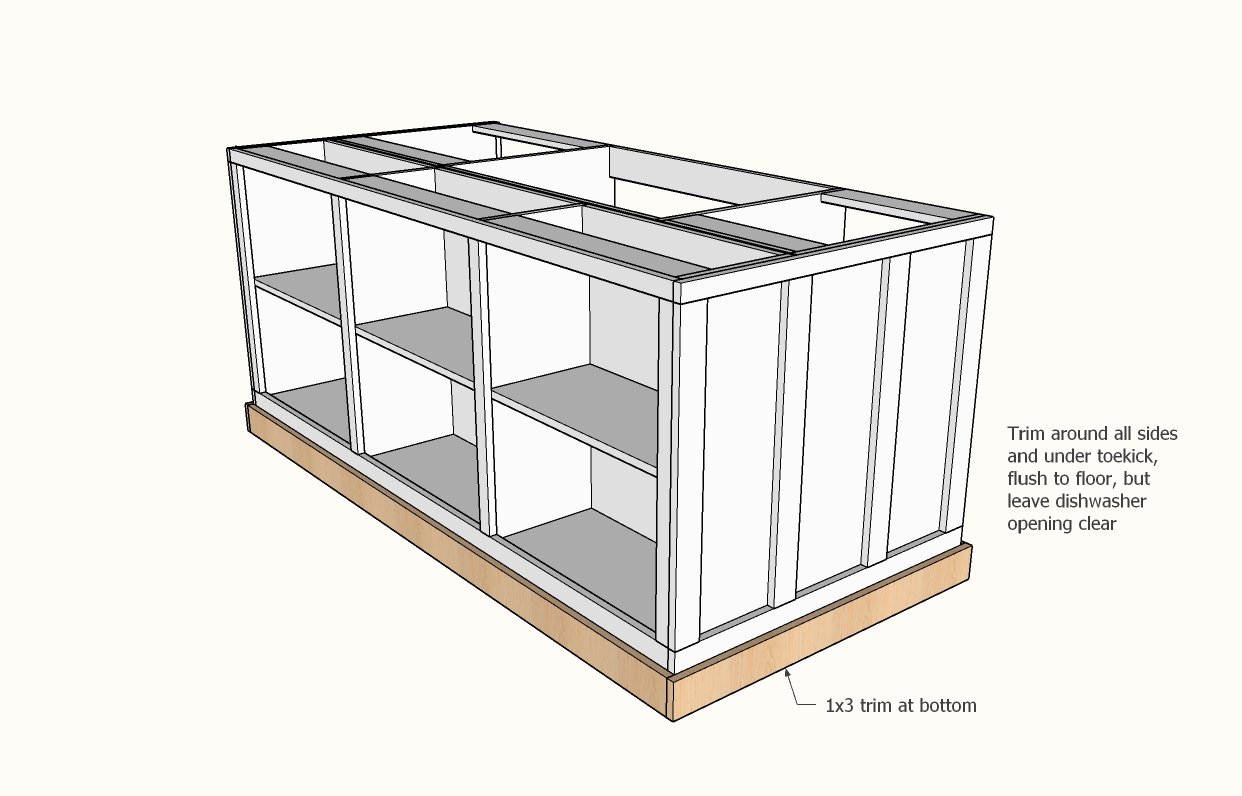
Trim the entire base with 1x4 boards or other base trim. Nail and glue on.
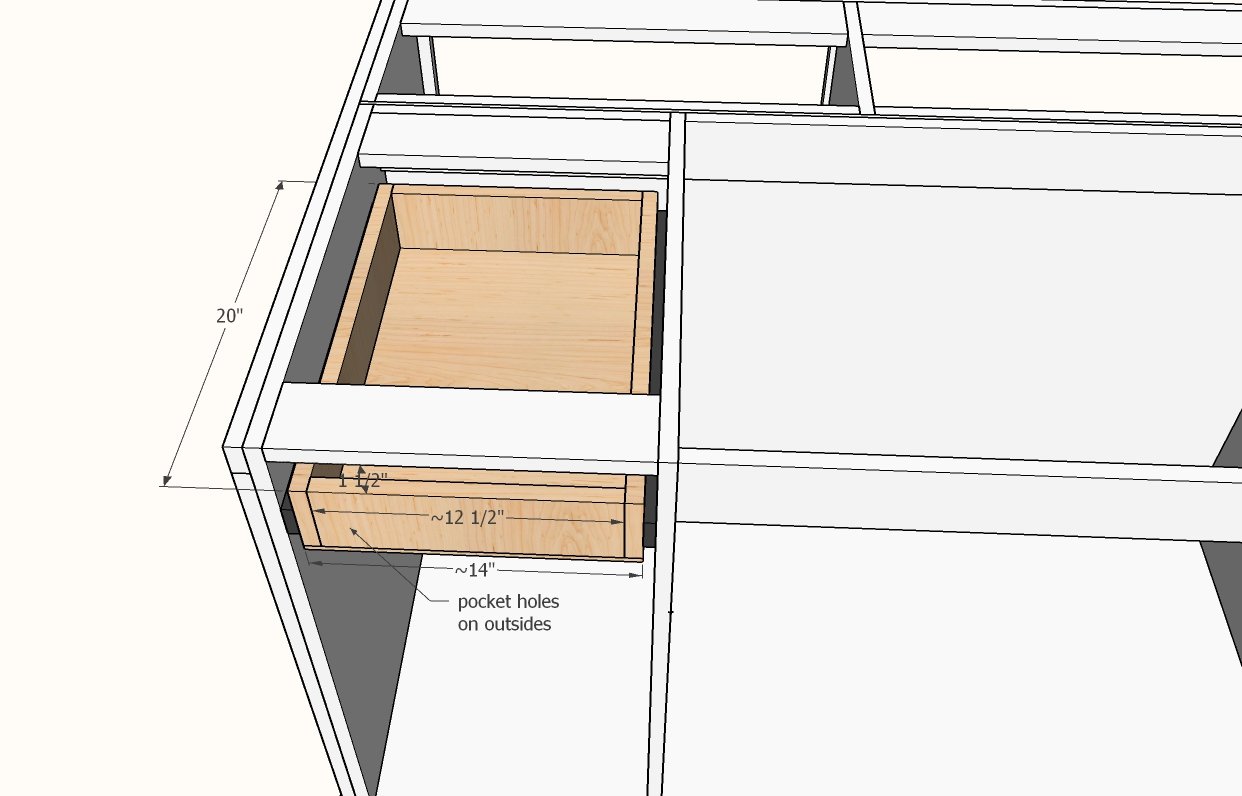
Build the drawer with 1x4 boards.
First cut two 1x4 @ 20" long. Install the drawer sides to the drawer slide and install inside the cavity. Measure between the two installed drawer sides and cut two 1x4s to match - should be about 12-1/2" long. Attach to the two drawer sides with pocket hole screws on the outside. Measure and cut 1/2" thick plywood for the drawer bottom. Attach with glue and nails. NOTE: Make sure you install the drawer at a height that will be covered by the drawer face. Here is my video tutorial of installing drawer boxes
Attach the drawer face to the drawer box.
Install doors with Frameless Hinges, HALF OVERLAY like these. Here is a video I did on installing these hinges
Step 13
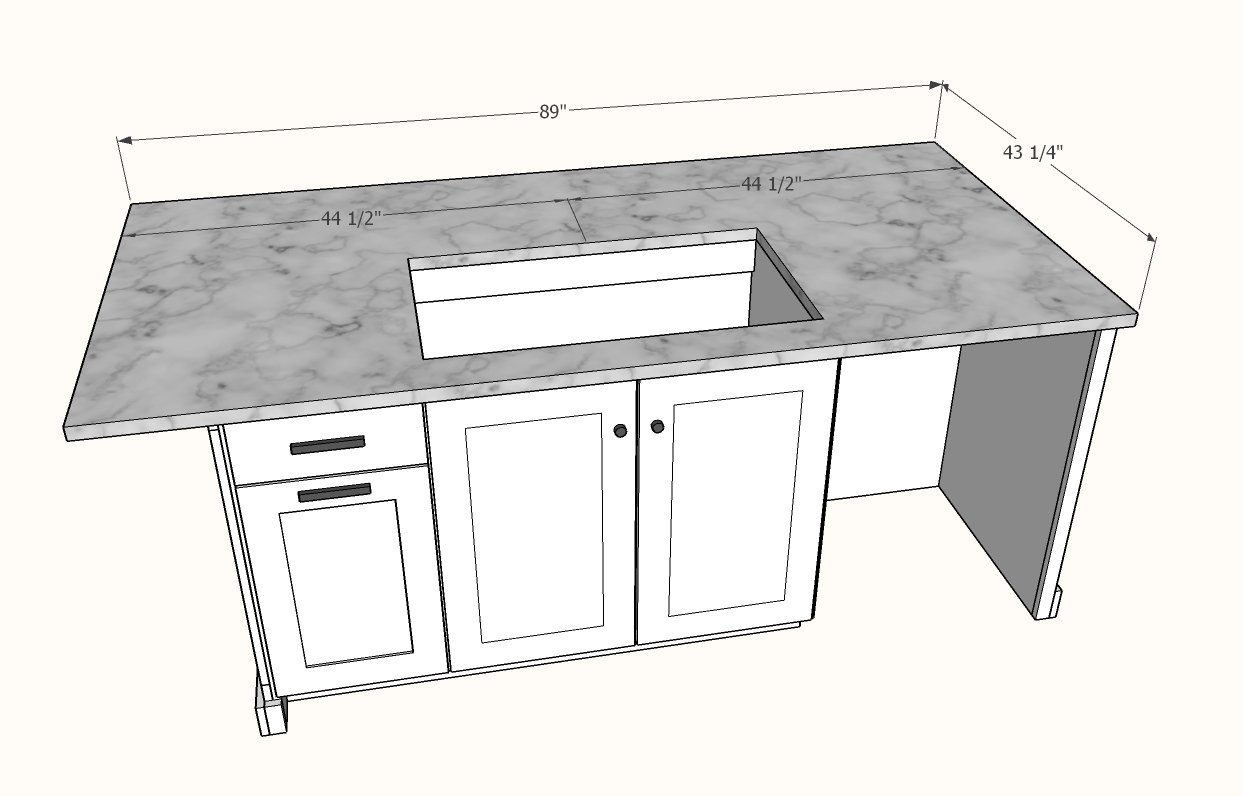
We had a countertop fabricator create and install our countertop out of quartz. The sink was cut out as well.
Step 14
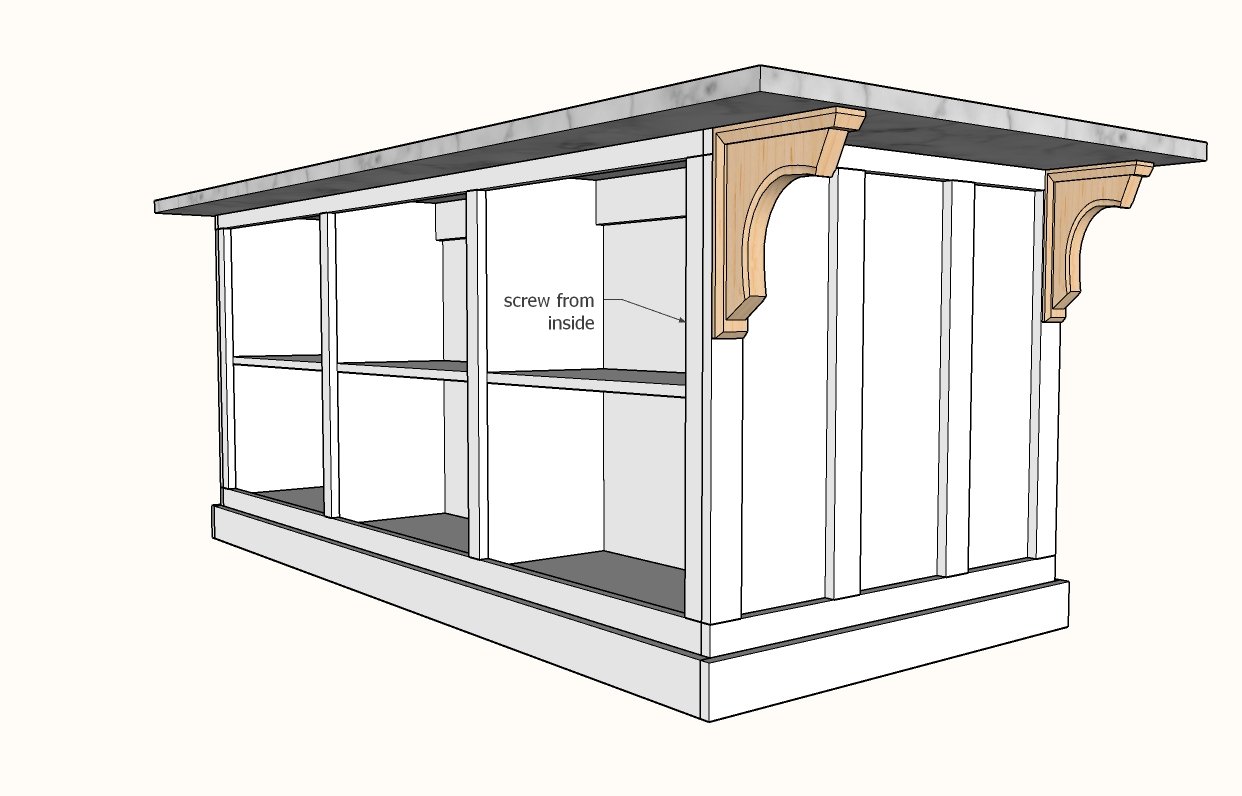
The corbels were added after the countertop, secured from the back side with 2" screws. I found these corbels at Home Depot, they are the 9” x 12” ones
Finishing
Sand all surfaces, starting with a medium grit and finishing with fine. Wipe off the dust, fill any holes or gaps with wood filler, and sand smooth once dry. Apply primer if you're painting, then finish with your choice of paint or stain and seal with a durable clear topcoat. For outdoor projects, use exterior-rated primer, paint or stain, and sealer so the piece stands up to the weather.
Source (temporary): https://www.ana-white.com/woodworking-projects/kitchen-island-open-shelving