Laundry Basket Dresser
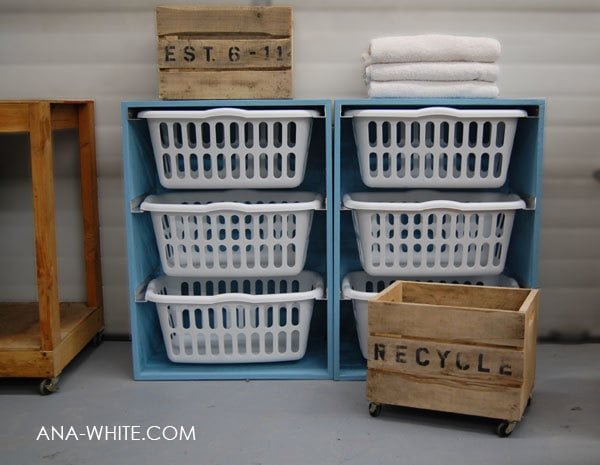
The Laundry Basket Dresser has taken my laundry room from the messiest room in my home to the tidiest. It's so easy to pull laundry out and put it directly into baskets. I then can take each basket to it's respective room and fold and put laundry away. For any busy home, these are a must.
Specifications
| Project type | Dresser Plans |
|---|---|
| Room | Storage Solutions |
| Style | Cottage Style Furniture Plans |
| Difficulty | Beginner Projects |
| Estimated cost | $20 - $50 |
Dimensions
Use the size-specific shopping and cut lists below.
Shopping List
3/4″ Plywood cut into 15 1/2″ wide x 8 feet long strips (referred to as 1x16s)
1/4″ Plywood for the backs
1 1/2″ x 1 1/2″ metal angle (ask for it at Blue or Orange)
2″ wood screws or 1 1/4″ pocket hole screws 3/4″ wood screws (to screw the metal angle to the insides of the boxes)
1 1/4″ wood screws
wood glue
wood filler finishing supplies
Cut List
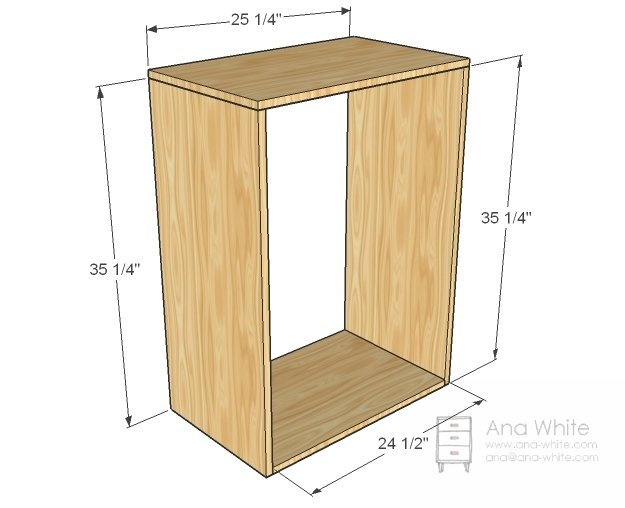
2 – 1×16 @ 35 1/4″ (Sides)
1 – 1×16 @ 24 1/2″ (Bottom)
1 – 1×16 @ 26″ (Top)
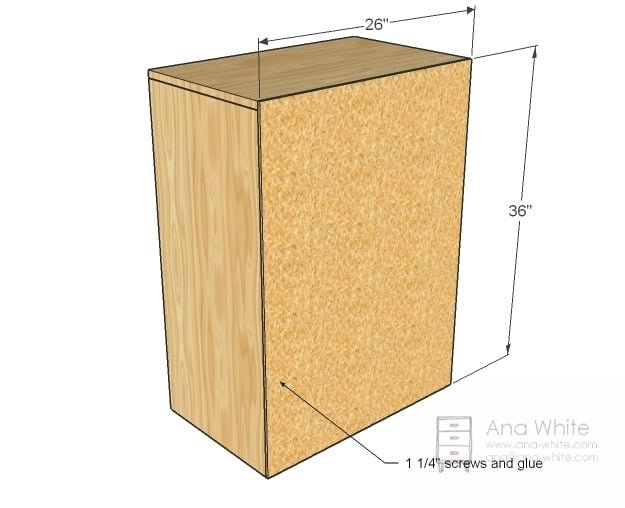
1 – 1/4″ Plywood @ 36″ x 25 3/4″ (Back)
6 – 1 1/2″ x 1 1/2″ Metal Angle 15 1/2″ long (ask hardware store to cut or cut with a hack saw)
Tools
- measuring tape
- square
- pencil
- safety glasses
- hearing protection
- drill
- circular saw
- sander
- level
- countersink drill bit
Step-by-step Instructions
Build the Box
I used pocket holes, but you can also use 2″ wood screws countersunk and screwed together to build the box. NOTE: Top Measurement should be 26″
Back
Adjust for square then screw the back on with 1 1/4″ screws and glue. I finished mine at this stage by filling all holes with wood filler, all plywood edges, and any imperfections in the plywood. I then sanded with coarse sandpaper because the plywood was builder grade cheapo stuff, the finished with medium sandpaper. Finally, I primed and painted with ooops paint in semigloss from Valspar.
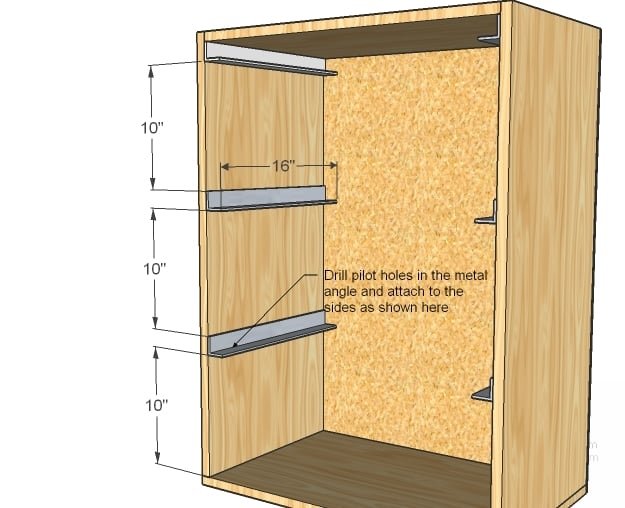
Metal Angle
If you are intimidated by metal angle, you can always use 2x2s glued and screwed here. Cut the metal angle with a hack saw and predrill holes (three per slide). Mark locations with a square and screw metal angle to the sides. TIP: Screw at a very slight downward angle to keep the baskets to the back of the box instead of sliding forward. If you choose to stack, make sure you secure the top laundry basket dress to a stud in the wall.
Finishing
Sand all surfaces, starting with a medium grit and finishing with fine. Wipe off the dust, fill any holes or gaps with wood filler, and sand smooth once dry. Apply primer if you're painting, then finish with your choice of paint or stain and seal with a durable clear topcoat. For outdoor projects, use exterior-rated primer, paint or stain, and sealer so the piece stands up to the weather.
Source (temporary): https://www.ana-white.com/woodworking-projects/laundry-basket-dresser