Little Cottage Loft Bed
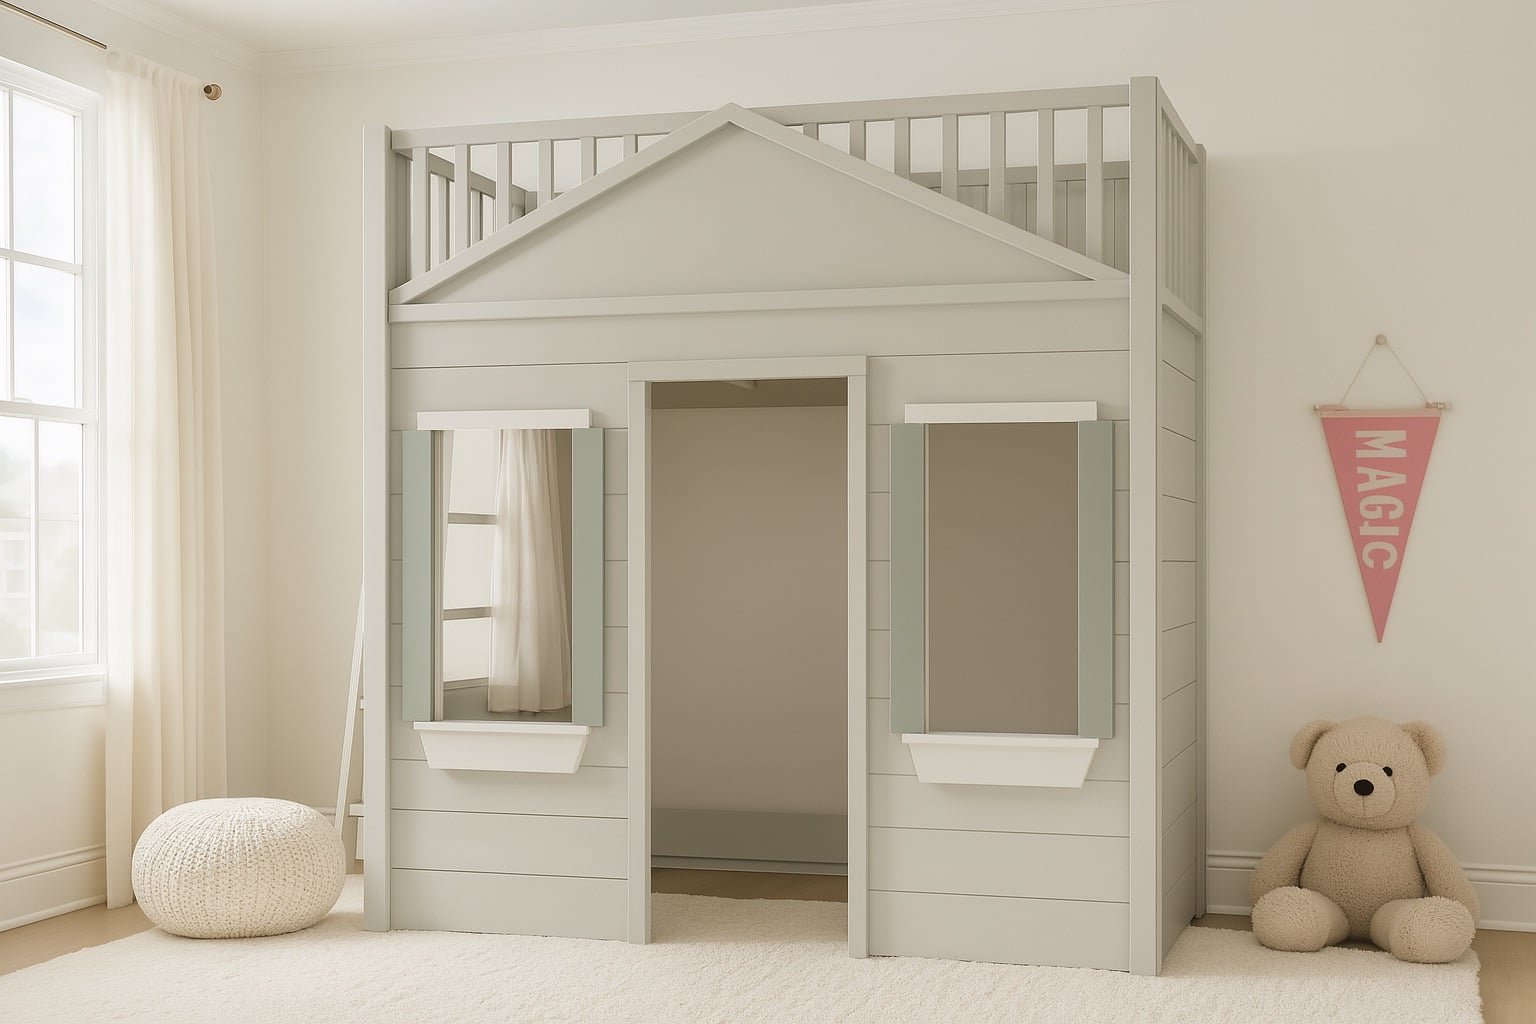
Transform your child’s bedroom with this DIY playhouse loft bed! Featuring a charming cottage-inspired design with window boxes, a slatted ladder, and an upper bunk, this space-saving bed is perfect for imaginative play and restful sleep. Built with 1x boards and planks that lines up just like real cottage walls, this bed fits beautifully in modern,…
Specifications
| Project type | Beds and Bed Frames |
|---|---|
| Room | Bedroom |
| Style | Cottage Style Furniture Plans |
| Difficulty | Advanced |
| Estimated cost | $150 - $200 |
Dimensions
Use the size-specific shopping and cut lists below.
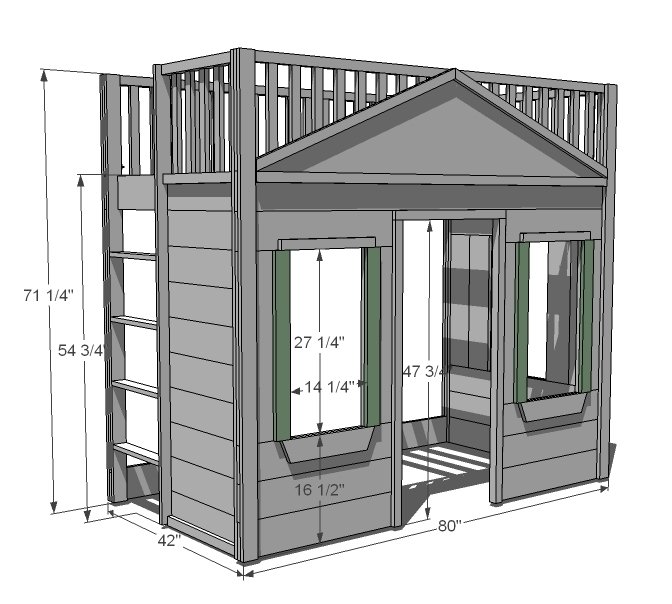
Shopping List
- 10 - 1x2 @ 8 feet long
- 7 - 2x2 @ 8 feet long
- 11 - 1x6 @ 8 feet long
- 11 - 1x3 @ 8 feet long
- 2 - 1x4 @ 8 feet long
- Slats or Bunkie Board
Acclimate lumber in room before assembling to prevent wood changes after build.
Cut List
- 50 - 1x2 @ 15" (Rails)*
- 1 - 2x2 @ 21" (Ladder Side, Top)
- 10 - 1x6 @ 21" (Ladder Side, Planks)
- 9 - 1x3 @ 71 1/4" (Legs)
- 1 - 1x6 @ 15 3/4" (Ladder Top)
- 4 - 1x3 @ 15 3/4" (Ladder Rungs)
- 2 - 1x2 @ 21" (Ladder Side Trim)
- 1 - 2x2 @ 37 1/2" (Window Side Top)
- 5 - 1x6 @ 37 1/2" (Window Side Planks)
- 4 - 1x6 @ 27 1/4" (Window Side Vertical Planks)
- 6 - 1x4 @ 27 1/4" (Window Trim)
- 1 - 1x3 @ 18 1/2" (Window Side Top Trim)
- 1 - 1x4 @ 18 1/2" (Window Side Bottom Trim, ends tapered in)
- 2 - 1x2 @ 37 1/2" (Window Side Trim)
- 2 - 2x2 @ 75" (Long Railing Tops)
- 4 - 1x3 @ 16 1/2" (Long Railing Ends)
- 3 - 1x6 @ 80" (Long Rail Bottoms/Bottom Support)
- 2 - 1x3 @ 43 3/4" (Back Spacers)
- 2 - 1x3 @ 27 1/4" (Front Window Spacers)
- 8 - 1x6 @ 28" (Front Planks)
- 1 - 2x2 @ 24" (Doorway top)
- 2 - 2x2 @ 47 3/4" (Doorway Sides)
- 2 - 1x2 @ 40 3/8" (Both ends cut at 20 degrees off square, ends parallel)
- 1 - 1x2 @ 78" (Gable End Trim)
- 1 - 1/8" Paneling to fit Gable end
- 2 - 1x3 @ 17 1/4" (Front Window Top Trim)
- 2 - 1x4 @ 17 1/4" (Front Window Bottom Trim, Ends Tapered)
- 2 - 1x2 @ 25 1/2" (Front Wall Trim)
- 2 - 2x2 @ 75" (Cleats)
- Slats for the mattress or bunkie board
*Set up a stop block to cut these boards quickly on your saw, don't try to measure and cut each one, you won't get accuracy or speed
Tools
- measuring tape
- square
- pencil
- safety glasses
- hearing protection
- kreg-jig
- drill
- circular saw
- nailer
- sander
- staple gun
- level
- countersink drill bit
Step-by-step Instructions
Step 1
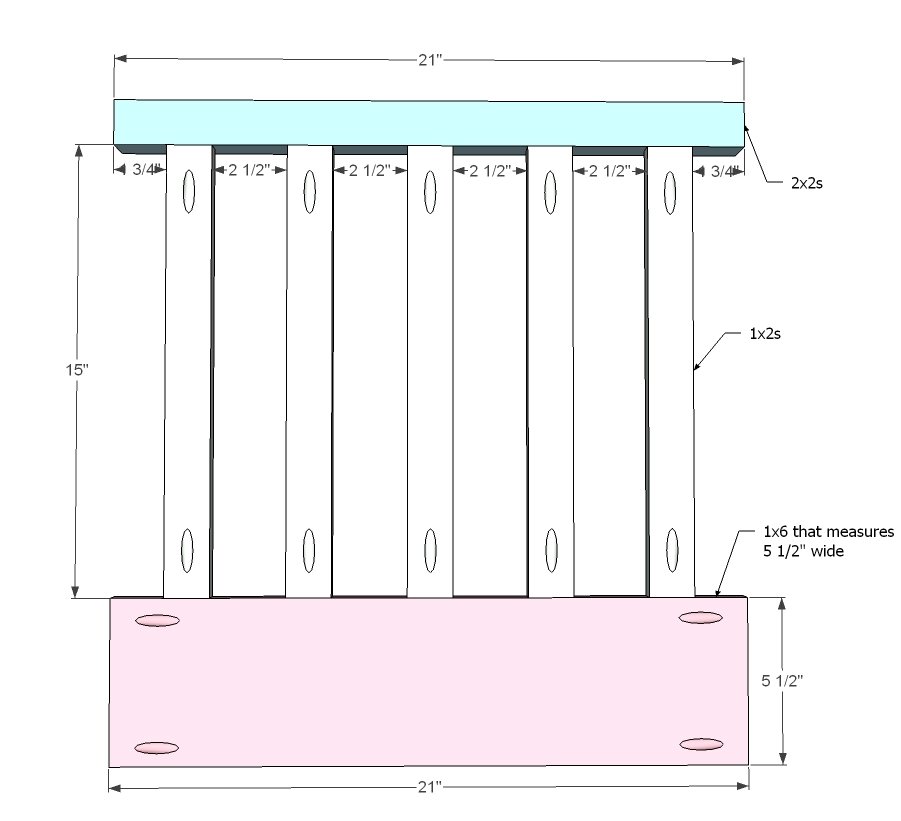
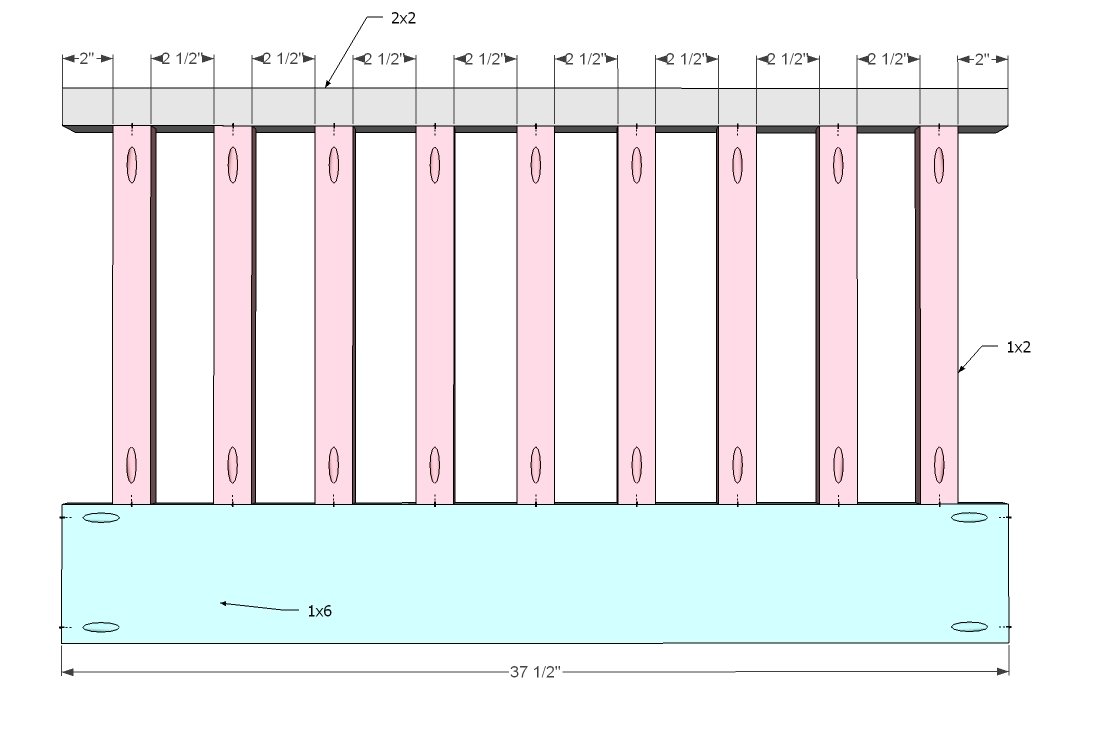
This is for the ladder side. The top is a 2x2, and the bottom is a 1x6. Mark out all the rail spacings as shown above and predrill holes with a Kreg Jig™ set for 3/4" stock. Fasten the rails to the top and bottom, keeping the back side flush. Try placing a 3/4" thick board under the rails to bring them up to flush with the 2x2 as you fasten. Little tricks like this can save you a ton of time.
Step 2
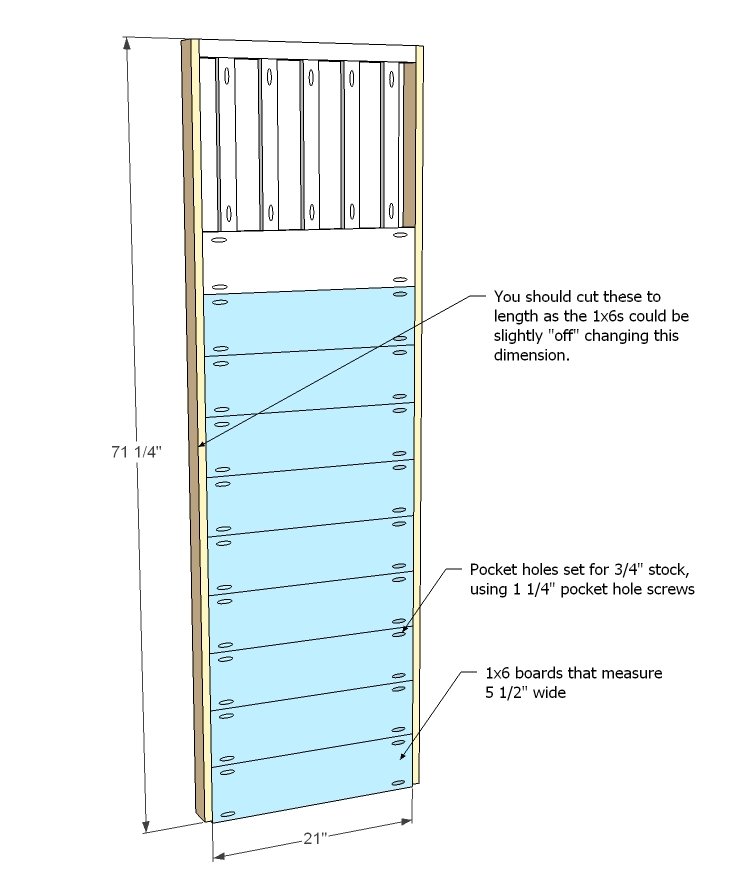
With your ladder side rails done, attach the legs and the 1x6s with pocket holes as shown above. Remember that all boards on the back side are flush. Use glue and 1 1/4" pocket hole screws.
Step 3
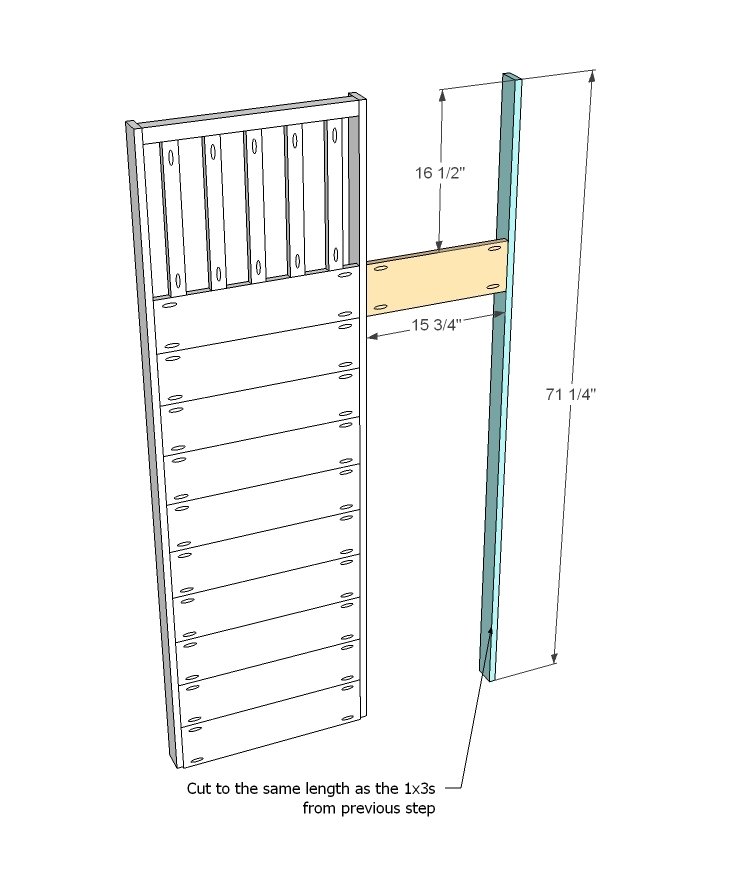
Now it's time to start constructing the ladder. Attach the ladder top trim and the remaining leg as shown above.
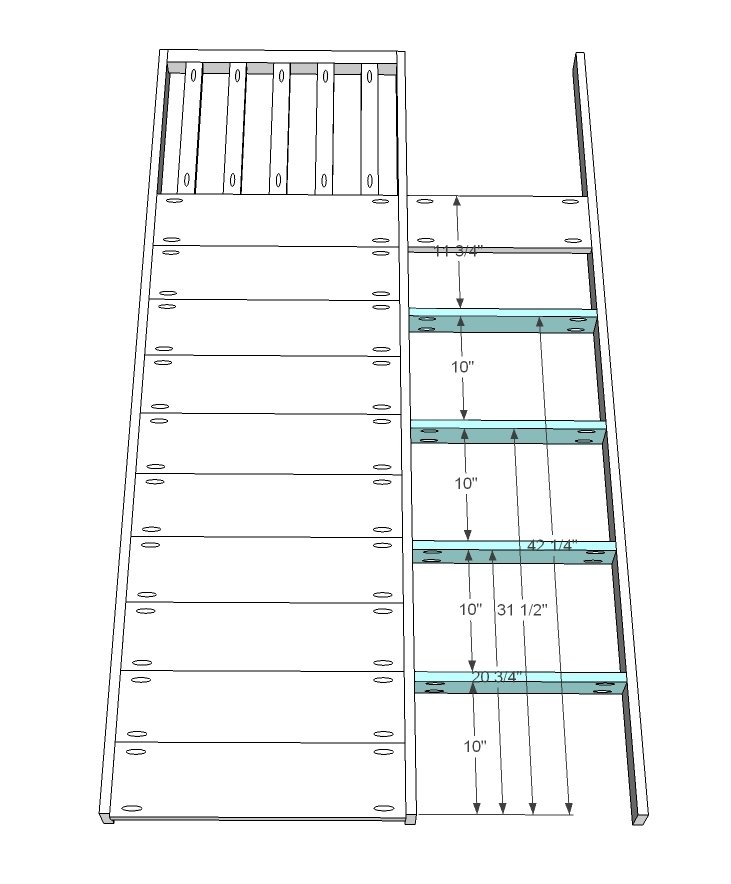
And now the ladder rungs.
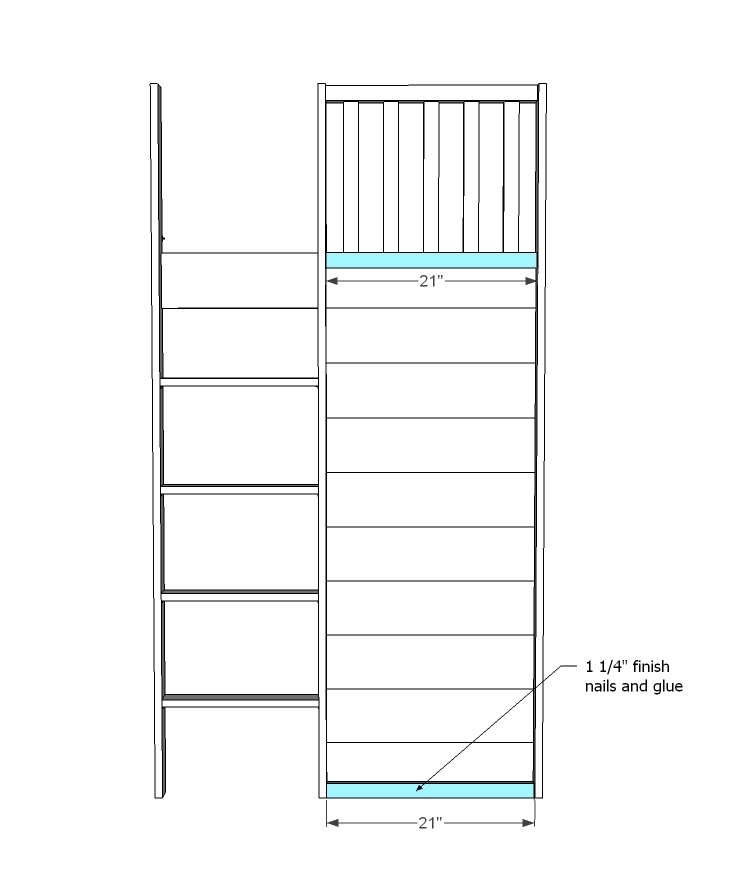
Depending on the quality of your 1x6s, you may wish to add a pocket hole screw in the center of each 1x6, joining 1x6s to each other.
Step 5
Step 6
Now build the window side railing as shown above, in the same manner as the ladder side.
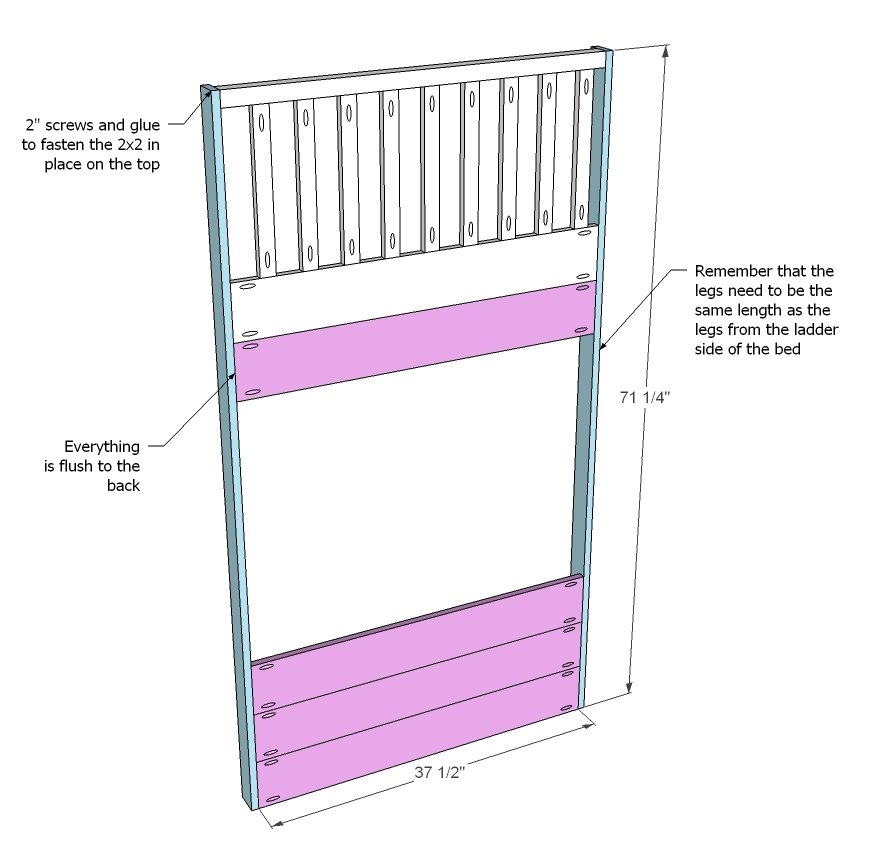
Step 7
And add the legs and the horizontal panel boards.
Step 8
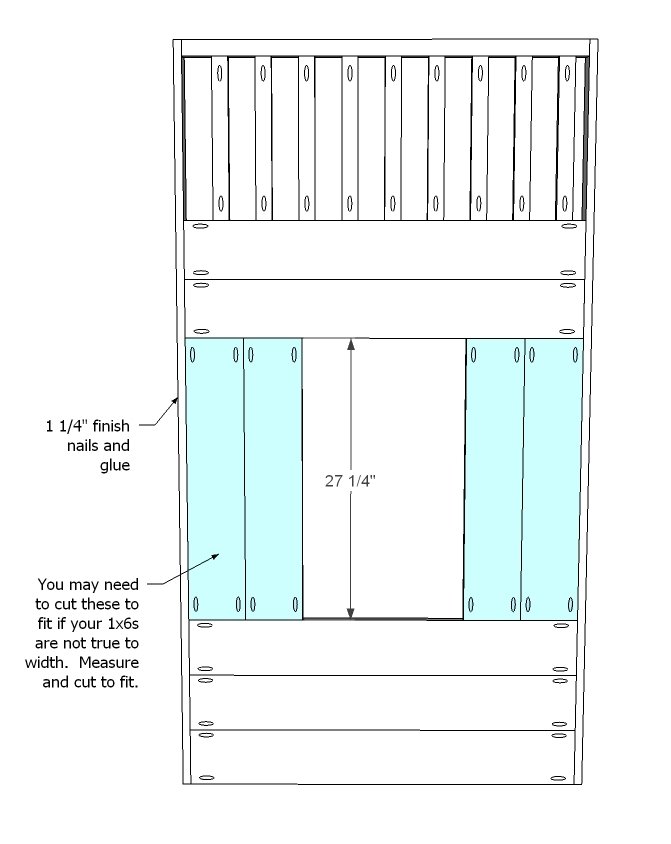
Now measure and cut the vertical panel boards as shown above. Fasten in place. From the leg, attach the panel board with 1 1/4" finish nails and glue.
Step 9
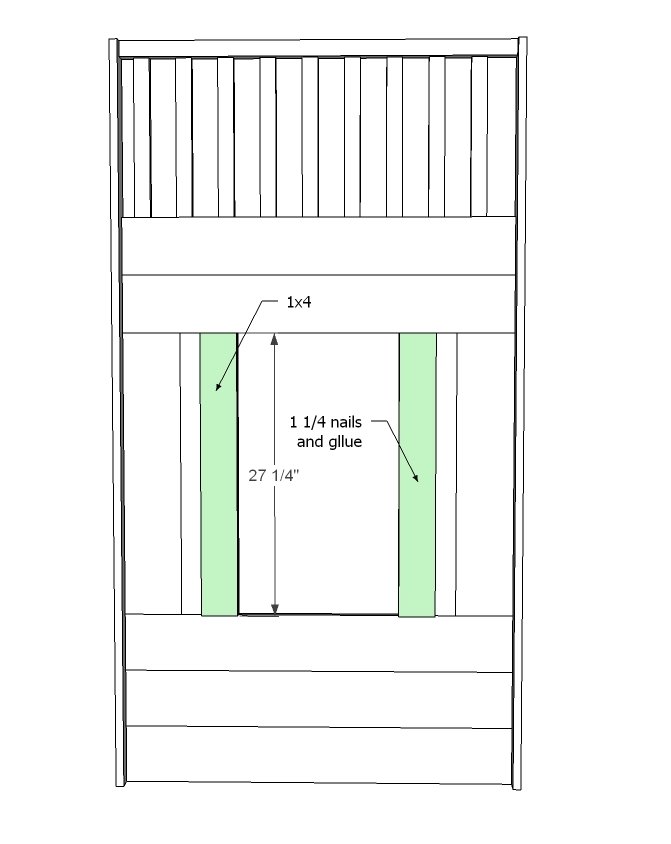
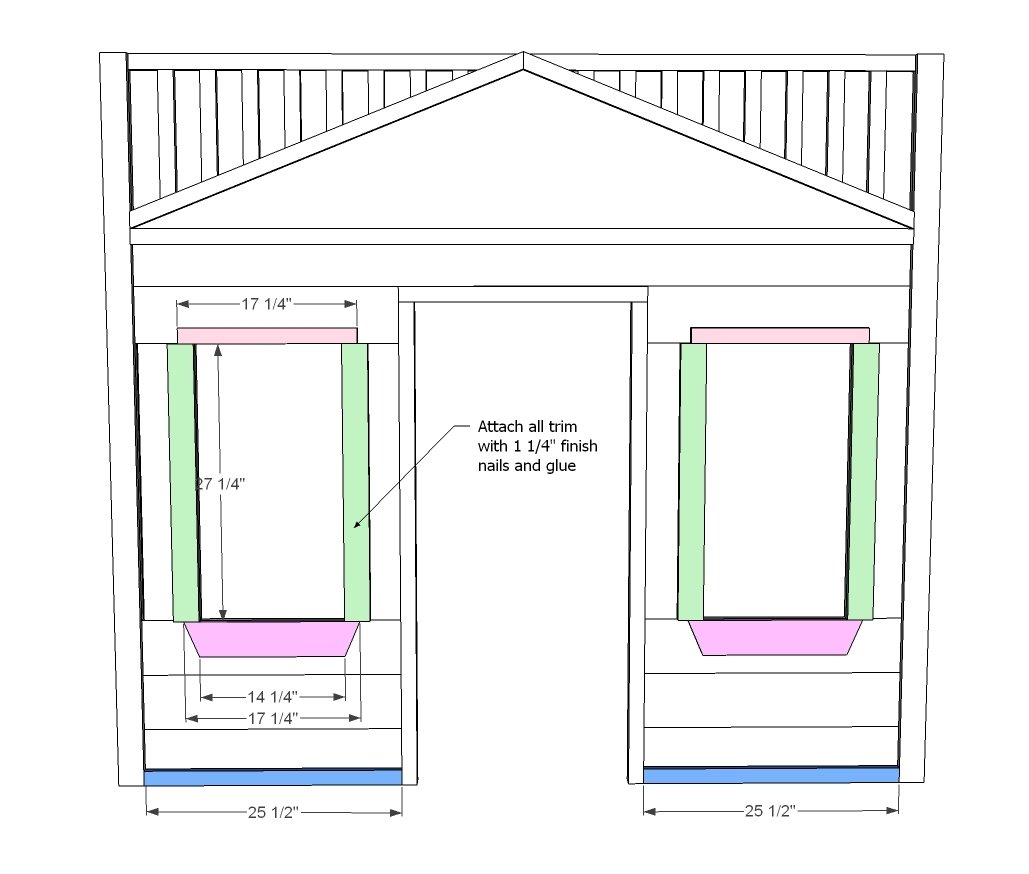
Some window trim. Attach with 1 1/4" finish nails and glue.
Step 10
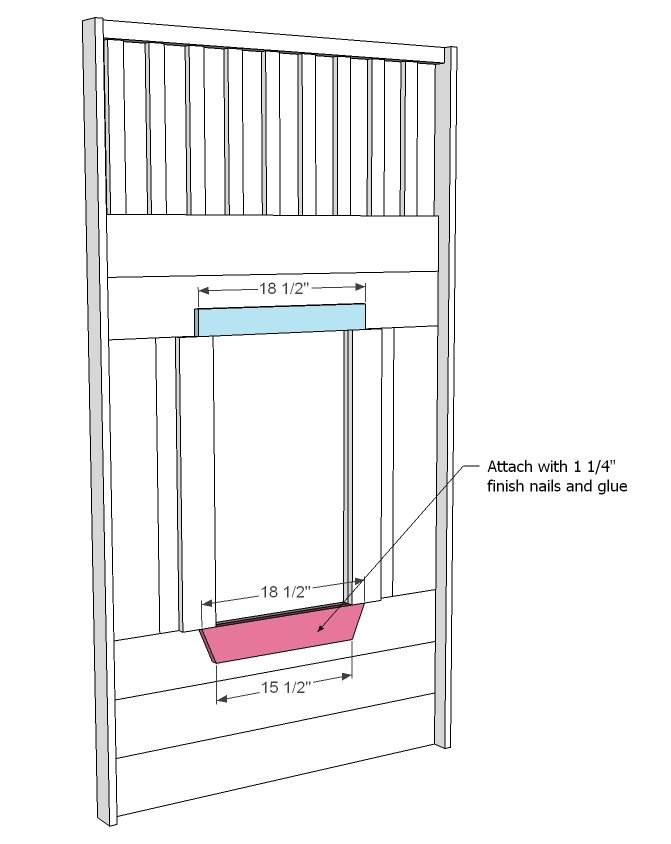
You don't have to do the trim in this manner - use your imagination and be creative! Attach with 1 1/4" finish nails and glue.
Step 11
A little trim will finish up the window side of the bed.
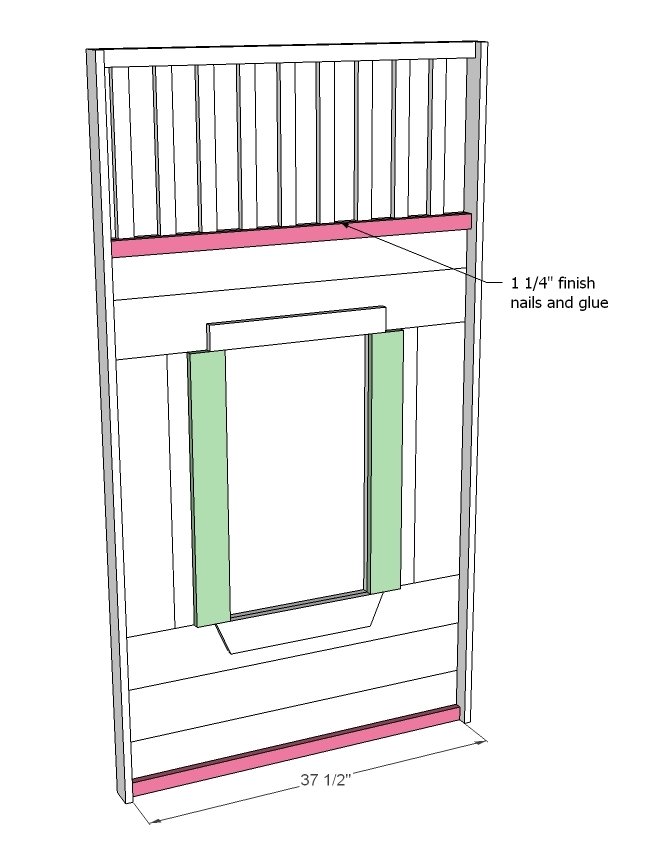
Step 12
You will need to build two of these, one for the front, and one for the back.
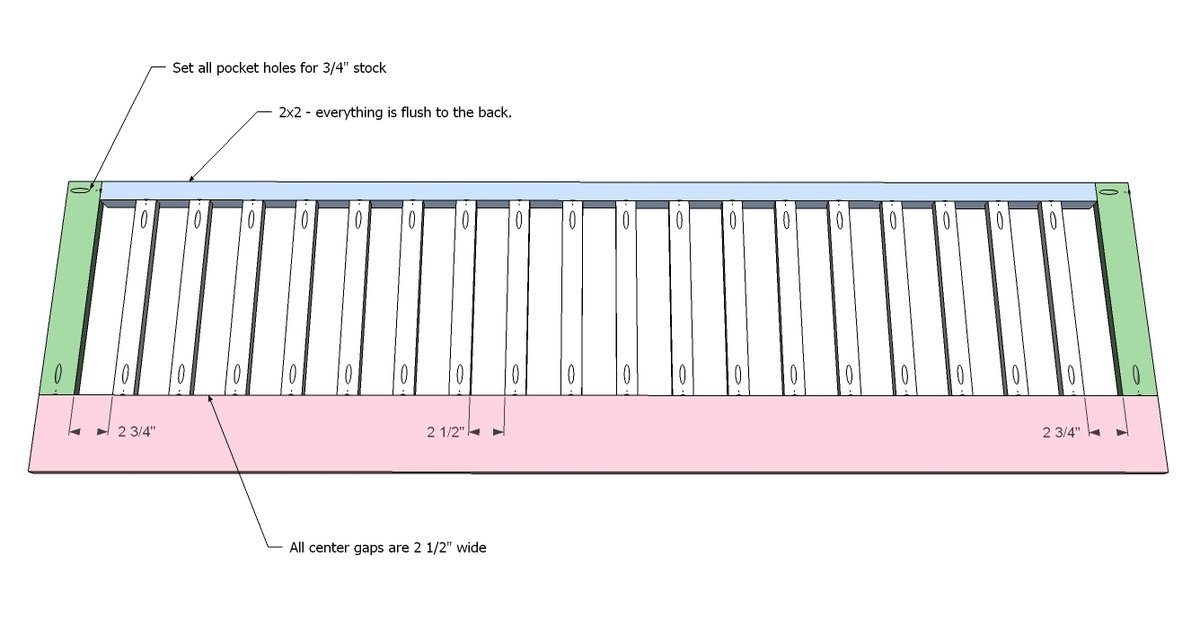
Step 13
To both of these railings, attach legs as shown here.
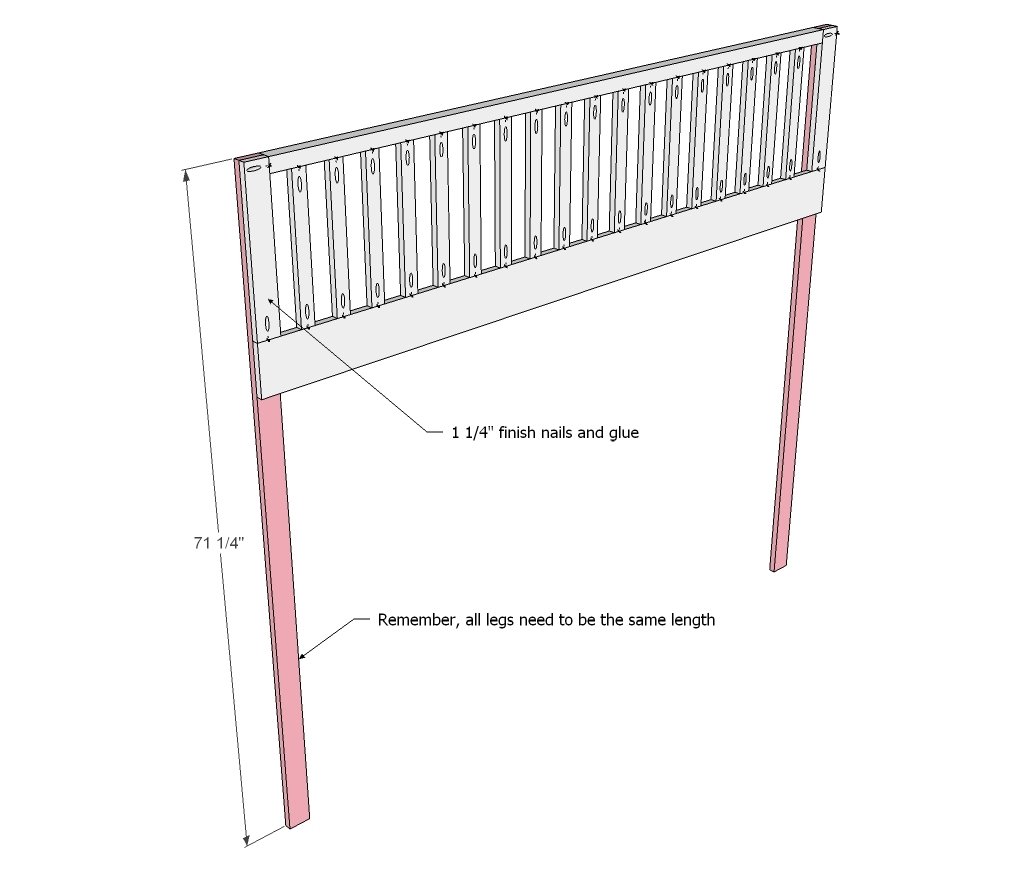
Step 14
To the back panel, attach a base support as shown above.
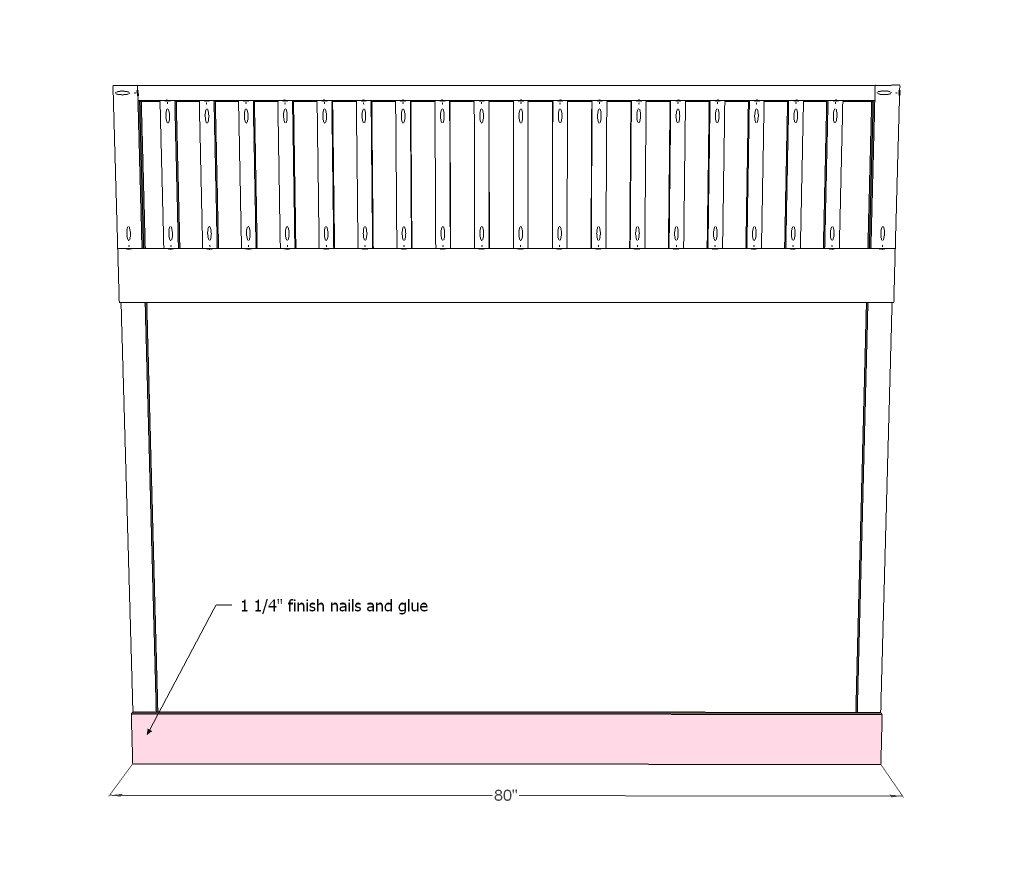
Step 15
And now fill in the legs as shown above. Use 1 1/4" finish nails and glue. This completes the back panel.
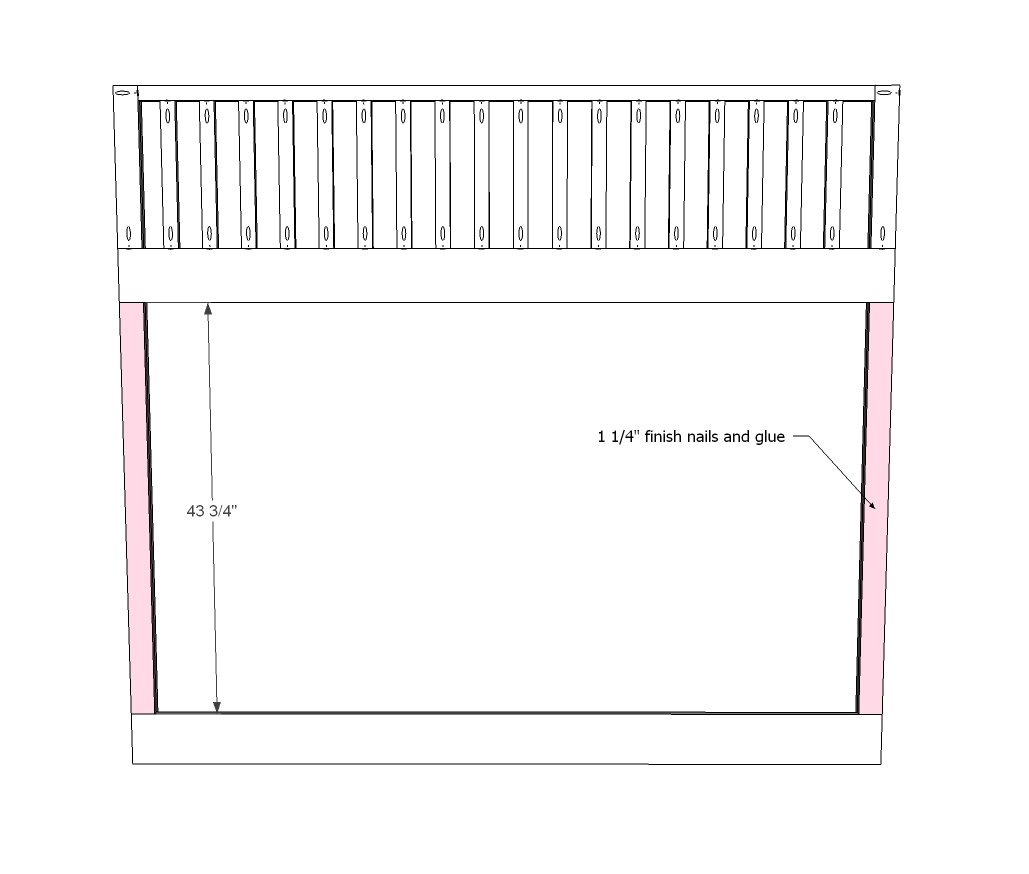
Step 16
On the remaining panel attach boards with 1 1/4" finish nails and glue. Use pocket holes to attach the door trim in place as shown above.
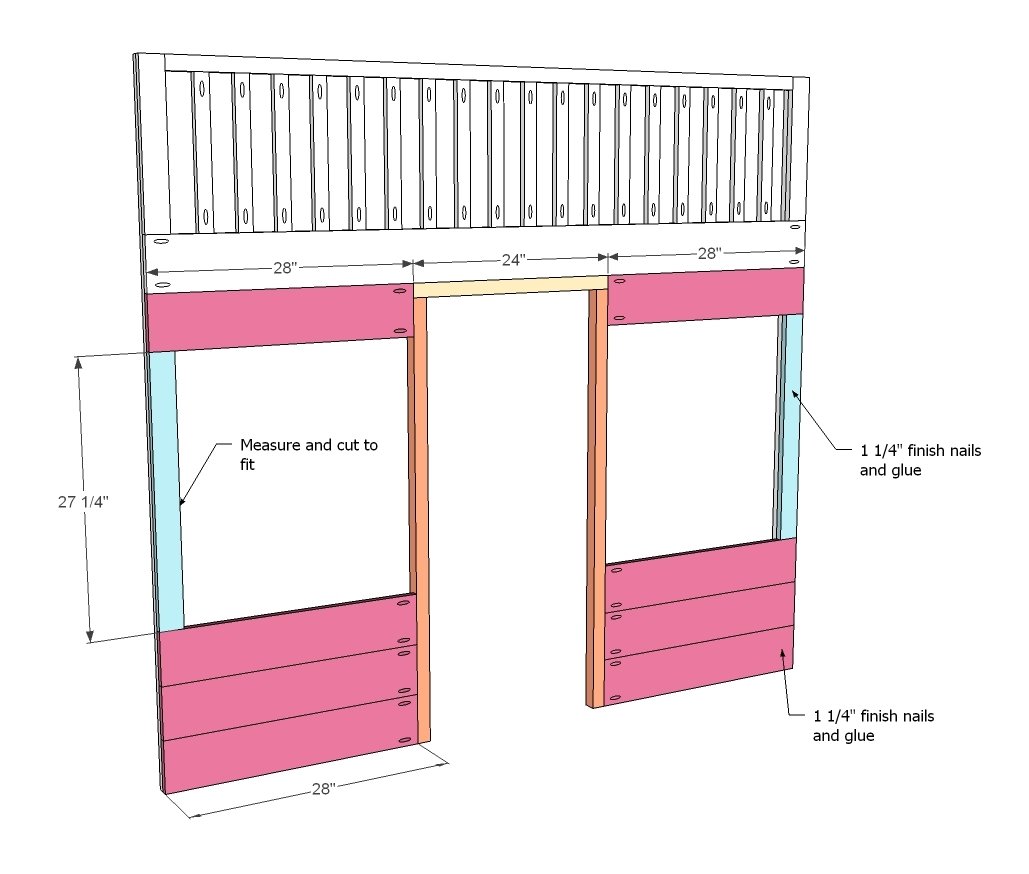
Step 17
Now add in the vertical panels as shown above. You may need to cut these to fit.
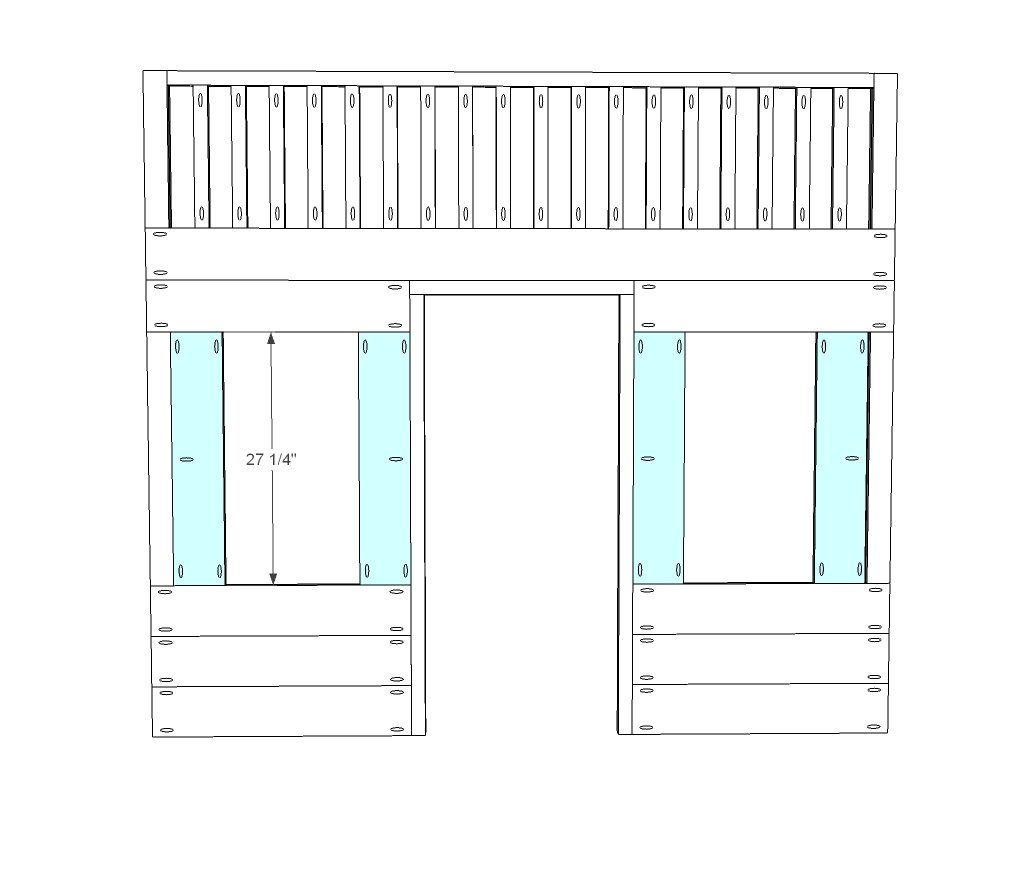
Step 18
Use your Kreg Jig to build a triangular frame as shown above. Then tack 1/8" beadboard paneling to the back with 3/4" finish nails or brad nails and glue. Then attach the gable end piece to the front of the bed with 1 1/4" finish nails and glue as shown above.
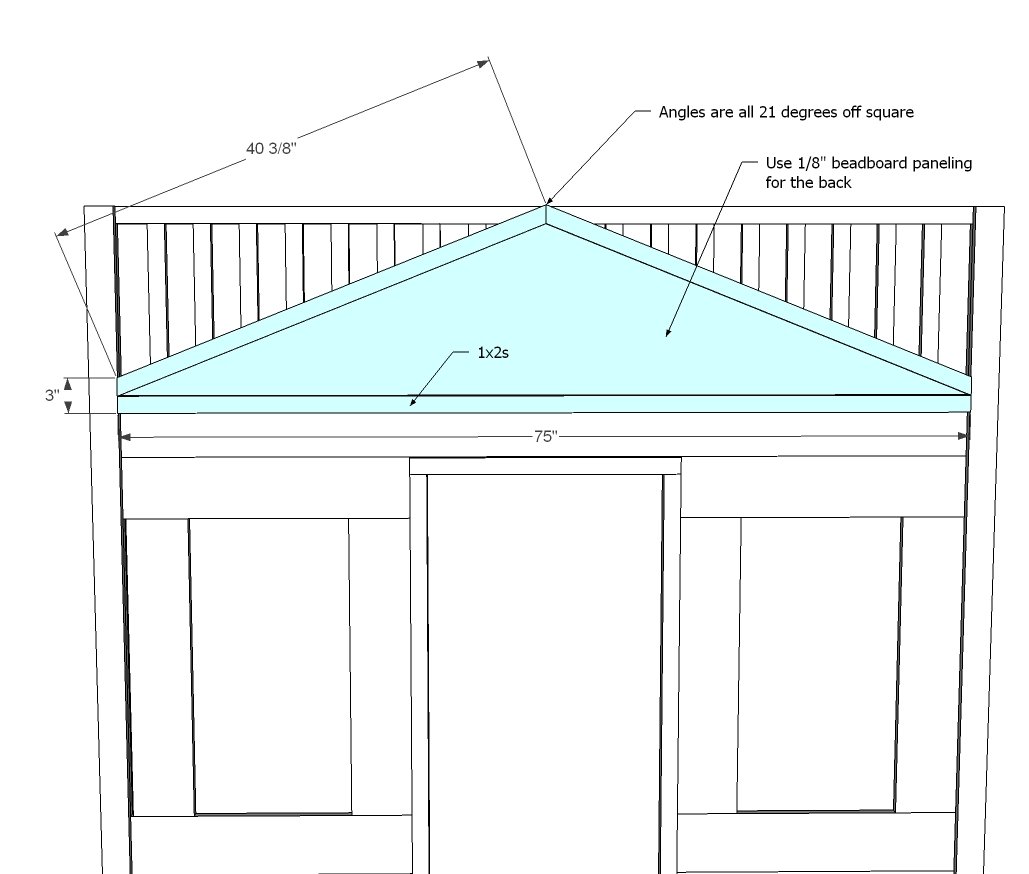
Step 19
Time for window trim. Same as the side window, use 1 1/4" finish nails and glue.
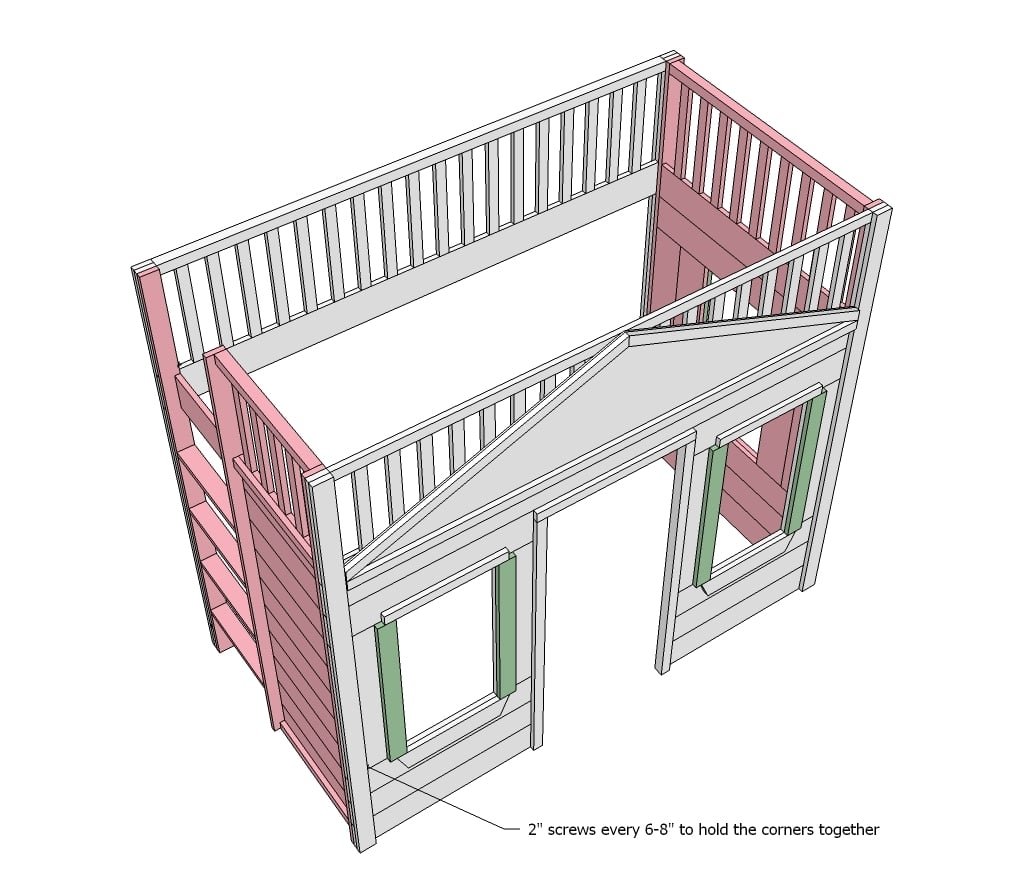
Step 20
This bed is easy to assemble in the room. Simply move all four panels into the room, and screw the walls together as shown above.
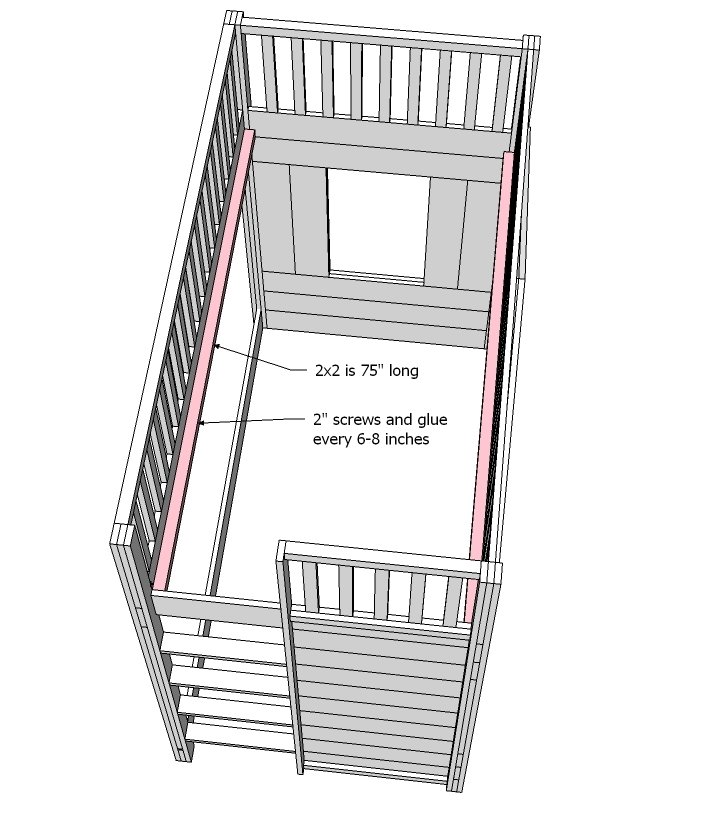
Step 21
Attach cleats to the inside of the bed as shown above with 2" screws and glue, every 6-8".
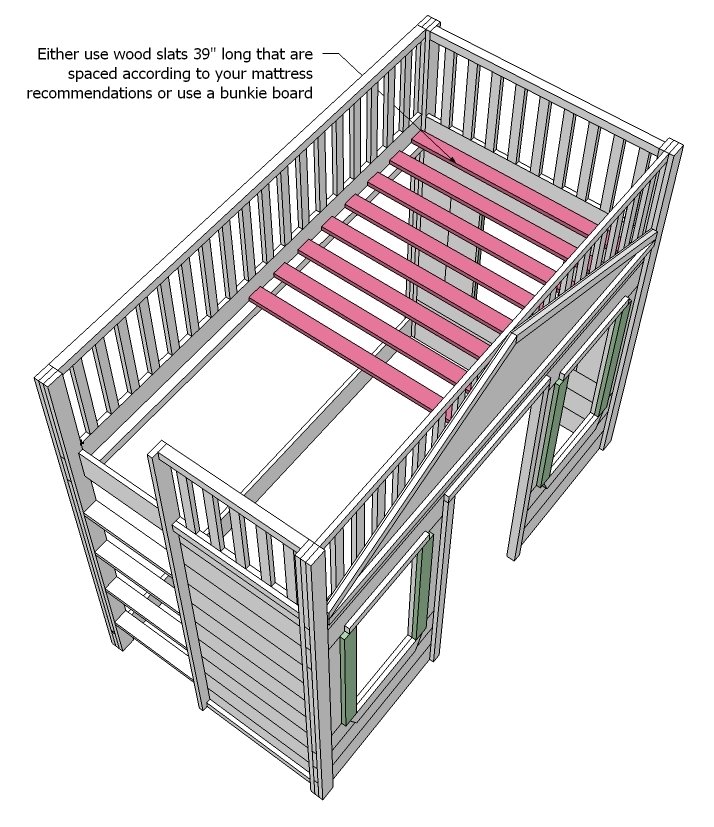
Step 22
Finally, lay slats across the cleats as recommended by your mattress, or use a bunkie board. If you use cleats, screw your cleats down with 2" screws.
Finishing
Sand all surfaces, starting with a medium grit and finishing with fine. Wipe off the dust, fill any holes or gaps with wood filler, and sand smooth once dry. Apply primer if you're painting, then finish with your choice of paint or stain and seal with a durable clear topcoat. For outdoor projects, use exterior-rated primer, paint or stain, and sealer so the piece stands up to the weather.
Source (temporary): https://www.ana-white.com/woodworking-projects/little-cottage-loft-bed