Media Console
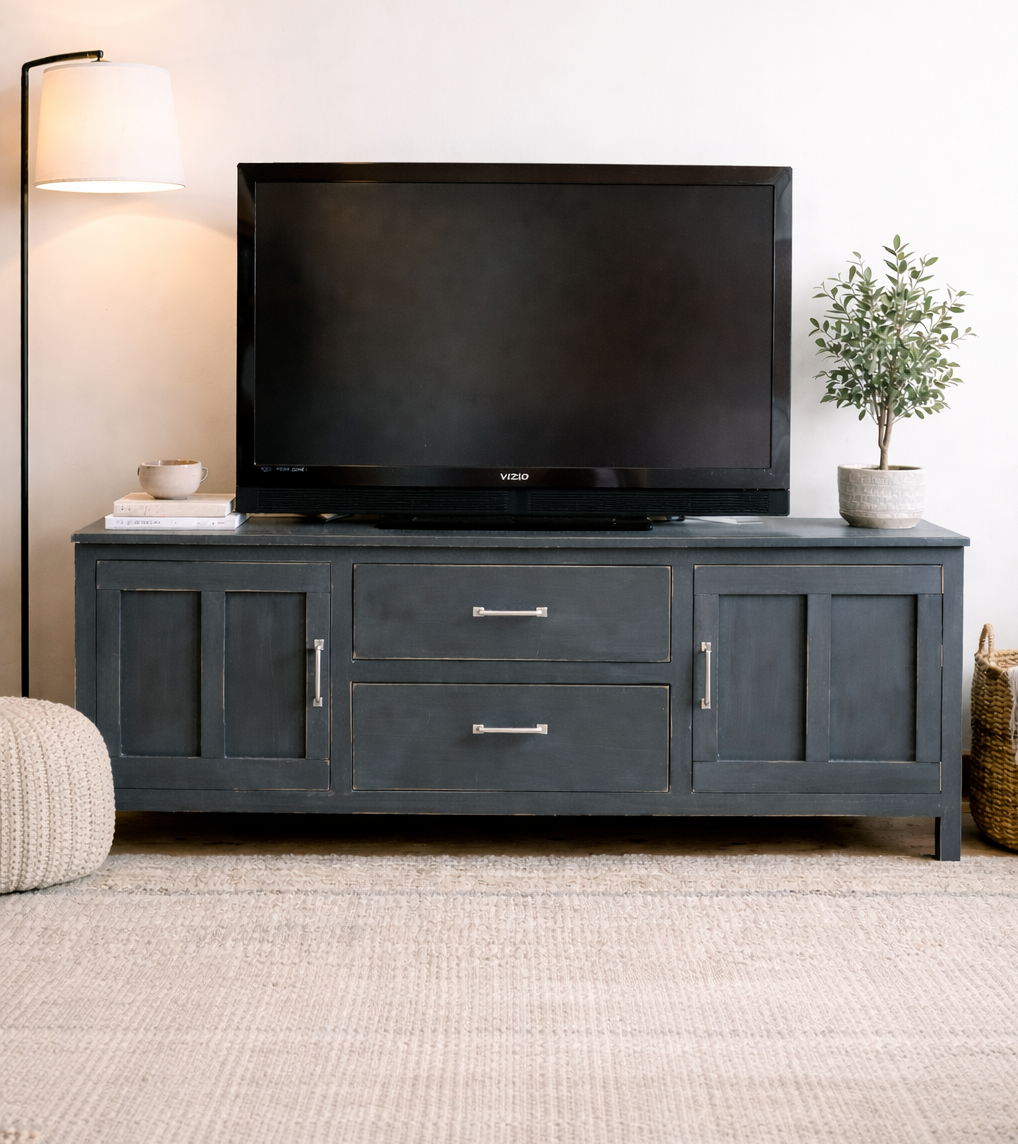
Build your own media console with board and batten detailing for extra charm. Features two cupboards with shelves and two large drawers. Raised design fits over air ducts and create the illusion of more space. This media console can be built with side towers and a hutch for a complete media wall. Board and Batten Collection – Classic and cozy board and batten style furniture you can build yourself. Perfect for bedrooms, guest spaces, and rustic-inspired homes. View the Full Collection
Specifications
| Project type | Media and Entertainment Centers |
|---|---|
| Room | Storage Solutions |
| Style | Cottage Style Furniture Plans |
| Difficulty | Advanced |
| Estimated cost | $50 - $100 |
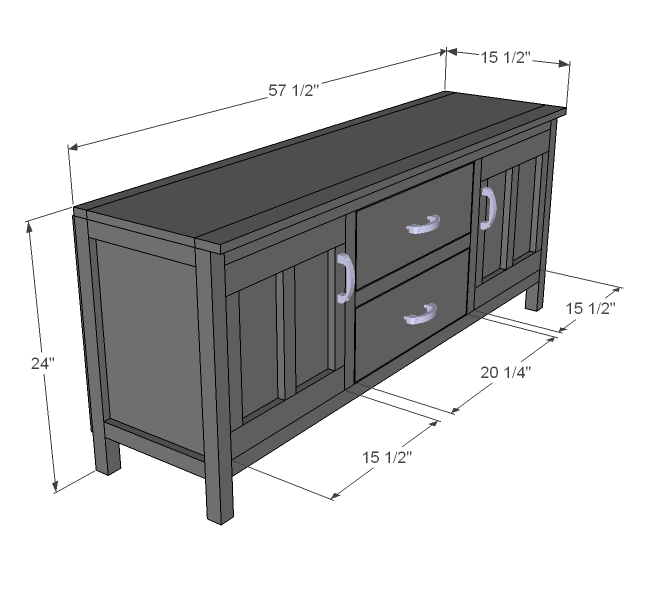
Dimensions
Use the size-specific shopping and cut lists below.
Shopping List
- 3 – 1×12 @ 8 feet long
- 5 – 2×2 @ 8 feet long
- 2 – 1×3 @ 8 feet long 2 – 1×2 @ 8 feet long
- 1 – 1×8 @ 12 feet long 1/4″ plywood (for door backs and optionally the back of the media center)
- 2 1/2″ screws or pocket hole screws
- finish nails (if you don’t use pocket hole screws)
- Wood Glue
- Finishing Supplies including paint and primer or stain
- 4 – knobs or handles
Cut List
- 2 – 1×12 @ 19 1/2″ (Sides)
- 4 – 1×2 @ 11 1/2″ (cut to the width of your 1×12 – side trim)
- 1 – 1×12 @ 57 1/2″ (Top)
- 2 – 1×12 @ 18 3/4″ (Center Partitions)
- 1 – 1×12 @ 54 1/2″ (Bottom of Box)
- 4 – 2×2 @ 23 1/4″ (Legs)
- 4 – 2×2 @ 54 1/2″ (Front/Back Trim)
- 1 – 1×2 @ 57 1/2″ (Top Trim, Back)
- 1 – 1×3 @ 57 1/2″ (Top Trim, Front)
- 4 – 2×2 @ 16 1/2″ (Drawer/Door Trim)
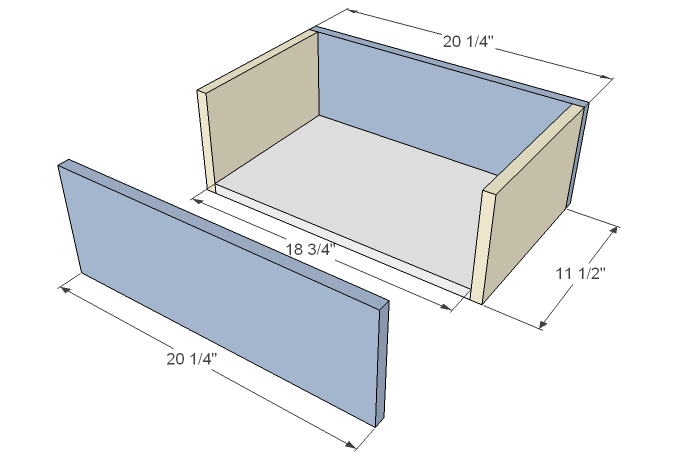
- 4 – 1×8 @ 20 1/4″ (Drawer Front/Back)
- 4 – 1×8 @ 11 1/2″ (Drawer Sides – cut to the width of your 1x12s)
- 2 – 1×12 @ 18 3/4″ (Drawer Bottom)
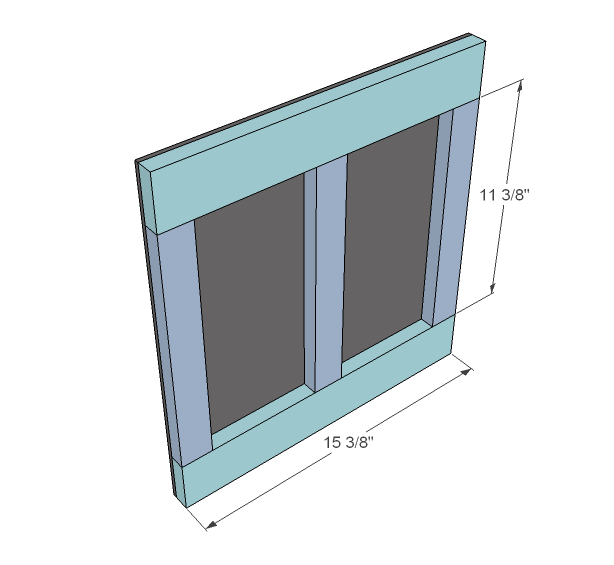
- 4 – 1×3 @ 15 3/8″ (Door Top/Bottom)
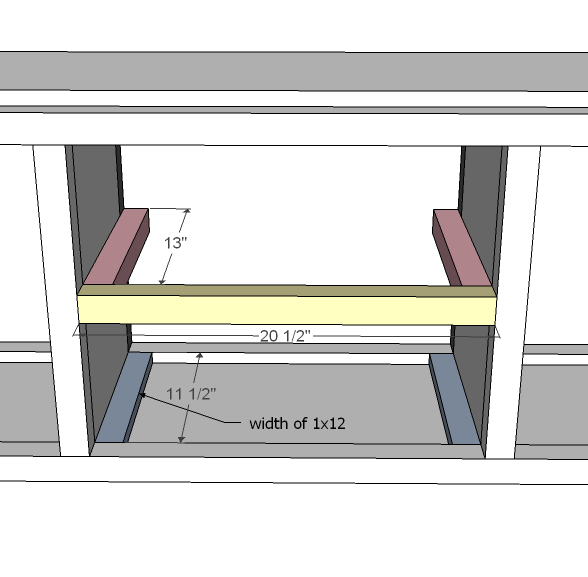
- 1 – 2×2 @ 20 1/2″ (Drawer Trim)
- 2 – 2×2 @ 13″ (Drawer Guides – 1×12 width + 1 1/2″)
- 2 – 1×2 @ 11 1/2″ (Cut to width of your 1×12 – bottom drawer guides)
- 6 – 1×2 @ 11 3/8″ (Door Sides/Trim)
- 1/4″ plywood @ 15 3/8″ x 16 1/4″ (Door Backs)
Tools
- measuring tape
- square
- pencil
- hammer
- safety glasses
- hearing protection
- kreg-jig
- drill
- circular saw
- nailer
- sander
Step-by-step Instructions
Side Trim
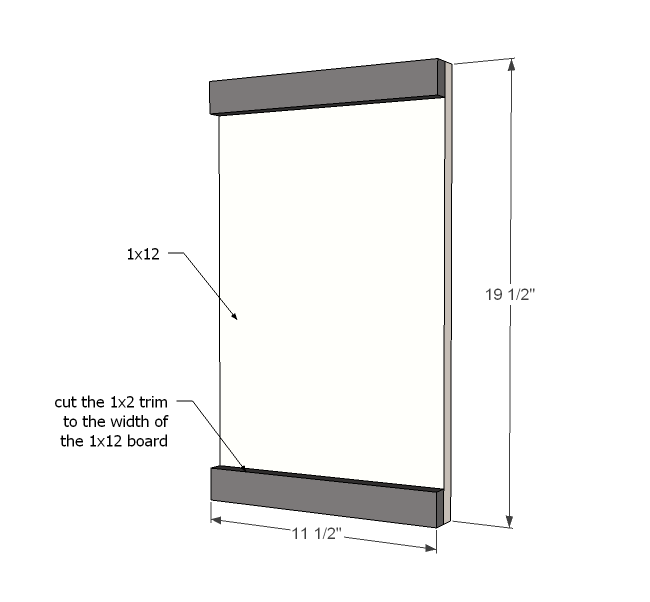
Attach the sides to the side trim as shown in the diagram. You will need to do two of these. I fastened mine from the inside to hide screw holes.
Box
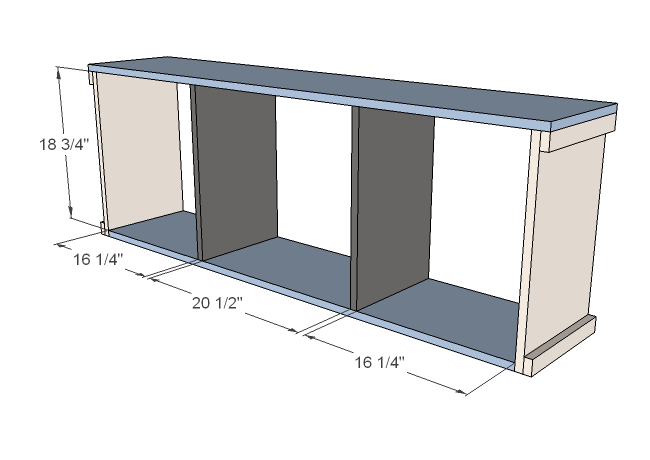
Build the box as shown above. I used pocket hole screws (1 1/4″ long), but you could use glue and coutnersunk screws or even nails (lots of glue) – just make sure your fasteners are 2″ long.
Legs
Attach the legs to the box, flush to the inside of the box and the outside of the side trim. Use 2 1/2″ finish nails or screws and glue or pocket hole screws from the inside.
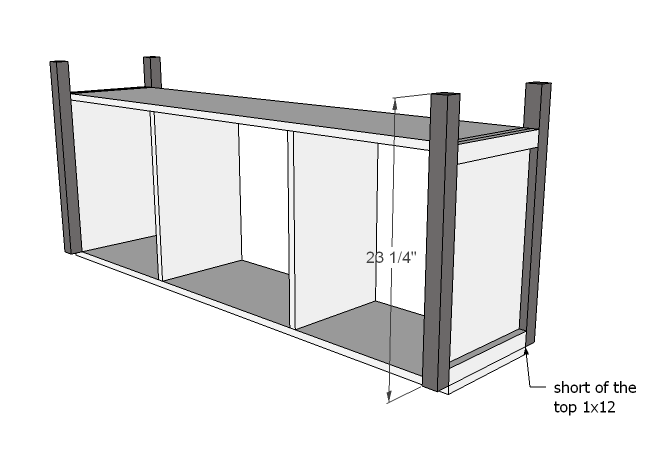
Front/Back Trim
This should be an easy step, but will strengthen up your piece considerably. Fasten same as legs. Also fasten legs to trim.
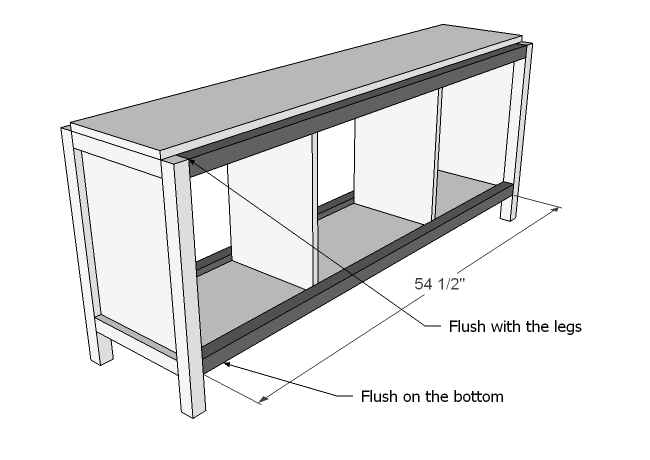
Step 5
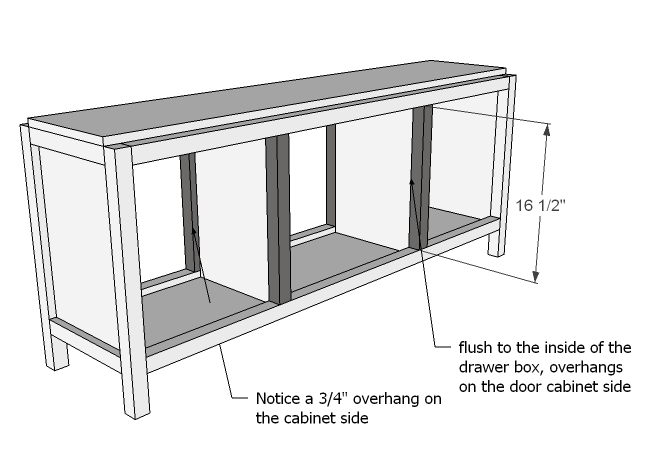
Top Front and Back
Finish off the top front and back as shown above. If you have a pocket hole system, you will want to have holes predrilled in the top 1×12 to attach the trim. otherwise, wood glue and screws will work (it’s fully supported by the 2x2s).
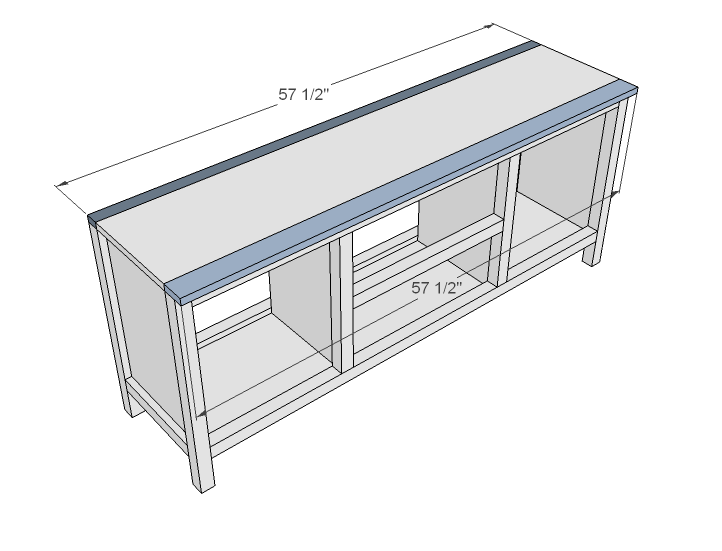
Drawers
Build your drawer as shown above. Use either pocket hole screws or 2″ screws and glue. You need two drawers.
Drawer Guides
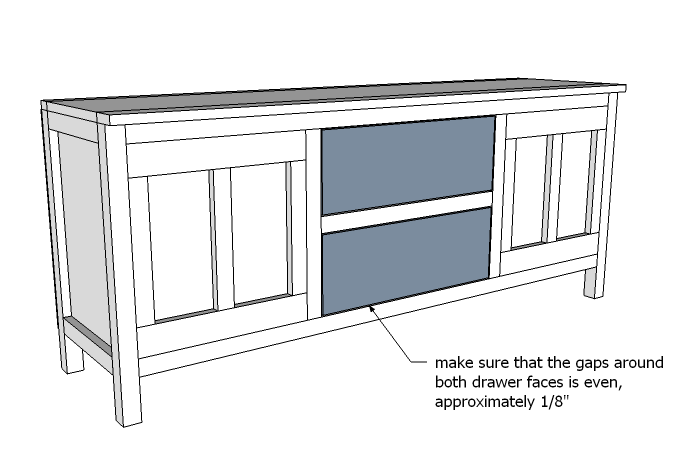
I like to adjust my drawer guides to a perfect fitting drawer. Begin by placing the bottom drawer guides in place. You may need to shim this one up 1/8″ so that the drawer face has an 1/8″ gap under it. Glue and use 1 1/4″ fasteners to keep in place (hold off on the glue until you are happy with the placement of both drawers). Then add the top drawer guides (not the trim yet) until you have approximately a 1/8″ gap to the top of the top drawer and the drawer is sliding smoothly. When you are happy with the top drawer, fit the center trim in place and adjust your drawers as necessary. The ultimate goal is an even gap around both drawers and smooth sliding drawers. TIP: Rub bottom edges of drawers and drawer guides with a cheapo candle to have super smooth sliding drawers. See below.
Step 9
Drawers
I stole this drawer part from the bases/nightstands because it’s identical (intentional). Here goes: When you cut your boards, make sure you measure the exact opening of your door, and leave 1/8 gap for a tight fit, 1/4″ (total gap, so that’s 1/8″ all the way around) for a roomier door. If you have a pocket hole system, build the door frame as shown above. You can use a countersink bit or wood dowels to build the door frame too. Otherwise, glue and nail to the back plywood. Keep in mind the allowance need for your hinges. Depending on the type of hinge that you are using, you may need to cut the plywood out around the hinge. This is an advanced project because there are alot of pieces, and if everything doesn’t come out square, your drawers/doors won’t work properly. Please don’t attempt as a first project. Happy Building!
Finishing
Sand all surfaces, starting with a medium grit and finishing with fine. Wipe off the dust, fill any holes or gaps with wood filler, and sand smooth once dry. Apply primer if you're painting, then finish with your choice of paint or stain and seal with a durable clear topcoat. For outdoor projects, use exterior-rated primer, paint or stain, and sealer so the piece stands up to the weather.
Source (temporary): https://www.ana-white.com/woodworking-projects/media-console-board-and-batten-collection