Media Hutch with Crown
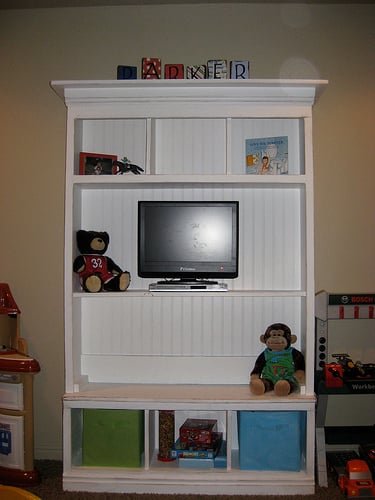
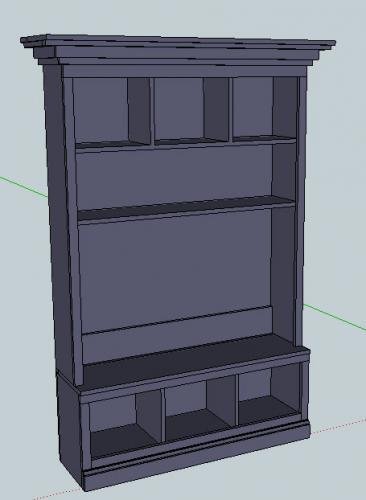
A media hutch for the Tommy Collection. Features three cubbies, one shelf and crown moulding.
Specifications
| Project type | Hutch Plans |
|---|---|
| Room | Storage Solutions |
| Style | Farmhouse Furniture |
| Difficulty | Intermediate |
| Estimated cost | $50 - $100 |
Dimensions
Use the size-specific shopping and cut lists below.
Shopping List
3 - 1x10 @ 8 feet long 1 - 1x6 @ 8 feet long
2 - 1x2 @ 8 feet long
1 - 1x4 @ 6 feet long
Full Sheet of beadboard paneling
Cut List
A) 2- 1x10 @ 55 3/4" (Sides of Hutch) B) 2 - 1x10 @ 43 1/2" (Shelves)
C) 1 - 1x6 @ 45" (Header)
D) 1 - 1x6 @ 43 1/2" (Bottom back hutch support)
E) 2 - 1x10 @ 16 1/2 (Vertical Dividers for cubbies)
F) 2 - 1x2 @ 50 1/4" (Front Side Trim Pieces)
G) 1 - 1x4 @ 50 1/2" (Top)
H) 1 - 1x10 @ 50 1/2" (Top)
I) 1 - 45" x 56" Beadboard (For the Back)
J) 8' of Crown Moulding, finished width less than 2 1/2" and finished height less than 4"
Tools
- measuring tape
- square
- safety glasses
- hearing protection
- circular saw
- compound miter saw
- nailer
- sander
Step-by-step Instructions
Step 1
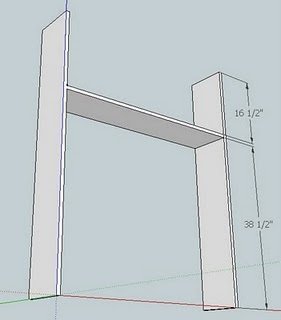
Build the Box. Start by "building the box" Use pieces A as sides and mark out as shown in the below diagram where the shelf will be placed. Attach with 2" nails and glue one of B, nailing through A into the edges of B on both sides.
Step 2
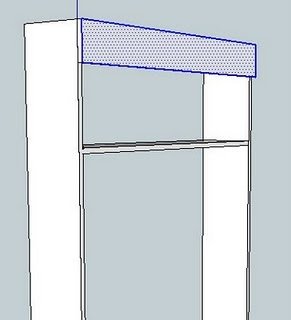
Header. Now add the header piece. Take the longer 1x6, piece C, and nail it to the face of the piece. You will nail through C into the edges of A. Keep all edges flush and square. This is shown below.
Step 3
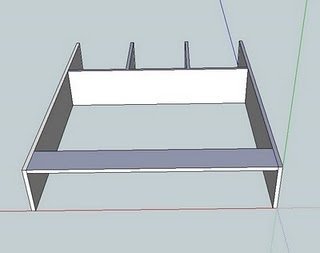
Back Support. Ignore the cubbies shown below. Let's focus on adding the back support piece, or the shorter 1x6, piece D, inset to the back of the hutch. You will nail through the sides of A into the edges of D, as shown below. Remember, the overall width of the pieces (not including the crown moulding) is 45"
Step 4
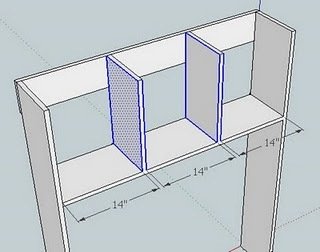
Cubbies. Now let's add the cubbies. Each cubby will be space 14" appart, as shown in the below diagram. Nail through the front header and the bottom of the shelf into the edges of E to match the below diagram. Make sure you mark off on the header the measurement to ensure the vertical dividers are square.
Step 5
Step 6
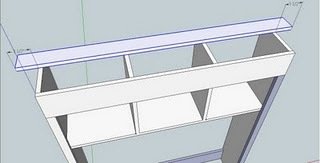
As shown in the below diagram, add the 1x4, piece G, to the top of the hutch, keeping the back edges flush. IMPORTANT NOTE: The 1x4 should overhand each side 2 3/4" NOT 3 1/2" as shown. After adding the 1x4, add the remaining 1x10, piece H, to the front of the top of the hutch to complete the top. Nail both pieces into the vertical cubby dividers. Again, piece H will overhand on each side 2 3/4"
Step 7
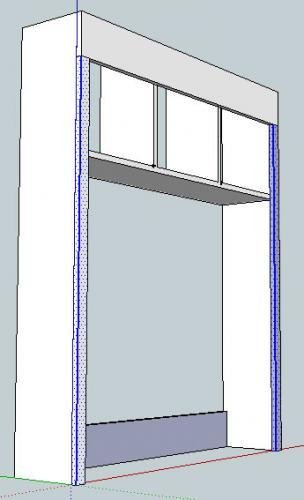
Lay the hutch on it's face and check for square. Video of how to check for square is located here. Then add the beadboard. The beadboard lines will run vertical. 8. Flip the piece on it's back and attach the crown moulding per manufacturers specifications.
Step 8
Decide where you would like the remaining shelf. Purchase shelf support brackets and add as desired to complete the piece.
Finishing
Sand all surfaces, starting with a medium grit and finishing with fine. Wipe off the dust, fill any holes or gaps with wood filler, and sand smooth once dry. Apply primer if you're painting, then finish with your choice of paint or stain and seal with a durable clear topcoat. For outdoor projects, use exterior-rated primer, paint or stain, and sealer so the piece stands up to the weather.
Source (temporary): https://www.ana-white.com/woodworking-projects/media-hutch-crown-tommy-collection