Mod Bar
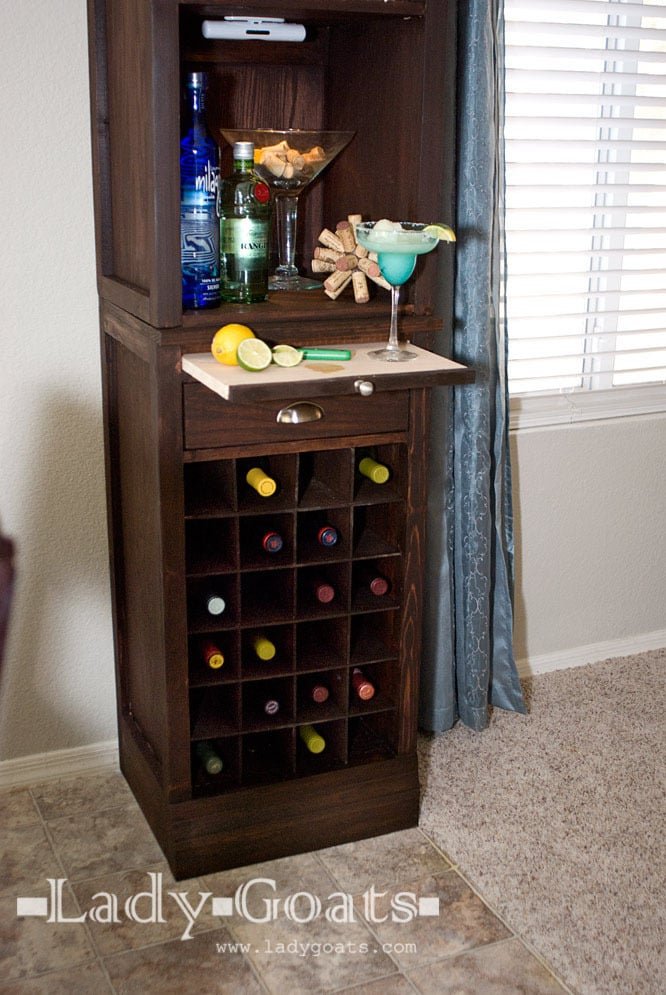
Build a beautiful bar system, inspired by the Pottery Barn modular bar collection. These simple, are for the wine grid base. A note from Gina: I was so excited when I saw these plans! My husband really wanted to have a "prep" area at the bar, so Ana and I discussed this, and one possible option was to have a board that sits on top of the drawer box. So you would pull the drawer out and it has a "top" that you can rest things on. Then you can push the top board in (wood rails inside, made of 1/4" stock) to access the drawer contents. I thought that was genius, but the Mr. really wanted a breadboard. I didn't want to use drawer slides, so I kinda winged this, and came up with a great little pull-out. I'll definitely post what I did on my blog, in case anyone else wants to take a peek (and master it so everyone else can build one if they want).
Specifications
| Project type | Wine Storage |
|---|---|
| Room | dining room |
| Style | Farmhouse Furniture |
| Difficulty | Intermediate |
| Estimated cost | $50 - $100 |
Dimensions
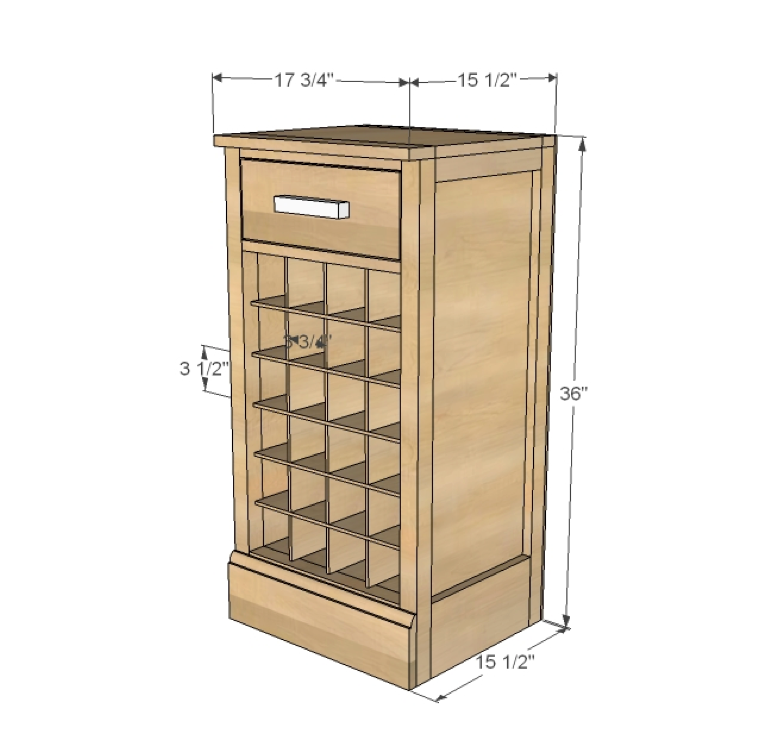
Use the size-specific shopping and cut lists below.
Shopping List
10 feet of 1x12 boards (you can get 32 feet of 1x12 boards from a single sheet of ¾” plywood ripped into 11 ¾” widths – consider if making three bases)
1 sheet of ¼” plywood will cover one base with wine grids and one hutch
2 – 1x2 @ 8 feet long
1 – 1x6 @ 4 feet long
12 feet of 2x2 boards
2 feet of 1x3 boards
6 feet of 1x4 boards
2 feet of 5 ¼” base moulding
Knob or handle
12” drawer sides – may be able to use 14” drawer slides depending on the width of 1x12 boards
Screws and nails, depending on pocket hole use or not
Cut List
2 – 1x2 @ 11 ¾” – cut to width of 1x12 boards
2 – 1x6 @ 11 ¾” – cut to width of 1x12 boards
2 – 1x12 @ 35 ¼” (shown using ¾” plywood ripped into strips 11 ¾” wide x 8 feet long)
1 – 1x12 @ 14 ¾”
4 – 2x2 @ 35 ¼”
5 – 1x2 @ 14 ¾”
1 – 1x2 @ 17 ¾”
1 – 1x12 @ 17 ¾”
1 – 1x3 @ 17 ¾”
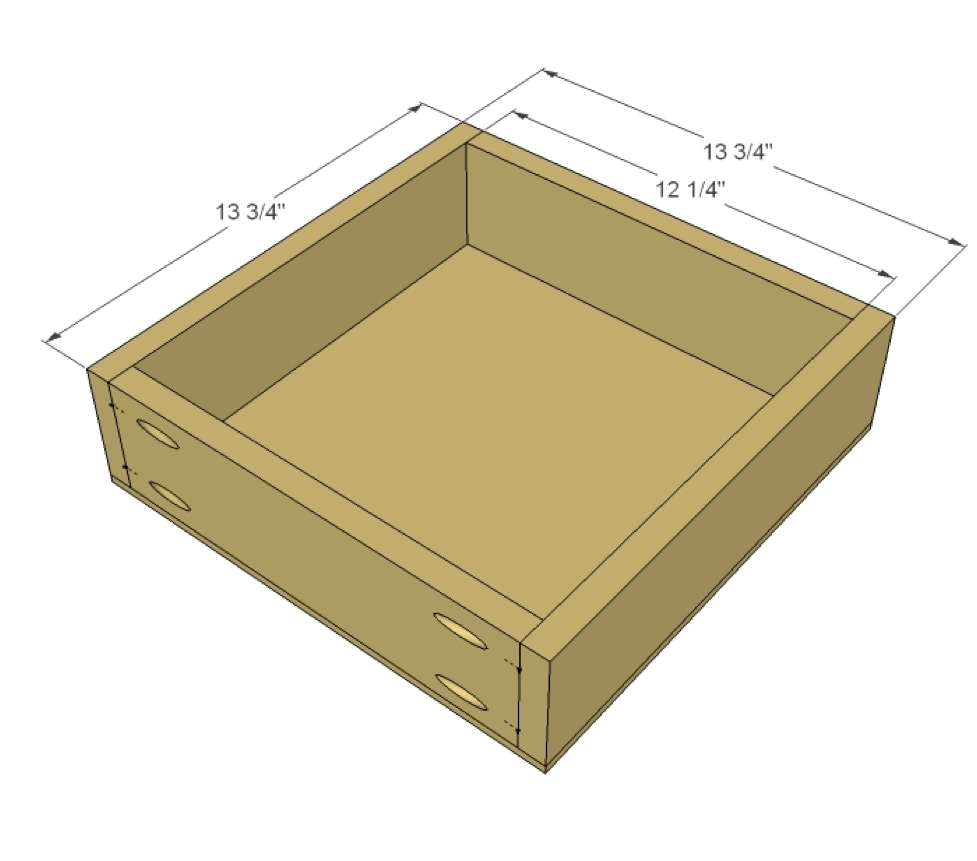
2 – 1x4 @ 13 ¾”
2 – 1x4 @ 14 ¼”
1 – ¼” plywood @ 13 ¾” x 13 ¾”
1 – 1x6 @ 14 ½”
1 – ¼” plywood @ 36” x 17 ¾”
1 – 5 ¼” base moulding @ 17 ¾”
5 – ¼” plywood @ 13 ¾” x 14 ¾”
3 – ¼” plywood @ 13 ¾” x 22 ½”
Tools
- measuring tape
- square
- pencil
- hammer
- hearing protection
- kreg-jig
- drill
- circular saw
- compound miter saw
- table saw
- nailer
- sander
- countersink drill bit
Step-by-step Instructions
Step 1
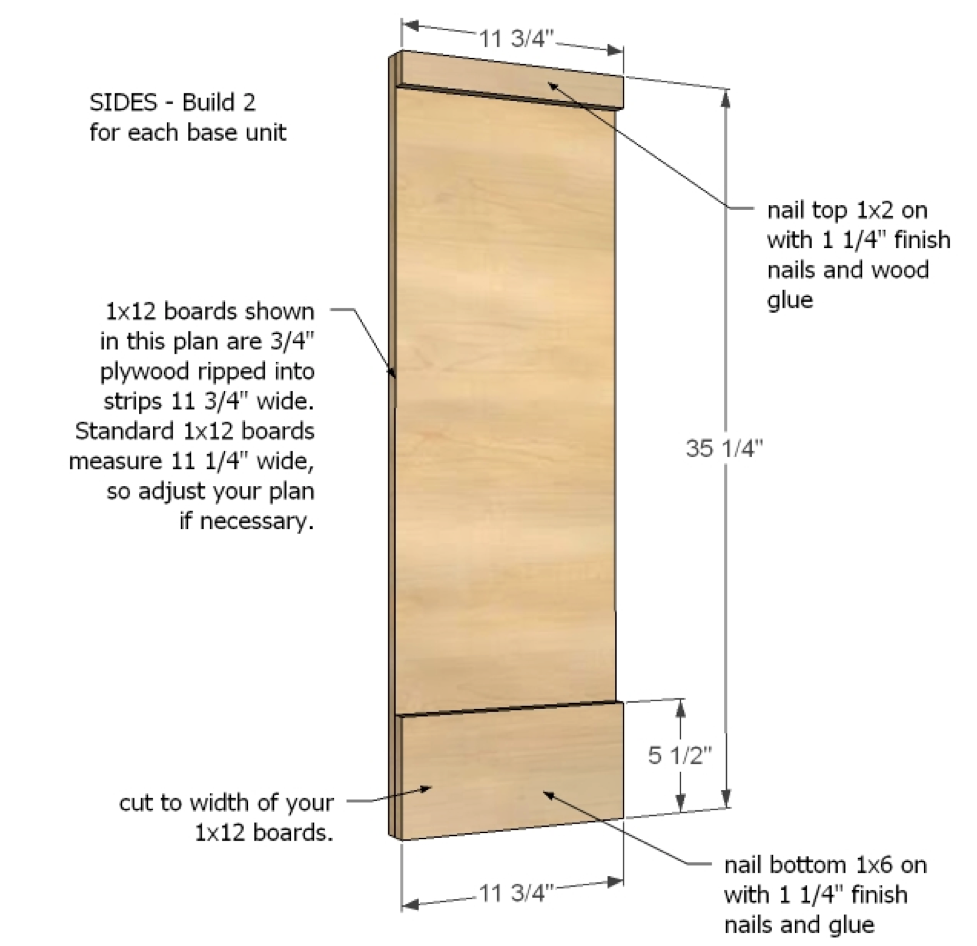
Build the sides. Cut your 1x2s and 1x6s to the width of your 1x12 boards and attach with glue and finish nails as shown. It would also be smart to add your pocket holes to the insides of these boards now (you'll need them on the opposite side of the trim, on the outside edges of the board. You do not need to put them at the top and bottom.) so that you can attach the front and back trim. You'll need to build two of these.
Step 2
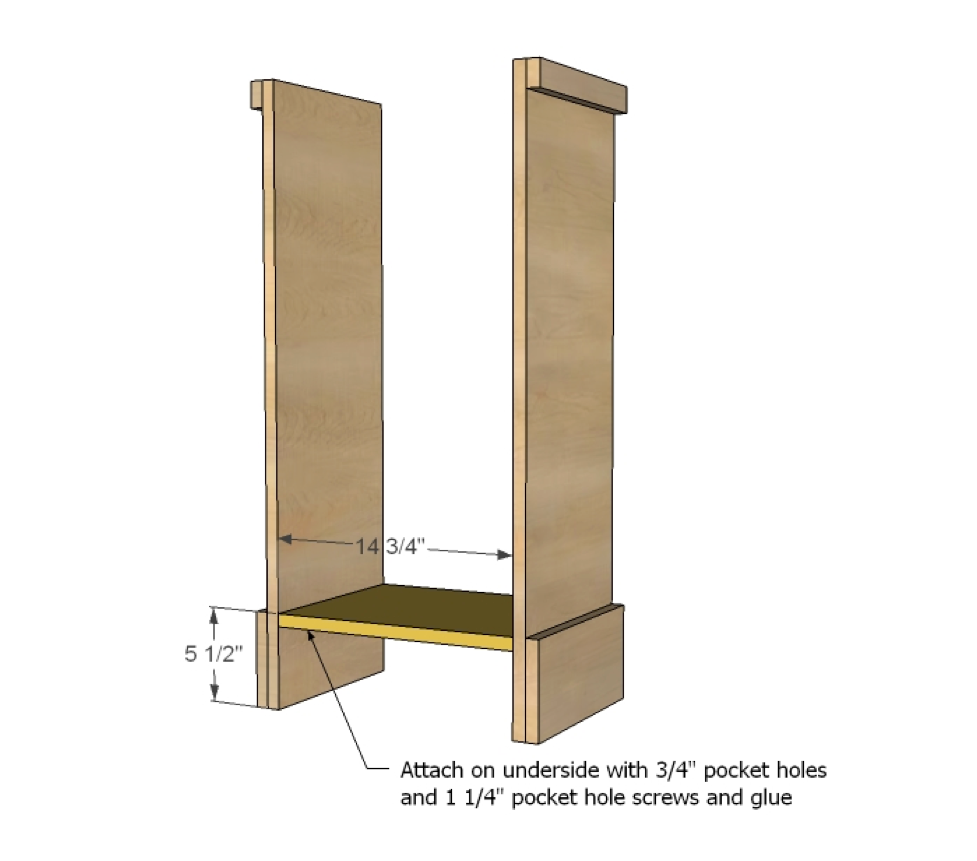
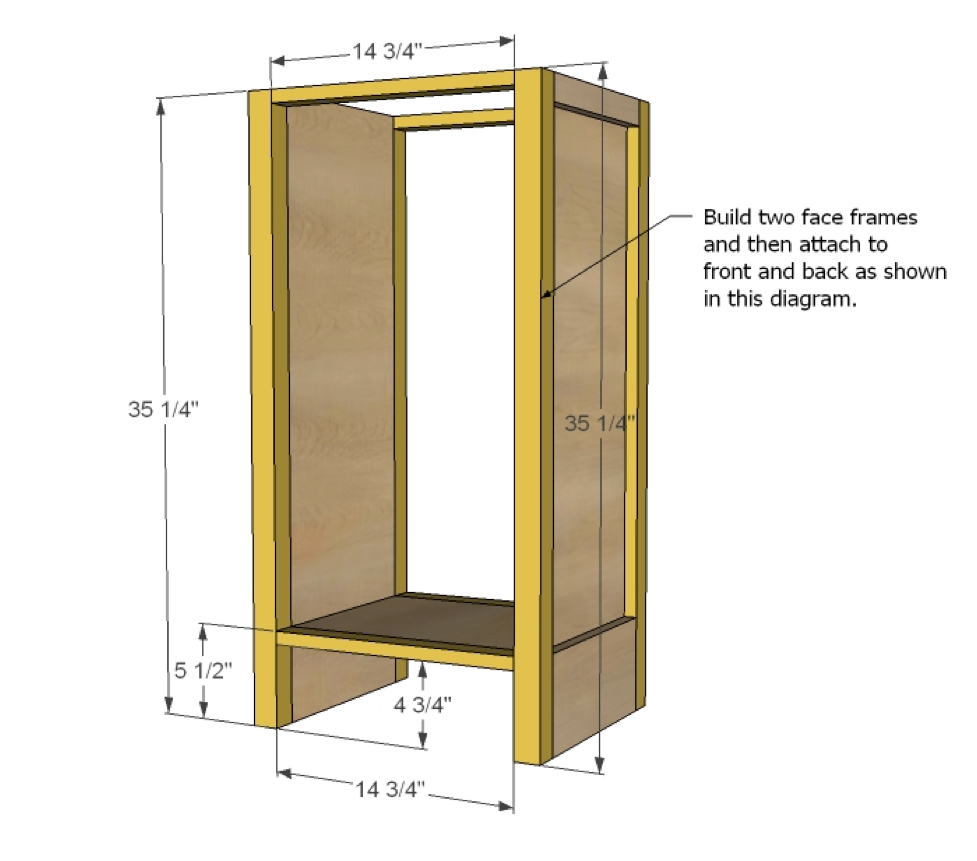
Measure 5 1/2" from the bottom, and attach the bottom shelf using pocket holes set for 3/4" stock and 1 1/4" pocket hole screws.
Step 3
Build two face frames as shown, and atatch to the front and back using pocket holes set for 3/4" stock and 1 1/4" pocket hole screws (these are the holes you pre-drilled in step 1)
Step 4
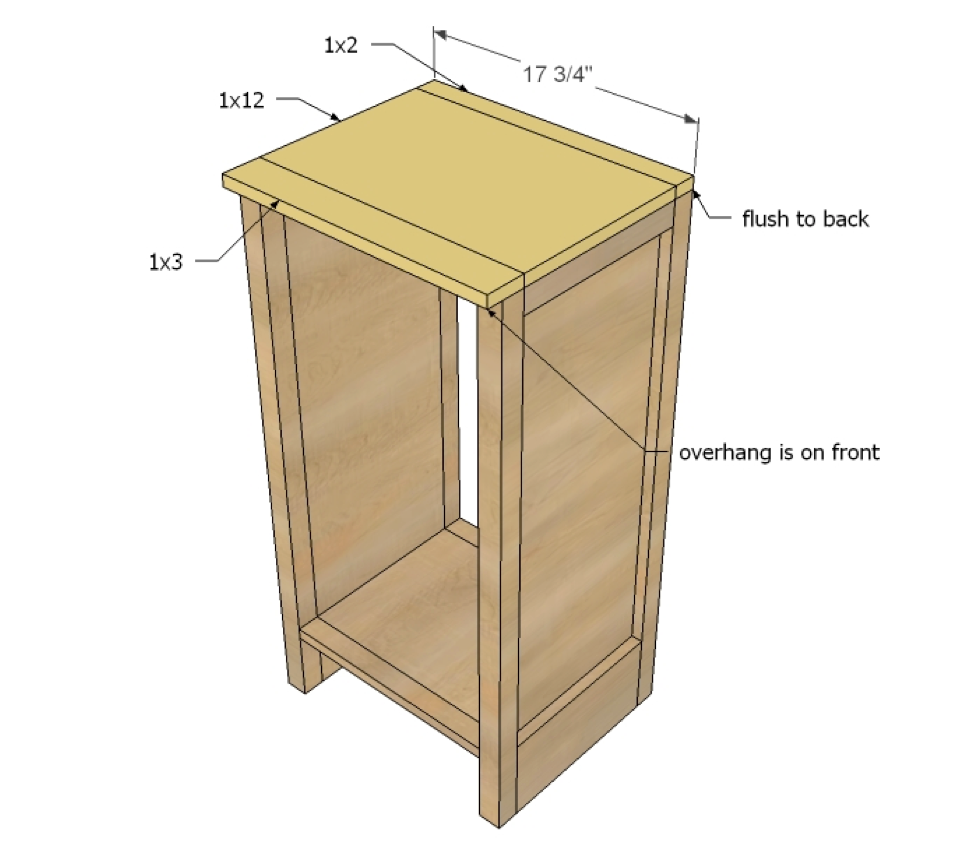
Attach the top as shown, using glue and 1 1/4" finish nails.
Step 5
Step 6
Step 7
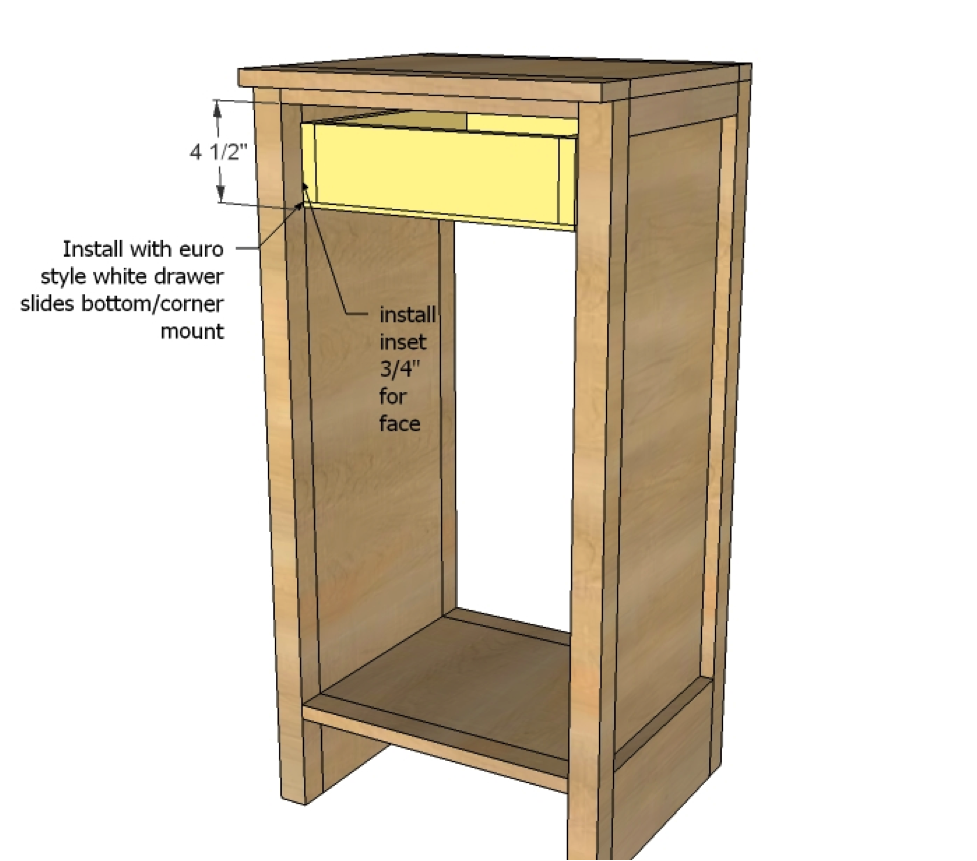
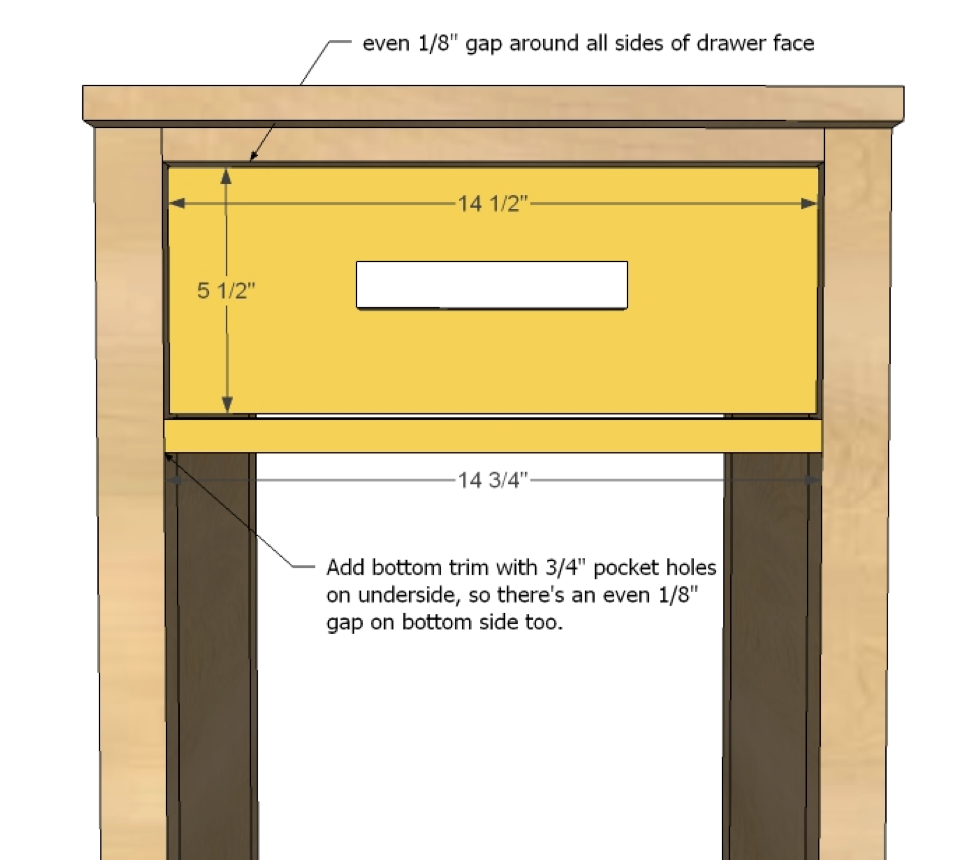
Attach your face frame so that there's an even 1/8" gap on the top and on both sides. Then attach the bottom trim so that there is a 1/8" gap on the bottom, using pocket holes on the underside, and glue.
Step 8
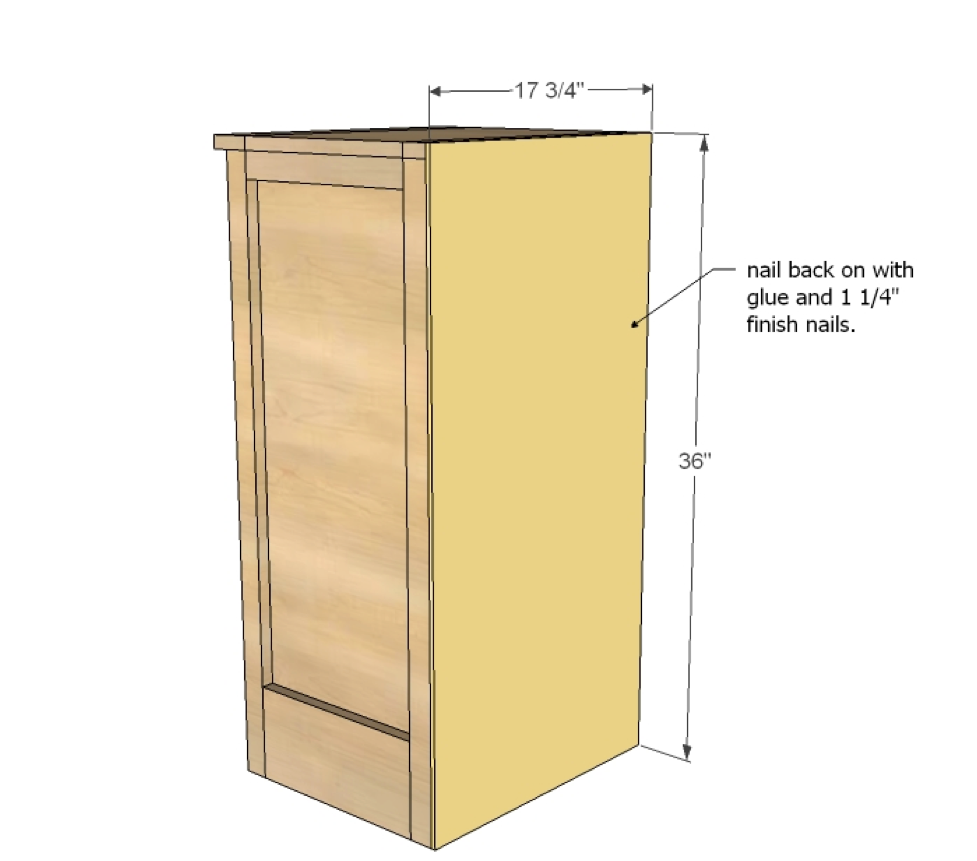
Attach the back with glue and 1 1/4" finish nails.
Step 9
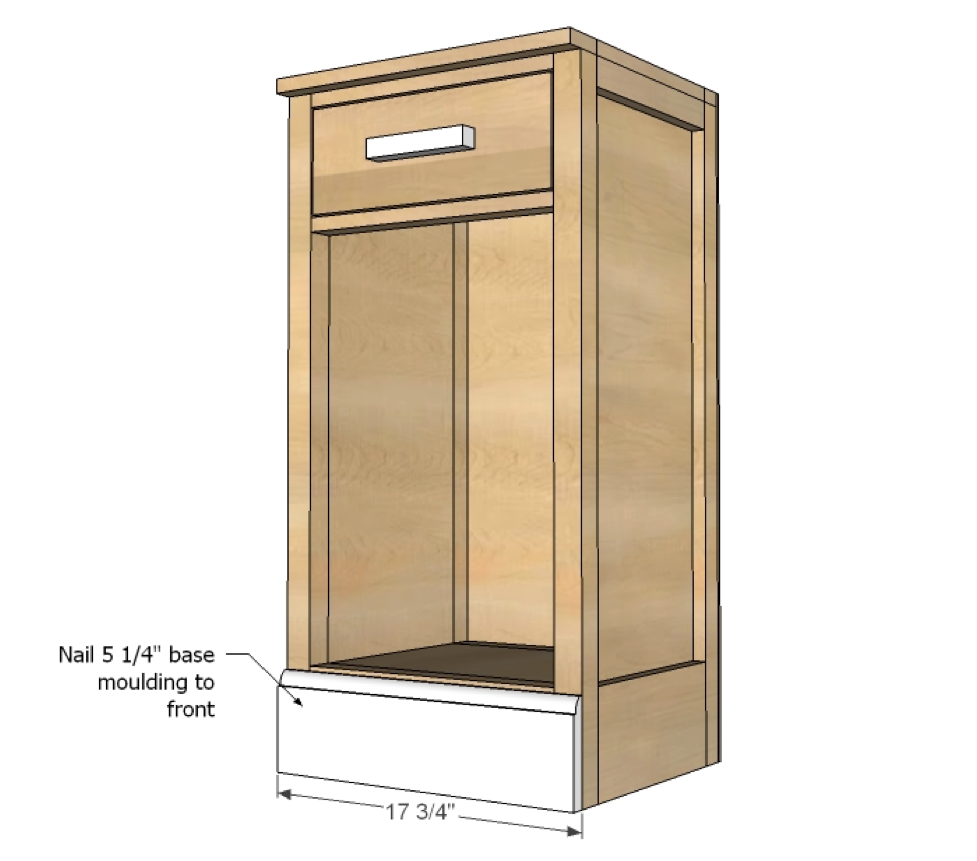
Nail your base moulding to the front. If you can't find 5 1/4" moulding that's stainable, you can buy shorter moulding and cut scrap 1x to make up for the remaining space.
Step 10
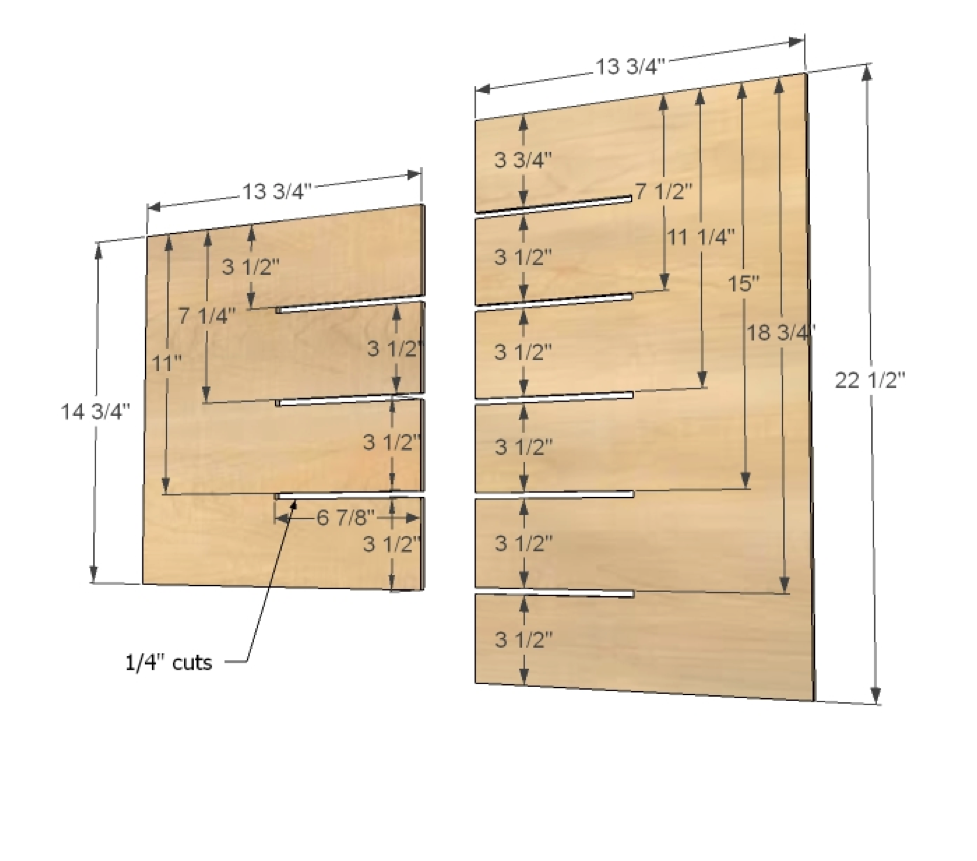
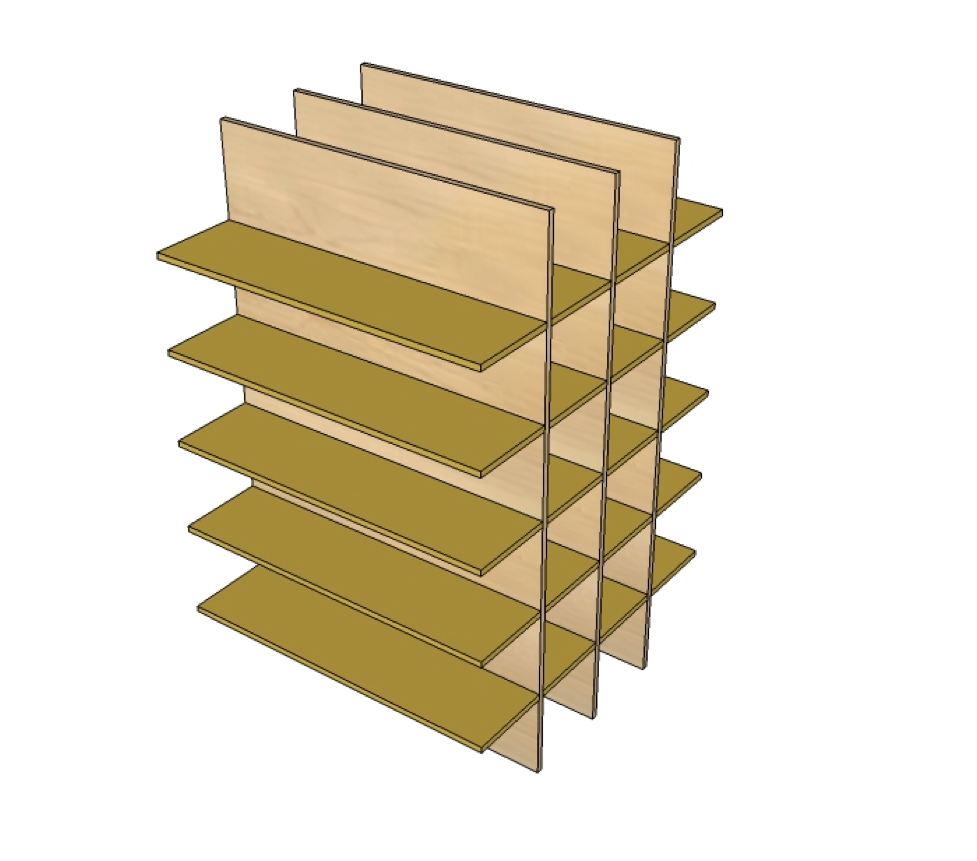
The best way to do this would be with a table saw, and just setting the fence to make these cuts. But if you don’t have a table saw, you can drill ¼” holes at the end of each mark (remember to add an 1/8” to measurements shown so you drill the hole in the center of the cut) and then cutting to that mark with a circular saw or jigsaw. Use a square to mark the cuts long before you cut. Remember, the cuts need to be the width of the plywood thickness. * Gina marked the cuts as shown above on one of each sized board and clamped all of the boards together (making sure they were perfectly aligned). Then she took her circular saw to make the cuts. If you do this, you'll need to touch up the bottom boards with either a Dremel or a jig saw, since the circular saw's rounded blade made the bottom board's cuts shorter than the top's.
Step 11
Once all the pieces go together, you should not need glue.
Step 12
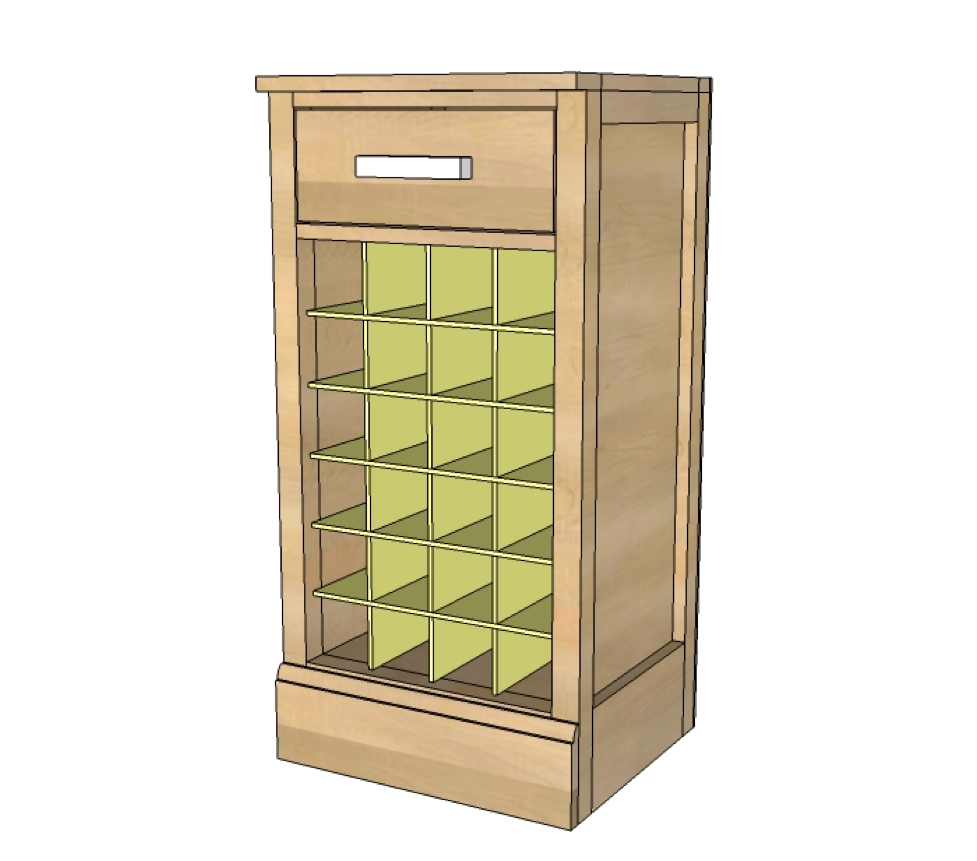
The base should hold the pieces tight and square.
Step 13
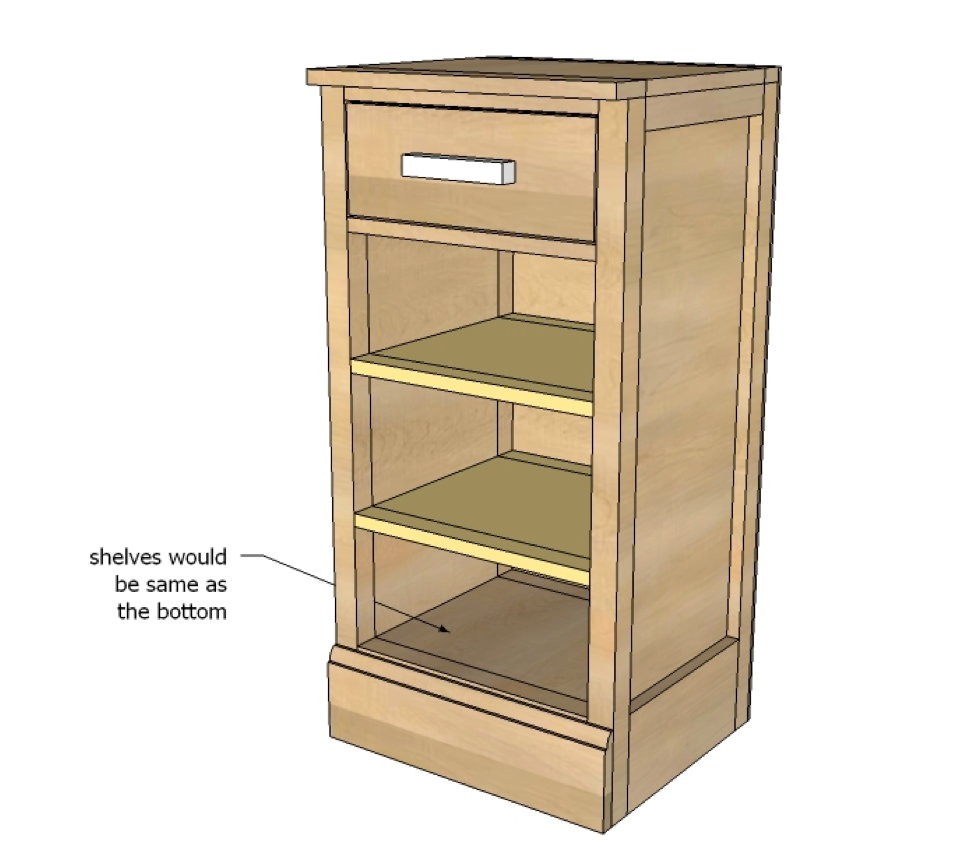
That way you can change it up with shelves if you like!
Finishing
Sand all surfaces, starting with a medium grit and finishing with fine. Wipe off the dust, fill any holes or gaps with wood filler, and sand smooth once dry. Apply primer if you're painting, then finish with your choice of paint or stain and seal with a durable clear topcoat. For outdoor projects, use exterior-rated primer, paint or stain, and sealer so the piece stands up to the weather.
Source (temporary): https://www.ana-white.com/woodworking-projects/mod-bar-wine-grid-base