Modern Angle Chair
Chairs can be very difficult to build just right because cutting back legs requires precision and often special tools. With this simple project plan based off of pocket hole technology, anyone can create surprisingly comfortable and modern style chairs. Special thanks to our readers for sharing their photos.
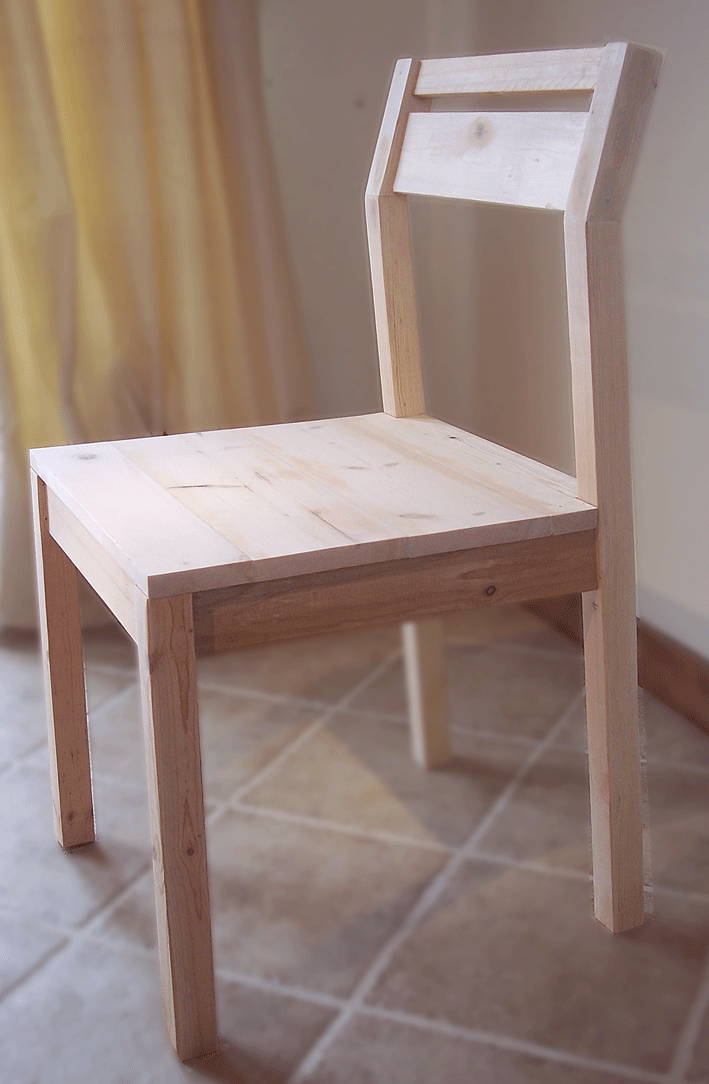
Specifications
| Project type | Chairs |
|---|---|
| Room | dining room |
| Style | Modern Style Furniture Plans |
| Difficulty | Advanced |
| Estimated cost | Under $20 |
Shopping List
2 – 2×2
1 – 1×3
Scrap 1×2 and 1×4 15″ Long
Project Panel 18″ x 18″ (Purchase a 36″ x 18″ for 2 seats)
2″ Screws
Wood Glue
Wood Filler
Cut List
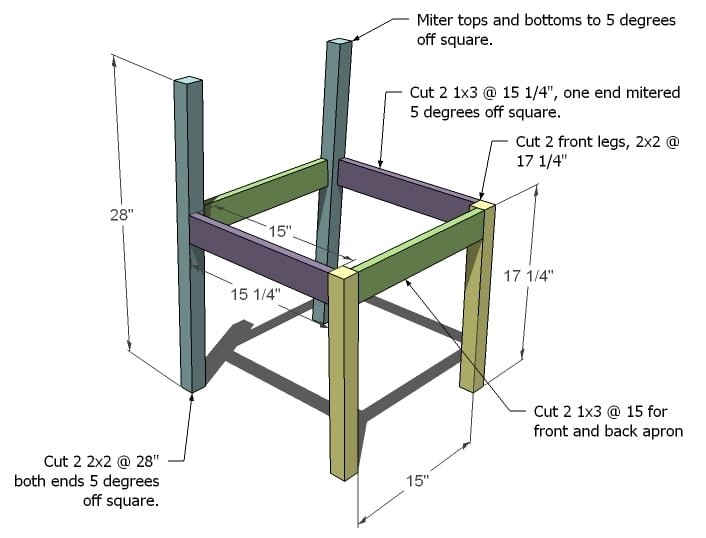
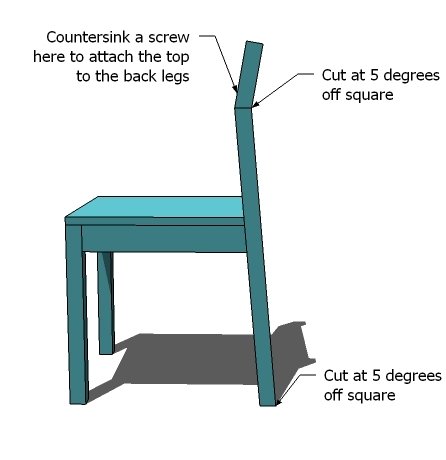
2 – 2×2 @ 28″, Ends Mitered at 5 degrees off square, short point to long point (Back Legs)
2 – 2×2 @ 17 1/4″ (Front Legs)
2 – 1×3 @ 15 1/4″, One End Mitred down 5 degrees off square (Side Aprons)
2 – 1×3 @ 15″ (Front and Back Apron)
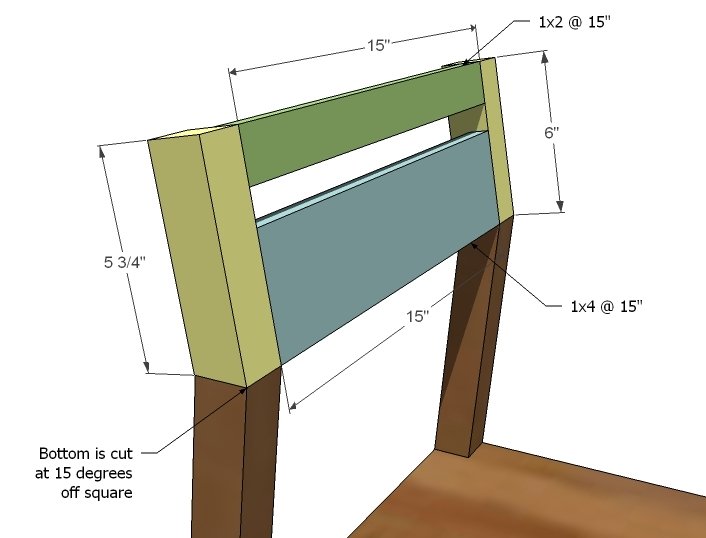
2 – 2×2 @ 6″, Bottom end mitred down at 15 degrees (Back Rest)
1 – 1×2 @ 15″ (Top Rail on Back)
1 – 1×4 @ 15″ (Bottom Rail on Back)
Pine Project Panel Cut at 18″ x 18″ or Boards Joined to create a surface 3/4″ thick 18″ x 18″ (Seat)
Tools
- measuring tape
- square
- pencil
- hammer
- safety glasses
- hearing protection
- kreg-jig
- drill
- compound miter saw
- sander
- level
Step-by-step Instructions
Step 1
Build the Chair Frame. I started with the front legs and with my Kreg Jig™, fastened the front apron to the front legs. I used a 1/4″ piece of plywood to inset my aprons from my legs by placing the apron on the plywood and not the legs to create a 1/4″ difference. Then I fastened the side aprons to the front legs in the same manner. The I used a level rested on the side apron as I fastened the side apron to the back legs. Finally, using the Kreg jig, I fastened the back apron to the back legs. You can predrill and countersink screws without the jig. Just make sure you add corner bracing (which I did anyway).
Step 2
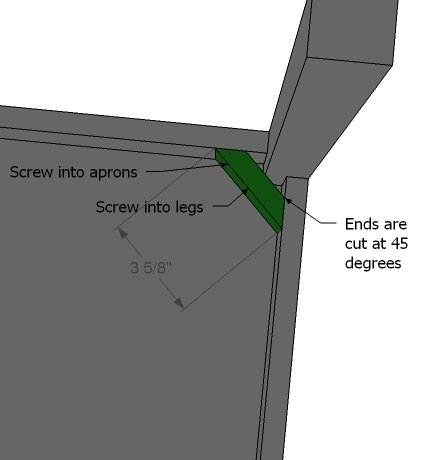
Corner Bracing. You can use scrap 1×3 pieces to build corner bracing, as shown above.
Step 3
Back Rest. Build the back rest first by attaching the rails to the sides, as shown above. I attached by screwing together with the Kreg Jig™ but you can also predrill and countersink your screws to fasten. I also centered my back rails on the sides, leaving a 3/8″ gap on both the front and back.
Step 4
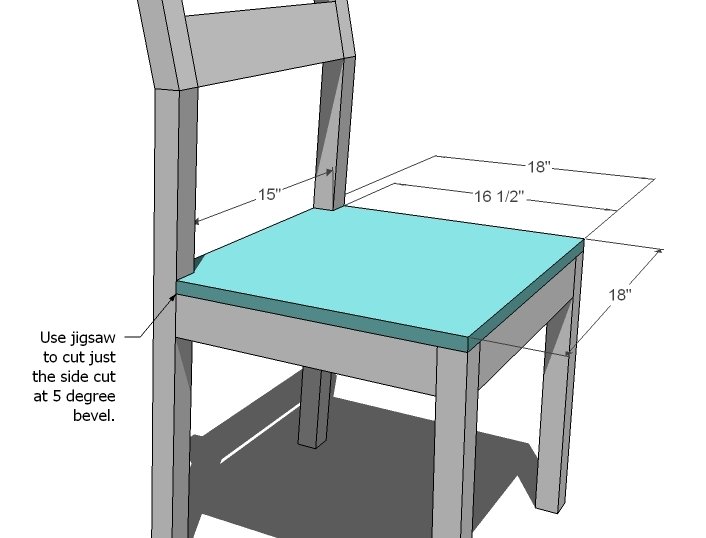
Seat. First cut your seat at 18″ x 18″. Then notch out the sides 1 1/2″ x 1 1/2″ on the backs as shown above. I ended up not cutting the back angle at 5 degrees and my chair looks great. I attached the seat from underneath using the Kreg Jig™, but you could also attach the seat by simply screwing through the top of the seat into the aprons. Also, if you have a Kreg Jig™, you can use it to join 1x stock together to get a seat that measures 18″ x 18″ (this is what I did).
Step 5
Finishing
Sand all surfaces, starting with a medium grit and finishing with fine. Wipe off the dust, fill any holes or gaps with wood filler, and sand smooth once dry. Apply primer if you're painting, then finish with your choice of paint or stain and seal with a durable clear topcoat. For outdoor projects, use exterior-rated primer, paint or stain, and sealer so the piece stands up to the weather.
Source (temporary): https://www.ana-white.com/woodworking-projects/modern-angle-chair