Modern Cutout Nightstand
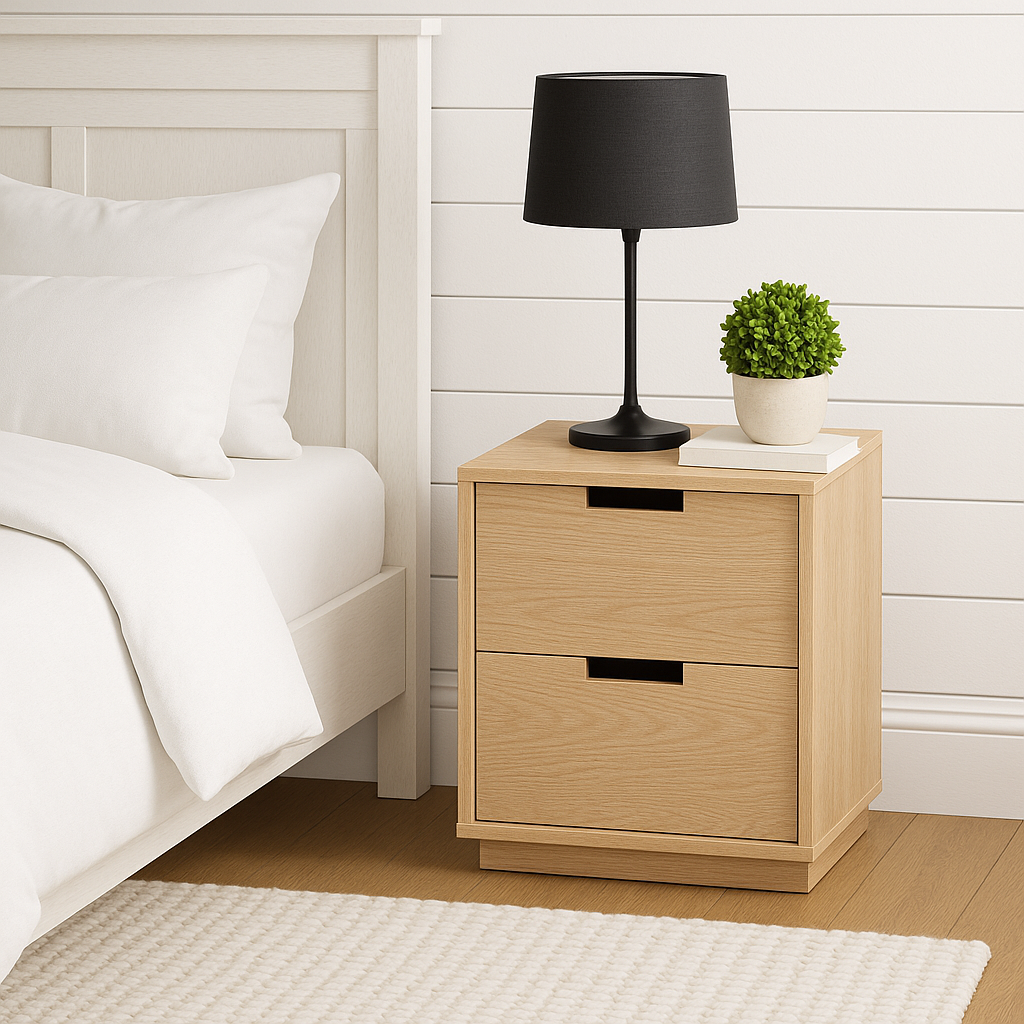
Simple clean lines and lots of storage. This modern cutout nightstand matches our modern cutout headboard and chunky leg platform bed - so you can upgrade your bedroom with nice furniture on a budget. including full diagrams, shopping and cut lists.
Specifications
| Project type | Nightstands |
|---|---|
| Room | Bedroom |
| Style | Modern Style Furniture Plans |
| Difficulty | Intermediate |
| Estimated cost | $100-$150 |
Dimensions
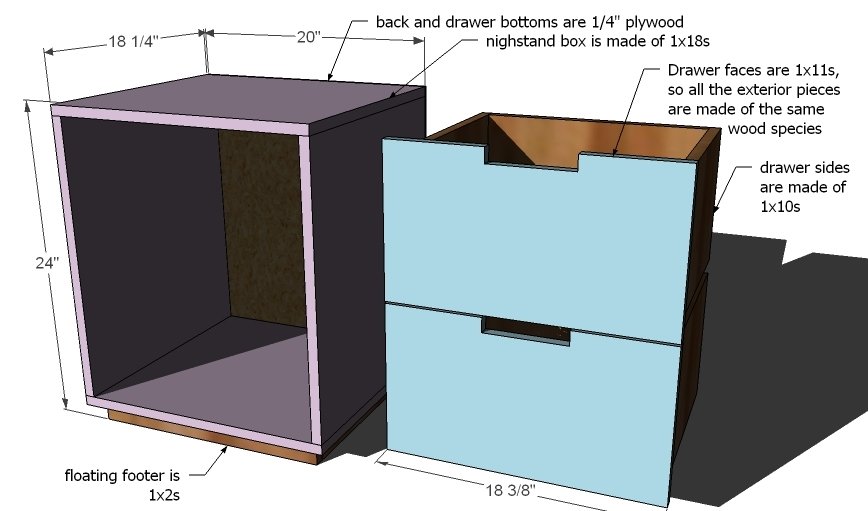
Use the size-specific shopping and cut lists below.
Shopping List
Shopping List for 2 Nightstands
- 1 – Sheet of 3/4″ MDF (for painting) or A1 Hardwood Plywood (for staining)
- 1 – Sheet of 1/4″ plywood
- 2 – 1×10, 8′ Length
- 2 – 1x2s, 8′ Length
- 4 – 16″ Drawer Slides with standard 1/2 clearance on sides (corner mount works best)
- Wood Filler
- 2″ Screws
- 1 1/4″ Nails
- Wood Glue
- Finishing Supplies
Cut List
CUT LIST FOR 2 NIGHTSTANDS
- 4 – 1×18 @ 20″ (Top and Bottom)
- 4 – 1×18 @ 21″ (Sides)
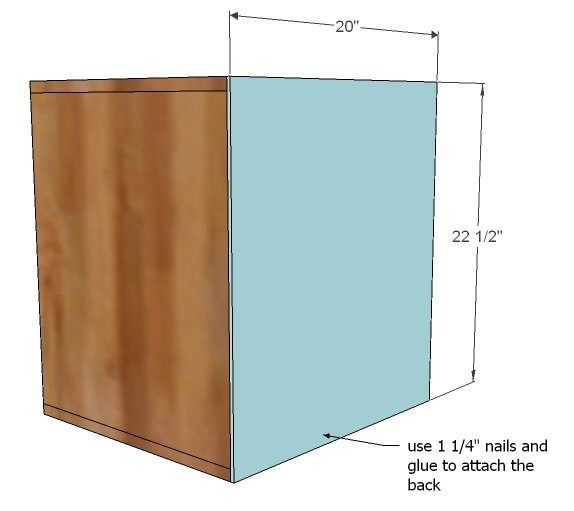
- 1 – 1/4″ Plywood @ 20 x 22 1/2″ (Back)
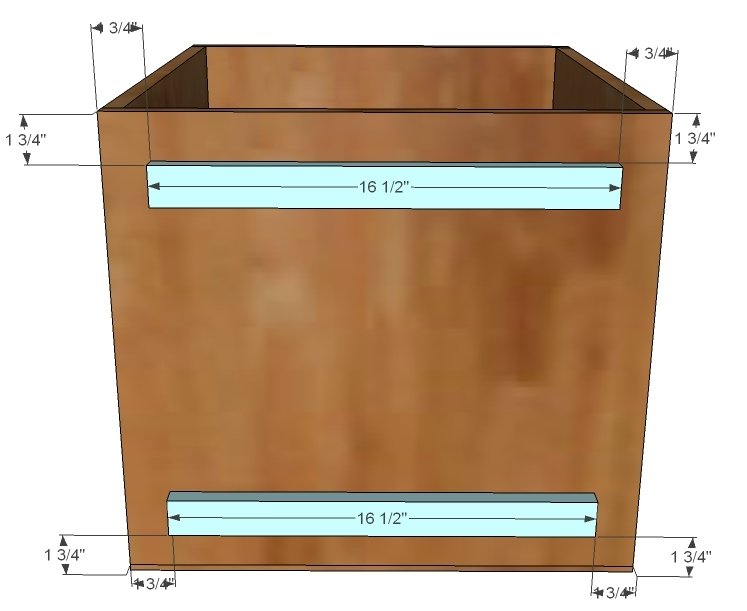
- 4 – 1×2 @ 16 1/2″ (Cleats)
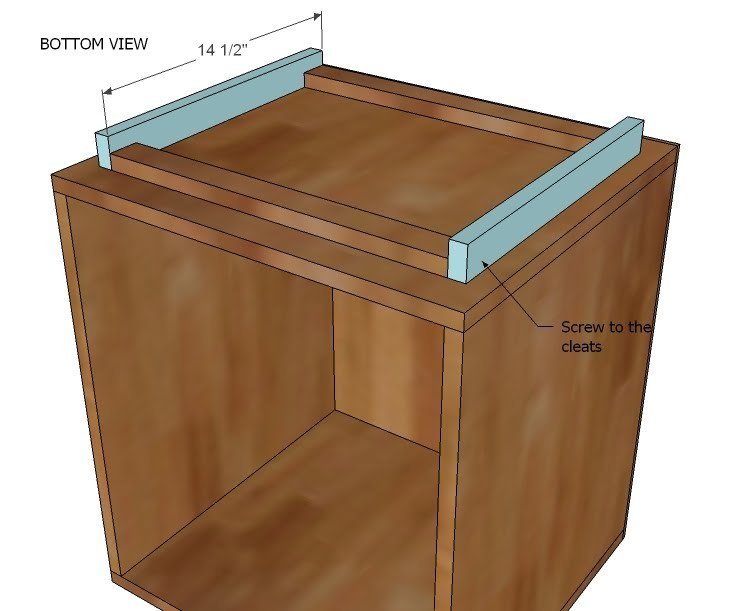
- 4 – 1×2 @ 14 1/2″ (Side Footer)
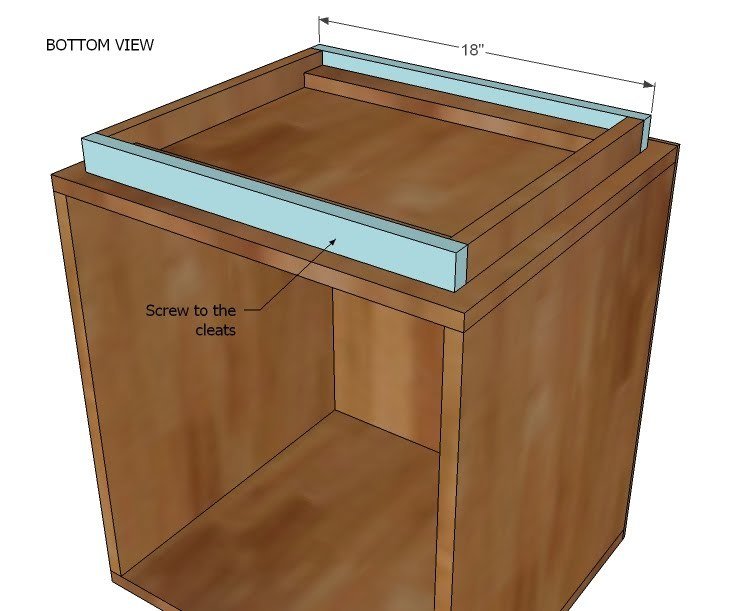
- 4 – 1×2 @ 18″ (Front and Back Footer)
CUT LIST FOR FOUR DRAWERS
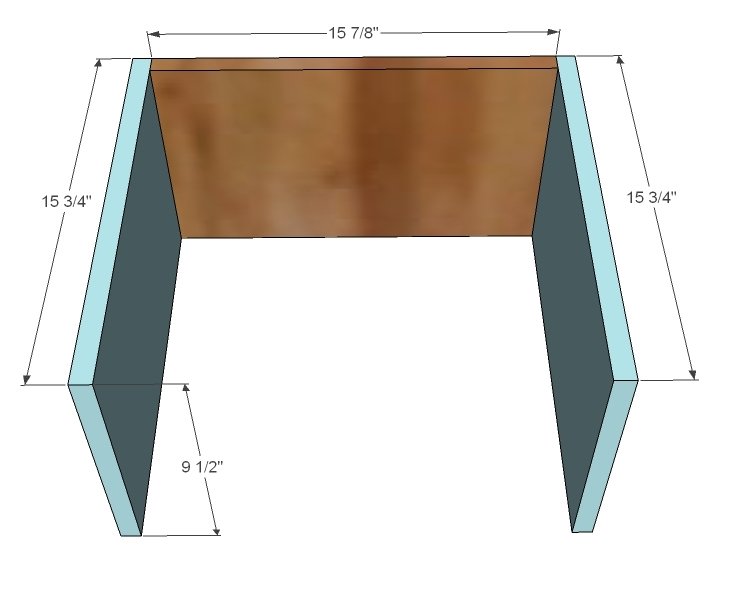
- 8 – 1×10 @ 15 3/4″ (Drawer Sides)
- 4 – 1×10 @ 15 7/8 (Drawer Backs)
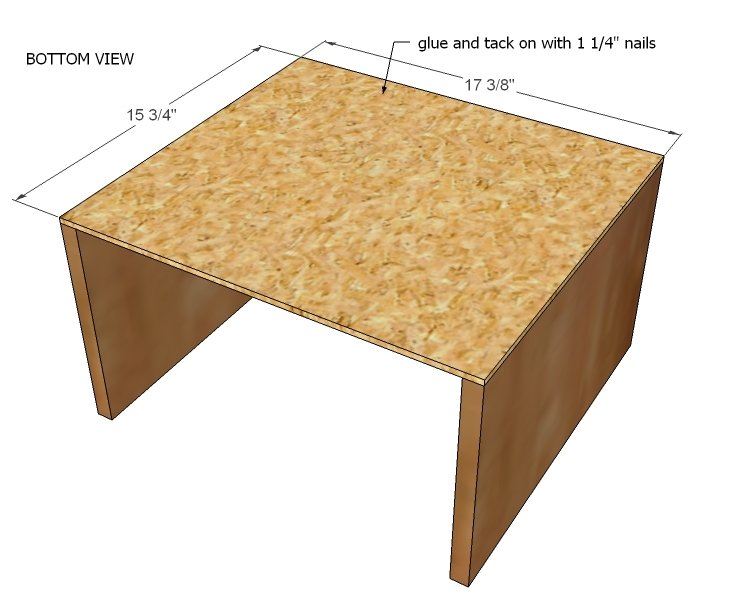
- 4 – 1/4″ Plywood @ 15 3/4″ x 17 3/8″ (Drawer Bottoms)
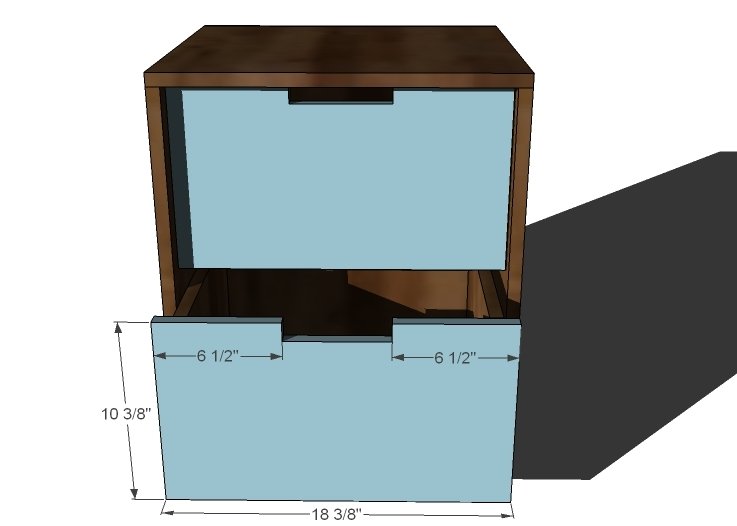
- 4 – 1×11 (see plywood cut layout) @ 18 3/8″ (Drawer Faces)
Tools
- measuring tape
- square
- pencil
- hammer
- safety glasses
- hearing protection
- circular saw
- sander
Step-by-step Instructions
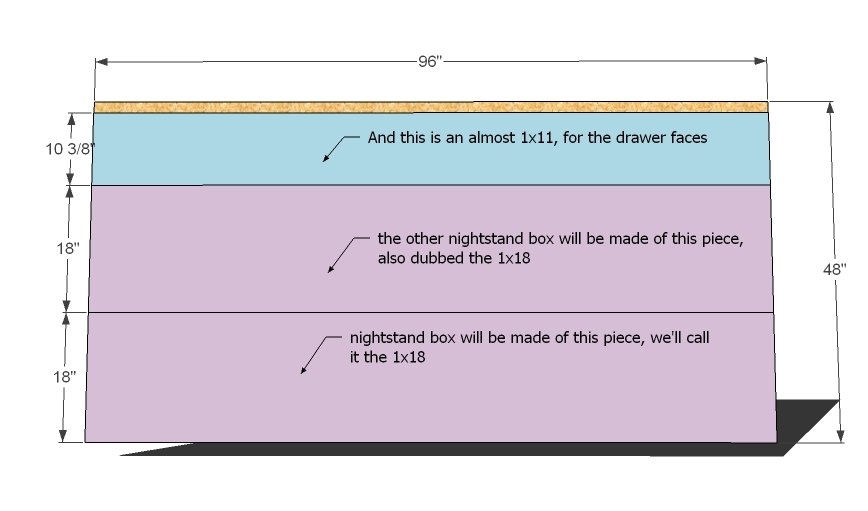
CUT LAYOUT
Have the nice man (or lady) at your orange or blue store cut your plywood as shown above into strips.
Step 2
Build the box as shown above. Check for square.
Step 3
Attach the back with 1 1/4″ nails and glue.
Step 4
Mark the bottom of the boxes 1 3/4″ in on the corners as shown above. Measurements given are to the outside of the box and do not include the back of the nightstand. Attach the cleats as shown above using 1 1/4″ screws or nails and glue.
Step 5
Step 6
Attach the footer front and back as shown above. Use glue and 2″ screws or nails.
Step 7
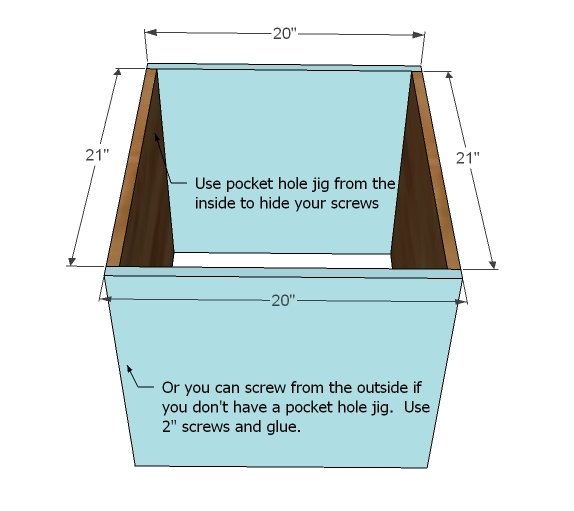
Build the drawer box as shown above. Use 2″ screws and glue, or pocket hole screws from the outside.
Step 8
Tack the drawer bottom to the drawer box as shown above. Use glue and 1 1/4″ nails. Don’t worry, we will use the corner mount drawer slides to keep the bottoms in place.
Step 9
Cut out the drawer faces as shown above. Mark the insides of the drawer faces 1/2″ in from the sides. Line these marks up with the drawer sides and nail to the drawer sides (or use a pocket hole to screw the face on from the outsides of the sides of the drawer box). Leave a 1/2″ gap on the bottom of the drawer to the bottom of the drawer face.
Step 10
Fill all of your holes with wood filler and let dry. Sand as needed. Vacuum with a soft bristled brush. Prime and paint, or stain as desired. Attach the drawers with the drawer slides to the sides of the nightstand. Attach the bottom drawer first, using the bottom of the nightstand as a guide, then attach the top drawer.
Finishing
Sand all surfaces, starting with a medium grit and finishing with fine. Wipe off the dust, fill any holes or gaps with wood filler, and sand smooth once dry. Apply primer if you're painting, then finish with your choice of paint or stain and seal with a durable clear topcoat. For outdoor projects, use exterior-rated primer, paint or stain, and sealer so the piece stands up to the weather.
Source (temporary): https://www.ana-white.com/woodworking-projects/modern-cutout-nightstand