Narrow Farmhouse Storage Armoire
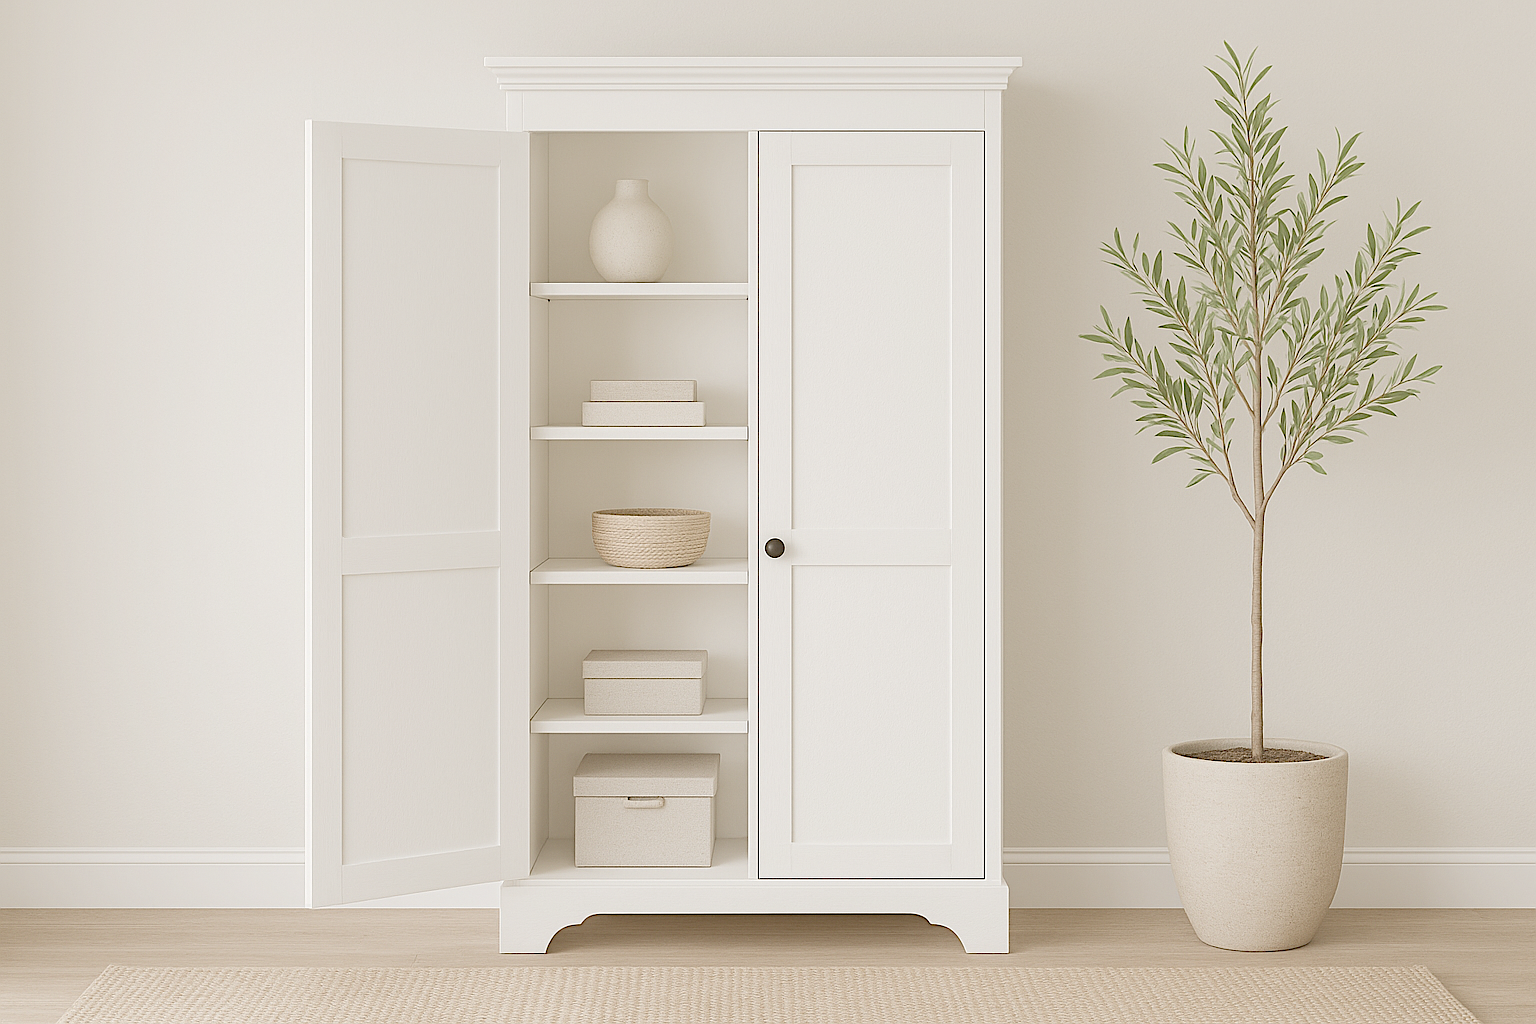
Farmhouse Storage Cabinet with Shelves and Crown Detail This beautifully crafted storage cabinet brings timeless farmhouse charm and practical elegance to any space. Finished in crisp white, the piece features a classic crown molding top and subtle scalloped base, making it a refined addition to living rooms, bedrooms, or entryways. Behind its framed double doors, five spacious shelves offer versatile storage for everything from linens and books to baskets and decor. A matte black knob adds a touch of contrast, while the soft-close door design ensures smooth functionality. A neutral olive tree and textured accents complete the look, blending utility and serenity in a light-filled modern farmhouse setting. Dimensions: 72" tall × 39" wide Material: Solid wood frame with MDF panels Finish: Painted white Style: Modern farmhouse Optional Features: Adjustable shelving · Crown molding · Decorative base · Soft-close hinges
Specifications
| Project type | Media and Entertainment Centers |
|---|---|
| Room | Storage Solutions |
| Style | Farmhouse Furniture |
| Difficulty | Intermediate |
| Estimated cost | $50 - $100 |
Dimensions
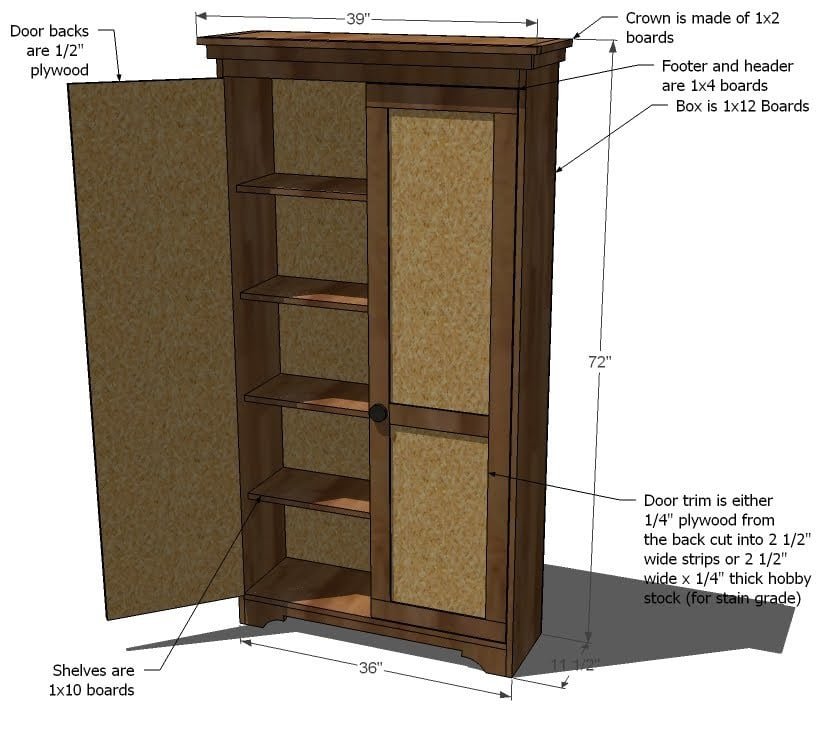
Use the size-specific shopping and cut lists below.
Shopping List
- 2 – 1×12, 10′ Length
- 1 – 1×10, 12′ Length
- 1 – 1×4, 8′ Length
- 2 – 1×2, 8′ Length
- 1 – Sheet of 1/4″ Plywood or MDF (for the backs)
- 1 – Sheet of 1/2″ Plywood or MDF (for the doors)
- 5/8″ Brad Nails
- Edge Banding if you are staining
- 3 Sets of Hinges for inset doors, frameless cabinets
- 2 Knobs
Cut List
Cut List for the Bookcase
- 2 – 1×12 @ 71 1/4″ (Sides)
- 1 – 1×12 @ 34 1/2″ (Bottom Shelf)
- 1 – 1×12 @ 36″ (Top Shelf)
- 4 – 1×10 @ 34 1/2″ (Shelves)
- 2 – 1×4 @ 34 1/2″ (Header and Footer)
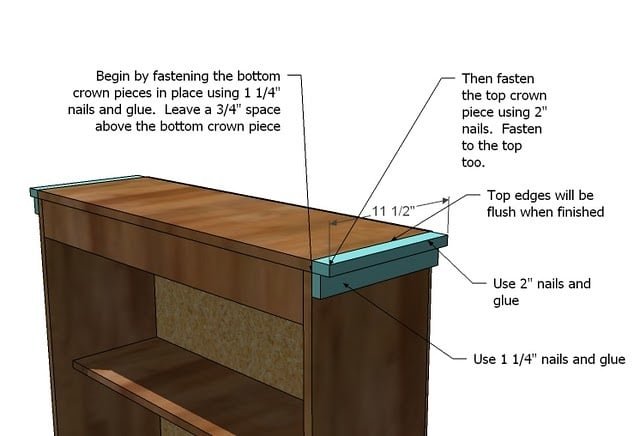
- 4 – 1×2 @ 11 1/2″ (Side Crown)
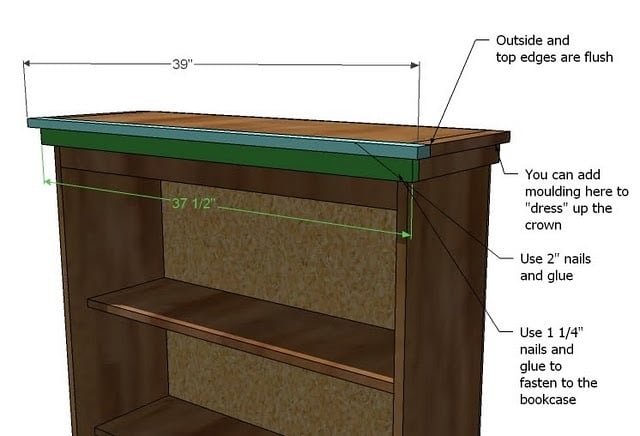
- 1 – 1×2 @ 37 1/2″ (Bottom Front Crown)
- 1 – 1×2 @ 39″ (Top Front Crown)
- 1 – 1/4″ Plywood or MDF @ 36″ x 72″ (Back)
Cut List for TWO Doors
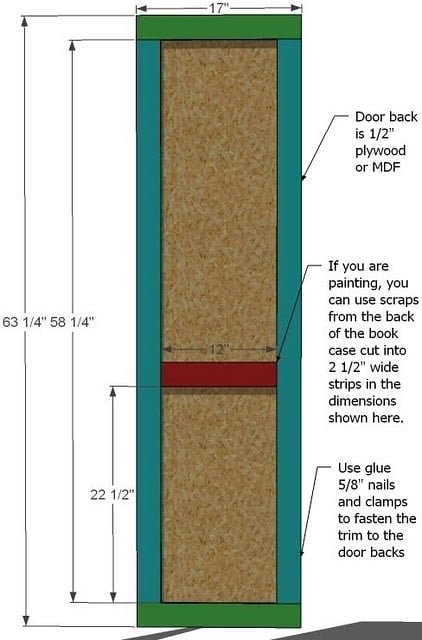
- 2 – 1/2″ Plywood or MDF @ 63 1/4″ x 17″ (Back of Doors)
- 4 – 1/4″ Plywood cut into 2 1/2″ wide strips @ 17″ (Top and Bottom Trim for Doors)
- 4 – 1/4″ Plywood cut into 2 1/2″ wide strips @ 58 1/4″ (Side Trim for Doors)
- 2 – 1/4″ Plywood cut into 2 1/2″ wide strips @ 12″ (Center Trim for Doors)
Tools
- measuring tape
- square
- pencil
- hammer
- safety glasses
- hearing protection
- kreg-jig
- drill
- circular saw
- jigsaw
- nailer
- sander
- staple gun
- level
Step-by-step Instructions
Step 1
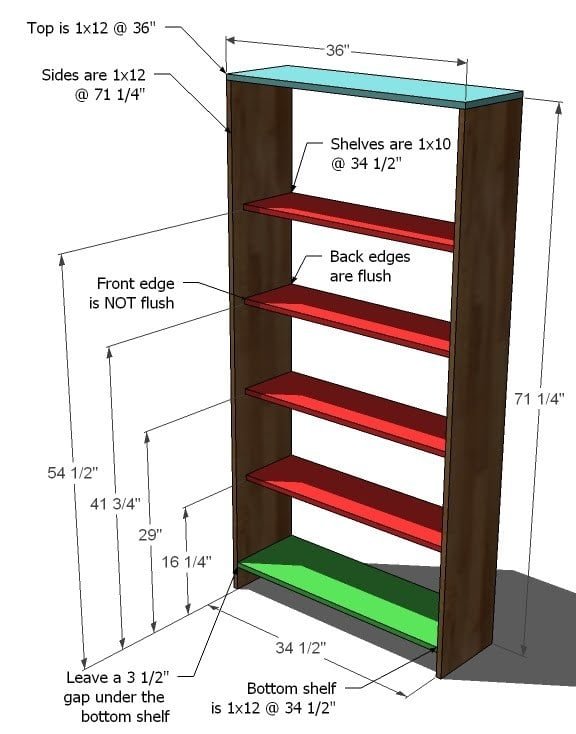
Build the Box. As shown above, build the box using 2″ nails and glue. Keep back edges flush. You can place the shelves anywhere you like, the shelf placement above is for 12″ clearance on each of the lower shelves. Remember to leave a 3 1/2″ gap under the bottom shelf, and that the top sit on top of the sides.
Step 2
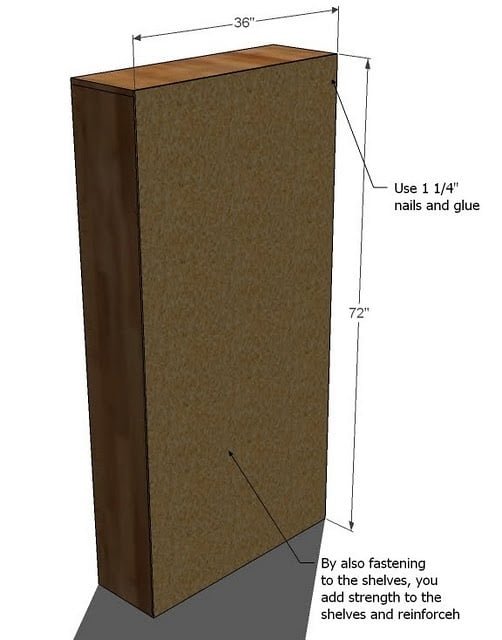
Back. Use 1 1/4″ nails and glue to fasten the back to the bookcase. Fasten all joining edges.
Step 3
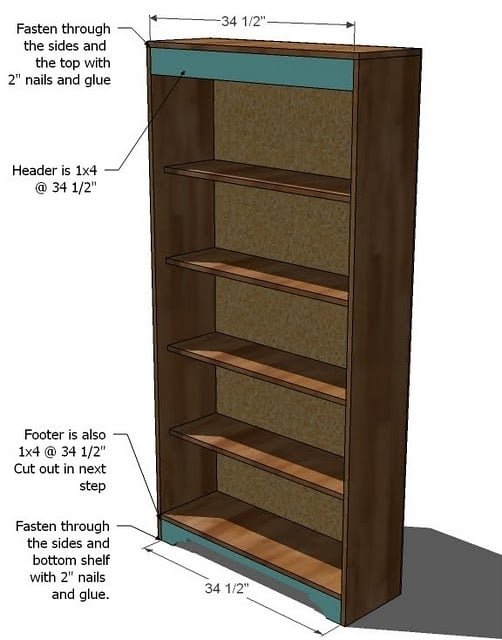
Header and Footer. Fasten the header and footer to the bookshelf, as shown above. Use 2″ nails and glue.
Step 4
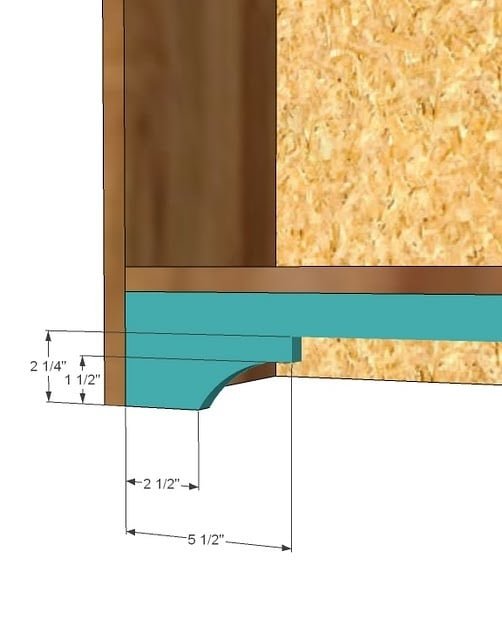
Footer Cutout. Measure and mark out the footer as shown above. Use a jigsaw to cut out the shape above on both ends.
Step 5
Step 6
Front Crown. Add the front crown as you did the side crown. If you would like to “dress” up the crown more, you can purchase and use cove moulding 3/4″ x 3/4″ in between the top and bottom crowns, or under the bottom edge. You will need to miter the outside corners.
Step 7
Door Construction. Cut your 1/2″ plywood for the backs. From leftovers from the back of the cabinet, cut 2 1/2″ strips with your tablesaw or circular saw. Then cut your trim boards from these 2 1/2″ strips to the measurements given above and in the cut list. Begin creating the doors by fastening the green trim above with 5/8″ nails and glue. Clamp and let dry. Do not clamp so hard that you loose all of your glue. Then add the blue trim, clamp and let dry. Finally, add the red trim. Dry on a flat level surface, the doors stacked, with a heavy object on top.
Step 8
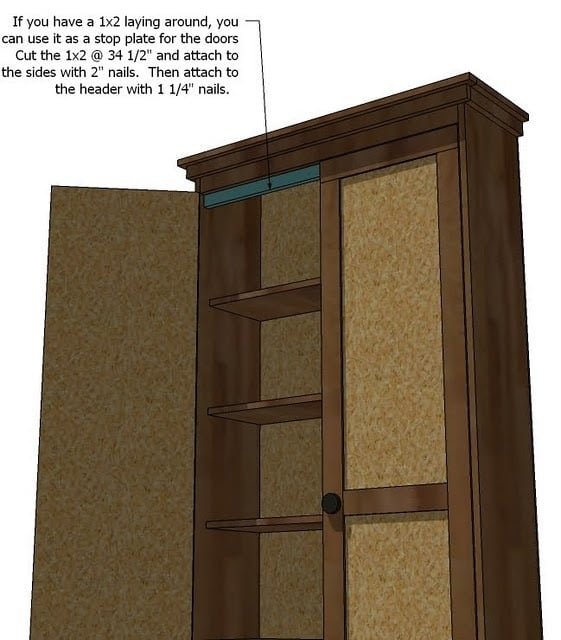
Optional: If you have a scrap 1×2 and want a little extra support for the tops of the doors, I often will add a 1×2 to the header as shown above. This also makes a nice finished look when the bookcase is opened.
Step 9
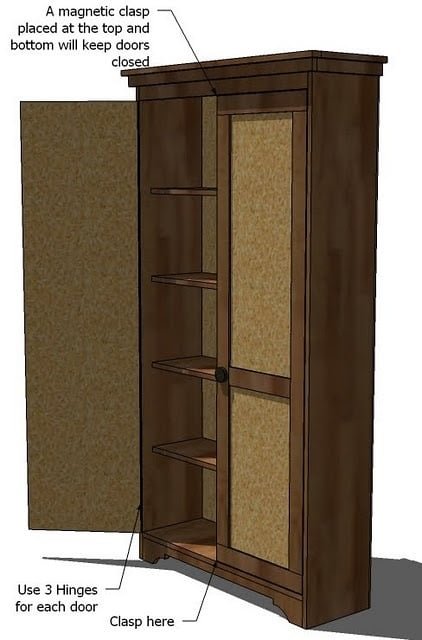
Door Construction. Use 3 Hinges per door and attach the doors to the bookcase. I like to add magnetic clasps to keep the doors from opening. Add knobs or pulls.
Finishing
Sand all surfaces, starting with a medium grit and finishing with fine. Wipe off the dust, fill any holes or gaps with wood filler, and sand smooth once dry. Apply primer if you're painting, then finish with your choice of paint or stain and seal with a durable clear topcoat. For outdoor projects, use exterior-rated primer, paint or stain, and sealer so the piece stands up to the weather.
Source (temporary): https://www.ana-white.com/woodworking-projects/narrow-farmhouse-storage-armoire