Nursery Armoire
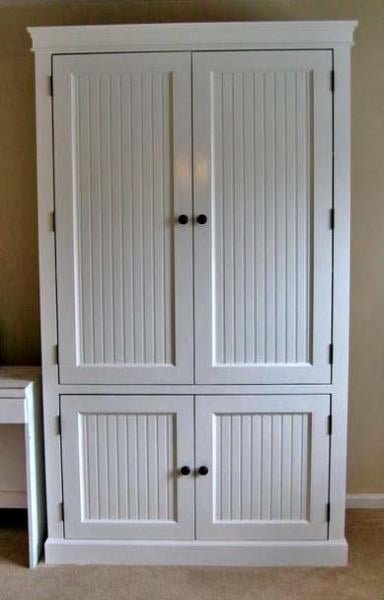
to build a nursery armoire - step by step directions with shopping list and cut list and diagrams. Lots of reader submitted photos.
Specifications
| Project type | Media and Entertainment Centers |
|---|---|
| Room | Storage Solutions |
| Style | Farmhouse Furniture |
| Difficulty | Advanced |
| Estimated cost | $150 - $200 |
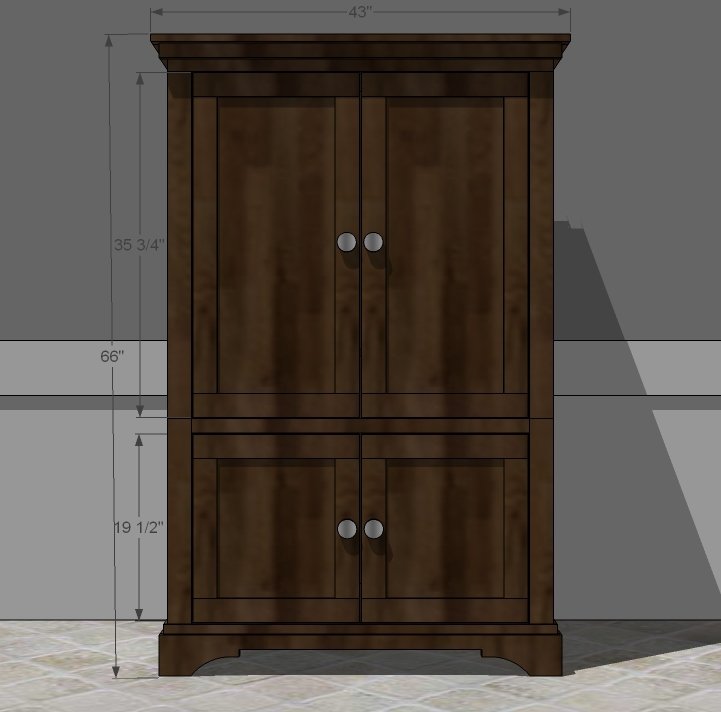
Dimensions
Use the size-specific shopping and cut lists below.
Shopping List
- 2 – Sheets of 3/4″ hardwood plywood
- 1 – Sheet of 1/4″ plywood (for the back)
- 1 – 4'x4' (half sheet) of 1/2" thick hardwood plywood (used for the backs of the doors)
- 1 - 1x4 @ 4 feet long
- 2 - 1x3 @ 8 feet long
- 3 - 1x2 @ 8 feet long
- 1-1/4" pocket hole screws (About 50)
- Wood Filler
- Wood Glue
- 2″ Brad Nails
- 1-1/4″ Brad Nails
- 5/8″ Brad Nails (for the cabinet doors)
- 3 – Sets of Full Overlay Frameless Door Hinges
- 5 – Sets of basic hinges
- 1 - 8′ stick of 5 1/4″ base board molding
- 3 – 8′ sticks of 1/4″ x 2 1/2″ hobby boards for the door detailing
Additional Shopping List for Optional Drawers
- Scrap 1×24, or matching width to the box from the armoire, 3′ or (2) 18′ pieces
- 2 – 8′ 1×6 Boards
- 2- Sets of Undermount Slides
Cut List
Cut List for the Box
- 1 – 3/4" plywood @ 23-1/4" x 6-1/2″ (Drawer Divider)
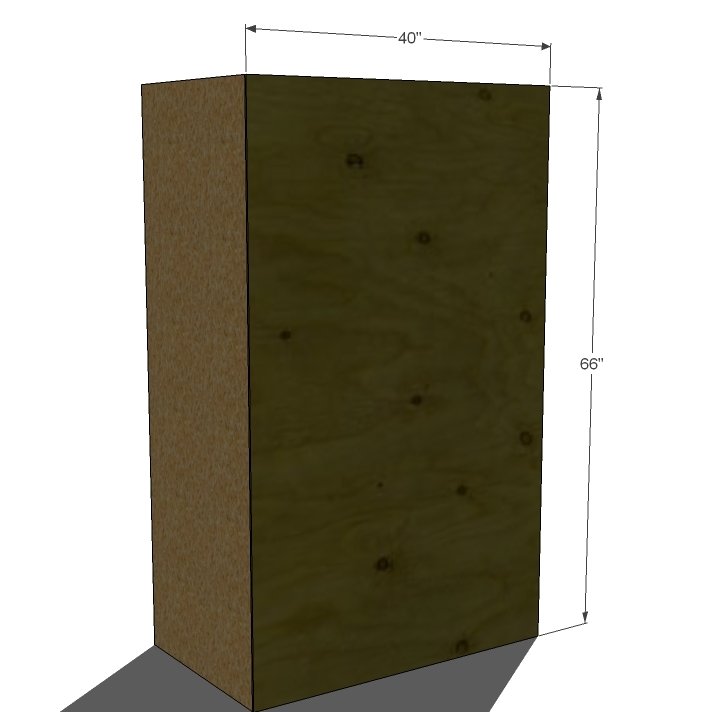
- 2 – 3/4" plywood @ 23-1/4" x 66″ (Sides)
- 4 – 3/4" plywood @ 23-1/4" x 38-1/2″ (Shelves)
Cut List for the Trim - Cut to fit as you go
- 1 – 1×4 @ 40″ (Top Header Trim)
- 2 – 1×3 @ 26-1/2″ (Bottom Side Trim, Fixed) (cut at 62 1/2″ if you want the top trim fixed too, for non-flat folding doors)
- 2 – 1×3 @ 36″ (Top Side Trim, if you choose to have the flat folding doors)
- 2 – 1×2 @ 35″ (Shelf Trim)
- 4 – 1×2 @ 24-1/4″ (Side Crown Trim)
- 1 – 1×2 @ 41-1/2″ (Bottom Front Crown Trim)
- 1 – 1×2 @ 43″ (Top Crown Front Trim)
- 2 – 5-1/4″ Base Moulding, @ 25″ (Longest Points, mitered out on front end) (measure to fit)
- 1 – 5-1/4″ Base Moulding, @ 41-1/2″ (Longest Points, mitered on both ends out) (measure to fit)
Cut List for the Doors
- 2 – 1/2" plywood @ 35 3/4″ x 17 1/4″ (Back of top Doors)
- 2 – 1/2″ plywood @ 19 1/2″ (Back of bottom Doors)
- 8 – 1/4″ plywood x 2-1/2″ wide hobby stock @ 17-1/4″ (Top and bottom trim for all doors)
- 4 – 1/4″ x 2-1/2″ wide hobby board @ 30-3/4″ (Top Sides, cut to measurement)
- 4 – 1/4″ x 2-1/2″ wide hobby board @ 14-1/2″ (Bottom Sides, cut to measurements)
Optional Drawers Cut List
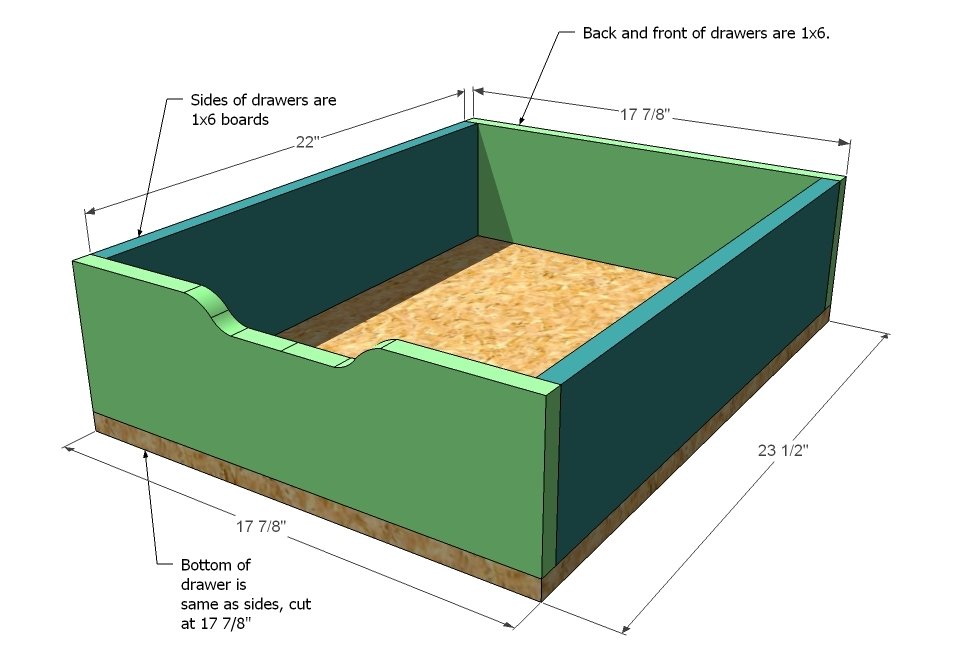
- 2 – 1×24 @ 17 7/8″ (Bottoms)
- 4 – 1×6 @ 17 7/8″ (Fronts and Back)
- 4 – 1×6 @ 22″ (Sides of Drawers)
Tools
- measuring tape
- square
- pencil
- safety glasses
- kreg-jig
- drill
- jigsaw
- compound miter saw
- table saw
- nailer
- sander
- level
- countersink drill bit
Step-by-step Instructions
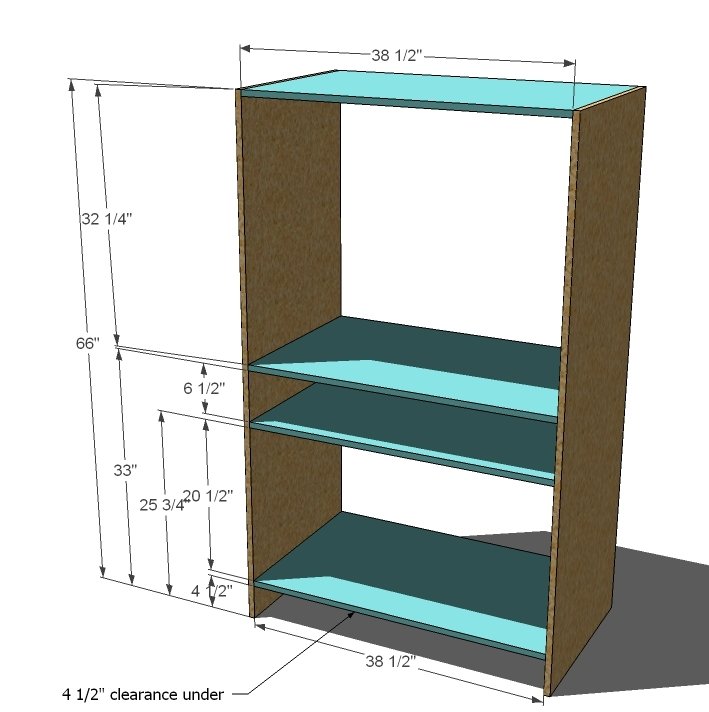
Carcass assembly -
Drill four 3/4" pocket holes on each end of each shelf board. Mark out and attach to the sides of the carcass to create the basic carcass for the project.
Divider for shelf -
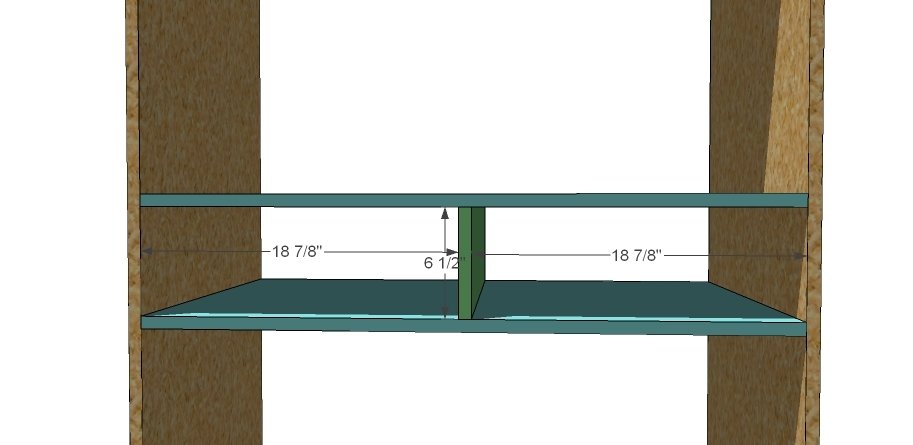
Center the divider between the shelves as shown. Then fasten the divider in place as shown above using glue and 1-1/4" brad nails. This divider is not just for the drawer housing. It adds strength, helping your shelf carry a heavier weight.
Step 3
Back. Using the 1 1/4″ nails and glue, fasten the back in place. Use the back to square up the armoire.
Begin Trim
Start with the header trim. Fasten in place with 2″ nails and glue, to both the top and sides. Then fasten the bottom side trim, also to the sides and shelves. Finally, measure and cut the blue trim above from 1×2 boards, and fasten in place with 2″ nails and glue. Keep edges flush with the tops of the shelves.
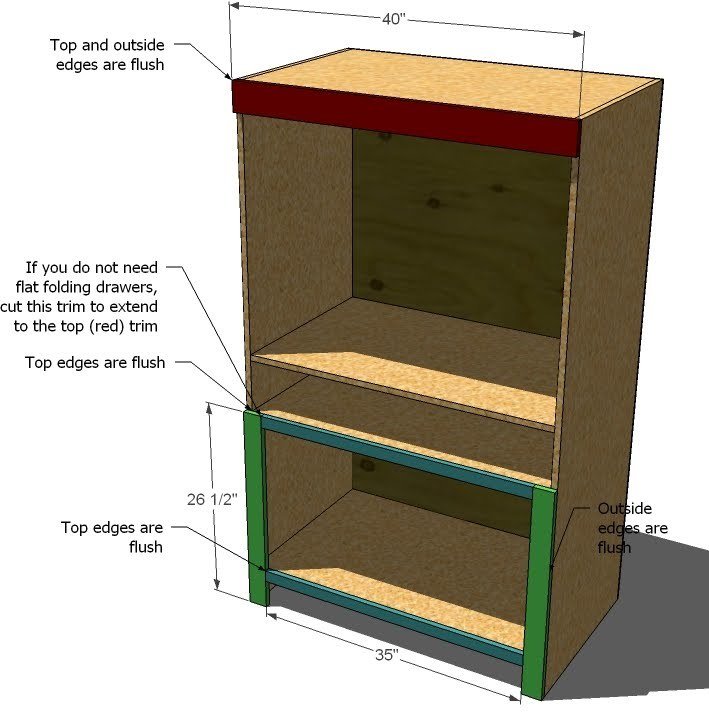
Step 5
Attach the side crown pieces together and then to the side of the armoire as shown.
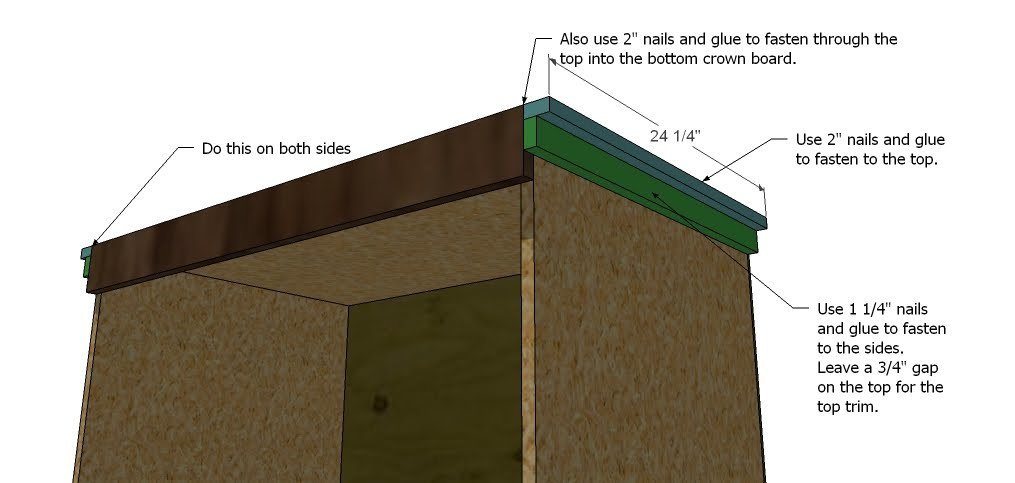
Front Crown Trim
In the same manner as you fasten the side trim, fasten the front crown.
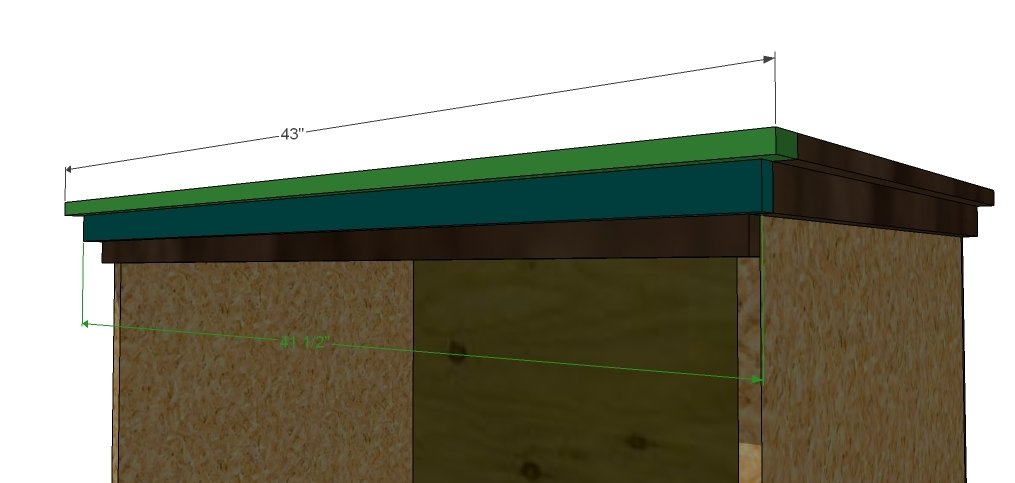
Footer
Mitering your corners, cut the base moulding to fit your sides. Then measure and cut your front piece, mitering out both sides to fit the sides. Use 1 1/4″ nails and glue to attach.
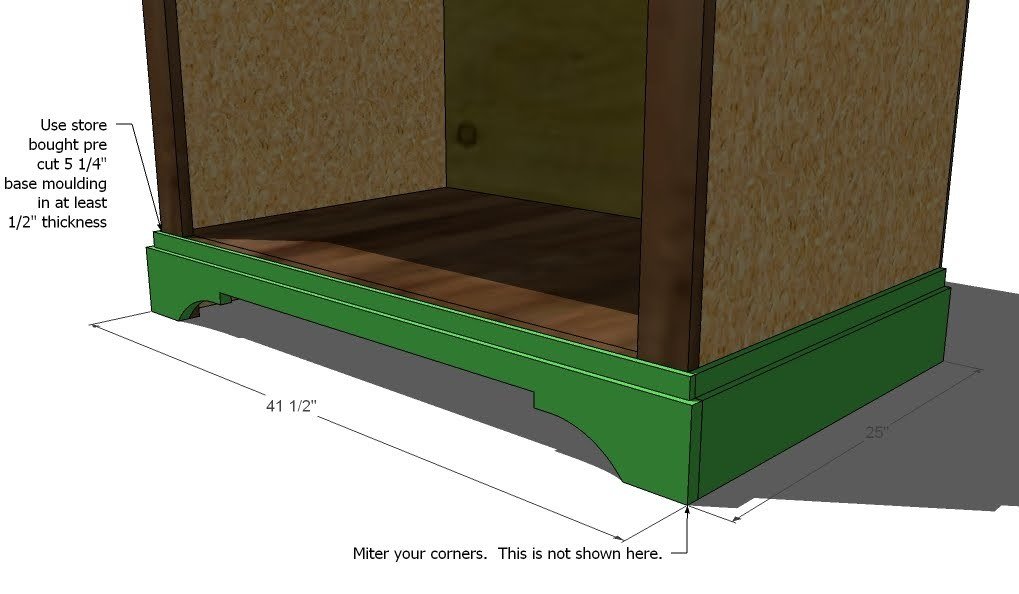
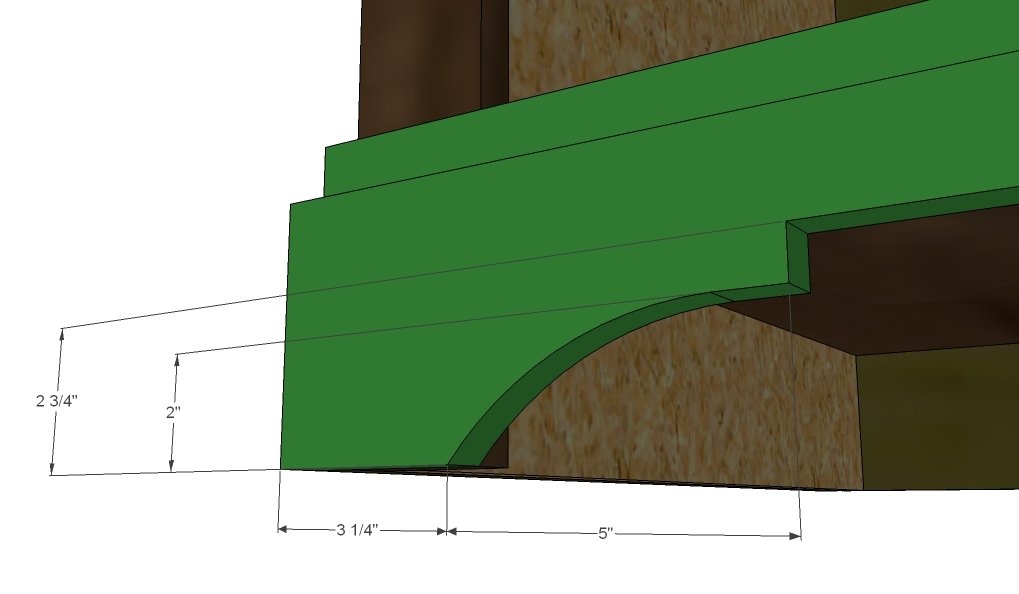
Footer Cutout
Cut out your footer as shown above with a jigsaw.
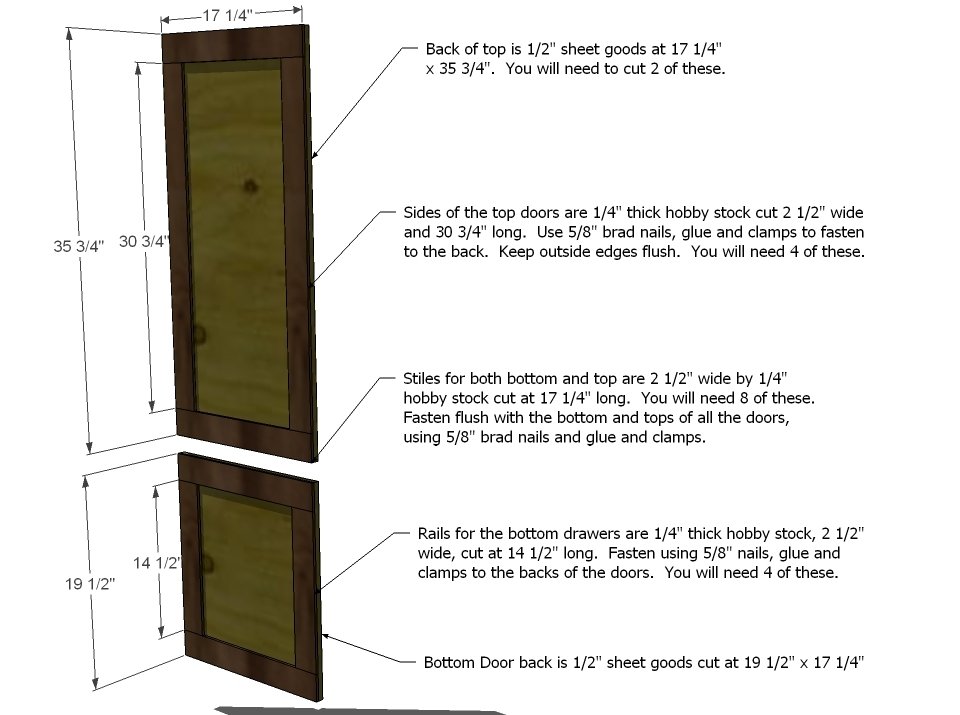
Doors
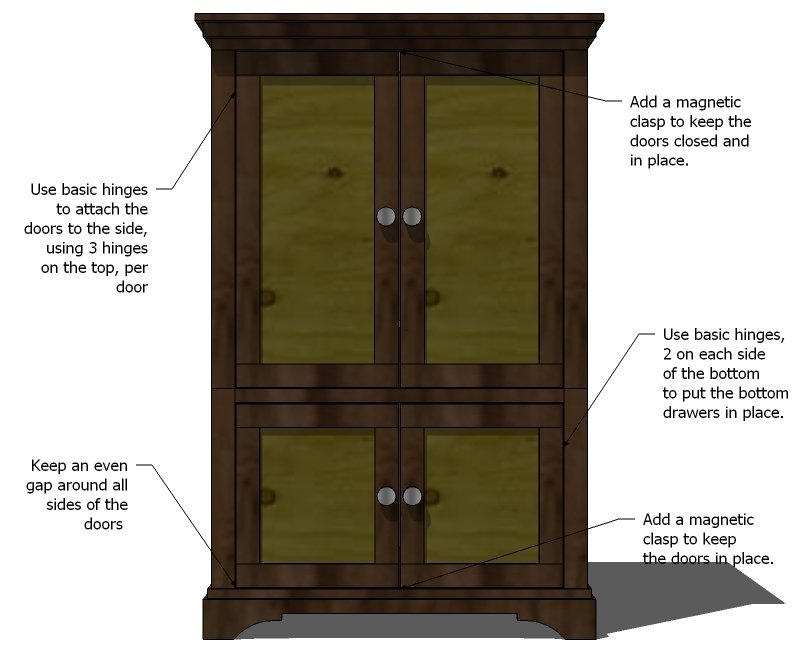
Cut your door pieces as shown above. Using 5/8″ nails, start by gluing and clamping the tops and bottom trim pieces to each door. Let dry flat. Then add the side trim for all the doors. If you wish to stain this piece, you will need to add edge banding to the visible edges of the doors.
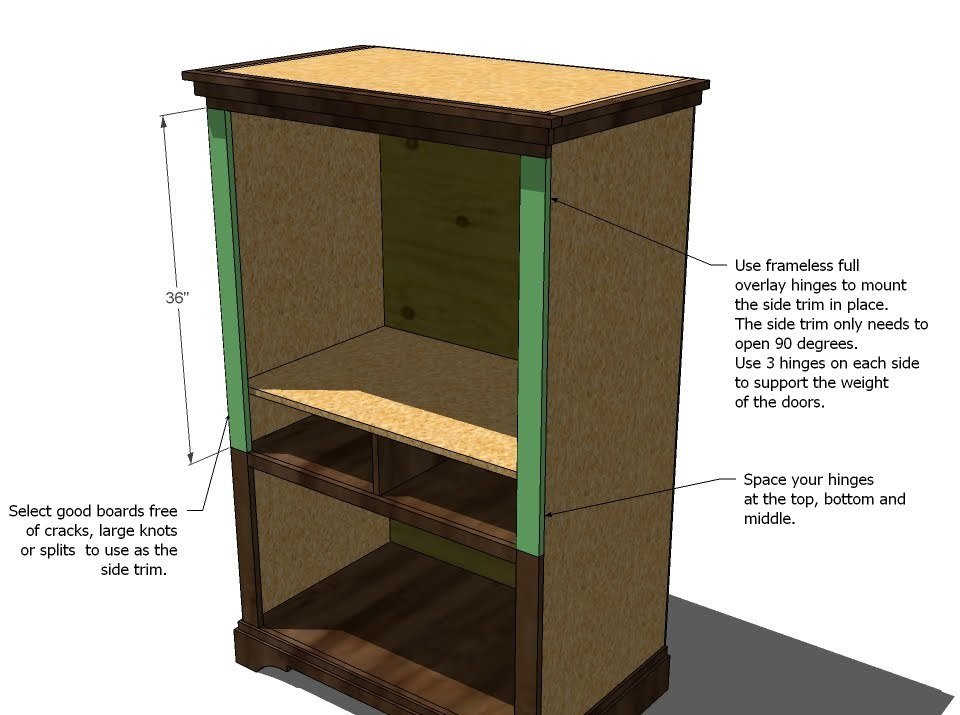
Step 10
Top Side Trim for Fold Flat Doors. Measure and cut the side trim, approximately 36″. Using framless full overylay hinges, fasten the trim piece in place. The trim will need to extend out 90 degrees when opened. You can use euro style (needs a special bit to install), but there are also other types. The important elements are FRAMLESS, FULL OVERLAY and opens 90 DEGREES or more.
Step 11
This drawer is designed to work with the flat folding doors. If you choose to have non-flatfolding doors, you will need to cut your drawer bottoms and sides @ 15″. Build your Drawers by fastening with glue and 2″ nails the fronts and the backs of the drawers to the bottoms. Then fasten the sides in place, with glue and 2″ nails, to both the bottom and the sides. Mount in the openings using undermount drawer slides.
Step 12
Fill any holes with wood filler. Let dry and sand and finish as desired. If you are staining, you may need to add edge banding to any exposed plywood edges.
Finishing
Sand all surfaces, starting with a medium grit and finishing with fine. Wipe off the dust, fill any holes or gaps with wood filler, and sand smooth once dry. Apply primer if you're painting, then finish with your choice of paint or stain and seal with a durable clear topcoat. For outdoor projects, use exterior-rated primer, paint or stain, and sealer so the piece stands up to the weather.
Source (temporary): https://www.ana-white.com/woodworking-projects/nursery-armoire-plans