Pallet Bookshelf
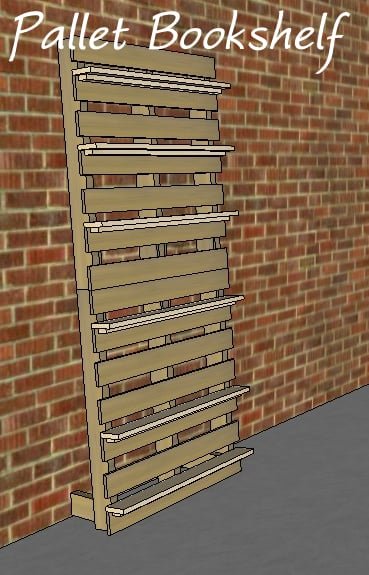
A simple bookcase made from pallets and a few 1x4's. The measurements will vary based on the size of the pallets used. Be on the lookout for donor pallets to provide wood for the shelves and support pieces. If you don't have enough pallet wood to make the shelves you'll need to buy some 1x4's In sketchup the shelves are 36" long.
Specifications
| Project type | Bookshelf and Bookcase Plans |
|---|---|
| Room | Storage Solutions |
| Style | Green or Eco-Friendly Style Furniture |
| Difficulty | Beginner Projects |
| Estimated cost | Under $20 |
Shopping List
1x2's approximately 36" per shelf, this will vary with the size of the pallets used.
As shown 2 10' 1x2's are needed
Tools
- measuring tape
- pencil
- safety glasses
- hearing protection
- drill
- countersink drill bit
Step-by-step Instructions
Step 1
1. Find two pallets of the same size in good condition. A third pallet can be used as a donor for shelf boards and support blocks. 2. Flip the pallets upside down 3. Remove the bottom boards as carefully as possible. This is the fun part. Cutting the nails with a reciprocating saw works well. 4. Save the boards to be reused
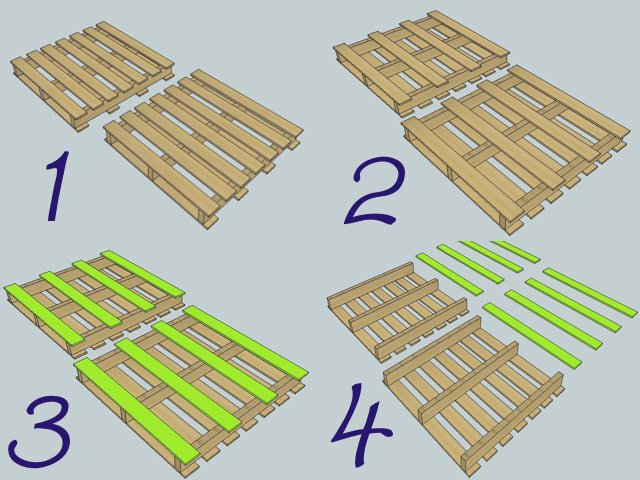
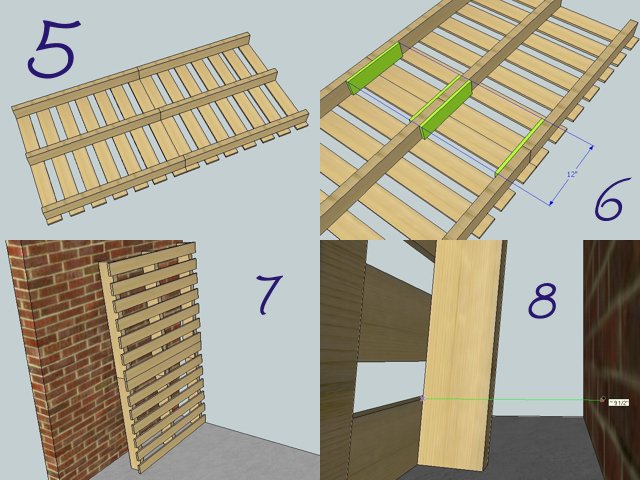
5. Set the pallets end to end.
6. Cut 4 12" pieces of boards saved from the bottoms of the pallets. Sandwich the center runner with two pieces and put one piece on the inside of each outer runner. Drive 3 2" screws into each side of the joints. Each 12" board will have 6 screws in it. 7. Lean the attached pallets up against a wall. Adjust the angle until it looks right. In the sketchup the pallets are at a 5 degree angle from vertical. 8. When you are happy with the angle measure from the top edge of the bottom board back to the wall. Cut 2 pieces of 2x4 to this length. In the example it was 9.5 inches. Your measurement will probably differ.
Step 3
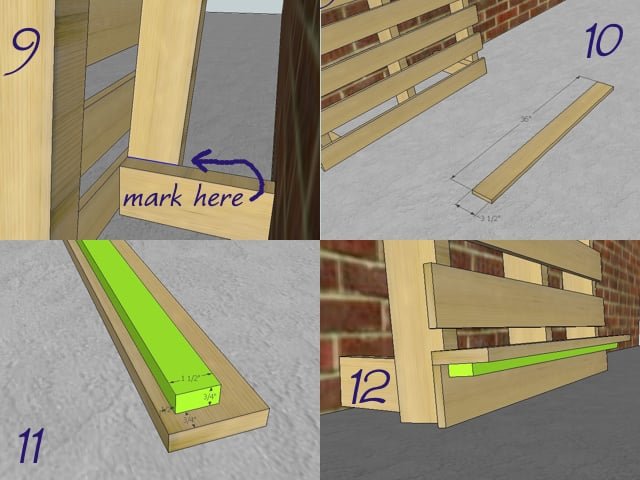
9. Insert the 2x4 blocks in behind the pallets alongside the outer runners. Scribe a line across the top of the 2x4 on both sides. Flip the pallets back upside down on the floor. Align your 2x4 blocks with the line and fasten to the pallet with 4 2.5" wood screws. Screw from the inside so the holes will be hidden. 10. Stand the pallets back upright. Cut shelving to the width of your pallets. You will need one 1x4 or pallet board per shelf. 11. Cut 1x2 supports to the length of your shelf minus 1.5 inches. This will give you a 3/4" overhang on the ends. 12. Clamp the 1x4 in position on top of one of the pallet boards. Place the 1x2 support underneath and clamp it to the 1x4. Predrill 3-4 holes through the back of the pallet boards into the 1x2. Drive 2" wood screws to secure the 1x2 to the pallet. Then predrill holes up through the bottom of the 1x2 into the 1x4. Offset the holes so you don't hit the screws already in place. 3-4 holes with 1.5" screws per shelf should be plenty
Step 4
No illustration but this is an important step. The top of the bookshelf should be fastened to the wall to prevent it from accidentally tipping over. Option 1: Find a wall stud and drive a 3.5" screw through the top of the frame of the bookshelf into the wall. This works as long as you can align the piece with a stud. Option 2: Attach a "earthquake strap" to the piece and drywall anchor it to the wall. Option 3: Attach a piece of 1x2 to the back of the shelf that spans across the three vertical runners and allows you to hit a stud somewhere in the wall. This is probably the best option as you will be able to hit 2 studs
Finishing
Sand all surfaces, starting with a medium grit and finishing with fine. Wipe off the dust, fill any holes or gaps with wood filler, and sand smooth once dry. Apply primer if you're painting, then finish with your choice of paint or stain and seal with a durable clear topcoat. For outdoor projects, use exterior-rated primer, paint or stain, and sealer so the piece stands up to the weather.
Source (temporary): https://www.ana-white.com/woodworking-projects/pallet-bookshelf