Playtable and Wheeled Storage Carts
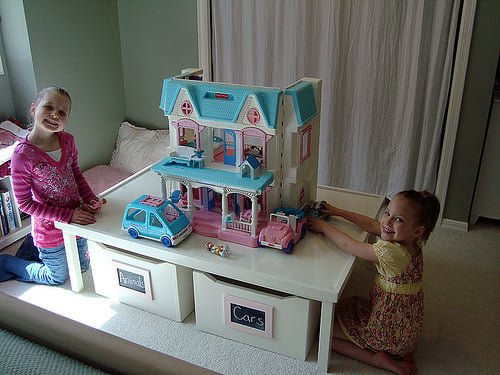
Small children have a way of taken over your coffee table with their toys. This play table when not in use rivals the beauty of a coffee table, but is at just the right height for play, and the carts hold all the toys! Special thanks to Jen for sharing her photos with us.
Specifications
| Project type | Kids Tables and Chairs |
|---|---|
| Room | Storage Solutions |
| Difficulty | Intermediate |
| Estimated cost | $50 - $100 |
Dimensions
Use the size-specific shopping and cut lists below.
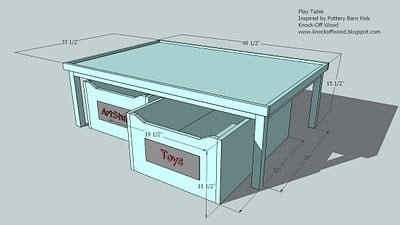
Shopping List
Materials List for Playtable
3 – 2×2 Boards (8′ Long, measuring dimensionally 1 1/2″ x 1 1/2″)
4 - 1×2 Boards (8′ Long, measuring dimensionally 1 1/2″ x 3/4″)
1 – 4′ x 8′ 3/4″ Hardwood Plywood (for staining) or MDF (can be used if painting)
Materials List for Storage Carts
Plywood or MDF leftover from Playtable
10′ 1×12 Board (Measuring dimensionally 3/4″ x 11 1/2″)
8′ 1×12 Board (Measuring dimensionally 3/4″ x 11 1/2″)
8 Casters, at least 2 1/2″ overall, plate mounted (see photo below)
Cut List
A) 4 – 2×2 @ 14 1/4″ (Legs)
B) 2 – 1×2 @ 30 1/2″ (Side Leg Support)
C) 2 – 2×2 @ 29″ (Side Apron)
D) 2 – 1×2 @ 45″ (Front and Back Apron)
E) 5 – 2×2 @ 30 1/2″ (Tabletop supports)
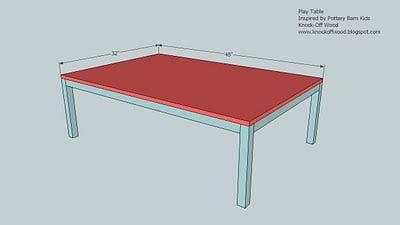
F) 1 – 32″ x48″ 3/4″ MDF (for paint) or hardwood plywood (for stain)
G) 2 – 1×2 @32″ (Top Rail, Front and Back)
H) 2 – 1×2@ 49 1/2″ (Top Rail, Sides)
Storage Boxes
I) 2 – 28 1/2″ x 18″ 3/4″ MDF (for painting) or Hardwood Plywood (for staining)
J) 4 – 1×12 @ 18″ (Front and Back of Boxes)
K) 4 – 1×12 @ 30″ (Sides of Storage Boxes)
Tools
- measuring tape
- square
- pencil
- hammer
- safety glasses
- hearing protection
- kreg-jig
- circular saw
- sander
Step-by-step Instructions
Step 1
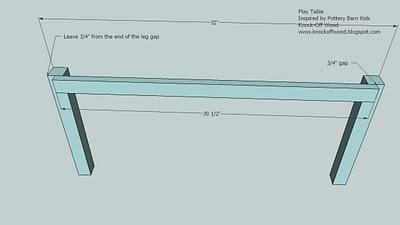
Fasten the legs, A, to the side leg support pieces, B, as shown above. Leave a 3/4″ gap on the ends of board B, as shown above.
Step 2
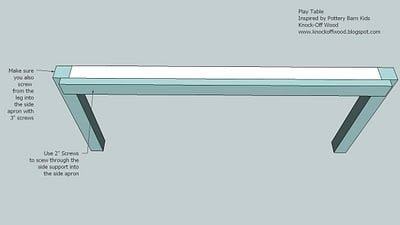
If step 3 is done correctly, piece B, the side apron, will fit perfectly as shown above. Make sure you screw from the leg support piece, B, and the legs into the side aprons, C.
Step 3
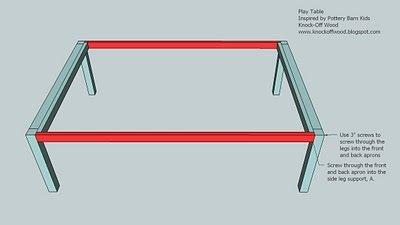
Add the front and back aprons, D, as shown above in red. Make sure you screw into the front and back aprons, D, from the legs,A, and also into the side leg support piece, B, as shown above.
Step 4
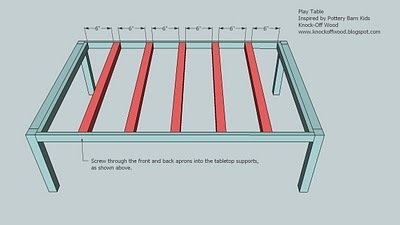
Evenly space the tabletop supports, E, and screw or nail into place, as shown above.
Step 5
Step 6
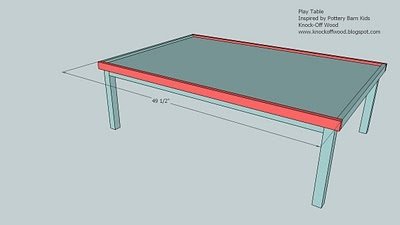
Add the side rails, G, to the side, leaving a 1/2″ gap on the top. This gap will keep toys on the table. Keep the side rails flush on the ends. Also add a few nails into the apron from the side rails.
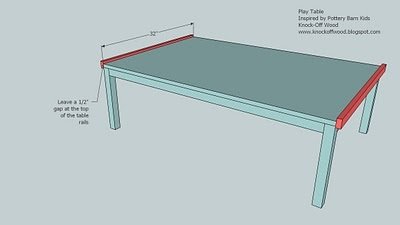
Fasten the front and back rails, H, to the table, using the guidelines in step 7.
Storage Carts
Step 8
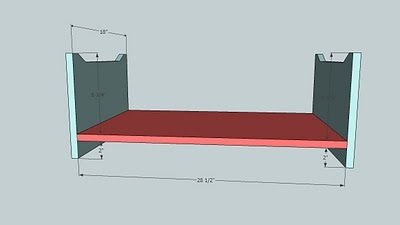
Fasten the front and back of the storage carts, J, to the bottom of the storage carts, I, as shown above. Leave a 2″ clearnace under the bottom of the storage cart (adjust the clearance to the height of the caster wheels).
Step 9
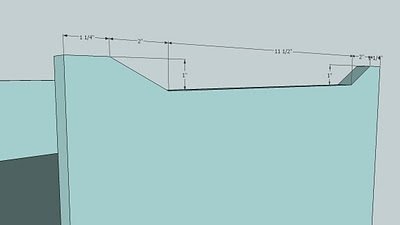
Cut the top of the fronts and backs of the storage carts, J, as shown above.
Step 10
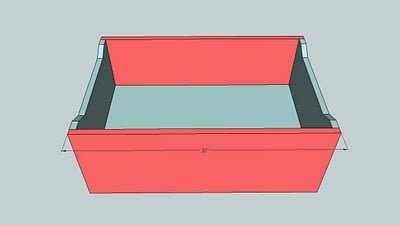
Fasten the sides, K, of the storage carts to the bottom, I, and front and back pieces, J, as shown above.
Finishing
Sand all surfaces, starting with a medium grit and finishing with fine. Wipe off the dust, fill any holes or gaps with wood filler, and sand smooth once dry. Apply primer if you're painting, then finish with your choice of paint or stain and seal with a durable clear topcoat. For outdoor projects, use exterior-rated primer, paint or stain, and sealer so the piece stands up to the weather.
Source (temporary): https://www.ana-white.com/woodworking-projects/playtable-and-wheeled-storage-carts