Pony Wall Workbench
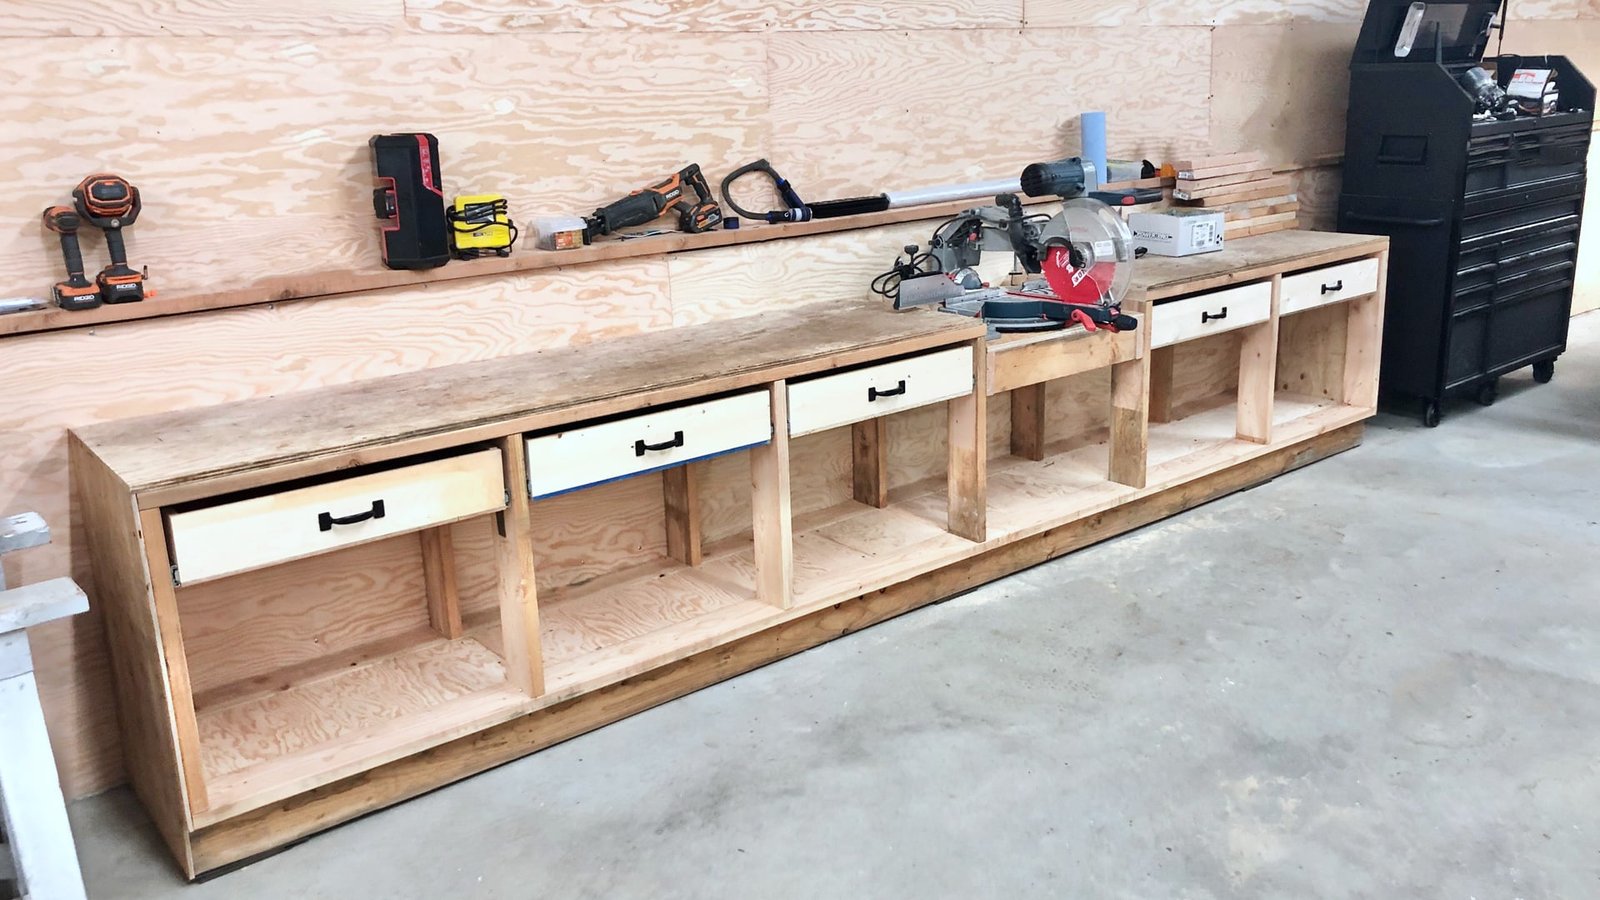
If you can build a pony wall your can build a workbench with drawers. All the functionality of cabinetry - but at a fraction of the cost and time! from
Specifications
| Project type | Workshop and Garage Plans |
|---|---|
| Room | Garage and Workshop |
| Difficulty | Intermediate |
Dimensions
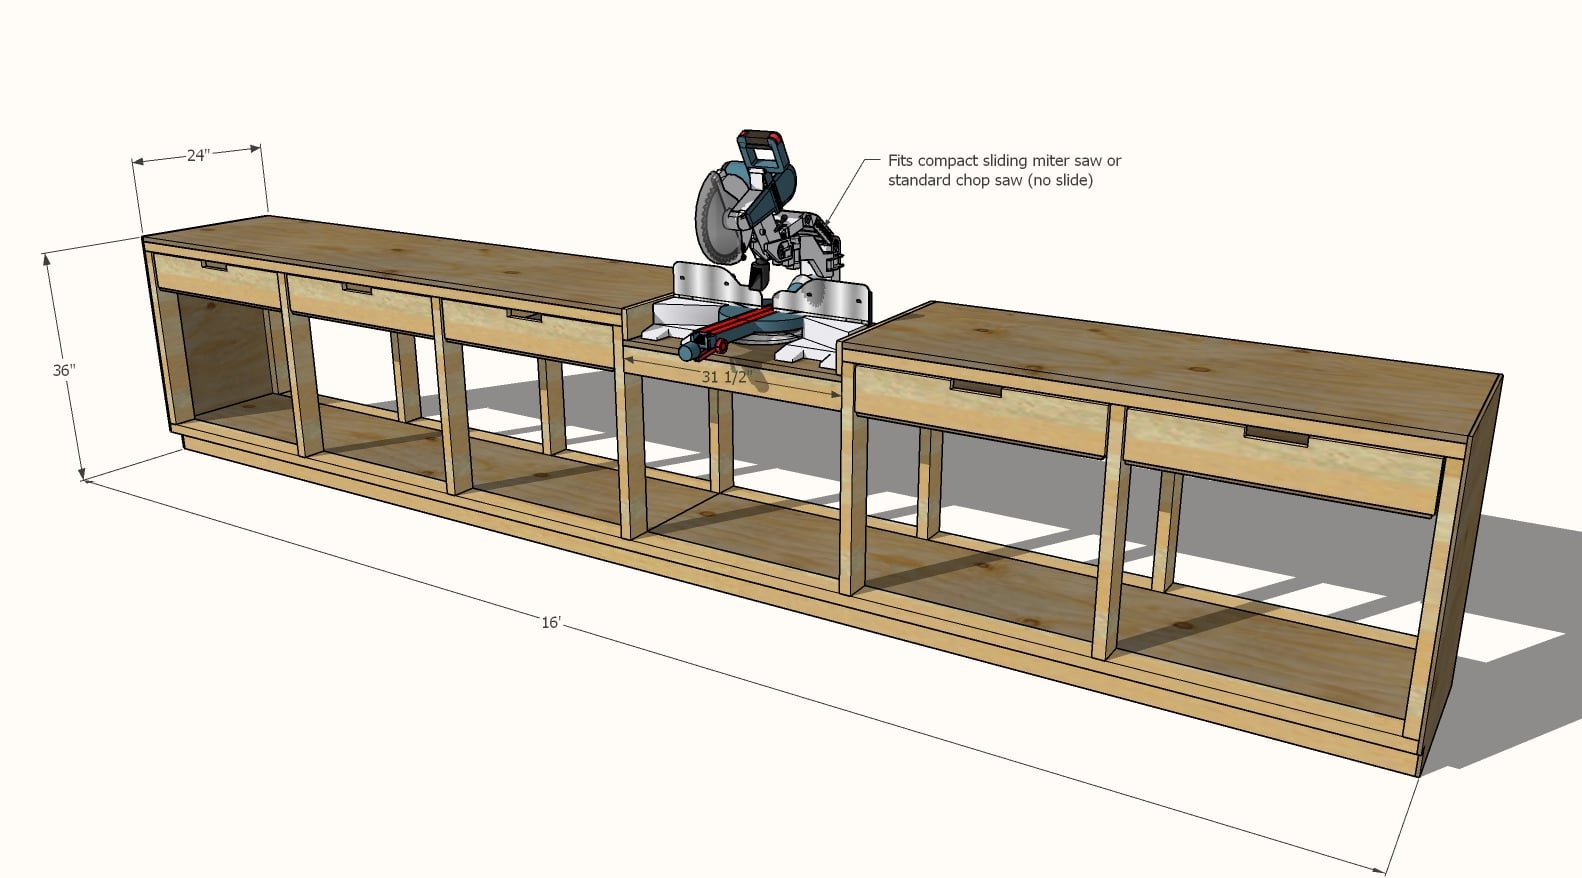
Use the size-specific shopping and cut lists below.
Shopping List
3 - 2x4 @ 16" - treated for base recommended
4 - 2x4 @ 16"
6 - 2x4 @ 8 feet or stud length
4 - 1x4 @ 8 feet long
2 - 1x6 @ 8 feet long
2 - 4x8 sheets of AC plywood
1 - sheet of 1/4" or 3/8" plywood for drawer bottoms and sides of workbench PLUS an additional drawer bottom 29" x 22-3/4"
150 - 2-3/4" self tapping construction screws
100 - 2" self tapping construction screws
1-1/4" brad nails
wood glue
5 - 22" full extension drawer slides
Cut List
BASE
- 2 - 2x4 @ 16' - treated
- 9 - 2x4 @ 19" - treated
CARCASS
- 4 - 2x4 @ 16'
- 14 - 2x4 @ 28-3/4"
- 2 - 3/4" plywood @ 8' x 17" - bottom shelf
- 4 - 3/4" plywood @ 8' x ~3-1/2" - hidden spacers under bottom shelf
- 1 - 3/4" plywood @ 8' x 24" - larger top
- 1 - 3/4" plywood @ 64-1/2" x 24" - smaller top
- 2 - 3/8" plywood @ 24" x 36" - sides
MITER SAW MOD
- 2 - 2x4 @ 22-1/2" - side supports
- 1 - 2x4 @ ~31-1/2" - front support
- 1 - 3/4" plywood @ 31-1/2" x 24"
DRAWERS
- 10 - 1x4 @ 22" - drawer sides
- 5 - 1x4 @ ~27-1/2" - drawer backs
- 5 - 1x6 @ 29-1/2" - drawer fronts
- 5 - 3/8" plywood @ 22-3/4" x 29"
Tools
- measuring tape
- square
- pencil
- safety glasses
- hearing protection
- drill
- circular saw
- compound miter saw
- nailer
Step-by-step Instructions
Step 1
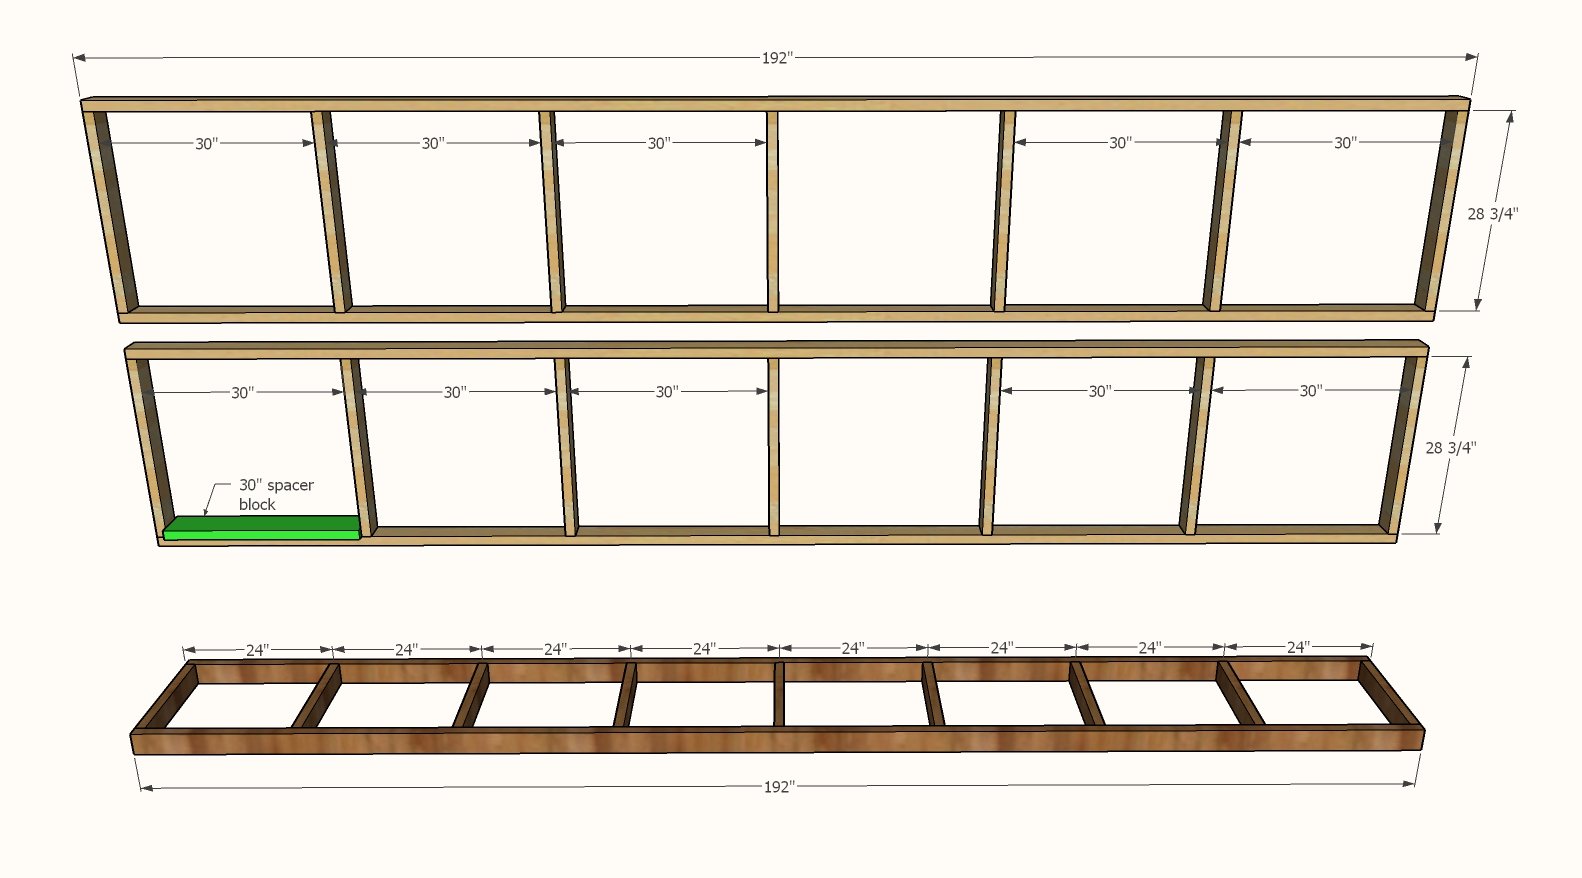
Build the base frame using the treated 2x4s and 2-3/4" screws. Set the base frame in it's final position and shim with composite wood shims until perfectly level. Adjust for square by taking opposite diagonals and adjusting the base until the diagonal are perfect matches. Attach to back wall with 2-3/4" screws. Build two of the cabinet frames. Use a spacer cut 30" long to space the openings on the left three bays and right two bays. Fasten with 2-3/4" screws. Check for square and adjust if necessary.
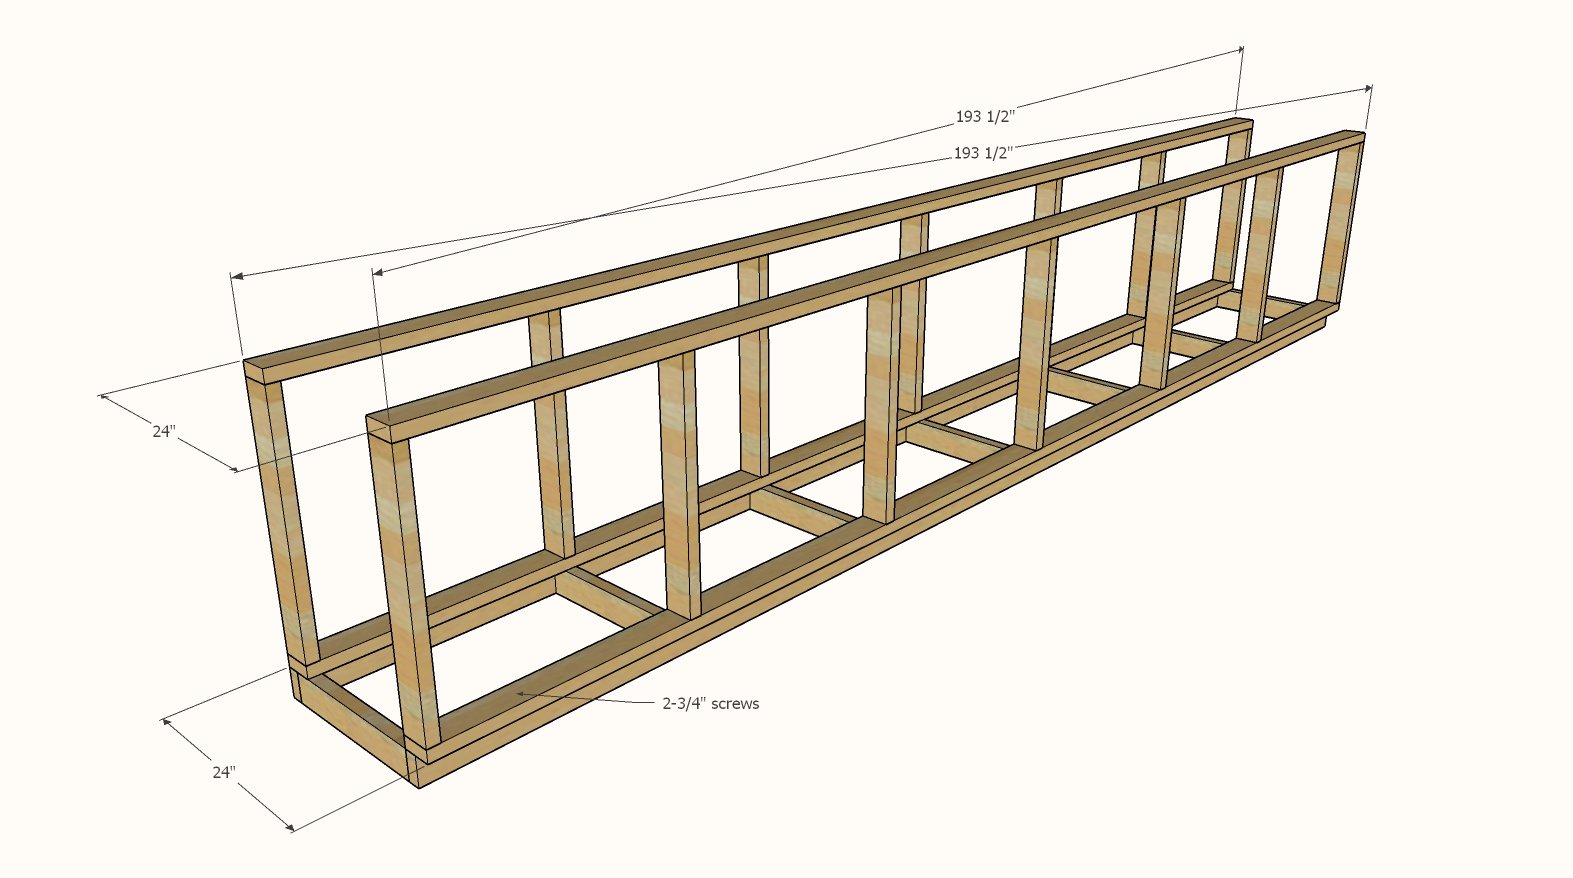
Attach upper frames to the base with 2-3/4" screws. Make sure the frames are square on top.
A temporary brace can be added to keep the two frames square and the front frame from falling forward.
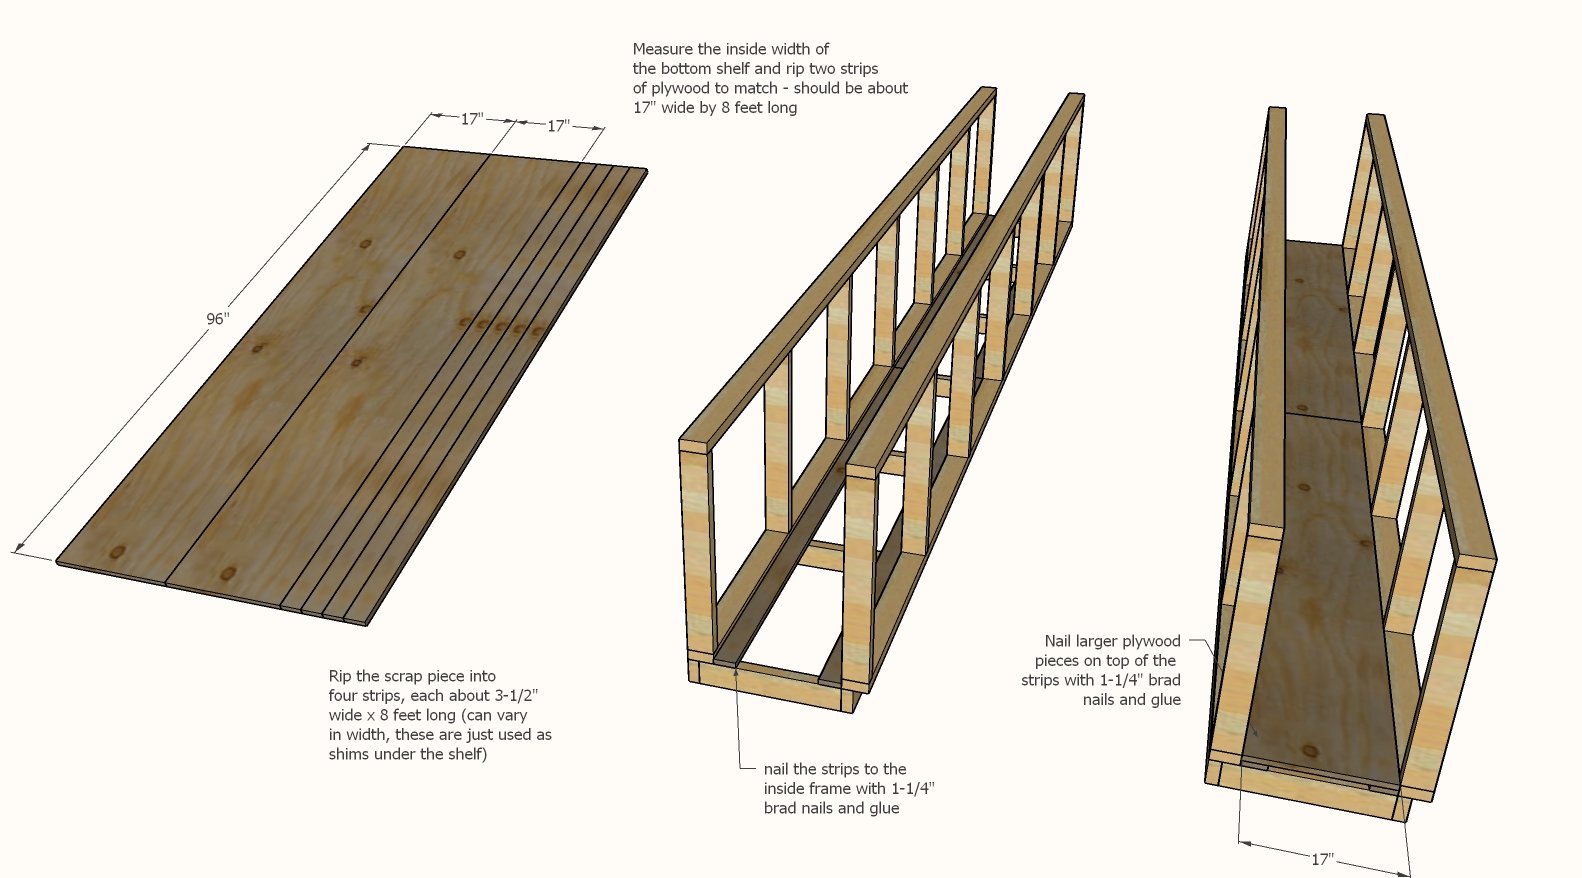
Measure the distance between the two frames on the inside.
Rip plywood to this width, should be about 17" wide x 8 feet long. Rip the remaining scraps into four pieces, each about 3-1/2" wide x 8 feet long. Attach the strips inside the cabinet with 1-1/4" brad nails and glue. Then set the shelf pieces on top of the strips and glue and nail down.
Step 4
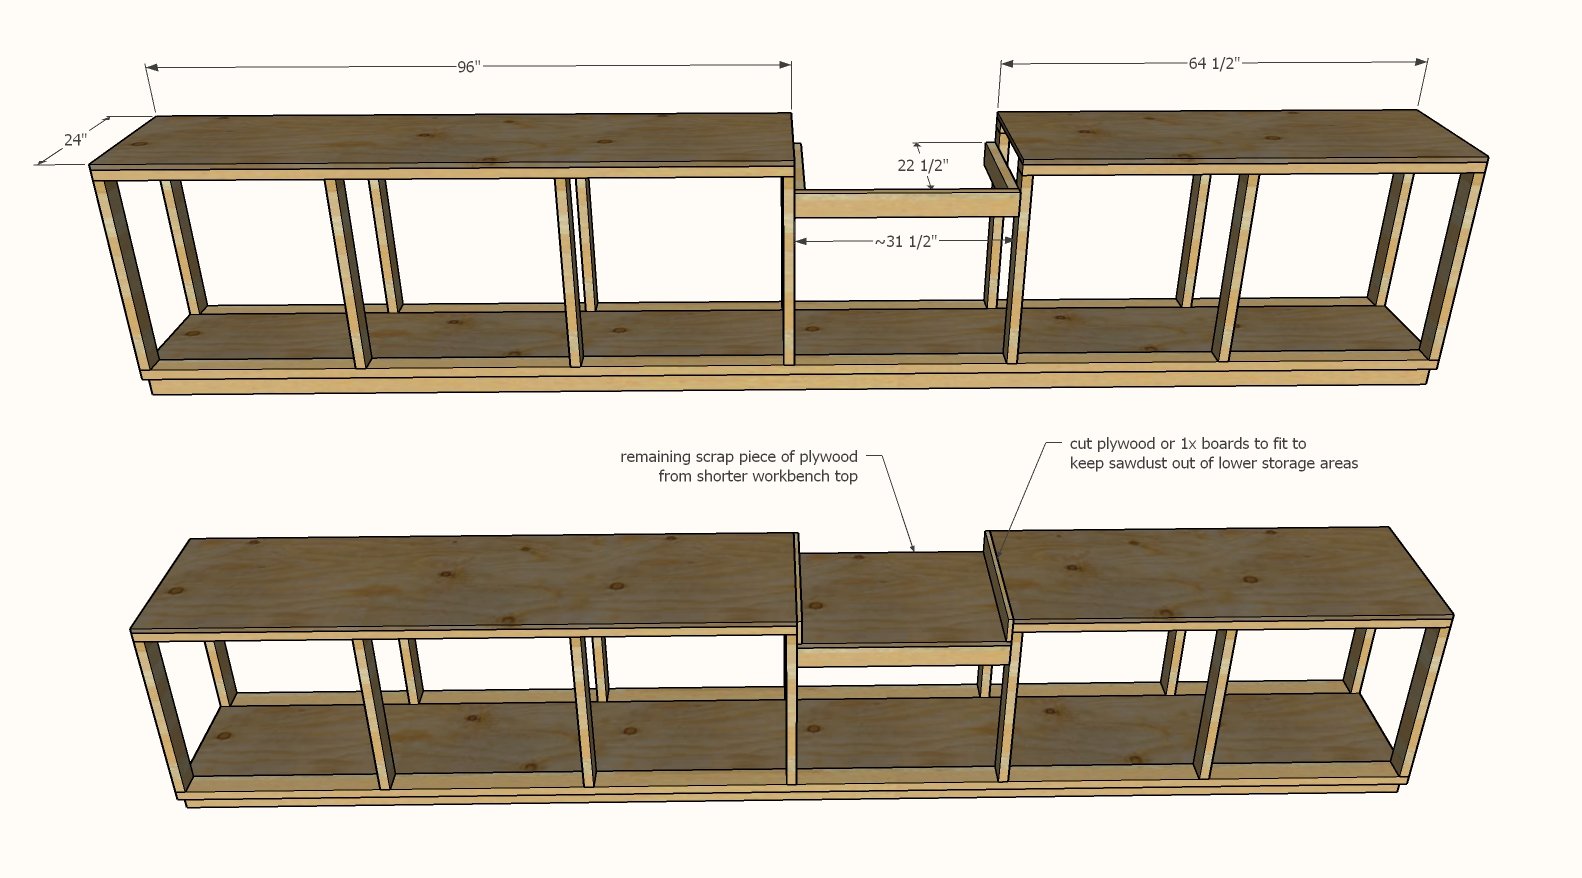
Cut the remaining sheet of 3/4" plywood in half width wise, so you have two pieces each 8 feet long and 24" wide. Attach one piece on the top left of the cabinet with the 2" screws. For no miter saw installation, attach the second piece on the right. For miter saw installation, cut the remaining piece of plywood to fit on the right. Cut out the 2x4s where the miter saw will be placed. Install the miter saw platform with 2-3/4" screws and add the remaining scrap piece of plywood on top. Screw plywood down with 2" screws.
Step 5
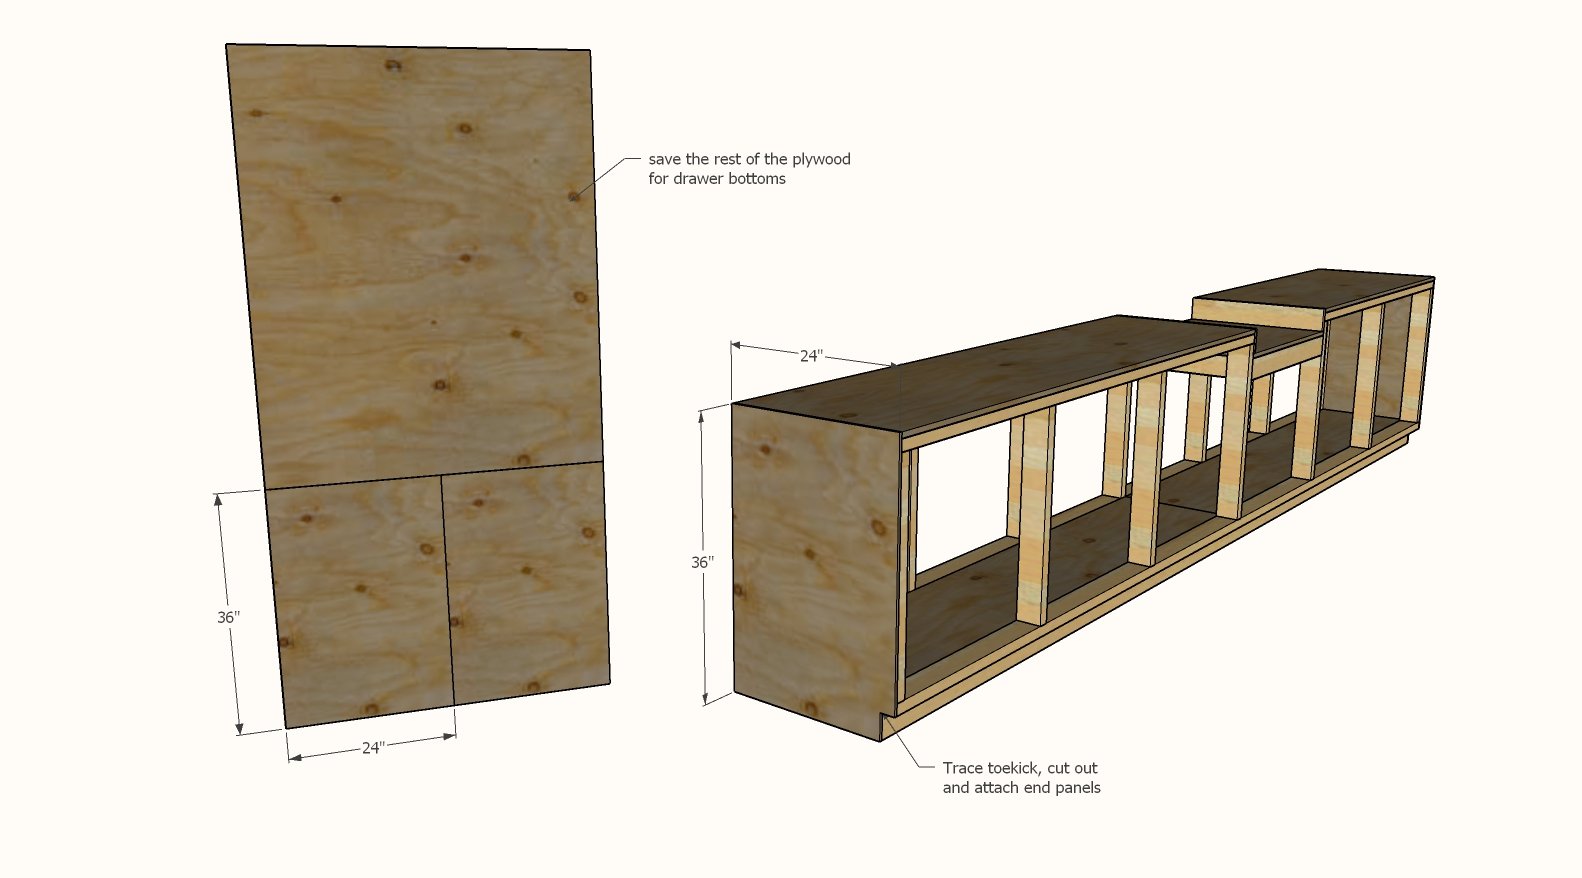
Take the sheet of 3/8" plywood and cut off a piece 36" x 48" - then cut that piece in half (two 24" x 36" pieces). Trace the toekicks and cut the toekicks out. Attach to ends with 1-1/4" brad nails and wood glue.
Step 6
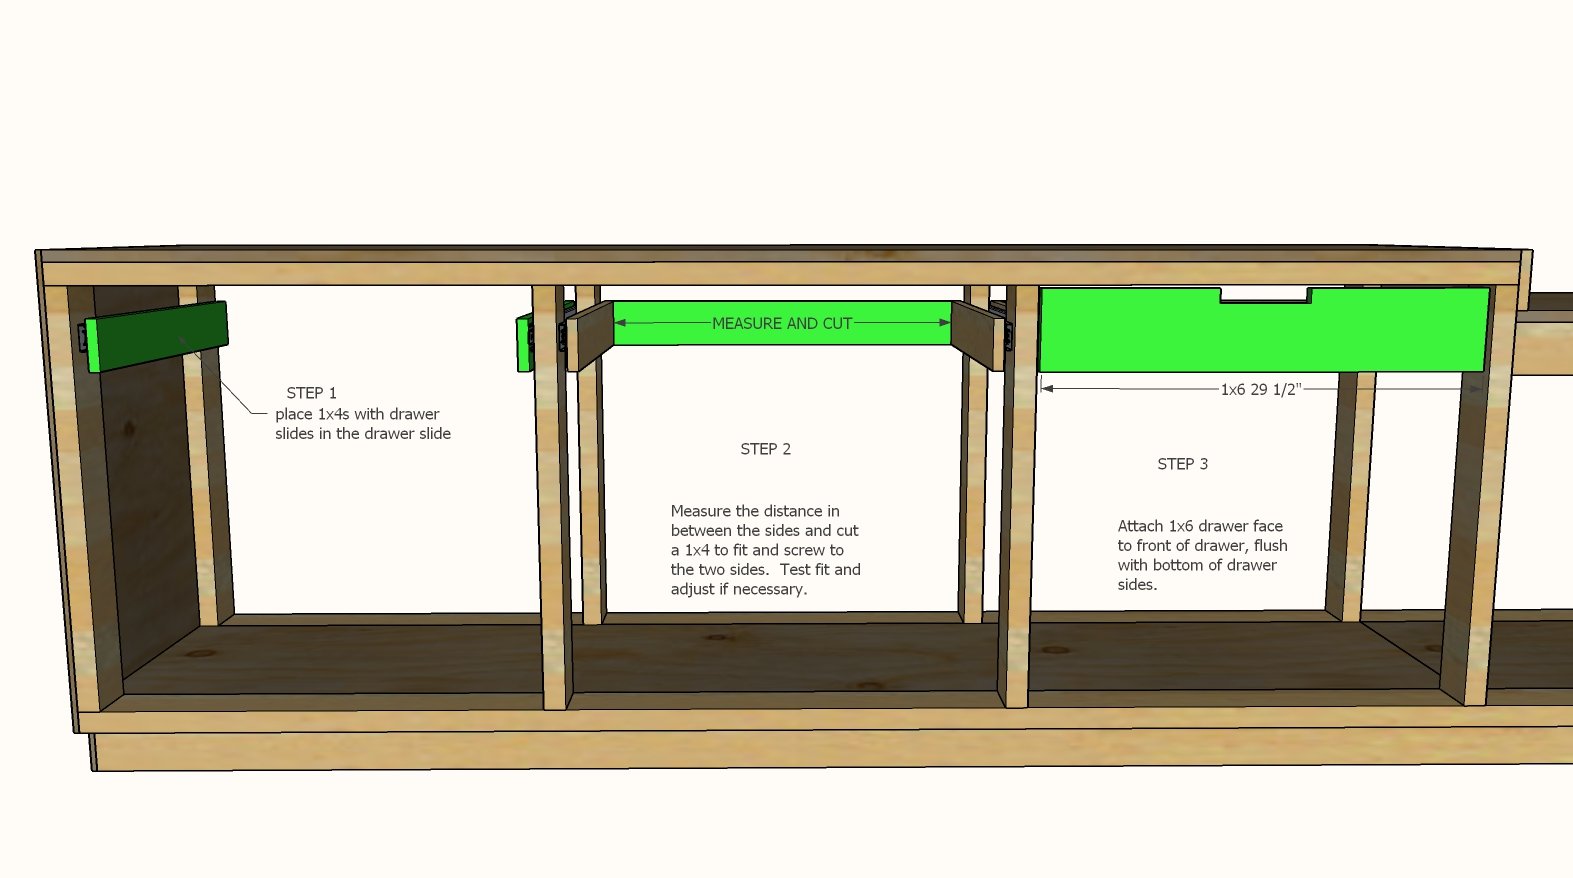
NOTE: I recommend building and installing one drawer first, to make sure it fits, and then build the remaining drawers. Installing the drawer slides Use a scrap piece of 1x4 or 2x4 to draw a line 3-1/2" down from the top of the inside of each of the openings as shown in the diagram. Draw a line parallel to the front edge, inset 1" from the front edge. Separate the drawer slides into cabinet member and drawer members. Screw the cabinet member to the inside of the cabinet, with screws placed on the line, front edge of the drawer slide set in on the 1" line. Mark the drawer sides down 1-1/4" from top edge. Screw drawer members to the 1x4 drawer sides with screws started on the line.
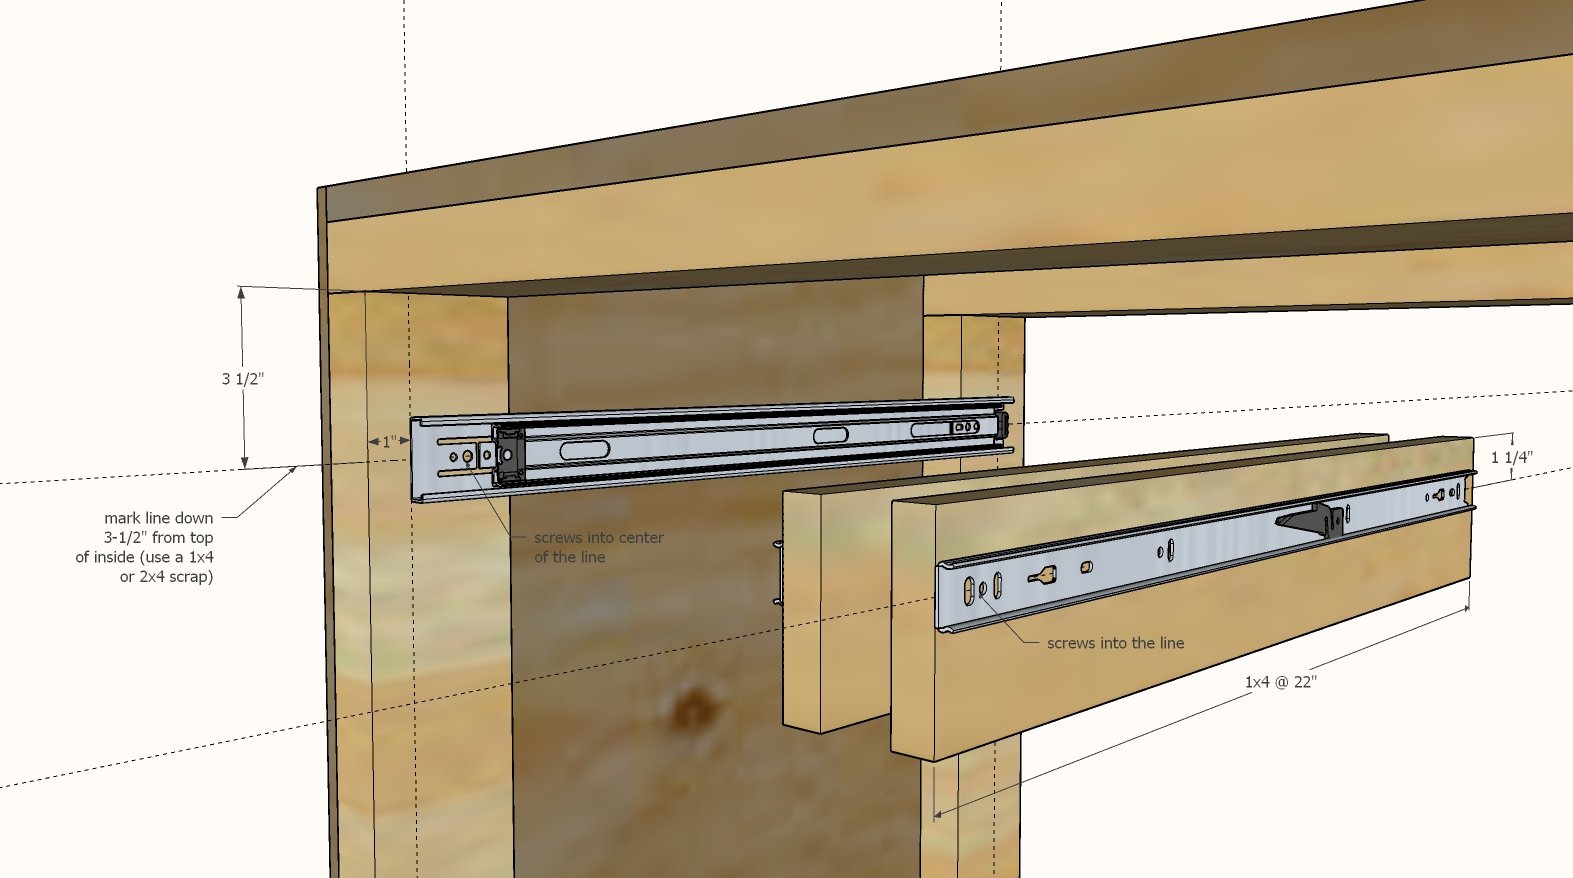
Put the drawer sides inside the cabinet members and fully close the drawer slides.
Measure in between and cut 1x4s to fit. Use the 2" screws to attach the drawer sides to the drawer backs. Test to make sure the drawer slides smoothly, adjust if necessary. Once the drawer slides good, attach the front face to the sides. Test the slide, adjust if necessary.
Step 8
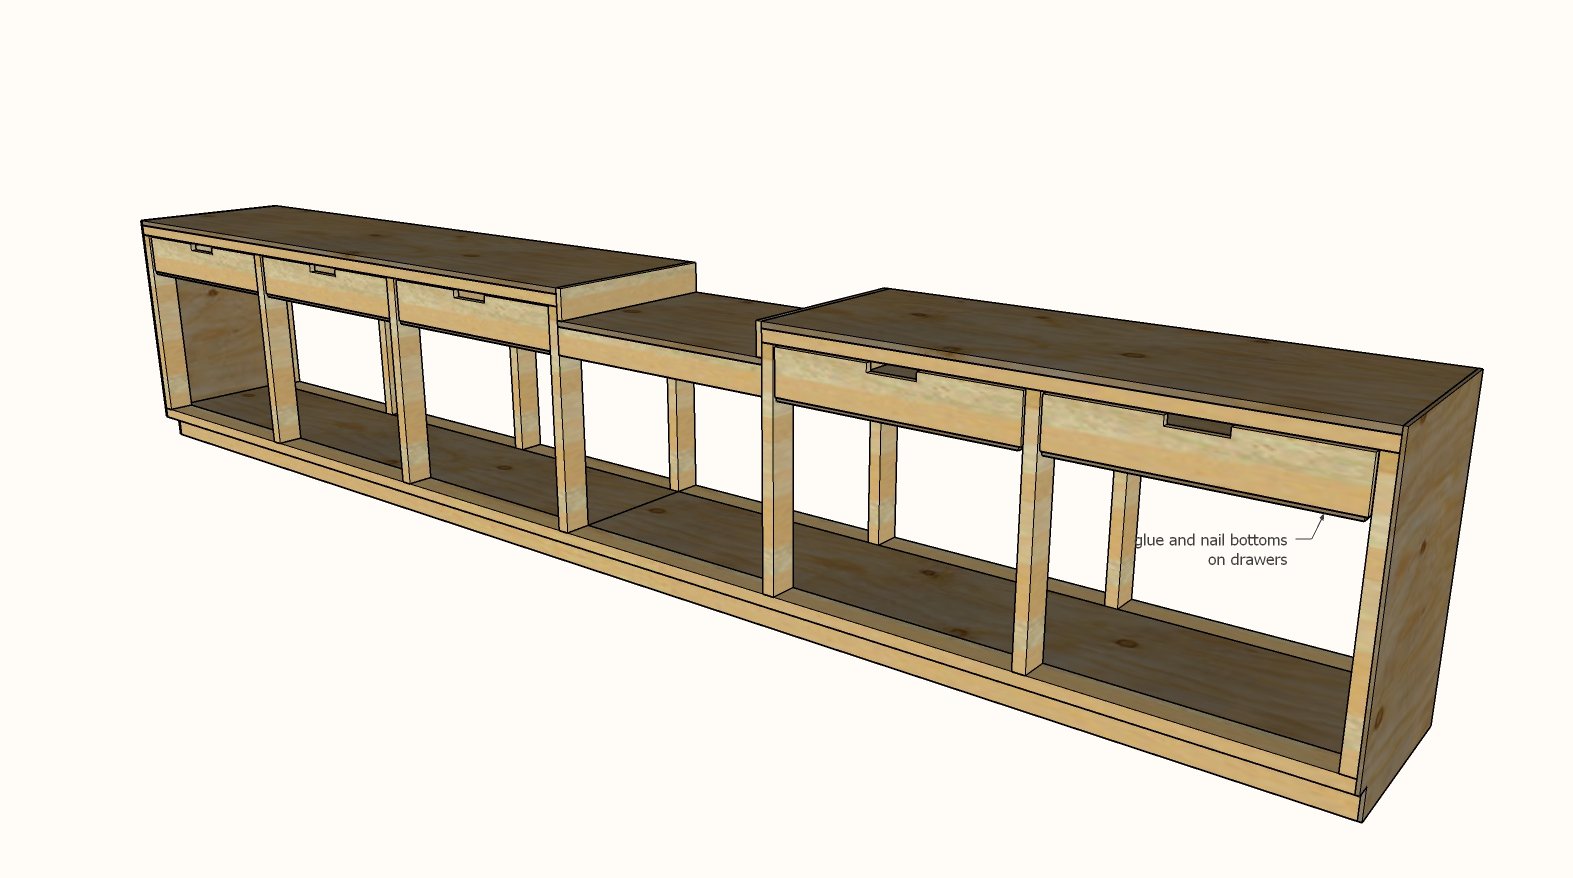
Once the drawers are sliding good, attach plywood to the bottom with 1-1/4" brad nails and glue.
Finishing
Sand all surfaces, starting with a medium grit and finishing with fine. Wipe off the dust, fill any holes or gaps with wood filler, and sand smooth once dry. Apply primer if you're painting, then finish with your choice of paint or stain and seal with a durable clear topcoat. For outdoor projects, use exterior-rated primer, paint or stain, and sealer so the piece stands up to the weather.
Source (temporary): https://www.ana-white.com/woodworking-projects/pony-wall-workbench